文章目录
前言
手把手教你封装一个移动端 Tabs组件(标签页),功能由简到杂以uniapp vue3为代码示例。
一、简单版Tabs
实现一个最简单版的Tabs,下划线无动画无手势切换等,如下图所示:

实现说明:标签通过flex布局排列,下划线通过伪类绝对定位在选中项底部,选中项通过索引记录动态添加激活class
代码实现:
tabs.vue
javascript
<template>
	<view class="tabs">
		<view :class="['tab',{active:index==selectIndex}]" v-for="(item,index) in  list" :key="index"
			@click="handleSelect(index)">{{item}}</view>
	</view>
</template>

<script setup>
	import {
		computed,
		ref
	} from 'vue'
	const props = defineProps({
		//标签配置
		list: {
			type: Array,
			default: () => []
		},
		//激活颜色
		activeColor: {
			type: String,
			defalut: 'deepskyblue'
		}
	})

	//激活颜色
	const activeColor = computed(() => {
		return props.activeColor || 'deepskyblue'
	})

	//当前选中索引
	const selectIndex = ref(0)

	//切换标签
	const handleSelect = (index) => {
		if (index !== selectIndex.value) {
			selectIndex.value = index
		}
	}
</script>

<style lang="scss" scoped>
	.tabs {
		width: 100%;
		display: flex;
		align-items: center;
		background-color: #fff;

		.tab {
			flex: 1;
			padding: 25rpx 10rpx;
			width: 0;
			box-sizing: border-box;
			text-align: center;
			white-space: nowrap;
			overflow: hidden;
			text-overflow: ellipsis;
			color: #333;
			font-size: 30rpx;
			position: relative;

			&.active {
				font-weight: bold;
				color: v-bind(activeColor);
                //下划线
				&::after {
					display: block;
					content: '';
					position: absolute;
					bottom: 0;
					left: 50%;
					transform: translateX(-50%);
					width: 30px;
					height: 6rpx;
					background-color: v-bind(activeColor);
					border-radius: 6rpx;
				}
			}
		}
	}
</style>
ps:注意scss中使用了v-bind引用vue变量activeColor动态设置标签和下划线激活颜色
二、下划线带动画的Tabs
接下来功能升级,要求切换标签的时候下划线有滑动动画,如下图所示

实现说明:因为下划线要有滑动动画,就不能相对于选中项绝对定位,而应该基于一个固定的父级元素定位,这个父元素就是组件最外层容器。选中后通过计算下划线到父容器距离(也就是下划线到页面最左边距离)确定绝对定位的left值,同时设置过渡动画。
API回顾:
在uniapp中由于底层使用引擎不同小程序或者app中无法像h5一样进行任何dom操作,只能通过官方提供的api来获取节点信息。
uni.createSelectorQuery()可用于获取节点信息,并结合如下使用方式:
javascript
import { getCurrentInstance } from 'vue';
const instance = getCurrentInstance();

const query = uni.createSelectorQuery().in(instance.proxy);
query
  .select("#id")
  .boundingClientRect((data) => {
    console.log("得到布局位置信息" + JSON.stringify(data));
    console.log("节点离页面顶部的距离为" + data.top);
     console.log("节点离页面左边的距离为" + data.left);
  })
  .exec();
来获取节点宽高和距离窗口左边或者顶部距离。
下划线位置计算:

下划线绝对定位left值=a段长度,a=b+标签宽/2,而b为标签与页面左边距离,b和标签宽都可以通过节点信息api获取
ps:因为下划线设置了css属性值 transform: translateX(-50%),向左平移自身一半,所以left值为a
代码实现:
tabs.vue
javascript
<template>
	<view class="tabs">
	    <!-- 标签栏 -->
		<view :class="['tab',{active:index==selectIndex}]" v-for="(item,index) in  list" :key="index"
			@click="handleSelect(index)">{{item}}</view>
		<!-- 下划线 -->
		<view :class="['underline',{transition:left!==null}]"></view>
	</view>
</template>

<script setup>
	import {
		computed,
		ref,
		onMounted,
		nextTick,
		getCurrentInstance
	} from 'vue'
	const props = defineProps({
		//标签配置
		list: {
			type: Array,
			default: () => []
		},
		//激活颜色
		activeColor: {
			type: String,
			defalut: 'deepskyblue'
		}
	})

	//激活颜色
	const activeColor = computed(() => {
		return props.activeColor || 'deepskyblue'
	})

	//当前选中索引
	const selectIndex = ref(0)

	//切换标签
	const handleSelect = (index) => {
		if (index !== selectIndex.value) {
			selectIndex.value = index
			setPosition()
		}
	}

	//下划线离父元素左边距
	const left = ref(null)
	//组件实例
	const instance=getCurrentInstance()
	//设置下划线位置
	const setPosition = () => {
		nextTick(() => {
			let query = uni.createSelectorQuery().in(instance.proxy)
			query.select(".active").boundingClientRect(data => {
				//定位距离=选中标签项与左距离+标签宽一半
				left.value =`${data.left+data.width/2}px`

			}).exec()
		})
	}

	onMounted(() => {
		//设置下划线初始位置
	   setPosition()
	})
</script>

<style lang="scss" scoped>
	.tabs {
		width: 100%;
		display: flex;
		align-items: center;
		background-color: #fff;
		position: relative;

		.tab {
			flex: 1;
			padding: 25rpx 10rpx;
			width: 0;
			box-sizing: border-box;
			text-align: center;
			white-space: nowrap;
			overflow: hidden;
			text-overflow: ellipsis;
			color: #333;
			font-size: 30rpx;
			position: relative;
			&.active {
				font-weight: bold;
				color: v-bind(activeColor);
			}
		}
	}
	//下划线
	.underline {
		position: absolute;
		width: 30px;
		height: 6rpx;
		background-color: v-bind(activeColor);
		border-radius: 6rpx;
		bottom: 0;
		left: v-bind(left);
		transform: translateX(-50%);
		display: none;
		&.transition {
			display: block;
			transition: all 0.3s;
		}
	}
</style>
ps:下划线绝对定位left值在scss通过 v-bind动态访问vue变量
三、内容区域滑动切换+切换动画
在上述示例基础上继续扩展功能,目标是切换标签页支持内容区域带动画同时内容区域滑动可以切换标签,如下图所示:

实现说明:结合swiper轮播图组件封装,内容区域使用swiper作为父容器,因为swiper支持手势滑动和滑动动画。
代码实现:
tabs.vue
javascript
<template>
	<view class="comp-container">
		<view class="tabs">
			<!-- 标签栏 -->
			<view :class="['tab',{active:index==selectIndex}]" v-for="(item,index) in  list" :key="index"
				@click="handleSelect(index)">{{item}}</view>
			<!-- 下划线 -->
			<view :class="['underline',{transition:left!==null}]"></view>
		</view>
		<!-- 内容区域 -->
		<view class="content">
			<swiper class="swiper" :current="selectIndex" @change="onSwiperChange">
				<swiper-item class="swiper-item" v-for="item in list" :key="item">
					<scroll-view scroll-y style="height:100%">
						<!-- 页面内容 -->
						<view class="main">{{item}}</view>
					</scroll-view>
				</swiper-item>
			</swiper>
		</view>
	</view>
</template>

<script setup>
	import {
		computed,
		ref,
		onMounted,
		nextTick,
		getCurrentInstance
	} from 'vue'
	const props = defineProps({
		//标签配置
		list: {
			type: Array,
			default: () => []
		},
		//激活颜色
		activeColor: {
			type: String,
			defalut: 'deepskyblue'
		}
	})

	//激活颜色
	const activeColor = computed(() => {
		return props.activeColor || 'deepskyblue'
	})

	//当前选中索引
	const selectIndex = ref(0)

	//切换标签
	const handleSelect = (index) => {
		if (index !== selectIndex.value) {
			selectIndex.value = index
			setPosition()
		}
	}

	//下划线离父元素左边距
	const left = ref(null)
	//组件实例
	const instance = getCurrentInstance()
	//设置下划线位置
	const setPosition = () => {
		nextTick(() => {
			let query = uni.createSelectorQuery().in(instance.proxy)
			query.select(".active").boundingClientRect(data => {
				//定位距离=选中标签项与左距离+标签宽一半
				left.value = `${data.left+data.width/2}px`

			}).exec()
		})
	}

	onMounted(() => {
		//设置下划线初始位置
		setPosition()
	})


	//手势切换回调
	const onSwiperChange = e => {
		if (e.detail.current !== selectIndex.value) {
			handleSelect(e.detail.current)
		}
	}
</script>

<style lang="scss" scoped>
	.comp-container {
		height: 100%;
		display: flex;
		flex-direction: column;
		background-color: #f2f2f2;
		overflow: hidden;
	}
	.tabs {
		width: 100%;
		display: flex;
		align-items: center;
		background-color: #fff;
		position: relative;
		flex-shrink: 0;

		.tab {
			flex: 1;
			padding: 25rpx 10rpx;
			width: 0;
			box-sizing: border-box;
			text-align: center;
			white-space: nowrap;
			overflow: hidden;
			text-overflow: ellipsis;
			color: #333;
			font-size: 30rpx;
			position: relative;

			&.active {
				font-weight: bold;
				color: v-bind(activeColor);
			}
		}
	}

	//下划线
	.underline {
		position: absolute;
		width: 30px;
		height: 6rpx;
		background-color: v-bind(activeColor);
		border-radius: 6rpx;
		bottom: 0;
		left: v-bind(left);
		transform: translateX(-50%);
		display: none;

		&.transition {
			display: block;
			transition: all 0.3s;
		}
	}

	.content {
		flex: 1;
		height: 0;
		overflow: hidden;

		.swiper {
			height: 100%;

			.swiper-item {
				height: 100%;
			}
		}

		.main {
			background: #f2f2f2;
			text-align: center;
			padding: 30rpx;
			box-sizing: border-box;
		}
	}
</style>
页面引用:
index.vue
javascript
<template>
	<view class="container">
		<Tabs :list="list" />
	</view>
</template>

<script setup>
	import Tabs from '@/components/tabs.vue'
	import {
		ref
	} from 'vue'
	const list = ref(['手机', '电脑', '电视机', '洗衣机'])
</script>

<style lang="scss" scoped>
	.container {
		height: 100vh;
		background-color: #f2f2f2;
	}
</style>
说明:为了使内容区域可滚动,内嵌了scroll-view,而scroll-view需要指定高度,整个组件高度默认继承父元素100%,所以在页面使用tabs组件时父元素必须设置高度。
(2)禁用手势滑动切换
swiper组件有个属性disable-touch用来禁用轮播图触摸操作,该属性只支持App 2.5.5+、H5 2.5.5+、支付宝小程序、抖音小程序与飞书小程序。微信小程序可以通过@touchmove.prevent阻止触摸事件冒泡来阻止页面滑动
代码实现:
javascript
<template>
	<view class="comp-container">
		<view class="tabs">
			<!-- 标签栏 -->
			<view :class="['tab',{active:index==selectIndex}]" v-for="(item,index) in  list" :key="index"
				@click="handleSelect(index)">{{item}}</view>
			<!-- 下划线 -->
			<view :class="['underline',{transition:left!==null}]"></view>
		</view>
		<!-- 内容区域 -->
		<view class="content">
			<swiper class="swiper" :current="selectIndex" disable-touch @change="onSwiperChange">
				<swiper-item class="swiper-item" v-for="item in list" :key="item" @touchmove.prevent>
					<scroll-view scroll-y style="height:100%">
						<!-- 页面内容 -->
						<view class="main">{{item}}</view>
					</scroll-view>
				</swiper-item>
			</swiper>
		</view>
	</view>
</template>
运行效果:

(3)内容区域换为插槽
内容区域通过动态插槽提供给页面自定义渲染
核心代码如下:
javascript
	<!-- 内容区域 -->
		<view class="content">
			<swiper class="swiper" :current="selectIndex" @change="onSwiperChange">
				<swiper-item class="swiper-item" v-for="(item,index) in list" :key="index">
					<scroll-view scroll-y style="height:100%">
						<!-- 页面内容 -->
			             <!-- #ifdef H5 ||APP -->
						<slot :name="`content${index}`"></slot>
						<!--#endif -->
						<!-- #ifdef MP-WEIXIN -->
						<slot name="content{{index}}"></slot>
						<!--#endif -->
					</scroll-view>
				</swiper-item>
			</swiper>
		</view>
需要注意的是微信小程序端不支持vue插槽动态命名语法,需要写成双花括号形式。
完整代码:
tabs.vue
javascript
<template>
	<view class="comp-container">
		<view class="tabs">
			<!-- 标签栏 -->
			<view :class="['tab',{active:index==selectIndex}]" v-for="(item,index) in  list" :key="index"
				@click="handleSelect(index)">{{item}}</view>
			<!-- 下划线 -->
			<view :class="['underline',{transition:left!==null}]"></view>
		</view>
		<!-- 内容区域 -->
		<view class="content">
			<swiper class="swiper" :current="selectIndex" @change="onSwiperChange">
				<swiper-item class="swiper-item" v-for="(item,index) in list" :key="index">
					<scroll-view scroll-y style="height:100%">
						<!-- 页面内容 -->
			             <!-- #ifdef H5 ||APP -->
						<slot :name="`content${index}`"></slot>
						<!--#endif -->
						<!-- #ifdef MP-WEIXIN -->
						<slot name="content{{index}}"></slot>
						<!--#endif -->
					</scroll-view>
				</swiper-item>
			</swiper>
		</view>
	</view>
</template>

<script setup>
	import {
		computed,
		ref,
		onMounted,
		nextTick,
		getCurrentInstance
	} from 'vue'
	const props = defineProps({
		//标签配置
		list: {
			type: Array,
			default: () => []
		},
		//激活颜色
		activeColor: {
			type: String,
			defalut: 'deepskyblue'
		}
	})

	//激活颜色
	const activeColor = computed(() => {
		return props.activeColor || 'deepskyblue'
	})

	//当前选中索引
	const selectIndex = ref(0)

	//切换标签
	const handleSelect = (index) => {
		if (index !== selectIndex.value) {
			selectIndex.value = index
			setPosition()
		}
	}

	//下划线离父元素左边距
	const left = ref(null)
	//组件实例
	const instance = getCurrentInstance()
	//设置下划线位置
	const setPosition = () => {
		nextTick(() => {
			let query = uni.createSelectorQuery().in(instance.proxy)
			query.select(".active").boundingClientRect(data => {
				//定位距离=选中标签项与左距离+标签宽一半
				left.value = `${data.left+data.width/2}px`

			}).exec()
		})
	}

	onMounted(() => {
		//设置下划线初始位置
		setPosition()
	})


	//手势切换回调
	const onSwiperChange = e => {
		if (e.detail.current !== selectIndex.value) {
			handleSelect(e.detail.current)
		}
	}
</script>

<style lang="scss" scoped>
	.comp-container {
		height: 100%;
		display: flex;
		flex-direction: column;
		background-color: #f2f2f2;
		overflow: hidden;
	}
	.tabs {
		width: 100%;
		display: flex;
		align-items: center;
		background-color: #fff;
		position: relative;
		flex-shrink: 0;

		.tab {
			flex: 1;
			padding: 25rpx 10rpx;
			width: 0;
			box-sizing: border-box;
			text-align: center;
			white-space: nowrap;
			overflow: hidden;
			text-overflow: ellipsis;
			color: #333;
			font-size: 30rpx;
			position: relative;

			&.active {
				font-weight: bold;
				color: v-bind(activeColor);
			}
		}
	}

	//下划线
	.underline {
		position: absolute;
		width: 30px;
		height: 6rpx;
		background-color: v-bind(activeColor);
		border-radius: 6rpx;
		bottom: 0;
		left: v-bind(left);
		transform: translateX(-50%);
		display: none;

		&.transition {
			display: block;
			transition: all 0.3s;
		}
	}

	.content {
		flex: 1;
		height: 0;
		overflow: hidden;

		.swiper {
			height: 100%;

			.swiper-item {
				height: 100%;
			}
		}

		.main {
			background: #f2f2f2;
			text-align: center;
			padding: 30rpx;
			box-sizing: border-box;
		}
	}
</style>
页面调用:
index.vue
javascript
<template>
	<view class="container">
		<Tabs :list="list" >
			<template #content0>手机</template>
			<template #content1>电脑</template>
			<template #content2>电视机</template>
			<template #content3>洗衣机</template>
		</Tabs>
	</view>
</template>

<script setup>
	import Tabs from '@/components/tabs.vue'
	import {
		ref
	} from 'vue'
	const list = ref(['手机', '电脑', '电视机', '洗衣机'])
</script>

<style lang="scss" scoped>
	.container {
		height: 100vh;
		background-color: #f2f2f2;
	}
</style>
四、标签栏可滚动
最终版------功能继续升级,上述案例都是基于标签比较少的场景下使用,如果标签很多超出屏幕就不再适用,此时标签栏需要支持滚动。
我们目标不仅支持滚动,更友好操作体验还希望实现点击某个标签自动移动到屏幕中间,如下图所示:

实现说明:
1、横向滚动:
布局上标签栏外层使用scroll-view包裹,内层依然使用flex布局,每个标签设置基础宽度,当标签过多总体宽度超出屏幕就出现横向滚动。
2、选中标签移动到屏幕中间:
需要分别计算滚动条位置和下划线位置
(1)滚动条位置
scroll-view 有个scroll-left属性控制滚动条位置,我们只需计算该值即可。
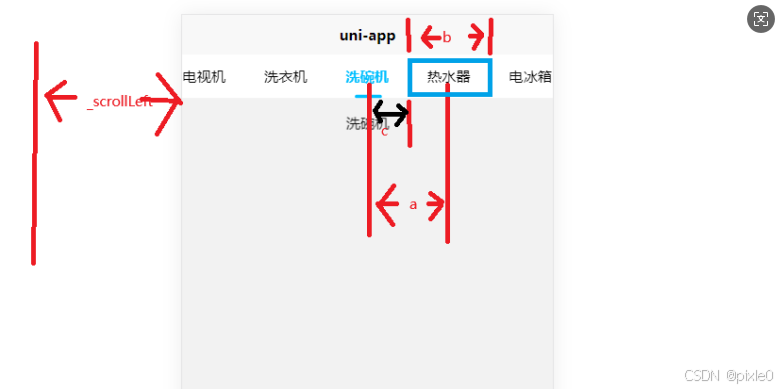
如上图所示,假设点击了热水器标签,热水器标签要移动到屏幕中间,需要平移a段距离,a=c+b/2,其中b为标签自身宽度,c为标签距离页面左边距离-页面宽/2,最终滚动条scrollLeft值=原scrollLeft值+a,所以每次标签切换都要记录计算scrollLeft值,scrollLeft初始值为
0。上述几个值都可以通过节点信息api获取。
需要注意的是如果点击第一或第二个标签或最后一个标签情况是无法使得标签移动到正中间,因为滚动条长度有限,所以在计算scrollLeft值时候需要限制最大值最小值。最小值为0,最大值为滚动条长度-页面宽度,而滚动条长度可以通过如下api获取:
javascript
query.select('#scrollview').fields(
                   {
                     size: true,
					scrollOffset: true
					},
					(data) => {
					console.log(data.scrollWidth,'滚动条长度')

				})
(2)下划线位置
下划线还是和之前的案例一样基于父容器绝对定位,因为滚动条的出现使得父容器不在位于页面最左边,而是滚动条最左边,所以下划线位置还需加上滚动条滚出左边页面区域长度也即scrollLeft值
代码实现
tabs.vue
javascript
<template>
	<view class="comp-container">
		<view class="tabs">
			<!-- 标签栏 -->
			<scroll-view id="scrollview" :scroll-left="scrollLeft" scroll-x style="width:100%" scroll-with-animation>
				<view class="title-wrap" >
					<view :class="[selectedIndex===index ?'active':'','title-item']" v-for="(item,index) in list"
						:key="item" @click="onSelect(index)">{{item}}</view>
						<!-- 下划线 -->
					<view :class="['underline',{transition:left!==null}]"></view>
				</view>
			</scroll-view>
		</view>
		<!-- 内容区域 -->
		<view class="content">
			<swiper class="swiper" :current="selectedIndex" @change="onSwiperChange" >
				<swiper-item class="swiper-item" v-for="(item,index) in list" :key="index">
					<scroll-view scroll-y style="height:100%">
						<!-- 页面内容 -->
						<!-- #ifdef H5 ||APP -->
						<slot :name="`content${index}`"></slot>
						<!--#endif -->
						<!-- #ifdef MP-WEIXIN -->
						<slot name="content{{index}}"></slot>
						<!--#endif -->
					</scroll-view>
				</swiper-item>
			</swiper>
		</view>

	</view>
</template>

<script setup>
	import {
		ref,
		onMounted,
		getCurrentInstance,
		nextTick,
		computed
	} from 'vue'

	const props = defineProps({
		//标签配置
		list: {
			type: Array,
			default: () => []
		},
		//激活颜色
		activeColor: {
			type: String,
			defalut: 'deepskyblue'
		}
	})

	//当前选中索引
	const selectedIndex = ref(0)
	//下划线离父元素左边距
	const left = ref(null)
	const instance = getCurrentInstance()

	//窗口宽度
	const winWidth = uni.getSystemInfoSync().windowWidth

	//设置滚动条和下划线位置
	const setPosition = () => {
		nextTick(() => {
			let query = uni.createSelectorQuery().in(instance.proxy)
			query.select(".active").boundingClientRect(async data => {

				//获取滚动条节点信息
				let scrollViewInfo= await getScrollViewInfo();
				//重新获取滚动条scrollLeft值,防止用户手动触发滚动情况下值scrollLeft未及时更新
				scrollLeft.value=scrollViewInfo.scrollLeft

				let offsetLeft = data.left
				let offsetWidth = data.width
				//设置下划线位置
				left.value = ((offsetLeft + offsetWidth / 2) + scrollLeft.value) + 'px'
				//计算滚动条位置
				let _scrollLeft=scrollLeft.value+ data.left + offsetWidth / 2 - winWidth / 2
				//限制滚动范围
				_scrollLeft = Math.max(0, _scrollLeft)
				//设置滚动条位置
				scrollLeft.value = Math.min(_scrollLeft, scrollWidth.value - winWidth)
			}).exec()
		})

	}

	//选中标签监听事件
	const onSelect = index => {
		if (index !== selectedIndex.value) {
			selectedIndex.value = index;
			setPosition()
		}

	}

	//手势切换回调
	const onSwiperChange = e => {
		if (e.detail.current !== selectedIndex.value) {
			onSelect(e.detail.current)
		}
	}

	//滚动条位置
	const scrollLeft = ref(0)
	//滚动条长度
	const scrollWidth = ref(0)
	//获取滚动条长度和位置信息
	const getScrollViewInfo = () => {
		return new Promise((resolve, reject) => {
			let query = uni.createSelectorQuery().in(instance.proxy)
			query.select('#scrollview').fields({
					size: true,
					scrollOffset: true,
				},
				(data) => {
					resolve({scrollWidth:data.scrollWidth,scrollLeft:data.scrollLeft})
				}
			).exec()
		})

	}

	onMounted(() => {
		nextTick(async () => {
			//初始化化记录滚动条长度
			let res= await getScrollViewInfo();
			scrollWidth.value=res.scrollWidth

			setPosition()
		})

	})
</script>

<style lang="scss" scoped>
	:deep(::-webkit-scrollbar) {
		display: none;
	}

	.comp-container {
		height: 100%;
		display: flex;
		flex-direction: column;
		background-color: #f2f2f2;
		overflow: hidden;
	}

	.tabs {
		width: 100%;
		position: relative;
		flex-shrink: 0;
		background-color: #fff;

		.title-wrap {
			width: 100%;
			display: flex;
			align-items: center;
			box-sizing: border-box;
			justify-content: flex-start;
			position: relative;


			.title-item {
				padding: 25rpx 10rpx;
				flex: 1 0 22%;
				width: 0;
				box-sizing: border-box;
				text-align: center;
				white-space: nowrap;
				overflow: hidden;
				text-overflow: ellipsis;

				&.active {
					color: deepskyblue;
					font-weight: bold;
				}
			}
		}

		.underline {
			position: absolute;
			width: 30px;
			height: 6rpx;
			background-color: deepskyblue;
			border-radius: 6rpx;
			bottom: 0;
			left: v-bind(left);
			transform: translateX(-50%);
			display: none;

			&.transition {
				display: block;
				transition: all 0.3s;
			}
		}
	}

	.content {
		flex: 1;
		height: 0;
		overflow: hidden;

		.swiper {
			height: 100%;

			.swiper-item {
				height: 100%;
			}
		}

		.main {
			background: #f2f2f2;
			padding: 30rpx;
			text-align: center;
		}
	}
</style>
页面调用
index.vue
javascript
<template>
	<view class="container">
		<Tabs :list="list">
			<template #content0>手机</template>
			<template #content1>电脑</template>
			<template #content2>电视机</template>
			<template #content3>洗衣机</template>
			<template #content4>洗碗机</template>
			<template #content5>热水器</template>
			<template #content6>电冰箱</template>
			<template #content7>烤箱</template>
		</Tabs>
	</view>
</template>

<script setup>
	import Tabs from '@/components/tabs.vue'
	import {
		ref
	} from 'vue'
	const list = ref(['手机', '电脑', '电视机', '洗衣机', '洗碗机', '热水器', '电冰箱', '烤箱'])
</script>

<style lang="scss" scoped>
	.container {
		height: 100vh;
		background-color: #f2f2f2;
	}
</style>