目录
[2.1 接口改动](#2.1 接口改动)
[2.2 静态页面](#2.2 静态页面)
[3.1 页面如下](#3.1 页面如下)
[3.2 问答测试](#3.2 问答测试)
[🍹 四、章末](#🍹 四、章末)
**🍸**前言
小伙伴们大家好,上次在本地测试了智普大模型提供的免费 api ,并且在控台实现了结果的流式输出,文章链接如下:
但是只看控台还是不太行,费眼,鄙人对 html、css、js 这些也只是略懂一点,但是足以在已有接口的基础上改动下,搭配一个简易的前端页面,实现一个问答服务
**🍻**一、环境配置
因为目前后端的接口环境已经有了,所以直接将静态页面跟后端接口放在一起,属于前后端不分离的项目
后端环境:jdk8、springBoot
前端使用:html、css、js
大模型使用的依然是智普,可以看下之前的文章,申请个账号即可,比较简单
**🍹**二、具体实现
2.1 接口改动
接口会返回一个 SseEmitter(Server-Sent Events,服务器推送事件)用于在服务器与客户端之间进行流式数据传输;
这里使用的 client 实例,可以参考上篇文章,为智普提供的操作api的实例;
请求进来后,会打印下请求参数,然后新创建一个线程去异步执行,提高响应效率;
java
    @GetMapping("/testAi2")
    public SseEmitter testAi2(@RequestParam("question") String question) {
        // 创建 SseEmitter 对象,用于流式推送
        SseEmitter emitter = new SseEmitter();
        System.out.println("请求进来了,对应的问题是: " + question);

        // 创建新的线程来处理流式数据
        new Thread(() -> {
            try {
                // 获取流式数据
                List<ChatMessage> messages = new ArrayList<>();
                ChatMessage chatMessage = new ChatMessage(ChatMessageRole.USER.value(), question);
                messages.add(chatMessage);
                String requestId = UUID.randomUUID().toString();
                ChatCompletionRequest chatCompletionRequest = ChatCompletionRequest.builder()
                        .model(Constants.ModelChatGLM4)
                        .stream(Boolean.TRUE)
                        .messages(messages)
                        .requestId(requestId)
                        .build();

                ModelApiResponse sseModelApiResp = client.invokeModelApi(chatCompletionRequest);

                if (sseModelApiResp.isSuccess()) {
                    AtomicBoolean isFirst = new AtomicBoolean(true);

                    // 将流数据映射到累加器并推送到前端
                    mapStreamToAccumulator(sseModelApiResp.getFlowable(), chatMessage)
                            .doOnNext(accumulator -> {

                                if (accumulator.getDelta() != null && accumulator.getDelta().getContent() != null) {
                                    // 通过 SSE 推送数据到前端
                                    try {
                                        emitter.send(accumulator.getDelta().getContent(), MediaType.TEXT_PLAIN);
                                    } catch (IOException e) {
                                        System.err.println("发送数据失败: " + e.getMessage());
                                        emitter.completeWithError(e);  // 发生错误时,关闭连接
                                    }
                                }
                            })
                            .doOnComplete(() -> {
                                try {
                                    // 在流完成时,发送 'end' 事件
                                    emitter.send("end", MediaType.TEXT_PLAIN); // 发送 'end' 标志
                                    emitter.complete(); // 完成 SSE 流
                                } catch (IOException e) {
                                    System.err.println("完成流时发送数据失败: " + e.getMessage());
                                    emitter.completeWithError(e);  // 发生错误时,关闭连接
                                }
                            })
                            .blockingLast();
                }
            } catch (Exception e) {
                System.err.println("处理过程中发生错误: " + e.getMessage());
                emitter.completeWithError(e);
            }
        }).start();

        return emitter;
    }
2.2 静态页面
css,js 跟 html 代码放到一起的,具体位置要在 resources/static 下面,这样项目启动后可以访问到这些静态资源;代码具体如下:因为对具体的使用不是很清楚,整体的搭建也是在 chatGpt 的帮助下,一步一步调试完善的
html
<!DOCTYPE html>
<html lang="en">
<head>
  <meta charset="UTF-8">
  <meta name="viewport" content="width=device-width, initial-scale=1.0">
  <title>AI Response</title>
  <style>
    body {
      font-family: 'Arial', sans-serif;
      background-color: #f4f7fc;
      color: #333;
      margin: 0;
      padding: 0;
      display: flex;
      justify-content: center;
      align-items: center;
      height: 100vh;
      flex-direction: column;
    }

    h1 {
      font-size: 2.5rem;
      color: #5c6bc0;
      margin-bottom: 20px;
    }

    .container {
      background-color: white;
      border-radius: 8px;
      box-shadow: 0 4px 8px rgba(0, 0, 0, 0.1);
      padding: 30px;
      width: 100%;
      max-width: 600px;
      text-align: center;
    }

    input[type="text"] {
      width: 80%;
      padding: 12px;
      font-size: 1rem;
      border: 2px solid #ccc;
      border-radius: 4px;
      margin-bottom: 15px;
      transition: border-color 0.3s;
    }

    input[type="text"]:focus {
      border-color: #5c6bc0;
      outline: none;
    }

    button {
      padding: 12px 20px;
      font-size: 1rem;
      color: white;
      background-color: #5c6bc0;
      border: none;
      border-radius: 4px;
      cursor: pointer;
      transition: background-color 0.3s;
    }

    button:hover {
      background-color: #4f5a92;
    }

    #response {
      display: none;
      background-color: #e3f2fd;
      border: 1px solid #90caf9;
      padding: 15px;
      border-radius: 4px;
      margin-top: 20px;
      text-align: left;
      max-height: 400px;
      overflow-y: auto;
      white-space: pre-line; /* 保持换行 */
      font-size: 1rem;
      color: #1e88e5;
    }

    /* 头像样式 */
    #wechat-avatar {
      position: fixed;
      bottom: 20px;
      right: 20px;
      width: 150px;  /* 调整头像大小 */
      height: 150px;
      border-radius: 50%;
      border: 3px solid #fff; /* 给头像加白色边框 */
      box-shadow: 0 4px 8px rgba(0, 0, 0, 0.2); /* 轻微阴影 */
      cursor: pointer;
    }

  </style>
</head>
<body>
<h1>Ask the AI</h1>
<div class="container">
  <input type="text" id="question" placeholder="请输入问题" />
  <button id="askButton">提问</button>
  <div id="response"></div>
</div>

<!-- 微信头像,假设头像文件存放在 'images' 文件夹下 -->
<img id="wechat-avatar" src="uploads/weixinPic.jpg" alt="微信头像" title="点击联系我" onclick="window.open('https://blog.csdn.net/TM007_?spm=1000.2115.3001.5343');" />

<script>
  document.getElementById('askButton').addEventListener('click', function () {
    const question = document.getElementById('question').value.trim();
    if (!question) {
      alert("请输入一个问题!");
      return;
    }

    const responseDiv = document.getElementById('response');
    responseDiv.style.display = 'none'; // 隐藏答案区域,等待新问题的响应

    // 清空之前的回答
    responseDiv.innerHTML = '';

    // 创建 EventSource 对象
    const eventSource = new EventSource(`http://localhost:8888/test/testAi2?question=${encodeURIComponent(question)}`);

    // 监听 SSE 数据流
    eventSource.onmessage = function(event) {
      const data = event.data;
      if (data) {
        responseDiv.textContent += data; // 用 textContent 代替 innerHTML 以避免注入
        responseDiv.style.display = 'block'; // 显示答案区域
      }
    };

    // 监听 SSE 流的结束
    eventSource.addEventListener('end', function(event) {
      responseDiv.textContent += "\n回答完毕";  // 使用 \n 来保证换行
      eventSource.close(); // 关闭 SSE 连接
    });

    // 监听错误事件
    eventSource.onerror = function(event) {
      // 检查是否是正常关闭的连接
      if (eventSource.readyState === EventSource.CLOSED) {
        return;  // 如果连接已经被关闭,就不做任何处理
      }

      console.error("SSE 错误:", event);  // 输出错误日志以便调试
      eventSource.close(); // 关闭 SSE 连接,避免触发重复的错误
    };
  });
</script>
</body>
</html>
**🍸**三、测试
启动后端项目,浏览器访问端口号+静态资源,本地地址如下:
http://localhost:8888/index2.html
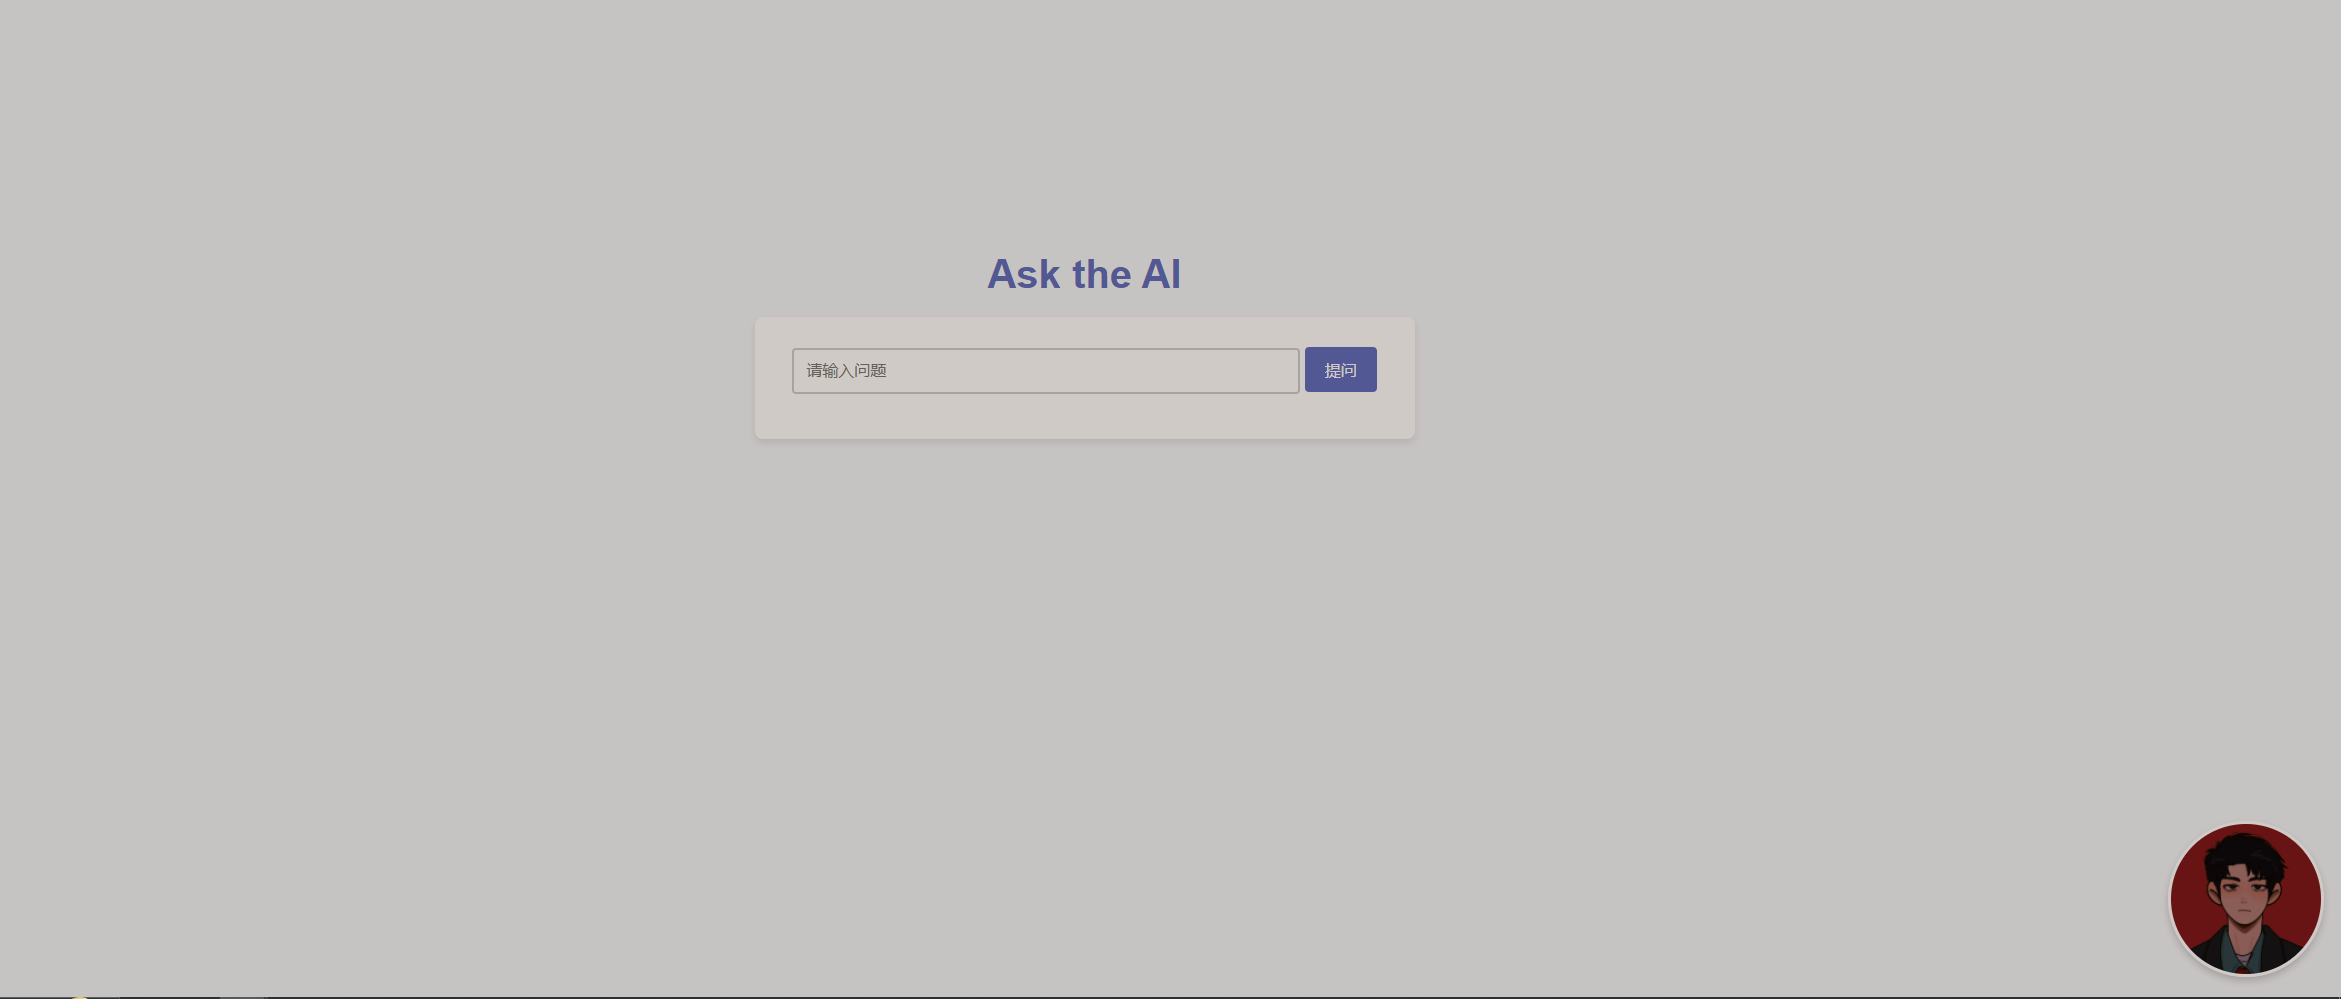
3.1 页面如下
一个问题输入框,可点击的按钮,一个横幅,加上 右下角的图片可以点击跳转,具体跳转到哪的,不明说了!
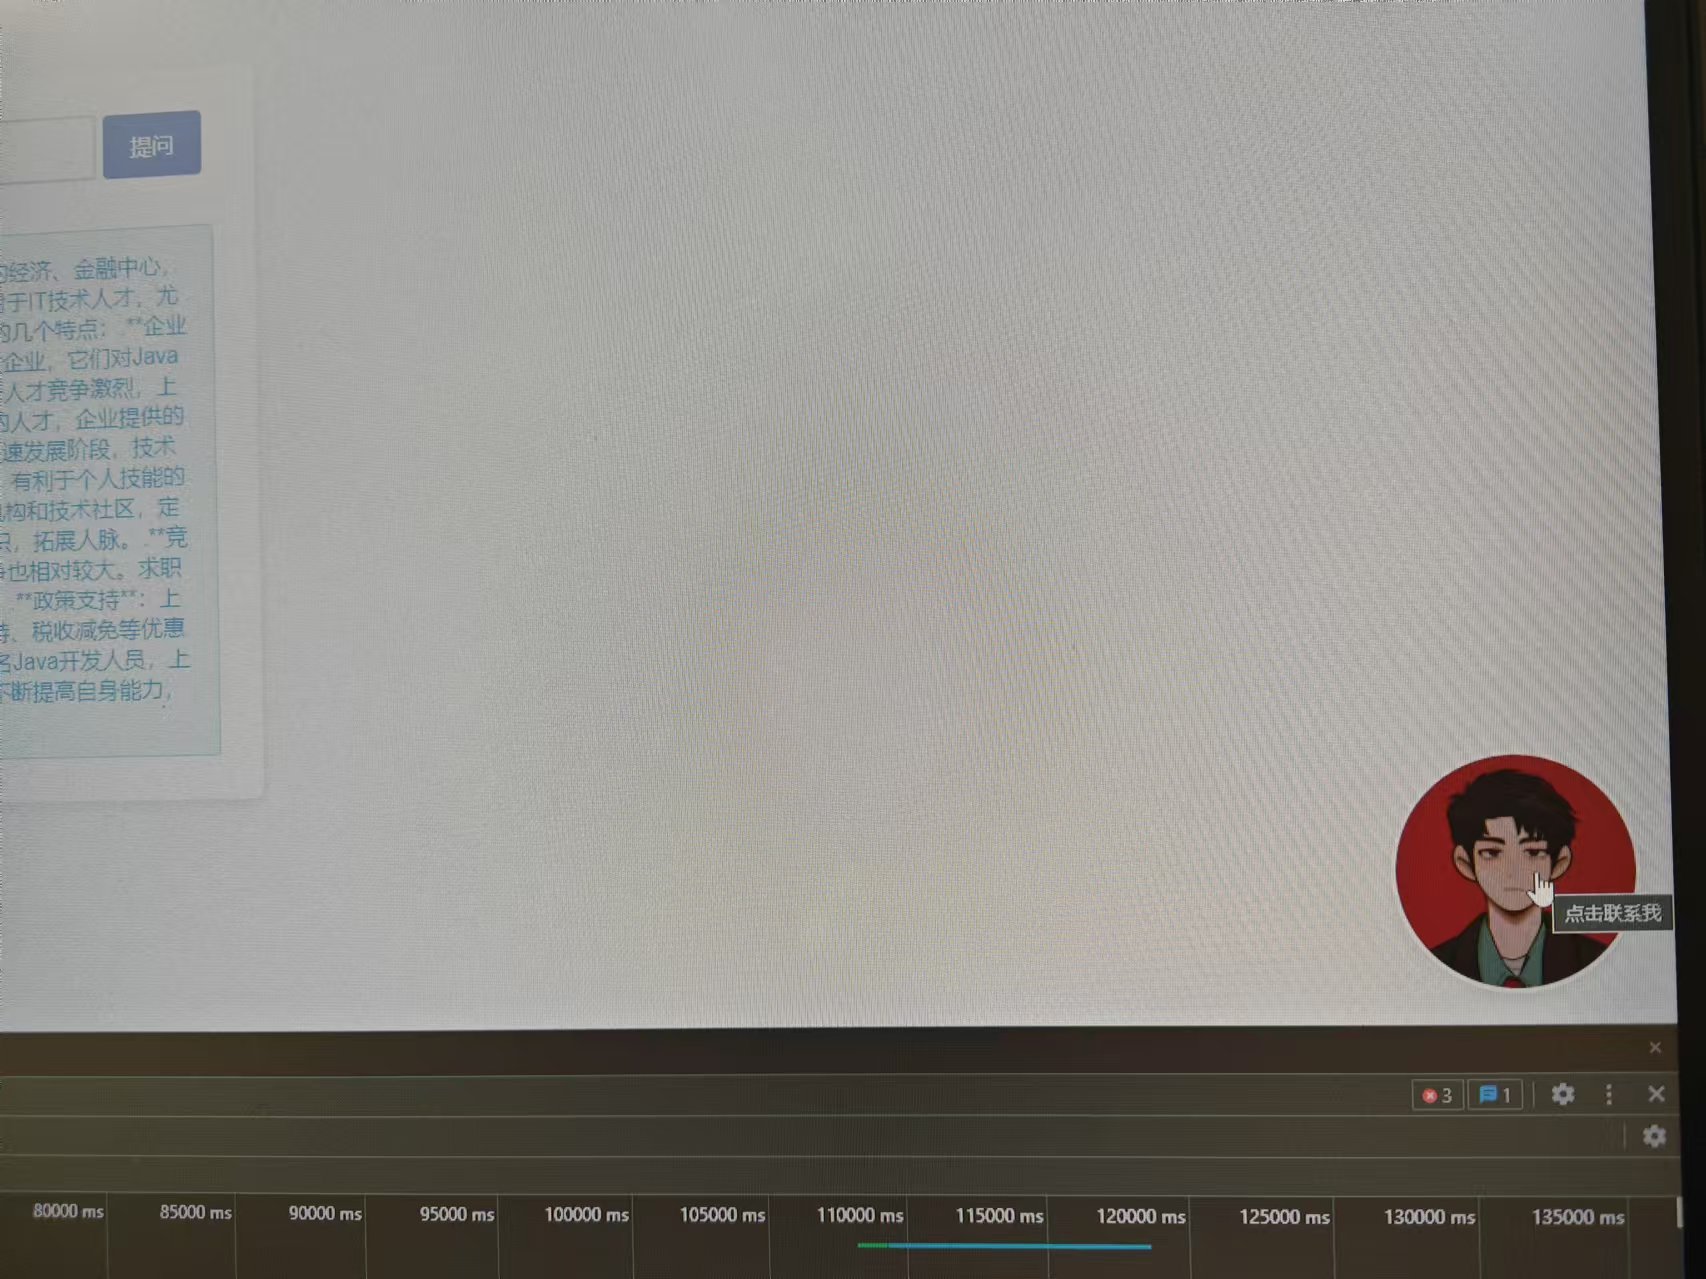
3.2 问答测试
输入问题,点击提问,流式输出的整体速度还好,后端记录也存在
 🍹 四、章末
本地址是简单实现了页面上展示的功能,其中包含的问题还有很多,但是也能使用,留给后面在做更新,文章到这里既结束了~