VScode中配置ESlint+Prettier详细步骤(图文详情)
前置环境:
node 18.19.0
vite 3.2.11
vue 3.2.47
本文将不在演示vue3基础工程创建,如果还没有vue3项目工程请参考文章:
Vite创建Vue3工程并引入ElementPlus(图文详细)
本文的ESlint+Prettier版本:
ESlint 8.57.1
Prettier 3.2.5
1 editorconfig设置
什么是 .editorconfig?
.editorconfig 是一个跨编辑器和IDE的文件格式,旨在帮助开发者定义和维护一致的代码格式规则。它由 EditorConfig 项目维护,并得到了广泛的支持,包括 Visual Studio Code、Sublime Text、Atom、IntelliJ IDEA 等许多流行的编辑器和IDE。
.editorconfig 文件是一种用于定义和维护代码格式一致性的配置文件。它可以帮助开发者确保在不同编辑器和IDE中,代码的缩进、换行符、字符编码等格式保持一致。通过使用 .editorconfig 文件,团队成员可以在不同的操作系统和开发环境中工作,而不必担心代码风格的不一致性。
打开vscode,在项目根目录新建.editorconfig文件并添加如下代码
# 告诉EditorConfig插件,这是根文件,不用继续往上查找
root = true

# 匹配全部文件
[*]
# 缩进风格,可选space、tab
indent_style = space
# 缩进的空格数
indent_size = 2
# 设置字符集
charset = utf-8
# 结尾换行符,可选lf、cr、crlf
end_of_line = lf
# 在文件结尾插入新行
trim_trailing_whitespace = true
# 删除一行中的前后空格
insert_final_newline = true

[*.md]
insert_final_newline = false
trim_trailing_whitespace = false
2 Eslint与Prettier设置
2.1 安装依赖包和插件
打开vscode搜索ESlint和Prettier插件进行安装(安装完毕后需重启vscode)
ESLint插件
- 用于代码风格检查和静态分析。
- 与 Vue 3 的 ESLint 插件一起使用,确保符合 Vue 3 的规范。

Prettier插件
- 代码格式化工具,帮助保持代码风格的一致性。
- 与 Vue 3 的 Prettier 插件一起使用,确保与 Vue 3 的风格一致。

安装ESlint和Prettier到项目中
注意:在Eslint的9.0版本之后变化较大,请注意和Prettier版本使用搭配!
使用终端打开项目根目录执行安装
安装Eslint
npm install eslint@8.57.1 --save-dev安装prettier
npm install prettier@3.2.5 --save-dev

npm i -D eslint-plugin-prettier @vue/eslint-config-prettier eslint-plugin-vue
2.2 Prettier设置
1.Prettier配置文件
在VScode的项目工程根目录下新建配置文件.prettierrc和.prettierignore
.prettierrc文件(用于prettier格式化规则设置,可根据自身需要修改)
json
{
	"printWidth": 220,
	"tabWidth": 2,
	"useTabs": true,
	"semi": true,
	"singleQuote": false,
	"quoteProps": "as-needed",
	"trailingComma": "none",
	"bracketSpacing": true,
	"jsxBracketSameLine": false,
	"arrowParens": "avoid",
	"endOfLine": "auto",
	"jsxSingleQuote": false,
	"vueIndentScriptAndStyle": true
}
文件释义
json
{
  "printWidth": 220, // 此设置定义了每行代码的最大字符数。若代码行超出此长度,格式化工具会尝试将其拆分为多行。
  "tabWidth": 2, // 此设置指定一个制表符(tab)的宽度,即它等同于多少个空格。这有助于确保代码缩进的一致性。
  "useTabs": true, // 此设置决定是否使用制表符进行缩进。若设为true,则使用制表符;反之,则使用空格。
  "semi": true, // 此设置决定是否在语句末尾添加分号。若设为false,则不添加。
  "singleQuote": false, // 此设置决定是否优先使用单引号。若设为true,则字符串默认使用单引号。
  "quoteProps": "as-needed", // 此设置定义对象属性是否添加引号。设为"as-needed"时,仅在属性名不是有效标识符时添加引号。
  "trailingComma": "none", // 此设置决定在多行时是否添加尾随逗号。设为"none"时,不添加尾随逗号。
  "bracketSpacing": true, // 此设置决定在对象字面量的括号间是否添加空格,例如:`{ foo: bar }`。
  "jsxBracketSameLine": false, // 在JSX中,若表达式跨多行,此设置决定`>`的位置。设为false时,`>`位于新行。
  "arrowParens": "avoid", // 此设置决定单参数箭头函数的参数是否使用圆括号。设为"avoid"时,尽可能不使用圆括号。
  "endOfLine": "lf", // 此设置定义行尾使用的字符。设为"lf"时,使用LF(换行符)作为行尾字符。
  "jsxSingleQuote": false, // 在JSX中,此设置决定是否使用单引号。设为false时,默认使用双引号。
  "vueIndentScriptAndStyle": true // 在Vue文件中,此设置决定`<script>`和`<style>`标签内的代码是否缩进。
}
.prettierignore文件(用于prettier需要忽略格式化的文件或目录)
/dist/*
.local
.output.js
/node_modules/**

**/*.svg
**/*.sh

/public/*
2. VScode配置Prettier插件
请务必按照以下步骤对Prettier插件进行设置,否则Prettier插件自动格式化代码可能将无效!

添加或修改prettier配置文件路径

取消默认配置勾选

添加vscode保存时自动格式化

勾选保存时自动格式化

勾选保存时默认格式化为prettier

3 Prettier测试
修改app.vue文件如下,打乱格式
vue
<template>
	      <div>
<h1></h1>
				   </div>
					  <div></div>

</template>

<script setup>
	import {} from 'vue'
</script>

<style lang="scss" scoped></style>
在vscode中按下ctrl+s保存后,则会自动使用prettier设置的规则进行格式化,例如对齐html标签和js脚本的双引号和加分号

2.3 ESlint设置
1.Eslint配置文件
在VScode的项目工程根目录下新建配置文件.eslintrc.cjs和.eslintignore
.eslintrc.cjs(用于eslint校验规则设置)
module.exports = {
	root: true,
	env: {
		browser: true,
		es2021: true,
		node: true
	},
	extends: ["plugin:vue/vue3-recommended", "eslint:recommended", "plugin:prettier/recommended"],
	parserOptions: {
		ecmaVersion: 12,
		sourceType: "module"
	},
	plugins: ["vue"],
	rules: {
		// 自定义规则
		"prettier/prettier": "error", // 将 Prettier 的格式化规则作为 ESLint 错误处理
		"no-console": process.env.NODE_ENV === "production" ? "warn" : "off",
		"no-debugger": process.env.NODE_ENV === "production" ? "warn" : "off",
		"space-before-function-paren": "off", // 确保方法名与括号之间没有空格检查
		"vue/multi-word-component-names": "off" //关闭组件命名规则
	}
};
.eslintignore(用于eslint需要忽略格式化的文件或目录)
*.sh
node_modules
*.md
*.woff
*.ttf
.vscode
.idea
dist
/public
/docs
.husky
.local
/bin
.eslintrc.cjs
prettier.config.js
src/assets
tailwind.config.js
postcss.config.js
2. VScode设置Eslint
在VScode设置里启用eslint

配置Settings.json加入vue文件校验

json
  "eslint.validate": [
    "javascript",
    "javascriptreact",
    "html",
    { "language": "vue", "autoFix": true }
  ]
3.测试Eslint
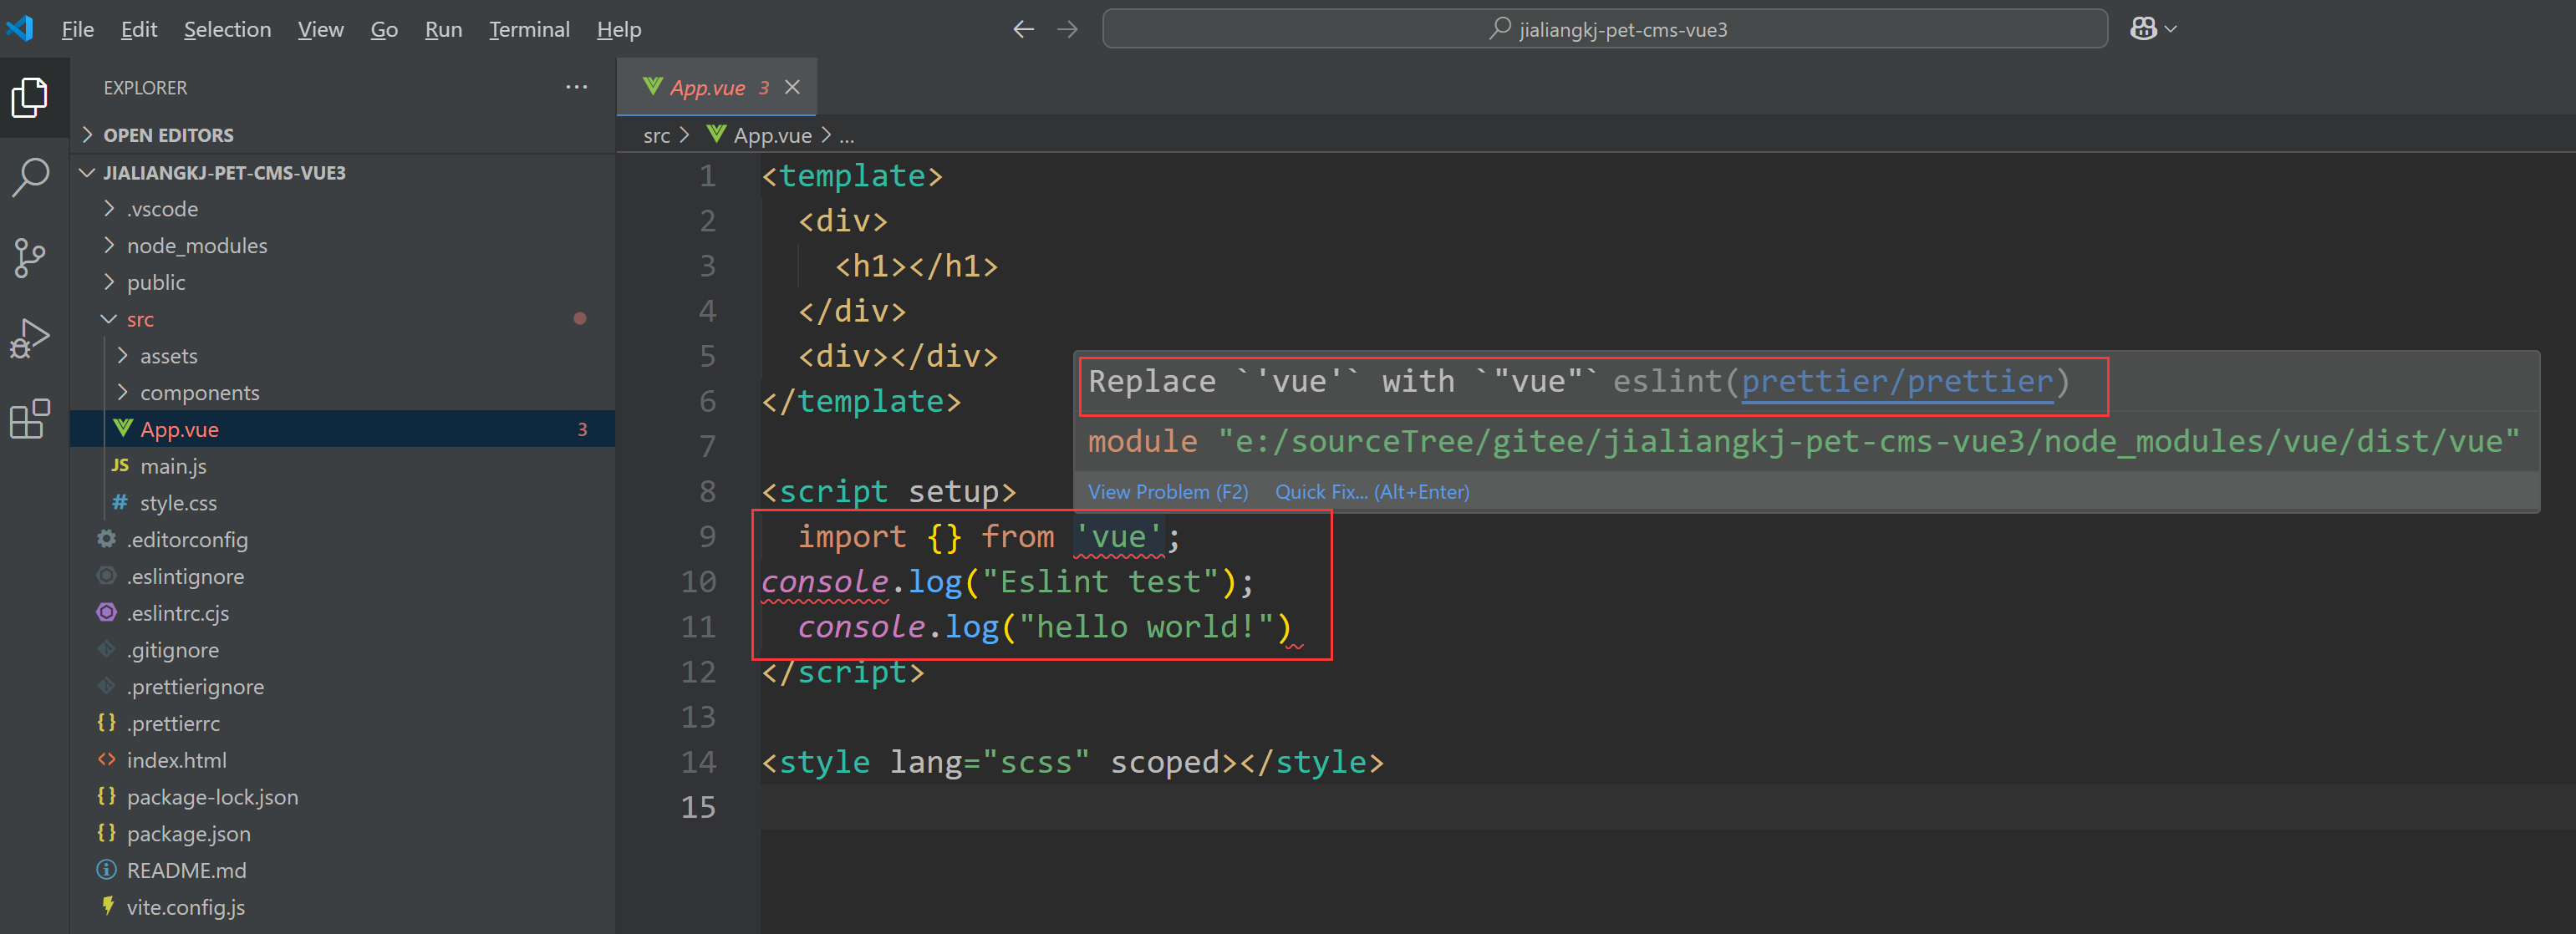
在app.vue添加如下测试代码
vue
<template>
	<div>
		<h1></h1>
	</div>
	<div></div>
</template>

<script setup>
	import {} from 'vue';
console.log("Eslint test");
	console.log("hello world!")
</script>

<style lang="scss" scoped></style>
可以看到对应不符合校验规则的已经爆红(建议重启vscode)
Eslint校验规则默认已经读取自prettier的规则配置,需要修改校验规则直接修改.prettierrc文件,或自行在.eslintrc.cjs文件里添加规则,但是需要注意和prettier的格式化规则冲突问题。
至此,综上所属已经完在vscode下eslint+prettier的组合规则校验+格式化规则添加。