🎉 新年将至,我决定开发一个独特的新年祝福网页,让每个人都能创建和分享自己的新年祝福。本文将详细介绍这个项目的开发过程,从技术选型到具体实现,希望能给大家一些启发。
一、项目概述
1.1 项目背景
在这个数字化的时代,传统的新年祝福方式似乎显得有些单调。作为开发者,我希望能够创造一个既保留传统节日氛围,又充满现代感的新年祝福平台。这个项目不仅是一次技术实践,更是对传统文化的一种新诠释。
1.2 技术选型
在开始开发之前,我仔细考虑了技术栈的选择:
- React 18:选择 React 的原因是其强大的组件化能力和丰富的生态系统
- TypeScript:使用 TypeScript 可以提供更好的类型安全和开发体验
- Tailwind CSS:这个原子化 CSS 框架能够快速构建美观的界面
- Framer Motion:用于实现流畅的动画效果
- Vite:作为构建工具,提供极快的开发体验
1.3 功能规划
核心功能包括:
- 个性化祝福创建
- 动态烟花效果
- 音乐播放器
- 祝福图片生成与分享
二、项目初始化
2.1 环境搭建
首先创建一个新的 Vite 项目:
bash
npm create vite@latest new-year-greetings -- --template react-ts
cd new-year-greetings
npm install
安装必要的依赖:
bash
npm install tailwindcss postcss autoprefixer framer-motion
npm install -D @types/node
2.2 配置 Tailwind CSS
创建 Tailwind 配置文件:
typescript
// tailwind.config.js
module.exports = {
  content: [
    "./index.html",
    "./src/**/*.{js,ts,jsx,tsx}",
  ],
  theme: {
    extend: {
      animation: {
        'float': 'float 3s ease-in-out infinite',
      },
      keyframes: {
        float: {
          '0%, 100%': { transform: 'translateY(0)' },
          '50%': { transform: 'translateY(-10px)' },
        }
      }
    },
  },
  plugins: [],
}
三、界面开发
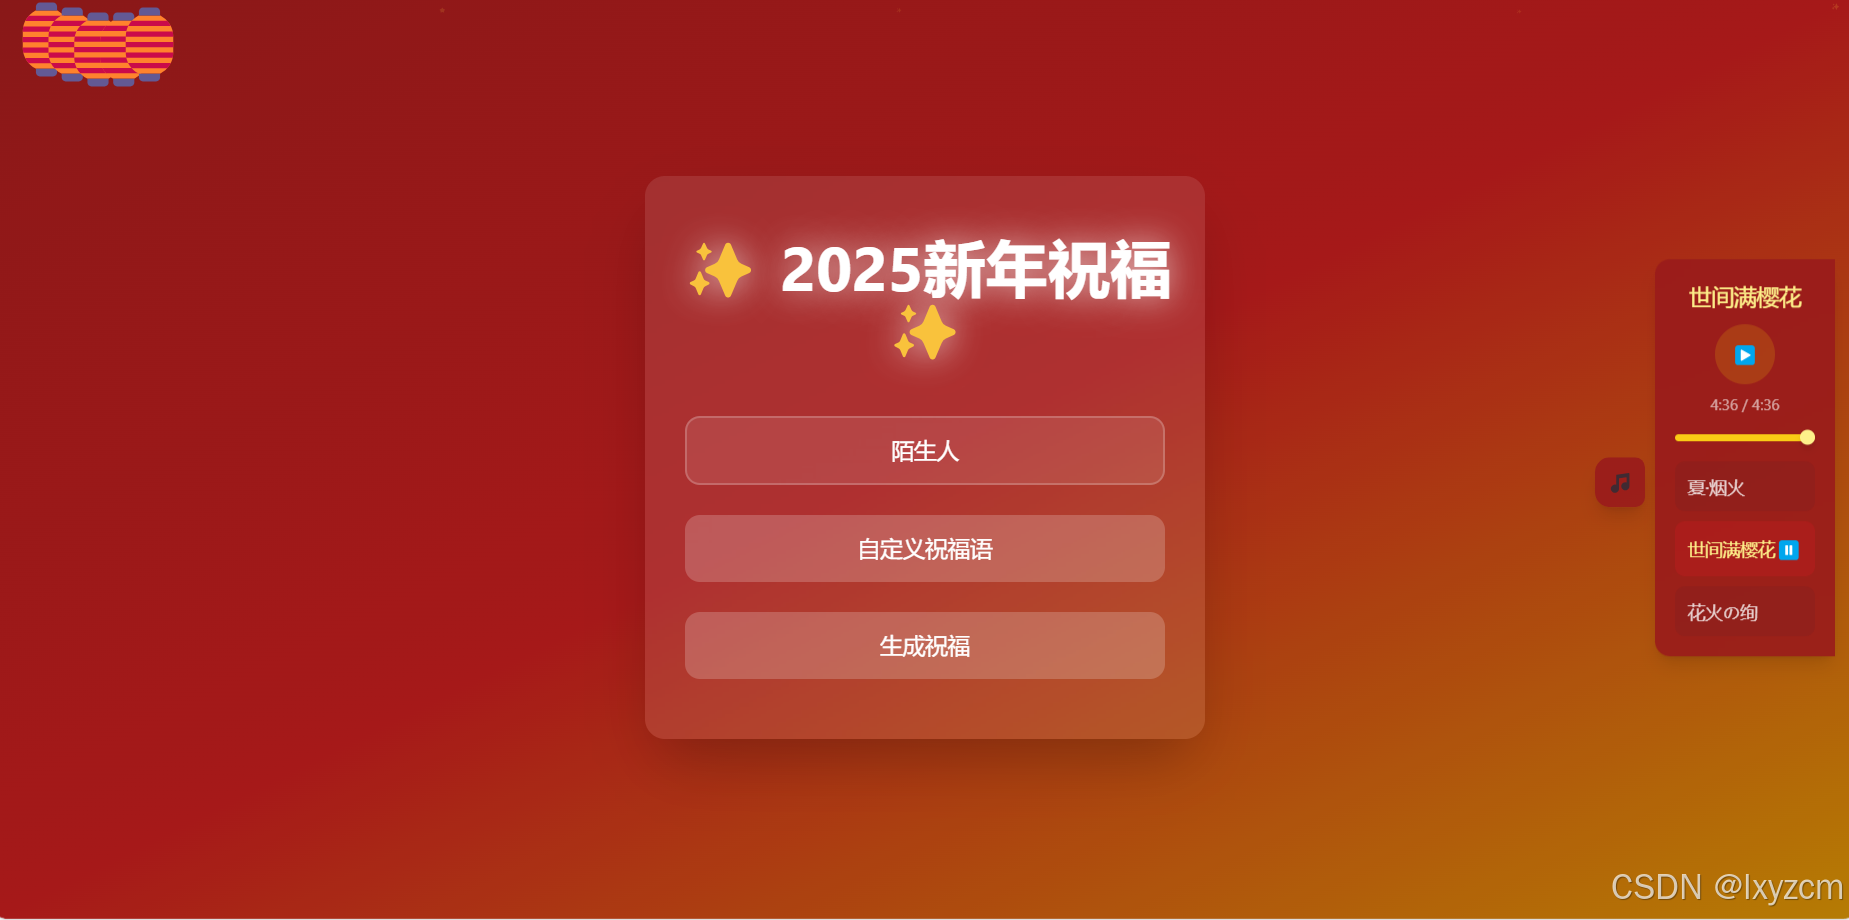
3.1 主页面布局
首先设计主页面的基本结构:
typescript
// App.tsx
function App() {
  return (
    <div className="min-h-screen bg-gradient-to-b from-red-800 to-yellow-600 text-white relative overflow-hidden">
      <div className="container mx-auto px-4 py-8 relative z-10">
        {/* 内容区域 */}
      </div>
    </div>
  );
}
3.2 灯笼组件实现
灯笼是传统节日不可或缺的元素:
typescript
const Lantern = ({ index }: { index: number }) => {
  return (
    <motion.div
      initial={{ y: -20, opacity: 0 }}
      animate={{ y: 0, opacity: 1 }}
      transition={{
        delay: index * 0.2,
        duration: 0.8,
        y: {
          duration: 2,
          repeat: Infinity,
          repeatType: "reverse",
          ease: "easeInOut"
        }
      }}
      className="absolute"
      style={{
        left: `${index * 25}%`,
        top: '20px'
      }}
    >
      <div className="w-16 h-20 bg-red-600 rounded-full relative">
        {/* 灯笼装饰 */}
        <div className="absolute top-0 left-1/2 -translate-x-1/2 w-8 h-3 bg-yellow-500 rounded-full"></div>
        <div className="absolute bottom-0 left-1/2 -translate-x-1/2 w-1 h-8 bg-red-800"></div>
      </div>
    </motion.div>
  );
};
3.3 烟花动画效果
使用 Framer Motion 实现绚丽的烟花效果:
typescript
const Firework = ({ x, y }: { x: number; y: number }) => {
const colors = ['#FFD700', '#FF6B6B', '#4ECDC4', '#45B7D1'];
const particles = Array.from({ length: 12 }).map((_, i) => ({
angle: (i * Math.PI * 2) / 12,
color: colors[Math.floor(Math.random() * colors.length)]
}));
return (
<motion.div
initial={{ opacity: 1 }}
animate={{ opacity: 0 }}
transition={{ duration: 0.8 }}
className="absolute"
style={{ left: x, top: y }}
>
{particles.map((particle, i) => (
<motion.div
key={i}
initial={{ x: 0, y: 0, scale: 1 }}
animate={{
x: Math.cos(particle.angle) * 50,
y: Math.sin(particle.angle) * 50,
scale: 0
}}
transition={{ duration: 0.8, ease: "easeOut" }}
style={{
position: 'absolute',
width: '4px',
height: '4px',
borderRadius: '50%',
backgroundColor: particle.color
}}
/>
))}
</motion.div>
);
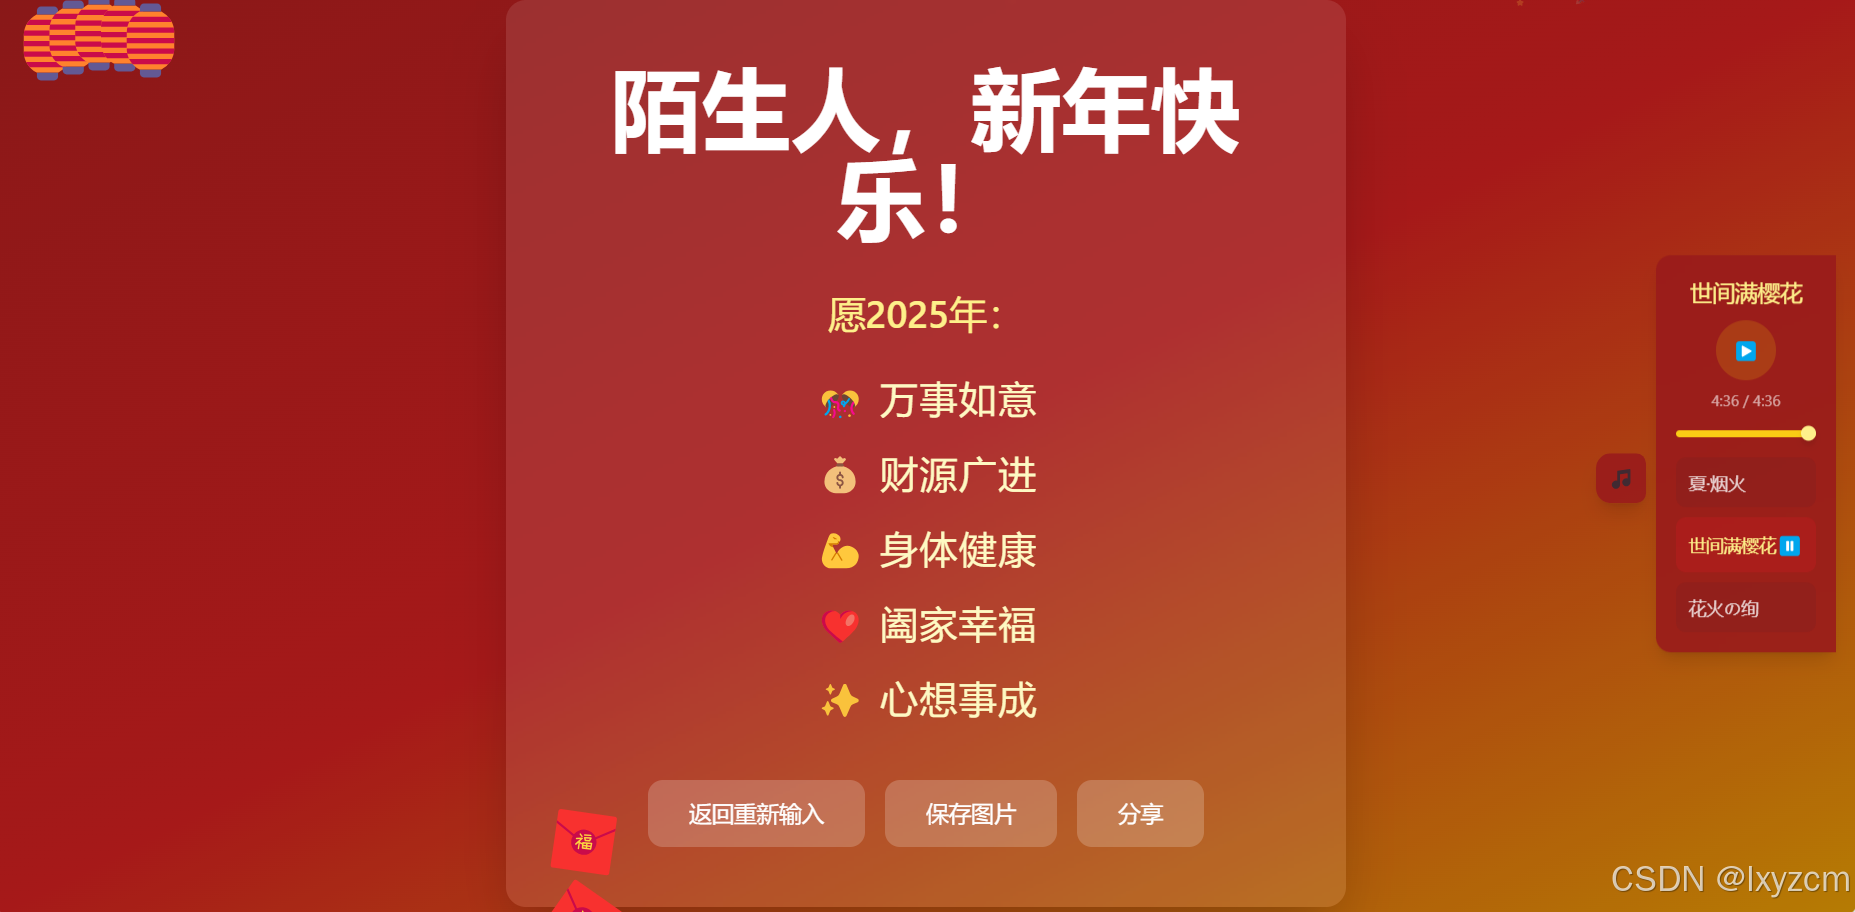
};3.4 祝福输入表单
创建一个优雅的输入界面:
typescript
const GreetingForm = () => {
  const [name, setName] = useState('');
  const [customGreeting, setCustomGreeting] = useState('');

  return (
    <motion.div
      initial={{ opacity: 0, y: 20 }}
      animate={{ opacity: 1, y: 0 }}
      className="space-y-4"
    >
      <input
        type="text"
        value={name}
        onChange={(e) => setName(e.target.value)}
        placeholder="请输入您的名字"
        className="w-full px-4 py-2 rounded-lg bg-white/10 border border-white/20"
      />
      <textarea
        value={customGreeting}
        onChange={(e) => setCustomGreeting(e.target.value)}
        placeholder="添加自定义祝福语(选填)"
        className="w-full px-4 py-2 rounded-lg bg-white/10 border border-white/20"
      />
    </motion.div>
  );
};
四、动画优化
4.1 性能考虑
为了确保动画流畅,我们需要注意以下几点:
- 使用
transform而不是改变位置属性 - 适当使用
will-change属性 - 控制同时展示的动画元素数量
4.2 动画时机控制
typescript
useEffect(() => {
  const timer = setInterval(() => {
    if (fireworks.length < 5) {  // 限制同时存在的烟花数量
      const newFirework = {
        id: Date.now(),
        x: Math.random() * window.innerWidth,
        y: Math.random() * (window.innerHeight / 2)
      };
      setFireworks(prev => [...prev, newFirework]);
    }
  }, 1000);

  return () => clearInterval(timer);
}, [fireworks]);
五、响应式设计
5.1 移动端适配
使用 Tailwind CSS 的响应式类:
typescript
<div className="grid grid-cols-1 md:grid-cols-2 lg:grid-cols-3 gap-4">
  {/* 内容 */}
</div>
5.2 触摸事件处理
typescript
const handleTouchStart = (e: React.TouchEvent) => {
  const touch = e.touches[0];
  addFirework(touch.clientX, touch.clientY);
};
六、音乐播放器开发
6.1 播放器设计思路
在设计音乐播放器时,我考虑了以下几个关键点:
- 用户体验:播放器应该易于使用且不影响主界面
- 功能完整:支持基本的播放控制和歌曲选择
- 视觉效果:与整体界面风格保持一致
- 响应式设计:在各种设备上都能良好展示
6.2 播放器组件实现
首先定义歌曲接口和歌曲列表:
typescript
interface Song {
  id: number;
  title: string;
  url: string;
}

const songs: Song[] = [
  { id: 1, title: '夏·烟火', url: '/songs/夏·烟火.mp3' },
  { id: 2, title: '世间满樱花', url: '/songs/世间满樱花.mp3' },
  { id: 3, title: '花火の绚', url: '/songs/花火の绚' },
];
播放器主体组件:
typescript
export const MusicPlayer: React.FC = () => {
  const [currentSong, setCurrentSong] = useState<Song | null>(null);
  const [isPlaying, setIsPlaying] = useState(false);
  const [progress, setProgress] = useState(0);
  const [isExpanded, setIsExpanded] = useState(false);
  const audioRef = useRef<HTMLAudioElement>(null);

  // 播放控制逻辑
  const handleSongSelect = (song: Song) => {
    if (currentSong?.id === song.id) {
      setIsPlaying(!isPlaying);
    } else {
      setCurrentSong(song);
      setIsPlaying(true);
    }
  };

  // 进度条控制
  const handleProgressClick = (e: React.MouseEvent<HTMLDivElement>) => {
    if (audioRef.current) {
      const bounds = e.currentTarget.getBoundingClientRect();
      const percent = (e.clientX - bounds.left) / bounds.width;
      audioRef.current.currentTime = percent * audioRef.current.duration;
    }
  };

  // 时间格式化
  const formatTime = (time: number) => {
    const minutes = Math.floor(time / 60);
    const seconds = Math.floor(time % 60);
    return `${minutes}:${seconds.toString().padStart(2, '0')}`;
  };

  return (
    <div className="fixed right-4 top-1/2 -translate-y-1/2 z-50">
      {/* 播放器界面实现 */}
    </div>
  );
};
6.3 播放器动画效果
使用 Framer Motion 实现展开/收起动画:
typescript
<motion.div
  initial={{ x: 300 }}
  animate={{ x: 0 }}
  className="relative"
>
  <motion.button
    whileHover={{ scale: 1.1 }}
    whileTap={{ scale: 0.9 }}
    onClick={() => setIsExpanded(!isExpanded)}
    className="absolute -left-12 top-1/2 -translate-y-1/2 w-10 h-10 bg-red-800/90"
  >
    {isExpanded ? '🎵' : '🎼'}
  </motion.button>

  <motion.div
    animate={{
      width: isExpanded ? 'auto' : '0px',
      opacity: isExpanded ? 1 : 0
    }}
    className="w-64 bg-red-800/90 backdrop-blur-md rounded-l-xl"
  >
    {/* 播放器内容 */}
  </motion.div>
</motion.div>
七、祝福图片生成
7.1 Canvas 绘制实现
使用 Canvas API 生成分享图片:
typescript
interface ShareImageProps {
  name: string;
  greeting: string;
  background: string;
}

const generateShareImage = async (props: ShareImageProps): Promise<string> => {
  const { name, greeting, background } = props;
  const canvas = document.createElement('canvas');
  const ctx = canvas.getContext('2d');

  if (!ctx) return '';

  // 设置画布尺寸
  canvas.width = 1080;
  canvas.height = 1920;

  // 加载背景图片
  const bgImage = new Image();
  bgImage.src = background;
  await new Promise(resolve => bgImage.onload = resolve);

  // 绘制背景
  ctx.drawImage(bgImage, 0, 0, canvas.width, canvas.height);

  // 添加渐变遮罩
  const gradient = ctx.createLinearGradient(0, 0, 0, canvas.height);
  gradient.addColorStop(0, 'rgba(0,0,0,0.6)');
  gradient.addColorStop(0.5, 'rgba(0,0,0,0.3)');
  gradient.addColorStop(1, 'rgba(0,0,0,0.6)');
  ctx.fillStyle = gradient;
  ctx.fillRect(0, 0, canvas.width, canvas.height);

  // 绘制文字
  ctx.textAlign = 'center';
  ctx.fillStyle = '#fff';

  // 绘制祝福语
  ctx.font = '48px Arial';
  ctx.fillText(greeting, canvas.width / 2, canvas.height / 2);

  // 绘制署名
  ctx.font = '36px Arial';
  ctx.fillText(`致:${name}`, canvas.width / 2, canvas.height / 2 + 100);

  return canvas.toDataURL('image/png');
};
7.2 图片保存功能
typescript
const handleSaveImage = async () => {
  try {
    setIsSaving(true);
    const imageUrl = await generateShareImage({
      name,
      greeting: selectedGreeting || customGreeting,
      background: '/images/bg.jpg'
    });

    // 创建下载链接
    const link = document.createElement('a');
    link.download = `新年祝福_${Date.now()}.png`;
    link.href = imageUrl;
    link.click();
  } catch (error) {
    console.error('保存图片失败:', error);
  } finally {
    setIsSaving(false);
  }
};
八、性能优化
8.1 资源加载优化
- 图片懒加载:
typescript
const LazyImage = ({ src, alt }: { src: string; alt: string }) => {
  const [isLoaded, setIsLoaded] = useState(false);

  return (
    <motion.img
      src={src}
      alt={alt}
      initial={{ opacity: 0 }}
      animate={{ opacity: isLoaded ? 1 : 0 }}
      onLoad={() => setIsLoaded(true)}
    />
  );
};- 音频预加载:
typescript
const preloadAudio = (url: string) => {
  const audio = new Audio();
  audio.src = url;
  audio.preload = 'auto';
};

useEffect(() => {
  songs.forEach(song => preloadAudio(song.url));
}, []);
8.2 渲染优化
- 使用 React.memo:
typescript
const SongItem = React.memo(({ song, isPlaying, onSelect }: SongItemProps) => {
  return (
    <motion.div
      whileHover={{ scale: 1.02 }}
      onClick={() => onSelect(song)}
      className="song-item"
    >
      {/* 歌曲项内容 */}
    </motion.div>
  );
});- 优化状态更新:
typescript
const handleTimeUpdate = useCallback(() => {
  if (audioRef.current) {
    const progress = (audioRef.current.currentTime / audioRef.current.duration) * 100;
    setProgress(progress);
  }
}, []);
结语
通过这个项目,我们不仅创造了一个有趣的新年祝福应用,还实践了许多现代前端开发技术。希望这个项目能给大家带来一些启发,也祝愿大家新年快乐!
🎉 如果你觉得这个项目有帮助,欢迎点赞转发!如果你有任何问题或建议,也欢迎在评论区留言交流!
相关链接: