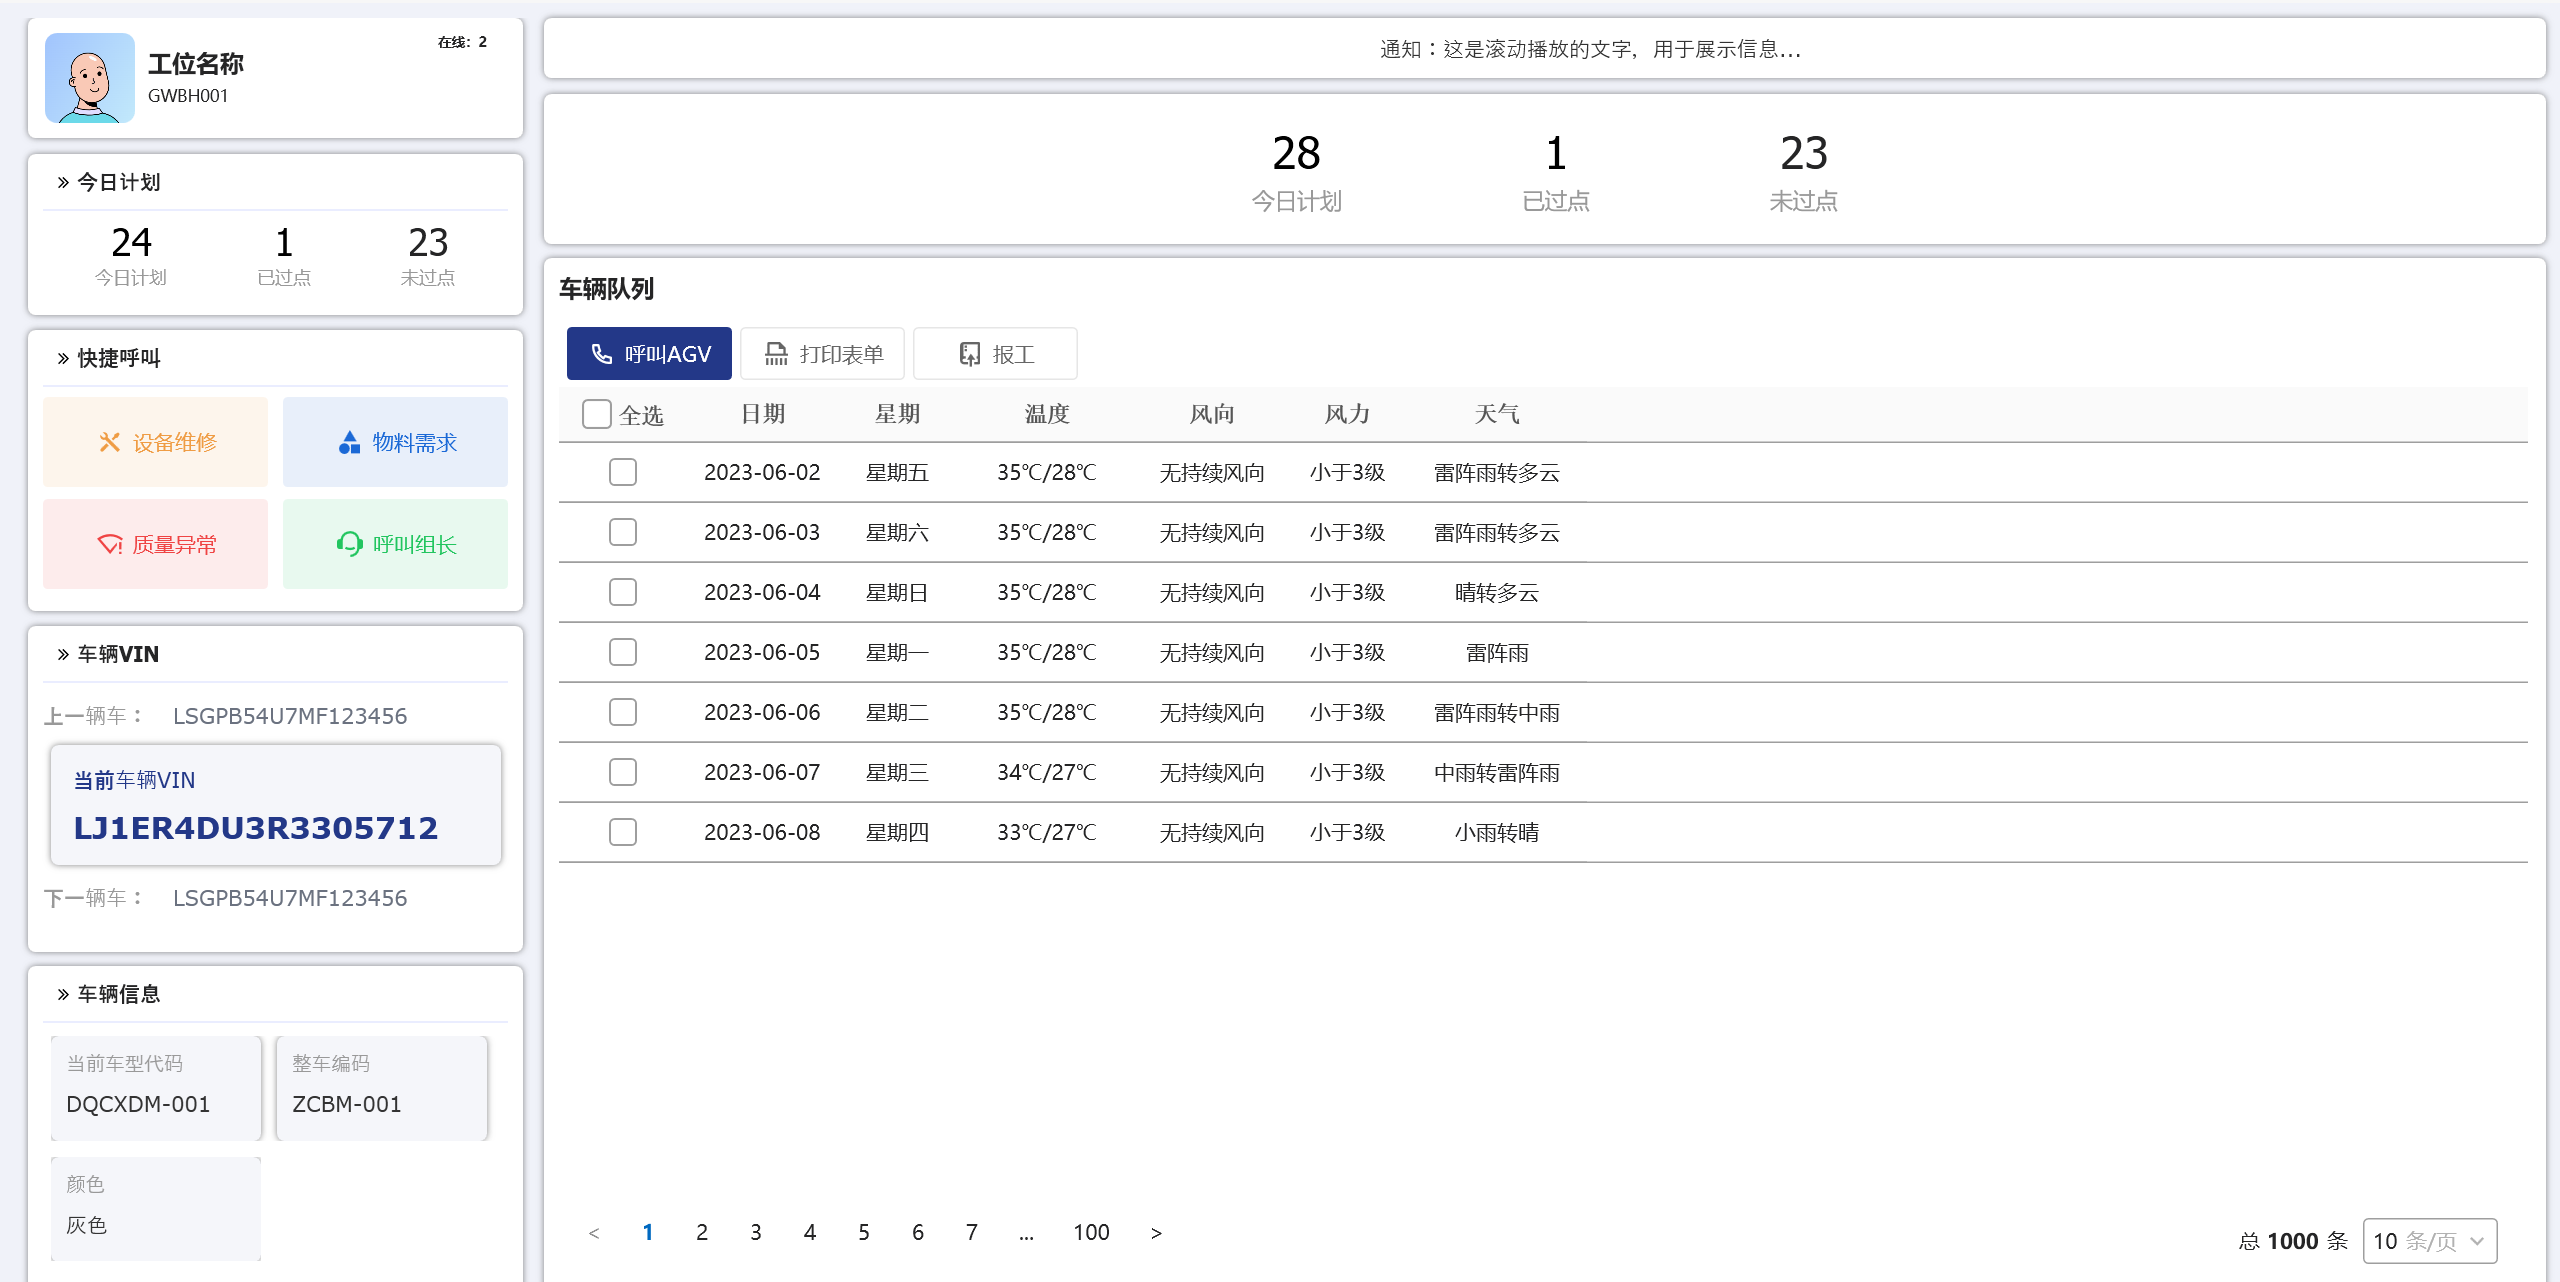
该实际场景比较常见于,当存在多个用户控件页面拼成一个窗体,因为实际控件对应窗体的宽度并不能确定,也不是那种能指定的宽度或者高度,比如窗体分导航区域和内容区域,左侧导航区域可以直接指定宽度,而右侧内容区域则是使用Auto或者*的宽度。
在WPF中,尝试将一个控件的宽度绑定到其父级用户控件的实际宽度(ActualWidth)时,会遇到一些挑战。因为 ActualWidth和ActualHeight 是只读属性,并且它们是在布局过程之后计算出来的,这可能导致绑定延迟或不更新的问题。为了确保子控件能够正确地响应父控件大小的变化,根据实际情况使用如下方式。
方法1:使用相对宽度和星号单位
最简单的方法是让子控件自动填充可用空间,而不是显式地绑定到父控件的 ActualWidth。可以通过设置子控件的 HorizontalAlignment 属性为 Stretch 或使用在布局Grid的宽度用 * 星号单位来实现这一点。
如下:
<rubyer:Card x:Name="cardNotice" Grid.Row="1"
             Height="120"
             Padding="5"
             HorizontalAlignment="Stretch"  <!-- 设置为 Stretch -->
             HorizontalContentAlignment="Center">
    <!-- Card 内容 -->
</rubyer:Card>
Card内容里部分,可用StackPanel容器包装,StackPanel容器自动适应内部空间的宽度和高度,在结合HorizontalAlignment="Stretch"就可以实现,将rubyer:Card这个控件自动适配宽度和用户控件的宽度一样,当然也需要该rubyer:Card占据用户控件全部的Column。
或:
<Grid x:Name="homeGrid"
      Margin="10">
    <Grid.ColumnDefinitions>
        <ColumnDefinition Width="350" />
        <ColumnDefinition Width="*" />
    </Grid.ColumnDefinitions>
    <Grid.RowDefinitions>
        <RowDefinition Height="*" />
        <RowDefinition Height="5" />
    </Grid.RowDefinitions>
 </Grid>
方法2:使用 RelativeSource 绑定
如果确实需要基于父控件的实际宽度进行绑定,可以尝试使用 RelativeSource 绑定来引用父控件的 ActualWidth。
如下:
<UserControl x:Class="YourNamespace.PlanMoudelView"
             xmlns="http://schemas.microsoft.com/winfx/2006/xaml/presentation"
             xmlns:x="http://schemas.microsoft.com/winfx/2006/xaml"
             SizeChanged="PlanMoudelView_SizeChanged">
    <Grid>
        <rubyer:Card x:Name="cardNotice" Grid.Row="1"
                     Height="120"
                     Width="{Binding RelativeSource={RelativeSource AncestorType=UserControl}, Path=ActualWidth, Mode=OneWay}"
                     Padding="5"
                     HorizontalAlignment="Stretch"
                     HorizontalContentAlignment="Center">
            <!-- Card 内容 -->
        </rubyer:Card>
    </Grid>
</UserControl>
主要为:Width="{Binding RelativeSource={RelativeSource AncestorType=UserControl}, Path=ActualWidth, Mode=OneWay}"
方法3:使用 SizeChanged 事件处理程序
另一种方法是在父控件的 SizeChanged 事件中手动调整子控件的宽度。这种方法适用于更复杂的情况,但通常不是首选,因为 WPF 布局系统应该能够处理大多数场景。
private void PlanMoudelView_SizeChanged(object sender, SizeChangedEventArgs e)
{
    if (cardNotice != null)
    {
        cardNotice.Width = this.ActualWidth; // 'this' 指向 PlanMoudelView
    }
}
方法4:使用 MultiBinding 和转换器
如果需要更复杂的逻辑,比如保留一定的边距或比例,可以使用 MultiBinding 结合 IMultiValueConverter 来计算子控件的宽度。
<rubyer:Card x:Name="cardNotice" Grid.Row="1"
             Height="120"
             Padding="5"
             HorizontalAlignment="Stretch"
             HorizontalContentAlignment="Center">
    <rubyer:Card.Width>
        <MultiBinding Converter="{StaticResource WidthConverter}">
            <Binding RelativeSource="{RelativeSource AncestorType=UserControl}" Path="ActualWidth"/>
            <Binding Source="{x:Static sys:Double.NaN}"/> <!-- 如果需要额外参数 -->
        </MultiBinding>
    </rubyer:Card.Width>
    <!-- Card 内容 -->
</rubyer:Card>
**注意:**确保父容器允许子控件扩展
确保包含 Card 控件的父容器(例如 Grid)没有限制子控件的尺寸。检查是否有固定的高度或宽度、MaxWidth 或 MaxHeight 等可能影响布局的属性。
总结
通常情况下,使用相对宽度(如 * 星号单位)和适当的 HorizontalAlignment 是最简单有效的方法,可以确保子控件随着父控件的大小变化而自动调整。如果需要更精确的控制,可以考虑使用 RelativeSource 绑定或其他高级技术。确保父容器也支持子控件的动态尺寸调整非常重要。
最后附上,绑定后宽度减数的转换器,因为通常不能直接用子控件跟父控件完全等宽或等高,肯定需要有偏差:


/// <summary>
/// 控件宽度减法转换器
/// 可用于子控件绑定父控件宽度做减法
/// </summary>
public class SubtractValueConverter : IValueConverter
{
    public object Convert(object value, Type targetType, object parameter, System.Globalization.CultureInfo culture)
    {
        double parentWidth = (double)value;
        double subtractValue = double.Parse(parameter.ToString());
        return parentWidth - subtractValue;
    }

    public object ConvertBack(object value, Type targetType, object parameter, System.Globalization.CultureInfo culture)
    {
        throw new NotImplementedException();
    }
}

在用户控件页面增加绑定资源:
<UserControl.Resources>
    <converter:SubtractValueConverter x:Key="subtractValueConverter" />
</UserControl.Resources>
然后,在绑定时增加转换器的使用:
Width="{Binding RelativeSource={RelativeSource AncestorType=UserControl}, Path=ActualWidth, Mode=OneWay, Converter={StaticResource subtractValueConverter}, ConverterParameter=20}"
转换器代码
实际下图中右下角的列表Card使用实例:


<UserControl x:Name="VehicleQueueView"
             x:Class="WpfAppMom.Views.Plan.VehicleQueue"
             xmlns="http://schemas.microsoft.com/winfx/2006/xaml/presentation"
             xmlns:x="http://schemas.microsoft.com/winfx/2006/xaml"
             xmlns:controls="clr-namespace:WpfAppMom.Controls"
             xmlns:converter="clr-namespace:WpfAppMom.Converter"
             xmlns:d="http://schemas.microsoft.com/expression/blend/2008"
             xmlns:i="http://schemas.microsoft.com/xaml/behaviors"
             xmlns:local="clr-namespace:WpfAppMom.Views.Plan"
             xmlns:mc="http://schemas.openxmlformats.org/markup-compatibility/2006"
             xmlns:rubyer="http://rubyer.io/winfx/xaml/toolkit"
             xmlns:viewModels="clr-namespace:WpfAppMom.ViewModels.Plan"
             d:DataContext="{d:DesignInstance Type=viewModels:VehicleQueueViewModel}"
             d:DesignHeight="450"
             d:DesignWidth="800"
             mc:Ignorable="d">
    <UserControl.Resources>
        <converter:SubtractValueConverter x:Key="subtractValueConverter" />
    </UserControl.Resources>
    <i:Interaction.Triggers>
        <i:EventTrigger EventName="Loaded">
            <i:InvokeCommandAction Command="{Binding LoadedCommand}" />
        </i:EventTrigger>
        <i:EventTrigger EventName="Closed">
            <i:InvokeCommandAction Command="{Binding CancelCommand}" CommandParameter="{Binding ElementName=VehicleQueueView}" />
        </i:EventTrigger>
    </i:Interaction.Triggers>
    <controls:ControlDisplay x:Name="QueueControl"
                             Title="车辆队列"
                             HorizontalAlignment="Stretch"
                             rubyer:PanelHelper.Spacing="10">
        <Grid Width="{Binding RelativeSource={RelativeSource AncestorType=UserControl}, Path=ActualWidth, Mode=OneWay, Converter={StaticResource subtractValueConverter}, ConverterParameter=20}"
              Height="{Binding RelativeSource={RelativeSource AncestorType=UserControl}, Path=ActualHeight, Mode=OneWay, Converter={StaticResource subtractValueConverter}, ConverterParameter=55}"
              HorizontalAlignment="Left"
              rubyer:GridHelper.RowDefinitions="45, *, 50">
            <Grid.ColumnDefinitions>
                <ColumnDefinition Width="*" />
                <ColumnDefinition Width="2" />
            </Grid.ColumnDefinitions>
            <StackPanel Grid.Row="0"
                        Margin="5"
                        HorizontalAlignment="Left"
                        rubyer:PanelHelper.Spacing="5"
                        Orientation="Horizontal">
                <Button Width="110"
                        rubyer:ButtonHelper.IconType="PhoneLine"
                        Content="呼叫AGV" />
                <Button Width="110"
                        rubyer:ButtonHelper.IconType="FileShredLine"
                        BorderBrush="{StaticResource ButtonBorderForegroundBrush}"
                        Content="打印表单"
                        FontStyle="Normal"
                        Foreground="{StaticResource ButtonFontForegroundBrush}"
                        Style="{StaticResource OutlineButton}" />
                <Button Width="110"
                        rubyer:ButtonHelper.IconType="GitRepositoryCommitsLine"
                        BorderBrush="{StaticResource ButtonBorderForegroundBrush}"
                        Content="报工"
                        Foreground="{StaticResource ButtonFontForegroundBrush}"
                        Style="{StaticResource OutlineButton}" />
            </StackPanel>
            <DataGrid x:Name="DataGrid" Grid.Row="1"
                      HorizontalContentAlignment="Center"
                      rubyer:ControlHelper.CornerRadius="{DynamicResource AllContainerCornerRadius}"
                      rubyer:ControlHelper.FocusedBrush="{DynamicResource Primary}"
                      rubyer:ControlHelper.FocusedForegroundBrush="{DynamicResource WhiteForeground}"
                      rubyer:ControlHelper.MaskOpacity="1"
                      rubyer:DataGridHelper.ClickToEdit="False"
                      rubyer:DataGridHelper.Loading="{Binding IsLoading}"
                      rubyer:HeaderHelper.Background="{StaticResource DataGridTitleBrackgroudBrush}"
                      rubyer:HeaderHelper.FontFamily="宋体"
                      rubyer:HeaderHelper.FontSize="15"
                      rubyer:HeaderHelper.FontWeight="DemiBold"
                      rubyer:HeaderHelper.Foreground="{StaticResource DataGridTitleFontBrush}"
                      rubyer:HeaderHelper.HorizontalAlignment="Center"
                      AutoGenerateColumns="True"
                      CanUserAddRows="False"
                      GridLinesVisibility="Horizontal"
                      IsReadOnly="False"
                      ItemsSource="{Binding Datas}"
                      RowHeight="40">
                <DataGrid.Columns>
                    <rubyer:DataGridSelectCheckBoxColumn Width="85"
                                                         Binding="{Binding IsSelected}"
                                                         Header="全选" />
                </DataGrid.Columns>
            </DataGrid>
            <rubyer:PageBar Grid.Row="2"
                            Margin="0 10 20 0"
                            IsShowPageSize="True"
                            IsShowTotal="True"
                            ItemsDock="Left"
                            PageIndexChanged="PageBar_PageIndexChanged"
                            PageSizeChanged="PageBar_PageSizeChanged"
                            PageSizeCollection="10, 20, 30, 50"
                            Style="{StaticResource TextPageBar}"
                            Total="1000" />
        </Grid>

    </controls:ControlDisplay>
</UserControl>
用户控件代码

