
本文示例代码: https://download.csdn.net/download/hefeng_aspnet/90174856
本文将探讨使用 ASP.NET Core Web API 上传 Excel 文件并将其数据保存到数据库的分步过程。我们将利用NPOI库和 Entity Framework Core 来实现此功能。
安装所需的库
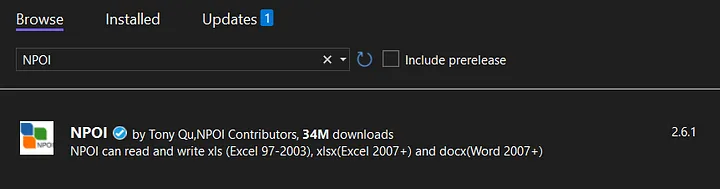
首先,我们必须从 NuGet 包管理器安装 NPOI 库:
接下来,我们还将安装 Entity Framework Core。我们将使用 Entity Framework Core Sqlite 来简化该过程。我们还可以使用其他提供程序,例如 SqlServer 或 PostgreSQL。
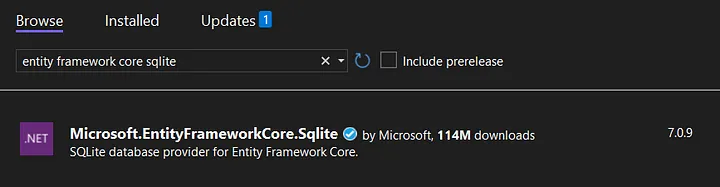
如果您使用的是 .NET 6.0,请确保选择 Entity Framework 的 6.xx (6.0.20) 版本。
创建实体模型
我们将使用实体模型来表示我们想要存储在数据库中的数据结构。
namespace UploadExcel.WebApi;
public class Product
{
public Guid Id { get; set; }
public string Name { get; set; }
public int Quantity { get; set; }
public decimal Price { get; set; }
public bool IsActive { get; set; }
public DateTime ExpiryDate { get; set; }
}
Product类具有最常用的数据类型的属性(string,int,decimal,bool,DateTime)。
创建数据上下文
另外,我们创建一个继承自 Entity Framework Core 的 DbContext 类的数据库上下文。此上下文将处理与数据库的通信。
using Microsoft.EntityFrameworkCore;
namespace UploadExcel.WebApi;
public class DataContext : DbContext
{
public DataContext(DbContextOptions<DataContext> opt) : base(opt)
{
}
public DbSet<Product> Products { get; set; }
}
创建请求模型
接下来,我们创建一个表示 Excel 文件数据结构的请求模型。此类共享 Product 类的所有属性,但 Id 属性除外,该属性将自动生成。
namespace UploadExcel.WebApi;
public class ProductRequest
{
public string Name { get; set; }
public int Quantity { get; set; }
public decimal Price { get; set; }
public bool IsActive { get; set; }
public DateTime ExpiryDate { get; set; }
}
ExcelHelper 类
ExcelHelper类是一个自定义类,它提供了一个辅助方法来从 Excel 文件读取数据并将其转换为对象列表。
using NPOI.SS.UserModel;
using NPOI.XSSF.UserModel;
namespace UploadExcel.WebApi;
public static class ExcelHelper
{
public static List<T> Import<T>(string filePath) where T : new()
{
XSSFWorkbook workbook;
using (var stream = new FileStream(filePath, FileMode.Open, FileAccess.Read))
{
workbook = new XSSFWorkbook(stream);
}
var sheet = workbook.GetSheetAt(0);
var rowHeader = sheet.GetRow(0);
var colIndexList = new Dictionary<string, int>();
foreach (var cell in rowHeader.Cells)
{
var colName = cell.StringCellValue;
colIndexList.Add(colName, cell.ColumnIndex);
}
var listResult = new List<T>();
var currentRow = 1;
while (currentRow <= sheet.LastRowNum)
{
var row = sheet.GetRow(currentRow);
if (row == null) break;
var obj = new T();
foreach (var property in typeof(T).GetProperties())
{
if (!colIndexList.ContainsKey(property.Name))
throw new Exception($"Column {property.Name} not found.");
var colIndex = colIndexListproperty.Name;
var cell = row.GetCell(colIndex);
if (cell == null)
{
property.SetValue(obj, null);
}
else if (property.PropertyType == typeof(string))
{
cell.SetCellType(CellType.String);
property.SetValue(obj, cell.StringCellValue);
}
else if (property.PropertyType == typeof(int))
{
cell.SetCellType(CellType.Numeric);
property.SetValue(obj, Convert.ToInt32(cell.NumericCellValue));
}
else if (property.PropertyType == typeof(decimal))
{
cell.SetCellType(CellType.Numeric);
property.SetValue(obj, Convert.ToDecimal(cell.NumericCellValue));
}
else if (property.PropertyType == typeof(DateTime))
{
property.SetValue(obj, cell.DateCellValue);
}
else if (property.PropertyType == typeof(bool))
{
cell.SetCellType(CellType.Boolean);
property.SetValue(obj, cell.BooleanCellValue);
}
else
{
property.SetValue(obj, Convert.ChangeType(cell.StringCellValue, property.PropertyType));
}
}
listResult.Add(obj);
currentRow++;
}
return listResult;
}
}
创建 ProductController
接下来,我们必须创建ProductController类。
ProductController类有两个注入参数,一个是DataContext实例,另一个是IWebHostEnvironment实例。DataContext负责与数据库通信,而IWebHostEnvironment保存与 Web 主机环境相关的信息。
ProductController类有一个操作方法Upload(),该方法接受包含产品请求数据的文件。该文件保存到uploads文件夹,然后使用该方法加载 Excel 表中的数据ExcelHelper.Import<ProductRequest>(filePath)。然后使用实体框架将数据保存到数据库。
using Microsoft.AspNetCore.Mvc;
namespace UploadExcel.WebApi.Controllers;
ApiController
Route("products")
public class ProductController : ControllerBase
{
private readonly DataContext _context;
private readonly IWebHostEnvironment _webHostEnvironment;
public ProductController(DataContext context, IWebHostEnvironment webHostEnvironment)
{
_context = context;
_webHostEnvironment = webHostEnvironment;
}
HttpPost("upload")
DisableRequestSizeLimit
public async Task<ActionResult> Upload(CancellationToken ct)
{
if (Request.Form.Files.Count == 0) return NoContent();
var file = Request.Form.Files0;
var filePath = SaveFile(file);
// load product requests from excel file
var productRequests = ExcelHelper.Import<ProductRequest>(filePath);
// save product requests to database
foreach (var productRequest in productRequests)
{
var product = new Product
{
Id = Guid.NewGuid(),
Name = productRequest.Name,
Quantity = productRequest.Quantity,
Price = productRequest.Price,
IsActive = productRequest.IsActive,
ExpiryDate = productRequest.ExpiryDate
};
await _context.AddAsync(product, ct);
}
await _context.SaveChangesAsync(ct);
return Ok();
}
// save the uploaded file into wwwroot/uploads folder
private string SaveFile(IFormFile file)
{
if (file.Length == 0)
{
throw new BadHttpRequestException("File is empty.");
}
var extension = Path.GetExtension(file.FileName);
var webRootPath = _webHostEnvironment.WebRootPath;
if (string.IsNullOrWhiteSpace(webRootPath))
{
webRootPath = Path.Combine(Directory.GetCurrentDirectory(), "wwwroot");
}
var folderPath = Path.Combine(webRootPath, "uploads");
if (!Directory.Exists(folderPath))
{
Directory.CreateDirectory(folderPath);
}
var fileName = $"{Guid.NewGuid()}.{extension}";
var filePath = Path.Combine(folderPath, fileName);
using var stream = new FileStream(filePath, FileMode.Create);
file.CopyTo(stream);
return filePath;
}
}
Program.cs
修改Program.cs以注册DataContext类并初始化数据库:
using Microsoft.EntityFrameworkCore;
using UploadExcel.WebApi;
var builder = WebApplication.CreateBuilder(args);
builder.Services.AddDbContext<DataContext>(opt => opt.UseSqlite("Data Source=data.db"));
builder.Services.AddControllers();
builder.Services.AddEndpointsApiExplorer();
builder.Services.AddSwaggerGen();
var app = builder.Build();
if (app.Environment.IsDevelopment())
{
app.UseSwagger();
app.UseSwaggerUI();
}
var context = app.Services.CreateScope().ServiceProvider.GetRequiredService<DataContext>();
context.Database.EnsureCreated();
app.UseHttpsRedirection();
app.MapControllers();
app.Run();
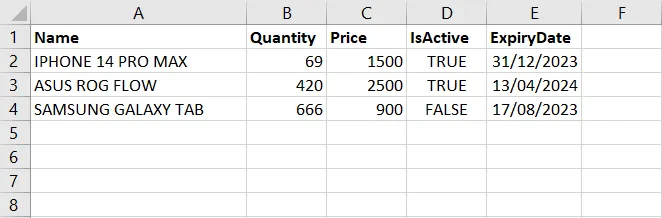
准备 Excel 文件
Excel 文件的第一行是我们要上传的产品数据的"列"。Excel 文件数据将如下所示:
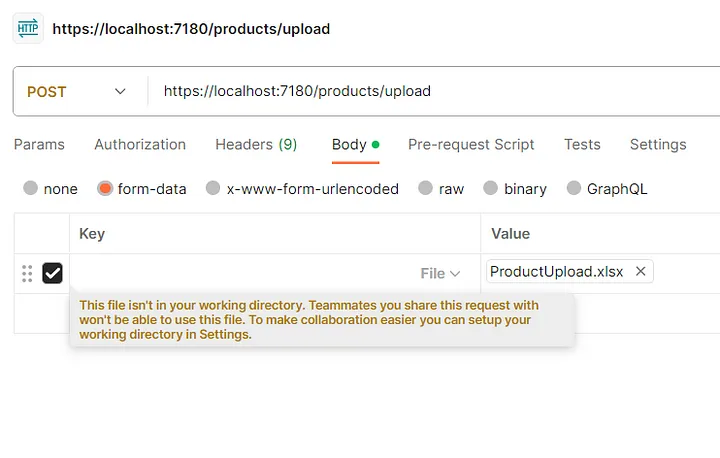
使用 Postman 进行测试
我们使用Postman进行测试。为此,请按照以下步骤操作:
1、将 HTTP 方法设置为POST
2、将 URL 设置为https://localhost:PORT/products/upload
3、将请求主体类型设置为form-data
4、将Key列设置为File
5、在值列上选择 Excel 文件
从 Web 应用程序中使用 Axios
以下是如何使用 Axios 库从 React JS Web 应用程序上传文件的示例代码:
const excelFile, setExcelFile = React.useState(null);
const requestHeaders = {
headers: {
'Content-Type': 'multipart/form-data'
}
};
const handleUpload = async () => {
const formData = new FormData();
formData.append('file', excelFile);
await axios.post('/products/upload', formData, requestHeaders);
};
return (
<input type="file" onChange={(e) => setExcelFile(e.target.files0)} />
<button onclick={handleUpload}>Upload</button>
);
本文示例代码: https://download.csdn.net/download/hefeng_aspnet/90174856
如果您喜欢此文章,请收藏、点赞、评论,谢谢,祝您快乐每一天。