前言
之前写过一篇文章说明文件空洞:《apue 文件中的空洞》,其中提到了 windows 稀疏文件是制造空洞的一种方式,但似乎没什么用处,如果仅仅处理占用磁盘空间的场景,使用SetEndOfFile 就足够了。
后来在实际工作中,发现稀疏文件在解决一个性能问题方面,有着不可替代的作用,下面且听我一一道来。
问题现象
公司的文件下载产品,为了预防在下载过程中因磁盘空间不足而失败,在 windows 上采取预分配的策略,在下载任务开始前就占据了相当于文件长度的磁盘空间。由于数据源也包括从 P2P 处获取的数据,导致写入时并不是顺序的,存乱序写入的情况,这些信息都存储在数据库中,当应用重启时,会从数据库加载块信息,继续对未落盘的块进行网络请求。
整个逻辑看起来没有问题,然而实测在距离当前写入位置较远的地方写入块时,会发现落盘速度极慢。
下面用一个简单的例子验证这一点,这个 demo 创建一个大文件,通常十几个 GB,具体长度由用户输入决定:
#include <iostream>
#include <Windows.h>

int main(int argc, char* argv[])
{
    if (argc < 3)
    {
        std::cout << "Usage: sparsefile file length (in GB)\n";
        return 1;
    }

    int ret = 0;
    HANDLE file_handle = INVALID_HANDLE_VALUE;
    LARGE_INTEGER pos = { 0 };

    do
    {
        file_handle = CreateFileA(argv[1], (GENERIC_READ | GENERIC_WRITE),
            FILE_SHARE_READ, 0, OPEN_ALWAYS, FILE_FLAG_OVERLAPPED, 0);
        if (file_handle == INVALID_HANDLE_VALUE)
        {
            std::cout << "CreateFile failed, error " << GetLastError() << std::endl;
            ret = 2;
            break;
        }

        pos.QuadPart = atoll(argv[2]) * 1024 * 1024 * 1024;  // unit in GB
        if (::SetFilePointerEx(file_handle, pos, NULL, FILE_BEGIN) == 0)
        {
            std::cout << "SetFilePointerEx failed, error " << GetLastError() << std::endl;
            ret = 3;
            break;
        }

        if (!::SetEndOfFile(file_handle))
        {
            std::cout << "SetEndOfFile failed, error " << GetLastError() << std::endl;
            ret = 4;
            break;
        }
    } while (0);

    if (ret == 0)
        std::cout << "create file with length " << pos.QuadPart << " success, path " << argv[1] << std::endl;

    if (file_handle)
        CloseHandle(file_handle);

    return ret;
}
执行以下命令创建文件:
PS D:\test\sparsefile\Release> .\sparsefile movie.mp4 10
SetEndOfFile failed, error 112
PS D:\test\sparsefile\Release> .\sparsefile movie.mp4 4
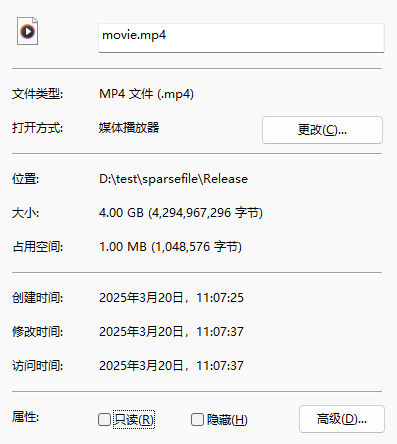
create file with length 4294967296 success, path movie.mp4分区 D: 目前仅有 5GB 空间,所以创建 10GB 的文件会失败,错误码 112 即磁盘空间不足;创建 4GB 的可以成功:
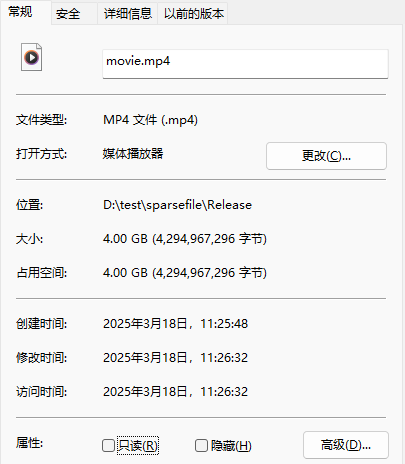
文件属性中,文件大小与占用空间是一致的,没有空洞。
在完成预分配后,立即在尾部写入 1 个字符,以模拟真实的使用场景:
...
        pos.QuadPart--;
        if (::SetFilePointerEx(file_handle, pos, NULL, FILE_BEGIN) == 0)
        {
            std::cout << "SetFilePointerEx failed, error " << GetLastError() << std::endl;
            ret = 30;
            break;
        }

        DWORD bytes = 0;
        c_timer t;
        if (!::WriteFile(file_handle, " ", 1, &bytes, NULL) || bytes != 1)
        {
            std::cout << "WriteFile failed, error " << GetLastError() << ", written " << bytes << std::endl;
            ret = 31;
            break;
        }

        int elapse = t.get_interval();
        std::cout << "write file elapse " << elapse << " ms" << std::endl;
...
注意需要前移文件指针,并在写入前后记录耗时,c_timer 封装了 windows 高精度计时器,可以精确到毫秒。下面是程序输出:
PS D:\test\sparsefile\Release> .\sparsefile movie.mp4 4
write file elapse 19502 ms
create file with length 4294967295 success, path movie.mp4
写入 4G 文件末尾 1 个字节,消耗了将近 20s,这还是 SSD,如果换作机械硬盘,耗时会更久。这就是 SetEndOfFile 占据磁盘空间产生的性能问题。
问题分析
网上搜索了一番,大概明白这个 20s 耗时是怎么回事了,简单说明一下:当使用 SetEndOfFile 预分配磁盘空间时,文件系统会将原始块分配给文件,这些块可能包含用户之前删除的文件数据,如果不写入新内容就读取,可能会读到用户隐私!黑客完全可以利用这个漏洞盗取用户数据,从而导致严重的安全问题。
为此,windows 在应用写入原始块时,会用零填充文件指针到上次写入位置之间的区域 (没有上次写入位置就从文件头开始),保证这些内容被清空,从而避免原始信息泄漏。上例中的耗时大部分时间用于填充整个 4GB 文件了,速度当然快不起来。
解决方案
目前有两种解决方案,下面分别说明
提权 + SetFileValidData
这种就是官方提出的解决方案,其实是给 service 打的补丁,MSDN 上写的很详细了:
You can use the SetFileValidData function to create large files in very specific circumstances so that the performance of subsequent file I/O can be better than other methods. Specifically, if the extended portion of the file is large and will be written to randomly, such as in a database type of application, the time it takes to extend and write to the file will be faster than using SetEndOfFile and writing randomly. In most other situations, there is usually no performance gain to using SetFileValidData, and sometimes there can be a performance penalty.
需要注意的是,这个函数需要用户拥有 SeManageVolumePrivilege 权限。以管理员身份运行时,默认是没有这个权限的:
D:\test\sparsefile\Release>whoami /priv

特权信息
----------------------

特权名                                    描述                               状态
========================================= ================================== ======
SeIncreaseQuotaPrivilege                  为进程调整内存配额                 已禁用
SeMachineAccountPrivilege                 将工作站添加到域                   已禁用
SeSecurityPrivilege                       管理审核和安全日志                 已禁用
SeTakeOwnershipPrivilege                  取得文件或其他对象的所有权         已禁用
SeLoadDriverPrivilege                     加载和卸载设备驱动程序             已禁用
SeSystemProfilePrivilege                  配置文件系统性能                   已禁用
SeSystemtimePrivilege                     更改系统时间                       已禁用
SeProfileSingleProcessPrivilege           配置文件单一进程                   已禁用
SeIncreaseBasePriorityPrivilege           提高计划优先级                     已禁用
SeCreatePagefilePrivilege                 创建一个页面文件                   已禁用
SeBackupPrivilege                         备份文件和目录                     已禁用
SeRestorePrivilege                        还原文件和目录                     已禁用
SeShutdownPrivilege                       关闭系统                           已禁用
SeDebugPrivilege                          调试程序                           已禁用
SeSystemEnvironmentPrivilege              修改固件环境值                     已禁用
SeChangeNotifyPrivilege                   绕过遍历检查                       已启用
SeRemoteShutdownPrivilege                 从远程系统强制关机                 已禁用
SeUndockPrivilege                         从扩展坞上取下计算机               已禁用
SeManageVolumePrivilege                   执行卷维护任务                     已禁用
SeImpersonatePrivilege                    身份验证后模拟客户端               已启用
SeCreateGlobalPrivilege                   创建全局对象                       已启用
SeIncreaseWorkingSetPrivilege             增加进程工作集                     已禁用
SeTimeZonePrivilege                       更改时区                           已禁用
SeCreateSymbolicLinkPrivilege             创建符号链接                       已禁用
SeDelegateSessionUserImpersonatePrivilege 获取同一会话中另一个用户的模拟令牌 已禁用
为此需要给进程提权:
...
        if (!EnablePrivilege(SE_MANAGE_VOLUME_NAME, TRUE))
        {
            std::cout << "EnablePrivilege failed, error " << GetLastError() << std::endl;
            ret = 10;
            break;
        }
...
EnablePrivilege 封装了 OpenProcessToken、LookupPrivilegeValue、AdjustTokenPrivileges 几个调用,文章末尾有完整的代码实现,提权代码需要放在CreateFile之前。接着设置文件有效数据长度:
...
        if (!::SetFileValidData(file_handle, pos.QuadPart))
        {
            std::cout << "SetFileValidData failed, error " << GetLastError() << std::endl;
            ret = 10;
            break;

        }
...
这段代码需要插入到 SetEndOfFile 与 WriteFile 之间。以管理员身份启动控制台后有如下输出:
D:\test\sparsefile\Release>.\sparsefile movie.mp4 4
write file elapse 0 ms
create file with length 4294967295 success, path movie.mp4
尾部写入数据的耗时大大降低了。如果不以管理员身份启动,会报下面的错误:
PS D:\test\sparsefile\Release> .\sparsefile movie.mp4 4
EnablePrivilege failed, error 1300
提权失败。如果未提权或 EnablePrivilege位于 CreateFile 之后,则报下面的错误:
D:\test\sparsefile\Release>.\sparsefile movie.mp4 4
SetFileValidData failed, error 1314
权限不足。
稀疏文件
如果无法获取管理员身份进行提权,则需要借助 NTFS 稀疏文件,在 WriteFile 之前加入下面的代码即可:
...
        DWORD temp = 0;
        if (!::DeviceIoControl(file_handle, FSCTL_SET_SPARSE, NULL, 0, NULL, 0, &temp, NULL))
        {
            std::cout << "DeviceIoControl failed, error " << GetLastError() << std::endl;
            ret = 12;
            break;
        }
...
以普通用户身份运行:
PS D:\test\sparsefile\Release> .\sparsefile movie.mp4 4
write file elapse 0 ms
create file with length 4294967295 success, path movie.mp4
耗时也大大降低了。稀疏文件依赖于文件系统的支持,可查询某个 Volume 是否支持稀疏文件:
    CHAR szVolName[MAX_PATH], szFsName[MAX_PATH];
    DWORD dwSN, dwFSFlag, dwMaxLen, nWritten;
    BOOL bSuccess;
    HANDLE hFile;
    bSuccess = GetVolumeInformation(NULL,
        szVolName,
        MAX_PATH,
        &dwSN,
        &dwMaxLen,
        &dwFSFlag,
        szFsName,
        MAX_PATH);

    if (!bSuccess)
    {
        printf("errno:%d", GetLastError());
        return -1;
    }

    printf("vol name:%s \t fs name:%s sn: %d.\n", szVolName, szFsName, dwSN);
    if (dwFSFlag & FILE_SUPPORTS_SPARSE_FILES)
        printf("support sparse file.\n");
    else
        printf("no support sparse file.\n");
或查询某个文件是否为稀疏文件:
// HANDLE hFile;
BY_HANDLE_FILE_INFORMATION stFileInfo;
GetFileInformationByHandle(hFile, &stFileInfo);
if(stFileInfo.dwFileAttributes & FILE_ATTRIBUTE_SPARSE_FILE)
    printf("is sparse file.\n");
else
    printf("no sparse file.\n");
也可以通过 fsutil 命令快速确认:
PS D:\test\sparsefile\Release> fsutil.exe sparse
---- 支持 SPARSE 命令 ----

queryflag       查询稀疏
queryrange      查询范围
setflag         设置稀疏
setrange        设置稀疏范围
PS D:\test\sparsefile\Release> fsutil.exe sparse queryflag .\movie.mp4
该文件被设为稀疏
PS D:\test\sparsefile\Release> fsutil.exe sparse queryrange .\movie.mp4
分配的范围[1]: 偏移: 0xffff0000  长度: 0x10000
fsutil 的 sparse 子命令查询文件是否稀疏 (queryflag)、以及有效数据的范围 (queryrange)。
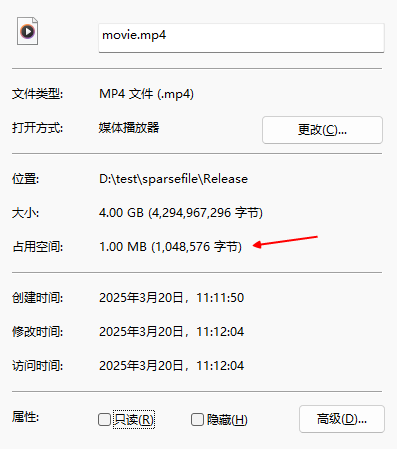
这里 queryrange 返回的长度 0x10000 对应的空间占用是 64KB,查看文件属性:
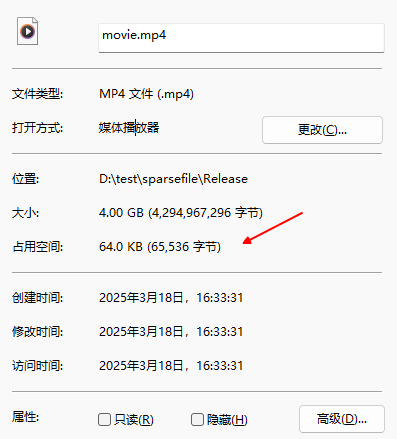
也是 64KB。看起来即使写入 1 个字节,windows 也会分配一个 64K 的块并将其标记为修改。
带来的新问题
两种方案相比较,稀疏文件方式无需获取管理员权限,看起来似乎更"亲民"一些,不过也有它自己的问题:无法真正占据磁盘空间。考察上例中 4GB 文件的属性,占用空间仅 64KB,此时再生成一个 4GB 的文件,仍能成功。然而在实际写入过程中,注定有一个文件因磁盘空间不足而失败,甚至两个都失败。修改 demo 以演示这个场景:
...
        long long file_size = pos.QuadPart;
        pos.QuadPart = 0;
        if (::SetFilePointerEx(file_handle, pos, NULL, FILE_BEGIN) == 0)
        {
            std::cout << "SetFilePointerEx failed, error " << GetLastError() << std::endl;
            ret = 20;
            break;
        }

        char buf[4096] = { 1 };
        c_timer t;
        DWORD bytes = 0;
        for (int i = 0; i < file_size; i += 4096)
        {
            if (!::WriteFile(file_handle, buf, 4096, &bytes, NULL) || bytes != 4096)
            {
                std::cout << "WriteFile failed, error " << GetLastError() << ", written " << bytes << std::endl;
                ret = 21;
                break;
            }
        }

        int elapse = t.get_interval();
        std::cout << "write file elapse " << elapse << " ms" << std::endl;
...
写入整个文件,每次 4KB,执行此程序的同时,通过 dd 开启另外一个 4GB 文件的写入:
$ dd if=/dev/zero of=./movie1.mp4 bs=1M count=1024
dd: error writing './movie1.mp4': No space left on device
335+0 records in
334+0 records out
350224384 bytes (350 MB, 334 MiB) copied, 2.08525 s, 168 MB/s
因磁盘剩余空间不足 8GB,最终 dd & demo 都会报错退出:
PS D:\test\sparsefile\Release>.\sparsefile movie.mp4 4
WriteFile failed, error 112, written 0
write file elapse 16420 ms
这表明稀疏文件即使占据了空间,也会受磁盘实际剩余空间的影响,真是占了个寂寞!
换句话,稀疏文件使 SetEndOfFile 的磁盘空间占用能力"消失"了,不过后者的剩余空间检查能力还在。当剩余空间不足 4GB 时,demo 会直接在 SetEndOfFile 处失败:
PS D:\test\sparsefile\Release> .\sparsefile movie.mp4 4
SetEndOfFile failed, error 112
所以上例不能采用 dd 预先写入 4GB 的方式进行测试,两个程序必需一先一后启动。
行文至此,正好验证一个说法:windows 稀疏文件会对零进行压缩,从而节省空间占用。如果这种说法为真,当写入的数据也是零,稀疏文件占用的空间也会大大小于文件大小,实际情况会怎样?修改一行代码进行验证:
...
        char buf[4096] = { 0 };
...
将缓存区默认值从 1 改为 0,此时写入的数据全为零:
PS D:\test\sparsefile\Release> .\sparsefile movie.mp4 4
write file elapse 11690 ms
create file with length 0 success, path movie.mp4
PS D:\test\sparsefile\Release> fsutil.exe sparse queryrange .\movie.mp4
分配的范围[1]: 偏移: 0x0         长度: 0x100000000
看起来没有任何空洞,查看文件属性:
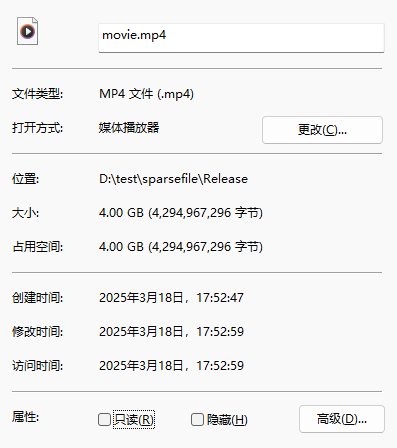
确实如此。这个实验说明:稀疏文件并不是对零进行压缩,而是标记了哪些块有写入,从而记录有有效数据区间,和 linux ext4 稀疏文件的实现应该是异曲同工的。
方案对比
总结一下目前的两个方案的缺点
- SetFileValidData:需要提权
- 稀疏文件:无法占据磁盘空间
看起来都挺致命的,难道就没有十全十美的方案了吗?在一次偶然的测试中,发现稀疏文件也能占据空间,只要关闭稀疏文件尾部 1 字节的写入:
PS D:\test\sparsefile\Release> .\sparsefile movie.mp4 4
create file with length 4294967295 success, path movie.mp4
PS D:\test\sparsefile\Release> fsutil.exe sparse queryrange .\movie.mp4
分配的范围[1]: 偏移: 0x0         长度: 0x100000000
看起来没有文件空洞,查看文件属性:
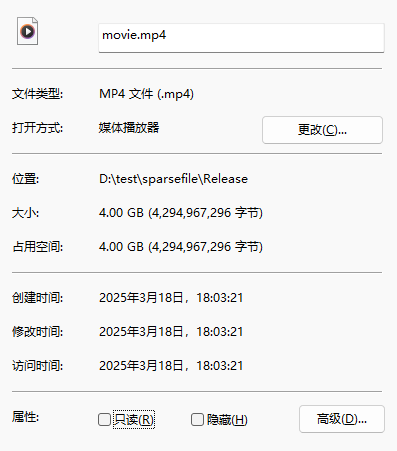
这样看起来能占据磁盘空间了?使用 dd 灌一些数据:
$ dd if=/dev/zero of=./movie.mp4 bs=1M count=1 seek=4095
1+0 records in
1+0 records out
1048576 bytes (1.0 MB, 1.0 MiB) copied, 0.0284056 s, 36.9 MB/s
在 4095M 位置写入 1M,结果露馅了:
看来还是占不了空间,之前显示空间占用 4G 是虚的靠不住的。
新的探索
看了下开源的种子下载神器 Transmission,当它采用 prealloc 模式时,在 windows 上底层使用的就是稀疏文件方式:
bool tr_sys_file_preallocate(tr_sys_file_t handle, uint64_t size, int flags, tr_error** error)
{
    TR_ASSERT(handle != TR_BAD_SYS_FILE);

    if ((flags & TR_SYS_FILE_PREALLOC_SPARSE) != 0)
    {
        DWORD tmp;

        if (!DeviceIoControl(handle, FSCTL_SET_SPARSE, nullptr, 0, nullptr, 0, &tmp, nullptr))
        {
            set_system_error(error, GetLastError());
            return false;
        }
    }

    return tr_sys_file_truncate(handle, size, error);
}
不过在占用空间方面,它使用的是 SetFileInformationByHandle:
bool tr_sys_file_truncate(tr_sys_file_t handle, uint64_t size, tr_error** error)
{
    TR_ASSERT(handle != TR_BAD_SYS_FILE);

    FILE_END_OF_FILE_INFO info;
    info.EndOfFile.QuadPart = size;

    bool ret = SetFileInformationByHandle(handle, FileEndOfFileInfo, &info, sizeof(info));

    if (!ret)
    {
        set_system_error(error, GetLastError());
    }

    return ret;
}
这个和 SetEndOfFile 有何区别,修改代码进行验证:
...
            FILE_END_OF_FILE_INFO info;
            info.EndOfFile.QuadPart = atoll(argv[2]) * 1024 * 1024 * 1024;  // unit in GB
            if (!SetFileInformationByHandle(file_handle, FileEndOfFileInfo, &info, sizeof(info)))
            {
                std::cout << "SetFileInformationByHandle failed, error " << GetLastError() << std::endl;
                ret = 5;
                break;
            }

            DWORD temp = 0;
            if (!::DeviceIoControl(file_handle, FSCTL_SET_SPARSE, NULL, 0, NULL, 0, &temp, NULL))
            {
                std::cout << "DeviceIoControl failed, error " << GetLastError() << std::endl;
                ret = 6;
                break;
            }
...
这段代码替换整个 SetEndOfFile 及之后的代码。再次运行 demo:
PS D:\test\sparsefile\Release> .\sparsefile movie.mp4 4
create file with length 4294967296 success, path movie.mp4
PS D:\test\sparsefile\Release> fsutil.exe sparse queryflag .\movie.mp4
该文件被设为稀疏
PS D:\test\sparsefile\Release> fsutil.exe sparse queryrange .\movie.mp4
分配的范围[1]: 偏移: 0x0         长度: 0x100000000
看起来没空洞了,但用 dd 测下尾部写入 1MB 后,结果就和之前一样了:
看起来没什么改善。
结语
本文尝试说明 SetEndOfFile 占用空间存在的一个性能问题,并讲解了两种解决方案,分别是SetFileValidData 和稀疏文件,以及它们的局限性;随后尝试破解稀疏文件局限性但失败了;最后验证了 Transmission 开源库基于SetFileInformationByHandle的方案也不可行。
附录中罗列了一些如何高效的拷贝稀疏文件的方法,关键在于遍历稀疏文件中的有效数据区间,感兴趣的读者可以参考附录 8。
代码
本期测试代码上传到了 github:https://github.com/goodpaperman/sparsefile
各种接口的调用尽量做成了选项,方便组合进行测试,参数不足时会展示 Usage:
PS D:\test\sparsefile\Release> .\sparsefile.exe movie.mp4
Usage: sparsefile file length(in GB) [set-file-end-of-file-info] [set-file-valid-data] [sparse-file] [write-file-mode 0|1|2] [fill-char]
文件路径和大小是必选项,5 个可选项分别控制:
set-file-end-of-file-info:使用SetFileInformationByHandle方式,默认为 0 使用SetEndOfFile方式set-file-valid-data:使用SetFileValidData方式,此时需要以管理员身份启动控制台,默认为 0sparse-file:使用稀疏文件,默认为 1write-file-mode:写文件模式,默认为 0- 0:不写
- 1:写文件末尾 1 字节
- 2:间隔 1M 写 4KB 数据
fill-char:写文件时填充的字符,默认为空 ('')
通过设置参数,可以验证本文的各种方案:
.\sparsefile movie.mp4 4,SetEndOfFile+ 稀疏文件 的方式.\sparsefile movie.mp4 4 0 0 1 1 ' ',在末尾写入数据耗时小,且空间占用失败.\sparsefile movie.mp4 4 0 0 1 1,末尾写入零时对空间占用无影响.\sparsefile movie.mp4 4 0 0 1 2
,写入全零块时文件占用空间并未压缩
.\sparsefile movie.mp4 4 0 0 0
,仅SetEndOfFile的方式.\sparsefile movie.mp4 4 0 0 0 1 ' '
,在末尾写入数据耗时大.\sparsefile movie.mp4 4 0 0 0 1
,在末尾写入零耗时小
.\sparsefile movie.mp4 4 1,SetFileInformationByHandle+ 稀疏文件 的方式.\sparsefile movie.mp4 4 1 0 1 1 ' ',在末尾写入数据耗时小,且空间占用失败
.\sparsefile movie.mp4 4 1 0 0,仅SetFileInformationByHandle的方式.\sparsefile movie.mp4 4 1 0 0 1 ' ',在末尾写入数据耗时大
.\sparsefile movie.mp4 4 0 1 0,SetEndOfFile+SetFileValidData+ 提权 的方式.\sparsefile movie.mp4 4 0 1 0 1 ' ',在末尾写入数据耗时小,且空间占用成功
可执行文件已经编译为了静态链接并上传到 git,理论上不需要装 VS 也能运行,配置是 Release x86 & x64 两个平台,方便没有编译环境的同学直接上手。
参考
2. 建希文件
6. Windows 下的文件预分配与 SetFileValidData 函数
8. 稀疏文件简介