转载请注明出处,未经同意,不可修改文章内容。🔥🔥🔥"前端一万小时"两大明星专栏------"从零基础到轻松就业"、"前端面试刷题",已于本月大改版,合二为一,干货满满,欢迎点击公众号菜单栏各模块了解。
1 需求
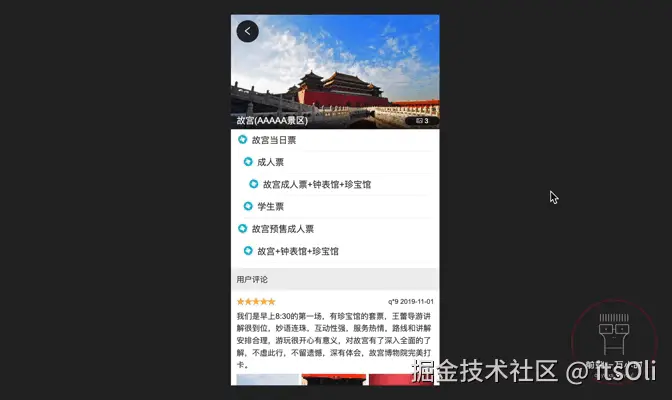
当点击详情页的海报图时,可查看景点介绍的图片:
- 左右滑动可查看每张图片;
- 图片下方有分页指示器;
- 再次点击可见区域时,退出查看图片状态,返回到详情页。
2 公用图片画廊组件
2.1 公用图片画廊组件布局
🔗前置知识:
《深入理解 Vue 组件------② 父子组件间的数据传递》
需求分析:当点击海报时,进入一个查看图片的区域。它的样式非常简单,图片垂直居中;左右滑动查看图片的功能,依然可以借助 vue-awesome-swiper 来实现。并且,在项目中,还有别的地方可能也会用到这样的功能。所以,我们可以将这个功能单独拆分出来,作为一个独立的公用组件(即,公用图片画廊组件),所有需要这个功能的组件直接调用它即可。
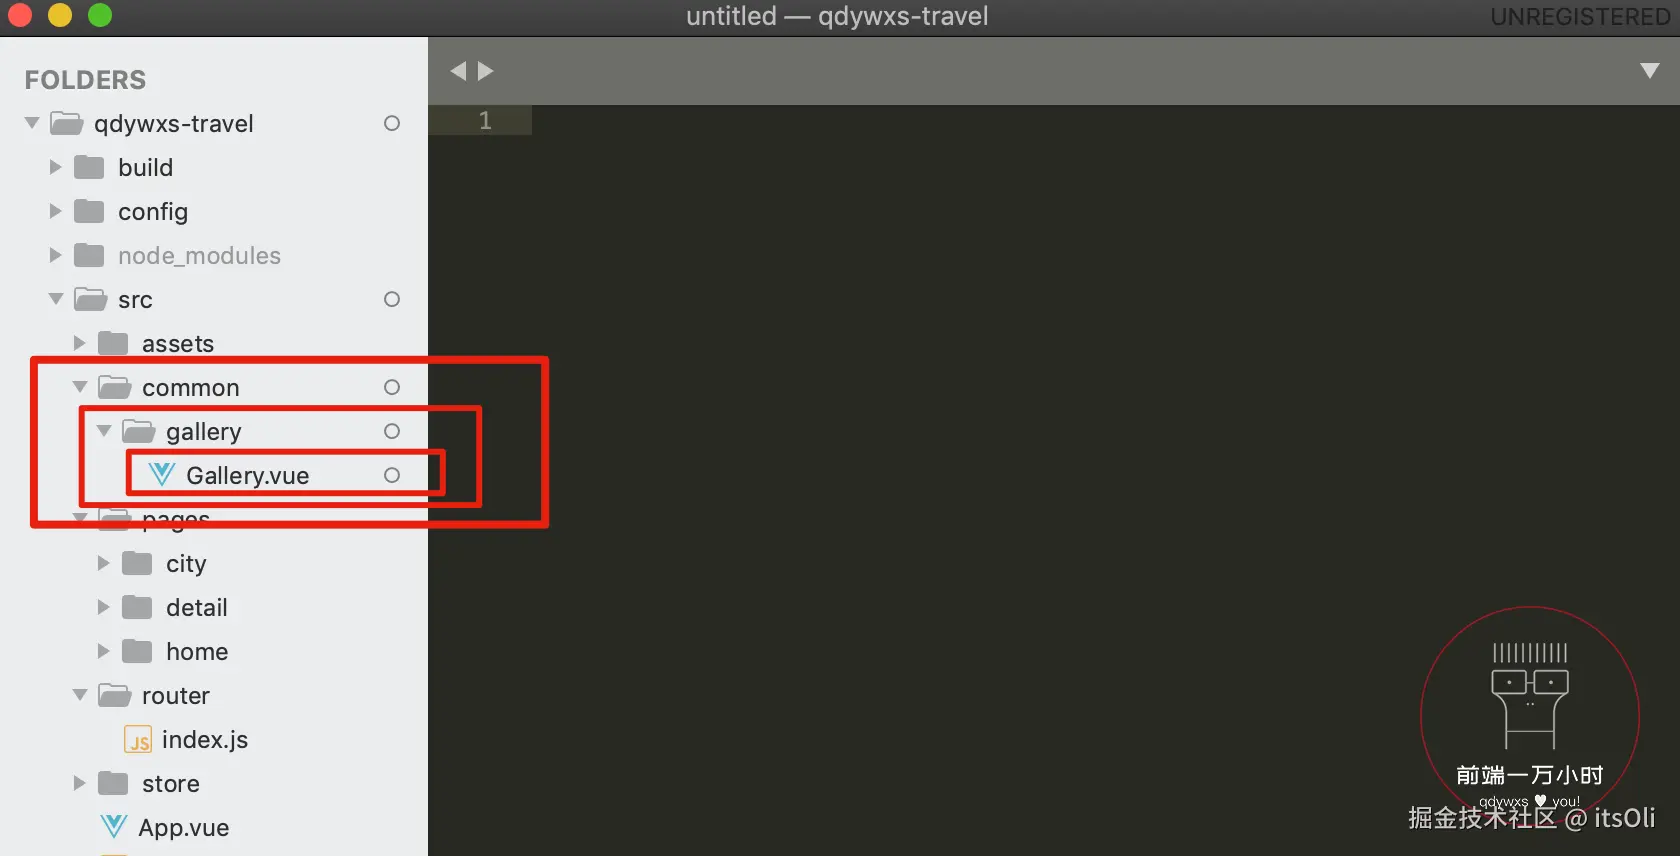
1️⃣在 src 下新建一个 common 文件夹,用来放置所有公用组件:

1️⃣-①:在 common 中新建一个 gallery 文件夹(后续若 Gallery 组件变得复杂、庞大时,方便继续在 gallery 文件夹中进行拆分);
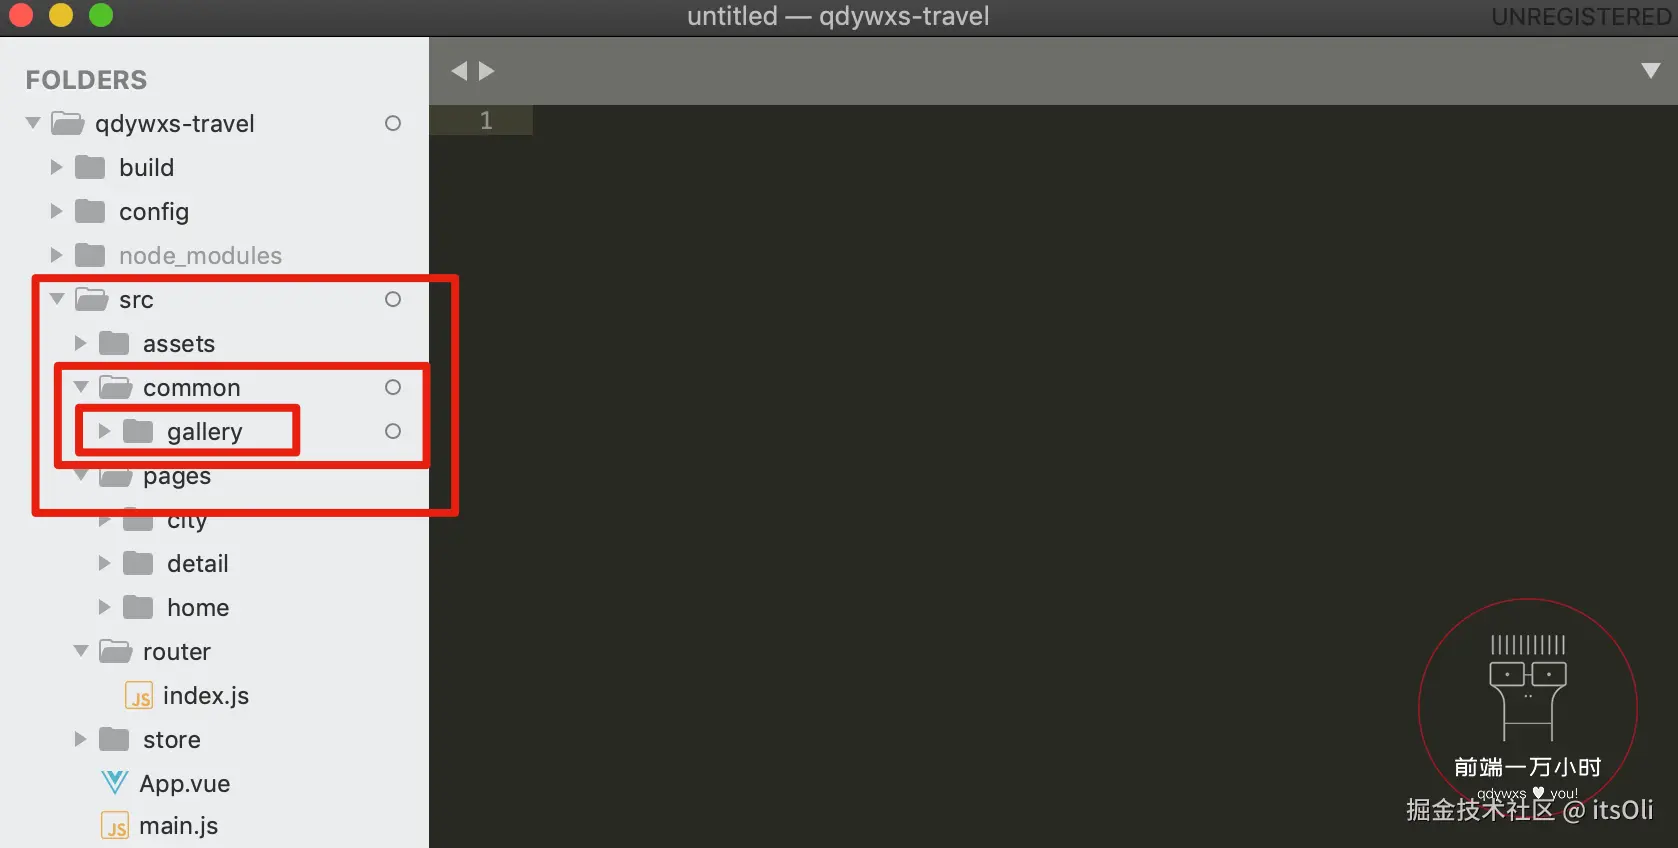
1️⃣-②:在 gallery 文件夹中新建公用图片画廊组件 Gallery.vue ;
html
<template>
  <div>This is Gallery.</div> <!-- 1️⃣-④:添加一点内容; -->
</template>

<script>
export default {
  name: 'CommonGallery' // 1️⃣-③:公用图片画廊组件命名为 CommonGallery;
}
</script>

<style lang="stylus" scoped>
</style>
1️⃣-⑤:由于我们可能会在任意组件中使用公用组件,所以打开 webpack.base.conf.js 给 common 文件夹路径添加一个别名;
javascript
'use strict'
const path = require('path')
const utils = require('./utils')
const config = require('../config')
const vueLoaderConfig = require('./vue-loader.conf')

function resolve (dir) {
  return path.join(__dirname, '..', dir)
}

const createLintingRule = () => ({
  test: /\.(js|vue)$/,
  loader: 'eslint-loader',
  enforce: 'pre',
  include: [resolve('src'), resolve('test')],
  options: {
    formatter: require('eslint-friendly-formatter'),
    emitWarning: !config.dev.showEslintErrorsInOverlay
  }
})

module.exports = {
  context: path.resolve(__dirname, '../'),
  entry: {
    app: './src/main.js'
  },
  output: {
    path: config.build.assetsRoot,
    filename: '[name].js',
    publicPath: process.env.NODE_ENV === 'production'
      ? config.build.assetsPublicPath
      : config.dev.assetsPublicPath
  },
  resolve: {
    extensions: ['.js', '.vue', '.json'],
    alias: {
      'vue$': 'vue/dist/vue.esm.js',
      '@': resolve('src'),
      'styles': resolve('src/assets/styles'),

      'common': resolve('src/common') // ❗️给 common 文件夹的路径添加别名。
    }
  },
  module: {
    rules: [
      ...(config.dev.useEslint ? [createLintingRule()] : []),
      {
        test: /\.vue$/,
        loader: 'vue-loader',
        options: vueLoaderConfig
      },
      {
        test: /\.js$/,
        loader: 'babel-loader',
        include: [resolve('src'), resolve('test'), resolve('node_modules/webpack-dev-server/client')]
      },
      {
        test: /\.(png|jpe?g|gif|svg)(\?.*)?$/,
        loader: 'url-loader',
        options: {
          limit: 10000,
          name: utils.assetsPath('img/[name].[hash:7].[ext]')
        }
      },
      {
        test: /\.(mp4|webm|ogg|mp3|wav|flac|aac)(\?.*)?$/,
        loader: 'url-loader',
        options: {
          limit: 10000,
          name: utils.assetsPath('media/[name].[hash:7].[ext]')
        }
      },
      {
        test: /\.(woff2?|eot|ttf|otf)(\?.*)?$/,
        loader: 'url-loader',
        options: {
          limit: 10000,
          name: utils.assetsPath('fonts/[name].[hash:7].[ext]')
        }
      }
    ]
  },
  node: {
    // prevent webpack from injecting useless setImmediate polyfill because Vue
    // source contains it (although only uses it if it's native).
    setImmediate: false,
    // prevent webpack from injecting mocks to Node native modules
    // that does not make sense for the client
    dgram: 'empty',
    fs: 'empty',
    net: 'empty',
    tls: 'empty',
    child_process: 'empty'
  }
}
(❗️注意:修改了 Webpack 配置项后,需要在终端重启服务器,让 Webpack 修改生效。)
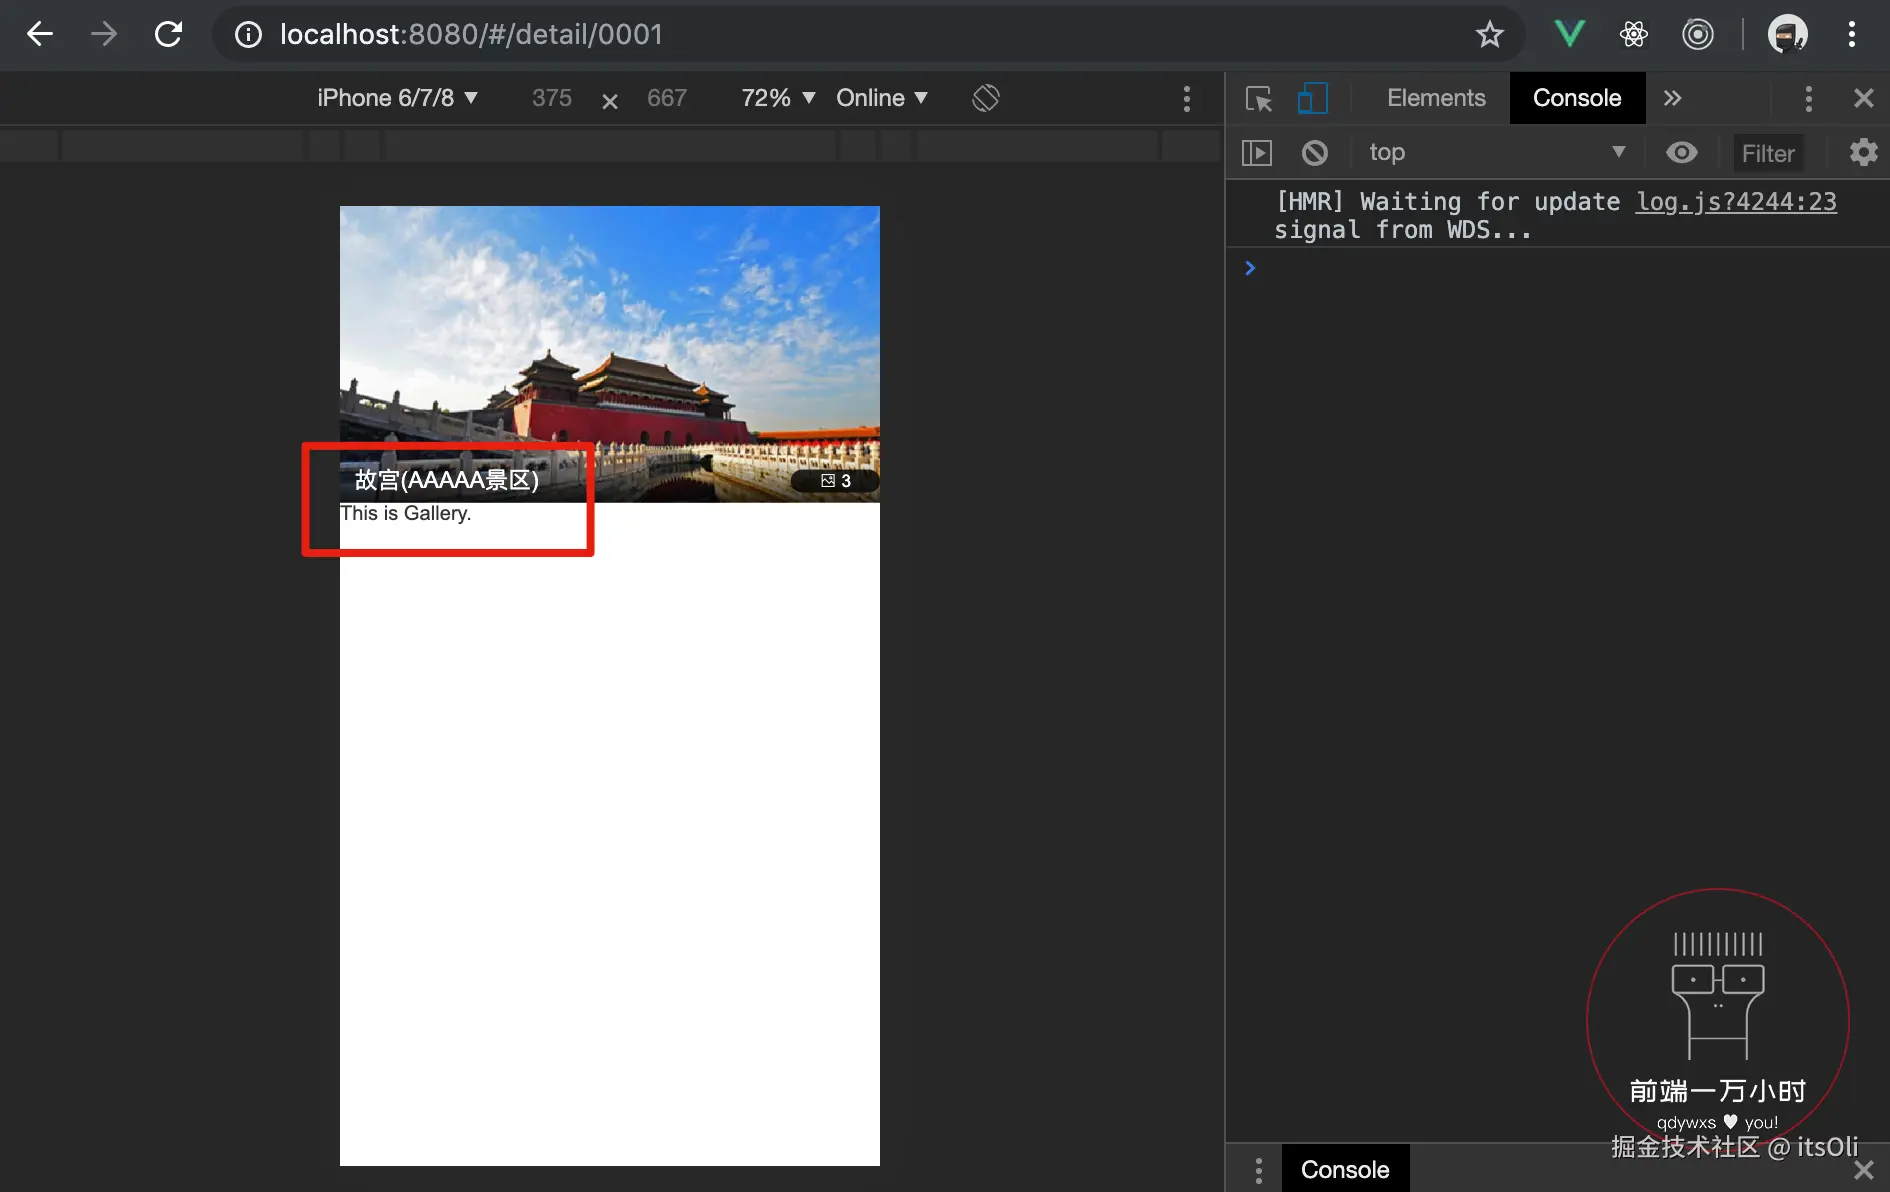
1️⃣-⑥:打开 detail 下 components 中的 Banner.vue ,在 Banner 组件使用公用画廊组件;
html
<template>
<div> <!-- 1️⃣-⑩:用 div 标签包裹 .banner 和 Gallery 组件。 -->
<div class="banner">
<img class="banner-img" src="https://qdywxs.github.io/travel-images/detail-banner-img.jpg">
<div class="banner-info">
<div class="banner-title">故宫(AAAAA景区)</div>
<div class="banner-number">
<span class="iconfont banner-icon"></span>
3
</div>
</div>
</div>
<common-gallery></common-gallery> <!-- 1️⃣-⑨:在 .banner 下方使用 Gallery 组件; -->
</div>
</template>
<script>
// 1️⃣-⑦:从 common 目录下的 gallery 引入 Gallery.vue;
import CommonGallery from 'common/gallery/Gallery'
export default {
name: 'DetailBanner',
components: { // 1️⃣-⑧:注册公用画廊组件;
CommonGallery
}
}
</script>
<style lang="stylus" scoped>
.banner
position: relative
overflow: hidden
height: 0
padding-bottom: 55%
.banner-img
width: 100%
.banner-info
position: absolute
left: 0
right: 0
bottom: 0
display: flex
line-height: .6rem
color: #fff
background-image: linear-gradient(top, rgba(0, 0, 0, 0), rgba(0, 0, 0, .8))
.banner-title
flex: 1
padding: 0 .2rem
font-size: .32rem
.banner-number
height: .32rem
padding: 0 .4rem
margin-top: .14rem
font-size: .24rem
color: #fff
line-height: .32rem
border-radius: .2rem
background: rgba(0, 0, 0, .8)
.banner-icon
font-size: .24rem
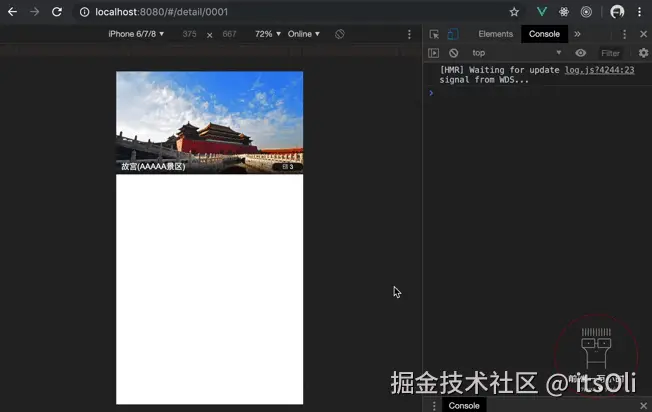
</style>保存后,返回页面查看,页面上正确显示内容,控制台无报错:
2️⃣返回 Gallery.vue 继续编写代码:
html
<template>
<div class="container"> <!-- 2️⃣-①:最外层 div 添加 class 类名为 container,作为内容的
容器; -->
<div class="wrapper"> <!-- 2️⃣-②:.container 中有一个 .wrapper,用来撑开图片内容区; -->
<!-- 2️⃣-⑦:复制 home 下 components 中 Swiper.vue 的轮播区域代码,添加轮播区域
(去掉不需要的 v-if 部分代码); -->
<swiper :options="swiperOption">
<swiper-slide> <!-- 2️⃣-⑧:swiper 中添加两个 swiper-slide 标签(去掉 v-for 循环
部分的代码),里边各有一个 img 标签类名 gallery-img,内容是景点图片; -->
<img class="gallery-img" src="https://qdywxs.github.io/travel-images/detail-gallary-img01.jpg">
</swiper-slide>
<swiper-slide>
<img class="gallery-img" src="https://qdywxs.github.io/travel-images/detail-gallary-img02.jpg">
</swiper-slide>
<div class="swiper-pagination" slot="pagination"></div>
</swiper>
</div>
</div>
</template>
<script>
export default {
name: 'CommonGallery',
data () {
return {
swiperOption: { // 2️⃣-⑨:swiperOption 中传入参数 pagination 给轮播添加分页指示器;
pagination: '.swiper-pagination'
}
}
}
}
</script>
<style lang="stylus" scoped>
.container /*
2️⃣-③:.container 为固定定位,top、right、left、bottom 为 0,撑满整个区域,
设置背景色为黑色;
*/
position: fixed
top: 0
right: 0
left: 0
bottom: 0
background: #000
z-index: 99 /* 2️⃣-④:z-index 设为 99,让 Gallery 显示在最上层; */
display: flex /* 2️⃣-⑤:.container 设为 flex 布局,容器内元素垂直居中; */
flex-direction: column
justify-content: center
.wrapper /* 2️⃣-⑥:.wrapper 宽设为 100%,高为宽的 75%; */
overflow: hidden
height: 0
width: 100%
padding-bottom: 75%
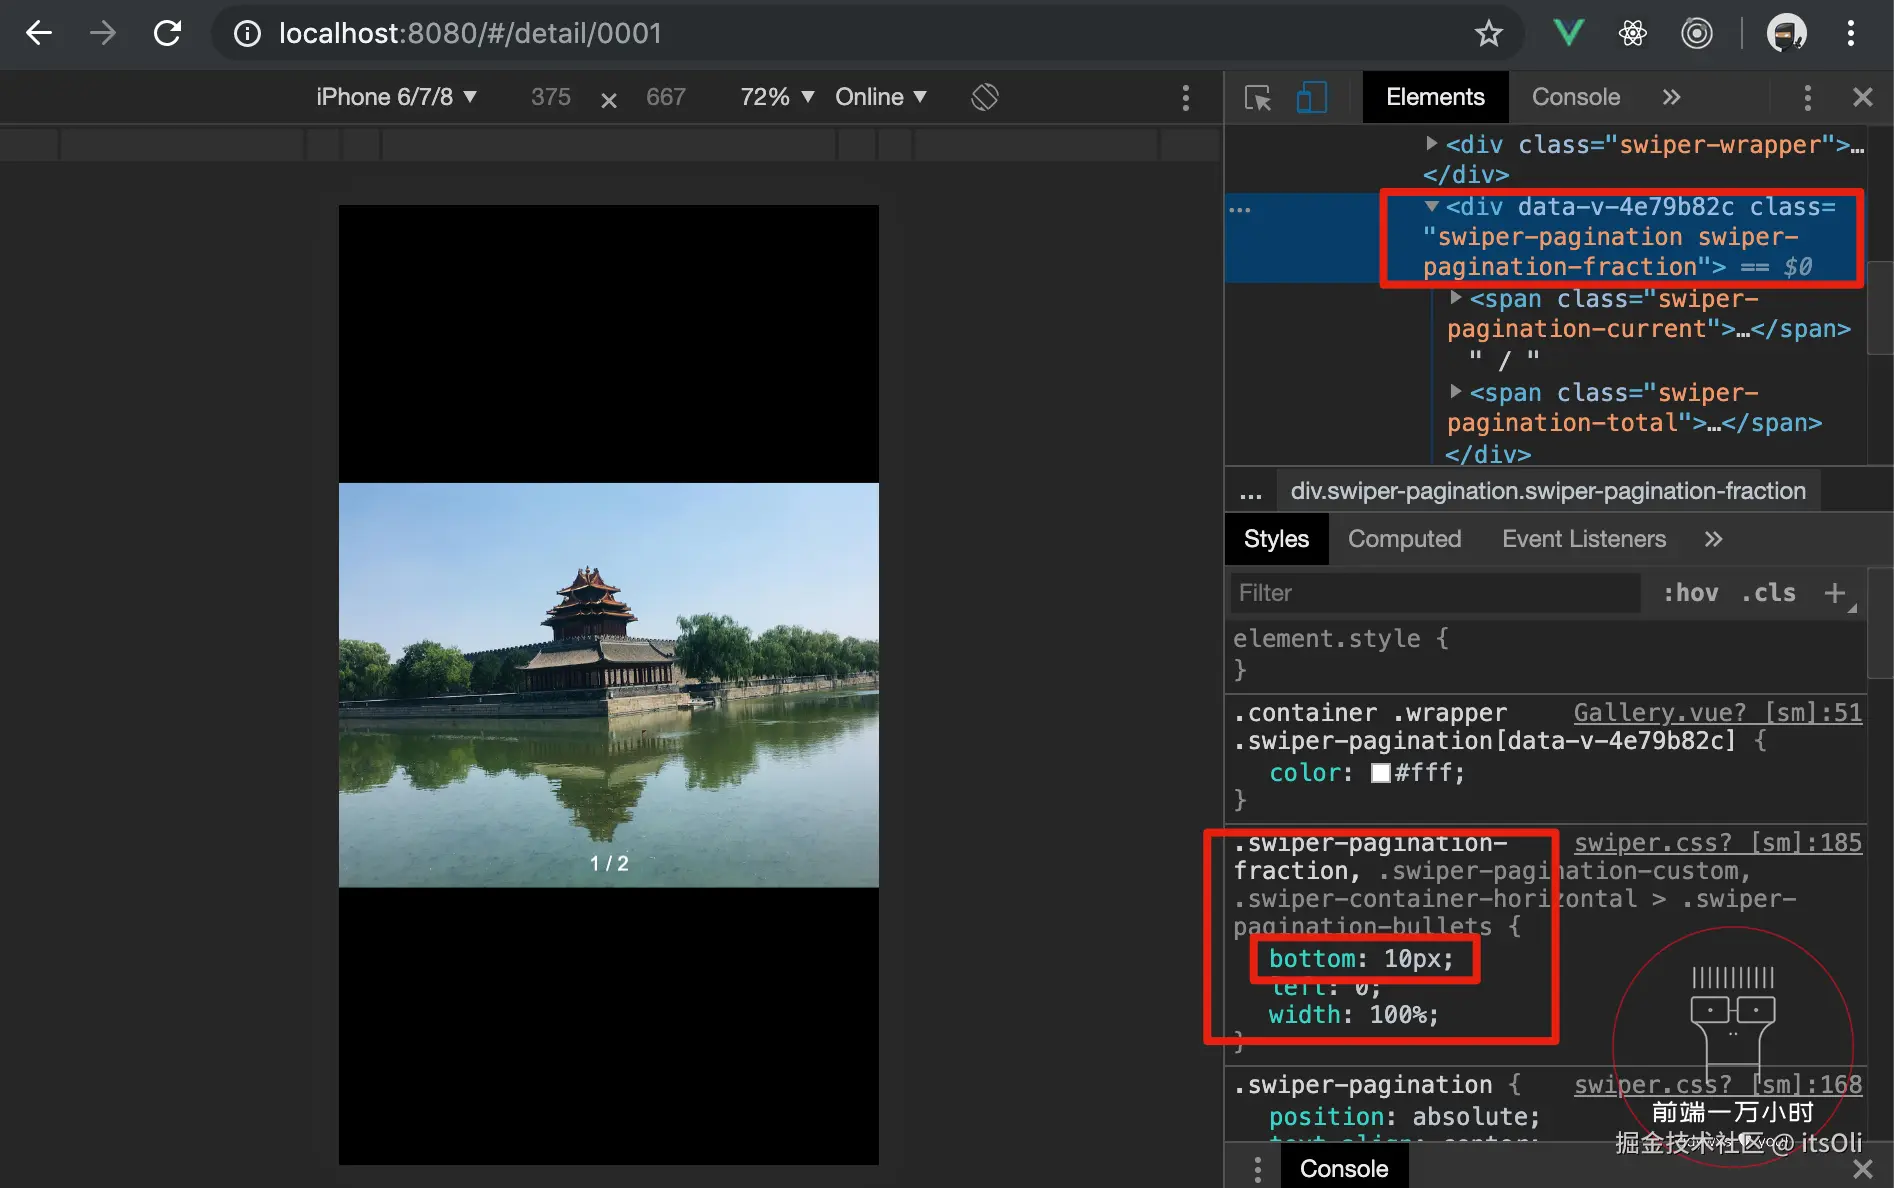
.gallery-img /* 2️⃣-⑩:设置图片宽度为 100%; */
width: 100%
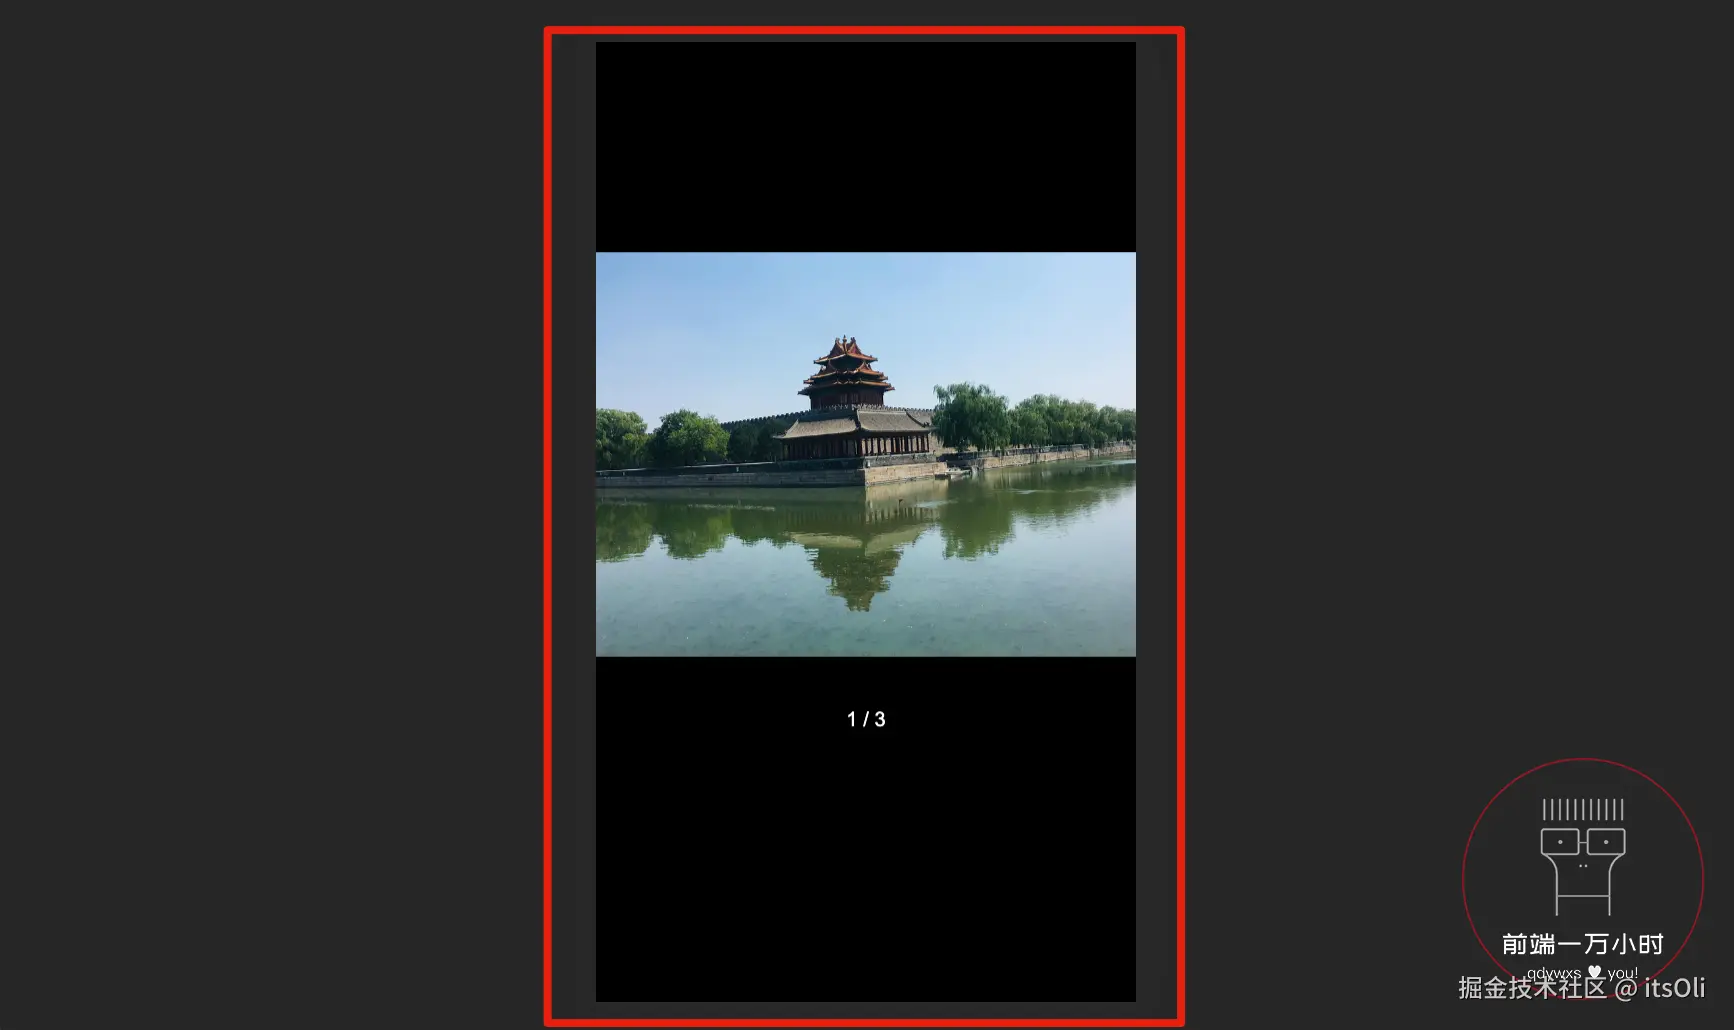
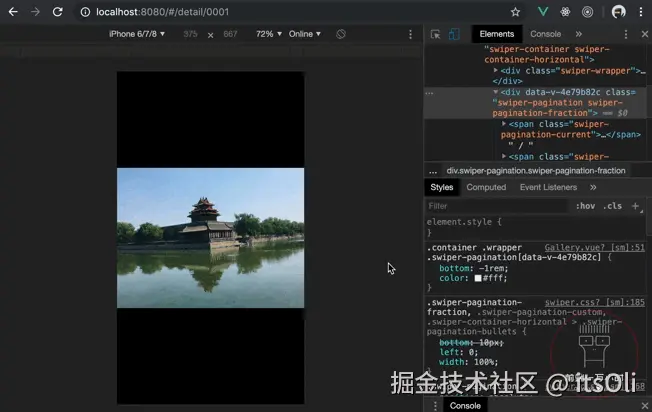
</style>保存后,返回页面查看,查看图片可左右滑动,也有了分页指示器,但不是"分数"样式的,且指示器位置也不对:
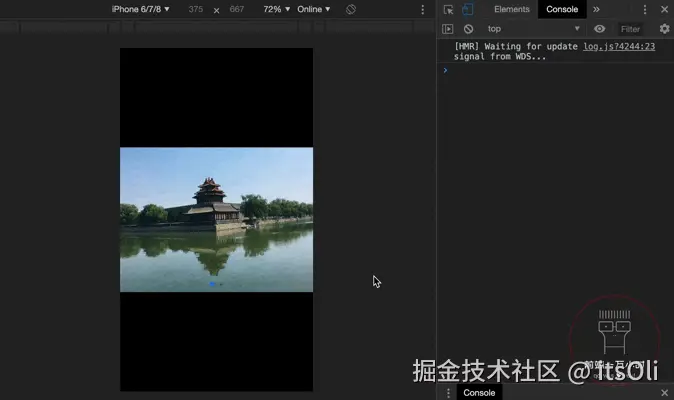
检查元素可以看到,指示器是设置了 bottom 为 10px:
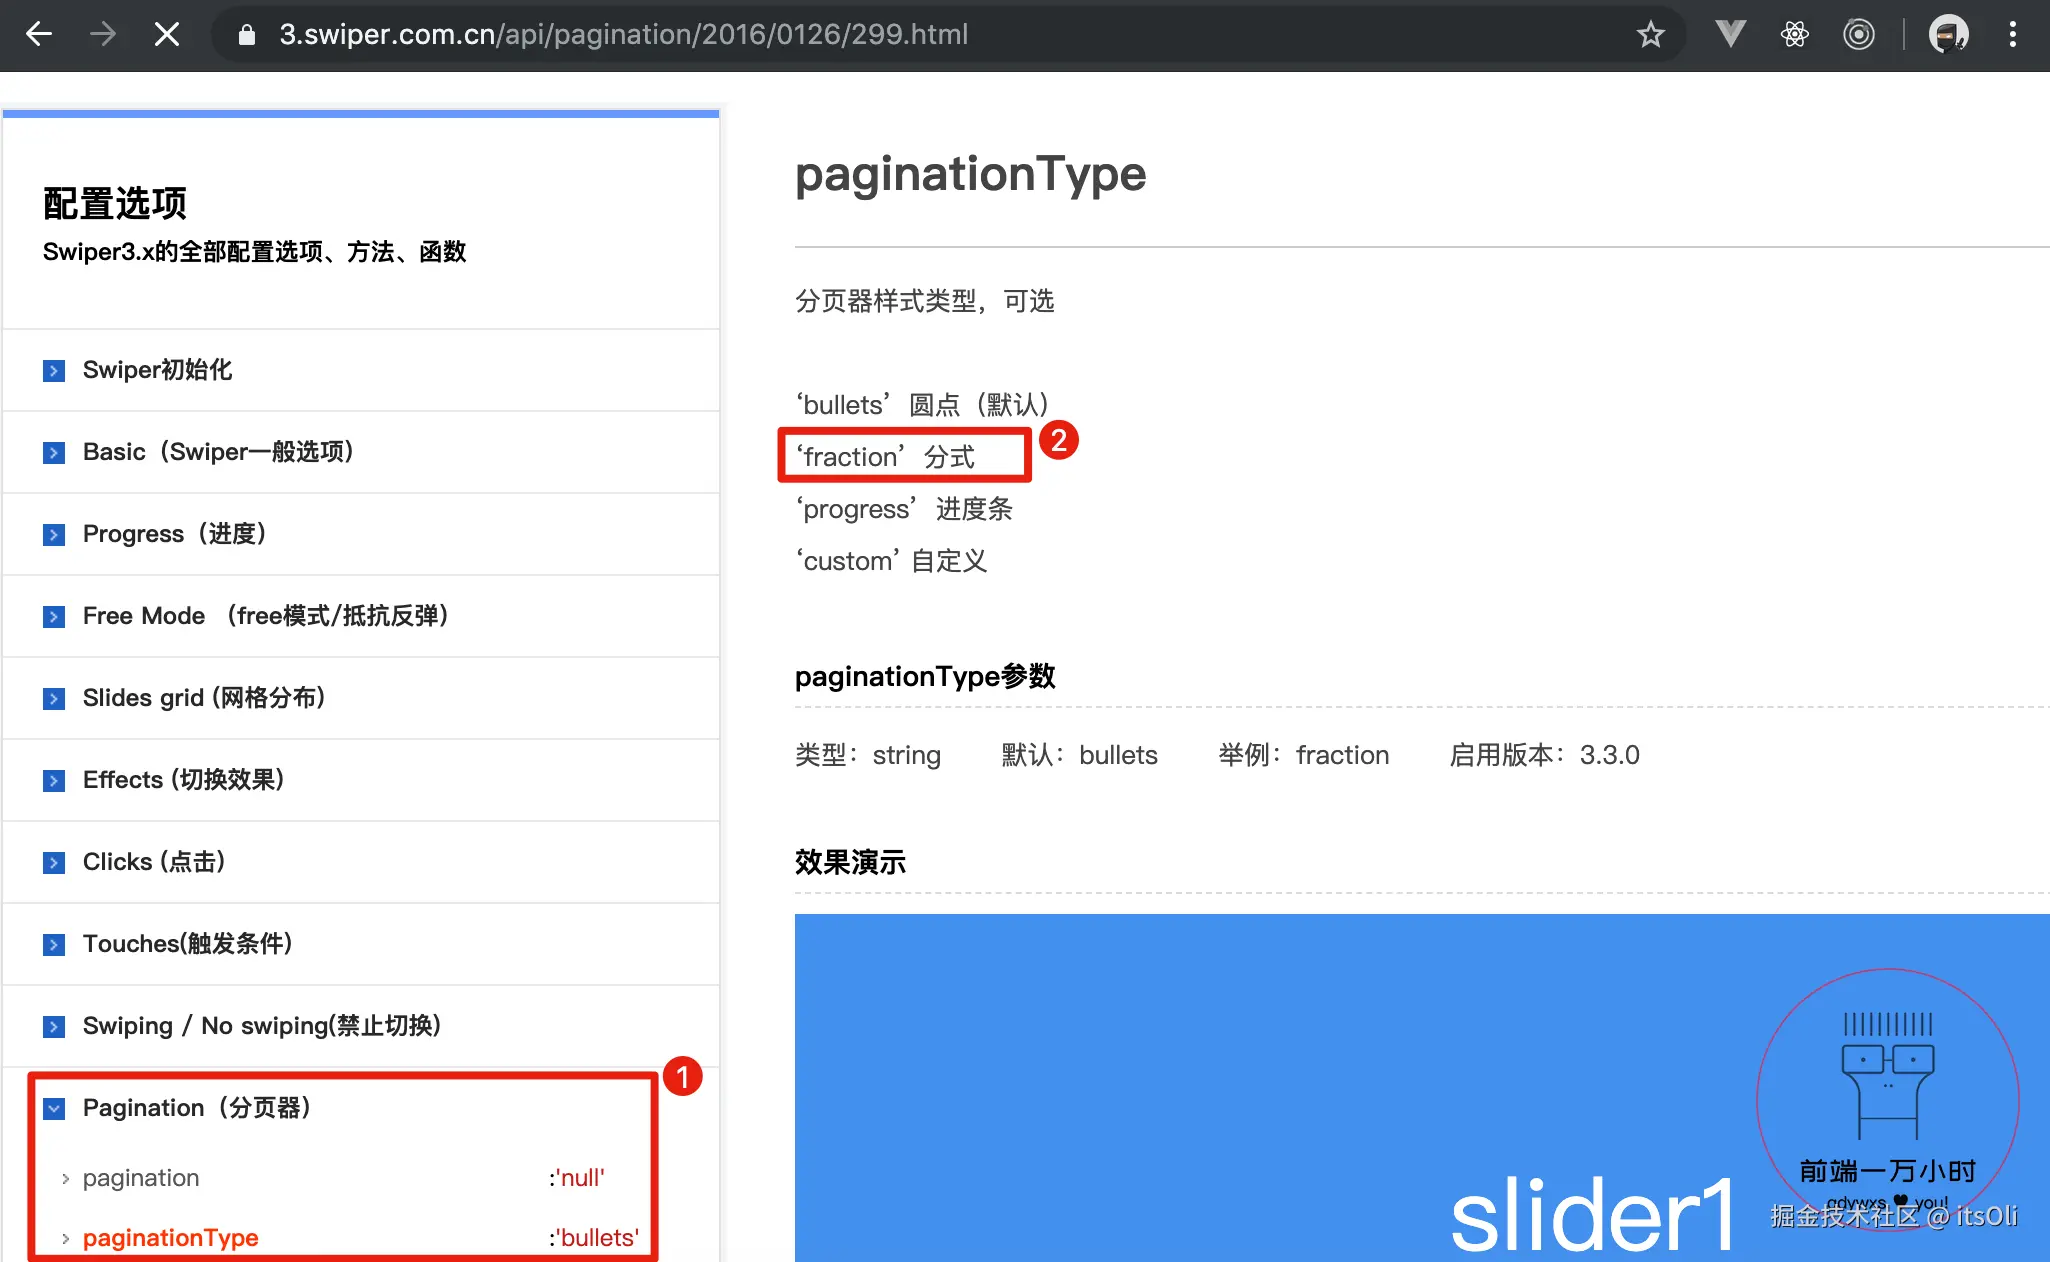
❓如何能够让第三方轮播插件 vue-awesome-swiper 的分页指示器,展示为其他我们所需要的样式呢?
答:vue-awesome-swiper 底层是借助 Swiper 实现的,所以我们在 Swiper 官网的 API 中可以找到 pagination 相关的参数。
我们使用的 vue-awesome-swiper 是基于 Swiper3 的 v2.6.7 版本,所以需要查看 Swiper3 的 API。在 Pagination 下的 paginationType 可以看到分页器样式的类型。我们需要的是"分式 fraction":
2️⃣-⑪:返回 common 下 gallery 中的 Gallery.vue ;
html
<template>
<div class="container">
<div class="wrapper">
<swiper :options="swiperOption">
<swiper-slide>
<img class="gallery-img" src="https://qdywxs.github.io/travel-images/detail-gallary-img01.jpg">
</swiper-slide>
<swiper-slide>
<img class="gallery-img" src="https://qdywxs.github.io/travel-images/detail-gallary-img02.jpg">
</swiper-slide>
<div class="swiper-pagination" slot="pagination"></div>
</swiper>
</div>
</div>
</template>
<script>
export default {
name: 'CommonGallery',
data () {
return {
swiperOption: {
pagination: '.swiper-pagination',
paginationType: 'fraction' /*
2️⃣-⑫:添加 paginationType,值为 fraction,指定指示器
为"分式";
*/
}
}
}
}
</script>
<style lang="stylus" scoped>
.container
position: fixed
top: 0
right: 0
left: 0
bottom: 0
z-index: 99
display: flex
flex-direction: column
justify-content: center
background: #000
.wrapper
overflow: hidden
height: 0
width: 100%
padding-bottom: 75%
.gallery-img
width: 100%
.swiper-pagination /* 2️⃣-⑬:设置指示器 bottom 为 -1rem,颜色为白色; */
bottom: -1rem
color: #fff
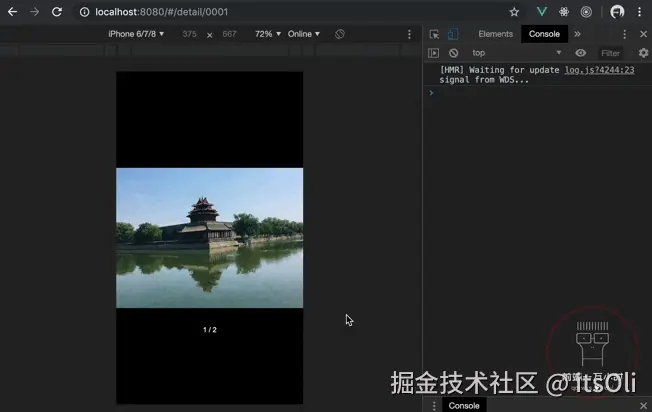
</style>保存后,返回页面查看,指示器完全"不见了"。打开检查发现,其实它已经在轮播图的下方了:
❓为什么"看不见"指示器了呢?
答:因为它的父元素上设置了 overflow: hidden ,且限制了高度,导致扩展出的内容无法显示。
2️⃣-⑭:返回 Gallery.vue ;
html
<template>
  <div class="container">
    <div class="wrapper">
      <swiper :options="swiperOption">
        <swiper-slide>
          <img class="gallery-img" src="https://qdywxs.github.io/travel-images/detail-gallary-img01.jpg">
        </swiper-slide>
        <swiper-slide>
          <img class="gallery-img" src="https://qdywxs.github.io/travel-images/detail-gallary-img02.jpg">
        </swiper-slide>
        <div class="swiper-pagination"  slot="pagination"></div>
      </swiper>

    </div>
  </div>
</template>

<script>
export default {
  name: 'CommonGallery',
  data () {
    return {
      swiperOption: {
        pagination: '.swiper-pagination',
        paginationType: 'fraction'
      }
    }
  }
}
</script>

<style lang="stylus" scoped>
.container >>> .swiper-container /*
  															 2️⃣-⑯:由于 Swiper 自身容器上也设置了 overflow 值
  															 为 hidden,所以这里使用深度作用选择器设置 .swiper-container
  															 的 overflow 值为 inherit;
  																*/
  overflow: inherit

.container
  position: fixed
  top: 0
  right: 0
  left: 0
  bottom: 0
  z-index: 99
  display: flex
  flex-direction: column
  justify-content: center
  background: #000

  .wrapper /* 2️⃣-⑮:去除 .wrapper 的 overflow 属性; */
    height: 0
    width: 100%
    padding-bottom: 75%
    .gallery-img
      width: 100%
    .swiper-pagination
      bottom: -1rem
      color: #fff
</style>
保存后,返回页面查看:分页指示器显示正确,控制台无报错, Gallery.vue 的布局完成。

2.2 公用图片画廊组件逻辑
需求分析:
- 首先,
Gallery.vue中显示的图片,不会是组件本身的数据,而是使用它的组件从外部传递进来的; - 其次,
Gallery.vue默认为隐藏状态,当点击 Banner 组件的海报时展示,再次点击后则隐藏。
3️⃣返回 common 下 gallery 中的 Gallery.vue :
html
<template>
  <div class="container">
    <div class="wrapper">
      <swiper :options="swiperOption">

        <!-- 3️⃣-③:保留一个 swiper-slide 标签,循环 imgs,动态绑定 key 值为 index; -->
        <swiper-slide v-for="(item, index) of imgs" :key="index">

          <!-- 3️⃣-④:动态绑定 src 的值为循环项 item; -->
          <img class="gallery-img" :src="item">
        </swiper-slide>

        <div class="swiper-pagination"  slot="pagination"></div>
      </swiper>

    </div>
  </div>
</template>

<script>
export default {
  name: 'CommonGallery',

  props: { /* 3️⃣-①:添加 props,从外部接收一个 imgs 属性; */

    imgs: { /* 3️⃣-②:imgs 的类型必须是数组 Array,default 是一个函数,默认 imgs 是一个数组; */
      type: Array,
      default () {
        return []
      }
    }
  },
  data () {
    return {
      swiperOption: {
        pagination: '.swiper-pagination',
        paginationType: 'fraction'
      }
    }
  }
}
</script>

<style lang="stylus" scoped>
.container >>> .swiper-container
  overflow: inherit
.container
  position: fixed
  top: 0
  right: 0
  left: 0
  bottom: 0
  z-index: 99
  display: flex
  flex-direction: column
  justify-content: center
  background: #000
  .wrapper
    height: 0
    width: 100%
    padding-bottom: 75%
    .gallery-img
      width: 100%
    .swiper-pagination
      bottom: -1rem
      color: #fff
</style>
3️⃣-⑤:打开 detail 下 components 中的 Banner.vue ;
html
<template>
<div>
<div class="banner">
<img class="banner-img" src="https://qdywxs.github.io/travel-images/detail-banner-img.jpg">
<div class="banner-info">
<div class="banner-title">故宫(AAAAA景区)</div>
<div class="banner-number">
<span class="iconfont banner-icon"></span>
3
</div>
</div>
</div>
<common-gallery :imgs="imgs"></common-gallery> <!-- 3️⃣-⑦:通过属性 :imgs 传递数据
imgs 给组件 Gallery.vue; -->
</div>
</template>
<script>
import CommonGallery from 'common/gallery/Gallery'
export default {
name: 'DetailBanner',
data () { // 3️⃣-⑥:在 data 中定义一个变量 imgs,它的值为一个数组,内容是两个图片地址;
return {
imgs: ['https://qdywxs.github.io/travel-images/detail-gallary-img01.jpg', 'https://qdywxs.github.io/travel-images/detail-gallary-img02.jpg']
}
},
components: {
CommonGallery
}
}
</script>
<style lang="stylus" scoped>
.banner
position: relative
overflow: hidden
height: 0
padding-bottom: 55%
.banner-img
width: 100%
.banner-info
position: absolute
left: 0
right: 0
bottom: 0
display: flex
line-height: .6rem
color: #fff
background-image: linear-gradient(top, rgba(0, 0, 0, 0), rgba(0, 0, 0, .8))
.banner-title
flex: 1
padding: 0 .2rem
font-size: .32rem
.banner-number
height: .32rem
padding: 0 .4rem
margin-top: .14rem
font-size: .24rem
color: #fff
line-height: .32rem
border-radius: .2rem
background: rgba(0, 0, 0, .8)
.banner-icon
font-size: .24rem
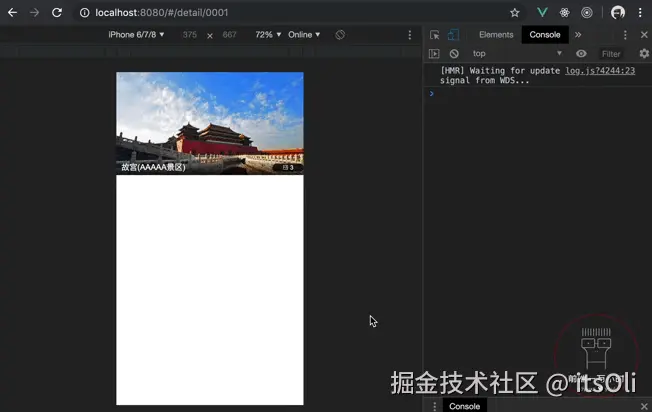
</style>保存后,返回页面查看,内容正确显示,控制台无报错:
默认 Gallery.vue 隐藏,点击 Banner.vue 中的海报时显示,那么只需要一个变量默认为 false(隐藏状态),然后绑定一个点击事件来切换变量为 true(显示状态)即可。
3️⃣-⑧:返回 detail 下 components 中的 Banner.vue ;
html
<template>
<div>
<!-- 3️⃣-⑪:在 .banner 上绑定点击事件,触发时执行 handleBannerClick 方法; -->
<div class="banner" @click="handleBannerClick">
<img class="banner-img" src="https://qdywxs.github.io/travel-images/detail-banner-img.jpg">
<div class="banner-info">
<div class="banner-title">故宫(AAAAA景区)</div>
<div class="banner-number">
<span class="iconfont banner-icon"></span>
3
</div>
</div>
</div>
<!-- 3️⃣-⑩:添加 v-show 指令,它等于 showGallery 这个变量; -->
<common-gallery :imgs="imgs" v-show="showGallery"></common-gallery>
</div>
</template>
<script>
import CommonGallery from 'common/gallery/Gallery'
export default {
name: 'DetailBanner',
data () {
return {
showGallery: false, // 3️⃣-⑨:定义一个变量 showGallery,默认为 false;
imgs: ['https://qdywxs.github.io/travel-images/detail-gallary-img01.jpg', 'https://qdywxs.github.io/travel-images/detail-gallary-img02.jpg']
}
},
methods: { // 3️⃣-⑫:在 methods 中定义 handleBannerClick 方法;
handleBannerClick () {
this.showGallery = true // 3️⃣-⑬:当 Banner 被点击时,将变量 showGallery 变为 true;
}
},
components: {
CommonGallery
}
}
</script>
<style lang="stylus" scoped>
.banner
position: relative
overflow: hidden
height: 0
padding-bottom: 55%
.banner-img
width: 100%
.banner-info
position: absolute
left: 0
right: 0
bottom: 0
display: flex
line-height: .6rem
color: #fff
background-image: linear-gradient(top, rgba(0, 0, 0, 0), rgba(0, 0, 0, .8))
.banner-title
flex: 1
padding: 0 .2rem
font-size: .32rem
.banner-number
height: .32rem
padding: 0 .4rem
margin-top: .14rem
font-size: .24rem
color: #fff
line-height: .32rem
border-radius: .2rem
background: rgba(0, 0, 0, .8)
.banner-icon
font-size: .24rem
</style>保存后,返回页面查看,控制台无报错, Gallery.vue 是隐藏状态。但当点击 Banner 后,轮播图没有正常显示:
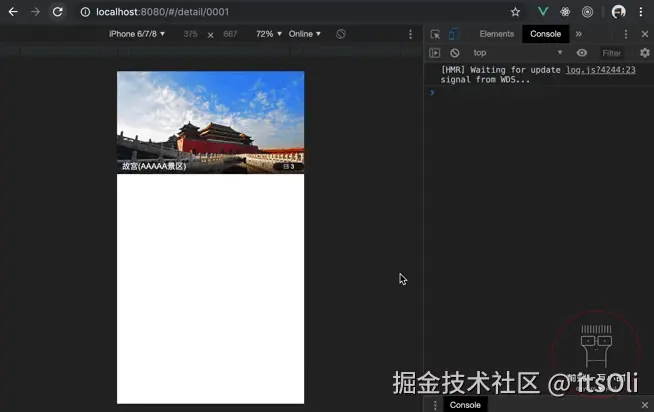
❓为什么轮播没有正确显示呢?
答:因为在刚开始时,我们是让 Gallery.vue 处于隐藏的状态,当再把它显示出来时,导致轮播计算宽度出错。所以轮播图无法正常显示、滑动。
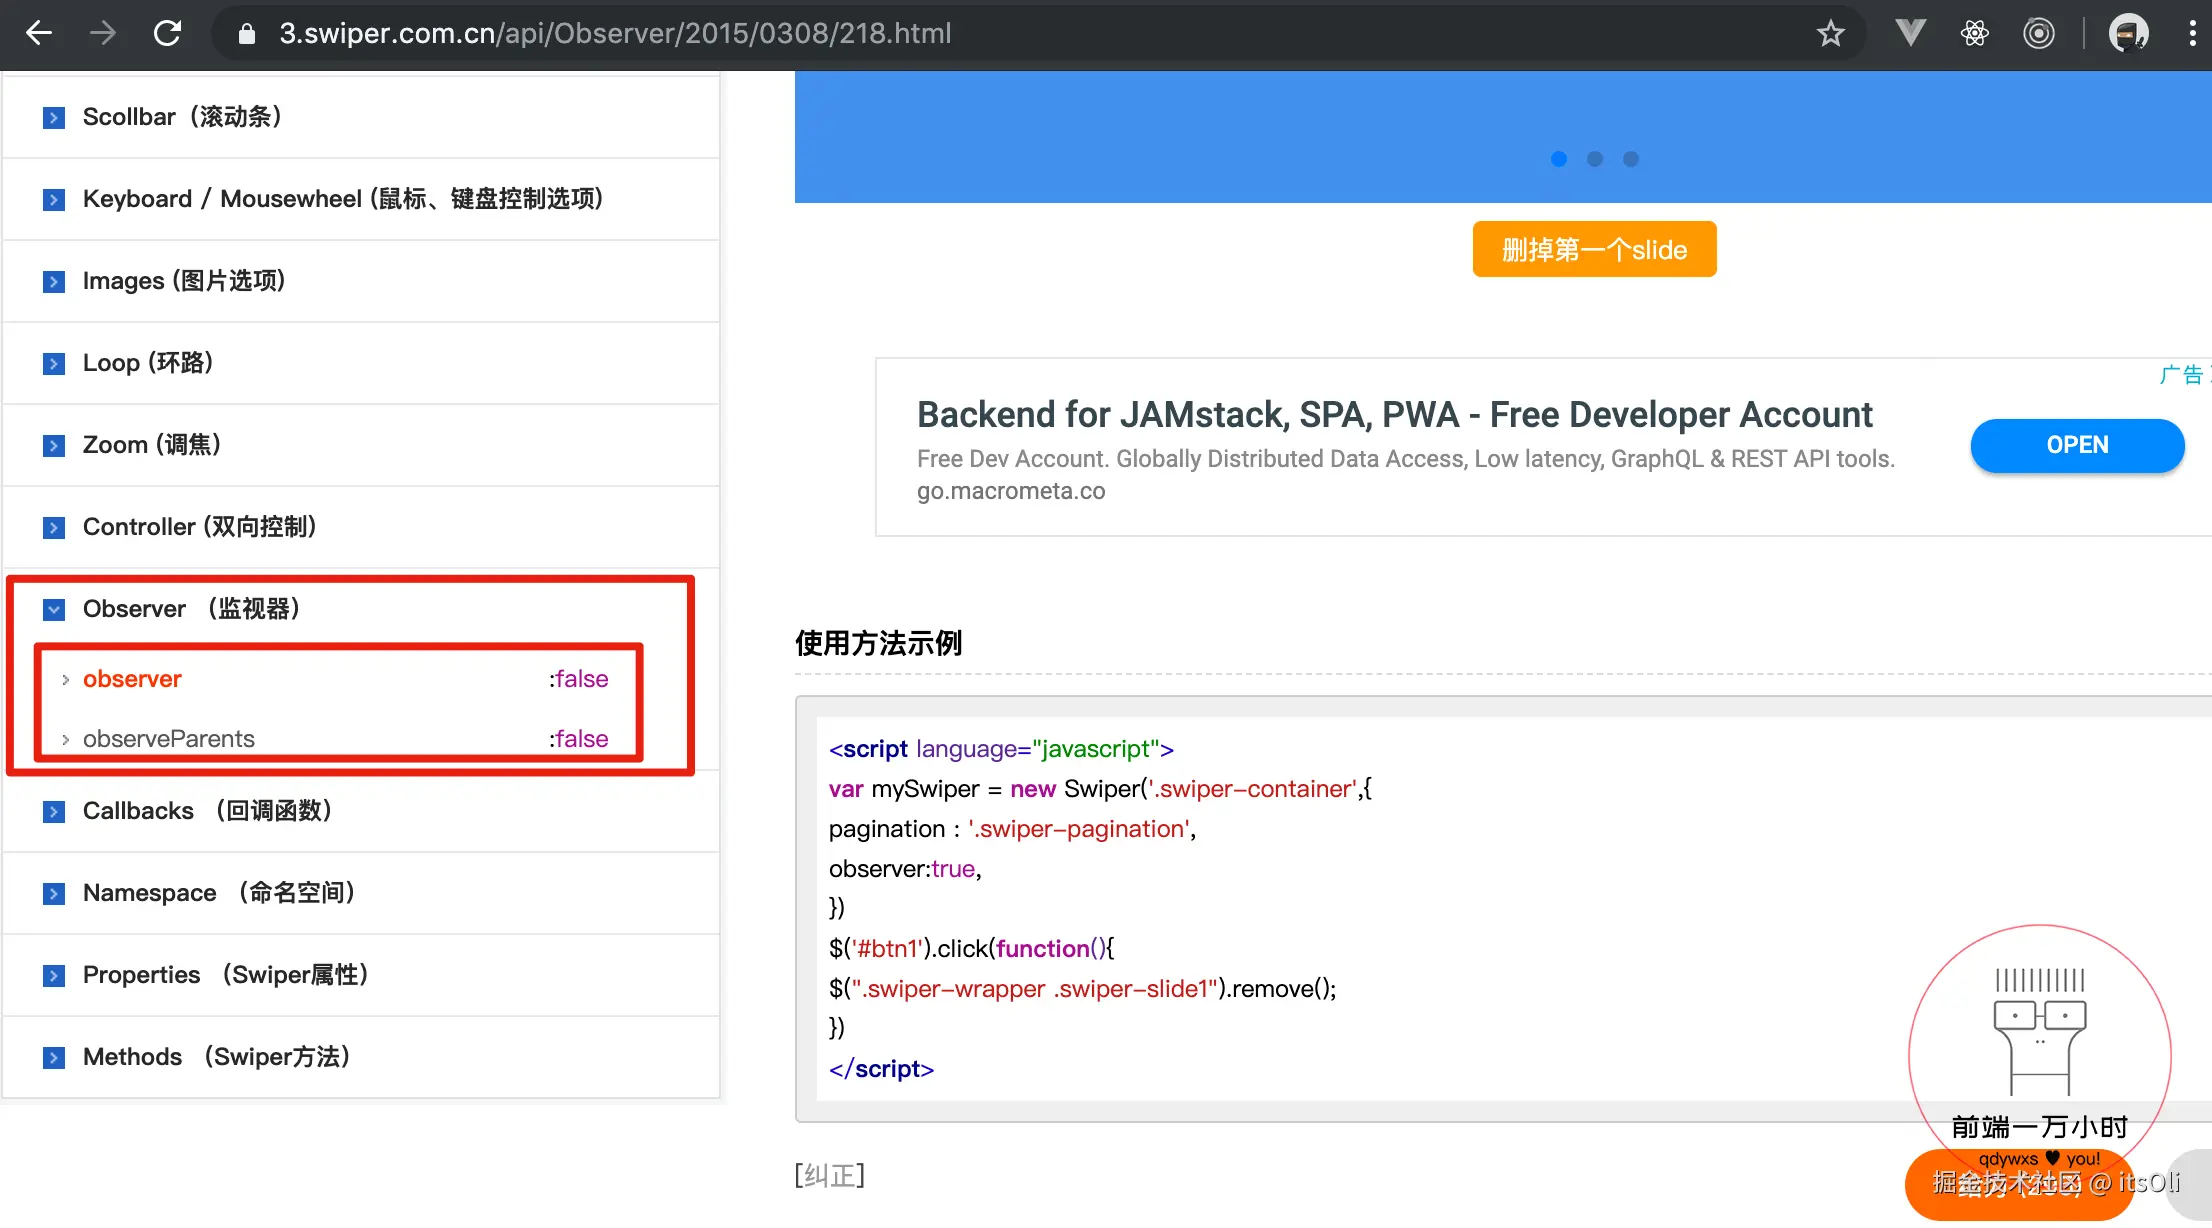
解决这个问题,我们可以在 Swiper 官网找到 Observer 这个配置项(或在官网搜索"observer"关键字):
3️⃣-⑭:打开 common 下 gallery 中的 Gallery.vue ;
html
<template>
  <div class="container">
    <div class="wrapper">
      <swiper :options="swiperOption">
        <swiper-slide v-for="(item, index) of imgs" :key="index">
          <img class="gallery-img" :src="item">
        </swiper-slide>
        <div class="swiper-pagination"  slot="pagination"></div>
      </swiper>
    </div>
  </div>
</template>

<script>
export default {
  name: 'CommonGallery',
  props: {
    imgs: {
      type: Array,
      default () {
        return []
      }
    }
  },
  data () {
    return {
      swiperOption: {
        pagination: '.swiper-pagination',
        paginationType: 'fraction',

        observer: true, /*
        								3️⃣-⑮:添加 observer 和 observeParents,且它们的值都为 true
                        (❗️这两句指的是:当 Swiper 本身或它的父级元素发生变化时,会自动初始化
                        一次 swiper);
                         */
        observeParents: true
      }
    }
  }
}
</script>

<style lang="stylus" scoped>
.container >>> .swiper-container
  overflow: inherit
.container
  position: fixed
  top: 0
  right: 0
  left: 0
  bottom: 0
  z-index: 99
  display: flex
  flex-direction: column
  justify-content: center
  background: #000
  .wrapper
    height: 0
    width: 100%
    padding-bottom: 75%
    .gallery-img
      width: 100%
    .swiper-pagination
      bottom: -1rem
      color: #fff
</style>
保存后,返回页面查看,轮播恢复了正常:
❓现在只剩一个问题:如何点击 Gallery 时,将它隐藏?
答:其实依然很简单。我们只需要在 Gallery.vue 上绑定一个点击事件,当它被点击时,向外触发一个事件(比如触发一个 close 事件)。
然后,调用 Gallery 的父组件 Banner.vue 就可以来接收这个事件。当 close 事件触发后,去更改 showGallery 为 false。
4️⃣打开 common 下 gallery 中的 Gallery.vue :
html
<template>
  <!-- 4️⃣-①:在 .container 上绑定一个点击事件,触发时执行 handleGalleryClick 方法; -->
  <div class="container" @click="handleGalleryClick">
    <div class="wrapper">
      <swiper :options="swiperOption">
        <swiper-slide v-for="(item, index) of imgs" :key="index">
          <img class="gallery-img" :src="item">
        </swiper-slide>
        <div class="swiper-pagination"  slot="pagination"></div>
      </swiper>
    </div>
  </div>
</template>

<script>
export default {
  name: 'CommonGallery',
  props: {
    imgs: {
      type: Array,
      default () {
        return []
      }
    }
  },
  data () {
    return {
      swiperOption: {
        pagination: '.swiper-pagination',
        paginationType: 'fraction',
        observer: true,
        observeParents: true
      }
    }
  },
  methods: {
    handleGalleryClick () {  // 4️⃣-②:handleGalleryClick 方法向外触发一个 close 事件;
      this.$emit('close')
    }
  }
}
</script>

<style lang="stylus" scoped>
.container >>> .swiper-container
  overflow: inherit
.container
  position: fixed
  top: 0
  right: 0
  left: 0
  bottom: 0
  z-index: 99
  display: flex
  flex-direction: column
  justify-content: center
  background: #000
  .wrapper
    height: 0
    width: 100%
    padding-bottom: 75%
    .gallery-img
      width: 100%
    .swiper-pagination
      bottom: -1rem
      color: #fff
</style>
4️⃣-③:打开 detail 下 components 中的 Banner.vue ;
html
<template>
<div>
<div class="banner" @click="handleBannerClick">
<img class="banner-img" src="https://qdywxs.github.io/travel-images/detail-banner-img.jpg">
<div class="banner-info">
<div class="banner-title">故宫(AAAAA景区)</div>
<div class="banner-number">
<span class="iconfont banner-icon"></span>
3
</div>
</div>
</div>
<!-- 4️⃣-④:在 Banner.vue 中接收 close 事件,事件触发时执行 handleGalleryClose 方法; -->
<common-gallery :imgs="imgs" v-show="showGallery" @close="handleGalleryClose"></common-gallery>
</div>
</template>
<script>
import CommonGallery from 'common/gallery/Gallery'
export default {
name: 'DetailBanner',
data () {
return {
showGallery: false,
imgs: ['https://qdywxs.github.io/travel-images/detail-gallary-img01.jpg', 'https://qdywxs.github.io/travel-images/detail-gallary-img02.jpg']
}
},
methods: {
handleBannerClick () {
this.showGallery = true
},
handleGalleryClose () { /*
4️⃣-⑤:定义 handleGalleryClose 方法,方法执行时,
更改 showGallery 为 false(即,隐藏 Gallery.vue)。
*/
this.showGallery = false
}
},
components: {
CommonGallery
}
}
</script>
<style lang="stylus" scoped>
.banner
position: relative
overflow: hidden
height: 0
padding-bottom: 55%
.banner-img
width: 100%
.banner-info
position: absolute
left: 0
right: 0
bottom: 0
display: flex
line-height: .6rem
color: #fff
background-image: linear-gradient(top, rgba(0, 0, 0, 0), rgba(0, 0, 0, .8))
.banner-title
flex: 1
padding: 0 .2rem
font-size: .32rem
.banner-number
height: .32rem
padding: 0 .4rem
margin-top: .14rem
font-size: .24rem
color: #fff
line-height: .32rem
border-radius: .2rem
background: rgba(0, 0, 0, .8)
.banner-icon
font-size: .24rem
</style>保存后,返回页面查看。当点击 Banner 时,显示 Gallery.vue ,且左右滑动流畅(轮播显示正常)。当点击 Gallery.vue 时,则恢复隐藏状态:
以上,我们拆分出了一个公用图片画廊组件 Gallery.vue ,并完善了 Banner 的逻辑。
祝好,qdywxs ♥ you!