1. 前言
忽然有一天,我想要做一件事:去代码中去验证那些曾经被"灌输"的理论。
-- 服装学院的IT男
本篇为 VSync 系列的第三篇,主要介绍应用添加链接的流程。
本系列为之前学习 SurfaceFlinger 整理的一些笔记,现在分享出来,希望能帮助到有需要的同学。代码基于 Android 13,虽然很多逻辑与最新源码有所不同,但总体思路依然不变,不影响对 VSync 整体逻辑的理解。
VSync 系列目录:
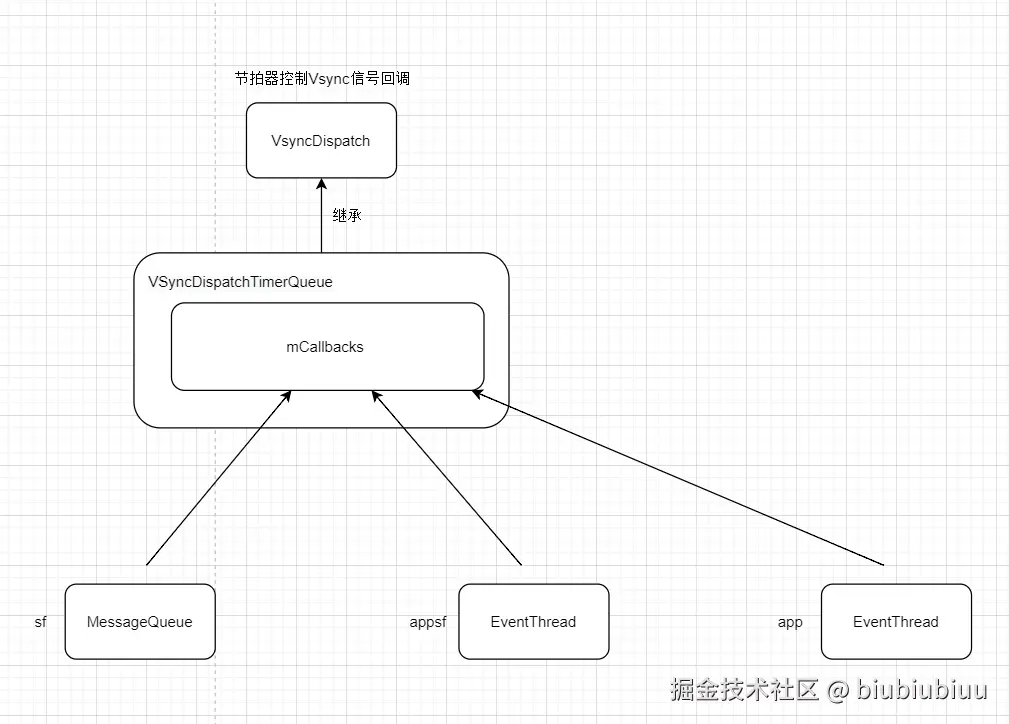
上一篇文章中提到,当 SW-VSYNC 产生时,会有三个对象监听回调。其中,app 端负责更新 UI 数据到缓冲区,sf (SurfaceFlinger) 负责处理各个应用的缓冲区合成、上帧等操作。SurfaceFlinger 收到 VSYNC-sf 后的处理流程相对容易理解,但 app 收到 VSYNC-app 后是如何分发到各个应用的呢?
当 app 收到 VSync 信号后,需要将其分发给各个具体的应用。这些应用必然维护在一个集合中,如下图所示:
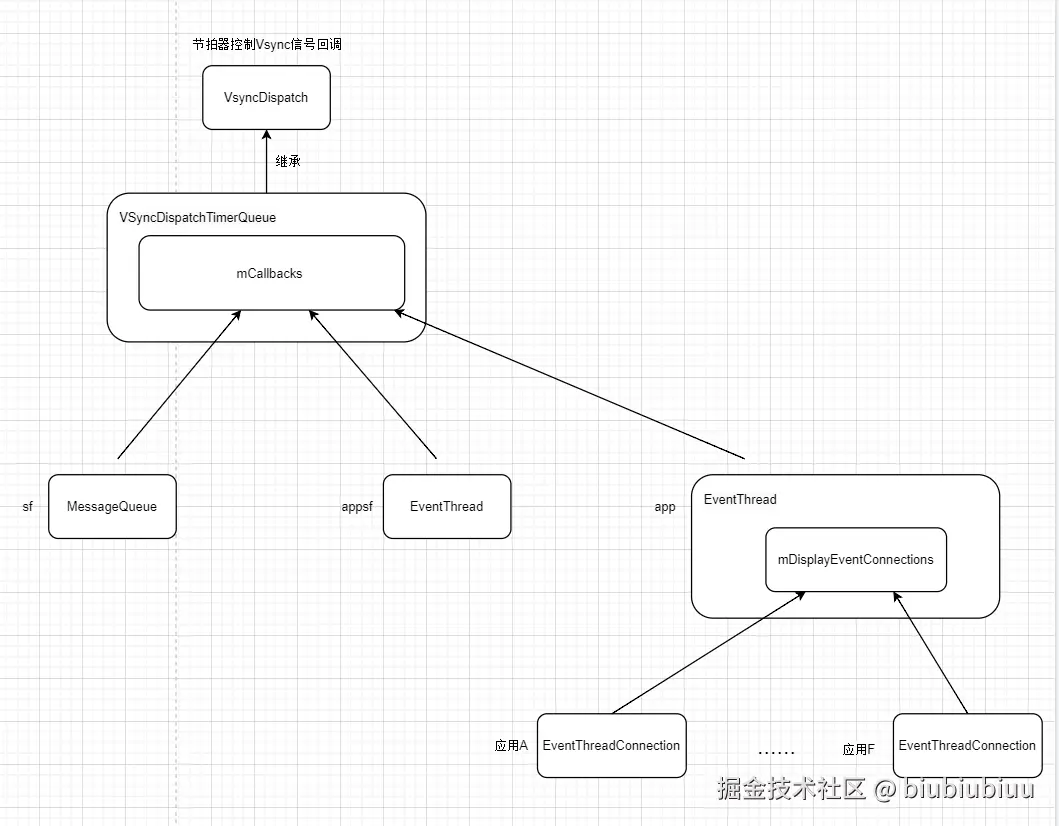
app 这个 EventThread 维护了一个名为 mDisplayEventConnections 的集合,其中存储了各个应用与 EventThread 的连接。当 app 这个 EventThread 收到 VSYNC-app 信号后,会遍历 mDisplayEventConnections 集合,将 VSync 信号传递给各个应用。
也就是说,各个应用端想要接收到 VSync 信号,首先需要将自己与 EventThread 的连接添加到 app 的 mDisplayEventConnections 集合中。
本篇将分析一个应用如何将自己的连接添加到 mDisplayEventConnections 集合中的流程。
1. java层处理
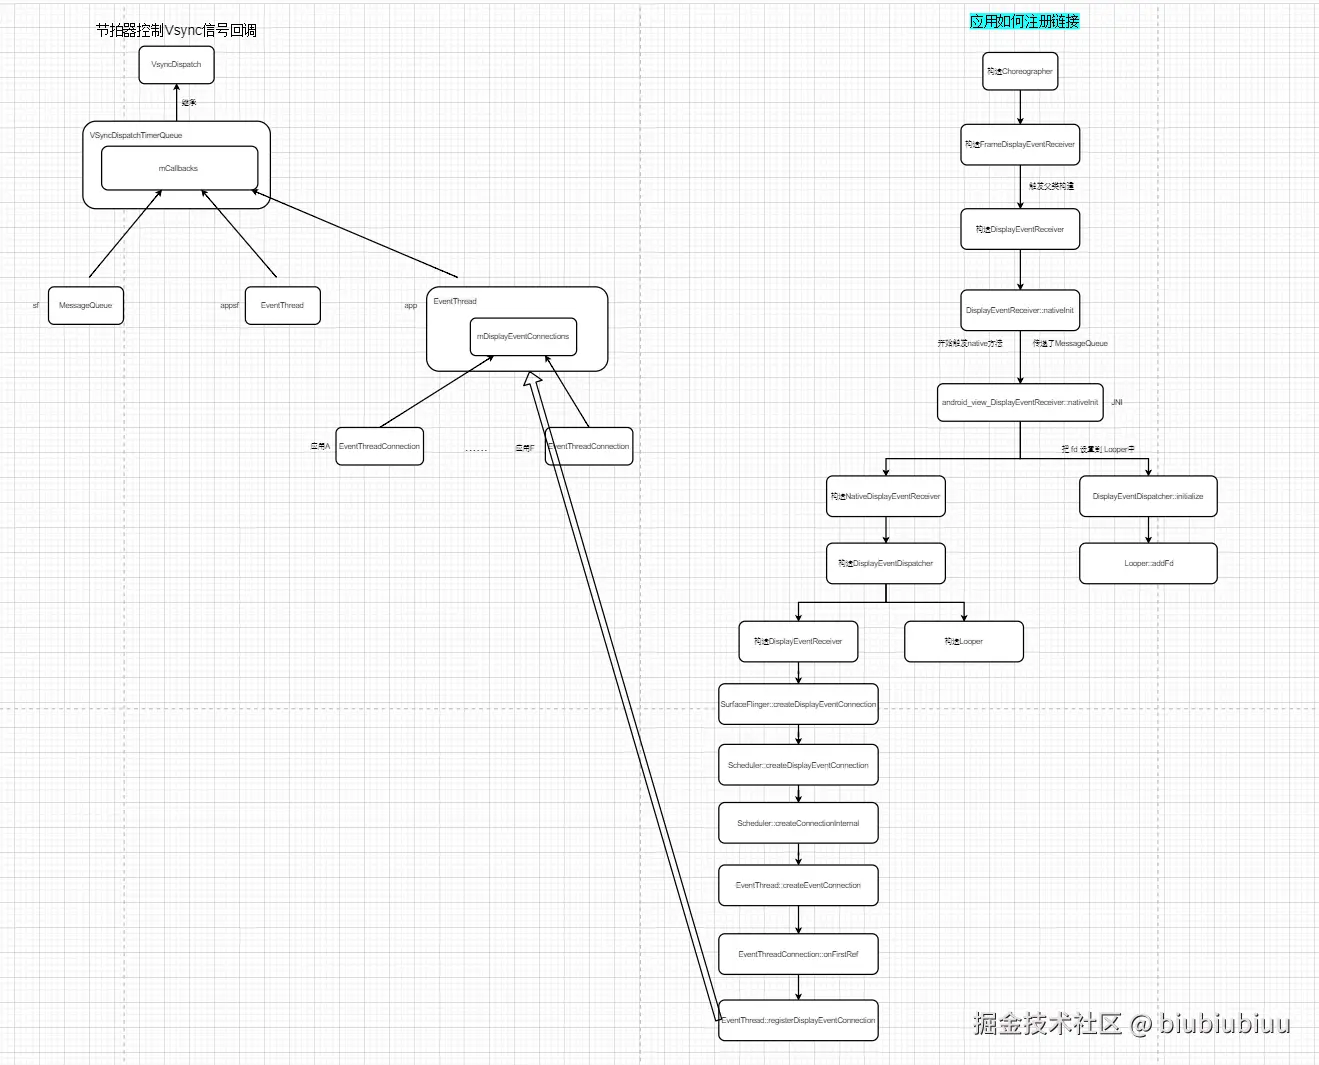
我们知道,Java 层应用端处理 VSync 的是 Choreographer 类,也就是常说的"编舞者"。 因此,关于应用如何申请 VSync,可以从这个类入手。在 ViewRootImpl 中有一个成员变量就是 Choreographer 的实例。
1.1 Choreographer 的构建
less
# ViewRootImpl.java

    final Choreographer mChoreographer;
    // 应用调用的是两个参数的构造方法
    public ViewRootImpl(Context context, Display display) {
        this(context, display, WindowManagerGlobal.getWindowSession(),
                false /* useSfChoreographer */);
    }

    public ViewRootImpl(@UiContext Context context, Display display, IWindowSession session,
            boolean useSfChoreographer) {
                ......
                // useSfChoreographer 为false
                mChoreographer = useSfChoreographer ? Choreographer.getSfInstance() : Choreographer.getInstance();
                ......
            }
应用在 WindowManagerGlobal 中构建 ViewRootImpl 对象时,调用的是两个参数的构造方法。 因此,在执行到四个参数的构造方法时,第四个参数 useSfChoreographer 为 false。
这里对 mChoreographer 赋值时,调用的是 Choreographer.getInstance(),说明 Choreographer 是一个单例。
csharp
# Choreographer.java

    private static volatile Choreographer mMainInstance;

    // 线程单例
    private static final ThreadLocal<Choreographer> sThreadInstance =
            new ThreadLocal<Choreographer>() {
        @Override
        protected Choreographer initialValue() {
            Looper looper = Looper.myLooper();
            if (looper == null) {
                throw new IllegalStateException("The current thread must have a looper!");
            }
            Choreographer choreographer = new Choreographer(looper, VSYNC_SOURCE_APP);
            if (looper == Looper.getMainLooper()) {
                mMainInstance = choreographer;
            }
            return choreographer;
        }
    };

    public static Choreographer getInstance() {
        return sThreadInstance.get();
    }
Choreographer 是一个线程单例 。我们重点关注 Choreographer 的构造方法。
ini
# Choreographer.java

    // 接收 VSync 的类
    private final FrameDisplayEventReceiver mDisplayEventReceiver;

    private Choreographer(Looper looper, int vsyncSource) {
        mLooper = looper;
        // 线程通信
        mHandler = new FrameHandler(looper);
        // 真正与SF通信的类
        mDisplayEventReceiver = USE_VSYNC
                ? new FrameDisplayEventReceiver(looper, vsyncSource)
                : null;
        mLastFrameTimeNanos = Long.MIN_VALUE;

        mFrameIntervalNanos = (long)(1000000000 / getRefreshRate());
        // 回调集合
        mCallbackQueues = new CallbackQueue[CALLBACK_LAST + 1];
        for (int i = 0; i <= CALLBACK_LAST; i++) {
            mCallbackQueues[i] = new CallbackQueue();
        }
        // b/68769804: For low FPS experiments.
        setFPSDivisor(SystemProperties.getInt(ThreadedRenderer.DEBUG_FPS_DIVISOR, 1));
    }
这里创建了三个关键对象:
FrameHandler:一个Handler对象,用于跨线程通信,处理 VSync 的申请和接收。但它只是一个中转,真正的工作由mDisplayEventReceiver完成。FrameDisplayEventReceiver:连接 Java 层和 Native 层的类,真正负责与 SurfaceFlinger 进行 VSync 相关的通信。CallbackQueue:保存着下一次 VSync 到来时需要执行的回调。
当前我们需要关注的是 FrameDisplayEventReceiver,它继承自 DisplayEventReceiver。
注意:构造
Choreographer时传入的Looper对象,也用于构造FrameHandler。
csharp
# DisplayEventReceiver.java
    // native 层句柄
    private long mReceiverPtr;
    // 消息队列
    private MessageQueue mMessageQueue;
    public DisplayEventReceiver(Looper looper, int vsyncSource, int eventRegistration) {
        if (looper == null) {
            throw new IllegalArgumentException("looper must not be null");
        }
        // 获取 Looper 关联的消息队列
        mMessageQueue = looper.getQueue();
        // 触发 Native 层的初始化
        mReceiverPtr = nativeInit(new WeakReference<DisplayEventReceiver>(this), mMessageQueue,
                vsyncSource, eventRegistration);
    }
这里通过 Looper 获取了与之绑定的 MessageQueue,因此 DisplayEventReceiver 和 FrameHandler 是协同工作的。
这里最重要的是触发了 nativeInit 方法,并将 mMessageQueue 作为参数传递,进入 Native 层。
1.2 Java 层调用链
arduino
ViewRootImpl::init
    Choreographer::getInstance
        Choreographer::init
            FrameHandler::init
            FrameDisplayEventReceiver::init
                DisplayEventReceiver::init
                    Looper::getQueue
                    DisplayEventReceiver::nativeInit  -- 进入native层
            CallbackQueue::init
2. native 层处理
接上一节,流程来到了 Native 层。DisplayEventReceiver 对应的 JNI 文件为 android_view_DisplayEventReceiver.cpp。
scss
# android_view_DisplayEventReceiver.cpp

    static jlong nativeInit(JNIEnv* env, jclass clazz, jobject receiverWeak, jobject messageQueueObj,
                            jint vsyncSource, jint eventRegistration) {
        // 取出messageQueue
        sp<MessageQueue> messageQueue = android_os_MessageQueue_getMessageQueue(env, messageQueueObj);
        if (messageQueue == NULL) {
            jniThrowRuntimeException(env, "MessageQueue is not initialized.");
            return 0;
        }
        // 1. 构建receiver
        sp<NativeDisplayEventReceiver> receiver =
                new NativeDisplayEventReceiver(env, receiverWeak, messageQueue, vsyncSource,
                                            eventRegistration);
        // 2. 初始化 NativeDisplayEventReceiver,将 socket 数据接收的 fd 传递给 Looper
        status_t status = receiver->initialize();
        ......
        // 返回指针给java层
        return reinterpret_cast<jlong>(receiver.get());
    }
这里分为两步:
- 构建
NativeDisplayEventReceiver对象。在这一步中,最终会创建一个当前应用的连接,并将其添加到app对应的EventThread的mDisplayEventConnections集合中。 - 执行
NativeDisplayEventReceiver的initialize方法。这一步主要是为了让应用端能够通过 socket 通信接收到 VSync 事件。
这里需要转变一下应用开发中的惯性思维。第一步是通过 Binder 通信建立应用和
EventThread的连接。如果按照应用开发的思路,可能认为这样就完成了,当有 VSync 信号时,直接通过连接触发回调即可。但实际上,当有 VSync 事件到来时,SurfaceFlinger 是通过 socket 通信来通知应用端的。而 socket 通信的建立,就是在initialize方法中完成的。至于为什么采用 socket 通信,可能是因为 VSync 信号需要更快的传递速度。
接下来,我们先看看应用连接是如何建立的。在 nativeInit 中创建的 NativeDisplayEventReceiver 是 DisplayEventDispatcher 的子类。
2.1 应用连接的建立
csharp
# android_view_DisplayEventReceiver.cpp

    // 是 DisplayEventDispatcher 的子类
    NativeDisplayEventReceiver::NativeDisplayEventReceiver(JNIEnv* env, jobject receiverWeak,
                                                        const sp<MessageQueue>& messageQueue,
                                                        jint vsyncSource, jint eventRegistration)
        : DisplayEventDispatcher(messageQueue->getLooper(),
                                static_cast<ISurfaceComposer::VsyncSource>(vsyncSource),
                                static_cast<ISurfaceComposer::EventRegistration>(eventRegistration)),
            mReceiverWeakGlobal(env->NewGlobalRef(receiverWeak)),
            mMessageQueue(messageQueue) {
        ALOGV("receiver %p ~ Initializing display event receiver.", this);
    }
我们需要关注 DisplayEventDispatcher 的构造方法:
php
# DisplayEventDispatcher.cpp

    DisplayEventDispatcher::DisplayEventDispatcher(
            const sp<Looper>& looper, ISurfaceComposer::VsyncSource vsyncSource,
            ISurfaceComposer::EventRegistrationFlags eventRegistration)
        : mLooper(looper), mReceiver(vsyncSource, eventRegistration), mWaitingForVsync(false),
            mLastVsyncCount(0), mLastScheduleVsyncTime(0) {
        ALOGV("dispatcher %p ~ Initializing display event dispatcher.", this);
    }

# DisplayEventDispatcher.h
    private:
        // 处理消息的Looper
        sp<Looper> mLooper;
        // 定义对象
        DisplayEventReceiver mReceiver;
在 DisplayEventDispatcher 的头文件中,定义了 mReceiver 成员变量,它是 DisplayEventReceiver 的实例。
在构造 DisplayEventDispatcher 时,会触发 mReceiver 的构造。
scss
# DisplayEventReceiver.cpp

    DisplayEventReceiver::DisplayEventReceiver(
            ISurfaceComposer::VsyncSource vsyncSource,
            ISurfaceComposer::EventRegistrationFlags eventRegistration) {
        // 获取到 sf 的代理对象,
        sp<ISurfaceComposer> sf(ComposerService::getComposerService());
        if (sf != nullptr) {
            // 重点* 1. 构建链接
            mEventConnection = sf->createDisplayEventConnection(vsyncSource, eventRegistration);
            if (mEventConnection != nullptr) {
                // 构建数据通道,用于 Vsync 事件传输
                mDataChannel = std::make_unique<gui::BitTube>();
                // 重点* 2. 与 mDataChannel 关联,控制事件的接收管道
                const auto status = mEventConnection->stealReceiveChannel(mDataChannel.get());
                ......// 异常处理
            }
        }
    }
这个方法非常重要,主要分为两步:
-
- 创建一个链接到 EventThread (其实就是app),用于控制链接对应的应用接收 VSYNC-app 信号,这个过程是 binder 通信
-
- 构建数据通道,用户监听 VSync 数据,这个过程是 socket 通信。
目前先分析第一步,看看链接是怎么建立的。
2.1.1 建立连接
ini
# SurfaceFlinger.cpp

    sp<IDisplayEventConnection> SurfaceFlinger::createDisplayEventConnection(
            ISurfaceComposer::VsyncSource vsyncSource,
            ISurfaceComposer::EventRegistrationFlags eventRegistration) {
        // 当前分析的场景肯定是应用,所以值为后面的应用句柄
        const auto& handle =
                vsyncSource == eVsyncSourceSurfaceFlinger ? mSfConnectionHandle : mAppConnectionHandle;

        return mScheduler->createDisplayEventConnection(handle, eventRegistration);
    }
这里的 mSfConnectionHandle 和 mAppConnectionHandle 就是上一篇中在 SurfaceFlinger::initScheduler 中创建的两个连接。
根据 handle 继续:
arduino
# Scheduler.cpp
    sp<IDisplayEventConnection> Scheduler::createDisplayEventConnection(
            ConnectionHandle handle, ISurfaceComposer::EventRegistrationFlags eventRegistration) {
        std::lock_guard<std::mutex> lock(mConnectionsLock);
        RETURN_IF_INVALID_HANDLE(handle, nullptr);
        // 获取到句柄下的线程,其实就是之前分析的的名为 app的 EventThread
        return createConnectionInternal(mConnections[handle].thread.get(), eventRegistration);
    }

    sp<EventThreadConnection> Scheduler::createConnectionInternal(
            EventThread* eventThread, ISurfaceComposer::EventRegistrationFlags eventRegistration) {
        return eventThread->createEventConnection([&] { resync(); }, eventRegistration);
    }
这里的 eventThread 就是之前分析的名为 "app" 的 EventThread。
php
# EventThread.cpp

    sp<EventThreadConnection> EventThread::createEventConnection(
            ResyncCallback resyncCallback,
            ISurfaceComposer::EventRegistrationFlags eventRegistration) const {
        // 创建 EventThreadConnection
        return new EventThreadConnection(const_cast<EventThread*>(this),
                                        IPCThreadState::self()->getCallingUid(),
                                        std::move(resyncCallback), eventRegistration);
    }
scss
# EventThread.cpp
    EventThreadConnection::EventThreadConnection(
            EventThread* eventThread, uid_t callingUid, ResyncCallback resyncCallback,
            ISurfaceComposer::EventRegistrationFlags eventRegistration)
        : resyncCallback(std::move(resyncCallback)),
            mOwnerUid(callingUid),
            mEventRegistration(eventRegistration),
            mEventThread(eventThread),
            mChannel(gui::BitTube::DefaultSize) {}

    void EventThreadConnection::onFirstRef() {
        // NOTE: mEventThread doesn't hold a strong reference on us
        ALOGI("EventThreadConnection::onFirstRef");
        mEventThread->registerDisplayEventConnection(this);
    }
在构建 EventThreadConnection 时,会触发其 onFirstRef 方法的执行,内部会执行 EventThread::registerDisplayEventConnection。
scss
# EventThread.cpp

    status_t EventThread::registerDisplayEventConnection(const sp<EventThreadConnection>& connection) {
        std::lock_guard<std::mutex> lock(mMutex);
        ATRACE_CALL();
        // this should never happen
        auto it = std::find(mDisplayEventConnections.cbegin(),
                mDisplayEventConnections.cend(), connection);
        if (it != mDisplayEventConnections.cend()) {
            ALOGW("DisplayEventConnection %p already exists", connection.get());
            mCondition.notify_all();
            return ALREADY_EXISTS;
        }
        ALOGI("EventThread::registerDisplayEventConnection");
        // 加到集合
        mDisplayEventConnections.push_back(connection);
        mCondition.notify_all();
        return NO_ERROR;
    }
当有 VSYNC-app 信号到来时,会遍历 mDisplayEventConnections 集合。现在,我们的应用已经将连接添加到这个集合中,因此也能接收到 VSync 信号。
2.1.2 socket 通道处理
触发执行 EventThreadConnection::stealReceiveChannel 的地方是在 2.1.1 小节的分叉处,也就是构建 NativeDisplayEventReceiver 时,会构建其父类 DisplayEventDispatcher,构建父类时会触发成员变量 mReceiver 的构建,这个 mReceiver 就是 DisplayEventReceiver 的实例。
DisplayEventReceiver 构造时,会先执行 SurfaceFlinger::createDisplayEventConnection 方法来触发应用端连接的建立,随后会创建 BitTube,再执行 EventThreadConnection::stealReceiveChannel 方法来设置 socket 通信的 fd。
fd (file descriptor,文件描述符) 是系统与进程间进行 I/O 操作的一种抽象。
rust
# EventThread.cpp
    binder::Status EventThreadConnection::stealReceiveChannel(gui::BitTube* outChannel) {
        std::scoped_lock lock(mLock);
        ALOGI("EventThreadConnection::stealReceiveChannel");
        if (mChannel.initCheck() != NO_ERROR) {
            return binder::Status::fromStatusT(NAME_NOT_FOUND);
        }

        // 将当前连接的接收文件描述符(fd)移动到 outChannel 的接收端,这实际上转移了接收通道的所有权。
        outChannel->setReceiveFd(mChannel.moveReceiveFd());
        // 复制当前连接的发送文件描述符,并将复制的文件描述符设置为 outChannel 的发送端。
        // 使用 base::unique_fd 管理复制的文件描述符,确保在不再需要时自动关闭
        outChannel->setSendFd(base::unique_fd(dup(mChannel.getSendFd())));
        return binder::Status::ok();
    }
传入的参数 outChannel 实际上是 BitTube 类型,也就是在 SurfaceFlinger::createDisplayEventConnection 中创建的 BitTube 对象 (对象名为 mDataChannel)。从参数命名上看,outChannel 是一个出参,用于 socket 通信。这里通过设置接收和发送的 fd,完成了对 BitTube 的设置。
最后,我们看一下 BitTube 类的两个设置方法:
cpp
# BitTube.cpp

    void BitTube::setReceiveFd(base::unique_fd&& receiveFd) {
        mReceiveFd = std::move(receiveFd);
    }

    void BitTube::setSendFd(base::unique_fd&& sendFd) {
        mSendFd = std::move(sendFd);
    }

# BitTube.cpp

    mutable base::unique_fd mSendFd;
mutable base::unique_fd mReceiveFd;可以看到,BitTube 使用两个成员变量分别控制接收和发送的 fd。
2.2 把socket的接收fd设置给 Looper
2.1 小节介绍了应用如何将连接添加到 mDisplayEventConnections 集合中,并创建了 BitTube,设置了接收和发送的 fd。
接下来,我们继续看看 DisplayEventDispatcher::initialize 做了什么。
arduino
# DisplayEventDispatcher.cpp
    status_t DisplayEventDispatcher::initialize() {
        // 检查初始化状态
        status_t result = mReceiver.initCheck();
        if (result) {
            ALOGW("Failed to initialize display event receiver, status=%d", result);
            return result;
        }

        if (mLooper != nullptr) {
            // 将 fd 添加到 mLooper,以便监听输入事件
            int rc = mLooper->addFd(mReceiver.getFd(), 0, Looper::EVENT_INPUT, this, NULL);
            if (rc < 0) {
                return UNKNOWN_ERROR;
            }
        }

        return OK;
    }
这里最终会将 socket 事件接收的 fd 设置给 mLooper,用于监听输入事件。这样,当 VSync 到来时,mLooper 就能监听到。
为了证明上述结论,我们还需要确认两个问题:
-
Looper::addFd方法传递的mReceiver.getFd()是否是 2.1.2 小节分析的接收 fd,也就是BitTube中的mReceiveFd变量。
-
Looper内部监听到 fd 的事件后,是如何传递到应用端的,也就是如何触发上层CallbackRecord::run的执行的。
2.2.1 getFd 是什么
先来看一下这个里的 getFd 返回的是什么。
arduino
# DisplayEventReceiver.cpp
    int DisplayEventReceiver::getFd() const {
        if (mDataChannel == nullptr) return mInitError.has_value() ? mInitError.value() : NO_INIT;

        return mDataChannel->getFd();
    }
这里的 mDataChannel 就是 2.1.2 小节中创建的 BitTube 对象。
arduino
# BitTube.cpp

    int BitTube::getFd() const {
        // socket 接收事件的fd
        return mReceiveFd;
    }

# BitTube.h

    mutable base::unique_fd mSendFd;
    mutable base::unique_fd mReceiveFd;
因此,可以确认这里获取到的 fd 就是 BitTube 中的 mReceiveFd。
2.2.2 Looper::addFd
VSync 到来后,如何具体传输到应用端,将在后续文章中单独分析。
Looper::addFd 方法定义在 android/system/core/libutils/Looper.cpp 中。由于该方法较长,这里不再贴出。 从代码上看,它会对添加进来的 fd 进行监听,一旦发现有改变 (事件到来),就会触发消息执行 (这部分还需要进一步了解)。
2.3 小结
arduino
android_view_DisplayEventReceiver::nativeInit
    android_view_DisplayEventReceiver::NativeDisplayEventReceiver::init
        DisplayEventDispatcher::init
            Looper::init
            DisplayEventReceiver::DisplayEventReceiver   -- 链接建立
                SurfaceFlinger::createDisplayEventConnection
                    Scheduler::createDisplayEventConnection
                        Scheduler::createConnectionInternal
                            EventThread::createEventConnection
                                EventThreadConnection::onFirstRef
                                    EventThread::registerDisplayEventConnection -- 应用对应的链接添加到 mDisplayEventConnections 集合下
                BitTube::init
                EventThreadConnection::stealReceiveChannel  -- socket通道处理
                    BitTube::setReceiveFd   -- 设置接收事件的fd到mReceiveFd
                    BitTube::setSendFd      -- 设置发送事件的fd到mSendFd
    NativeDisplayEventReceiver::initialize  -- socket的接收fd处理
        DisplayEventReceiver::getFd   -- 拿到mReceiveFd
        Looper::addFd                 -- mReceiveFd设置到Looper中
经过这个调用链后,应用的链接就被添加到 mDisplayEventConnections 中了。
3. 补充:dump 应用链接
可以使用以下命令对 SurfaceFlinger 进行 dump:
bash
adb shell dumpsys SurfaceFlinger > sf.txt输出和应用链接相关的内容如下:
rust
  pending events (count=0):
  connections (count=18):
    Connection{0xb400007218713eb0, VSyncRequest::None}
    Connection{0xb4000072187915b0, VSyncRequest::None}
    Connection{0xb4000072187672b0, VSyncRequest::None}
    Connection{0xb400007218768270, VSyncRequest::None}
    Connection{0xb4000072187939b0, VSyncRequest::None}
    Connection{0xb400007218796350, VSyncRequest::None}
    Connection{0xb4000072187295d0, VSyncRequest::None}
    Connection{0xb400007218735e10, VSyncRequest::None}
    Connection{0xb40000721874c4f0, VSyncRequest::None}
    Connection{0xb40000721871c910, VSyncRequest::None}
    Connection{0xb400007218785c10, VSyncRequest::None}
    Connection{0xb400007218771930, VSyncRequest::None}
    Connection{0xb40000721872ac50, VSyncRequest::None}
    Connection{0xb4000072187848f0, VSyncRequest::None}
    Connection{0xb40000721876a550, VSyncRequest::None}
    Connection{0xb40000721873de50, VSyncRequest::None}
    Connection{0xb400007218750e10, VSyncRequest::None}
    Connection{0xb4000072187473f0, VSyncRequest::None}
可以看到当前有 18 个应用连接。
代码中控制输出的地方如下:
c
# EventThread.cpp

    void EventThread::dump(std::string& result) const {
        std::lock_guard<std::mutex> lock(mMutex);

        StringAppendF(&result, "%s: state=%s VSyncState=", mThreadName, toCString(mState));
        if (mVSyncState) {
            StringAppendF(&result, "{displayId=%s, count=%u%s}\n",
                        to_string(mVSyncState->displayId).c_str(), mVSyncState->count,
                        mVSyncState->synthetic ? ", synthetic" : "");
        } else {
            StringAppendF(&result, "none\n");
        }

        StringAppendF(&result, "  pending events (count=%zu):\n", mPendingEvents.size());
        for (const auto& event : mPendingEvents) {
            StringAppendF(&result, "    %s\n", toString(event).c_str());
        }

        StringAppendF(&result, "  connections (count=%zu):\n", mDisplayEventConnections.size());
        for (const auto& ptr : mDisplayEventConnections) {
            if (const auto connection = ptr.promote()) {
                StringAppendF(&result, "    %s\n", toString(*connection).c_str());
            }
        }
    }
参考:
<千里马学框架-SurfaceFlinger>