简介
介绍:Vold 是用来管理 android 系统的存储设备,如U盘、SD卡、磁盘等移动设备的热插拔、挂载、卸载、格式化
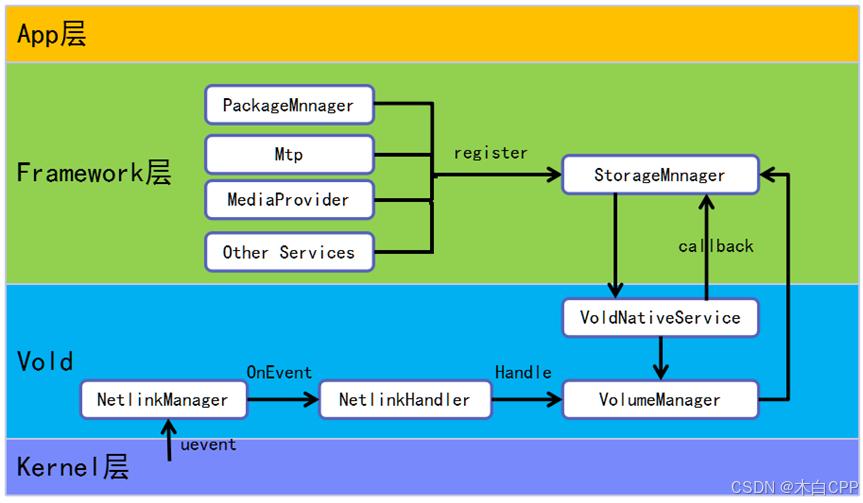
框架结构:Vold 在系统中以守护进程存在,是一个单独的进程。处于Kernel和Framework之间,是两个层级连接的桥梁。下图是Vold在Android系统的整体架构
组成
重要模块
• NetLinkManager(简称NM) :内部建立了 socket 连接,主要作用是接收来自 Kernel 的 Uevent 消息。例如SD卡的插拔等动作都会引起 Kernel 向 NM 发送 Uevent 消息
○ NetlinkHandler:负责解析内核的 Uevent ,它本质上是一个SocketListener类,它们的继承关系,即:NetlinkHandler、NetlinkListener和SocketListener继承关系如下:
• VolumeManager模块(简称VM) :Android13 中是VM处理完从NM接收到的NetlinkEvent后,通过binder将消息传递给StorageManagerService 进行下一步处理,然后 VM 根据 StorageManagerService 返回的消息管理卷
○ VoldNativeService模块 :主要是与 StorageManagerService 进行通信,继承 BinderService 类,启动过程中主要注册了接口,使其他服务可以通过IVold可以找到,然后启动线程
• StorageManager 模块:Framework 层的API,用于APP和其它系统组件访问存储相关的功能。它是 StorageManagerService 的客户端,通过 Binder 调用 StorageManagerService 提供的 API
Vold 启动流程
与其说是Vold启动流程,更不如说是Android存储的初始化工作,Vold的主要功能,就是存储区的管理。Android 的初始化工作可以大致分为三个阶段:
- 清理环境,因为Android是支持多用户的,启动时的可能是另一个用户,所以需要把之前的用户数据清理干净
- 启动存储服务,如Vold、StorageManager等等
- 挂载emulated存储(用于模拟SD卡,历史原因,下面章节会着重介绍)
第一个用户态进程init
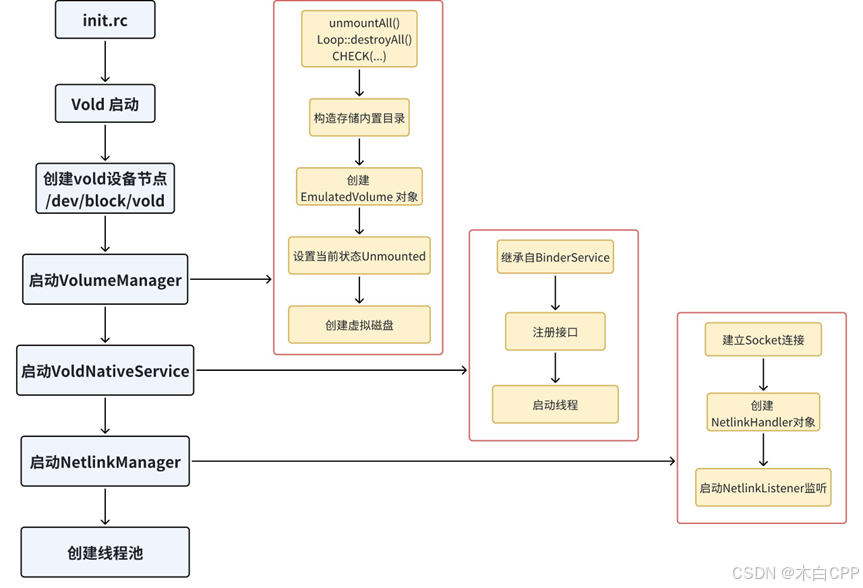
• init.rc 启动 Vold 进程
C++
//init.rc  片段
service vold /system/bin/vold \
--blkid_context =u:r:blkid:s0 --blkid_untrusted_context=u:r:blkid_untrusted:s0 \
--fsck_context =u:r:fsck:s0 --fsck_untrusted_context=u:r:fsck_untrusted:s0
class core
ioprio be 2
task_profiles ProcessCapacityHigh
shutdown critical
group root reserved_disk
reboot_on_failure reboot,vold-failed
bash
// adb shell -> ps -A | grep vold
130|shenoo:/mnt/media_rw # ps -A | grep vold // vold 的父进程PID=1(init)
root           471     1 11001604  9596 binder_wait_for_work 0 S vold
Vold 启动
动VolumeManager:
- VM 会先卸载掉对应文件夹中的所有东西,使之处于一个干净的状态;
- 通过VolumeBase基类智能指针new了一个EmulatedVolume对象,同时构造出内置存储目录(/data/media);
- 在create函数中,执行了doCreate,doCreate是虚函数,在EmulatedVolume中并没有实现,所以最终还是调用了基类函数,也就直接返回了。之后的listener则是StorageManager服务,但是由于Vold启动较早,SystemServer还没有启动StorageManager,所以这里getListener()得到的是空,后面StorageManager启动完成后会重新触发。
- 设置了当前存储设备的状态为unmounted。
- 最后Vold会创建一个虚拟磁盘
• 启动VoldNativeService:VoldNativeService依赖的是aidl接口逻辑,连接着StorageManager和vold。它继承自BinderService,启动过程中主要注册了接口,使其他服务可以通过 IVold 可以找到,然后启动线程。
• 启动NetlinkManager:启动过程中内部建立了一个socket连接,用于接收所有的uevent事件,最后会new一个NetlinkHandler对象,并执行start函数。然后调用NetlinkListener父类的startListener函数去监听event。
• 总之,Vold启动完成后,后续Vold会监听kernel的uevent事件,然后处理转发通过Callback通知到StorageManager,而Framework的服务以及App则可以通过StorageManager去使用Vold处理Command
cpp
int main(int argc, char** argv) {
    ... //忽略部分代码
    ATRACE_BEGIN("main");
    VolumeManager* vm;
    NetlinkManager* nm;
    parse_args(argc, argv); //解析传递的参数
    ...
    mkdir("/dev/block/vold", 0755);
    ...
    //创建 VolumeManager 实例
    if (!(vm = VolumeManager::Instance())) {
        LOG(ERROR) << "Unable to create VolumeManager";
        exit(1);
    }
    //创建 NetlinkManager 实例
    if (!(nm = NetlinkManager::Instance())) {
        LOG(ERROR) << "Unable to create NetlinkManager";
        exit(1);
    }

    if (android::base::GetBoolProperty("vold.debug", false)) {
        vm->setDebug(true);
    }
    //启动 VolumeManager
    if (vm->start()) {
        PLOG(ERROR) << "Unable to start VolumeManager";
        exit(1);
    }
    ...
    VoldConfigs configs = {};
    if (process_config(vm, &configs)) {
        PLOG(ERROR) << "Error reading configuration... continuing anyways";
    }
    ...
    android::hardware::configureRpcThreadpool(1, false /* callerWillJoin */);
    ...
    //VoldNativeService它是一个binder服务,start方法会把它发布到ServiceManager中
    if (android::vold::VoldNativeService::start() != android::OK) {
        LOG(ERROR) << "Unable to start VoldNativeService";
        exit(1);
    }
    ...
    //启动 NetlinkManager
    if (nm->start()) {
        PLOG(ERROR) << "Unable to start NetlinkManager";
        exit(1);
    }
    ...
    android::IPCThreadState::self()->joinThreadPool();//加入线程池
    LOG(INFO) << "vold shutting down";
    exit(0);
}
启动 storaged 服务
此外,系统还会启动与Vold息息相关的服务,比如它的上游服务------StorageManagerService,大致流程如下:
Bash
init.rc -> Zygote -> SystemServer -> StorageManagerService具体:
• 开机后,安卓启动的第一个用户态进程是init,init进程会fork出zygote进程,zygote又fork出 system server
zygote fork system server
Java
zygoteServer = new ZygoteServer(isPrimaryZygote);• SystemServer 启动函数入口
zygote 启动服务
Java
     /**
     * The main entry point from zygote.
     */
    public static void main(String[] args) {
        new SystemServer().run();
    }
•	SystemServer().run()会启动各种service
通过 run() 启动各种服务
Java
779      private void run() {
            .......
955          // Start services.
956          try {
957              t.traceBegin("StartServices");
958              startBootstrapServices(t);
               .....
962          } catch (Throwable ex) {
963              Slog.e("System", "******************************************");
964              Slog.e("System", "************ Failure starting system services", ex);
965              throw ex;
966          }
            ........
• 在startBootstrapServices函数里会启动 ActivityManager
StartActivityManager
Java
1073      private void startBootstrapServices(@NonNull TimingsTraceAndSlog t) {
            .......
1144          t.traceBegin("StartActivityManager");
1145          // TODO: Might need to move after migration to WM.
1146          ActivityTaskManagerService atm = mSystemServiceManager.startService(
1147                  ActivityTaskManagerService.Lifecycle.class).getService();
1148          mActivityManagerService = ActivityManagerService.Lifecycle.startService(
1149                  mSystemServiceManager, atm);
1150          mActivityManagerService.setSystemServiceManager(mSystemServiceManager);
1151          mActivityManagerService.setInstaller(installer);
1152          mWindowManagerGlobalLock = atm.getGlobalLock();
1153          t.traceEnd();
启动systemReady()函数
Java
 2829          // We now tell the activity manager it is okay to run third party
2830          // code.  It will call back into us once it has gotten to the state
2831          // where third party code can really run (but before it has actually
2832          // started launching the initial applications), for us to complete our
2833          // initialization.
2834          mActivityManagerService.systemReady(() -> {
2835              Slog.i(TAG, "Making services ready");
2836              t.traceBegin("StartActivityManagerReadyPhase");
2837              mSystemServiceManager.startBootPhase(t, SystemService.PHASE_ACTIVITY_MANAGER_READY);
2838              t.traceEnd();
2839              t.traceBegin("StartObservingNativeCrashes");
systemReady 实现
Java
8264 /**
8265 * Ready. Set. Go!
8266 */
8267 public void systemReady(final Runnable goingCallback, @NonNull TimingsTraceAndSlog t) {
8268 t.traceBegin("PhaseActivityManagerReady");
8269 mSystemServiceManager.preSystemReady();
8392 // On Automotive / Headless System User Mode, at this point the system user has already been
8393 // started and unlocked, and some of the tasks we do here have already been done. So skip
8394 // those in that case. The duplicate system user start is guarded in SystemServiceManager.
8395 // TODO(b/242195409): this workaround shouldn't be necessary once we move the headless-user
8396 // start logic to UserManager-land.
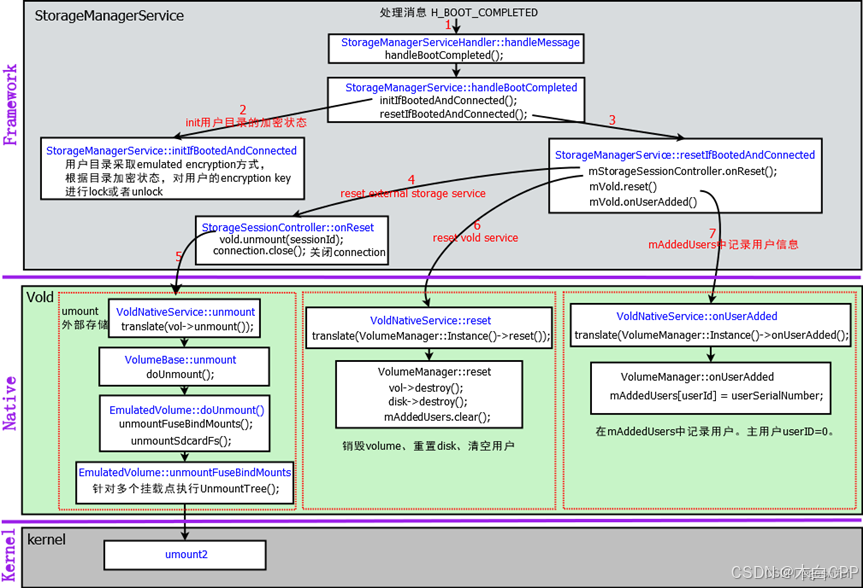
8397 mSystemServiceManager.onUserStarting(t, currentUserId);处理 H_BOOT_COMPLETED 消息