名词定义 单次网络IO: 执行一次Netty的Unsafe.beginRead();(因为这个beginRead()中可能会从内核读取多次数据)
1、作用
用于动态调整接收从网络上获取的数据
2、类图
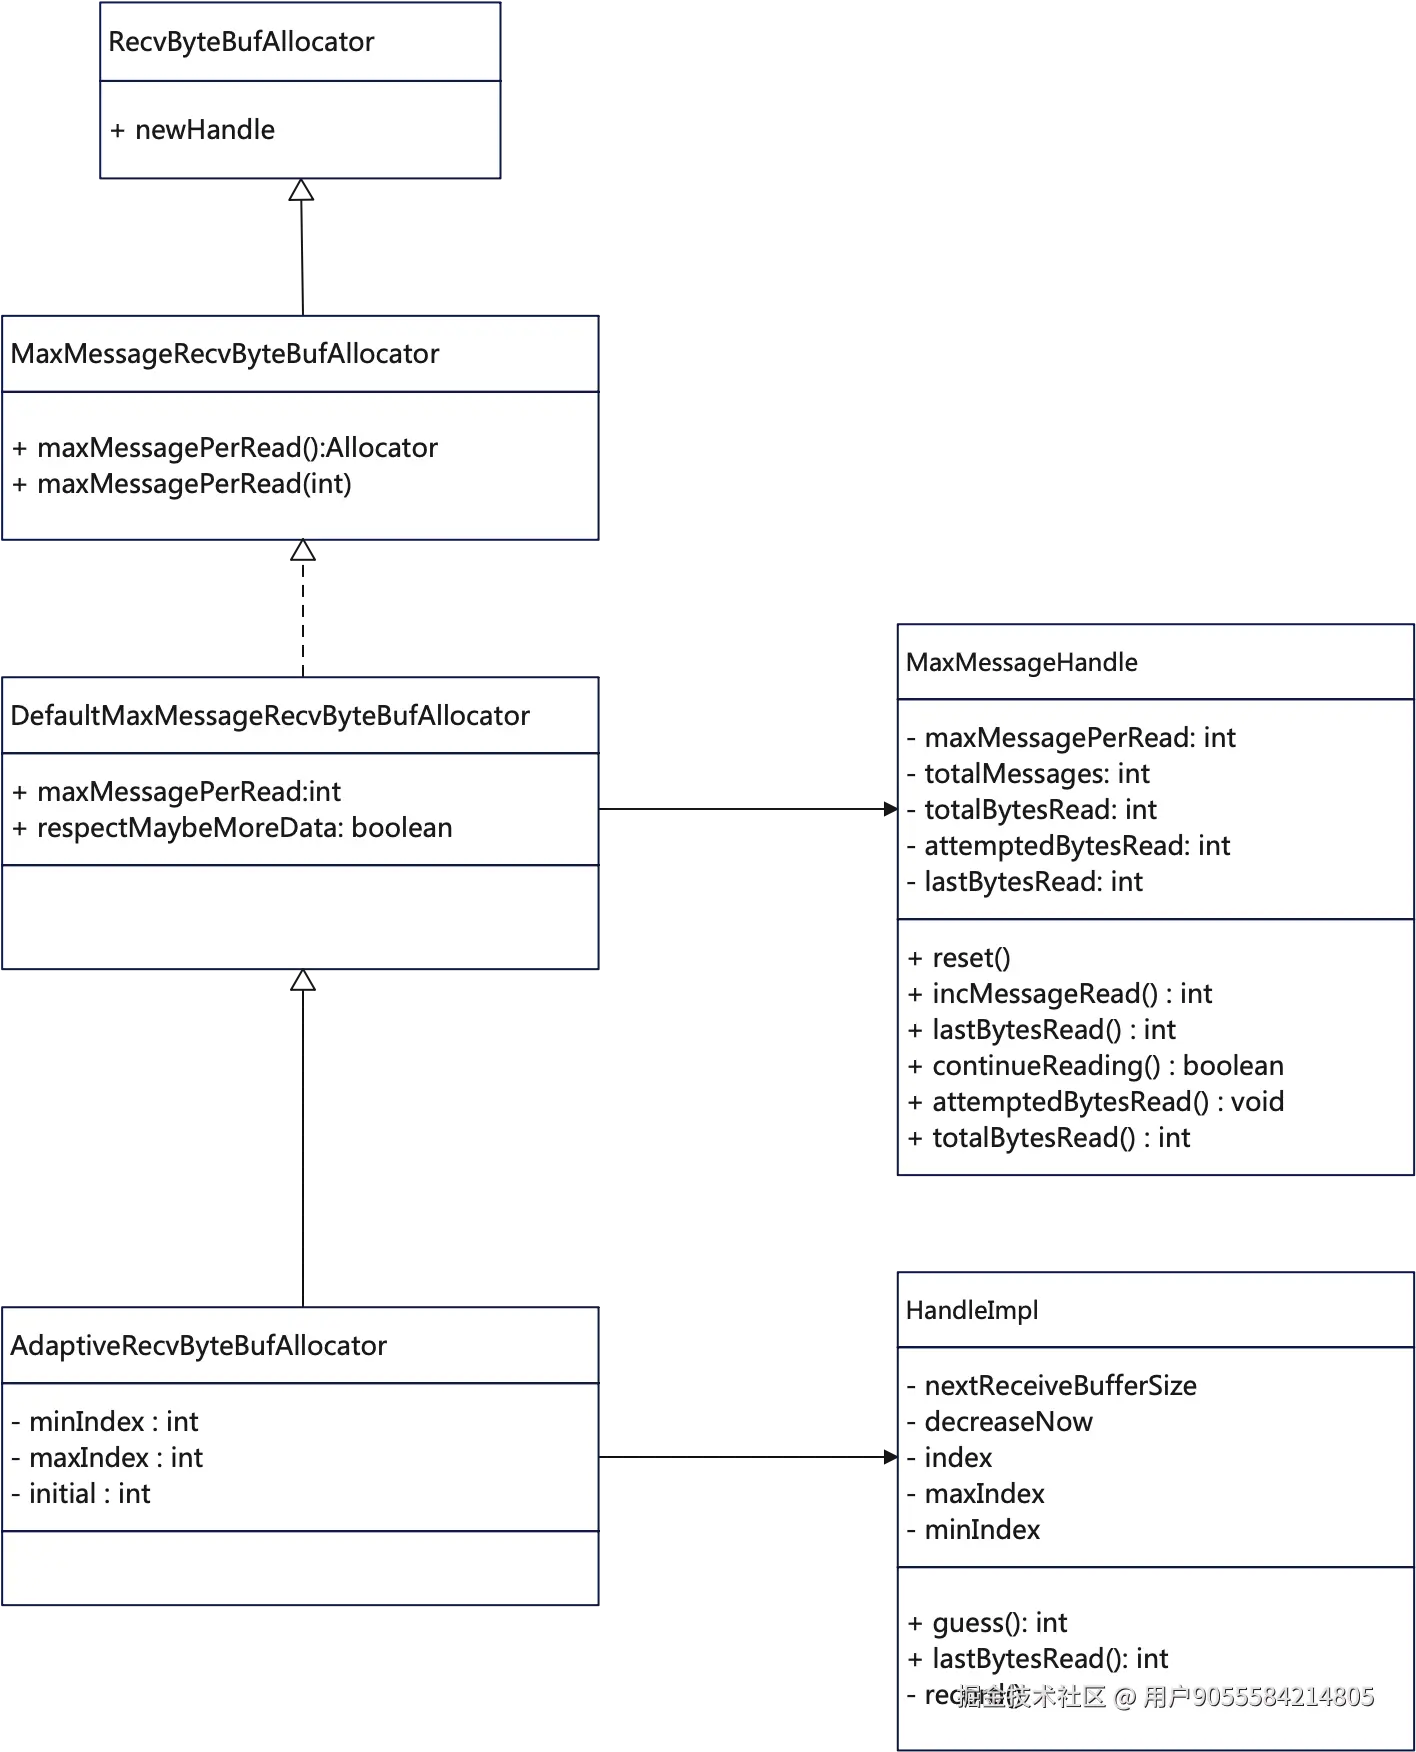
3、源码
本文基于4.1.38版本的AdaptiveRecvByteBufAllocator、Epoll模式进行源码分析
核心API介绍
AdaptiveRecvByteBufAllocator
核心变量
java
// 默认值
static final int DEFAULT_MINIMUM = 64;
static final int DEFAULT_INITIAL = 1024;
static final int DEFAULT_MAXIMUM = 65536;
// 自适应变化的时候,一次扩容2^4=16倍,缩容2^1=2倍;
private static final int INDEX_INCREMENT = 4;
private static final int INDEX_DECREMENT = 1;

// 每次读取的最大读取次数
private volatile int maxMessagesPerRead;
// 希望一次读取更多的数据
private volatile boolean respectMaybeMoreData = true;
// 最小读取的字节数的索引值
private int minIndex;
// 最大读取的字节数的索引值
private int maxIndex;
// 初始值
private int initial;
构造器
- 规格化minIndex、maxIndex、initial;
- 如果minIndex 对应的字节数小于minimum,那么就会minIndex+1
- 如果maxIndex对应的字节数大于maximum,就会maxIndex-1
- 默认参数是:minimum=64,initial=1024, maximum=64k
ini
public AdaptiveRecvByteBufAllocator(int minimum, int initial, int maximum) {
    ......
    int minIndex = getSizeTableIndex(minimum);
    if (SIZE_TABLE[minIndex] < minimum) {
        this.minIndex = minIndex + 1;
    } else {
        this.minIndex = minIndex;
    }

    int maxIndex = getSizeTableIndex(maximum);
    if (SIZE_TABLE[maxIndex] > maximum) {
        this.maxIndex = maxIndex - 1;
    } else {
        this.maxIndex = maxIndex;
    }

    this.initial = initial;
}
getSizeTableIndex
通过二分法,获取size对应的索引值
ini
private static int getSizeTableIndex(final int size) {
    for (int low = 0, high = SIZE_TABLE.length - 1;;) {
        if (high < low) {
            return low;
        }
        if (high == low) {
            return high;
        }

        int mid = low + high >>> 1;
        int a = SIZE_TABLE[mid];
        int b = SIZE_TABLE[mid + 1];
        if (size > b) {
            low = mid + 1;
        } else if (size < a) {
            high = mid - 1;
        } else if (size == a) {
            return mid;
        } else {
            return mid + 1;
        }
    }
}
HandleImpl
io.netty.channel.AdaptiveRecvByteBufAllocator.HandleImpl
关键变量
java
private ChannelConfig config;
// 单次IO读取message的次数;
private int maxMessagePerRead;
// 读取message的次数
private int totalMessages;
// 本次IO读取字节总量;
private int totalBytesRead;
// 单次期望读取的字节总量
private int attemptedBytesRead;
// 最近一次从内核读取的字节数(真实数据量)
private int lastBytesRead;
private final boolean respectMaybeMoreData = DefaultMaxMessagesRecvByteBufAllocator.this.respectMaybeMoreData;
private final UncheckedBooleanSupplier defaultMaybeMoreSupplier = new UncheckedBooleanSupplier() {
    @Override
    public boolean get() {
    // 通过判断预计读取的字节数和真实读取的字节数相比较;若相同, 说明可能还有数据
    // 如果不相等,说明真实读取的字节数小于预计,那么说明内核中没有可读数据了;那也就不用再读了;
        return attemptedBytesRead == lastBytesRead;
    }
};
构造器
- 设置minIndex、maxIndex、index
- 比较重要的nextReceiveBufferSize变量,表示下一次recvBuffer的大小;它是如何动态变化呢?看后文
ini
HandleImpl(int minIndex, int maxIndex, int initial) {
    this.minIndex = minIndex;
    this.maxIndex = maxIndex;

    index = getSizeTableIndex(initial);
    nextReceiveBufferSize = SIZE_TABLE[index];
}
lastBytesRead
scss
public void lastBytesRead(int bytes) {
    // 如果从网卡中上去的真实数据的数量和预期要读的数据的数量是一致的话,那么就进行一次记录
    // 为动态扩缩容做准备
    if (bytes == attemptedBytesRead()) {
        record(bytes);
    }
    // 给lastBytesRead变量赋值,将当次的字节数加入到totalBytesRead里面;
    super.lastBytesRead(bytes);
}
record
ini
private void record(int actualReadBytes) {
    // 如果真实读到的字节数小于等于index-1-1对应的字节数,
    // 第一次小于,那么只是将decreaseNow设置为true
    // 第二次小于的时候,就会进行索引;
    // 扩展一下,也就是两次网络IO读取的数据都比较小,就会触发缩容
    if (actualReadBytes <= SIZE_TABLE[max(0, index - INDEX_DECREMENT - 1)]) {
        if (decreaseNow) {
            index = max(index - INDEX_DECREMENT, minIndex);
            nextReceiveBufferSize = SIZE_TABLE[index];
            decreaseNow = false;
        } else {
            decreaseNow = true;
        }
    // 如果真实读取的数据大于nextReceiveBufferSize,index从(index+4,maxIndex)中获取最小的那个参数,同时将decreaseNow设置为false
    // 最大recvBuf的大小是64k
    } else if (actualReadBytes >= nextReceiveBufferSize) {
        index = min(index + INDEX_INCREMENT, maxIndex);
        nextReceiveBufferSize = SIZE_TABLE[index];
        decreaseNow = false;
    }
}
readComplete
csharp
public void readComplete() {
    // 获取本次IO读取的总的字节数,进行做一个记录;
    // 这里的作用就是为了可能得缩容做准备
    record(totalBytesRead());
}
guess
csharp
public int guess() {
    // 返回下一次recvBuffer的大小;
    return nextReceiveBufferSize;
}
continueReading
typescript
public boolean continueReading() {
    return continueReading(defaultMaybeMoreSupplier);
}
public boolean continueReading(UncheckedBooleanSupplier maybeMoreDataSupplier) {
    // 可读 && 预期还有数据 && 读取数据的次数小于maxMessagePerRead &&读取总字节数大于0
    return config.isAutoRead() &&
           (!respectMaybeMoreData || maybeMoreDataSupplier.get()) &&
           totalMessages < maxMessagePerRead &&
           totalBytesRead > 0;
}
reset
信息重置,主要是maxMessagePerRead, totalMessages、totalBytesRead
ini
public void reset(ChannelConfig config) {
    this.config = config;
    maxMessagePerRead = maxMessagesPerRead();
    totalMessages = totalBytesRead = 0;
}
初始化AdaptiveRecvByteBufAllocator
创建一个EpollSocketChannel对象时,其内部会生成一个EpollSocketChannelConfig,在其父类DefaultChannelConfig中会创建AdaptiveRecvByteBufAllocator对象;
arduino
public EpollSocketChannel() {
    super(newSocketStream(), false);
    config = new EpollSocketChannelConfig(this);
}
在创建DefaultChannelConfig时
- 创建一个AdaptiveRecvByteBufAllocator
- 获取channel的metadata对象,然后设置defaultMaxMessagePerRead
- 注:这个Metadata对象是EpollSocketChannel(在AbstractEpollChannel)的常量;
scss
public DefaultChannelConfig(Channel channel) {
    this(channel, new AdaptiveRecvByteBufAllocator());
}

protected DefaultChannelConfig(Channel channel, RecvByteBufAllocator allocator) {
    setRecvByteBufAllocator(allocator, channel.metadata());
    this.channel = channel;
}
io.netty.channel.epoll.AbstractEpollChannel
- 这个ChannelMetadata中,defaultMaxMessagePerRead大小是16,也就是每次最多从网络IO中读取16次的数据量,防止由于单次响应结果数据量过大,导致这个EventLoop中Queue里面的其他任务无法执行,导致其他任务耗时增加的情况发生;
java
private static final ChannelMetadata METADATA = new ChannelMetadata(false);使用AdaptiveRecvByteBufAllocator进行动态分配内存
epollInReady
源码位置: io.netty.channel.epoll.AbstractEpollStreamChannel$EpollStreamUnsafe 简单逻辑如下:(详细可看代码解释)
- 获取EpollRecvByteAllocatorHandle,这个是代理类,代理了AdaptiveRecvByteBufAllocator.HandleImpl对象;
- 设置handle的处理模式是Native.EPOLLET
- 从channelConfig中获取Allocator,准备开始分配数据了;
- 分配一块内存,这块内存的大小由guess()决定,
- 分配完成后,将内核中的数据写入到这个ByteBuf对象中,同时设置allocHandle的最近一次读取数据的字节数(lastBytesRead)
- incMessage() 将读取次数加1;
- 触发pipeline.fireChannelRead()
- 判断是否可读(continueReading):如果可读,则继续读;不可读,跳出循环;
ini
void epollInReady() {
    final ChannelConfig config = config();
    if (shouldBreakEpollInReady(config)) {
        clearEpollIn0();
        return;
    }
    // 1. 获取Handle对象,这块是对AdaptiveRecvByteBuf$HandlerImpl的包装、代理;
    final EpollRecvByteAllocatorHandle allocHandle = recvBufAllocHandle();
    allocHandle.edgeTriggered(isFlagSet(Native.EPOLLET));

    final ChannelPipeline pipeline = pipeline();
    // 2. 获取Allocator,准备开始分配内存了;
    final ByteBufAllocator allocator = config.getAllocator();
    allocHandle.reset(config);
    epollInBefore();

    ByteBuf byteBuf = null;
    boolean close = false;
    try {
        Queue<SpliceInTask> sQueue = null;
        do {
            ......

            // we use a direct buffer here as the native implementations only be able
            // to handle direct buffers.
            // 分配内存,这块是一个重点,扩展讲下,他会从guess()中获取,guess()返回的是下一次可以申请的最大字节数;
            byteBuf = allocHandle.allocate(allocator);
            // 简单总结:从IO读取数据,设置lastBytesRead,attemptedBytesRead
            allocHandle.lastBytesRead(doReadBytes(byteBuf));
            // 如果没有读取到数据,则返回
            if (allocHandle.lastBytesRead() <= 0) {
                // nothing was read, release the buffer.
                byteBuf.release();
                byteBuf = null;
                close = allocHandle.lastBytesRead() < 0;
                if (close) {
                    // There is nothing left to read as we received an EOF.
                    readPending = false;
                }
                break;
            }
            // 读取次数+1
            allocHandle.incMessagesRead(1);
            readPending = false;
            pipeline.fireChannelRead(byteBuf);
            byteBuf = null;

            if (shouldBreakEpollInReady(config)) {
            ......
                break;
            }
            // 可读 & lastBytesRead==attemptedBytesRead & 没有超过最大字节数 &&已读字节数>0
        } while (allocHandle.continueReading());

        // 说明本次IO读取完成,设置一下信息,为自适应扩缩容提供数据
        allocHandle.readComplete();
        pipeline.fireChannelReadComplete();

        if (close) {
            shutdownInput(false);
        }
    } catch (Throwable t) {
        handleReadException(pipeline, byteBuf, t, close, allocHandle);
    } finally {
       // 如果本次IO没有读取完成呢? 那么就需要将其封装后,在等下一次轮回~~
        epollInFinally(config);
    }
}
epollInFinally
scss
final void epollInFinally(ChannelConfig config) {
    // 判断是否还有更多数据,判断依据:期望读取的字节数=真实读取的字节数
    maybeMoreDataToRead = allocHandle.maybeMoreDataToRead();
    // 检测对端是否已经处于禁止写入状态(半关闭状态) ,
    // || 是否在读挂起状态并且还有更多的数据要读
    if (allocHandle.isReceivedRdHup() || (readPending && maybeMoreDataToRead)) {
       .......
        executeEpollInReadyRunnable(config);
    } else if (!readPending && !config.isAutoRead()) {
       .......
        clearEpollIn();
    }
}
executeEpollInReadyRunnable
- 判断是否处于活跃状态、是否执行挂起、是否已经关闭
- 将这个runnable放到EventLoop的Queue中,准备再次执行
ini
final void executeEpollInReadyRunnable(ChannelConfig config) {
    if (epollInReadyRunnablePending || !isActive() || shouldBreakEpollInReady(config)) {
        return;
    }
    epollInReadyRunnablePending = true;
    eventLoop().execute(epollInReadyRunnable);
}

private final Runnable epollInReadyRunnable = new Runnable() {
    @Override
    public void run() {
        epollInReadyRunnablePending = false;
        epollInReady();
    }
};
总结
- 经典代码的变量命名是很值得推敲的,变量名不怕长(但也不能太长。。。),就怕词不达意;举例 :方法名executeEpollInReadyRunnable就很能表达当前这个方法的含义,
- 在执行特定场景的时候,使用到公共处理类,仍然希望做一些定制的行为变动;此时可以考虑使用委托者模式,类似于EpollRecvByteAllocatorHandle包装了AdaptiveRecvByteBufAllocator$HandleImpl;
- 自适应变化:一次扩容16倍,避免频繁扩缩容,缩容2倍,避免缩容太多,导致容量不足
- 自适应变化:最好是需要足够的统计数据进行数据支撑,不然自适应容易成为性能瓶颈
- 阅读代码时,先梳理轮廓,再看细节,方能头脑清醒