你是否曾经好奇,当你点击网页上的"提交"按钮后会发生什么?
比如:
- 如果你提交了一些信息,这些信息会发送到哪里?
- 是如何被处理的?
这些问题的答案都围绕着HTTP 请求的工作机制。
常见的 HTTP 请求类型
HTTP 请求有很多种类型,最常用的四种是:
- GET:用于获取信息
- POST:用于发送(提交)信息
- PUT:用于更新信息
- DELETE:用于删除信息
在本节课中,我们将重点学习 GET 和 POST 请求。
- GET 请求 :我们从某个来源(通常是网站)获取数据。
- POST 请求 :我们向某个来源发送数据,由它来处理,并返回响应。
JavaScript 中的异步事件处理
JavaScript 使用 事件循环(event loop) 来处理异步函数调用。
- 当程序运行时,函数调用会被加入一个**调用栈(stack)**中。
- 如果某些函数发出了网络请求并需要等待服务器响应,那么这些函数会被送到**任务队列(queue)**中等待执行。
- 一旦调用栈清空,任务队列中的函数才会被执行。
异步编程与 Promise
Web 开发者可以借助事件循环,让网页体验更加流畅,比如控制函数的调用时机和处理异步事件。
为了让异步事件处理更简单,ES6 引入了 Promise 。
Promise 是处理异步操作的一种新方式,比回调函数更直观、可读性更好。
fetch()、Promise 及 async/await
在接下来的学习中,我们将介绍如何使用:
fetch()函数发起请求,Promise处理响应,- 以及如何使用
async/await简化这些过程。
你很快就能掌握现代 JavaScript 中处理请求的关键技能!
使用 Fetch 的 GET 请求简介
我们将要学习的第一种请求类型是使用 fetch() 的 GET 请求。
fetch() 函数的作用:
- 创建一个包含 API 所需信息的请求对象;
- 将该请求对象发送到提供的 API 端点;
- 返回一个 Promise,该 Promise 最终解析为一个响应对象,该对象包含请求的状态和 API 返回的信息。

我们来一步步了解样板代码,看看如何使用 fetch() 创建一个 GET 请求。
首先,调用 fetch() 函数,并传入一个字符串形式的 URL 作为第一个参数,这个 URL 决定了请求的目标端点:
js
fetch('https://api-to-call.com/endpoint')接下来,通过链式调用 .then() 方法,在其第一个参数中,将 GET 请求的响应(response)传递给回调箭头函数。当 fetch() 返回的 Promise 状态变为已解决时,.then() 方法才会触发。
在回调函数中,响应对象的 ok 属性会返回一个布尔值。如果没有发生错误,response.ok 为 true,代码将返回 response.json()。
如果 response.ok 是假值(falsy),我们的代码会抛出一个错误:
javascript
throw new Error('Request failed!');.then() 方法的第二个参数可以是另一个箭头函数,它会在 Promise 被拒绝(rejected)时被触发。该函数接收一个 networkError 参数,该对象表示如果我们完全无法连接到端点(例如服务器宕机)时的错误信息。
最后,再添加一个 .then() 方法,这个方法会在前一个 .then() 成功执行后触发。它接收一个 jsonResponse 参数,即前一个 .then() 中 response.json() 的结果对象,我们可以根据需要对它进行处理。
发起get请求
在上一节中,我们学习了如何使用 fetch() 和 .then() 方法编写 GET 请求的样板代码。本节中,我们将实际应用这些代码,通过访问 Datamuse API,并将获取到的信息渲染到浏览器上。
Datamuse API 是一个为开发者设计的词语查询引擎。它可以在应用程序中使用,按照特定的条件查找在特定语境下可能出现的词语。
如果请求成功,我们将会收到一个数组,包含发音类似于我们在输入框中输入的单词的词语。
在完成每一个步骤的过程中,你可能会遇到一些错误。这是因为我们将某些步骤拆分成了更小的步骤,以方便理解。等到所有步骤完成后,这些错误就会消失。
**注意:**你可以使用浏览器的 DevTools 控制台(Console)查看你的代码输出的内容
- 要访问的api
js
const url = "https://api.datamuse.com/words?sl=";- 和查询条件做拼接
js
const getSuggestions = () => {
  const wordQuery = inputField.value;
  const endpoint = url + wordQuery;
}- 将参数传入fetch
js
const getSuggestions = () => {
  const wordQuery = inputField.value;
  const endpoint = url + wordQuery;
  fetch(endpoint, {cache: 'no-cache'}).then(response => {

  })
}
fetch(endpoint, { cache: 'no-cache' }):向 Datamuse API 发起 GET 请求,同时设置{ cache: 'no-cache' }来避免缓存响应。.then():处理异步返回的 Promise,解析 JSON 数据。- response:
response是从fetch()函数返回的 Promise 中解析出来的 响应对象 (Response对象)。fetch()会发出一个 HTTP 请求(这里是 GET 请求),然后返回一个 Promise 。这个 Promise 在请求完成后会被"解决"(resolved) ,解决后的值就是 一个 Response 对象,它包含了服务器返回的各种信息。
- 检查response的ok是否为真,如果是就返回response.json()
js
const getSuggestions = () => {
  const wordQuery = inputField.value;
  const endpoint = url + wordQuery;
  fetch(endpoint, {cache: 'no-cache'}).then(response => {
    if(response.ok){
      return response.json();
    }
  })
}- 请求失败时引发的异常:
在 .then() 里的回调函数中手动抛出一个错误(Exception)。
通常用于处理响应成功但状态不对 的情况,比如返回了 404 Not Found、500 Server Error,虽然网络连接是成功的。
js
const getSuggestions = () => {
  const wordQuery = inputField.value;
  const endpoint = url + wordQuery;
  fetch(endpoint, {cache: 'no-cache'}).then(response => {
    if(response.ok){
      return response.json();
    }
    throw new Error('Request failed!');
  })
}- 处理网络错误:
用来处理网络错误(如请求根本没发出去)
-
没有网络
-
DNS 解析失败
-
服务器根本没响应
js
const getSuggestions = () => {
  const wordQuery = inputField.value;
  const endpoint = url + wordQuery;
  fetch(endpoint, {cache: 'no-cache'}).then(response => {
    if(response.ok){
      return response.json();
    }
    throw new Error('Request failed!');
  },(networkError) => {
    console.log(networkError.message);
  })
}- 当请求因为网络问题完全失败时,不会执行第一个
.then()的回调,而是直接进入这个错误回调。 - 这类似于
.catch()的作用(只是写法不同)。
也可以通过catch简写成更加清晰的写法
js
fetch(endpoint, { cache: 'no-cache' })
  .then(response => {
    if (response.ok) {
      return response.json();
    }
    throw new Error('Request failed!');
  })
  .then(jsonResponse => {
    // 成功处理 JSON 数据
  })
  .catch(error => {
    console.log(error.message);
  });
处理get请求
在上一个练习中,我们使用 fetch() 函数向 Datamuse API 的端点发起了一个 GET 请求。然后,你使用了 .then() 方法并传入了两个回调函数作为参数 ------ 一个用于处理请求成功时的 Promise 结果,另一个用于处理请求失败时的网络错误。
在这个练习中,我们将继续链式调用另一个 .then() 方法,它会让我们可以使用从 API 返回的信息来操作网页内容!
请注意:如果在第一个 .then() 中返回了错误,那么后面的 .then() 方法将不会执行。
- 在之前的then方法后再链式调用一个then
js
  fetch(endpoint, {cache: 'no-cache'}).then(response => {
    if (response.ok) {
      return response.json();//状态码200,可以继续解析结果
    }
    throw new Error('Request failed!');//拿到了错误的状态码(404.500),
  }, networkError => {
    console.log(networkError.message)
  }).then(jsonResponse => {

  })
}- 在回调函数内部调用renderRawResponse函数
js
const url = 'https://api.datamuse.com/words?sl=';
const inputField = document.querySelector('#input');

const getSuggestions = () => {
  const wordQuery = inputField.value; //获取用户输入的单词
  const endpoint = `${url}${wordQuery}`; //用模版字符串拼接出请求的url

  fetch(endpoint, {cache: 'no-cache'}).then(response => {
    if (response.ok) {
      return response.json();
    }
    throw new Error('Request failed!');
  }, networkError => {
    console.log(networkError.message)
  }).then(jsonResponse => {
    renderRawResponse(jsonResponse);//对得到的结果进行一个解析
  })
}
js
// Renders response before it is modified
const renderRawResponse = (res) => {
  // Takes the first 10 words from res
  let trimmedResponse = res.slice(0, 10);
  // Manipulates responseField to render the unformatted response
  responseField.innerHTML = `<text>${JSON.stringify(trimmedResponse)}</text>`;
}- fetch: 浏览器提供的发送http请求的原生函数,返回一个 Promise。
- fetch()
在确定请求是否发送成功这点上,不需要我们去实现,浏览器(更准确说是 JS 引擎 + Fetch API)在后台判断结果 ,然后自动决定该走 .then() 的成功函数,还是 .catch()(或 .then(..., errorFn))的失败函数。
- js的promise是可以链式传递错误的。如果你在前面的
.then()里抛了一个错误,比如这句:
js
throw new Error('Request failed!');那这个错误会自动传递到后面的 .catch() 或 .then(undefined, errorHandler) 去处理。
所以,后面的 .then() 没写错误处理函数,其实是默认把错误"传下去了",你可以像这样加个 .catch():
js
fetch(endpoint, { cache: 'no-cache' })
  .then(response => {
    if (response.ok) {
      return response.json();
    }
    throw new Error('Request failed!');
  })
  .then(jsonResponse => {
    renderResponse(jsonResponse);
  })
  .catch(error => {
    console.error('发生了错误:', error.message);
  });
使用fetch发送post请求简介
在上一节练习中,我们已经成功地使用 fetch API 编写了一个 GET 请求,并通过处理 Promise 拿到了 Datamuse 提供的单词建议。
现在,我们将学习如何使用 fetch() 来构建 POST 请求!
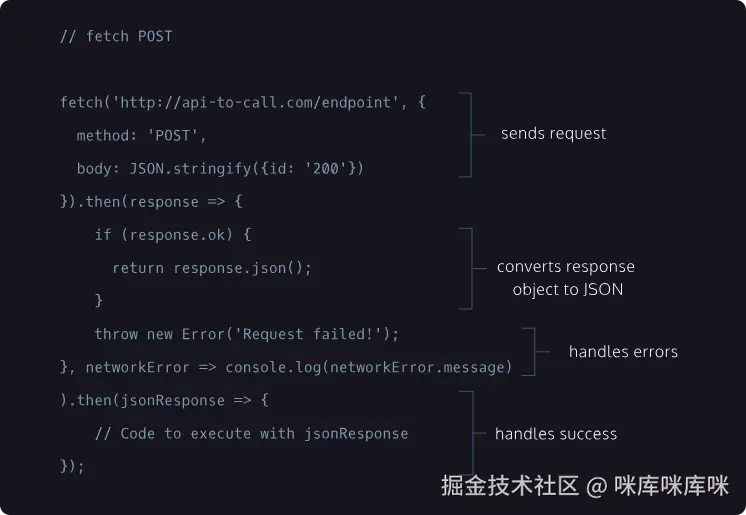
注意:fetch() 调用接收两个参数:
- 一个 endpoint(API 地址)
- 一个包含请求所需信息的 对象
这个作为第二个参数传给 fetch() 的对象包含两个属性:
method:值是'POST',表示这是一个 POST 请求;body:值是JSON.stringify({id: '200'}),表示要发送给 API 的信息内容(被序列化为 JSON 字符串)。
这个第二个参数决定了请求的方式(POST)以及要发送什么数据给服务器。
一个成功的 POST 请求会返回响应体(response body),它的内容取决于 API 的设计。
除了第二个参数的设置,其它写法与 GET 请求是一样的。
我们依然使用 .then() 方法链接到 fetch():
- 第一个
.then()用于检查响应是否成功、转换响应格式、以及在网络错误时抛出异常; - 第二个
.then()用于处理已经解析好的响应数据,做我们想做的事。
发起post请求
在上一节练习中,我们学习了如何使用 fetch() 和 .then() 编写 POST 请求的基础模板代码。
在本节练习中,我们将使用那段模板代码,通过 Rebrandly 的 URL 缩短服务 API 来实现一个功能:把一个长网址缩短成短链接。
我们将需要一个 Rebrandly 的 API 密钥(API key) 。
为此,请阅读 Rebrandly 的注册指南(sign up guide),以设置你的 API。
www.codecademy.com/article/reb...
请注意:
- 虽然在这些练习中使用你的 API 密钥是可以的,
- 但绝对不要将你的密钥分享给任何人(即使是在论坛里提问时也不要)!
- 另外,如果你在某个时间点重置了练习,你需要在代码顶部重新粘贴你的 API 密钥。
- 我们将在
shortenUrl()函数内部发起 POST 请求。
在 shortenUrl() 的代码块中,创建一个名为 urlToShorten 的常量变量,并将其赋值为 inputField.value。
urlToShorten 将保存输入框中输入的内容。
js
const apiKey = '<your api key>';
const url = 'https://api.rebrandly.com/v1/links';

// Some page elements
const inputField = document.querySelector('#input');
const shortenButton = document.querySelector('#shorten');
const responseField = document.querySelector('#responseField');

// Asynchronous functions
const shortenUrl = () => {
  const urlToShorten = inputField.value;
}- 在
urlToShorten声明的下面,创建另一个名为data的常量变量,并将其赋值为{ destination: urlToShorten }的字符串化结果。我们可以使用JSON.stringify()方法来完成这个操作。
这个 data 变量将用于发送信息到请求体中,而这些信息必须是字符串格式的。
js
const shortenUrl = () => {
  const urlToShorten = inputField.value;
  const data = JSON.stringify({destination: urlToShorten});
}
为什么需要这样做
当我们使用 fetch() 发起一个 POST 请求,我们通常是要"把一些数据发送给服务器",比如:
- 登录账号时:发送用户名和密码
- 添加任务时:发送任务内容和时间
- 缩短网址时:发送你输入的网址
那么问题来了,服务器要接收什么格式的数据?
服务器并不能直接理解一个 JavaScript 对象,比如这样:
js
{ destination: "https://example.com" } // JS对象服务器希望接收到的是一种标准格式,比如JSON 字符串,也就是这样:
json
"{\"destination\":\"https://example.com\"}" // 字符串格式- 转义字符是js语法要求
解决方案通常是使用json.stringify:
这个方法能把一个对象转成 JSON 字符串格式:
js
const data = JSON.stringify({ destination: urlToShorten });这样,fetch() 才能把 data 正确地放进请求体(body)里,服务器收到之后也能正确解析和使用它。
- 在我们声明完data变量之后,调用fetch函数,将url作为第一个参数传入,将一个空对象{}作为第二个参数传入
js
const shortenUrl = () => {
  const urlToShorten = inputField.value;
  const data = JSON.stringify({destination: urlToShorten});
  fetch(url, {})
}- 现在可以在空对象中添加一些参数了,添加一个属性,键为method,值为'POST'
js
const shortenUrl = () => {
  const urlToShorten = inputField.value;
  const data = JSON.stringify({destination: urlToShorten});
  fetch(url, {method:'POST'})
}- 在相同的对象中,加入其他参数,键为header,值为下列:
js
{
  'Content-type': 'application/json',
  'apikey': apiKey
}
我们将使用这个去调用api
js
const shortenUrl = () => {
  const urlToShorten = inputField.value;
  const data = JSON.stringify({destination: urlToShorten});
  fetch(url, {method:'POST', headers:{
  'Content-type': 'application/json',
  'apikey': apiKey
  }
})
}- 在同一个对象中(已经包含了method和headers属性),再添加一个属性:键为body,值为data
现在,我们已经创建好一个包含所有post请求所需信息的对象了
js
const shortenUrl = () => {
  const urlToShorten = inputField.value;
  const data = JSON.stringify({destination: urlToShorten});
  fetch(url, {method:'POST', headers:{
  'Content-type': 'application/json',
  'apikey': apiKey
  },
  body:data
})
}-
我们将要发送的数据放在了请求体(request body)中
-
method:'post'表示不是要获取数据,而是要发送数据给服务器
服务器接收到的数据:
http
POST /shorten-url HTTP/1.1
Content-Type: application/json

{"destination":"https://example.com"}
为什么发送get请求时不用写method 这是因为 ------ GET 是 fetch 的默认请求方式,所以你可以省略它。
处理POST请求
在上一个练习中,我们通过提供接口地址(endpoint)和包含所有必要信息的对象,完成了 POST 请求的设置。
在本练习中,我们将处理这个请求的响应。
该请求会返回一个 Promise,它要么被解决(resolve),要么被拒绝(reject)。
如果这个 promise 被解决了,我们就可以检查并返回响应(response)。
接着,我们会再链式调用一个 .then() 方法,处理返回的 JSON 对象,并把信息展示到网页上。
现在,让我们把这些知识应用到代码中吧!
- 我们在上一个练习中写好的fetch函数末尾链式添加一个then方法,在这个
.then()方法中,传入一个 箭头函数作为回调函数 ,这个箭头函数的唯一参数是response。
js
fetch(url, {
    method: 'POST',
    headers: {
      'Content-type': 'application/json',
      'apikey': apiKey
    },
    body: data
  }).then((response) => {

  })
}- 在then()方法的回调函数内部,检查response.ok的值,如果reposne.ok的值为真,则返回response.json()
js
fetch(url, {
    method: 'POST',
    headers: {
      'Content-type': 'application/json',
      'apikey': apiKey
    },
    body: data
  }).then((response) => {
    if(response.ok){
      return response.json();
    }
 })
response.ok是一个布尔值,只有当状态码在 200 到 299 之间 时才为true,也就是"请求成功"。
如果你想更明确地判断某个状态码,也可以这么写:
js
if (response.status === 200) {
  return response.json();
} else if (response.status === 404) {
  throw new Error('Not Found');
} else {
  throw new Error('Some other error');
}- response.ok为假时,抛出一个新的错误,错误信息应为'Request failed!'
js
fetch(url, {
    method: 'POST',
    headers: {
      'Content-type': 'application/json',
      'apikey': apiKey
    },
    body: data
  }).then((response) => {
    if(response.ok){
      return response.json();
    }
    throw new Error('Request failed!');
})-
作为then方法的第二个参数,添加另一个箭头回调函数,这个函数只接收一个参数networkError
在这个回调函数内部,打印networkError.message
通过添加这个第二个回调函数,你可以在少见的 网络错误发生时,让程序更加安全、稳定。
js
fetch(url, {
    method: 'POST',
    headers: {
      'Content-type': 'application/json',
      'apikey': apiKey
    },
    body: data
  }).then((response) => {
    if(response.ok){
      return response.json();
    }
    throw new Error('Request failed!');
  }, (networkError) => {
    console.log(networkError.message)
})- 在上一个then方法的尾部,再链式添加一个then方法
js
  	fetch(url, {
   method: 'POST',
   headers: {
     'Content-type': 'application/json',
     'apikey': apiKey
   },
   body: data
 }).then((response) => {
   if(response.ok){
     return response.json();
   }
   throw new Error('Request failed!');
 }, (networkError) => {
   console.log(networkError.message)
 }).then()
}- 在我们第二个
.then()方法中,传入一个匿名箭头函数 作为参数。这个回调函数只接收一个参数jsonResponse。
在这个回调函数内部,调用 renderResponse() 并将 jsonResponse 作为参数传入。
renderResponse() 是一个辅助函数,可以在 public/helperFunctions.js 文件中查看它的实现。
运行代码。
在网页的文本框中输入任意一个 URL,然后点击 "shorten" 按钮。请确保你输入的是完整的链接,包括 'http://' 或 'https://'。
js
const shortenUrl = () => {
 const urlToShorten = inputField.value;
 const data = JSON.stringify({destination: urlToShorten});

   fetch(url, {
   method: 'POST',
   headers: {
     'Content-type': 'application/json',
     'apikey': apiKey
   },
   body: data
 }).then((response) => {
   if(response.ok){
     return response.json();
   }
   throw new Error('Request failed!');
 }, (networkError) => {
   console.log(networkError.message)
 }).then((jsonResponse) => {
   renderResponse(jsonResponse);
 })
}
异步GET请求简介
在接下来的练习中,我们将把之前学到的关于 Promise 链式调用 的知识,结合 ES8 中引入的新功能 ------ async 和 await,让写法变得更简单。没错,你已经完成了困难的部分,现在是简化它的时候了!
我们将要写的请求结构和之前会有一点点不同。你会看到新的关键字:async 和 await,以及 try...catch 语句。
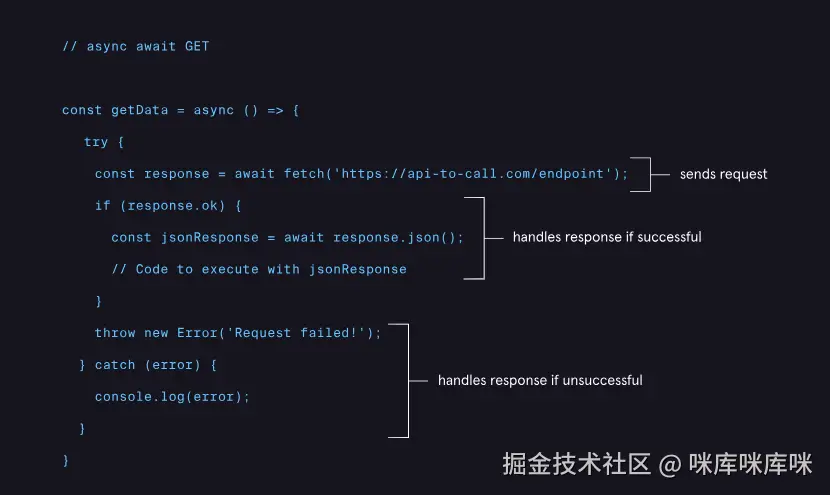
请看右侧图示。
以下是我们在学习代码时要牢记的一些重点:
-
async关键字用于声明一个异步函数 ,这个函数会返回一个 Promise。 -
await只能在async函数内部使用 ,它会在等待 Promise 处理完成时 暂停代码执行。 -
在
try...catch语句中:try代码块中的内容会被正常执行;- 如果出现异常,就会跳转到
catch代码块中运行。
请仔细阅读右侧的 async getData() 函数,看看如何使用 async 和 await 来编写这个请求。
创建一个异步get请求
在上一个练习中,我们学习了如何使用 async 和 await 来编写 GET 请求的模板代码。
在本练习中,我们将把这些代码实际运用起来,通过 Datamuse API 获取描述输入单词的名词(nouns) 。
- 在注释
"Asynchronous function"的下方,创建一个名为getSuggestions的常量变量,并将其设置为一个使用async关键字的箭头函数。
js
const getSuggestions = async() => {

}
你将在这个 getSuggestions() 函数内部完成本练习的所有代码编写。
- 在getSuggestions中创建一个const变量命名为wordQuery,并赋给它inputField.value
js
const getSuggestions = async() => {
  const wordQuery = inputField.value;
}- 创建另一个const变量命名为endpoint,并给它赋值一个字符串,字符串由url,queryParams,wordQuery拼接成
js
const getSuggestions = async() => {
  const wordQuery = inputField.value;
  const endpoint = url + queryParams + wordQuery;
}- 创建try......catch,try可以暂时为空代码块,catch需要将error打印到控制台
js
const getSuggestions = async() => {
  const wordQuery = inputField.value;
  const endpoint = url + queryParams + wordQuery;

  try{

  }catch(error){
    console.log(error);
  }
}- 在
try代码块内部,创建一个名为response的常量变量,并将其赋值为await fetch()的结果。调用fetch()时,使用endpoint作为第一个参数。
为了让这个 API 在 Codecademy 的浏览器中正常工作,需要传入第二个参数 {cache: 'no-cache'}。
js
const getSuggestions = async() => {
  const wordQuery = inputField.value;
  const endpoint = `${url}${queryParams}${wordQuery}`;
  const response = await fetch(endpoint, {cache: 'no-cache'} )
  try{
  }catch(error){
    console.log(error);
  }
}- 在上一步中声明的
response变量下面,创建一个条件语句 ,用于检查response的ok属性是否为真(truthy 值)。
如果条件成立(也就是说请求成功),就在这个条件语句的代码块中,使用 await response.json() 来解析返回的 JSON 数据,并将其保存到一个新的常量变量 jsonResponse 中。
js
 try{
   const response = await fetch(endpoint, {cache: 'no-cache'} );
   if(response.ok){
   const jsonResponse = await response.json();
   }
 }catch(error){
   console.log(error);
 }
}- 仍然在条件语句(
if判断)内部,调用函数renderResponse(),并传入jsonResponse作为参数。然后运行这段代码。
接着,在网页上的输入框中输入一个单词,并点击提交按钮。
太棒了!现在我们已经从 GET 请求中获得了一组整理好的词汇列表!
renderResponse() 函数的定义可以在 public/helperFunctions.js 文件中找到。
异步post请求
现在你已经学会了如何发送异步的 GET 请求,接下来我们开始了解异步的 POST 请求。
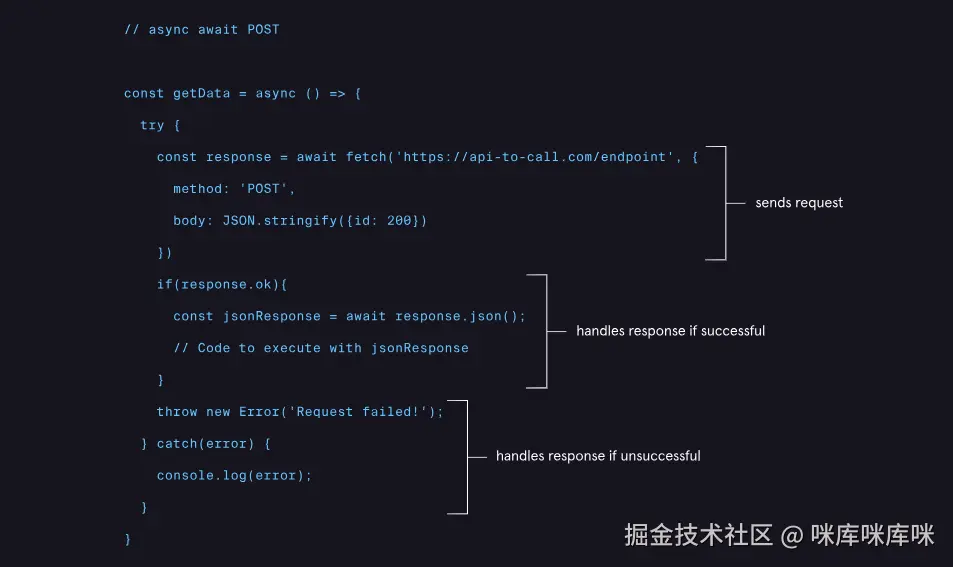
就像我们之前学到的一样,POST 请求需要更多的信息。请看右边的图表。
我们仍然会使用与异步 GET 请求相同的 try 和 catch 结构。但在调用 fetch() 时,我们现在需要传入一个额外的参数,这个参数包含了更多信息,例如 method 和 body。
其中,method 属性的值设为 'POST',用于指定我们要发送的是 POST 类型的请求。然后我们还需要包含一个 body 属性,它的值是 JSON.stringify({id: 200}),表示请求体中要发送的数据。
发起异步POST请求
既然我们已经学习了异步 POST 请求的基础代码结构,下一步就是将这些逻辑应用到实际的请求中。
在本练习中,我们需要获取 Rebrandly 的 API 密钥,以便访问 Rebrandly API。
然后,我们会将接口地址(endpoint)和请求对象作为参数传入 fetch() 方法中,来发起我们的 POST 请求。
fetch()函数应该写在try {}代码块中,而这个try {}应该放在shortenUrl()函数内部。
在 fetch() 函数中,传入 url 作为第一个参数,空对象 {} 作为第二个参数。
然后在这个空对象中添加以下三个属性:
method,值为'POST'body,值为dataheaders,值为以下对象:
js
{
  'Content-type': 'application/json',
  'apikey': apiKey
}
js
const shortenUrl = async () => {
const urlToShorten = inputField.value;
  const data = JSON.stringify({destination: urlToShorten});
  try {
    const response = await fetch(url, {
      method: 'POST',
      body: data,
      headers: {
        'Content-type': 'application/json',
        'apikey': apiKey
      }
    }
    );
      if(response.ok){
      const jsonResponse = await response.json();
      renderResponse(jsonResponse);
    }
  } catch (error) {
    console.log(error);
  }
}
总结
在本课中,我们学习了如何使用 Fetch API 和 async/await 关键字来发送 GET 和 POST 请求。让我们来回顾一下在之前的练习中涉及到的概念:
- GET 和 POST 请求有多种创建方式。
- 我们可以使用
fetch()和async/await异步地从 API 获取数据。 - Promise 是 JavaScript 中的一种对象,表示将来某个时间返回的数据。
fetch()函数可以用来发起请求,并且会返回一个 Promise。- 我们可以使用
.then()方法链式处理fetch()返回的 Promise。 async关键字用于创建异步函数,这些函数会返回 Promise。await关键字只能在用async声明的函数中使用。await会在 Promise 被解决之前暂停程序的执行。
恭喜你!你已经学会了关于异步请求的所有基础知识,包括 fetch()、async 和 await!这些概念是开发更强大 Web 应用程序的基础!