引言:
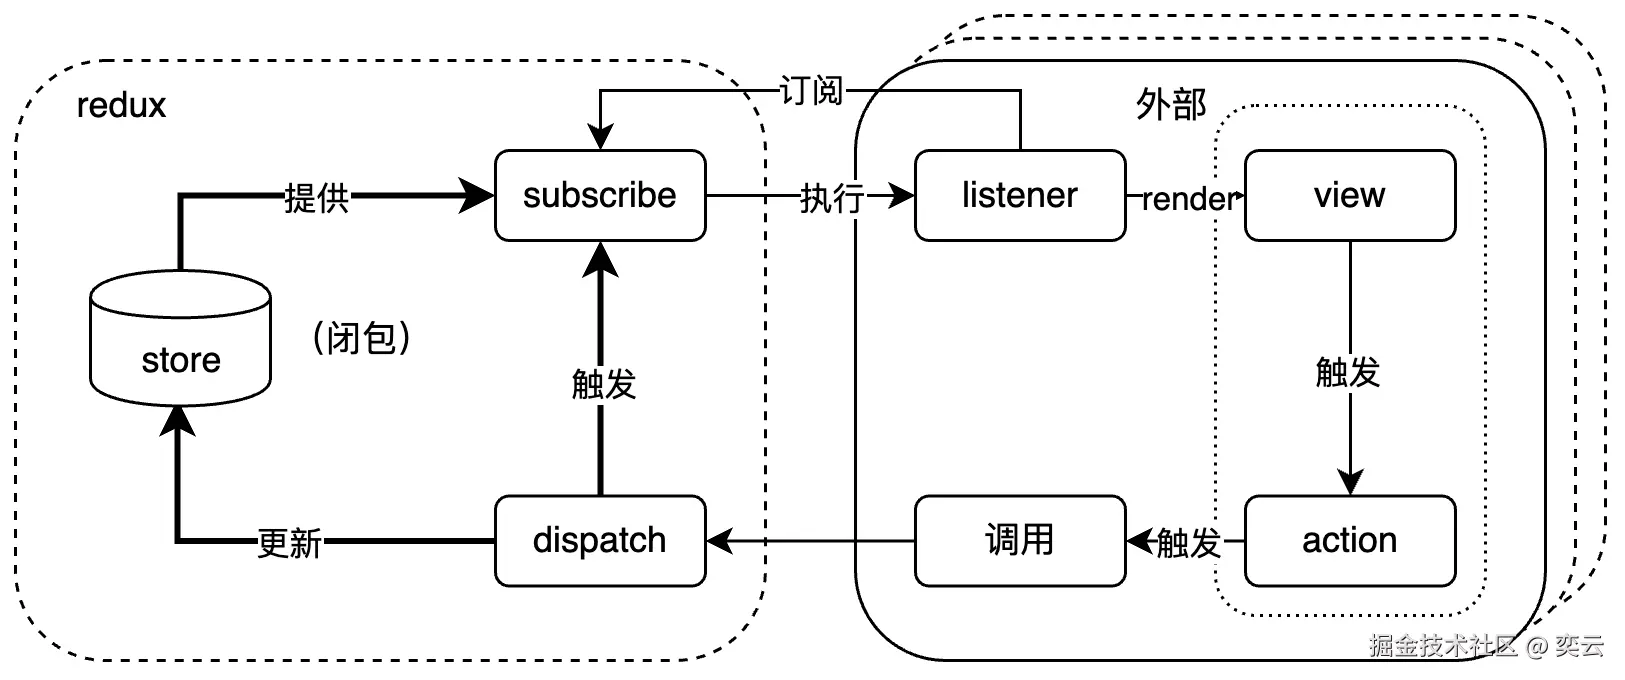
- redux采用闭包+订阅发布模式实现全局状态管理。
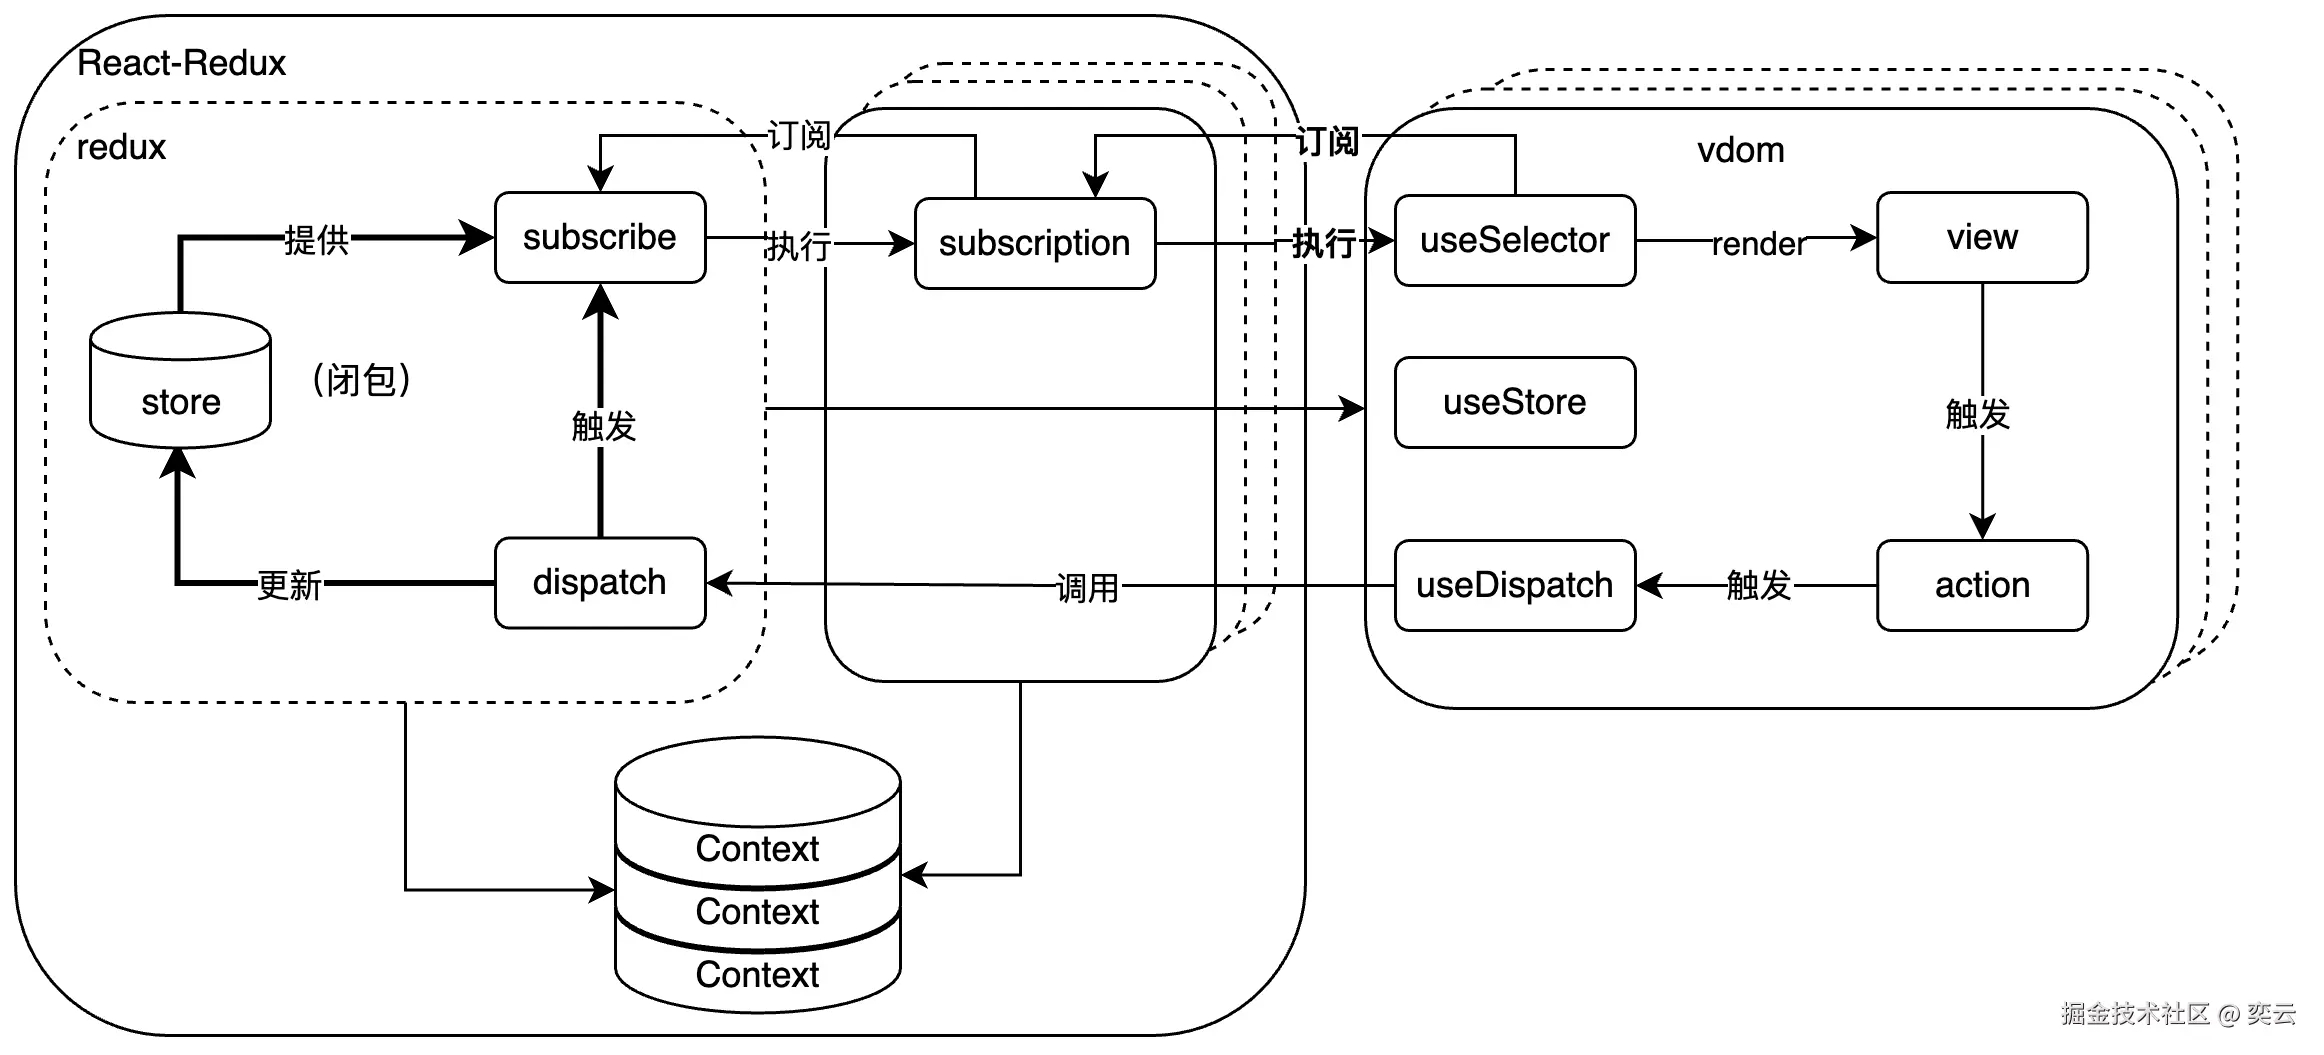
- react-redux 主要采用ReactContext将 redux store 共享给其他子组建。子组件使用 useSelector 订阅 store状态,该hook内部由 useSyncExternalStore和selector 实现,分别实现触发渲染和避免重复渲染的功能。使用useDispatch 更新store,然后触发一系列监听者,实现视图更新。
redux 实现原理
0. redux整体设计
在阅读源码前,我们先看看原生redux 是如何使用的:
js
// 首先定义一个reducer
function count(state, action) {
    const defaultState = {
        year: 2015,
    };
    state = state || defaultState;
    switch (action.type) {
        case 'add':
            return {
                year: state.year + 1
            };
        case 'sub':
            return {
                year: state.year - 1
            }
        default:
            return state;
    }
}
// store的创建
const createStore = require('redux').createStore;
const store = createStore(count);
// store里面的数据发生改变时,触发的回调函数
store.subscribe(function () {
    // render dom
    console.log('the year is: ', store.getState().year);
});

// action: 触发state改变的唯一方法(按照reducer的第二个参数)
const action1 = { type: 'add' };
const action3 = { type: 'sub' };
// 改变store里面的值
store.dispatch(action1); // 'the year is: 2016
store.dispatch(action3); // 'the year is: 2015
从使用中可以很明显的看到 redux 的核心功能 createStore()
我们这就看下这个函数的实现方式:
【输入】:reducer、初始值
【输出】:getState() 、subscribe()、dispatch()
- 利用将状态 保存在 currentState(闭包)中
- 通过发布订阅模式 派发状态变更
js
export function createStore(
  reducer, // 用户定义的 reducer
  preloadedState, // 初始值
  enhancer, // store增强, 本文暂不讨论
){
  // 1.参数处理,确保参数接收正确
  if(){
    ...
  }
  // 实现部分
  // 这里闭包变量,用于保存store的状态和监听器
  let currentReducer = reducer
  let currentState = preloadedState
  let currentListeners =  new Map() // 存放listeners
  let nextListeners = currentListeners
  let listenerIdCounter = 0 //
  let isDispatching = false // 是否处于 执行action 状态
  //使用 Map 存放 listener, 执行 subscribe 调用
  function ensureCanMutateNextListeners() {}
  // 获取当前状态
  function getState(){}
  // 添加订阅
  function subscribe(listener) {}
  // dispatch 方法
  function dispatch(action) {}
  // 替换reducer
  function replaceReducer(nextReducer) {}
  // 观察者模式
  function observable() {}
  // 执行reducer 初始化
  dispatch({ type: ActionTypes.INIT })
  const store = {
    dispatch,//用于 action 分发
    subscribe,//注册 listener,实现 state改变后,能够通知其他调用者
    getState, // 获取当前状态
    replaceReducer,// 替换reducer
    [$$observable]: observable
  }
  return store
}
接下来我们看下 getState() 、subscribe()、dispatch() 这个三个函数的实现
- getState()
【输入】:无
【输出】:全局状态
- 获取闭包中的 state
js
function getState {
    // 禁止在 reducer 中调用 getState
    if (isDispatching) {
      throw new Error()
    }
    return currentState
}- dispatch()
【输入】:action
【输出】:action
- 执行reducer,触发订阅器
js
//let currentReducer = reducer
 function dispatch(action) {
    try {
      isDispatching = true // 标注 分发状态,避免在 在执行recuer 过程中使用 getState()
      // 每次状态更新都会获取一个全新的 全局状态对象
      currentState = currentReducer(currentState, action) // 执行传入 reducer;
    } finally {
      isDispatching = false
    }
    const listeners = (currentListeners = nextListeners)
    // 触发订阅者回掉函数,todo: 为什么不把 currentState 直接传递到listener中
    listeners.forEach(listener => {
      listener()
    })
    return action
}- subscribe()
【输入】:listener
【输出】:取消订阅函数
js
// 闭包变量
// let currentListeners = new Map()
// let nextListeners = currentListeners

// 这里使用 两个 listener 列表,为避免在 执行reducer 过程中重新添加新的listener 出现死循环导致栈溢出
function ensureCanMutateNextListeners() {
    if (nextListeners === currentListeners) { // 在dispatch 中会同步 listeners
      nextListeners = new Map()
      currentListeners.forEach((listener, key) => {
        nextListeners.set(key, listener)
      })
    }
}
function subscribe(listener) {
    let isSubscribed = true // 设置某个订阅状态,用于标识是否被取消订阅
    ensureCanMutateNextListeners()
    const listenerId = listenerIdCounter++ // 设置监听器ID(key)
    nextListeners.set(listenerId, listener)
    // 返回 一个 取消监听器 的函数
    return function unsubscribe() {
      if (!isSubscribed) { // 避免多次调用 取消订阅,造成性能消耗
        return
      }
      isSubscribed = false
      ensureCanMutateNextListeners()
      nextListeners.delete(listenerId)
      currentListeners = null
    }
}
2. 其他功能
- combinReducers()
随着应用越来越大,一方面,不能把所有数据都放到一个reducer里面,另一方面,为每个reducer创建一个store维护起来页比较麻烦,因此需要对reducer进行分片整合。
还是先从使用入手:
js
// 创建两个reducer: count year
function count (state, action) {
  state = state || {count: 1}
  switch (action.type) {
    default:
      return state;
  }
}
function year (state, action) {
  state = state || {year: 2015}
  switch (action.type) {
    default:
      return state;
  }
}
// 将多个reducer合并成一个
var combineReducers = require('redux').combineReducers;
var rootReducer = combineReducers({
  count: count,
  year: year,
});
var createStore = require('redux').createStore;
var store = createStore(rootReducer);
源码实现:
【输入】:reducers 对象
【输出】:返回一个类似 reducer 的函数
- 首先拷贝传入对象,避免直接引用导致reducers被以外更改,出现状态不一致问题
- 遍历reducers 所有属性依次执行所有reducer
js
export default function combineReducers(reducers) {
  const reducerKeys = Object.keys(reducers)
  const finalReducers= {} // 拷贝 reducers
  for (let i = 0; i < reducerKeys.length; i++) {
    const key = reducerKeys[i]
    if (typeof reducers[key] === 'function') {
      finalReducers[key] = reducers[key] // 拷贝
    }
  }
  const finalReducerKeys = Object.keys(finalReducers)
  let shapeAssertionError
  try {
    assertReducerShape(finalReducers) // 验证reducer 参数
  } catch (e) {
    shapeAssertionError = e
  }
// 返回一个总reducers函数,其中联合了所有reducer,在触发dispatch 时通过遍历的方式 执行对应的action
// 实现功能:
// 1. 整合所有 reducer 的状态为一个状态,使用reducers 的key 作为每个 state 的key;
// 2. 遍历调用所有 reducer 函数
  return function combination(
    state = {},
    action
  ) {
    if (shapeAssertionError) {
      throw shapeAssertionError
    }
    let hasChanged = false
    // combineReducers 更新逻辑 遍历所有reducer
    const nextState = {}
    for (let i = 0; i < finalReducerKeys.length; i++) {
      const key = finalReducerKeys[i]
      const reducer = finalReducers[key]
      const previousStateForKey = state[key]
      // 注意:根据传入 action 执行所有reducers ,因此会导致相同的type 都被执行
      const nextStateForKey = reducer(previousStateForKey, action)
      nextState[key] = nextStateForKey // 整合所有reducer 的状态
      hasChanged = hasChanged || nextStateForKey !== previousStateForKey // 通过 === 确定是否改变状态
    }
    hasChanged =
      hasChanged || finalReducerKeys.length !== Object.keys(state).length
    return hasChanged ? nextState : state
  }
}- applyMiddleware()
- 只是一个 compose() 的使用
js
export default function applyMiddleware(...middlewares) {
  return createStore => (reducer, preloadedState) => { // 返回createStore 方法
    const store = createStore(reducer, preloadedState) // 创建 store
    let dispatch = () => {
      throw new Error(
        'Dispatching while constructing your middleware is not allowed. ' +
          'Other middleware would not be applied to this dispatch.'
      )
    }
    const middlewareAPI = {
      getState: store.getState,
      dispatch: (action, ...args) => dispatch(action, ...args)
    }
    const chain = middlewares.map(middleware => middleware(middlewareAPI)) //TODO: 创建中间件链
    dispatch = compose(...chain)(store.dispatch) // 组合函数,创建链式调用,将中间件插在 dispatch 之前执行
    return {
      ...store,
      dispatch // dispatch 替换
    }
  }
}

// 再看看redux-thunk的实现, next就是store里面的上一个dispatch
function thunkMiddleware({ dispatch, getState }) {
  return next => action =>
    typeof action === 'function' ?
      action(dispatch, getState) :
      next(action);
 }
3. 总结
通过看源码发现redux 实现还是比较简单 闭包+订阅发布模式 ,这使得它能够整合在任意框架中。那么他是如何整合在react中的呢?
2. react-redux
1. 整体设计
整体设计:react-redux 主要采用ReactContext 将 redux store 共享给其他子组建。子组件使用 useSelector 订阅 store状态,该hook内部由 useSyncExternalStore和selector 实现,分别实现触发渲染和避免重复渲染的功能,使用useDispatch 更新store,然后触发一系列监听者,实现视图更新。
2. 核心实现 Provider & useEelector
在使用react-redux 都需要在组件树顶端添加 Provider 同时,将 store 作为参数传入,我们这就看看 Provider 做了什么?
1. Provider 组件
【输入】:
- children: 子组件树
- store: redux store对象
- serverState: 支持SSR(本文不讨论)
- context: react Context组件,自定义redux 要使用context
【输出】:Context组件
主要工作内容:
- 创建订阅器,这里之所以要再次创建一个订阅器,而不是直接使用redux 原生的订阅器,是因为Provider可以多次调用 但所有Provider却共享同一个Context对象(这个我们可以在 ReactReduxContext 中看到),这样通过增加中间订阅器的形式,可以快速实现Provider卸载后取消订阅。
- 全局共享同一个 Context对象,并将其挂在到 全局对象上便于获取。
- 监听 contextValue ,在组件更新时,实现更新订阅者的功能。
js
// Provider 实现方式
function Provide(providerProps) {
// store 由 redux createStore 方法创建
  const { children, context, serverState, store } = providerProps
// 定义Context 的存储对象
  const contextValue = React.useMemo(() => {
    // 创建 订阅器
    const subscription = createSubscription(store)
    const baseContextValue = {
      store,
      subscription,
      getServerState: serverState ? () => serverState : undefined,
    }
    return baseContextValue
  }, [store, serverState])
// 保留状态,确定状态是否改变
  const previousState = React.useMemo(() => store.getState(), [store])
//根据环境(浏览器或者 native)使用 useEffect 或者 useLayoutEffect
  useIsomorphicLayoutEffect(() => {
    const { subscription } = contextValue
    subscription.onStateChange = subscription.notifyNestedSubs //指定订阅stroe 的回掉
    subscription.trySubscribe() // 创建订阅器
    if (previousState !== store.getState()) {// store 变更时主动 Provider的通知订阅者
      subscription.notifyNestedSubs()
    }
    return () => {
      subscription.tryUnsubscribe()
      subscription.onStateChange = undefined
    }
  }, [contextValue, previousState])
  const Context = context || ReactReduxContext // 创建Context 保存 store
  return <Context.Provider value={contextValue}>{children}</Context.Provider>
}- ReactReduxContext 实现源码
该变量的主要功能是为Provider组件提供Context对象
js
const ContextKey =  Symbol.for(`react-redux-context`)
// 获取全局对象
const gT = (
  typeof globalThis !== 'undefined'
    ? globalThis
    : {}
)
function getContext(){
  if (!React.createContext) return {}
// 这里将 Context挂载到全局 对象中,便于子组建能够在任何位置获取 Context对象
  const contextMap = (gT[ContextKey] ??= new Map())
  let realContext = contextMap.get(React.createContext)
  if (!realContext) {
    realContext = React.createContext(
      null,
    )
    if (process.env.NODE_ENV !== 'production') {
      realContext.displayName = 'ReactRedux'
    }
    contextMap.set(React.createContext, realContext)
  }
  return realContext;
}
export const ReactReduxContext = /*#__PURE__*/ getContext()- createSubscription(store)
创建一个订阅器,该订阅器收集来自vdom对状态的订阅,通过监听store 的变化,执行vdom的执行回掉。
tip: 可以先看 useEelector 的实现,在返回来看这里跟容易理解
js
const nullListeners = {
  notify() {},
  get: () => [],
}
// 发布订阅模式
export function createSubscription(store, parentSub) { // 这里的parentSub 主要目的是为了 类组件 在使用 connect时能够将子组件都传递到同一个Provider 订阅器上。
  let unsubscribe // 取消 store订阅的函数(streo.subscribe的返回值)
  let listeners = nullListeners
  let subscriptionsAmount = 0 // 订阅计数器
  let selfSubscribed = false
  // 添加订阅:useSelector 订阅 Provider 时使用的方法
  function addNestedSub(listener) {
    trySubscribe()
    const cleanupListener = listeners.subscribe(listener)
    // cleanup nested sub
    let removed = false
    return () => {
      if (!removed) {
        removed = true
        cleanupListener()
        tryUnsubscribe()
      }
    }
  }
// 执行 订阅回掉
  function notifyNestedSubs() {
    listeners.notify()
  }
// 订阅stoer变更时的回掉
  function handleChangeWrapper() {
    if (subscription.onStateChange) {
      subscription.onStateChange()
    }
  }

  function isSubscribed() {
    return selfSubscribed
  }
// 订阅 store
  function trySubscribe() {
    subscriptionsAmount++
    if (!unsubscribe) { // 检测是否已经订阅
      unsubscribe = parentSub // 订阅store
        ? parentSub.addNestedSub(handleChangeWrapper)
        : store.subscribe(handleChangeWrapper)

      listeners = createListenerCollection()
    }
  }
// 取消订阅 store
  function tryUnsubscribe() {
    subscriptionsAmount--
    if (unsubscribe && subscriptionsAmount === 0) {
      unsubscribe()
      unsubscribe = undefined
      listeners.clear()
      listeners = nullListeners
    }
  }

  function trySubscribeSelf() {
    if (!selfSubscribed) {
      selfSubscribed = true
      trySubscribe()
    }
  }

  function tryUnsubscribeSelf() {
    if (selfSubscribed) {
      selfSubscribed = false
      tryUnsubscribe()
    }
  }
  const subscription = {
    addNestedSub,
    notifyNestedSubs,
    handleChangeWrapper,
    isSubscribed,
    trySubscribe: trySubscribeSelf,
    tryUnsubscribe: tryUnsubscribeSelf,
    getListeners: () => listeners,
  }
  return subscription
}
// 订阅器 监听列表 双链结构
function createListenerCollection() {
  return {
// 清空订阅列表
    clear() {},
// 触发订阅回调
    notify() {},
// 获取订阅列表
    get() {},
// 添加订阅,返回取消订阅的方法
    subscribe(callback) {},
  }
}
2. useSelector
【输入】:
- selector: store分片函数
- equalityFnOrOptions: 状态比较函数
【输出】:
- state: 一个状态对象,变更后触发渲染
js
export const useSelector =createSelectorHook()
const refEquality = (a, b) => a === b
// useSelector 核心实现
export function createSelectorHook(context = ReactReduxContext) {
// 由useContext 实现,通过全局对象获取 Context 上的 value
  const useReduxContext =
    context === ReactReduxContext
      ? useDefaultReduxContext
      : createReduxContextHook(context) // 源码实现在下文
// 返回的 useSelector 函数内容
  const useSelector = (selector, equalityFnOrOptions = {}) => {
    const { equalityFn = refEquality } =
      typeof equalityFnOrOptions === 'function'
        ? { equalityFn: equalityFnOrOptions }
        : equalityFnOrOptions
    const reduxContext = useReduxContext()
    // 结构 value 值
    const { store, subscription, getServerState } = reduxContext
    //封装 selector函数
    const wrappedSelector = React.useCallback(
    // 先定义一个对象,然后通过【】获取属性,为获取其动态方法名,便于调试
      {
        [selector.name](state) {
          const selected = selector(state)
          return selected
        },
      }[selector.name],
      [selector],
    )
    // useSyncExternalStoreWithSelector 核心实现为 react 提供的 useSyncExternalStore
    // 这里是避免重复渲染的关键
    const selectedState = useSyncExternalStoreWithSelector(
      subscription.addNestedSub,
      store.getState,
      getServerState || store.getState,
      wrappedSelector,
      equalityFn,
    )
    React.useDebugValue(selectedState)
    return selectedState
  }
  //辅助ts进行类型推断
  Object.assign(useSelector, {
    withTypes: () => useSelector,
  })
  return useSelector
}- createReduxContextHook
js
export function createReduxContextHook(context = ReactReduxContext) {
  return function useReduxContext(): ReactReduxContextValue {
    const contextValue = React.useContext(context)
    return contextValue!
  }
}- useSyncExternalStoreWithSelector
【输入】
- subscribe:一个订阅器,添加订阅的方法
- getSnapshot: 获取状态值的方法
- getServerSnapshot: ssr 下获取状态值的方法
- seletor:切片函数,避免重复渲染的关键,实现更细粒度的状态监听
- isEqual: 状态比较函数,默认 ===
【输出】:一个 状态值
- 该hook是实现触发组件渲染和避免重复渲染的关键,其核心依赖react18 提供的新 hook useSyncExternalStore。 因此大家去研究一下 useSyncExternalStore的使用,就能理解这个函数的作用。到这里就能理解Provider创建 订阅器的原因了,既useSyncExternalStore 订阅 Provider,而Provider订阅 store。当store发生变更后会触发 Provider订阅回掉执行,而Provider订阅回掉又会执行 useSyncExternalStore 的订阅回掉,从而实现组件render,更新状态。至于为什么该hook不直接订阅store,可能是为了Provider能够完全卸载吧。(嵌套Provider使用的很多吗?)
- Selector切片原理就是创建更细粒度的状态值
- 注意这里使用了 subscription.addNestedSub,这个方法现在我们可以回到Provider中 Subscribtion的实现了。
js
function is(x, y) {
  return (x === y && (0 !== x || 1 / x === 1 / y)) || (x !== x && y !== y);
}
var objectIs = "function" === typeof Object.is ? Object.is : is,
  useSyncExternalStore = React.useSyncExternalStore,
  useRef = React.useRef,
  useEffect = React.useEffect,
  useMemo = React.useMemo,
  useDebugValue = React.useDebugValue;

export useSyncExternalStoreWithSelector = function (
  subscribe,
  getSnapshot,
  getServerSnapshot,
  selector,
  isEqual
) {
  var instRef = useRef(null);
  if (null === instRef.current) {
    var inst = { hasValue: !1, value: null };
    instRef.current = inst;
  } else inst = instRef.current;
// 创建 Seletor 切片函数
  instRef = useMemo(
    function () {
      function memoizedSelector(nextSnapshot) {
        if (!hasMemo) {
          hasMemo = !0;
          memoizedSnapshot = nextSnapshot;
          nextSnapshot = selector(nextSnapshot);
          if (void 0 !== isEqual && inst.hasValue) {
            var currentSelection = inst.value;
            if (isEqual(currentSelection, nextSnapshot))
              return (memoizedSelection = currentSelection);
          }
          return (memoizedSelection = nextSnapshot);
        }
        currentSelection = memoizedSelection;
        // 判断 原快照 是否改变
        if (objectIs(memoizedSnapshot, nextSnapshot)) return currentSelection;
        var nextSelection = selector(nextSnapshot);
        // 判断 selector 后的 快照是否被改变
        if (void 0 !== isEqual && isEqual(currentSelection, nextSelection))
          return (memoizedSnapshot = nextSnapshot), currentSelection;
        memoizedSnapshot = nextSnapshot;
        return (memoizedSelection = nextSelection);
      }

      var hasMemo = !1,// 是否第一次获取 快照
        memoizedSnapshot, // selector 前的快照
        memoizedSelection,// selector 后的快照
        maybeGetServerSnapshot =
          void 0 === getServerSnapshot ? null : getServerSnapshot;
      return [
        function () {
          return memoizedSelector(getSnapshot());
        },
        null === maybeGetServerSnapshot
          ? void 0
          : function () {
              return memoizedSelector(maybeGetServerSnapshot());
            }
      ];
    },
    [getSnapshot, getServerSnapshot, selector, isEqual]
  );
  // react18 useSyncExternalStore
  var value = useSyncExternalStore(subscribe, instRef[0], instRef[1]);
  useEffect(
    function () {
      inst.hasValue = !0;
      inst.value = value;
    },
    [value]
  );
  useDebugValue(value);
  return value;
};
3.其他功能
useDispatch 和 useStore hook 就比较简单,直接使用useContext 从context 获取 store 方法,这里就不讲了,直接看源码。
- useDispatch()
js
export const useDispatch = createDispatchHook()
// 获取 redux dispatch 方法
export function createDispatchHook(context = ReactReduxContext) {
  const useStore = // 获取 redux store 对象 用于拿去dispatch方法
    context === ReactReduxContext ? useDefaultStore : createStoreHook(context)

  const useDispatch = () => {
    const store = useStore()
    return store.dispatch
  }

  Object.assign(useDispatch, {
    withTypes: () => useDispatch,
  })

  return useDispatch
}- useStore()
js
export const useStore = createStoreHook()
// 返回 redux 的 store 对象
export function createStoreHook(context = ReactReduxContext) {
  // 获取 Context value 的值,核心方法见 getContext()
  const useReduxContext =
    context === ReactReduxContext
      ? useDefaultReduxContext
      : createReduxContextHook(context)
  const useStore = () => {
    const { store } = useReduxContext() //
    return store
  }
 // 扩展 useStore ,便于 ts 类型推断
  Object.assign(useStore, {
    withTypes: () => useStore,
  })
  return useStore
}
4.总结
react-redux 其实就是对redux 的封装,将redux的store 保存在 Context 中供react子组件使用,同时使用Selector 和 useSyncExternalStore 监听全局状态的更改,实现渲染组件和避免重复渲染的问题。