前提:
电脑已经准备好mingw编译器环境,已经加入环境变量.
测试方法: window下打开cmd,输入gcc -v 会有信息打印.
u8g2
u8g2官方支持sdl2接口,已经做好了适配. 所以只需要在使用的开发环境配置好SDL2路径即可.
sdl2和u8g2的适配主要在两个文件内,分别是u8x8_d_sdl_128x64.c, u8x8_sdl_key.c.主要看第一个文件.
下面主要是u8x8_d_sdl_128x64.c的部分内容.
c
int u8g_sdl_multiple = 3;

static void u8g_sdl_init(int width, int height)
{
 // 省略部分内容

  u8g_sdl_color[0] = SDL_MapRGB( u8g_sdl_screen->format, 0, 0, 0 );
  u8g_sdl_color[1] = SDL_MapRGB( u8g_sdl_screen->format, 255, 255, 0);
  u8g_sdl_color[2] = SDL_MapRGB( u8g_sdl_screen->format, 100, 100, 100 );
  u8g_sdl_color[3] = SDL_MapRGB( u8g_sdl_screen->format, 255, 255, 255 );
  u8g_sdl_color[4] = SDL_MapRGB( u8g_sdl_screen->format, 0, 0, 0 );

 // 省略部分内容

}
经过实际测试 u8g_sdl_color[0]为背景色,u8g_sdl_color[3]为前景色.其他暂时没发现作用.
SDL2
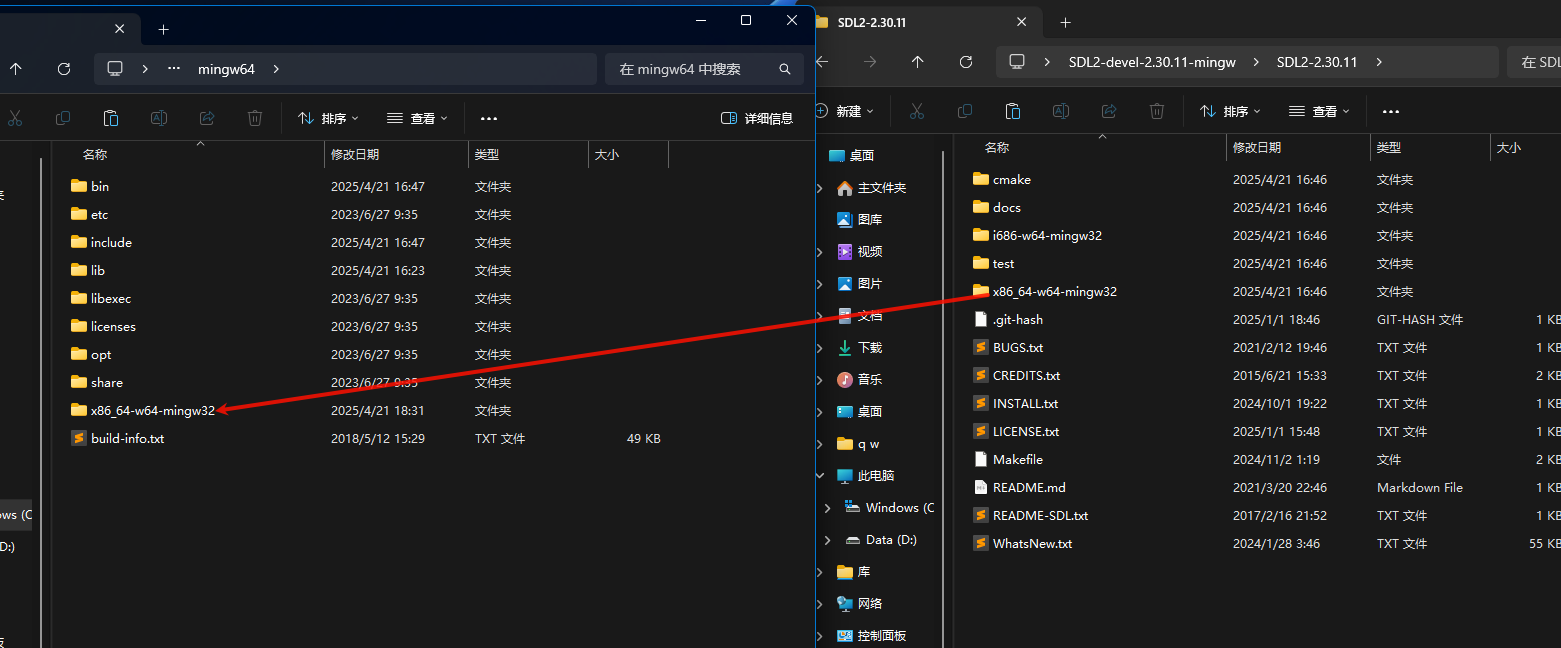
下载SDL2压缩包,解压后把内部的x86_64-w64-mingw32直接粘贴到mingw文件夹内,注意mingw文件夹内也有一个x86_64-w64-mingw32文件夹,但是粘贴时不会覆盖任何文件。
下载U8G2源码,然后把CSRC文件夹拖入到新的工程,创建main.c,输入如下内容.
例子是参考:u8g2电脑模拟器里面的
c
#include "csrc/u8g2.h"
#include <stdio.h>

u8g2_t u8g2;

int main(void)
{
  int x, y;

  int k;
  int i;

  u8g2_SetupBuffer_SDL_128x64_4(&u8g2, &u8g2_cb_r0);
  u8x8_InitDisplay(u8g2_GetU8x8(&u8g2));
  u8x8_SetPowerSave(u8g2_GetU8x8(&u8g2), 0);

  u8g2_SetFont(&u8g2, u8g2_font_helvB18_tn);

  x = 50;
  y = 30;

  for (;;)
  {
    u8g2_FirstPage(&u8g2);
    i = 0;
    do
    {
      u8g2_SetFontDirection(&u8g2, 0);
      u8g2_DrawStr(&u8g2, x, y, "123");
      u8g2_SetFontDirection(&u8g2, 1);
      u8g2_DrawStr(&u8g2, x, y, "123");
      u8g2_SetFontDirection(&u8g2, 2);
      u8g2_DrawStr(&u8g2, x, y, "123");
      u8g2_SetFontDirection(&u8g2, 3);
      u8g2_DrawStr(&u8g2, x, y, "123");
      if (i == 1)
      {
        u8g2_DrawHVLine(&u8g2, u8g2.user_x0, u8g2.user_y0, 1, 0);
        u8g2_DrawHVLine(&u8g2, u8g2.user_x0, u8g2.user_y1 - 1, 1, 0);
        u8g2_DrawHVLine(&u8g2, u8g2.user_x1 - 1, u8g2.user_y1 - 1, 1, 0);
        u8g2_DrawHVLine(&u8g2, u8g2.user_x1 - 1, u8g2.user_y0, 1, 0);
      }

      i++;

    } while (u8g2_NextPage(&u8g2));

    do
    {
      k = u8g_sdl_get_key();
    } while (k < 0);

    if (k == 273)
      y -= 7;
    if (k == 274)
      y += 7;
    if (k == 276)
      x -= 7;
    if (k == 275)
      x += 7;

    if (k == 'e')
      y -= 1;
    if (k == 'x')
      y += 1;
    if (k == 's')
      x -= 1;
    if (k == 'd')
      x += 1;
    if (k == 'q')
      break;
  }
  return 0;
}
然后我用的是vscode + mingw.
c_cpp_properties.json
c_cpp_properties.json文件如下所示
json
{
    "configurations": [
        {
            "name": "Win32",
            "includePath": [
                "${workspaceFolder}/**",
                "C:\\x86_64-8.1.0-release-posix-seh-rt_v6-rev0\\mingw64\\x86_64-w64-mingw32\\include\\**"
            ],
            "defines": [
                "_DEBUG",
                "UNICODE",
                "_UNICODE"
            ],
            "windowsSdkVersion": "10.0.19041.0",
            "compilerPath": "C:/x86_64-8.1.0-release-posix-seh-rt_v6-rev0/mingw64/bin/g++.exe",
            "cStandard": "c99",
            "cppStandard": "c++11",
            "intelliSenseMode": "windows-gcc-x64"

        }
    ],
    "version": 4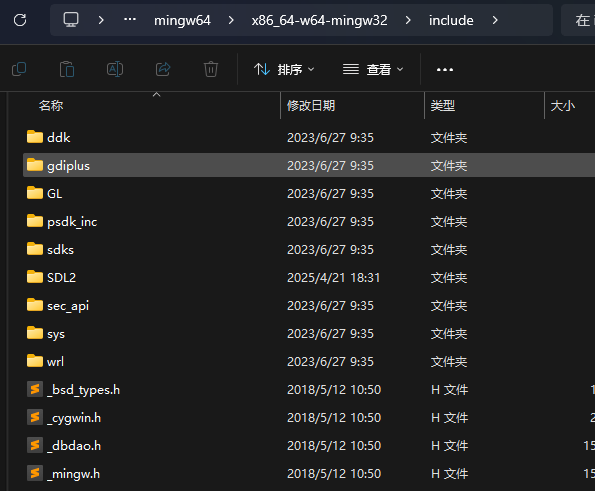
}要把配置中的"C:\\x86_64-8.1.0-release-posix-seh-rt_v6-rev0\\mingw64\\x86_64-w64-mingw32\\include\\**"替换为你自己的路径.该文件夹如下所示.
launch.json
文件内容如下所示
json
{
    // Use IntelliSense to learn about possible attributes.
    // Hover to view descriptions of existing attributes.
    // For more information, visit: https://go.microsoft.com/fwlink/?linkid=830387
    "version": "0.2.0",
    "configurations": [
        {
            "name": "C/C++: gcc.exe 生成活动文件",
            "type": "cppdbg",
            "request": "launch",
            "program": "${fileDirname}\\${fileBasenameNoExtension}.exe",
            "args": [],
            "stopAtEntry": false,
            "cwd": "${workspaceFolder}",
            "environment": [],
            "externalConsole": true,
            "MIMode": "gdb",
            "miDebuggerPath": "C:\\x86_64-8.1.0-release-posix-seh-rt_v6-rev0\\mingw64\\bin\\gdb.exe",
            "logging": {
                "engineLogging": true,
                "trace": true,
                "traceResponse": true,


            },
            "setupCommands": [
                {
                    "description": "Enable pretty-printing for gdb",
                    "text": "-enable-pretty-printing",
                    "ignoreFailures": true
                },
        {
            "description": "Force breakpoint sync",
            "text": "set breakpoint pending on",  // 允许挂起断点
            "ignoreFailures": false
        }

            ],
            "preLaunchTask": "C/C++: gcc.exe 生成活动文件",
        }
    ]
}
同样的把上述关于路径相关的都替换为自己的路径.
task.json
json
{
    "tasks": [
        {
            "type": "cppbuild",
            "label": "C/C++: gcc.exe 生成活动文件",
            "command": "C:\\x86_64-8.1.0-release-posix-seh-rt_v6-rev0\\mingw64\\bin\\gcc.exe",
            "args": [
                "-fdiagnostics-color=always",
                "-g",
                "${fileDirname}\\*.c",
                "${fileDirname}\\csrc\\*.c",

                "-IC:\\x86_64-8.1.0-release-posix-seh-rt_v6-rev0\\mingw64\\include\\SDL2",

                "-L",  // 在库文件的搜索路径列表中添加dir目录,
                "C:\\x86_64-8.1.0-release-posix-seh-rt_v6-rev0\\mingw64\\x86_64-w64-mingw32\\bin",
                "-lSDL2",

                "-o",
                "${fileDirname}\\${fileBasenameNoExtension}.exe"
            ],
            "options": {
                // "cwd": "C:\\x86_64-8.1.0-release-posix-seh-rt_v6-rev0\\mingw64\\bin"
                "cwd": "${fileDirname}"

            },
            "problemMatcher": [
                "$gcc"
            ],
            "group": {
                "kind": "build",
                "isDefault": true
            },
            "detail": "调试器生成的任务。"
        }
    ],
    "version": "2.0.0"
}
同样的把上述关于路径相关的都替换为自己的路径.
上面的配置文件和参考中的makefile编译参数基本一致.
配置后效果如下所示