什么是 MCP
MCP(Model Context Protocol,模型上下文协议)是一项由 Anthropic 发起的开放标准,它通过定义统一的通信格式与能力协商机制,使大型语言模型(LLMs)能够动态地发现并调用外部数据源、工具和服务,从而突破纯训练数据的局限,显著提升 AI 应用的交互和自动化能力。其核心优势在于"模型主导"的工具调用方式------由模型根据上下文决定何时、调用哪种工具及其参数,而非由应用层预先硬编码,这赋能了更灵活的 AI Agent 架构。
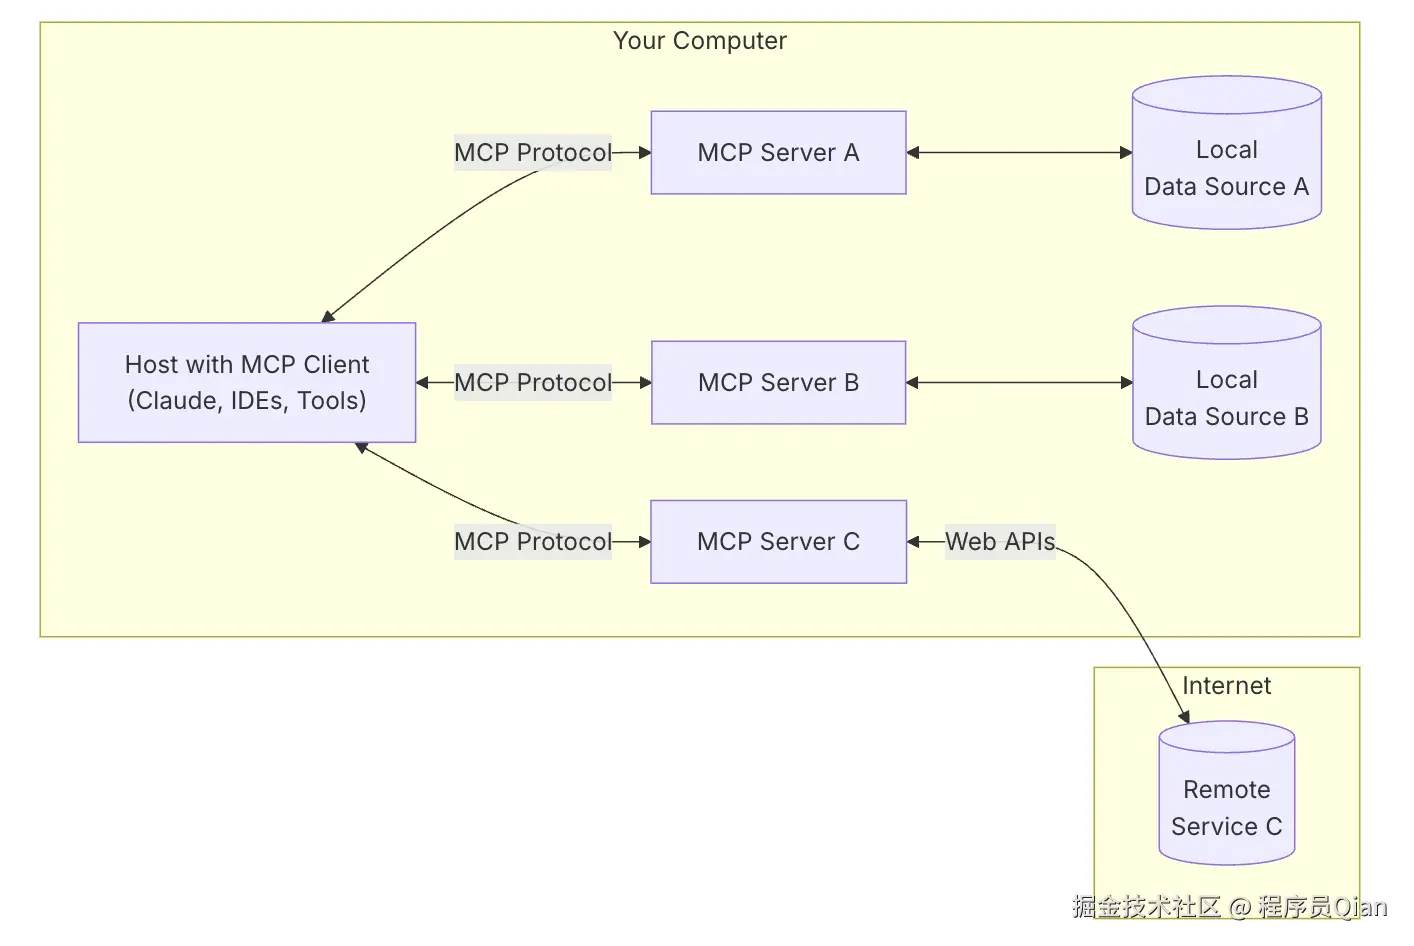
MCP 是 CS ( client-server) 架构,也就是客户端-服务器架构,这个和我们的 Web 端开发类似,架构图如下:
开发前准备
安装nodejs 环境
此教程天气 mcp 服务使用 typescript-sdk 开发,所以你的电脑需要安装 nodejs 环境,如何安装 nodejs 本文不做赘述,对于本教程,您需要 Node.js 版本 16 或更高版本。
安装 Cursor
你的电脑需要安装支持 MCP 服务的客户端,如 Claude for Desktop、Cursor、VsCode等,本文使用 Cursor 客户端来连接 mcp 服务。
你也可以查看其他支持 mcp 协议的客户端:modelcontextprotocol.io/clients
注册心知天气
心知天气是一家企业级高精度气象数据服务提供商,个人就可以注册使用,有一定的免费额度。
MCP 核心概念
资源 (Resources):客户端可以读取的类似文件的数据(例如 API 响应或文件内容)工具 (Tools):可由用户调用的函数(需经用户批准)提示 (Prompts):预先编写的模板,帮助用户完成特定任务
了解了上面的基础知识后,让我们开始构建我们的天气服务器吧!
创建项目
shell
# 创建一个项目文件夹
mkdir weather
cd weather

# 初始化npm项目
npm init -y

# 安装依赖
npm install @modelcontextprotocol/sdk zod axios
npm install -D @types/node typescript

# 创建文件
mkdir src
touch src/index.ts
更新你的package.json
json
{
  "type": "module",
  "bin": {
    "weather": "./dist/index.js"
  },
  "scripts": {
    "build": "tsc && chmod 755 dist/index.js",
    "start": "node dist/index.js",
    "dev": "tsc --watch && node dist/index.js"
  },
  "files": [
    "dist"
  ],
}
在项目根目录下创建 tsconfig.json
json
{
  "compilerOptions": {
    "target": "ES2022",
    "module": "Node16",
    "moduleResolution": "Node16",
    "outDir": "./dist",
    "rootDir": "./src",
    "strict": true,
    "esModuleInterop": true,
    "skipLibCheck": true,
    "forceConsistentCasingInFileNames": true
  },
  "include": ["src/**/*"],
  "exclude": ["node_modules"]
}
上面的文件都完成后,就让我开始完成天气 MCP 服务吧!
开始编写代码
src/index.ts
先在 src/index.ts 文件中加入如下内容:
js
#!/usr/bin/env node

import { McpServer } from "@modelcontextprotocol/sdk/server/mcp.js";
import { StdioServerTransport } from "@modelcontextprotocol/sdk/server/stdio.js";
import { z } from "zod";
import axios from "axios";

/**
 * 创建MCP服务器实例
 */
const server = new McpServer({
  name: "weather",
  version: "1.0.0",
  capabilities: {
    resources: {},
    tools: {},
  },
});
基础代码解释
#!/usr/bin/env node 用于告诉操作系统"调用环境变量 PATH 中的 node 可执行程序来运行本文件",从而使脚本可执行并具备跨平台的可移植性
McpServer McpServer 是 Model Context Protocol 的 TypeScript SDK 提供的核心类,用于创建符合 MCP 规范的服务器实例
StdioServerTransport StdioServerTransport 实现了 MCP 的标准输入/输出(stdio)通信层,适合在本地进程间以流的方式收发消息,MCP 支持多种传输机制,其中 stdio 传输最常用于桌面客户端与本地服务器的交互场景 。
Zod zod 是一个 TypeScript 优先的声明式数据模式验证库,可在运行时对任意数据进行类型校验,定义一次验证模式后,Zod 会自动推断出静态的 TypeScript 类型,并在 .parse() 时抛出详细错误信息。
name 与 version:为该服务器指定唯一标识和版本号,便于调试和管理 。
capabilities.resources:用于声明该服务器可读写的"资源"(如文件内容、API 响应等)。
capabilities.tools:用于注册可被 LLM 调用的"工具"函数(如获取天气、解析地理位置等)。
如何定义工具 Tools
(Tools)工具是模型上下文协议 (MCP) 中一个强大的原语,它使服务器能够向客户端公开可执行功能。通过工具,LLM 可以与外部系统交互、执行计算并在现实世界中采取行动。
工具定义结构
js
{
  name: string;          // 工具的唯一标识符
  description?: string;  // 人类可读的描述
  inputSchema: {         // 工具参数的 JSON 模式
    type: "object",
    properties: { ... }  // 工具特定的参数
  },
  annotations?: {        // 关于工具行为的可选提示
    title?: string;      // 工具的人类可读标题
    readOnlyHint?: boolean;    // 如果为 true,则工具不会修改其环境
    destructiveHint?: boolean; // 如果为 true,则工具可能执行破坏性更新
    idempotentHint?: boolean;  // 如果为 true,则使用相同参数重复调用不会产生额外影响
    openWorldHint?: boolean;   // 如果为 true,则工具会与外部实体交互
  }
}
示例:
js
{
  "name": "github_create_issue",
  "description": "Create a GitHub issue",
  "inputSchema": {
    "type":"object",
    "properties": {
      "title": {"type":"string"},
      "body": {"type":"string"}
    },
    "required":["title","body"]
  }
}
定义天气 tool
了解了什么是 Tools 以及如何描述 Tools 那么我们就可以完成下面的代码了。
ts
interface WeatherResponse {
  results: [
    {
      location: {
        id: string;
        name: string;
        country: string;
        path: string;
        timezone: string;
        timezone_offset: string;
      };
      daily: Array<{
        date: string;
        text_day: string;
        code_day: string;
        text_night: string;
        code_night: string;
        high: string;
        low: string;
        precip: string;
        wind_direction: string;
        wind_direction_degree: string;
        wind_speed: string;
        wind_scale: string;
        rainfall: string;
        humidity: string;
      }>;
      last_update: string;
    }
  ];
}

/**
 * 获取天气信息的工具
 */
server.tool(
  "get_weather",
  "获取天气预报信息",
  {
    city: z.string().describe("要获取天气预报的城市名称"),
    days: z
      .number()
      .optional()
      .describe("预测天数 (最大15, 默认3)"),
    language: z
      .string()
      .optional()
      .describe("响应语言 (默认: zh-Hans)"),
    unit: z
      .string()
      .optional()
      .describe("温度单位 (c 或 f, 默认: c)"),
  },
  async ({ city, days = 3, language = "zh-Hans", unit = "c" }) => {
    try {
      // 获取Seniverse API密钥
      const API_KEY = process.env.SENIVERSE_API_KEY;
      if (!API_KEY) {
        return {
          content: [
            {
              type: "text",
              text: "Error: Seniverse API key not found. Please set SENIVERSE_API_KEY environment variable.",
            },
          ],
          isError: true,
        };
      }

      // 发送请求获取天气预报数据
      const response = await axios.get<WeatherResponse>(
        `https://api.seniverse.com/v3/weather/daily.json?key=${API_KEY}&location=${encodeURIComponent(
          city
        )}&language=${language}&unit=${unit}&start=0&days=${days}`
      );

      // 解析响应数据
      const { location, daily, last_update } = response.data.results[0];

      const forecastText = daily
        .map((day) => {
          return `${day.date}:
- 白天: ${day.text_day}, 夜间: ${day.text_night}
- 温度: ${day.low}°${unit.toUpperCase()} ~ ${day.high}°${unit.toUpperCase()}
- 降水概率: ${day.precip}%
- 风速: ${day.wind_speed}${unit === "c" ? "km/h" : "mph"}
- 湿度: ${day.humidity}%`;
        })
        .join("\n\n");

      return {
        content: [
          {
            type: "text",
            text: `${location.name} (${location.path}) 天气预报:

${forecastText}

最后更新时间: ${last_update}`,
          },
        ],
      };
    } catch (error: unknown) {
      if (axios.isAxiosError(error)) {
        const errorMessage = error.response?.data?.status || error.message;
        return {
          content: [
            {
              type: "text",
              text: `Error fetching weather data: ${errorMessage}`,
            },
          ],
          isError: true,
        };
      }
      return {
        content: [
          {
            type: "text",
            text: `Error fetching weather data: ${
              error instanceof Error ? error.message : "Unknown error"
            }`,
          },
        ],
        isError: true,
      };
    }
  }
);
代码解释
我们通过 server.tool 注册一个天气工具,代码中使用axios 来调用心知天气api,我们使用 zod来描述心知天气 API 的参数让 LLM 能知道如何调用接口。我们调用心知天气成功后,要封装其数据并按要求返回如下结构:
ts
return {
        content: [
          {
            type: "text", // 返回的数据类型
            text: ``,  // 要返回的文本内容,内容会被 LLM 读取。
          },
        ],
      };
process.env.SENIVERSE_API_KEY 将在下文的配置中介绍如何配置。
配置客户端 mcp 服务
 默认配置文件为 mcp.json,在mcp.json 文件中加入如下内容:
ts
{
  "mcpServers": {
    "weather": {
      "command": "node",
      "args": ["/path/to/weather/dist/index.js"],
      "env": {
        "SENIVERSE_API_KEY": "心知天气 api key"
      }
    }
  }
}
路径 /path/to/weather/dist/index.js 要根据你电脑的上的文件位置进行更改。SENIVERSE_API_KEY 就是 process.env.SENIVERSE_API_KEY 的变量。
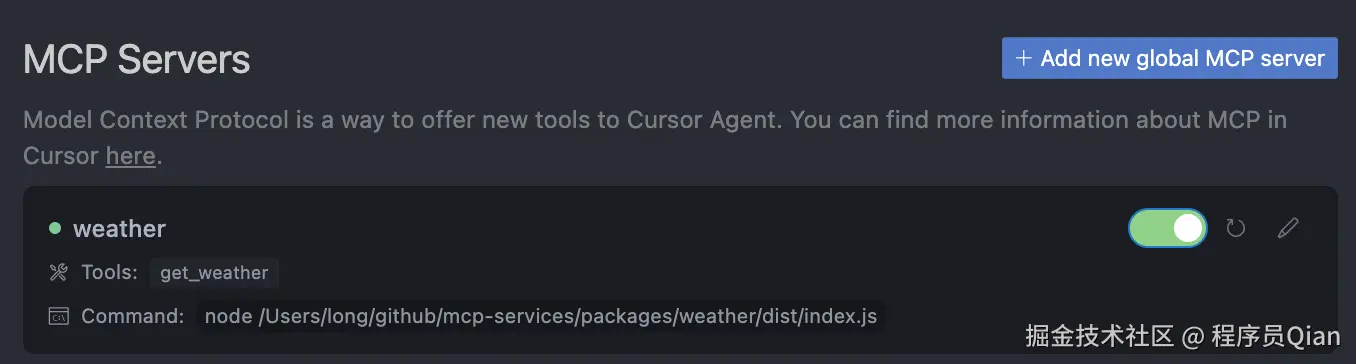
如果配置正确,你将看到如下图所示:
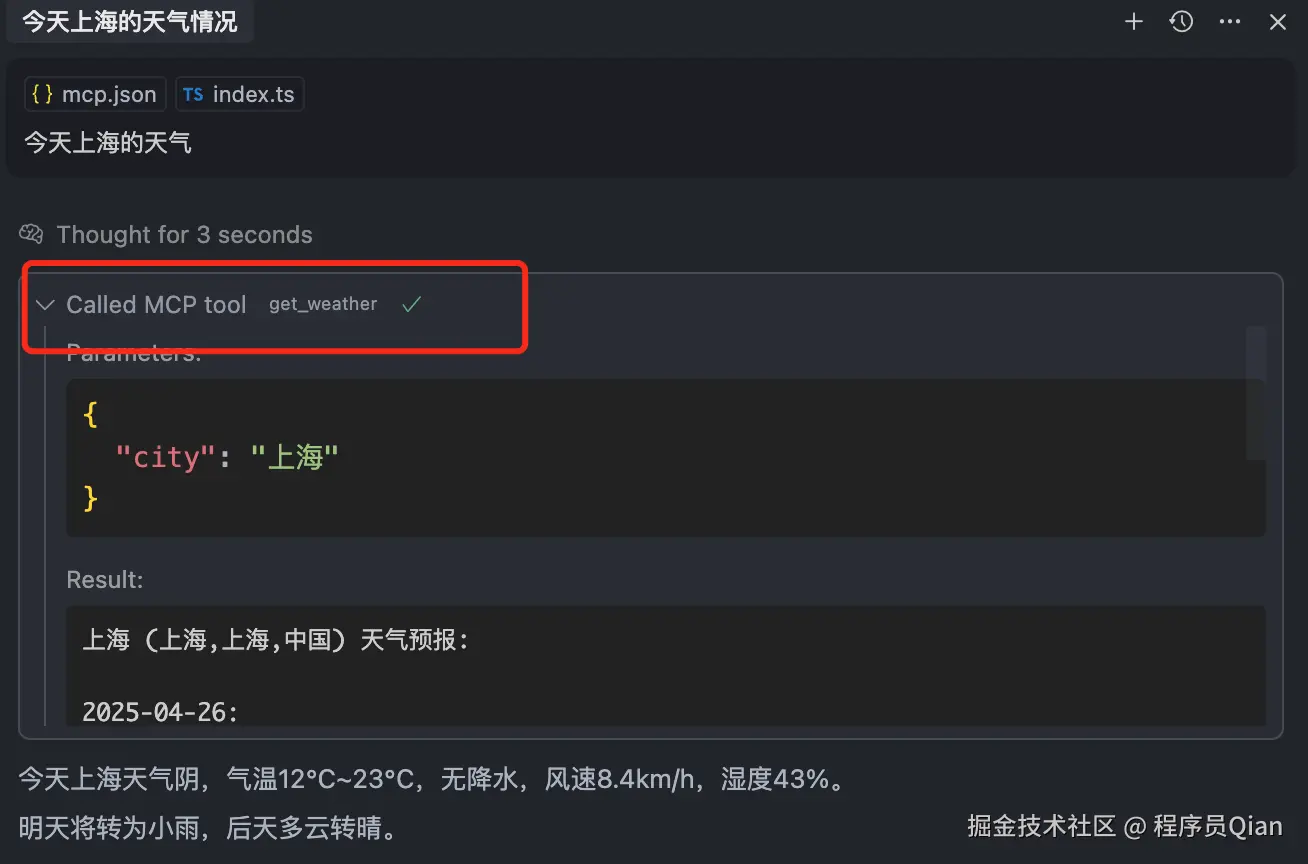
调用 mcp 服务
问今天上海的天气,回答如下图所示:
完整代码
仓库地址: github.com/HelTi/mcp-s...
总结
MCP 协议不仅强化了大型语言模型的能力边界,更赋能了更灵活的 AI Agent 架构。在对话的过程中,AI 不仅仅可以告诉我们如何操作,而且可以代替人类进行一些系统操作。
在本文的教程中我们通过标准传输协议(standard input/output )在本地进行服务通信,另外mcp也支持 http 传输协议,本文不做叙述。
相关文档: