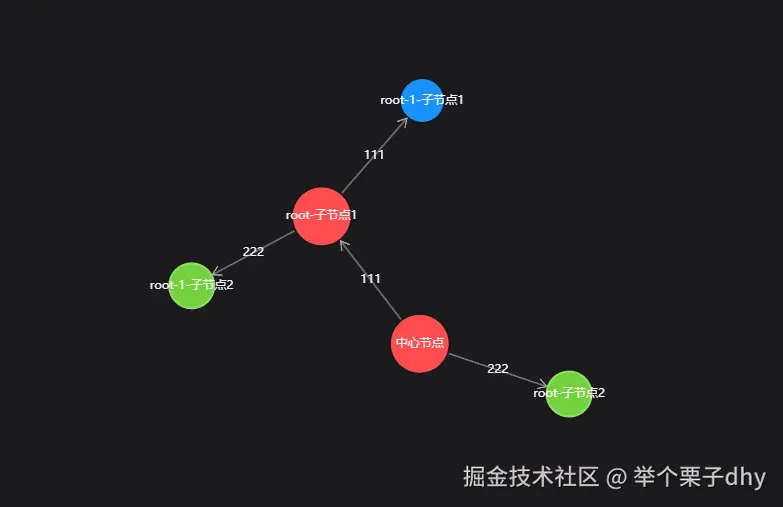
一、 效果图
二、antv/g6 依赖安装
bash
npm install --save @antv/g6三、基本渲染 useG6Graph 封装
useG6Graph.tsx
tsx
import G6, {Graph} from '@antv/g6'
import {useEffect, useRef} from 'react'
import {config} from './G6Config'

export const useG6Graph: useG6GraphHook = props => {
  const containerRef = useRef<HTMLDivElement>(null)
  const graphRef = useRef<Graph | null>(null)
  // 初始化图实例
  useEffect(() => {
   if (!containerRef.current) return

    // 创建图实例
    const graph = new G6.Graph({
      container: containerRef.current,
      width: containerRef.current.clientWidth,
      ...config,
    })

    // 初始化数据渲染
    graph.data()
    graph.render()

    // 保存实例引用
    graphRef.current = graph

    // 窗口resize处理
    const resizeObserver = new ResizeObserver(() => {
      graph.changeSize(containerRef.current!.clientWidth, 800)
    })
    const resizeObserver = new ResizeObserver(() => {
      graph.changeSize(containerRef.current!.clientWidth, 800)
    })
    resizeObserver.observe(containerRef.current)

   return () => {
      graph.destroy()
      resizeObserver.disconnect()
    }
  }, [])
  return {containerRef, graphRef}
}

export type useG6GraphHook = {
  (props?: any): {
    /**G6实例 */
    graphRef: React.MutableRefObject<Graph>
    /**容器的实例 */
    containerRef: React.MutableRefObject<HTMLDivElement>
  }
}
G6Config.js基本配置
js
export const config = {
  modes: {
    default: ['drag-canvas', 'zoom-canvas', 'drag-node'],
  },
   layout: {
    type: 'force',
    preventOverlap: true,
    linkDistance: 50, // 边的长度
    nodeStrength: -500, // 节点之间的斥力强度
    edgeStrength: 0.1, // 边的引力强度
    collideStrength: 0.8, //防止节点之间重叠的力强度
    alphaDecay: 0.01, //迭代阈值的衰减率
  },
  defaultNode: {
    type: 'circle',
    size: 35,
    style: {
      fill: '#237dd2',
      lineWidth: 2,
      stroke: '#237dd2',
    },
    labelCfg: {
      position: 'center',
      style: {
        fontSize: 12,
        fill: J_color.font_color_10,
      },
    },
  },
   defaultEdge: {
    type: 'line',
    style: {
      stroke: J_color.border_color_6,
      lineWidth: 1,
      endArrow: true,
    },
     labelCfg: {
      position: 'center',
      style: {
        fontSize: 12,
        fill: J_color.font_color_11,
      },
    },
  },
   autoPaint: true,
  minZoom: 0.5,
  maxZoom: 2,
  groupByTypes: false,
  animate: true,
  animateCfg: {
    duration: 500, // 动画时长
    easing: 'easePolyInOut', // 动画缓动函数
  },
}
graph.data()的样例数据
js
  const initialData = {
    nodes: [
      {
        id: 'root',
        label: '中心节点',
        level: 1,
        hasChildren: true
      },
    ],
    edges: [],
  }

graph.data(initialData)四、G6Graph.tsx组件使用
G6Graph.tsx
1. 使用
tsx
interface G6GraphPropsType {}
export const G6Graph: FC<G6GraphPropsType> = (props)=>{
  const {containerRef, graphRef} = useG6Graph()
  return(
      <div className="g6_graph" ref={containerRef}></div>
  )
}
2.处理节点点击(展开/收起)
js
const [loading, setLoading] = useState<boolean>(false)

const handleNodeClick = async (node: Item) => {
  const model = node.getModel() as NodeData;
  const graph = graphRef.current!;

  if (!model.hasChildren) return;

  if (model.collapsed) {
    //收起
    // 使用迭代代替递归防止栈溢出
    const descendantIds = new Set<string>();
    const stack: string[] = [model.id];

    // 广度优先遍历获取所有后代节点
    while (stack.length > 0) {
      const currentId = stack.pop()!;
      const children = graph.getNeighbors(currentId, 'target');

      children.forEach(child => {
        const childId = child.getID();
        if (!descendantIds.has(childId)) {
          descendantIds.add(childId);
          stack.push(childId);
        }
      });
    }

    // 收集需要删除的边(排除父级连接边)
    const edgesToRemove = new Set<string>();
    descendantIds.forEach(id => {
      const nodeEdges = graph.findById(id).getEdges();

      nodeEdges.forEach(edge => {
        const edgeModel = edge.getModel();
        const isParentEdge =
          edgeModel.source === model.id ||
          edgeModel.target === model.id;

        // 只删除后代节点之间的边
        if (!isParentEdge) {
          edgesToRemove.add(edge.getID());
        }
      });
    });

    // 批量删除优化
    try {
      // 1. 先删除边
      edgesToRemove.forEach(edgeId => {
        graph.removeItem(edgeId);
      });

      // 2. 后删除节点(倒序删除防止引用问题)
      const sortedIds = Array.from(descendantIds).reverse();
      sortedIds.forEach(id => {
        graph.removeItem(id);
      });

      // 3. 更新当前节点状态
      graph.updateItem(model.id, {
        collapsed: false,
        style: { fill: '#1890ff' }
      });

      // 4. 增量布局(只刷新相关区域)
      graph.refreshPositions({
        nodes: [model.id],
        duration: 300
      });
    } catch (error) {
      console.error('收起操作失败:', error);
      // 回滚操作建议
      graph.layout();
    }
  } else {
   try {
        setLoading(true)
        // 展开请求子节点数据
        const { nodes: children, edges: relations } = await mockFetchChildren(model.id);
        // 添加新节点和边
       children.forEach(child => {graph.addItem('node', {
          ...child,
          style: { fill: '#52c41a' } // 子节点颜色
           });
        });

      relations.forEach(rel => {
        graph.addItem('edge', rel);
      });

      // 更新当前节点状态
          graph.updateItem(node, {
            collapsed: true,
            style: { fill: '#ff4d4f' } // 标记已展开
          });
       // 重新布局
          graph.layout()
        })
      } finally {
        setLoading(false)
      }
    }
  }
模拟API请求
typescript
const mockFetchChildren = (
  nodeId: string
): Promise<{nodes: NodeData[]; edges: EdgeData[]}> => {
  return new Promise(resolve => {
    setTimeout(() => {
      resolve({
        nodes: [{
            id: `${nodeId}-1`,
            label: `${nodeId}-子节点1`,
            level: 3,
            hasChildren: true,
          },
          {
            id: `${nodeId}-2`,
            label: `${nodeId}-子节点2`,
            level: 2,
            hasChildren: false,
          },
        ],
           edges: [
          {
            source: nodeId,
            target: `${nodeId}-1`,
            label: '111',
            id: new Date(),
          },
          {
            source: nodeI,
             target: `${nodeId}-2`,
            label: '222',
            id: J.createID(),
          },
        ],
      })
    }, 800)
  })
}
3.绑定节点点击事件
js
useEffect(() => {
    if (!graphRef.current) return

    graphRef.current.on('node:click', e => {
      const node = e.item
      if (node) handleNodeClick(node)
    })
  }, [])
4.优化
4.1 遍历后代节点
报错:"Uncaught RangeError: Maximum call stack size exceeded"
- 优化前:无限递归,导致调用栈溢出问题
js
// 获取当前节点所有后代节点ID(不包括自己)
  const getDescendantIds = (nodeId: string): string[] => {
    const graph = graphRef.current!;
    let ids: string[] = [];

    const children = graph.getNeighbors(nodeId, 'target');
    children.forEach(child => {
      const childId = child.getID();
      ids.push(childId);
      ids = ids.concat(getDescendantIds(childId));
    });

    return ids;
  };

  // 获取需要删除的边(只包含后代节点之间的边)
  const getEdgesToRemove = (descendantIds: string[]): string[] => {
    const graph = graphRef.current!;
    const edgesToRemove: string[] = [];

    descendantIds.forEach(id => {
      const edges = graph.findById(id).getEdges();
      edges.forEach(edge => {
        const model = edge.getModel();
        // 只删除目标方向边(父->子)
        if (model.source === id || model.target === id) {
          edgesToRemove.push(edge.getID());
        }
      });
    });

    return Array.from(new Set(edgesToRemove)); // 去重
  };
js
// 收起逻辑
const descendantIds = getDescendantIds(model.id);
const edgesToRemove = getEdgesToRemove(descendantIds);

// 批量删除操作
graph.getEdges().forEach(edge => {
        if (edgesToRemove.includes(edge.getID())) {
            graph.removeItem(edge);
            }
         });

descendantIds.forEach(id => {
        graph.removeItem(id);
       });

 // 更新当前节点状态
graph.updateItem(model.id, {
    collapsed: false,
    style: { fill: '#1890ff' }
  });

// 重新布局
graph.layout();getDescendantIds函数使用递归遍历所有子节点,如果节点层级很深或者子节点数量庞大,递归深度可能超过JavaScript引擎的限制,从而导致栈溢出。此外,可能在遍历过程中重复处理某些节点,或者存在循环引用,导致无限递归。
- 优化后:递归遍历子节点的函数改为迭代实现,避免栈溢出。
js
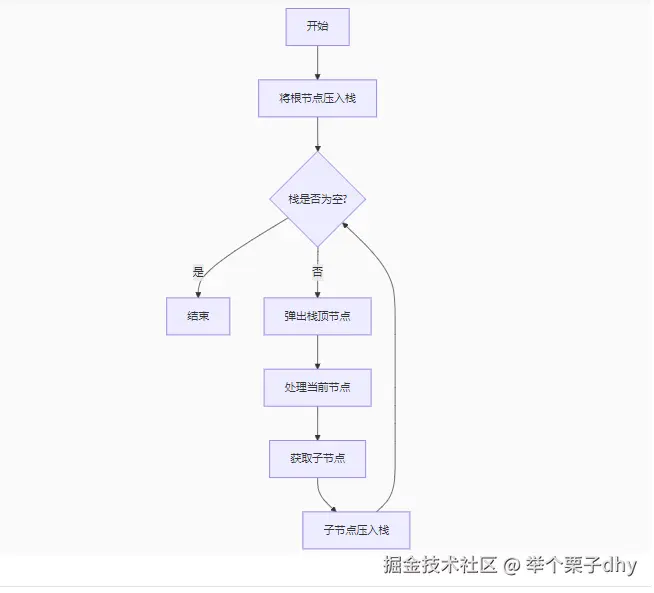
// 使用栈实现的广度优先遍历(BFS)
const stack: string[] = [model.id];
while (stack.length > 0) {
  const currentId = stack.pop()!;
  const children = graph.getNeighbors(currentId, 'target');
  // ...
}
替代递归方案,避免深度层级导致的栈溢出
4.2 批量删除节点
收起节点只收起展开的节点及边,而不是收起子节点与父节点的边,导致节点孤立。
- 优化后:只收起展开的节点及边
- 边过滤逻辑增强
js
const isParentEdge =
  edgeModel.source === model.id ||
  edgeModel.target === model.id;
if (!isParentEdge) {
  edgesToRemove.add(edge.getID());
}
确保保留父节点到当前节点的连接边;
- 批量删除顺序优化
js
// 先边后节点,倒序删除
const sortedIds = Array.from(descendantIds).reverse();
sortedIds.forEach(id => {
  graph.removeItem(id);
});
防止子节点未完全删除导致的引用异常
4.3 递归与迭代对比
一、递归 vs 迭代的本质区别
| 特性 | 递归 (Recursion) | 迭代 (Iteration) |
|---|---|---|
| 实现方式 | 通过函数自我调用实现循环 | 通过 for/while 等循环结构实现 |
| 内存消耗 | 需要维护调用栈(每层调用占用栈空间) | 只需维护变量(栈空间占用恒定) |
| 执行速度 | 较慢(函数调用有额外开销) | 较快(无函数调用开销) |
| 代码可读性 | 更接近数学归纳法,代码简洁 | 需要手动控制循环变量,代码稍显复杂 |
| 适用场景 | 树状结构遍历、分治算法等 | 线性结构遍历、需要控制内存的场景 |
二、调用栈溢出问题的根源
递归方案的问题
js
// 递归获取子节点(危险示例)
const getChildrenIds = (nodeId) => {
  const children = getNeighbors(nodeId);
  children.forEach(child => {
    ids.push(child.id);
    getChildrenIds(child.id); // 递归调用
  });
}- 栈空间消耗:每次递归调用都会在内存栈中创建一个新的栈帧(stack frame)
- 最大深度限制 :JavaScript 引擎默认调用栈深度约为 10,000~100,000 层(不同浏览器有差异)
- 崩溃场景 :当节点层级深度超过栈容量时,触发
RangeError: Maximum call stack size exceeded
迭代方案的优势
js
// 迭代获取子节点(安全示例)
const getChildrenIds = (rootId) => {
  const stack = [rootId]; // 使用栈结构
  while(stack.length > 0) {
    const currentId = stack.pop();
    const children = getNeighbors(currentId);
    children.forEach(child => stack.push(child.id));
  }
}- 恒定内存:使用堆内存(heap)存储待处理节点,不受调用栈限制
- 可控性:可处理任意深度的树结构(仅受可用内存限制)
- 性能:避免函数调用开销,适合大数据量场景
三、知识图谱场景的具体分析
1. 递归为何导致崩溃?
假设存在以下深层级结构:
css
A → B → C → D → ... → Z (共26层)- 递归调用会创建 26层栈帧
- 若默认栈深度为 10,000,单个节点展开 100 层子节点就会导致崩溃
2. 迭代为何能解决?
- 数据存储位置 :迭代的
stack数组存储在堆内存中 - 内存可控性 :现代浏览器堆内存通常可达 几百MB~几GB,能处理百万级节点
- 执行过程:
总结
在知识图谱的收起功能中,使用 迭代方案 :
- 避免栈溢出:突破调用栈深度限制,可处理任意深度的节点层级
- 内存可控:显式管理待处理节点,避免不可预知的内存增长
- 性能更优:减少函数调用开销,适合频繁的交互操作
建议在类似树状结构遍历的场景中,优先考虑迭代方案以保证系统健壮性。递归仅推荐用于层级深度可控(如文件目录遍历)或代码简洁性优先的场景。