前言
前面在后端使用了插件shell,这篇就在前端使用一下这个插件
正文
前端使用shell插件
rust
pnpm tauri add shell前端使用插件,从前面的插件fs、opener等经验总结,本质上就两件事
1、权限问题
2、通信函数的使用
简单使用
rust
import {Command} from '@tauri-apps/plugin-shell'
export async function useCommand(){
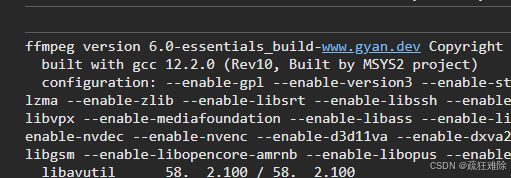
const cmd=Command.create("ffmpeg",["--version"])
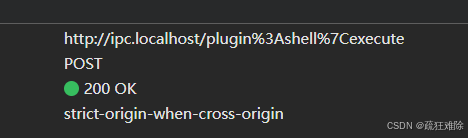
let a=await cmd.execute()
console.log(a.stderr)
}需要设置权限,简单设置一下
rust
 {
      "identifier":"shell:allow-execute",
      "allow": [
      {
        "name": "ffmpeg",
        "cmd": "ffmpeg"
      },
      {
        "name": "ffplay",
        "cmd": "ffplay"
      },
      {
        "name": "ffprobe",
        "cmd": "ffprobe"
      }
    ]
    }
结果如下
这个create方法
rust
static create(program: string, args?: string | string[]): Command<string>;是个静态方法,第一个传字符串,第一个参数传字符串或者字符串数组,返回 Command<string>
而execute方法就是通信函数,返回ChildProcess,
rust
execute(): Promise<ChildProcess<O>>;这ChildProcess就是一个接口,字段如下
TypeScript
interface ChildProcess<O extends IOPayload> {
    /** Exit code of the process. `null` if the process was terminated by a signal on Unix. */
    code: number | null;
    /** If the process was terminated by a signal, represents that signal. */
    signal: number | null;
    /** The data that the process wrote to `stdout`. */
    stdout: O;
    /** The data that the process wrote to `stderr`. */
    stderr: O;
}
处理执行之后的事情
spawn与事件
笔者先把要使用的权限写出来
rust
  {
      "identifier": "shell:allow-spawn",
      "allow": [
        {
          "name": "python",
          "cmd": "python",
          "args": [
            { "validator": "^[\\s\\S]*$" }
          ]
        },
        {
          "name": "ffmpeg",
          "cmd": "ffmpeg",
          "args": [
            { "validator": "^[\\s\\S]*$" }
          ]
        },
        {
          "name":"ffprobe",
          "cmd":"ffprobe",
          "args": [
            { "validator": "^[\\s\\S]*$" },
            { "validator": "^[\\s\\S]*$" }
          ]
        }
      ]
    },
  "shell:allow-stdin-write",
名字和 cmd可以不一样,name是任取的
^\\\\s\\\\S*$是正则表达式,这能够匹配几乎所有的字符。
可以写具体的。
先试试ffmpeg
rust
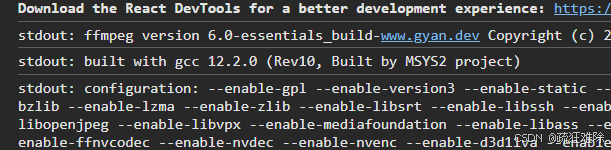
const command = Command.create('ffmpeg',["-version"]);
command.stdout.on('data', (data) => {
console.log(`stdout: ${data}`);
});
command.stderr.on('data', (data) => {
console.error(`stderr: ${data}`);
});
command.on('error', (error) => {
console.error(`error: ${error}`);
});
command.on('close', (code) => {
console.log(`child process exited with code ${code}`);
});
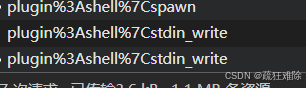
let child=await command.spawn();上面就是前端用于监控shell的输出事件
打印的结果是成功的,打印的是stdout的输出
使用python
rust
 const command = Command.create('python',["-i"]);
    ....
    await child.write("print('hello world')\n");
结果如下,打印了hello world 没有问题

如果没有设置权限或者权限不准确,比如说
rust
 {
          "name": "python",
          "cmd": "python"
  },
去掉参数,没有打印结果
运行了,但是没有打印语句的出现。
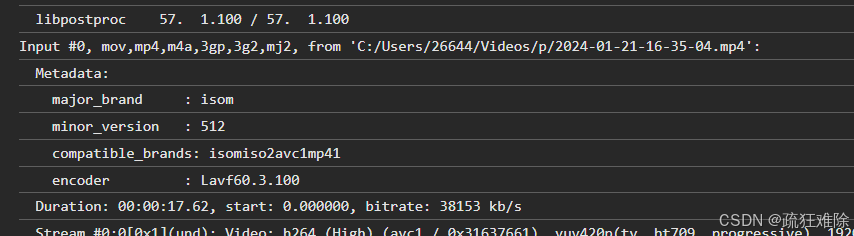
使用ffprobe,获取MP4信息
rust
    const command = Command.create("ffprobe",["-i",
        "C:/Users/26644/Videos/p/2024-01-21-16-35-04.mp4"]);
结果如下 ,成功
如果不满足正则表达式,也会报错,
当然,笔者直接匹配任意字符,不管三七二十一。
spawn会返回Child,如果需要是kill方法,还需要权限kill
rust
"shell:allow-kill"通信函数
从后端的invoke_handler中或者控制台中
rust
.invoke_handler(tauri::generate_handler![
            commands::execute,
            commands::spawn,
            commands::stdin_write,
            commands::kill,
            commands::open
        ])
可以发现有五个通信函数,open一般不使用,因此,就四个
也很简单
1、execute:同步执行一个系统命令,并返回其输出
2、spawn:异步启动一个子进程
3、stdin_write:向已启动的子进程的标准输入
4、kill:强制终止一个正在运行的子进程
使用bun
配置exe
rust
    "externalBin": [
      "bin/bun"
    ],
记得改名,编译后

配置权限
{
"identifier": "shell:allow-spawn",
"allow": { "name":"bin/bun", "sidecar": true }
},
使用
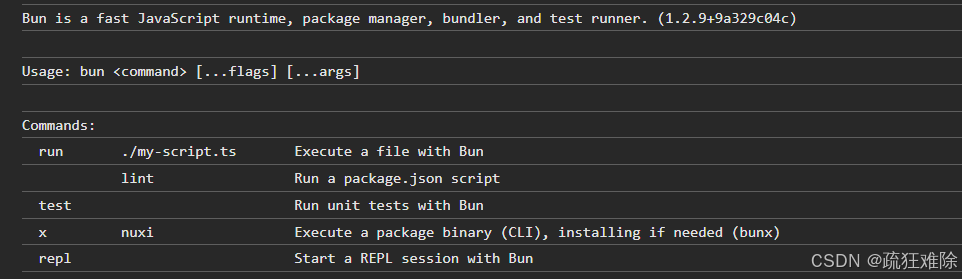
rust
export async function useCommand(){
    let cmd=Command.sidecar("bin/bun")
    cmd.stdout.on("data",(data)=>{
        console.log(data.toString())
    })
    cmd.stderr.on("data",(data)=>{
        console.log(data.toString())
    })
    cmd.on("close",(code)=>{
        console.log(`child process exited with code ${code}`);
    })
    let child=await cmd.spawn()
    console.log(child)

}直接写bun会报错,需要写bin/bun。结果如下
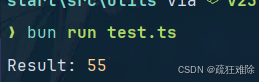
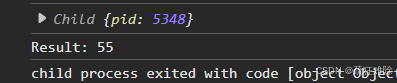
执行TS
一段简单地TS代码,src/utils/test.ts
TypeScript
function fibonacci(n: number): number {
    return n <= 1 ? n : fibonacci(n - 1) + fibonacci(n - 2);
}

const result = fibonacci(10);
console.log("Result:", result);
bun运行结果如下
修改权限,如下
rust
  {
      "identifier": "shell:allow-spawn",
      "allow": [
        {
          "name":"bin/bun",
          "args": [
            "run",
            { "validator": "^[\\s\\S]*$" }
          ],
          "sidecar": true
        }
      ]
    },
修改关键代码
rust
import {path} from "@tauri-apps/api";
const tsFilePath = await path.resolve('../src/utils/test.ts');
let cmd=Command.sidecar("bin/bun",["run",tsFilePath])
默认项目的根路径居然是**src-tauri,**需要后退
结果如下
node.js当作sidebar
一段简单地代码backend.js
javascript
const express = require('express');
const app = express();
const port = 3000;

app.get('/', (req, res) => {
    res.send('Hello world');
});

app.listen(port, () => {
    console.log(`Server is running on port ${port}`);
});
实际上可以把node.js变成可执行文件
Node.js 作为 Sidecar | Tauri - Tauri 框架![]() https://v2.tauri.org.cn/learn/sidecar-nodejs/使用的是pkg这个东西
https://v2.tauri.org.cn/learn/sidecar-nodejs/使用的是pkg这个东西
将NodeJS应用程序打包为独立可执行文件(exe)_nodejs打包成exe-CSDN博客![]() https://blog.csdn.net/ouyangtianhan/article/details/136767883这个pkg有要求node的版本,但是笔者node是v23,太高了,没成功。
https://blog.csdn.net/ouyangtianhan/article/details/136767883这个pkg有要求node的版本,但是笔者node是v23,太高了,没成功。
将NodeJS应用程序打包为独立可执行文件(exe)_nodejs打包成exe-CSDN博客![]() https://blog.csdn.net/ouyangtianhan/article/details/136767883如果使用nexe,也要配置配置,笔者也没有成功。
https://blog.csdn.net/ouyangtianhan/article/details/136767883如果使用nexe,也要配置配置,笔者也没有成功。
如下报错
❯ nexe backend.js --build
i nexe 5.0.0-beta.4
√ Including dependency: D:\start\src\utils\backend.js
√ Already downloaded...
√ Compiling Node with arguments: nosign,release,x64
√ Finished in 0.421sError: vcbuild.bat nosign release x64 exited with code: 1
vcbuild.bat nosign release x64 exited with code: 1 · Issue #799 · nexe/nexe![]() https://github.com/nexe/nexe/issues/799解决这个报错,从github的链接中可用发现如下命令
https://github.com/nexe/nexe/issues/799解决这个报错,从github的链接中可用发现如下命令
nexe backend.js -o test -t windows --build --verbose
笔者看了看,也有很多要求。。。。
需要有Python、NASM、Visual Studio, 当然**,**笔者恰好都有
在编译中还搞一大推东西。我怀疑自己用错了,没编译完
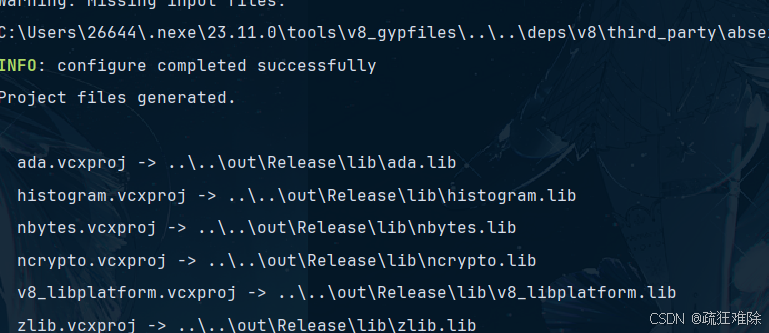
但是这搞得也太麻烦了,不推荐使用。。。。。
将就使用pkg
首先,需要切换node版本,笔者使用volta来管理node版本
Volta - The Hassle-Free JavaScript Tool Manager![]() https://volta.sh/如下
https://volta.sh/如下
❯ volta install node@18
success: installed and set node@18.20.8 (with npm@10.8.2) as default
然后修改backend.js的后缀js改为cjs
打包运行
❯ pkg backend.cjs --target win
> pkg@5.8.1start\src\utils via v18.20.8 took 5s
❯ node backend.cjs
Server is running on port 3000
没问题。后面在tauri中使用这个exe文件就不必细说了。
总结
前端使用shell,实际上,并没有后端方便。
当然,还有可以的。
看个人需求。