目录
[1. 根布局(LinearLayout)](#1. 根布局(LinearLayout))
[2. 显示区域(TextView)](#2. 显示区域(TextView))
[3. 按钮区域(GridLayout)](#3. 按钮区域(GridLayout))
[4. 清除和删除按钮](#4. 清除和删除按钮)
[5. 数字和操作符按钮](#5. 数字和操作符按钮)
[6. 其他行的按钮](#6. 其他行的按钮)
[7. 最后一行](#7. 最后一行)
[1. 类和变量声明](#1. 类和变量声明)
[2. onCreate 方法](#2. onCreate 方法)
[3. 数字按钮处理](#3. 数字按钮处理)
[4. 操作符按钮处理](#4. 操作符按钮处理)
[5. 执行计算](#5. 执行计算)
[6. 清除所有内容](#6. 清除所有内容)
[7. 删除最后一个字符](#7. 删除最后一个字符)
[8. 更新显示](#8. 更新显示)
[9. 显示错误提示](#9. 显示错误提示)

代码讲解
activity_calculator.xmld代码讲解
1. 根布局(LinearLayout)
XML
<LinearLayout xmlns:android="http://schemas.android.com/apk/res/android"
    xmlns:app="http://schemas.android.com/apk/res-auto"
    xmlns:tools="http://schemas.android.com/tools"
    android:id="@+id/main"
    android:layout_width="match_parent"
    android:layout_height="match_parent"
    tools:context="myapp.CalculatorActivity"
    android:orientation="vertical"
android:padding="8dp">LinearLayout:- 根布局是一个垂直方向的线性布局 (
android:orientation="vertical"),所有子控件会从上到下依次排列。
- 根布局是一个垂直方向的线性布局 (
xmlns:android和xmlns:tools:- 命名空间声明,支持 Android 的属性和工具属性。
android:layout_width和android:layout_height:- 设置布局的宽度和高度为
match_parent,表示充满整个父容器。
- 设置布局的宽度和高度为
tools:context:- 指定该布局与哪个 Activity 关联(这里是
CalculatorActivity)。
- 指定该布局与哪个 Activity 关联(这里是
android:padding="8dp":- 设置内边距为 8dp,使内容与屏幕边缘保持一定距离。
2. 显示区域(TextView)
XML
<TextView
    android:id="@+id/tv_display"
    android:layout_width="match_parent"
    android:layout_height="100dp"
    android:gravity="end|center_vertical"
    android:textSize="32sp"
    android:background="#EEEEEE"
    android:padding="16dp"
android:text="0"/>TextView:- 显示计算器的输入和结果。
android:id="@+id/tv_display":- 给控件一个唯一标识符,方便在代码中引用。
android:layout_width="match_parent"和android:layout_height="100dp":- 宽度充满父容器,高度固定为 100dp。
android:gravity="end|center_vertical":- 文本靠右对齐,并在垂直方向居中。
android:textSize="32sp":- 设置字体大小为 32sp。
android:background="#EEEEEE":- 设置背景颜色为浅灰色。
android:padding="16dp":- 设置内边距为 16dp,避免文本紧贴边界。
android:text="0":- 初始显示内容为"0"。
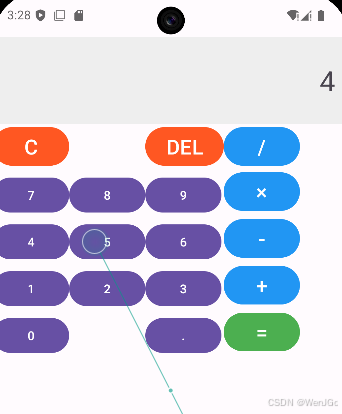
3. 按钮区域(GridLayout)
XML
<GridLayout
    android:layout_width="match_parent"
    android:layout_height="wrap_content"
    android:columnCount="4"
android:rowCount="5">GridLayout:- 用于放置计算器的按钮,按网格形式排列。
android:columnCount="4":- 网格有 4 列。
android:rowCount="5":- 网格有 5 行。
4. 清除和删除按钮
XML
<Button
    android:id="@+id/btn_clear"
    android:layout_columnSpan="2"
    android:text="C"
    android:textSize="24sp"
    android:backgroundTint="#FF5722"/>

<Button
    android:id="@+id/btn_delete"
    android:text="DEL"
    android:textSize="24sp"
android:backgroundTint="#FF5722"/>btn_clear:- 清除按钮,占据两列(
android:layout_columnSpan="2"),用于清空输入。 - 背景色为橙红色(
#FF5722)。
- 清除按钮,占据两列(
btn_delete:- 删除按钮,用于删除最后一个字符。
- 背景色同样为橙红色。
5. 数字和操作符按钮
XML
<Button android:id="@+id/btn_7" android:text="7"/>
<Button android:id="@+id/btn_8" android:text="8"/>
<Button android:id="@+id/btn_9" android:text="9"/>
<Button
    android:id="@+id/btn_multiply"
    android:text="×"
    android:textSize="24sp"
android:backgroundTint="#2196F3"/>- 数字按钮 :
- 数字按钮(如
btn_7,btn_8,btn_9)用于输入数字。
- 数字按钮(如
- 操作符按钮 :
- 操作符按钮(如
btn_multiply)用于输入运算符(乘法符号×)。 - 背景色为蓝色(
#2196F3)。
- 操作符按钮(如
6. 其他行的按钮
XML
<Button android:id="@+id/btn_4" android:text="4"/>
<Button android:id="@+id/btn_5" android:text="5"/>
<Button android:id="@+id/btn_6" android:text="6"/>
<Button
    android:id="@+id/btn_subtract"
    android:text="-"
    android:textSize="24sp"
android:backgroundTint="#2196F3"/>- 类似于上一行,每行包含三个数字按钮和一个操作符按钮(减号
-)。
7. 最后一行
XML
<Button
    android:id="@+id/btn_0"
    android:layout_columnSpan="2"
    android:text="0"/>

<Button
    android:id="@+id/btn_dot"
    android:text="."/>

<Button
    android:id="@+id/btn_equal"
    android:text="="
    android:textSize="24sp"
android:backgroundTint="#4CAF50"/>btn_0:- 数字 0 按钮,占据两列(
android:layout_columnSpan="2")。
- 数字 0 按钮,占据两列(
btn_dot:- 小数点按钮,用于输入小数。
btn_equal:- 等号按钮,用于计算结果。
- 背景色为绿色(
#4CAF50)。

CalculatorActivity.java代码讲解
1. 类和变量声明
java
public class CalculatorActivity extends AppCompatActivity {

    private TextView tvDisplay;
    private StringBuilder currentInput = new StringBuilder();
    private double operand1 = Double.NaN;
private String currentOperator = "";CalculatorActivity:- 继承自
AppCompatActivity,表示这是一个 Activity。
- 继承自
tvDisplay:- 用于显示用户输入和计算结果的
TextView。
- 用于显示用户输入和计算结果的
currentInput:- 使用
StringBuilder存储当前用户的输入内容。
- 使用
operand1:- 存储第一个操作数,默认值为
Double.NaN(表示未初始化)。
- 存储第一个操作数,默认值为
currentOperator:- 存储当前的操作符(如 "+"、"-" 等),默认为空字符串。
2. onCreate 方法
java
@Override
protected void onCreate(Bundle savedInstanceState) {
    super.onCreate(savedInstanceState);
    EdgeToEdge.enable(this);
    setContentView(R.layout.activity_calculator);
    ViewCompat.setOnApplyWindowInsetsListener(findViewById(R.id.main), (v, insets) -> {
        Insets systemBars = insets.getInsets(WindowInsetsCompat.Type.systemBars());
        v.setPadding(systemBars.left, systemBars.top, systemBars.right, systemBars.bottom);
        return insets;
    });

    tvDisplay = findViewById(R.id.tv_display);

    // 数字按钮统一处理
    setNumberButton(R.id.btn_0, "0");
    setNumberButton(R.id.btn_1, "1");
    setNumberButton(R.id.btn_2, "2");
    setNumberButton(R.id.btn_3, "3");
    setNumberButton(R.id.btn_4, "4");
    setNumberButton(R.id.btn_5, "5");
    setNumberButton(R.id.btn_6, "6");
    setNumberButton(R.id.btn_7, "7");
    setNumberButton(R.id.btn_8, "8");
    setNumberButton(R.id.btn_9, "9");
    setNumberButton(R.id.btn_dot, ".");

    // 操作符按钮
    setOperatorButton(R.id.btn_add, "+");
    setOperatorButton(R.id.btn_subtract, "-");
    setOperatorButton(R.id.btn_multiply, "×");
    setOperatorButton(R.id.btn_divide, "/");

    // 功能按钮
    findViewById(R.id.btn_equal).setOnClickListener(v -> performCalculation());
    findViewById(R.id.btn_clear).setOnClickListener(v -> clearAll());
    findViewById(R.id.btn_delete).setOnClickListener(v -> deleteLastChar());
}EdgeToEdge.enable(this):- 启用全面屏模式,使内容可以延伸到屏幕边缘。
setContentView(R.layout.activity_calculator):- 设置布局文件为
activity_calculator.xml。
- 设置布局文件为
ViewCompat.setOnApplyWindowInsetsListener:- 处理系统栏(如状态栏和导航栏)的内边距,确保内容不会被遮挡。
findViewById(R.id.tv_display):- 将布局中的
TextView控件与代码中的变量绑定。
- 将布局中的
- 数字按钮和操作符按钮 :
- 使用
setNumberButton和setOperatorButton方法统一设置按钮的点击事件。
- 使用
- 功能按钮 :
- 为等号、清除和删除按钮分别设置点击事件。
3. 数字按钮处理
java
private void setNumberButton(int buttonId, String value) {
    findViewById(buttonId).setOnClickListener(v -> {
        if (currentInput.length() < 15) {
            // 防止重复小数点
            if (value.equals(".") && currentInput.toString().contains(".")) return;

            currentInput.append(value);
            updateDisplay();
        }
    });
}- 限制输入长度 :
- 最大允许输入 15 个字符。
- 防止重复小数点 :
- 如果当前输入中已经包含小数点,则不允许再输入小数点。
- 更新显示 :
- 调用
updateDisplay()方法更新TextView的内容。
- 调用
4. 操作符按钮处理
java
private void setOperatorButton(int buttonId, String operator) {
    findViewById(buttonId).setOnClickListener(v -> {
        if (currentInput.length() > 0) {
            operand1 = Double.parseDouble(currentInput.toString());
            currentOperator = operator;
            currentInput.setLength(0);
        }
    });
}- 保存第一个操作数 :
- 当用户点击操作符按钮时,将当前输入的内容转换为数字并存储到
operand1中。
- 当用户点击操作符按钮时,将当前输入的内容转换为数字并存储到
- 保存操作符 :
- 将当前操作符保存到
currentOperator中。
- 将当前操作符保存到
- 清空输入 :
- 清空
currentInput,以便用户输入第二个操作数。
- 清空
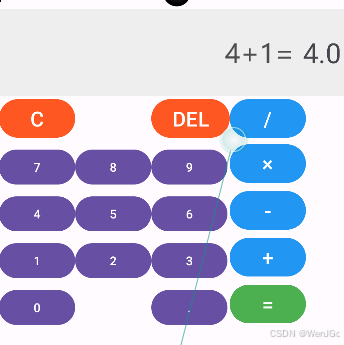
5. 执行计算
java
private void performCalculation() {
    if (!Double.isNaN(operand1) && currentInput.length() > 0) {
        double operand2 = Double.parseDouble(currentInput.toString());
        try {
            switch (currentOperator) {
                case "+":
                    operand1 += operand2;
                    break;
                case "-":
                    operand1 -= operand2;
                    break;
                case "×":
                    operand1 *= operand2;
                    break;
                case "/":
                    if (operand2 == 0) throw new ArithmeticException();
                    operand1 /= operand2;
                    break;
            }
            currentInput.setLength(0);
            currentInput.append(operand1 % 1 == 0 ? (int) operand1 : operand1);
            updateDisplay();
        } catch (ArithmeticException e) {
            showError("不能除以零");
        }
        currentOperator = "";
    }
}- 检查条件 :
- 确保
operand1已初始化且当前有输入内容。
- 确保
- 执行运算 :
- 根据
currentOperator的值执行相应的运算(加、减、乘、除)。
- 根据
- 处理除以零的情况 :
- 如果除数为零,抛出异常并显示错误提示。
- 格式化结果 :
- 如果结果是整数(如 10.0),则去掉小数部分。
- 更新显示 :
- 调用
updateDisplay()方法更新TextView的内容。
- 调用
6. 清除所有内容
java
private void clearAll() {
    currentInput.setLength(0);
    operand1 = Double.NaN;
    currentOperator = "";
    tvDisplay.setText("0");
}- 清空输入 :
- 重置
currentInput。
- 重置
- 重置操作数和操作符 :
- 将
operand1重置为Double.NaN,currentOperator重置为空字符串。
- 将
- 重置显示 :
- 将
TextView的内容重置为"0"。
- 将
7. 删除最后一个字符
java
private void deleteLastChar() {
    if (currentInput.length() > 0) {
        currentInput.deleteCharAt(currentInput.length() - 1);
        updateDisplay();
    }
}- 删除字符 :
- 删除
currentInput的最后一个字符。
- 删除
- 更新显示 :
- 调用
updateDisplay()方法更新TextView的内容。
- 调用
8. 更新显示
java
private void updateDisplay() {
    String displayText = currentInput.length() > 0 ? currentInput.toString() : "0";
    tvDisplay.setText(displayText);
}- 显示内容 :
- 如果
currentInput不为空,则显示其内容;否则显示"0"。
- 如果
9. 显示错误提示
java
private void showError(String message) {
    Toast.makeText(this, message, Toast.LENGTH_SHORT).show();
    clearAll();
}- 弹出提示 :
- 使用
Toast显示错误信息。
- 使用
- 清空内容 :
- 调用
clearAll()方法重置所有状态。
- 调用

完整代码
activity_calculator.xml
html
<?xml version="1.0" encoding="utf-8"?>
<LinearLayout xmlns:android="http://schemas.android.com/apk/res/android"
    xmlns:app="http://schemas.android.com/apk/res-auto"
    xmlns:tools="http://schemas.android.com/tools"
    android:id="@+id/main"
    android:layout_width="match_parent"
    android:layout_height="match_parent"
    tools:context="myapp.CalculatorActivity"
    android:orientation="vertical"
    android:padding="8dp">

    <!-- 显示区域 -->
    <TextView
        android:id="@+id/tv_display"
        android:layout_width="match_parent"
        android:layout_height="100dp"
        android:gravity="end|center_vertical"
        android:textSize="32sp"
        android:background="#EEEEEE"
        android:padding="16dp"
        android:text="0"/>

    <!-- 按钮区域 -->
    <GridLayout
        android:layout_width="match_parent"
        android:layout_height="wrap_content"
        android:columnCount="4"
        android:rowCount="5">

        <!-- 第一行:清除按钮 -->
        <Button
            android:id="@+id/btn_clear"
            android:layout_columnSpan="2"
            android:text="C"
            android:textSize="24sp"
            android:backgroundTint="#FF5722"/>

        <Button
            android:id="@+id/btn_delete"
            android:text="DEL"
            android:textSize="24sp"
            android:backgroundTint="#FF5722"/>

        <Button
            android:id="@+id/btn_divide"
            android:text="/"
            android:textSize="24sp"
            android:backgroundTint="#2196F3"/>

        <!-- 数字按钮 -->
        <Button android:id="@+id/btn_7" android:text="7"/>
        <Button android:id="@+id/btn_8" android:text="8"/>
        <Button android:id="@+id/btn_9" android:text="9"/>
        <Button
            android:id="@+id/btn_multiply"
            android:text="×"
            android:textSize="24sp"
            android:backgroundTint="#2196F3"/>

        <Button android:id="@+id/btn_4" android:text="4"/>
        <Button android:id="@+id/btn_5" android:text="5"/>
        <Button android:id="@+id/btn_6" android:text="6"/>
        <Button
            android:id="@+id/btn_subtract"
            android:text="-"
            android:textSize="24sp"
            android:backgroundTint="#2196F3"/>

        <Button android:id="@+id/btn_1" android:text="1"/>
        <Button android:id="@+id/btn_2" android:text="2"/>
        <Button android:id="@+id/btn_3" android:text="3"/>
        <Button
            android:id="@+id/btn_add"
            android:text="+"
            android:textSize="24sp"
            android:backgroundTint="#2196F3"/>

        <!-- 最后一行 -->
        <Button
            android:id="@+id/btn_0"
            android:layout_columnSpan="2"
            android:text="0"
            />

        <Button
            android:id="@+id/btn_dot"
            android:text="."
            />

        <Button
            android:id="@+id/btn_equal"
            android:text="="
            android:textSize="24sp"
            android:backgroundTint="#4CAF50"/>
    </GridLayout>
</LinearLayout>
CalculatorActivity.java
java
package myapp;

import android.os.Bundle;
import android.widget.TextView;
import android.widget.Toast;

import androidx.activity.EdgeToEdge;
import androidx.appcompat.app.AppCompatActivity;
import androidx.core.graphics.Insets;
import androidx.core.view.ViewCompat;
import androidx.core.view.WindowInsetsCompat;

import com.example.usthandroidjava.R;

public class CalculatorActivity extends AppCompatActivity {

    private TextView tvDisplay;
    private StringBuilder currentInput = new StringBuilder();
    private double operand1 = Double.NaN;
    private String currentOperator = "";

    @Override
    protected void onCreate(Bundle savedInstanceState) {
        super.onCreate(savedInstanceState);
        EdgeToEdge.enable(this);
        setContentView(R.layout.activity_calculator);
        ViewCompat.setOnApplyWindowInsetsListener(findViewById(R.id.main), (v, insets) -> {
            Insets systemBars = insets.getInsets(WindowInsetsCompat.Type.systemBars());
            v.setPadding(systemBars.left, systemBars.top, systemBars.right, systemBars.bottom);
            return insets;
        });

        tvDisplay = findViewById(R.id.tv_display);

        // 数字按钮统一处理
        setNumberButton(R.id.btn_0, "0");
        setNumberButton(R.id.btn_1, "1");
        setNumberButton(R.id.btn_2, "2");
        setNumberButton(R.id.btn_3, "3");
        setNumberButton(R.id.btn_4, "4");
        setNumberButton(R.id.btn_5, "5");
        setNumberButton(R.id.btn_6, "6");
        setNumberButton(R.id.btn_7, "7");
        setNumberButton(R.id.btn_8, "8");
        setNumberButton(R.id.btn_9, "9");
        setNumberButton(R.id.btn_dot, ".");

        // 操作符按钮
        setOperatorButton(R.id.btn_add, "+");
        setOperatorButton(R.id.btn_subtract, "-");
        setOperatorButton(R.id.btn_multiply, "×");
        setOperatorButton(R.id.btn_divide, "/");

        // 功能按钮
        findViewById(R.id.btn_equal).setOnClickListener(v -> performCalculation());
        findViewById(R.id.btn_clear).setOnClickListener(v -> clearAll());
        findViewById(R.id.btn_delete).setOnClickListener(v -> deleteLastChar());
    }

    private void setNumberButton(int buttonId, String value) {
        findViewById(buttonId).setOnClickListener(v -> {
            if (currentInput.length() < 15) {
                // 防止重复小数点
                if (value.equals(".") && currentInput.toString().contains(".")) return;

                currentInput.append(value);
                updateDisplay();
            }
        });
    }

    private void setOperatorButton(int buttonId, String operator) {
        findViewById(buttonId).setOnClickListener(v -> {
            if (currentInput.length() > 0) {
                operand1 = Double.parseDouble(currentInput.toString());
                currentOperator = operator;
                currentInput.setLength(0);
            }
        });
    }

    private void performCalculation() {
        if (!Double.isNaN(operand1) && currentInput.length() > 0) {
            double operand2 = Double.parseDouble(currentInput.toString());
            try {
                switch (currentOperator) {
                    case "+":
                        operand1 += operand2;
                        break;
                    case "-":
                        operand1 -= operand2;
                        break;
                    case "×":
                        operand1 *= operand2;
                        break;
                    case "/":
                        if (operand2 == 0) throw new ArithmeticException();
                        operand1 /= operand2;
                        break;
                }
                currentInput.setLength(0);
                currentInput.append(operand1 % 1 == 0 ? (int) operand1 : operand1);
                updateDisplay();
            } catch (ArithmeticException e) {
                showError("不能除以零");
            }
            currentOperator = "";
        }
    }

    private void clearAll() {
        currentInput.setLength(0);
        operand1 = Double.NaN;
        currentOperator = "";
        tvDisplay.setText("0");
    }

    private void deleteLastChar() {
        if (currentInput.length() > 0) {
            currentInput.deleteCharAt(currentInput.length() - 1);
            updateDisplay();
        }
    }

    private void updateDisplay() {
        String displayText = currentInput.length() > 0 ? currentInput.toString() : "0";
        tvDisplay.setText(displayText);
    }

    private void showError(String message) {
        Toast.makeText(this, message, Toast.LENGTH_SHORT).show();
        clearAll();
    }
}
运行效果