目录
二.Nginx+KeepAlived高可用负载均衡集群的部署
一.LVS+KeepAlived高可用负载均衡集群的部署
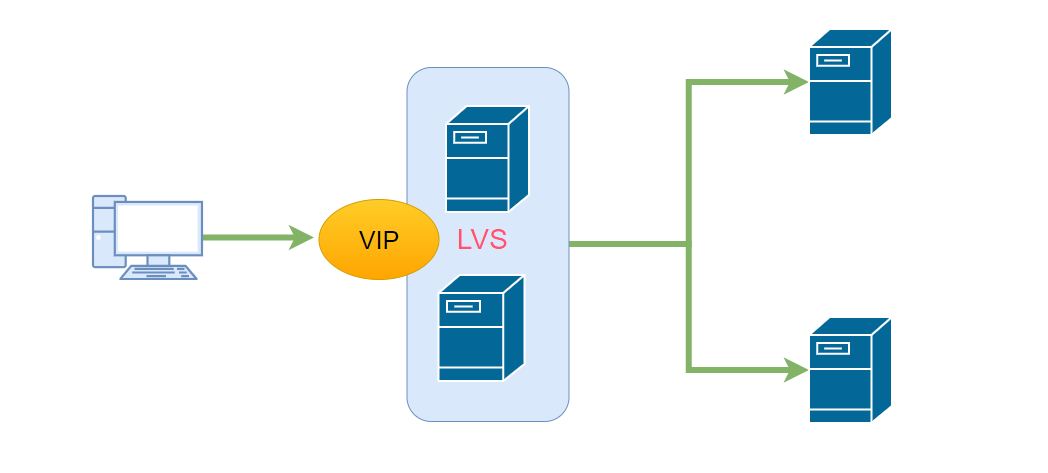
实验环境
主keepalived:192.168.181.10 lvs (7-1)
备keepalived:192.168.181.100 lvs (7-2)
web1:192.168.181.11 (7-3)
web2:192.168.181.12 (7-4)
vip:192.168.181.188
客户机访问
实验开始前关闭所有机器的防火墙
systemctl stop firewalld.service
setenforce 0
主上操作(7-1)
yum install ipvsadm keepalived -y
modprobe ip_vs
cat /proc/net/ip_vs
ipvsadm-save > /etc/sysconfig/ipvsadm
systemctl start ipvsadm.service
cd /etc/keepalived/
cp keepalived.conf keepalived.conf.bak
#复制一份
vim keepalived.conf (修改相关配置)
global_defs {
notification_email {
acassen@firewall.loc
failover@firewall.loc
sysadmin@firewall.loc
}
notification_email_from Alexandre.Cassen@firewall.loc
smtp_server 127.0.0.1
#修改邮箱指向自己(10行)
smtp_connect_timeout 30
router_id LVS_01
#指定服务器名称主备需要不一样(12行)
vrrp_skip_check_adv_addr
#vrrp_strict
#14行需要注释否则服务启动有问题
vrrp_garp_interval 0
vrrp_gna_interval 0
}
vrrp_instance VI_1 {
state MASTER
#指定服务器类型MASTER为主 BACKUP为备(20行)
interface ens33
#修改网卡名称为ens33(21)
virtual_router_id 10
#指定虚拟路由器的ID号主备需要一致
#nopreempt
#非抢占模式两个节点都需要配置去掉注释
priority 100
#设定优先级数字越大优先级越高,准备需要不一样
advert_int 1
#通告间隔(查看是否存活)
authentication {
auth_type PASS
#认证类型
auth_pass 123456
#修改验证密码,主备需要一样(27行)
}
virtual_ipaddress {
192.168.181.188
#指定群集vip地址
}
}
virtual_server 192.168.181.188 80 {
delay_loop 6
#健康间隔时间6秒
lb_algo rr
#调度算法轮询
lb_kind DR
#lvs模式为DR
persistence_timeout 0
#连接保持时间改为0 否则 无法体现效果
protocol TCP
#采用协议
real_server 192.168.181.11 80 {
#43行修改地址为真实主机地址
weight 1
#45行删除
#节点权重
TCP_CHECK {
connect_port 80
#检查目标端口
connect_timeout 3
#连接超时
nb_get_retry 3
#重试次数
delay_before_retry 3
#重试间隔时间
}
}
real_server 192.168.181.12 80 {
#第二个
weight 1
TCP_CHECK{
connect_port 80
connect_timeout 3
nb_get_retry 3
delay_before_retry 3
}
}
scp /etc/keepalived/keepalived.conf root@192.168.181.100:/etc/keepalived/ (复制给从7-2)
vim /etc/sysctl.conf
net.ipv4.conf.all.send_redirects = 0
net.ipv4.conf.default.send_redirects = 0
net.ipv4.conf.ens33.send_redirects = 0
sysctl -p
systemctl restart keepalived.service
备上操作(7-2)
yum install ipvsadm keepalived -y
modprobe ip_vs
cat /proc/net/ip_vs
ipvsadm-save > /etc/sysconfig/ipvsadm
systemctl start ipvsadm.service
cd /etc/keepalived/
cp keepalived.conf keepalived.conf.bak
#复制一份
vim keepalived.conf (从主上拷贝过来的修改以下三项)
router_id LVS_02
state BACKUP
priority 90
vim /etc/sysctl.conf
net.ipv4.conf.all.send_redirects = 0
net.ipv4.conf.default.send_redirects = 0
net.ipv4.conf.ens33.send_redirects = 0
sysctl -p
systemctl restart keepalived.service
在web1 web2 上操作
yum install httpd -y
ifconfig lo:0 192.168.181.188 netmask 255.255.255.255
vim /etc/sysctl.conf
net.ipv4.conf.all.arp_ignore = 1
net.ipv4.conf.all.arp_announce = 2
net.ipv4.conf.default.arp_ignore = 1
net.ipv4.conf.default.arp_announce = 2
net.ipv4.conf.lo.arp_ignore = 1
net.ipv4.conf.lo.arp_announce = 2
sysctl -p
route add -host 192.168.91.188 dev lo:0
#设置路由
分别在web1 web2上输入
echo 7-3 > /var/www/html/index.html
echo 7-4 > /var/www/html/index.html
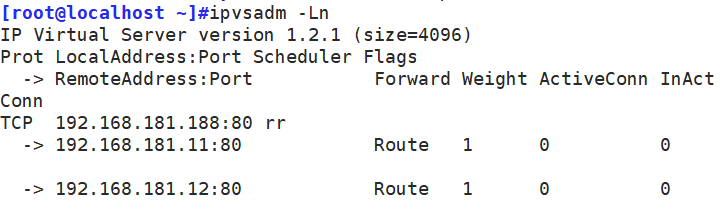
最后用客户机curl 192.168.181.188 会发现7-3 7-4 出现概率大概为1:1
即使关掉7-1lvs keepalived 7-2也可以支持工作
二.Nginx+KeepAlived高可用负载均衡集群的部署

实验环境:
主keepalived:192.168.91.100 nginx
备keepalived:192.168.91.101 nginx
web1:192.168.91.102
web2:192.168.91.103
vip:192.168.91.188
客户机访问
7-3 7-4
systemctl stop firewalld
setenforce 0
yum install httpd -y
echo 7-3 > /var/www/html/index.html
systemctl start httpd
systemctl stop firewalld
setenforce 0
yum install httpd -y
echo 7-4 > /var/www/html/index.html
systemctl start httpd
7-1
systemctl stop firewalld
setenforce 0
yum install epel-release.noarch -y
yum install -y nginx
systemctl start nginx
vim /etc/nginx/nginx.conf
upstream web {
server 192.168.91.102;
server 192.168.91.103;
}
location / {
proxy_pass http://web;
}
scp /etc/nginx/nginx.conf 192.168.91.101:/etc/nginx/nginx.conf
7-2
systemctl stop firewalld
setenforce 0
yum install epel-release.noarch -y
yum install -y nginx
systemctl start nginx
7-1 7-2 都要操作
yum install keepalived -y
7-1
vim /etc/keepalived/keepalived.conf
! Configuration File for keepalived
global_defs {
notification_email {
acassen@firewall.loc
failover@firewall.loc
sysadmin@firewall.loc
}
notification_email_from Alexandre.Cassen@firewall.loc
smtp_server 127.0.0.1 # 修改邮箱地址
smtp_connect_timeout 30
router_id LVS01 # 修改名称
vrrp_skip_check_adv_addr
#vrrp_strict #关闭严格模式
vrrp_garp_interval 0
vrrp_gna_interval 0
}
vrrp_script check_down {
script "/etc/keepalived/ng.sh"
interval 1
weight -30
fall 3
rise 2
timeout 2
}
vrrp_instance VI_1 {
state MASTER
interface ens33 #修改网卡的名称
virtual_router_id 51
priority 100
advert_int 1
authentication {
auth_type PASS
auth_pass 1111
}
virtual_ipaddress {
192.168.91.188 #修改vip
}
track_script {
check_down
}
}
vim /etc/keepalived/ng.sh
killall -0 nginx
chmod +x /etc/keepalived/ng.sh
scp /etc/keepalived/keepalived.conf 192.168.91.101://etc/keepalived/
7-2 上操作
vim /etc/keepalived/keepalived.conf
state BACKUP
priority 80
router_id LVS02
vim /etc/keepalived/ng.sh
killall -0 nginx
chmod +x /etc/keepalived/ng.sh
最后用客户机curl 192.168.181.188 会发现7-3 7-4 出现概率大概为1:1
即使关掉7-1nginx keepalived 7-2也可以支持工作