1 Kubernetes 安装部署指南
1.1 前置工作与注意事项
部署规划
- 服务器规划
| IP | Role | Hostname | resource | Remark |
|---|---|---|---|---|
| 172.16.1.72 | master 和 node | 2c , 4g, 10GB(个人建议至少2c,2g) | k8s-master-1 | 资源有限,此台机器同时作为 master 和 node 节点 |
- 版本
- cpu : x86-64
- os : centos 7.9
- docker : 26.1.4
- k8s : 1.25.0 ≥ 1.24.0 (涉及适配 CRI-O)
- kubeEdge : 1.16.6 x/本文不涉及
机器配置
- 系统配置
- 要求:2c 2g 20g 以上
- cpu 至少为2核,否则k8s初始化无法成功。
- 内存 建议master节点内存给4g
操作系统
- OS
- CENTOS 7.9
- 不同版本的系统对k8s影响较大,具体看实际情况而定。 有的还需要更新系统内核
hosts / hostname
- hosts
shell
vim /etc/hosts

172.16.1.72 k8s-master-1 k8s-slave-1
1台机器 1行 host 配置
- hostname配置
○ 每台机器都需配置,这里我们以 172.16.1.72 为例,我们需要设置hostname为 "k8s-master-1" ,与hosts 相匹配。
○ 如果不配置hostname 默认会配置为
localhost.localdomain,k8s 运行时会报错Error getting node" err="node \"localhost.localdomain\" not found
shell
# 设置当前机器的hostname
hostnamectl set-hostname k8s-master-1

# 查看当前机器hostname
hostname
- ping 一下
shell
ping k8s-master-1
ping k8s-slave-1
其他注意事项
- k8s安装有多种方式
- 使用
minikube安装单节点集群,用于测试- 采用工具
kubeadm-- 我们使用的这种方式(开发环境,机器比较少(几十台以下))- 使用
kubespray, google官方提供的工具- 全手动: 二进制安装(运维)
- 全自动安装: rancher、kubesphere (大型生产环境,百台,万台机器)
- k8s health会依赖一些端口,为了不出现网络问题,我们在虚拟机(master)中开放以下端口:
- 6443 主要
- 2379
- 2380
- kubeadm
- ca 证书:帮助我们安装的ca 证书时限是一年,所以不推荐正式环境使用,或需要手动配置ca证书。
1.2 安装步骤
1.2.1 初始准备 master + node
设置 hostname
shell
# 设置当前机器的hostname
hostnamectl set-hostname k8s-master-1

# 查看当前机器hostname
hostname
基础依赖包的安装
shell
# 基础依赖包安装
yum -y install wget vim net-tools ntpdate bash-completion
系统时钟同步
shell
# 向阿里云服务器同步时间
ntpdate time1.aliyun.com

# 删除本地时间并设置时区为上海
rm -rf /etc/localtime
ln -s /usr/share/zoneinfo/Asia/Shanghai /etc/localtime

# 查看时间
date -R || date
关闭防火墙、selinux
shell
systemctl stop firewalld
systemctl disable firewalld

# 临时关闭
setenforce 0
# 永久关闭
sed -i 's/enforcing/disabled/' /etc/selinux/config
关闭 swap
K8S 不能使用swap
shell
# 临时关闭Swap
swapoff -a

# 修改 /etc/fstab 删除或者注释掉swap的挂载,可永久关闭swap
sed -i '/swap/s/^/#/' /etc/fstab

# 修改完后我们检测一下,看最后一行swap 都是0 就成功了
free -m
#----------------start----------------------
 total used free shared buff/cache available
Mem: 1837 721 69 10 1046 944
Swap: 0 0 0
#-----------------end---------------------
网桥过滤
shell
# 网桥过滤
vim /etc/sysctl.conf

net.bridge.bridge-nf-call-ip6tables = 1
net.bridge.bridge-nf-call-iptables = 1
net.bridge.bridge-nf-call-arptables = 1
net.ipv4.ip_forward=1
net.ipv4.ip_forward_use_pmtu = 0

# 生效命令
sysctl --system

# 查看效果
sysctl -a|grep "ip_forward"
开启ipvs
- 开启ipvs
kubernetes 1.8版本开始,新增了kube-proxy对ipvs的支持,性能和追踪问题比iptable强此步骤为选填项,如果不执行那么默认使用
iptables
shell
# 安装IPVS
yum -y install ipset ipvsdm

# 编译ipvs.modules文件
vi /etc/sysconfig/modules/ipvs.modules
# 文件内容如下
#!/bin/bash
modprobe -- ip_vs
modprobe -- ip_vs_rr
modprobe -- ip_vs_wrr
modprobe -- ip_vs_sh
modprobe -- nf_conntrack_ipv4

# 赋予权限并执行
chmod 755 /etc/sysconfig/modules/ipvs.modules && bash /etc/sysconfig/modules/ipvs.modules &&lsmod | grep -e ip_vs -e nf_conntrack_ipv4

# 重启电脑,检查是否生效
reboot
lsmod | grep ip_vs_rr
修改hosts
- 修改hosts文件
添加 dns 解析
shell
vim /etc/hosts

172.16.1.72 k8s-master-1 k8s-slave-1
1.2.2 Docker 安装 master + node
docker 换源
shell
# 安装yum utils ( 安装 yum-config-manager 命令 )
yum install -y yum-utils

# yum docker-ce config 换源
#yum-config-manager --add-repo https://download.docker.com/linux/centos/docker-ce.repo
yum-config-manager --add-repo http://mirrors.aliyun.com/docker-ce/linux/centos/docker-ce.repo

ls -la /etc/yum.repos.d/
安装docker
- 安装 docker
shell
# 安装 docker (亦可指定版本)
yum -y install docker-ce docker-ce-cli containerd.io

# 启动docker, enable 为必须,k8s会检测docker.service
systemctl enable docker && systemctl start docker- 查验 docker 版本
sh
docker version配置镜像加速
shell
# 创建docker目录
mkdir -p /etc/docker

# 设置镜像源, exec-opts必须指定否则k8s启动报错(cgroup、systemd)
tee /etc/docker/daemon.json <<-'EOF'
{
 "exec-opts": ["native.cgroupdriver=systemd"],
 "registry-mirrors": [" https://fl791z1h.mirror.aliyuncs.com"]
}
EOF

# 重启docke并生效镜像加速
systemctl daemon-reload && systemctl restart docker

# 查看 docker 运行的进程和镜像
docker ps
docker images
1.2.3 K8S安装
step1 配置源 master + node
shell
cat <<EOF > /etc/yum.repos.d/kubernetes.repo
[kubernetes]
name=Kubernetes
baseurl=https://mirrors.aliyun.com/kubernetes/yum/repos/kubernetes-el7-x86_64/
enabled=1
gpgcheck=1
repo_gpgcheck=1
gpgkey=https://mirrors.aliyun.com/kubernetes/yum/doc/yum-key.gpg https://mirrors.aliyun.com/kubernetes/yum/doc/rpm-package-key.gpg
EOF
step2 安装 kubernetes(kubelet/kubeadm/kubectl) master+node
注意:阿里源 并未与官网同步
gpg(由于官网未开放同步方式, 可能会有索引gpg检查失败的情况,这时请用如下命令安装)
- 安装 kubernetes, 最好指定版本,否则会使用最新版本。
k8s 每个版本的变化都比较大,这里我们的k8s使用 1.25.0 版本
shell
# 检测可用的k8s版本(--nogpgcheck 忽略gpg检测)
yum list --nogpgcheck --showduplicates kubeadm --disableexcludes=kubernetes

# 找到我们想要安装的版本,并安装(这里可以用 1.23.8 / 1.25.0 等版本,目前≥1.24.0 版本安装时启用docker,需要特别安装 CRI,尽量使用 docker 与 k8s 兼容的区间版本
# 安装 kubelet、kubeadm、kubectl 组件
# yum install --nogpgcheck kubelet-1.23.8 kubeadm-1.23.8 kubectl-1.23.8
yum -y install --nogpgcheck kubelet-1.25.0 kubeadm-1.25.0 kubectl-1.25.0

# 此时还不能启动 kubelet :因为此时配置还不能,现在仅仅可设置开机自启动
$ systemctl enable kubelet
Created symlink from /etc/systemd/system/multi-user.target.wants/kubelet.service to /usr/lib/systemd/system/kubelet.service.
- 安装完成后,我们检查一下
shell
# 检查 kubectl 版本
kubectl version
##########show start############
WARNING: This version information is deprecated and will be replaced with the output from kubectl version --short. Use --output=yaml|json to get the full version.
Client Version: version.Info{Major:"1", Minor:"25", GitVersion:"v1.25.0", GitCommit:"a866cbe2e5bbaa01cfd5e969aa3e033f3282a8a2", GitTreeState:"clean", BuildDate:"2022-08-23T17:44:59Z", GoVersion:"go1.19", Compiler:"gc", Platform:"linux/amd64"}
Kustomize Version: v4.5.7
The connection to the server localhost:8080 was refused - did you specify the right host or port?
###########show end###########

# 检查 kubeadm 版本
kubeadm version
##########show start############
kubeadm version: &version.Info{Major:"1", Minor:"25", GitVersion:"v1.25.0", GitCommit:"a866cbe2e5bbaa01cfd5e969aa3e033f3282a8a2", GitTreeState:"clean", BuildDate:"2022-08-23T17:43:25Z", GoVersion:"go1.19", Compiler:"gc", Platform:"linux/amd64"}
##########show end############
step3 安装容器运行时(CRI) master + node
【特别注意】
k8s 1.24及更高版本不能直接兼容docker引擎, Docker Engine 没有实现 CRI, 而这是容器运行时在 Kubernetes 中工作所需要的。
为此,若K8s版本≥1.24时,必须安装一个额外的服务cri-dockerd。 cri-dockerd 是一个基于传统的内置 Docker 引擎支持的项目, 它在 1.24 版本从 kubelet 中移除。
你需要在集群内每个节点上安装一个容器运行时以使Pod可以运行在上面。
Kubernetes 中几个常见的容器运行时:
- containerd
- CRI-O
- Docker Engine
- Mirantis Container Runtime
以下是使用cri-dockerd适配器*来将 Docker Engine 与 Kubernetes 集成。
安装cri-dockerd
shell
wget https://github.com/Mirantis/cri-dockerd/releases/download/v0.2.6/cri-dockerd-0.2.6.amd64.tgz
tar -xf cri-dockerd-0.2.6.amd64.tgz
cp cri-dockerd/cri-dockerd /usr/bin/
chmod +x /usr/bin/cri-dockerd
配置启动服务(cri-docker.service)
shell
cat <<"EOF" > /usr/lib/systemd/system/cri-docker.service
[Unit]
Description=CRI Interface for Docker Application Container Engine
Documentation=https://docs.mirantis.com
After=network-online.target firewalld.service docker.service
Wants=network-online.target
Requires=cri-docker.socket
[Service]
Type=notify
ExecStart=/usr/bin/cri-dockerd --network-plugin=cni --pod-infra-container-image=registry.aliyuncs.com/google_containers/pause:3.8
ExecReload=/bin/kill -s HUP $MAINPID
TimeoutSec=0
RestartSec=2
Restart=always
StartLimitBurst=3
StartLimitInterval=60s
LimitNOFILE=infinity
LimitNPROC=infinity
LimitCORE=infinity
TasksMax=infinity
Delegate=yes
KillMode=process
[Install]
WantedBy=multi-user.target
EOF
主要是通过命令:
ExecStart=/usr/bin/cri-dockerd --network-plugin=cni --pod-infra-container-image=http://registry.aliyuncs.com/google_containers/pause:3.8
注意:pause的版本可通过:kubeadm config images list(此命令执行时,可能会有点点慢)
shell
kubeadm config images list生成 cri-docker.socket 文件
shell
cat <<"EOF" > /usr/lib/systemd/system/cri-docker.socket
[Unit]
Description=CRI Docker Socket for the API
PartOf=cri-docker.service
[Socket]
ListenStream=%t/cri-dockerd.sock
SocketMode=0660
SocketUser=root
SocketGroup=docker
[Install]
WantedBy=sockets.target
EOF
启动 cri-docker 服务、并配置开机启动
shell
systemctl daemon-reload
systemctl enable cri-docker
systemctl start cri-docker
systemctl is-active cri-docker
step4 部署Kubernetes master
kubeadm init
注意:node节点不需要执行kubeadm init
这里考虑的是单master,多slave
- 创建
kubeadm.yaml文件,命令如下:
shell
kubeadm init \
--apiserver-advertise-address=172.16.1.72 \
--image-repository registry.aliyuncs.com/google_containers \
--kubernetes-version v1.25.0 \
--service-cidr=10.10.0.0/12 \
--pod-network-cidr=10.244.0.0/16 \
--ignore-preflight-errors=all \
--cri-socket unix:///var/run/cri-dockerd.sock
##########show start############
[init] Using Kubernetes version: v1.25.0
[preflight] Running pre-flight checks
[WARNING CRI]: container runtime is not running: output: time="2025-05-17T16:37:27+08:00" level=fatal msg="validate service connection: CRI v1 runtime API is not implemented for endpoint \"unix:///var/run/cri-dockerd.sock\": rpc error: code = Unimplemented desc = unknown service runtime.v1.RuntimeService"
, error: exit status 1
[preflight] Pulling images required for setting up a Kubernetes cluster
[preflight] This might take a minute or two, depending on the speed of your internet connection
[preflight] You can also perform this action in beforehand using 'kubeadm config images pull'
[WARNING ImagePull]: failed to pull image registry.aliyuncs.com/google_containers/kube-apiserver:v1.25.0: output: time="2025-05-17T16:37:27+08:00" level=fatal msg="validate service connection: CRI v1 image API is not implemented for endpoint \"unix:///var/run/cri-dockerd.sock\": rpc error: code = Unimplemented desc = unknown service runtime.v1.ImageService"
, error: exit status 1
[WARNING ImagePull]: failed to pull image registry.aliyuncs.com/google_containers/kube-controller-manager:v1.25.0: output: time="2025-05-17T16:37:27+08:00" level=fatal msg="validate service connection: CRI v1 image API is not implemented for endpoint \"unix:///var/run/cri-dockerd.sock\": rpc error: code = Unimplemented desc = unknown service runtime.v1.ImageService"
, error: exit status 1
[WARNING ImagePull]: failed to pull image registry.aliyuncs.com/google_containers/kube-scheduler:v1.25.0: output: time="2025-05-17T16:37:27+08:00" level=fatal msg="validate service connection: CRI v1 image API is not implemented for endpoint \"unix:///var/run/cri-dockerd.sock\": rpc error: code = Unimplemented desc = unknown service runtime.v1.ImageService"
, error: exit status 1
[WARNING ImagePull]: failed to pull image registry.aliyuncs.com/google_containers/kube-proxy:v1.25.0: output: time="2025-05-17T16:37:27+08:00" level=fatal msg="validate service connection: CRI v1 image API is not implemented for endpoint \"unix:///var/run/cri-dockerd.sock\": rpc error: code = Unimplemented desc = unknown service runtime.v1.ImageService"
, error: exit status 1
[WARNING ImagePull]: failed to pull image registry.aliyuncs.com/google_containers/pause:3.8: output: time="2025-05-17T16:37:27+08:00" level=fatal msg="validate service connection: CRI v1 image API is not implemented for endpoint \"unix:///var/run/cri-dockerd.sock\": rpc error: code = Unimplemented desc = unknown service runtime.v1.ImageService"
, error: exit status 1
[WARNING ImagePull]: failed to pull image registry.aliyuncs.com/google_containers/etcd:3.5.4-0: output: time="2025-05-17T16:37:27+08:00" level=fatal msg="validate service connection: CRI v1 image API is not implemented for endpoint \"unix:///var/run/cri-dockerd.sock\": rpc error: code = Unimplemented desc = unknown service runtime.v1.ImageService"
, error: exit status 1
[WARNING ImagePull]: failed to pull image registry.aliyuncs.com/google_containers/coredns:v1.9.3: output: time="2025-05-17T16:37:27+08:00" level=fatal msg="validate service connection: CRI v1 image API is not implemented for endpoint \"unix:///var/run/cri-dockerd.sock\": rpc error: code = Unimplemented desc = unknown service runtime.v1.ImageService"
, error: exit status 1
[certs] Using certificateDir folder "/etc/kubernetes/pki"
[certs] Generating "ca" certificate and key
[certs] Generating "apiserver" certificate and key
[certs] apiserver serving cert is signed for DNS names [k8s-master-1 kubernetes kubernetes.default kubernetes.default.svc kubernetes.default.svc.cluster.local] and IPs [10.0.0.1 172.16.1.72]
[certs] Generating "apiserver-kubelet-client" certificate and key
[certs] Generating "front-proxy-ca" certificate and key
[certs] Generating "front-proxy-client" certificate and key
[certs] Generating "etcd/ca" certificate and key
[certs] Generating "etcd/server" certificate and key
[certs] etcd/server serving cert is signed for DNS names [k8s-master-1 localhost] and IPs [172.16.1.72 127.0.0.1 ::1]
[certs] Generating "etcd/peer" certificate and key
[certs] etcd/peer serving cert is signed for DNS names [k8s-master-1 localhost] and IPs [172.16.1.72 127.0.0.1 ::1]
[certs] Generating "etcd/healthcheck-client" certificate and key
[certs] Generating "apiserver-etcd-client" certificate and key
[certs] Generating "sa" key and public key
[kubeconfig] Using kubeconfig folder "/etc/kubernetes"
[kubeconfig] Writing "admin.conf" kubeconfig file
[kubeconfig] Writing "kubelet.conf" kubeconfig file
[kubeconfig] Writing "controller-manager.conf" kubeconfig file
[kubeconfig] Writing "scheduler.conf" kubeconfig file
[kubelet-start] Writing kubelet environment file with flags to file "/var/lib/kubelet/kubeadm-flags.env"
[kubelet-start] Writing kubelet configuration to file "/var/lib/kubelet/config.yaml"
[kubelet-start] Starting the kubelet
[control-plane] Using manifest folder "/etc/kubernetes/manifests"
[control-plane] Creating static Pod manifest for "kube-apiserver"
[control-plane] Creating static Pod manifest for "kube-controller-manager"
[control-plane] Creating static Pod manifest for "kube-scheduler"
[etcd] Creating static Pod manifest for local etcd in "/etc/kubernetes/manifests"
[wait-control-plane] Waiting for the kubelet to boot up the control plane as static Pods from directory "/etc/kubernetes/manifests". This can take up to 4m0s
[apiclient] All control plane components are healthy after 24.503463 seconds
[upload-config] Storing the configuration used in ConfigMap "kubeadm-config" in the "kube-system" Namespace
[kubelet] Creating a ConfigMap "kubelet-config" in namespace kube-system with the configuration for the kubelets in the cluster
[upload-certs] Skipping phase. Please see --upload-certs
[mark-control-plane] Marking the node k8s-master-1 as control-plane by adding the labels: [node-role.kubernetes.io/control-plane node.kubernetes.io/exclude-from-external-load-balancers]
[mark-control-plane] Marking the node k8s-master-1 as control-plane by adding the taints [node-role.kubernetes.io/control-plane:NoSchedule]
[bootstrap-token] Using token: 67yn2j.pwv6zn6ci59bw8ma
[bootstrap-token] Configuring bootstrap tokens, cluster-info ConfigMap, RBAC Roles
[bootstrap-token] Configured RBAC rules to allow Node Bootstrap tokens to get nodes
[bootstrap-token] Configured RBAC rules to allow Node Bootstrap tokens to post CSRs in order for nodes to get long term certificate credentials
[bootstrap-token] Configured RBAC rules to allow the csrapprover controller automatically approve CSRs from a Node Bootstrap Token
[bootstrap-token] Configured RBAC rules to allow certificate rotation for all node client certificates in the cluster
[bootstrap-token] Creating the "cluster-info" ConfigMap in the "kube-public" namespace
[kubelet-finalize] Updating "/etc/kubernetes/kubelet.conf" to point to a rotatable kubelet client certificate and key
[addons] Applied essential addon: CoreDNS
[addons] Applied essential addon: kube-proxy
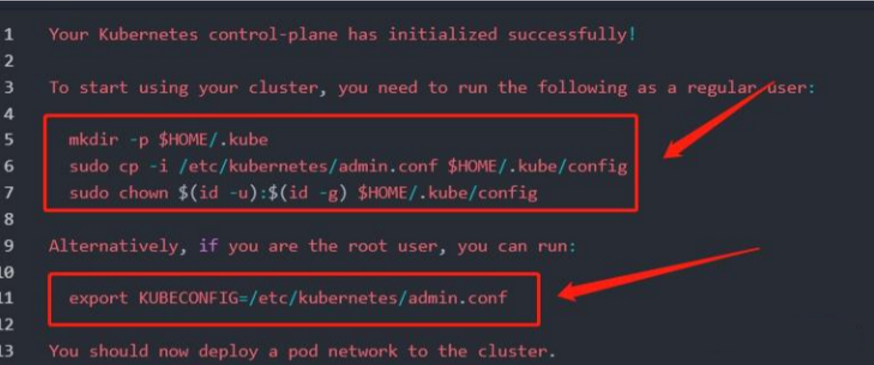
Your Kubernetes control-plane has initialized successfully!
To start using your cluster, you need to run the following as a regular user:
mkdir -p $HOME/.kube
sudo cp -i /etc/kubernetes/admin.conf $HOME/.kube/config
sudo chown $(id -u):$(id -g) $HOME/.kube/config
Alternatively, if you are the root user, you can run:
export KUBECONFIG=/etc/kubernetes/admin.conf
You should now deploy a pod network to the cluster.
Run "kubectl apply -f [podnetwork].yaml" with one of the options listed at:
https://kubernetes.io/docs/concepts/cluster-administration/addons/
Then you can join any number of worker nodes by running the following on each as root:
kubeadm join 172.16.1.72:6443 --token 67yn2j.pwv6zn6ci59bw8ma \
--discovery-token-ca-cert-hash sha256:ef39262b36489b6f6e8df35af5d921cdee7a4de01148544e2f28c18f5c3d7d1d
##########show end############
--apiserver-advertise-address=master节点IP
--pod-network-cidr=10.244.0.0/16要与后面kube-flannel.yml里的ip一致也就是使用
10.244.0.0/16不要改它。
| 参数名 | 示例值 | 含义 |
| --kubernetes-version | v1.25.0 | 版本 |
| --apiserver-advertise-address | 172.16.1.72 | 当前机器节点IP |
| --image-repository | registry.aliyuncs.com/google_containers | 镜像仓库 |
| --service-cidr | 10.10.0.0/12 | service 网段 |
| --pod-network-cidr | 10.244.0.0/16 | k8s内部pod节点的网段,不能和 --service-cidr 相同 |
成功后末尾输出信息如下:
【注意】这里是通过
kubeadm init安装,所以执行后会下载相应的docker镜像,一般会发现在控制台卡着不动很久,这时就是在下载镜像,你可以docker images查看是不是有新的镜像增加。
shell
docker imagesstep5 配置 .kube/config master + node
配置 .kube/config
- 使用kubectl工具,kubeadm安装好后,控制台也会有提示执行以下命令,照着执行。
这也是上一步最后控制台输出的)
shell
mkdir -p $HOME/.kube
sudo cp -i /etc/kubernetes/admin.conf $HOME/.kube/config
sudo chown $(id -u):$(id -g) $HOME/.kube/config
配置 KUBECONFIG 环境变量
shell
vim /etc/profile
# 加入以下变量
export KUBECONFIG=/etc/kubernetes/admin.conf

source /etc/profile
基于 kubectl 查验集群节点
- 测试一下 kubectl
shell
kubectl get nodes
##########show start############
NAME STATUS ROLES AGE VERSION
k8s-master-1 NotReady control-plane 11m v1.25.0
##########show end############
一般来说状态先会是NotReady ,可能程序还在启动中,过一会再看看就会变成Ready
step6 安装Pod网络插件 flannel master + node
- 安装pod网络插件 flannel
flannel和calico是常用的网络插件。故也有网友推荐 callico。
shell
kubectl apply -f https://raw.githubusercontent.com/coreos/flannel/master/Documentation/kube-flannel.yml

或 手动下载下来后,执行: kubectl apply -f /root/kube-flannel.yml

##########show start############
namespace/kube-flannel created
clusterrole.rbac.authorization.k8s.io/flannel created
clusterrolebinding.rbac.authorization.k8s.io/flannel created
serviceaccount/flannel created
configmap/kube-flannel-cfg created
daemonset.apps/kube-flannel-ds created
##########show end############
【注意】
若报错:The connection to the server http://raw.githubusercontent.com was refused - did you specify the right host or port?
原因:国外资源访问不了
解决办法:host配置可以访问的ip(例如下述操作)
shell
vim /etc/hosts
# 在/etc/hosts增加以下这条
199.232.28.133 raw.githubusercontent.com
step7 node节点加入master node
此步骤即执行
kubeadm init步骤中控制台输出的内容
提前验证网络连通性
shell
ssh 172.16.1.72 -p 6443 -vnode 加入 master
shell
kubeadm join 172.16.1.72:6443 --token ebe5w8.hfd3b59u9ww1r966 \
  --discovery-token-ca-cert-hash sha256:b3683deac5daa34a5778ede0ac0210bfbefce78a380c738aac7c2304c1cb1e4f \
  --ignore-preflight-errors=all \
  --cri-socket unix:///var/run/cri-dockerd.sock
【注意】
--ignore-preflight-errors=all
--cri-socket unix:///var/run/cri-dockerd.sock这两行配置命令,一定要加上,以避免各种报错:
由于本文中 master 和 node 实际上,均是同一台机器,故本步骤便不再执行,避免报错:
log
//运行情况:
[preflight] Running pre-flight checks
 [WARNING FileAvailable--etc-kubernetes-kubelet.conf]: /etc/kubernetes/kubelet.conf already exists
 [WARNING CRI]: container runtime is not running: output: time="2025-05-17T17:26:39+08:00" level=fatal msg="validate service connection: CRI v1 runtime API is not implemented for endpoint \"unix:///var/run/cri-dockerd.sock\": rpc error: code = Unimplemented desc = unknown service runtime.v1.RuntimeService"
, error: exit status 1
 [WARNING Port-10250]: Port 10250 is in use
 [WARNING FileAvailable--etc-kubernetes-pki-ca.crt]: /etc/kubernetes/pki/ca.crt already exists

error execution phase preflight: couldn't validate the identity of the API Server: could not find a JWS signature in the cluster-info ConfigMap for token ID "ebe5w8"
To see the stack trace of this error execute with --v=5 or higher- 在master可查看集群的node情况
shell
kubectl get nodes
注:网络截图↑
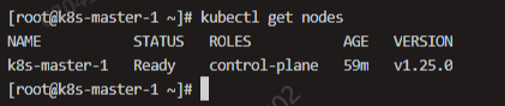
注:此处的实际截图
- 查看 pod 情况
shell
kubectl get pod --all-namespaces
##########show start############
NAMESPACE NAME READY STATUS RESTARTS AGE
kube-flannel kube-flannel-ds-lgrbd 1/1 Running 0 50m
kube-system coredns-c676cc86f-nzj2x 1/1 Running 0 80m
kube-system coredns-c676cc86f-s88tw 1/1 Running 0 80m
kube-system etcd-k8s-master-1 1/1 Running 0 80m
kube-system kube-apiserver-k8s-master-1 1/1 Running 0 80m
kube-system kube-controller-manager-k8s-master-1 1/1 Running 0 80m
kube-system kube-proxy-l9g4h 1/1 Running 0 80m
kube-system kube-scheduler-k8s-master-1 1/1 Running 0 80m
##########show end############- 到这里,整个k8s集群环境就基本搭建完成了。
【注意】
- 安装时,注意自己安装的程序版本
- k8s组件也是以 docker 容器 的形式存在。所以,会下载很多
dokcer image- 一般安装时可能会出现不少问题,可用
tailf /var/log/messages跟踪下日志- 最好把几台机器的系统时间同步下,节点通讯中的 token 与时间有关
1.2.4 检查系统资源消耗
此时,查看下系统的资源消耗情况:
经实际对比,安装 k8s 前,至现在安装完成k8s后,内存增加了 932-196 = 736 MB;CPU:2核。
shell
free -h1.2.5 安装dashboard (可选步骤)
- 详情参见:
- 效果预览:(实际,本步骤未执行)
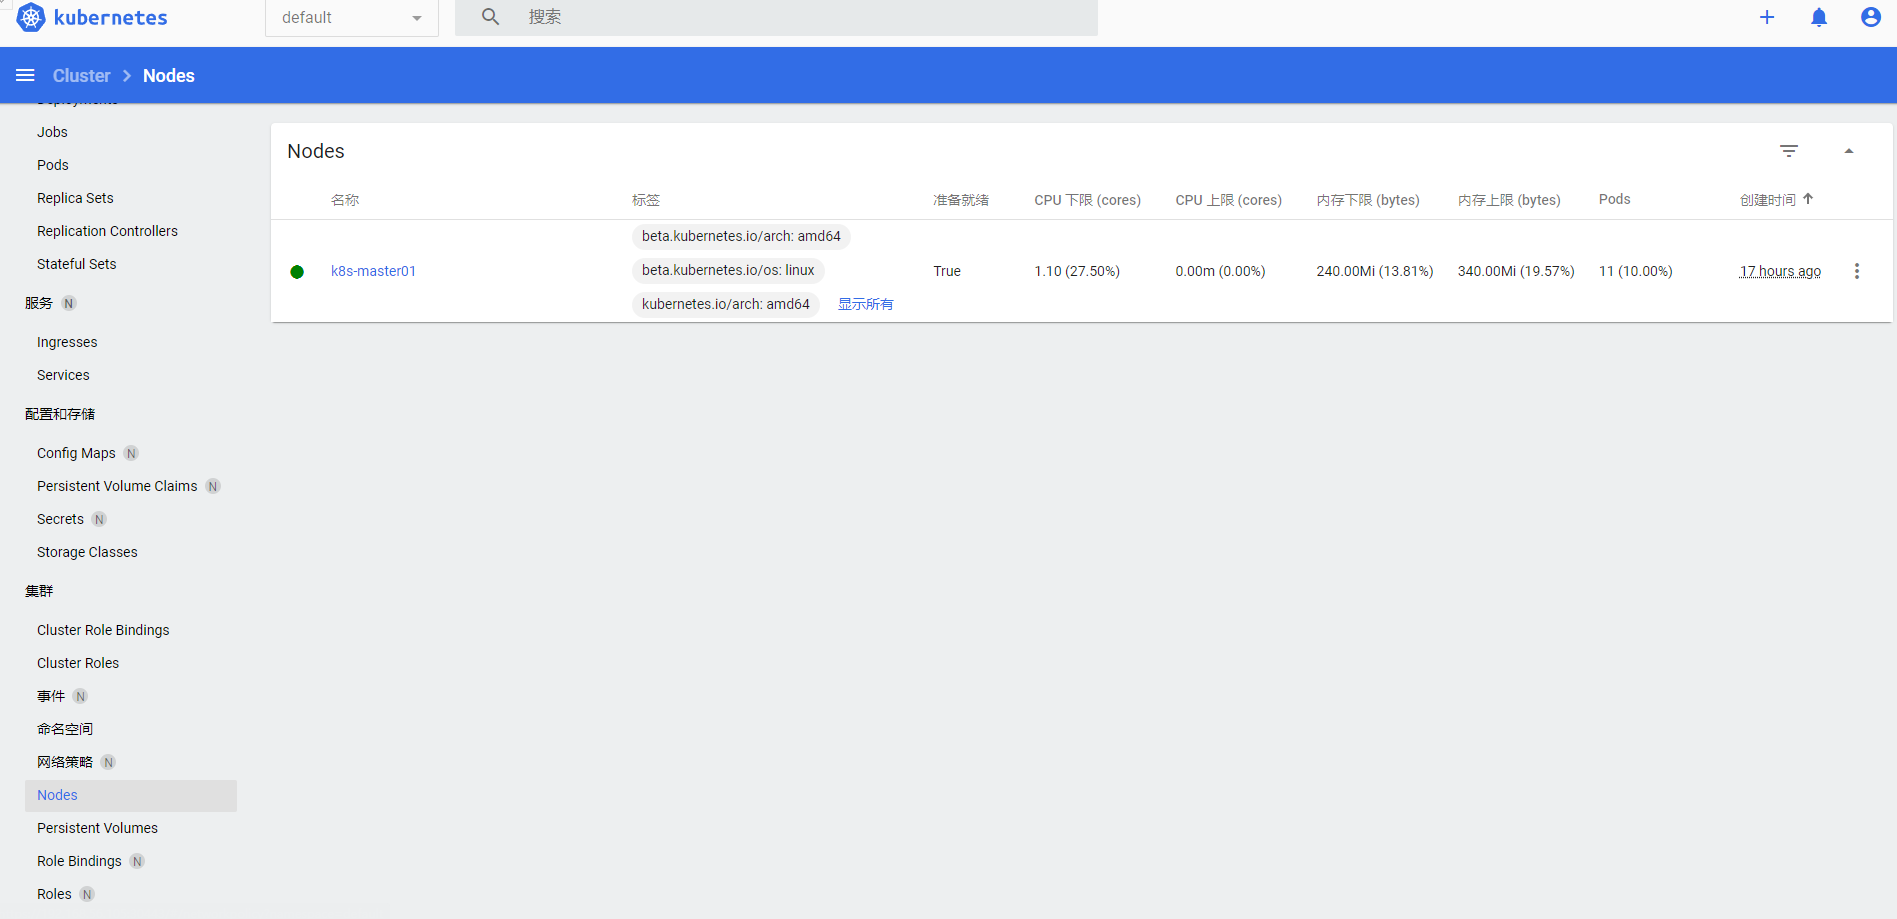
网友的效果图
FAQ K8s的安装部署
Q:K8S在kubeadm init后,没有记录kubeadm join如何查询?
shell
# 再生成一个token即可
kubeadm token create --print-join-command

# 可通过如下命令,查看历史的token
kubeadm token list
Q:node节点kubeadm join失败后,要重新join怎么办?
shell
# 先执行
kubeadm -y reset

# 再执行
kubeadm join  xx.....
Q:重启kubelet?
shell
systemctl daemon-reload
systemctl restart kubelet
Q:查询K8s集群的 node / pod?
shell
# 查询节点
kubectl get nodes

# 查询pods 一般要带上"-n"即命名空间。不带等同  -n default
kubectl get pods -n kube-system
Q:k8s"弃用"docker?
- 记得当时"k8s弃用docker"解读满天飞,很多文章说docker已死。后来也出来一波说并不是完全弃用docker只是移除了docker作为容器运行时的支持。
- k8s去掉的其实是dockershim,这是一个在kubelet和docker之间的适配器,用来将docker的接口转换为k8s所需的CRI(容器运行时接口)。这样做是为了简化k8s的架构,提高性能和安全性,以及支持更多的容器运行时。
- k8s并没有完全弃用docker,而是默认弃用了docker作为容器运行时的支持。这意味着k8s将不再使用docker来创建和运行容器,而是使用其他符合CRI标准的运行时,如containerd或CRI-O123。这样做的原因是docker不符合CRI标准,而且需要一个叫做dockershim的中间层来适配k8s的API。
- k8s去掉docker并不意味着docker就没有用了,或者你不能或者不应该用docker作为开发工具。docker仍然是构建容器镜像的非常有用的工具,而且它生成的镜像是符合OCI(开放容器倡议)标准的。这意味着任何用docker构建的镜像都可以在k8s中与其他容器运行时正常工作。所以,你不需要担心你的docker镜像会失效或者不兼容。
Q:k8s常用运维命令?
shell
# 查看k8s 运行日志命令
# 比较有用,在k8s 启动、kubeadm init、kubeadm join 阶段可以辅助分析问题。
journalctl -xefu kubelet

# 查看k8s驱动
systemctl show --property=Environment kubelet |cat
##########show start##########
Environment=KUBELET_KUBECONFIG_ARGS=--bootstrap-kubeconfig=/etc/kubernetes/bootstrap-kubelet.conf --kubeconfig=/etc/kubernetes/kubelet.conf KUBELET_CONFIG_ARGS=--config=/var/lib/kubelet/config.yaml
##########show end##########

# 重启k8s
systemctl restart kubelet

# 启动k8s
systemctl start kubelet
# 停止k8s
systemctl stop kubelet
# 开机自启k8s
systemctl enable kubelet

# dashboard 获取token
kubectl describe secret admin-user -n kubernetes-dashboard

# kubeadm 重置
# 有些时候我们在使用kubeadm init 命令时会报错,我们根据错误提示修复问题后需要重新进行 init 操作,因此需要进行reset重置
kubeadm reset
Q:环境信息?
shell
# k8s 安装目录
/etc/kubernetes/
##########show start##########
total 44
drwxr-xr-x 4 root root 4096 May 17 16:37 .
drwxr-xr-x. 83 root root 4096 May 17 17:08 ..
-rw------- 1 root root 5635 May 17 16:37 admin.conf
-rw------- 1 root root 5667 May 17 16:37 controller-manager.conf
-rw------- 1 root root 1983 May 17 16:37 kubelet.conf
drwxr-xr-x 2 root root 4096 May 17 16:37 manifests
drwxr-xr-x 3 root root 4096 May 17 16:37 pki
-rw------- 1 root root 5615 May 17 16:37 scheduler.conf
##########show end##########

# 组件配置文件目录
/etc/kubernetes/manifests/
##########show start##########
[root@k8s-master-1 ~]# ls -la /etc/kubernetes/manifests/
total 24
drwxr-xr-x 2 root root 4096 May 17 16:37 .
drwxr-xr-x 4 root root 4096 May 17 16:37 ..
-rw------- 1 root root 2400 May 17 16:37 etcd.yaml
-rw------- 1 root root 3362 May 17 16:37 kube-apiserver.yaml
-rw------- 1 root root 2878 May 17 16:37 kube-controller-manager.yaml
-rw------- 1 root root 1464 May 17 16:37 kube-scheduler.yaml
##########show end##########

# 自定义dashboard yaml文件目录 (此目录,因实际未安装 dashboard,故不存在)
/opt/kube-dashboard/conf/
##########show start##########
总用量 8
-rw-r--r--. 1 root root 1124 6月 29 08:41 admin-user-dashboard.yaml
-rw-r--r--. 1 root root 285 6月 29 08:25 k8s-dashboard.yaml
##########show end##########
Y 推荐文献
- Docker 基于CENTOS7安装Docker环境 - 博客园/千千寰宇
- Docker Docker 基础教程(概念/原理/基础操作) - 博客园/千千寰宇
- 虚拟化 K8S概述 - 博客园/千千寰宇
- K8s/云原生 开源 Kubernetes Web UI 管理工具 - 博客园/千千寰宇
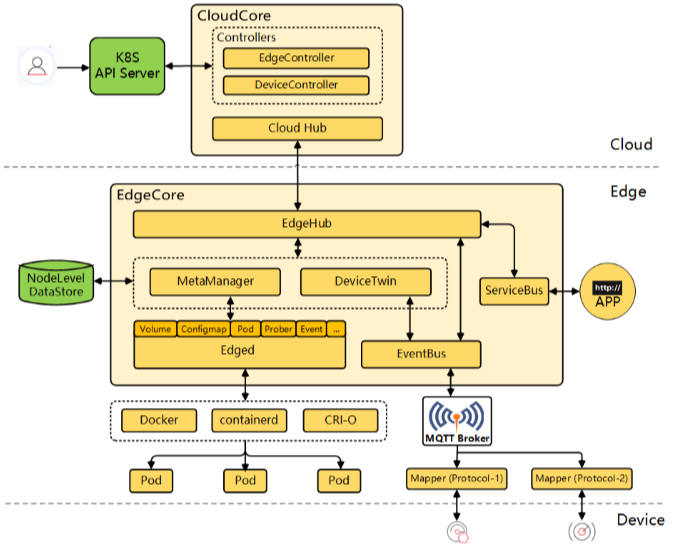
- kubernetes+KubeEdge云边环境的安装与部署 - CSDN
- KubeEdge与Kubernets的版本兼容性
https://github.com/kubeedge/kubeedge#kubernetes-compatibility
k8s 1.17 - 1.23
| Kubernetes 1.17 | Kubernetes 1.18 | Kubernetes 1.19 | Kubernetes 1.20 | Kubernetes 1.21 | Kubernetes 1.22 | Kubernetes 1.23 | |
|---|---|---|---|---|---|---|---|
| KubeEdge 1.11 | ✔ | ✔ | ✔ | ✔ | ✔ | ✔ | - |
| KubeEdge 1.12 | ✔ | ✔ | ✔ | ✔ | ✔ | ✔ | - |
| KubeEdge 1.13 | ✔ | ✔ | ✔ | ✔ | ✔ | ✔ | ✔ |
k8s 1.25 - 1.30
| Kubernetes 1.25 | Kubernetes 1.26 | Kubernetes 1.27 | Kubernetes 1.28 | Kubernetes 1.29 | Kubernetes 1.30 |
|---|---|---|---|---|---|
| KubeEdge 1.16 | ✓ | ✓ | ✓ | - | - |
| KubeEdge 1.17 | + | ✓ | ✓ | ✓ | - |
| KubeEdge 1.18 | + | + | ✓ | ✓ | ✓ |
| KubeEdge 1.19 | + | + | ✓ | ✓ | ✓ |
| KubeEdge 1.20 | + | + | + | ✓ | ✓ |
| KubeEdge HEAD (master) | + | + | + | ✓ | ✓ |
txt
√ KubeEdge和Kubernetes版本完全兼容。
+ KubeEdge具有Kubernetes版本中可能不存在的功能或API对象。
- Kubernetes版本有KubeEdge无法使用的特性或API对象。