文章目录
- 前言
-
- [🔧 一、核心监听方式(浏览器层)](#🔧 一、核心监听方式(浏览器层))
-
- [1. 拦截同步错误:`window.onerror`](#1. 拦截同步错误:
window.onerror) - [2. 拦截异步错误:`window.addEventListener('unhandledrejection')`](#2. 拦截异步错误:
window.addEventListener('unhandledrejection')) - [3. 覆写全局 API:如 `console.error`、`XMLHttpRequest.prototype.send`](#3. 覆写全局 API:如
console.error、XMLHttpRequest.prototype.send)
- [1. 拦截同步错误:`window.onerror`](#1. 拦截同步错误:
- [⚙️ 二、框架适配层(Vue/React/Angular)](#⚙️ 二、框架适配层(Vue/React/Angular))
-
- [Vue 示例(Vue 2 / Vue 3)](#Vue 示例(Vue 2 / Vue 3))
- [React 示例(ErrorBoundary)](#React 示例(ErrorBoundary))
- [🧪 三、错误信息序列化 & 上报](#🧪 三、错误信息序列化 & 上报)
- [🔄 四、额外能力(增强稳定性与分析能力)](#🔄 四、额外能力(增强稳定性与分析能力))
-
- [1. Source Map 支持](#1. Source Map 支持)
- [2. Breadcrumbs(用户行为轨迹)](#2. Breadcrumbs(用户行为轨迹))
- [3. 采样与过滤](#3. 采样与过滤)
- [📦 五、Sentry SDK 封装架构简要流程](#📦 五、Sentry SDK 封装架构简要流程)
- [✅ 总结一句话:](#✅ 总结一句话:)
- [🧩 一、前端 SDK 最小实现](#🧩 一、前端 SDK 最小实现)
-
- [📁 文件结构](#📁 文件结构)
- [🔧 `error-sdk.js`](#🔧
error-sdk.js)
- [🧪 二、模拟错误触发(`index.html`)](#🧪 二、模拟错误触发(
index.html)) - [🧰 三、后端错误日志接收(Node.js + Express)](#🧰 三、后端错误日志接收(Node.js + Express))
-
- [📁 文件结构](#📁 文件结构)
- [🔧 `index.js`](#🔧
index.js)
- [📈 四、运行方式(测试用)](#📈 四、运行方式(测试用))
- [🚀 五、进阶扩展建议](#🚀 五、进阶扩展建议)
- [✅ 总结](#✅ 总结)
- [Vue 3 错误查看平台](#Vue 3 错误查看平台)
-
- [🧱 一、项目结构概览(Vue 3 + Vite)](#🧱 一、项目结构概览(Vue 3 + Vite))
- [🚀 二、主要技术点实现](#🚀 二、主要技术点实现)
-
- [1. 获取错误日志列表(支持时间过滤)](#1. 获取错误日志列表(支持时间过滤))
- [2. 日志聚类(前端聚类示例)](#2. 日志聚类(前端聚类示例))
- [3. 时间过滤 UI 示例](#3. 时间过滤 UI 示例)
- [4. 日志卡片组件(堆栈、行为轨迹回放)](#4. 日志卡片组件(堆栈、行为轨迹回放))
- [5. 主视图:分页+聚类展示](#5. 主视图:分页+聚类展示)
- [📦 三、运行环境和后端配合](#📦 三、运行环境和后端配合)
-
- [后端 `/api/logs` 响应格式:](#后端
/api/logs响应格式:)
- [后端 `/api/logs` 响应格式:](#后端
- [✅ 四、进一步可扩展能力](#✅ 四、进一步可扩展能力)
前言
像 Sentry 这样的前端错误监听与上报框架,其核心是通过劫持浏览器原生错误处理机制 ,并拦截框架生命周期中的异常,最终将错误信息序列化后发送到后端进行归档与聚合。
以下是它的底层工作原理剖析:
🔧 一、核心监听方式(浏览器层)
1. 拦截同步错误:window.onerror
js
window.onerror = function (message, source, lineno, colno, error) {
  // 捕获运行时错误(语法/引用错误等)
  sendToServer({ message, source, lineno, colno, stack: error?.stack });
};
作用:
- 捕获未被 try/catch 包裹的错误
- 包含错误信息、脚本来源、行列号、错误堆栈
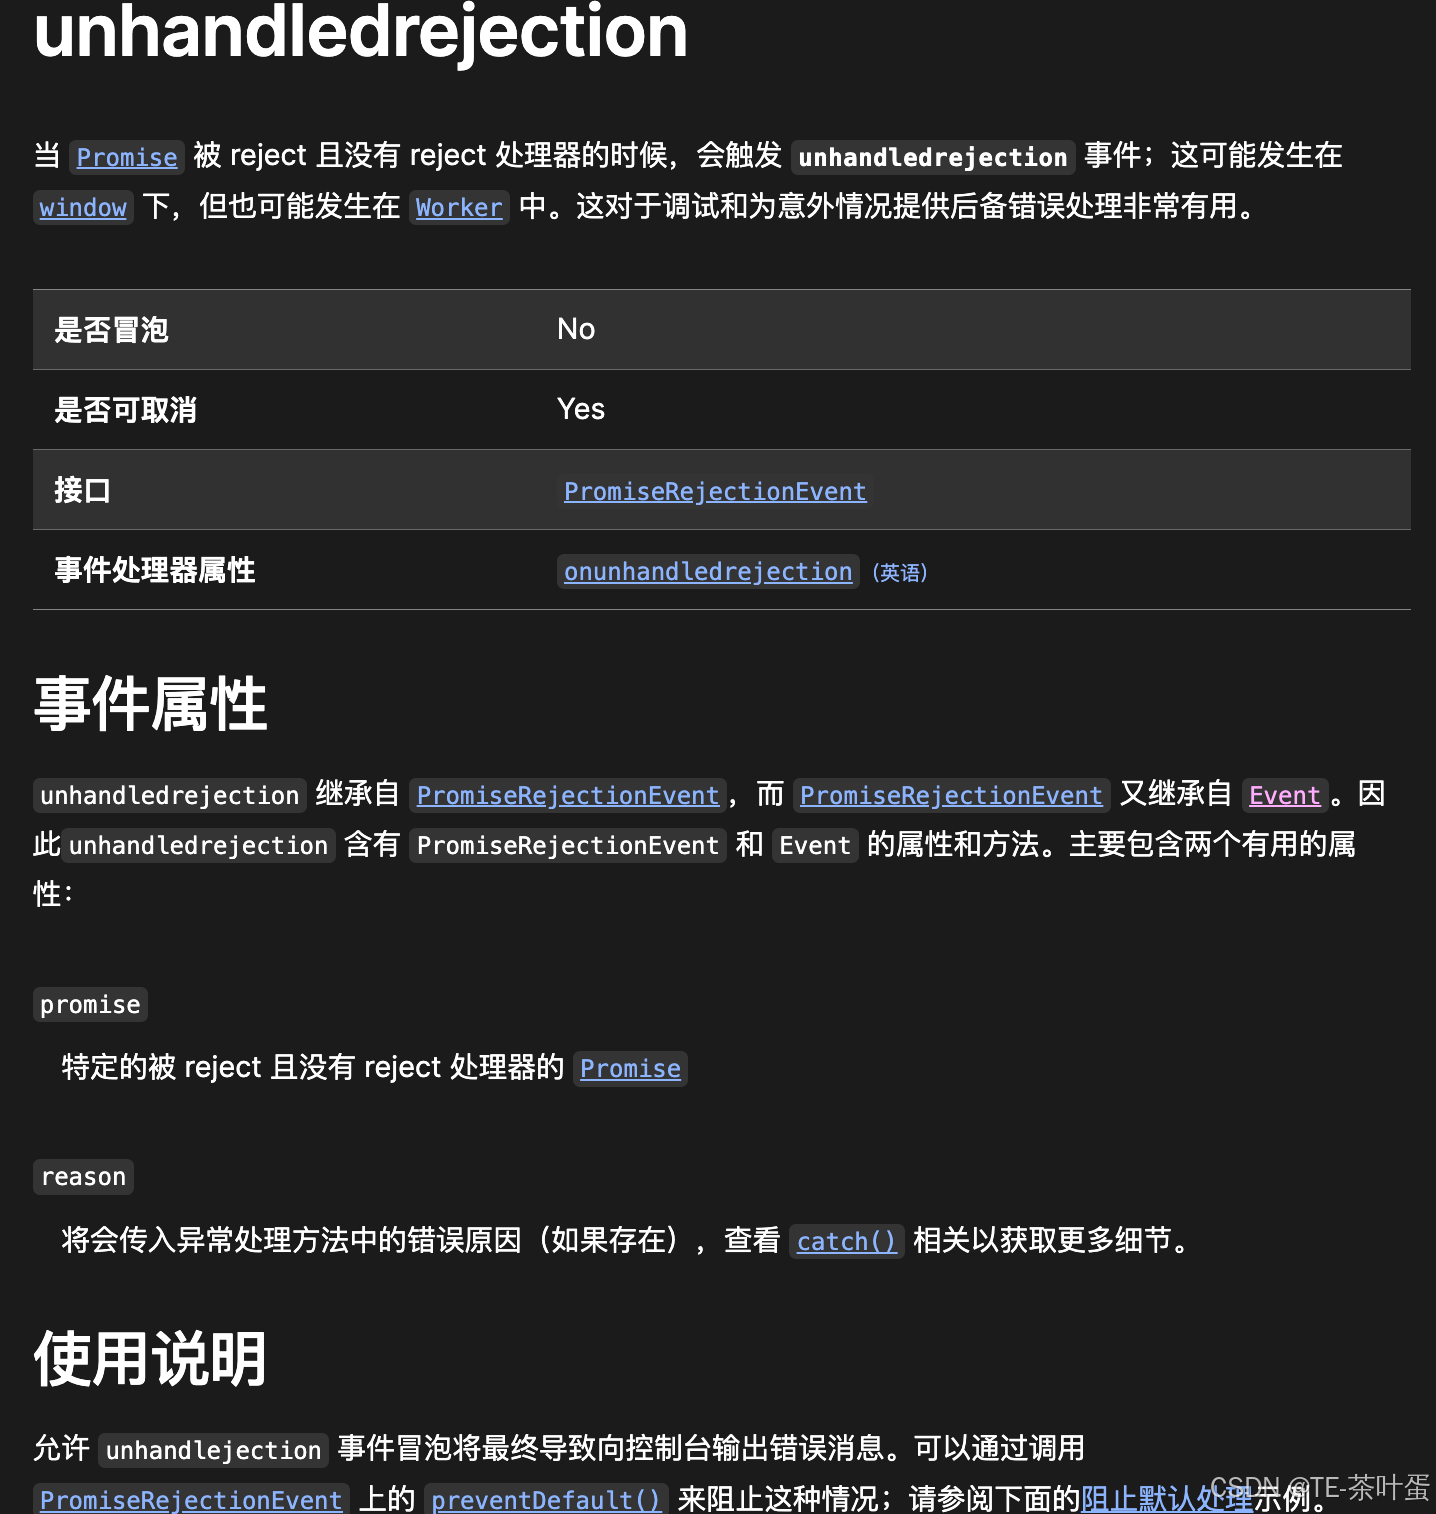
2. 拦截异步错误:window.addEventListener('unhandledrejection')
了解更多 :unhandledrejection | Web api MDN
js
window.addEventListener("unhandledrejection", event => {
  const reason = event.reason;
  sendToServer({ type: 'PromiseError', reason });
});
作用:
- 捕获未处理的 Promise 错误
- 包括
fetch(...).then().then()链中报错但未.catch()的情况
3. 覆写全局 API:如 console.error、XMLHttpRequest.prototype.send
部分监控库还会:
- 重写
console.error,记录开发者手动抛出的信息 - Hook
fetch/XMLHttpRequest以监听请求失败
⚙️ 二、框架适配层(Vue/React/Angular)
Vue 示例(Vue 2 / Vue 3)
js
Vue.config.errorHandler = (err, vm, info) => {
  sendToServer({
    message: err.message,
    stack: err.stack,
    component: vm.$options.name || '(anonymous)',
    info
  });
};- Vue 把组件渲染和事件处理等错误暴露给
errorHandler - Sentry 会自动注册这个钩子进行错误接管
React 示例(ErrorBoundary)
ts
class ErrorBoundary extends React.Component {
  componentDidCatch(error, info) {
    sendToServer({ error, info });
  }
  ...
}- React 17+ 推荐使用
ErrorBoundary组件包裹所有 UI 节点 - Sentry 提供开箱即用的
withErrorBoundary高阶组件
🧪 三、错误信息序列化 & 上报
错误标准格式:
json
{
  "message": "Cannot read property 'x' of undefined",
  "type": "TypeError",
  "stack": "at Object.<anonymous> (main.js:10:15)",
  "timestamp": 1684453410000,
  "browser": "Chrome 113",
  "userAgent": "...",
  "url": "https://xxx.com/page",
  "breadcrumbs": [...], // 用户行为轨迹
  "extra": {...}
}
上报方式:
- Sentry 使用beacon / fetch / xhr等方式发送错误日志到后端
- 示例:
js
navigator.sendBeacon('/api/log', JSON.stringify(error));- Sentry SDK 支持异步缓冲、重试、采样率控制等机制
🔄 四、额外能力(增强稳定性与分析能力)
1. Source Map 支持
- Sentry 可上传构建时生成的
.map文件 - 将压缩代码中的错误还原为源码中的具体文件、行号、方法名等
2. Breadcrumbs(用户行为轨迹)
- 自动记录用户行为链,如点击、输入、页面跳转、XHR 请求等
- 每条错误日志都会带一份"历史行为快照"
3. 采样与过滤
- 默认并不记录所有错误,防止高频错误占满带宽
- 可配置采样比例(如 10% 上报)、忽略特定错误类型或路径
📦 五、Sentry SDK 封装架构简要流程
js
浏览器/框架异常
      ↓
捕获器(window.onerror / unhandledrejection / Vue.errorHandler 等)
      ↓
中间层(格式标准化 + 过滤 + 日志构造)
      ↓
缓冲池(采样 + 批量 + 异步)
      ↓
HTTP 上报(beacon/fetch/XHR)
      ↓
Sentry 服务端聚合处理
✅ 总结一句话:
Sentry 的底层是基于浏览器和框架提供的全局异常钩子,结合源码映射、用户行为追踪和智能采样,完成完整的"采集→转化→上报→可视化"流程。
下面是一个最小可用的"类 Sentry 前端错误上报系统"示例,包括:
- ✅ 前端 SDK(监听、采集、上报)
- ✅ 后端服务(接收、保存、可视化展示)
- ✅ 进阶扩展建议(sourceMap、用户行为轨迹、异常采样)
🧩 一、前端 SDK 最小实现
📁 文件结构
/client/
  ├── index.html
  ├── error-sdk.js   ← 错误监听与上报逻辑
🔧 error-sdk.js
js
(function () {
  const endpoint = 'https://your-server.com/api/log';

  function report(error) {
    const payload = {
      message: error.message || error,
      type: error.name || 'UnknownError',
      stack: error.stack || '',
      url: location.href,
      userAgent: navigator.userAgent,
      time: Date.now()
    };
    navigator.sendBeacon(endpoint, JSON.stringify(payload));
  }

  // 捕获同步错误
  window.onerror = function (msg, src, line, col, err) {
    report(err || msg);
  };

  // 捕获 Promise 错误
  window.addEventListener('unhandledrejection', event => {
    report(event.reason);
  });

  // 封装为全局对象供外部手动调用
  window.$ErrorSDK = {
    capture: report
  };
})();
🧪 二、模拟错误触发(index.html)
html
<!DOCTYPE html>
<html>
<head>
  <title>Test Error</title>
  <script src="./error-sdk.js"></script>
</head>
<body>
  <h1>点击按钮触发错误</h1>
  <button onclick="throw new Error('测试错误!')">抛错</button>
</body>
</html>
🧰 三、后端错误日志接收(Node.js + Express)
📁 文件结构
/server/
  ├── index.js           ← 主服务
  ├── db.json            ← 模拟数据库
🔧 index.js
js
const express = require('express');
const fs = require('fs');
const app = express();
const logs = [];

app.use(express.json({ limit: '1mb' }));
app.use(express.static(__dirname + '/public'));

app.post('/api/log', (req, res) => {
  let raw = '';
  req.on('data', chunk => (raw += chunk));
  req.on('end', () => {
    try {
      const log = JSON.parse(raw);
      logs.push(log);
      fs.writeFileSync('db.json', JSON.stringify(logs, null, 2));
      res.sendStatus(204);
    } catch {
      res.sendStatus(400);
    }
  });
});

// 简单页面查看日志
app.get('/logs', (req, res) => {
  const data = fs.readFileSync('db.json', 'utf-8');
  res.send(`<pre>${data}</pre>`);
});

app.listen(3000, () => {
  console.log('🚀 Error log server running on http://localhost:3000');
});
📈 四、运行方式(测试用)
-
安装依赖:
bashnpm install express -
启动后端服务:
bashnode index.js -
打开
client/index.html,点击按钮模拟异常 -
浏览器访问
http://localhost:3000/logs查看错误信息
🚀 五、进阶扩展建议
| 功能 | 建议实现方式 |
|---|---|
| source map 解析 | 使用 Sentry CLI 或 source-map npm 包 |
| 用户行为 Breadcrumb | 记录点击、跳转、输入事件至数组 window.$SDK.track(event) 并附加上报 |
| 请求异常采集 | Hook XMLHttpRequest 与 fetch,记录失败请求 |
| 错误去重与采样 | 哈希 message+stack 内容并设置 TTL;使用采样率避免刷爆日志 |
| 多端接入支持 | 提供 init({ appKey }) 和上传接口文档,兼容 React/Vue |
| 数据持久化 | 使用 SQLite / MongoDB / Elasticsearch 替代 db.json |
| 面板可视化 | 使用 Vue3/React + ECharts 可视化报错趋势、影响用户数等指标 |
✅ 总结
你现在已经拥有了一个:
- ✨ 监听错误、捕获堆栈、上报后端的前端 SDK
- 🧾 可接收并持久化日志的 Node 后端
- 📊 简单的错误列表 UI 页面
这就是最小版 Sentry 的工作模型。
Vue 3 错误查看平台
功能包括:
- ✅ 错误列表展示(分页 / 时间过滤)
- ✅ 错误聚类(按 message+stack 聚类)
- ✅ 堆栈信息展开查看
- ✅ 行为轨迹回放(breadcrumbs)
- ✅ 基于 Element Plus 组件库 + Pinia 状态管理(可选)
🧱 一、项目结构概览(Vue 3 + Vite)
js
error-dashboard/
├── public/
├── src/
│   ├── api/           ← 接口调用
│   ├── components/    ← UI 组件(日志卡片、时间过滤等)
│   ├── views/         ← 页面(ErrorList.vue)
│   ├── App.vue
│   └── main.ts
├── index.html
├── vite.config.ts
🚀 二、主要技术点实现
1. 获取错误日志列表(支持时间过滤)
ts
// src/api/error.ts
import axios from 'axios';

export interface ErrorLog {
  id: string;
  message: string;
  stack: string;
  type: string;
  time: number;
  url: string;
  userAgent: string;
  breadcrumbs: string[];
}

export const getErrorLogs = (params: { startTime?: number; endTime?: number }) =>
  axios.get<ErrorLog[]>('/api/logs', { params });
2. 日志聚类(前端聚类示例)
ts
// 简化版聚类函数:根据 message + stack 做分组
export function clusterLogs(logs: ErrorLog[]) {
  const map = new Map<string, ErrorLog[]>();
  logs.forEach(log => {
    const key = log.message + log.stack?.split('\n')[0]; // 可加 hash
    if (!map.has(key)) map.set(key, []);
    map.get(key)!.push(log);
  });
  return [...map.entries()].map(([key, group]) => ({
    key,
    count: group.length,
    latest: group.sort((a, b) => b.time - a.time)[0],
    samples: group
  }));
}
3. 时间过滤 UI 示例
html
<!-- src/components/TimeFilter.vue -->
<template>
  <el-date-picker
    v-model="range"
    type="daterange"
    unlink-panels
    start-placeholder="开始时间"
    end-placeholder="结束时间"
    @change="emitFilter"
  />
</template>

<script setup>
import { ref } from 'vue';
const emit = defineEmits(['filter']);
const range = ref([]);
function emitFilter() {
  if (range.value.length === 2) {
    emit('filter', {
      startTime: new Date(range.value[0]).getTime(),
      endTime: new Date(range.value[1]).getTime()
    });
  }
}
</script>
4. 日志卡片组件(堆栈、行为轨迹回放)
html
<!-- src/components/ErrorCard.vue -->
<template>
  <el-card class="mb-4">
    <div>
      <strong>{{ log.message }}</strong>
      <el-tag class="ml-2">{{ log.type }}</el-tag>
    </div>
    <div class="text-sm text-gray-500">{{ new Date(log.time).toLocaleString() }}</div>
    <el-button text @click="showStack = !showStack">查看堆栈</el-button>
    <el-button text @click="showBreadcrumb = !showBreadcrumb">行为轨迹</el-button>

    <el-collapse v-if="showStack">
      <pre>{{ log.stack }}</pre>
    </el-collapse>
    <el-collapse v-if="showBreadcrumb">
      <ul>
        <li v-for="(b, i) in log.breadcrumbs" :key="i">{{ b }}</li>
      </ul>
    </el-collapse>
  </el-card>
</template>

<script setup>
import { ref } from 'vue';
defineProps(['log']);
const showStack = ref(false);
const showBreadcrumb = ref(false);
</script>
5. 主视图:分页+聚类展示
html
<!-- src/views/ErrorList.vue -->
<template>
  <TimeFilter @filter="onFilter" />
  <div v-for="group in clusters" :key="group.key">
    <ErrorCard :log="group.latest" />
    <span class="text-sm text-gray-500">共 {{ group.count }} 次</span>
  </div>
</template>

<script setup>
import { ref, onMounted } from 'vue';
import { getErrorLogs } from '@/api/error';
import { clusterLogs } from '@/utils/cluster';
import ErrorCard from '@/components/ErrorCard.vue';
import TimeFilter from '@/components/TimeFilter.vue';

const logs = ref([]);
const clusters = ref([]);

async function fetchLogs(params = {}) {
  const res = await getErrorLogs(params);
  logs.value = res.data;
  clusters.value = clusterLogs(logs.value);
}

function onFilter(params) {
  fetchLogs(params);
}

onMounted(() => fetchLogs());
</script>
📦 三、运行环境和后端配合
后端 /api/logs 响应格式:
json
[
  {
    "id": "uuid",
    "message": "Uncaught TypeError: Cannot read property 'x'",
    "stack": "at main.js:1:123",
    "type": "TypeError",
    "time": 1684928000000,
    "url": "https://xxx.com/page",
    "userAgent": "...",
    "breadcrumbs": ["click button", "fetch /api/user fail", ...]
  }
]
✅ 四、进一步可扩展能力
| 功能 | 实现方式建议 |
|---|---|
| 搜索 / 排序 | 加入输入框 + 下拉框(Element UI Table 支持) |
| 权限访问 | 登录鉴权 + token 验证 |
| 图表展示错误趋势 | Vue + ECharts 绘制 bar/line 图 |
| map 映射源码 | 后端集成 source-map npm 包,转堆栈回原文件 |
| 行为轨迹可视化 | 类似 DevTools 的 Timeline,做 step-by-step 回放 |