Prism
Prism.Dryloc 包
安装 Nuget 包 - Prism.DryIoc
1. 修改 App.xaml
修改 App.xaml 文件,添加 prism 命名空间, 继承由 Application → PrismApplication,删除默认启动 url, StartupUri="MainWindow.xaml"
xml
<dryioc:PrismApplication
    x:Class="PrismClass.App"
    xmlns="http://schemas.microsoft.com/winfx/2006/xaml/presentation"
    xmlns:x="http://schemas.microsoft.com/winfx/2006/xaml"
  🔴xmlns:dryioc="http://prismlibrary.com/"
    xmlns:local="clr-namespace:PrismClass">
    <dryioc:PrismApplication.Resources />

</dryioc:PrismApplication>
2. 修改App.xaml.cs
打开 App.xaml.cs 文件, 继承由 Application → PrismApplication(注意这里一定要编译一下,不然会报分部类继承类不一致的错误) , 如下所示。实现基类两个抽象方法:CreateShell( ) 与 RegisterTypes( ) 。
- CreateShell:该方法返回了一个 Window 类型的窗口, 其实就是返回应用程序的主窗口。
- RegisterTypes:该方法用于在 Prism 初始化过程中, 我们定义自身需要的一些注册类型, 以便于在 Prism 中可以使用。说白了,就是依赖注入,可以注入需要的服务等。
csharp
public partial class App : PrismApplication
{
  protected override Window CreateShell() //返回应用程序的主窗口
  {
    return Container.Resolve<MainWindow>();
  }

  protected override void RegisterTypes(IContainerRegistry containerRegistry) //依赖注入
  {
    throw new NotImplementedException();
  }
}
Prism Template Pack 扩展
Prism Template Pack 提供了哪些?
- Blank Project 空项目
- Module Project 模块示例项目
- 代码片段(用户快速创建属性、命令)
- propp-property(depends on BindableBase)
- cmd-DelegateCommand
- cmdg-DelegateCommand
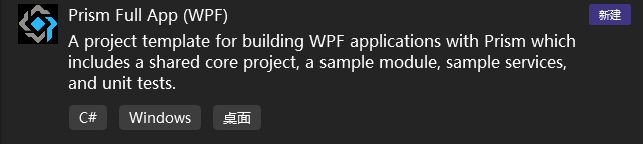
安装完成后,再次打开 Visual Studio,将会看到 Prism Template Pack 提供了多种项目模板,用于快速构建基于 Prism 的应用程序
-
完整带Damo
-
模块
-
空项目


内置代码片段
这个生产力工具也内置了大量代码片段,例如:
-
propp - Property, 有一个后端字段,该字段依赖于 BindableBase 类。
csharpprivate string _fieldName; public string PropertyName { get { return _fieldName; } set { SetProperty(ref _fieldName, value); } } -
cmd - 创建一个带有执行方法的委托命令属性。
csharpprivate DelegateCommand _fieldName; public DelegateCommand CommandName => _fieldName ?? (_fieldName = new DelegateCommand(ExecuteCommandName)); void ExecuteCommandName() { } -
cmdfull - 创建一个具有"执行"和"能否执行"方法的委托命令属性
csharpprivate DelegateCommand _fieldName; public DelegateCommand CommandName => _fieldName ?? (_fieldName = new DelegateCommand(ExecuteCommandName)); void ExecuteCommandName() { } bool CanExecuteCommandName() { return true; } -
cmdg - 创建一个带参数的委托命令属性
csharpprivate DelegateCommand<string> _fieldName; public DelegateCommand<string> CommandName => _fieldName ?? (_fieldName = new DelegateCommand<string>(ExecuteCommandName)); void ExecuteCommandName(string parameter) { } -
cmdgfull - 创建一个具有"执行"和"能否执行"方法的泛型委托命令属性
csharpprivate DelegateCommand<string> _fieldName; public DelegateCommand<string> CommandName => _fieldName ?? (_fieldName = new DelegateCommand<string>(ExecuteCommandName, CanExecuteCommandName)); void ExecuteCommandName(string parameter) { } bool CanExecuteCommandName(string parameter) { return true; }
Prism MVVM
本框架和其它二个常用的MVVM框架之间的区别:
| 功能↓ / →框架名 | Prism | Mvvmlight | CommunityToolkit.MVVM |
|---|---|---|---|
| 通知 | BindableBase | ViewModelBase | ObservableObject |
| 命令 | DelegateCommand | RelayCommand | Async/RelayCommand |
| 聚合器 | IEventAggregator | IMessenger | IMessenger |
| 模块化 | √ | × | × |
| 容器 | √ | × | × |
| 依赖注入 | √ | × | × |
| 导航 | √ | × | × |
| 对话 | √ | × | × |
Views 和 ViewModels 的绑定
在 MVVM 中,Prism 提供了 Views 和 ViewModels 的绑定的几种方式:
方法一:基于约定
两个个文件夹 Views 和 ViewModels
-
Views 中是 xxx.xaml
-
ViewModels 是 xxxViewModel.cs
-
注意要在 Xaml 中开启自动绑定:
xmlprism:ViewModelLocator.AutoWireViewModel="True
方法二:重写映射规则
重写 ConfigureViewModelLocator 方法,用于配置 ViewModel 定位器
csharp
protected override void ConfigureViewModelLocator()
{
    // 调用基类的 ConfigureViewModelLocator 方法,保留默认的配置行为
    base.ConfigureViewModelLocator();

    // 设置默认的 View 类型到 ViewModel 类型的解析方式
    ViewModelLocationProvider.SetDefaultViewTypeToViewModelTypeResolver((viewType) =>
    {
        // 获取视图类型的完整名称(包括命名空间)
        var viewName = viewType.FullName;

        // 获取视图所在程序集的完整名称
        var viewAssemblyName = viewType.GetTypeInfo().Assembly.FullName;

        // 构造对应的 ViewModel 类型名称,假设约定为视图类名加后缀 "VM",并与视图同在一个程序集
        var viewModelName = $"{viewName}VM, {viewAssemblyName}";

        // 根据构造的 ViewModel 名称获取对应的类型对象
        return Type.GetType(viewModelName);
    });
}
方法三:手动指定
手动指定 View 和 ViewModel 关系
csharp
protected override void ConfigureViewModelLocator()
{
  base.ConfigureViewModelLocator();

  //1️⃣ type / type
  ViewModelLocationProvider.Register(typeof(MainWindow).ToString(), typeof(CustomViewModel));

  //2️⃣ type / factory
  ViewModelLocationProvider.Register(typeof(MainWindow).ToString(), () => Container.Resolve<CustomViewModel>());

  //3️⃣ generic factory
  ViewModelLocationProvider.Register<MainWindow>(() => Container.Resolve<CustomViewModel>());

  //4️⃣ generic type
  ViewModelLocationProvider.Register<MainWindow, CustomViewModel>();
}
BindableBase 通知
属性通知
在 Prism 中, 继承 BindableBase 可以实现属性的变化通知,变化通知可以设置 SetProperty() 这个可以通知其他属性,带有这个方法重载或 RaisePropertyChanged() 我们可以看到 SetProperty() 方法有两个参数,会判断 _title 和 value 是否相等,如果不相等就进行赋值操作并触发 OnPropertyChanged 事件。
csharp
namespace PrismCollection.ViewModels
{
    public class MainWindowViewModel : BindableBase //支持通知需要继承 BindableBase
    {
        private string _title = "Prism Application";
        public string Title
        {
            get { return _title; }
            set { SetProperty(ref _title, value); } //SetProperty()通知
        }

        private string name;
        public string Name
        {
            get { return name; }
            set
            {
                name = value;
                RaisePropertyChanged(); //相当于原版 OnPropertyChanged()
            }
        }


        public MainWindowViewModel()
        {

        }
    }
}
📍 RaisePropertyChanged() 和 SetProperty() 的区别?
- RaisePropertyChanged():手动触发属性变更通知,相当于原版 OnPropertyChanged()
- 通知绑定系统某个属性的值发生了变化。
- 你需要手动传入属性名。
- SetProperty() :简化属性设置和通知变更
- 自动比较新旧值(避免重复通知)。
- 如果值有变化,则赋值并调用
RaisePropertyChanged()。- 可以添加额外的回调(如值改变后的操作)。
数据验证
在属性变化的时候还会涉及到数据验证的问题,Prism 提供了 ErrorContainer 以便管理及通知数据验证的错误消息,如果想要使用,ViewModel 类不要直接继承 BindableBase,而是抽离出基类 DomainObject,让其实现 INotifyDataErrorInfo 的接口和 BindableBase 类,代码如下:
使用时就让 ViewModel 继承下面的实现类 DomainObject
1️⃣ 创建基类
实现 INotifyDataErrorInfo 的接口和 BindableBase 类
csharp
//带属性验证的基类
public class DomainObject : BindableBase, INotifyDataErrorInfo //继承BindableBase类和INotifyDataErrorInfo接口
{
  public ErrorsContainer<string> _errorsContainer;
  protected ErrorsContainer<string> ErrorsContainer
  {
    get
    {
      if (_errorsContainer == null)
        _errorsContainer = new ErrorsContainer<string>(s => OnErrorsChanged(s));

      return _errorsContainer;
    }
  }

  public void OnErrorsChanged(string propertyName)
  {
    ErrorsChanged?.Invoke(this, new DataErrorsChangedEventArgs(propertyName));
  }

  //实现 INotifyDataErrorInfo 接口
  public event EventHandler<DataErrorsChangedEventArgs> ErrorsChanged;

  public IEnumerable GetErrors(string propertyName)
  {
    return ErrorsContainer.GetErrors(propertyName);
  }

  public bool HasErrors //实现 bool HasErrors { get; } 属性
  {
    get { return ErrorsContainer.HasErrors; }
  }
}
2️⃣ViewModel 继承上面创建的类
在 ViewModel 中通过 ErrorsContainer.SetErrors 输出错误消息 和 ErrorContainer.ClearErrors 清空错误 管理数据验证的错误消息了,代码如下:
csharp
namespace PrismCollection.ViewModels
{
    public class ErrorContainerMockViewModel:DomainObject //继承上面自己实现的基类 DomainObject
   {

		private int age;
		public int Age
		{
			get { return age; }
			set {
				    SetProperty(ref age, value);

				  if (age < 0)
              //参数1. 属性名  参数2. 错误信息
              ErrorsContainer.SetErrors(nameof(Age), new[] { "年龄不能小于0" });

				  else
              ErrorsContainer.ClearErrors(nameof(Age));
			    }
		}
	}
}
nameof :是 C# 6.0 引入的一个关键字,用于获取变量、属性、方法、类等成员的名称(字符串),不会因重命名而失效
3️⃣ 在 XAML 中绑定
xml
<TextBox
 Width="200"
 Height="30"
 Text="{Binding Age, UpdateSourceTrigger=PropertyChanged}"
 ToolTip="{Binding (Validation.Errors)[0].ErrorContent, RelativeSource={RelativeSource Self}}" />
DelegateCommand 命令
在 Prism 当中,可以使用 DelegateCommand 即带参数的 Command。
注意 XAML 中传参的方式为 CommandParameter,如果是属性则直接 CommandParameter="{Binding Property}",如果是绑定到控件属性上则要写成下面这种方式,指定元素名称和路径值。
装完 Prism Template Pack 扩展后可以直接使用 cmd 快速生成 DelegateCommand 属性。
命令快捷键:
-
cmd:只有一个逻辑方法
-
cmdfull: 有一个逻辑方法和一个是否执行方法
-
cmdg:只有一个带参数的逻辑方法
-
cmdgfull :有一个带参数的逻辑方法和一个是否执行方法
1️⃣ ViewModel .cs 中实现命令
DelegateCommand 用于命令,其也有泛型 DelegateCommand,本质是一个委托,当命令触发的时候,委托调用方法执行。
csharp
using System.Windows;
using Prism.Commands;
using Prism.Mvvm;

namespace PrismCollection.ViewModels
{
    public class MainWindowViewModel : BindableBase
    {
      //构造函数
      public MainWindowViewModel()
        {
            ClickBtnCommand = new DelegateCommand(ClickBtnMethod);
            ClickBtnCommandByPara = new DelegateCommand<string>(ClickBtnMethodByPara);
        }

        //1️⃣ 不带参数命令
        public DelegateCommand ClickBtnCommand { get; set; }

        private void ClickBtnMethod()
          {
              MessageBox.Show("I can click btn");
          }

        //2️⃣ 带参数命令
        public DelegateCommand<string> ClickBtnCommandByPara { get; set; }

        private void ClickBtnMethodByPara(string obj)
        {
            MessageBox.Show(obj);
        }
    }
}
2️⃣ View .Xaml 中绑定命令
xml
<Button Content="{Binding Title}"/>

<TextBox Name="textBox" Text="你好"/>

<Button Content="ClickCommand"
        Command="{Binding ClickBtnCommand}"/>

<Button Content="ClickCommandByPara"
        Command="{Binding ClickBtnCommandByPara}"
        CommandParameter="{Binding ElementName=textBox,Path=Text}"/>
⏺ 带属性校验的命令:
csharp
public MainWindowViewModel(IEventAggregator eventAggregator,IRegionManager regionManager)
{
  // 如果标题发生变化
  ClickBtnCommand = new DelegateCommand(ClickBtnMethod, CanExecuteFromTitleChange)
    .ObservesProperty(()=>Title); //当 Title 属性发生变化时,自动调用 RaiseCanExecuteChanged(),刷新按钮是否可用
}

// 不带参数命令
public DelegateCommand ClickBtnCommand { get; set; }

private void ClickBtnMethod()
{
  MessageBox.Show("你好");
}

private bool CanExecuteFromTitleChange()
{
	if(Title == "Albert")
	   {
		   return true;
	   }
	return false;
}
ObservesProperty( ):是 Prism 框架中
DelegateCommand的一个扩展方法,用于自动监听某个属性的变化,从而自动触发命令的CanExecute逻辑刷新。
CompositeCommand 多路命令
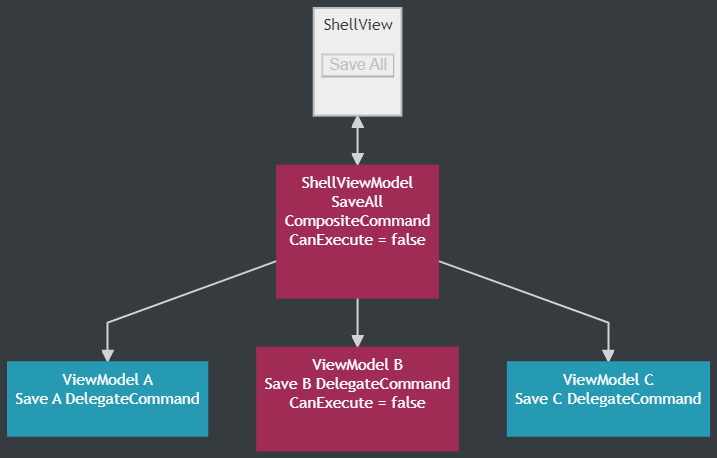
对于单个 Command 而言, 只是触发单个对应的功能, 而复合命令是 Prism 当中非常强大的功能, CompositeCommand 简单来说是一个父命令, 它可以注册 N 个子命令, 如下所示:
ShellView\n\nSave All ShellViewModel\nSaveAll\nCompositeCommand ViewModel A\nSave A DelegateCommand ViewModel B\nSave B DelegateCommand ViewModel C\nSave C DelegateCommand
当父命令被激活, 它将触发对所有的子命令, 如果任意一个命令 CanExecute=false 它将无法被激活,如下所示:
注意代码中复合命令 CompositeCommandByBtn.RegisterCommand(xxx)
csharp
using System.Windows;
using Prism.Commands;
using Prism.Mvvm;

namespace PrismCollection.ViewModels
{
    public class MainWindowViewModel : BindableBase
    {
       //构造函数
       public MainWindowViewModel()
        {
            ClickBtnCommand = new DelegateCommand(ClickBtnMethod);
            ClickBtnCommandByPara = new DelegateCommand<string>(ClickBtnMethodByPara);

            // 注册复合命令
            CompositeCommandByBtn = new CompositeCommand();
            CompositeCommandByBtn.RegisterCommand(ClickBtnCommand);
            CompositeCommandByBtn.RegisterCommand(ClickBtnCommandByPara);
        }

        // 不带参数命令
        public DelegateCommand ClickBtnCommand { get; set; }

        // 带参数命令
        public DelegateCommand<string> ClickBtnCommandByPara { get; set; }

        // 多路命令
        public CompositeCommand CompositeCommandByBtn { get; private set; }

        private void ClickBtnMethodByPara(string obj)
        {
            MessageBox.Show(obj);
        }

        private void ClickBtnMethod()
        {
            MessageBox.Show("你好");
        }
    }
}
IEventAggregator 事件聚合器
事件聚合器什么意思?
相信大家一定都使用过聊天软件,这就是事件聚合器。当你在一个视图 A 中输入文字点击发送之后,另外一个视图 B 会接收到这个消息,并将文字输出到屏幕上,而这个时候,视图 A 并不关心谁将收到信息,只管提交,视图 B 也不管是谁发来的消息,只管接收,并显示。这个其实就是订阅发布,通过 DelegateCommand 来实现事件的订阅发布。
1️⃣ 消息订阅体
定义一个事件类,这边选择的是用字典来发送消息:
csharp
public class MessageEvent: PubSubEvent<Dictionary<string,string>> //要继承 PubSubEvent<> 里面页可以选择其它类型
{
}
2️⃣ 订阅事件和发布事件(先订阅再发布)
关于 Subscribe 当中的4个参数, 详解:
- action: 发布事件时执行的委托。
- ThreadOption 枚举: 指定在哪个线程上接收委托回调,有三种选择 PublisherThread(与发布者保持在同一线程上)、UIThread(在 UI 线程上执行)、BackgroundThread(在后台线程上执行)
- keepSubscriberReferenceAlive: 如果为 true,则 Prism.Events.PubSubEvent 保留对订阅者的引用因此它不会收集垃圾,用完必须要取消订阅。
- filter: 进行筛选以评估订阅者是否应接收事件。
csharp
 //创建事件聚合器字段
private readonly IEventAggregator _eventAggregator;
private string _textLook = string.Empty;

/*1️⃣ SubscribeCommand 订阅命令***********/
public DelegateCommand SubscribeCommand { get; private set; }

void SubscribeMessage()
		{
			this.UnsubscribeMessage(); //先取消对事件的订阅,防止重复注册或内存泄露
			_eventAggregator.GetEvent<MessageEvent>().Subscribe(OnMessageReceived); //注册上面定义的事件
		}

void OnMessageReceived(Dictionary<string, string> dicMsg) //收到事件后执行的方法
		{
       // 处理接收到的消息
       //把当前时间和 dicMsg["TextLook"] 的内容,以字符串的形式追加到 TextLook 属性中
			TextLook += $"{DateTime.Now} Subscribe : {dicMsg["TextLook"]} \r\n";
		}


/*2️⃣ UnSubscribeCommand 取消订阅命令***********/
public DelegateCommand UnsubscribeCommand { get; private set; }

void UnsubscribeMessage()
		{
			_eventAggregator.GetEvent<MessageEvent>().Unsubscribe(OnMessageReceived);
		}


/*3️⃣ PublishCommand 发布命令***********/
public DelegateCommand<Dictionary<string, string>> PublishCommand { get; private set; }

void PublishMessage(Dictionary<string,string> dicMsg)
		{
			dicMsg = new Dictionary<string,string>();
			dicMsg.Add("TextLook", "AlbertZhao");
			_eventAggregator.GetEvent<MessageEvent>().Publish(dicMsg);
		}


/*4️⃣ FilterCommand 带条件过滤的订阅***********/
public DelegateCommand FilterCommand { get; private set; }
private void Filter()
	{
		//先取消对事件的订阅,防止重复注册或内存泄露
		_eventAggregator.GetEvent<MessageEvent>().Unsubscribe(OnMessageReceived);

		//过滤事件
     //参数1. 收到事件后执行的方法(自己写的)
     //参数2. 指定在哪个线程调用回调(在发布线程中执行)
     //参数3. 是否保持强引用(不保持强引用,让GC可以清理)
     //参数4. 过滤器,只让满足条件的消息触发回调
		_eventAggregator.GetEvent<MessageEvent>()
			.Subscribe(OnMessageReceived, ThreadOption.PublisherThread, false, dicMsg =>
					   {
				if (dicMsg["TextLook"].Equals("Hello")) return true;
				else
				{
					TextLook += $"{DateTime.Now} : Filter data :{dicMsg["TextLook"]} \r\n";
					return false;
				}
			});
	}
📌实例项目功能结构概览:
命令 方法 功能 SubscribeCommandSubscribeMessage普通订阅消息 UnsubscribeCommandUnsubscribeMessage取消订阅 PublishCommandPublishMessage发布消息 FilterCommandFilter带条件过滤的订阅
- _eventAggregator.GetEvent<MessageEvent>().Subscribe(OnMessageReceived):订阅
- _eventAggregator.GetEvent<MessageEvent>().Unsubscribe(OnMessageReceived):取消订阅
- _eventAggregator.GetEvent<MessageEvent>() .Publish(dicMsg):发布
- _eventAggregator.GetEvent<MessageEvent>().Subscribe():过滤
📌在 "4" 过滤订阅 中几个参数说明:
参数名 类型 含义 默认值 actionAction<TPayload>接收到事件时执行的回调方法 必填 threadOptionThreadOption指定在哪个线程调用回调 PublisherThreadkeepSubscriberReferenceAlivebool是否保持强引用(防止被GC) falsefilterPredicate<TPayload>过滤器,只让满足条件的消息触发回调 null下面是示例中所使用的值解释:
参数 值 说明 actionOnMessageReceived收到事件后执行的方法 threadOptionPublisherThread在发布线程中执行(UI操作时推荐用 UIThread)keepSubscriberReferenceAlivefalse不保持强引用,让GC可以清理(推荐) filterdicMsg => ...只有 TextLook == "Hello"的消息才触发OnMessageReceived,否则被拦截
3️⃣ 构造函数注入 IEventAggregator
csharp
//构造函数
public MainWindowViewModel(IEventAggregator eventAggregator)
{
  this._eventAggregator = eventAggregator; //注入聚合器字段
  PublishCommand = new DelegateCommand<Dictionary<string, string>>(PublishMessage);//发布
  SubscribeCommand = new DelegateCommand(SubscribeMessage); // 订阅
  UnsubscribeCommand = new DelegateCommand(UnsubscribeMessage);  //取消订阅
  FilterCommand = new DelegateCommand(Filter);  //过滤订阅
}
注意其中还有消息过滤的事件订阅 FilterCommand,用于过滤消息。
Module
Modules 是能够独立开发、测试、部署的功能单元,Modules 可以被设计成实现特定业务逻辑的模块(如 Profile Management),也可以被设计成实现通用基础设施或服务的模块(如 Logging、Exception Management)。既然 Modules 能够独立开发、测试、部署,那么如何告诉Shell(我们的宿主程序)去 Load 哪些 Module,以怎样的形式 Load 这些 Module 呢?Prism 为此提供了一个叫 ModuleCatalog 的东西。他用这个来管理 Module。所以在 App 启动之初,需要创建配置一个 ModuleCatalog。
-
通过 Prism Template Package 创建 Prism Module 项目或者直接创建 Wpf 项目,引入 Prism 包,并删除 App.xaml,然后将 outputType 改为 Class Library。
-
新建 Views 文件夹,新建一个用户控件 ViewA,新增一个类 ModuleAModule.cs 实现 IModule 接口(每一个 Module 类都要实现这个接口,而每一个 Module 都要有这样一个类来对 Module 里的资源统一管理)
csharp
using Prism.Ioc;
using Prism.Modularity;
using Prism.Regions;
using PrismCollectionModuleA.Views;
using System;
using System.Collections.Generic;
using System.Linq;
using System.Text;
using System.Threading.Tasks;

namespace PrismCollectionModuleA
{
    public class ModuleA : IModule
    {
        public void OnInitialized(IContainerProvider containerProvider)
        {
            var regionManager = containerProvider.Resolve<RegionManager>();
            regionManager.RegisterViewWithRegion("RegionPage", typeof(ModuleViewA));
        }

        public void RegisterTypes(IContainerRegistry containerRegistry)
        {
        }
    }
}- 在主程序中加载模块官方 Demo 中有五种常见方式 https://github.com/PrismLibrary/Prism-Samples-Wpf
(1)AppConfig 方式
在项目中添加 App.config 配置文件,注意这边 moduleType 是名称空间.类名形式。重写 App.xaml.cs CreateModuleCatalog() 方法。注意拷贝模块 dll 到主项目生成目录下
xml
<?xml version="1.0" encoding="utf-8"?>
<configuration>
  <configSections>
    <section name="modules" type="Prism.Modularity.ModulesConfigurationSection, Prism.Wpf" />
  </configSections>
  <startup>
  </startup>
  <modules>
    <module assemblyFile="PrismCollectionModuleA.dll" moduleType="PrismCollectionModuleA.ModuleA, PrismCollectionModuleA, Version=1.0.0.0, Culture=neutral, PublicKeyToken=null" moduleName="ModuleA" startupLoaded="True" />
  </modules>
</configuration>
csharp
//App.xaml.cs
protected override IModuleCatalog CreateModuleCatalog()
{
    return new ConfigurationModuleCatalog();
}
(2)目录方式:主项目重写 CreateModuleCatalog 方法,创建一个 Modules 文件夹,里面拷贝生成好的 dll。
csharp
protected override IModuleCatalog CreateModuleCatalog()
{
	return new DirectoryModuleCatalog() { ModulePath = @".\Modules" };
}
(3)代码方式:主项目引用模块项目,重写 ConfigureModuleCatalog 方法,将模块添加进去。
csharp
protected override void ConfigureModuleCatalog(IModuleCatalog moduleCatalog)
{
	moduleCatalog.AddModule<PrismCollectionModuleA.ModuleA>();
}
(4)手动加载方式:主项目引用模块项目,重写 ConfigureModuleCatalog 方法
csharp
protected override void ConfigureModuleCatalog(IModuleCatalog moduleCatalog)
{
	var moduleAType = typeof(ModuleA);
	moduleCatalog.AddModule(new ModuleInfo()
									{
				ModuleName = ModuleA.Name,
				ModuleType = ModuleA.AssemblyQualifiedName,
				InitializationMode = InitializationMode.OnDemand
				});
}
(5)Xaml 方式:不推荐,不作介绍,直接查看官方源码
Region 区域
什么是区域?
在理解这个之前, 首先需要了解一下, 在最常见的开发模式当中, 我们去设计某个页面的时候, 实际上界面元素在设计的时候已经被固定。
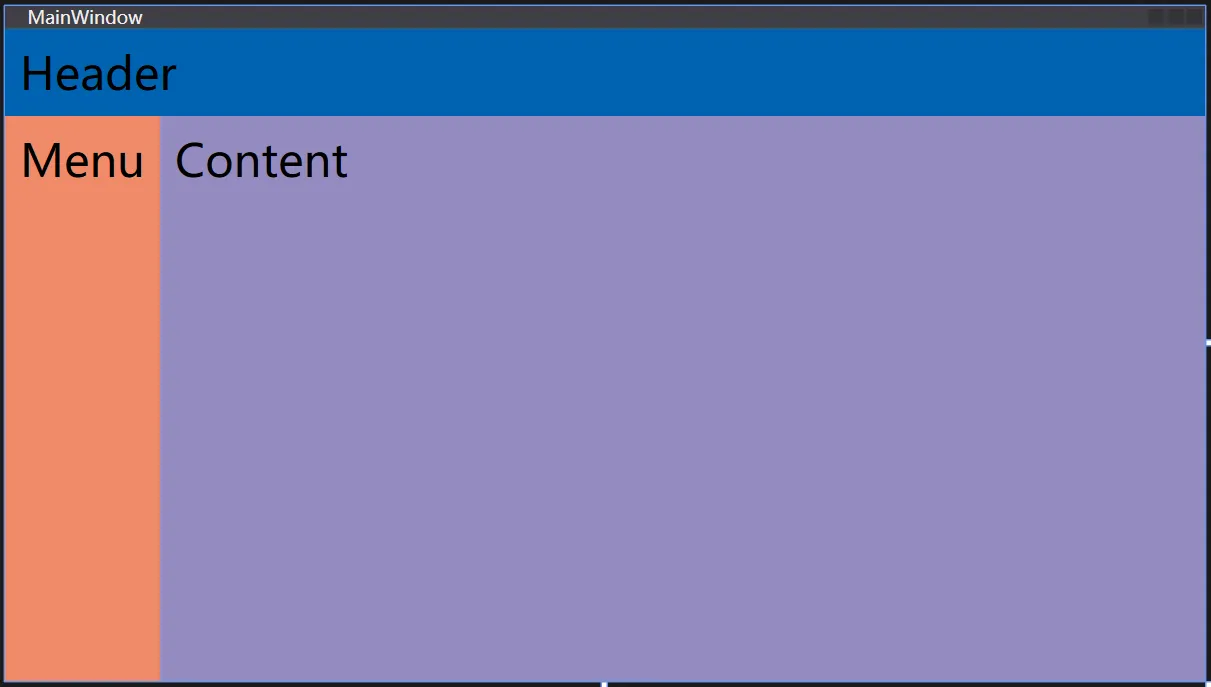
举个简单的例子,当我们去设计如下页面, 它包含 Header、Menu、Content 内容。我们可以为这个页面设计一些元素, 例如:
-
Menu 可以放置 ListBox
-
Content 可以放置一个 ContentControl
-
Header 可以放置一些 ToolBar
这就导致了页面多的时候难以统一管理,就引出了 Prism 中 Region 的概念,演变为下图:
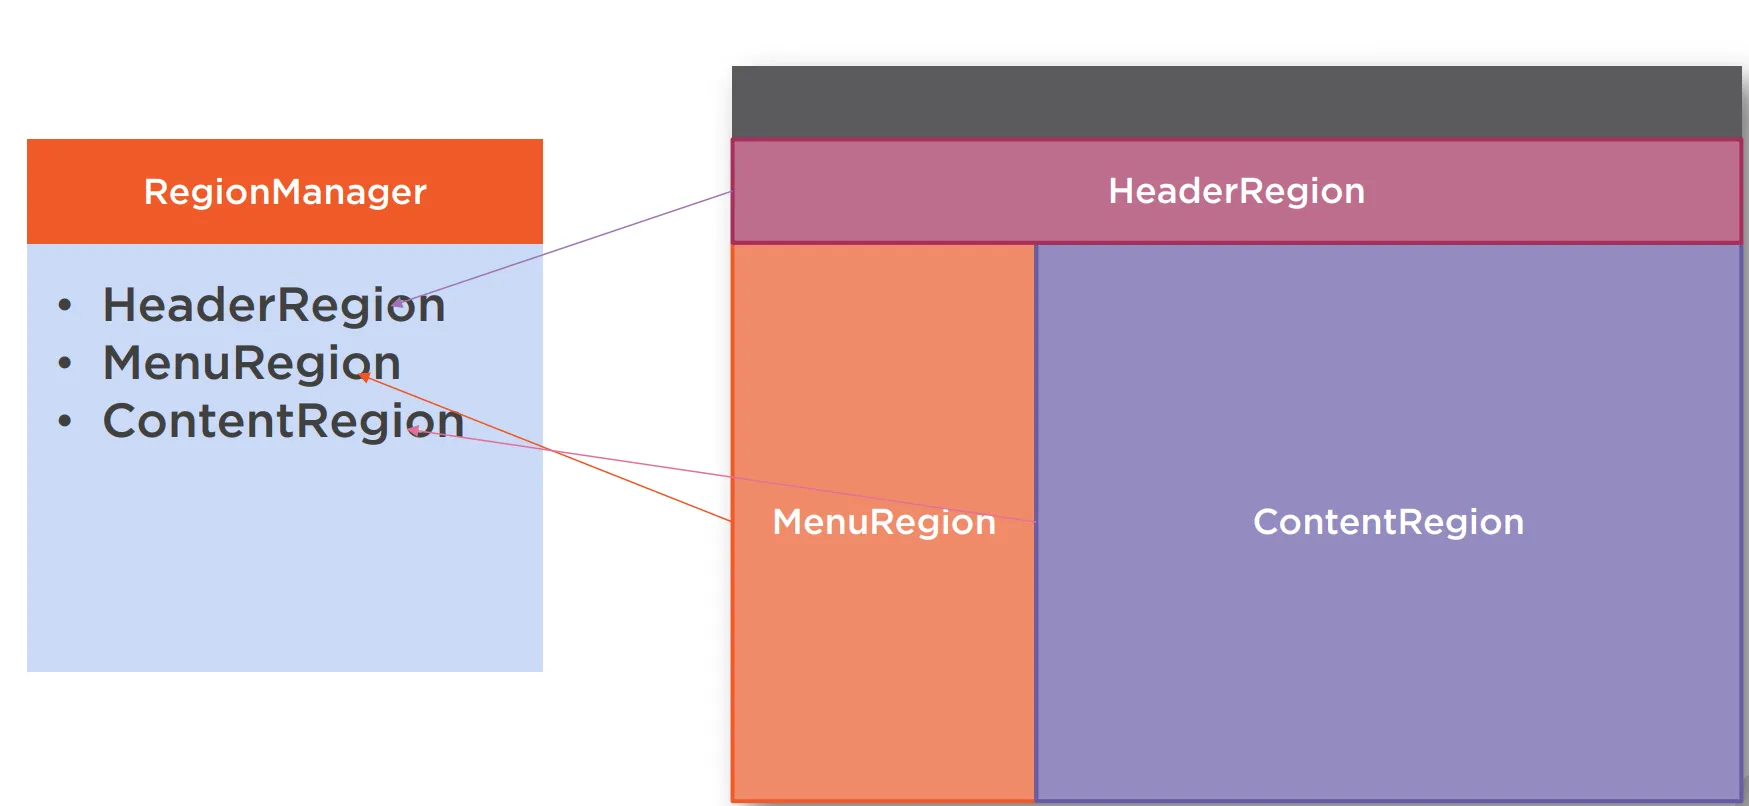
RegionManager 功能主要有维护区域集合、提供对区域的访问、合成视图、区域导航、定义区域。
定义 Region
区域(Region)就是 View 的占位容器,你可以将其他 View 动态地插入这个容器中,而不需要在 XAML 中提前写死。
在 XAML 代码中引入名称空间xmlns:prism="http://prismlibrary.com/",定义一个 ContentControl,官方实现了 ContentControlRegionAdapter.cs 内容控件适配器,所以可以为其指定区域,这里用的设计模式为适配器模式。
区域名称 RegionManager.RegionName="xxx"
定义区域
可以使用前端或者后端指定区域
-
前端定义
- prism:RegionManager.RegionName="RegionPage"
-
后端代码定义
- RegionManager.SetRegionName(RegionPage, "RegionPage");
1️⃣ 前端代码定义区域
xml
<Window x:Class="PrismCollection.Views.MainWindow"
        xmlns="http://schemas.microsoft.com/winfx/2006/xaml/presentation"
        xmlns:x="http://schemas.microsoft.com/winfx/2006/xaml"
        xmlns:prism="http://prismlibrary.com/"
        prism:ViewModelLocator.AutoWireViewModel="True"
        Title="{Binding Title}"
        Height="350"
        Width="525">
  <Grid>
     <ContentControl Name="RegionPage"
                    prism:RegionManager.RegionName="RegionPage"
                    />
  </Grid>
</Window>
2️⃣ 后端代码定义区域:
csharp
using Prism.Regions;
using System.Windows;

namespace PrismCollection.Views
{
    /// <summary>
    /// Interaction logic for MainWindow.xaml
    /// </summary>
    public partial class MainWindow : Window
    {
        public MainWindow()
        {
            InitializeComponent();
            //参数1. 你要标记为区域的控件  参数2. 给这个区域起的名字
            RegionManager.SetRegionName(RegionPage, "RegionPage");

        }
    }
}
定义视图和区域的关系
我们有两种方式来定义视图和区域的关系,一种是视图发现,一种是视图注入,下面将介绍两种方式。
1️⃣ 视图发现
视图发现 ViewDiscovery
- 创建一个用户自定义控件叫做 RegionPageB,
- 在 MainWindowViewModel 中进行区域注入,使用容器注入 IRegionManager
- RegisterViewWithRegion 将我们的视图和区域进行关联起来
IRegionManager 接口包含一个只读属性 Regions,是 Region 的集合(这个集合是从 xaml 中获取的,也就是我们定义的那些),RegionManager 的实例会使用他们,并将 view 注册给他们。
csharp
namespace PrismCollection.ViewModels
{
    public class MainWindowViewModel : BindableBase
    {
        private readonly IRegionManager regionManager; //声明一个字段来接收 Region 集合

        public MainWindowViewModel(IRegionManager regionManager)
        {
            // 在区域中注册视图
            this.regionManager = regionManager;
            //参数1. 区域名称  参数2. 你要注册到该区域的视图
            this.regionManager.RegisterViewWithRegion("RegionPage", typeof(RegionPageB));
        }
    }
}
📌
RegisterViewWithRegion和RequestNavigate区别
方法 作用 显示多个视图? 备注 RegisterViewWithRegion注册一个默认视图,自动显示 ❌ 通常只用于初始加载 RequestNavigate动态导航切换视图 ✅(配合 INavigationAware)更灵活,推荐用于菜单切换
2️⃣ 视图注入
视图注入 View Injection:实际上还是注入 IRegionManager,通过容器 IContainerExtension 来获取 view,通过 RegionManager 来获取 region,最后在 region 中加入 view。
-
先在 App.xaml.cs 中注册两个视图 ChangeRegionToA 和 ChangeRegionToB:
csharpprotected override void RegisterTypes(IContainerRegistry containerRegistry) { // 注册 RegionPageA containerRegistry.Register<RegionPageA>(); // 如果有 RegionPageB,也一并注册 containerRegistry.Register<RegionPageB>(); } -
然后再 view.cs 中注入并激活:
csharppublic partial class MainWindow : Window { private readonly IContainerExtension _container; private readonly IRegionManager _regionManager; public DelegateCommand ChangeRegionToA { get; private set; } public DelegateCommand ChangeRegionToB { get; private set; } public MainWindow(IContainerExtension container, IRegionManager regionManager) { InitializeComponent(); _container = container; _regionManager = regionManager; } ChangeRegionToA = new DelegateCommand(() => { //获取名为 "RegionPage" 的区域容器 var region = _regionManager.Regions["RegionPage"]; //获取注册的类型实例 RegionPageA var view = _container.Resolve<RegionPageA>(); if (!region.Views.Contains(view)) region.Add(view); //把 视图 添加到 区域中 //激活视图 a,切换显示当前视图 region.Activate(view); }); ChangeRegionToB = new DelegateCommand(() => { var view = containerExtension.Resolve<RegionPageB>(); var region = regionManager.Regions["RegionPage"]; region.Add(view); //激活视图 b,切换显示当前视图 region.Activate(view); }); }
IContainerExtension:依赖注入容器的扩展封装接口,它用于在运行时解析服务 / 视图 / ViewModel常用方法:
方法 用法说明 Resolve<T>()获取注册的类型实例 Register<TFrom, TTo>()注册服务接口和实现 RegisterInstance<T>(T instance)注册已存在的实例 IsRegistered<T>()判断是否已注册
视图激活
csharp
private void Button_Click(object sender, RoutedEventArgs e)
{
	//activate view a
	_region.Activate(_viewA);
}

private void Button_Click_1(object sender, RoutedEventArgs e)
{
	//deactivate view a
	_region.Deactivate(_viewA);
}
导航 Navigation
导航基础
导航核心api:
| 名称 | 说明 |
|---|---|
Region(区域) |
页面中用来承载视图的容器(如 ContentControl) |
RegionManager |
管理区域和导航的工具 |
RequestNavigate |
请求区域跳转到某个视图 |
RegisterForNavigation |
将视图注册为可导航的组件 |
IContainerRegistry |
依赖注入容器注册接口 |
Prism 官方实现的导航方式示例:
- 注册区域,按照上面所述注册,比如区域名为 RegionPage.
- 编写前台界面并绑定到后台 Command 上如下文代码:
xml
<Window
        x:Class="PrismCollection.Views.MainWindow"
        xmlns="http://schemas.microsoft.com/winfx/2006/xaml/presentation"
        xmlns:x="http://schemas.microsoft.com/winfx/2006/xaml"
        xmlns:prism="http://prismlibrary.com/"
        Title="{Binding Title}"
        Width="525"
        Height="350"
        prism:ViewModelLocator.AutoWireViewModel="True">
  <Grid>
    <Grid.ColumnDefinitions>
      <ColumnDefinition Width="40*" />
      <ColumnDefinition Width="67*" />
    </Grid.ColumnDefinitions>
    <!--定义区域-->
    <ContentControl Name="RegionPage"
                    Grid.Column="1"
                    prism:RegionManager.RegionName="RegionPage" />

    <StackPanel>
      <Button Command="{Binding NavigationACommand}"
              CommandParameter="NavigationA"
              Content="NavigationA"/>
      <Button Command="{Binding NavigationBCommand}"
              CommandParameter="NavigationB"
              Content="NavigationB"/>
    </StackPanel>

  </Grid>
</Window>- 在 App.xmal.cs 中注册导航
csharp
namespace PrismCollection
{
    public partial class App: PrismApplication
    {
        /*设置主窗口 *********/
        protected override Window CreateShell()
        {
            return Container.Resolve<MainWindow>();
        }

        /*注册可导航视图 *********/
        protected override void RegisterTypes(IContainerRegistry containerRegistry)
        {
            // 注册两个导航
            containerRegistry.RegisterForNavigation<NavigationA>();
            containerRegistry.RegisterForNavigation<NavigationB>();
        }

        /*模块系统 *********/
        protected override IModuleCatalog CreateModuleCatalog()
        {
            return new ConfigurationModuleCatalog();
        }
    }
}
- CreateShell():设置主窗口
- 这是应用启动时的入口,告诉 Prism 使用哪个窗口作为主界面。
MainWindow需要在容器中注册(Prism 会自动处理主窗体),这里你只需要确保MainWindow.xaml定义好区域。- RegisterTypes():注册导航视图
- 注册
NavigationA.xaml和NavigationB.xaml为可导航视图。- 注册后你可以使用
RequestNavigate("RegionName", "NavigationA")来切换页面。- 这里的
"NavigationA"默认就是类名- CreateModuleCatalog():模块系统
- 表示你打算使用模块(Module)功能,可以加载独立功能模块(DLL)。
- 如果暂时没有使用模块系统,可以用默认的
return base.CreateModuleCatalog();- IContainerRegistry:依赖注入容器注册接口
- Register()注册类型Transient(每次新实例)
- RegisterSingleton()注册单例Singleton(全局单例)
- RegisterInstance()注册实例Singleton(使用提供的实例)
- RegisterForNavigation()注册导航视图根据框架管理
- RegisterDialog()注册对话框根据框架管理
- 在 MainViewModel 中绑定带参数命令来切换导航。
csharp
//导航到 A 页面命令
private DelegateCommand<string> navigationACommand;
public DelegateCommand<string> NavigationACommand =>
navigationACommand ?? (navigationACommand = new DelegateCommand<string>(ExecuteNavigationACommand));

void ExecuteNavigationACommand(string parameter)
		{
			if (!string.IsNullOrEmpty(parameter))
			{
         //参数1. 目标区域名  参数2. 要导航的页面名  参数3. 回调方法,用于处理导航成功或失败的情况
				this.regionManager.RequestNavigate("NavigationPage", parameter, NavigationCompelted);
			}
		}

//导航到 B 页面命令
private DelegateCommand<string> navigationBCommand;
public DelegateCommand<string> NavigationBCommand =>
			navigationBCommand ?? (navigationBCommand = new DelegateCommand<string>(ExecuteNavigationBCommand));

void ExecuteNavigationBCommand(string parameter)
		{
			if (!string.IsNullOrEmpty(parameter))
			{
				this.regionManager.RequestNavigate("NavigationPage", parameter, NavigationCompelted);
			}
		}

//导航回调处理
//NavigationResult 包含导航是否成功的结果。
//若找不到页5面或绑定失败,则 Result 为 false。
private void NavigationCompelted(NavigationResult result)
		{
			if (result.Result == true)
			{
				MessageBox.Show($"Success-{result.Context.Uri.ToString()}");
			}
			else
			{
				MessageBox.Show($"Failure-{result.Context.Uri.ToString()}");
			}
		}
名称 内容 RequestNavigate(region, viewName)请求导航 NavigationResult回调判断是否导航成功 CommandParameter在按钮中传递 "NavigationA"、"NavigationB"
导航前后回调 INavigationAware(导航传参)
我们经常在两个界面切换的时候需要做一些逻辑处理,比如保存当前用户填写的一些信息,这时候就要用到 INavigationAware 接口来处理了。
📌 INavigationAware 源码:
csharp
public interface INavigationAware : Object
{
	Void OnNavigatedTo(NavigationContext navigationContext);

	Boolean IsNavigationTarget(NavigationContext navigationContext);

	Void OnNavigatedFrom(NavigationContext navigationContext);
}
此接口有三个方法,分别是:
- OnNavigatedFrom:导航之前触发,一般用于保存该页面的数据
- OnNavigatedTo:导航后目的页面触发,一般用于初始化或者接受上页面的传递参数
- IsNavigationTarget:True 则重用该 View 实例,Flase 则每一次导航到该页面都会实例化一次。
导航基础传递参数:
csharp
public class MainWindowViewModel
{
  private readonly IRegionManager regionManager;

  public MainWindowViewModel(IRegionManager regionManager)
  {
    this.regionManager = regionManager;
  }

  private DelegateCommand<string> navigationACommand;
  public DelegateCommand<string> NavigationACommand =>
    navigationACommand ?? (navigationACommand = new DelegateCommand<string>(ExecuteNavigationACommand));

  void ExecuteNavigationACommand(string parameter)
  {
    if (!string.IsNullOrEmpty(parameter))
    {
      var param = new NavigationParameters(); // 创建导航参数对象
      param.Add("OpenA","Tuling"); // 添加参数 key = OpenA, value = Tuling
      //参数1. 导航到的页面    参数2. 目标区域    参数3. 要传递的参数
      this.regionManager.RequestNavigate("NavigationPage", "PageA", param); // 发起导航并传参
    }
  }
}
this.regionManager.RequestNavigate("NavigationPage", "PageA", param);
其中的参数:
- 参数1. 目标区域是
"NavigationPage"(你在 XAML 中指定的RegionName="NavigationPage"的控件);- 参数2. 请求导航到名为
"PageA"的页面;- 参数3. 附带参数
param(类型是NavigationParameters)一起传过去。
导航页面 A
csharp
public class LoginMainContentViewModel : BindableBase, INavigationAware
{
  private readonly IRegionManager _regionManager;
  private DelegateCommand _createAccountCommand;

  public LoginMainContentViewModel(IRegionManager regionManager)
  {
    _regionManager = regionManager;
  }

  public DelegateCommand CreateAccountCommand =>
    _createAccountCommand ?? (_createAccountCommand = new DelegateCommand(ExecuteCreateAccountCommand));

  private void ExecuteCreateAccountCommand()
  {
    Navigate("CreateAccount");
  }

  private void Navigate(string navigatePath)
  {
    if (navigatePath != null)
      _regionManager.RequestNavigate(RegionNames.LoginContentRegion, navigatePath);
  }

  // True 则重用该 View 实例,False 则每一次导航到该页面都会实例化一次。
  public bool IsNavigationTarget(NavigationContext navigationContext)
  {
    return true;
  }

  // 导航离开当前页时触发
  public void OnNavigatedFrom(NavigationContext navigationContext)
  {
    MessageBox.Show("退出了LoginMainContent");
  }

  // 导航完成后,接收用户传递的参数
  public void OnNavigatedTo(NavigationContext navigationContext)
  {
    //获取键为 "OpenA" 的字符串参数值
    //GetValue 是 NavigationParameters 类的一个泛型方法,用于从导航参数中获取指定类型的值
    var test = navigationContext.Parameters.GetValue<string>("OpenA");
  }
}
以上代码的基本流程为:
用户点击按钮 调用 RequestNavigate 执行 OnNavigatedFrom 方法 加载目标视图 执行 OnNavigatedTo 方法
NavigationContext包含了导航相关的信息,比如:
Parameters:导航时传递的参数NavigationService:导航服务Uri:导航的目标URI
导航页面 B
csharp
// ViewModel
public class CreateAccountViewModel : BindableBase, INavigationAware
{
  private readonly IRegionManager _regionManager;
  private DelegateCommand _loginMainContentCommand;

  public CreateAccountViewModel(IRegionManager regionManager)
  {
    _regionManager = regionManager;
  }

  public DelegateCommand LoginMainContentCommand =>
    _loginMainContentCommand ?? (_loginMainContentCommand = new DelegateCommand(ExecuteLoginMainContentCommand));

  private void ExecuteLoginMainContentCommand()
  {
    Navigate("LoginMainContent");
  }

  private void Navigate(string navigatePath)
  {
    if (navigatePath != null)
      _regionManager.RequestNavigate(RegionNames.LoginContentRegion, navigatePath);
  }

  public bool IsNavigationTarget(NavigationContext navigationContext)
  {
    return true;
  }

  public void OnNavigatedFrom(NavigationContext navigationContext)
  {
    MessageBox.Show("退出了CreateAccount");
  }

  public void OnNavigatedTo(NavigationContext navigationContext)
  {
    MessageBox.Show("从LoginMainContent导航到CreateAccount");
  }
}
导航询问是否允许
IConfirmNavigationRequest 这个接口继承自 INavigationAware,里面有一个导航前是否询问的方法。
IConfirmNavigationRequest 接口:
- 在导航发生前进行拦截
- 允许用户确认或取消导航操作
- 必须调用
continuationCallback(bool)来告知框架是否继续导航
csharp
//导航前询问,由 Prism 框架自动调用
//当用户尝试 离开当前页面 时,框架会检查当前ViewModel是否实现了 IConfirmNavigationRequest
//如果实现了,就会自动调用这个方法
public void ConfirmNavigationRequest(NavigationContext navigationContext, Action<bool> continuationCallback)
{
  var result = false;

  if (MessageBox.Show("是否需要导航到LoginMainContent页面?", "温馨提示",MessageBoxButton.YesNo) ==MessageBoxResult.Yes)
  {
    result = true;
  }

  continuationCallback(result);
}
导航间传递参数
当然我们也可以通过导航前询问传参到下一处都是 OK 的,本质上还是依托 navigationContext
csharp
public class CreateAccountViewModel : IConfirmNavigationRequest, INavigationAware
{
    private readonly IRegionManager _regionManager;

    public User CurrentUser { get; set; }
    public string RegisteredLoginId { get; set; }
    public bool IsUseRequest { get; set; }

    public CreateAccountViewModel(IRegionManager regionManager)
    {
        _regionManager = regionManager;
    }

    public void ConfirmNavigationRequest(NavigationContext navigationContext, Action<bool> continuationCallback)
    {
        if (!string.IsNullOrEmpty(RegisteredLoginId) && this.IsUseRequest)
        {
            var result = MessageBox.Show("是否需要用当前注册的用户登录?", "Navigate?", MessageBoxButton.YesNo);

            if (result == MessageBoxResult.Yes)
            {
                // 取消当前导航
                continuationCallback(false);

                // 手动导航并带参(MainRegion 是你在 Shell 界面里注册的区域名)
                var parameters = new NavigationParameters
                {
                    { "loginId", RegisteredLoginId }
                };

                _regionManager.RequestNavigate("MainRegion", "LoginMainContent", parameters);
                return;
            }
        }

        // 正常继续原有导航
        continuationCallback(true);
    }

    public void OnNavigatedTo(NavigationContext navigationContext)
    {
        MessageBox.Show("从CreateAccount导航到LoginMainContent");

        var loginId = navigationContext.Parameters["loginId"] as string;
        if (loginId != null)
        {
            //创建一个新的 User 实例,并设置它的 LoginId 属性为导航参数中接收到的 loginId,
            //然后赋值给 ViewModel 的 CurrentUser 属性。
            this.CurrentUser = new User() { LoginId = loginId };
        }
    }

    public bool IsNavigationTarget(NavigationContext navigationContext) => true;

    public void OnNavigatedFrom(NavigationContext navigationContext) { }
}
导航日志
IRegionNavigationJournal
csharp
//ViewModelA 代码
private readonly IRegionManager _regionManager;
private IRegionNavigationJournal _journal; // 用于记录导航历史

public ViewModelA(IRegionManager regionManager)
{
  _regionManager = regionManager;
}

regionManager.RequestNavigate("ContentRegion","ViewA",arg=>{
  journal = arg.Context.NavigationService.Journal;
});

regionManager.RequestNavigate("ContentRegion","ViewB",arg=>{
  journal = arg.Context.NavigationService.Journal;
});

//
IRegionNavigationJournal _journal;

private DelegateCommand _goBackCommand;
public DelegateCommand GoBackCommand =>
  _goBackCommand ?? (_goBackCommand = new DelegateCommand(ExecuteGoBackCommand));

void ExecuteGoBackCommand()
{
  _journal.GoBack();
}
如果不打算将页面在导航过程中不加入导航日志,可以通过实现 IJournalAware 并从 PersistInHistory 返回 false
csharp
public class LoginMainContentViewModel : IJournalAware
{
    public bool PersistInHistory() => false;
}
对话框
在 Prism 中,通过一个 IDialogAware 接口来实现对话框服务。
csharp
public interface IDialogAware
{
    bool CanCloseDialog();
    void OnDialogClosed();
    void OnDialogOpened(IDialogParameters parameters);
    string Title { get; set; }
    event Action<IDialogResult> RequestClose;
}- CanCloseDialog() 函数是决定窗体是否关闭
- OnDialogClosed() 函数是窗体关闭时触发,触发条件取决于CanCloseDialog() 函数
- OnDialogOpened() 函数时窗体打开时触发,比窗体Loaded事件早触发
- Title 为窗体的标题
- RequestClose 为关闭事件,可由此控制窗体的关闭
-
弹出框前后端代码
xml<!--xaml--> <Button Content="{Binding DialogTitle}" FontSize="30" />csharp//View.cs namespace PrismCollection.ViewModels { public class DialogAViewModel : Albert_BindableBase, IDialogAware { public string Title => "弹框提醒"; public event Action<IDialogResult> RequestClose; // 允许关闭当前窗口 public bool CanCloseDialog() { return true; } public void OnDialogClosed() { } public void OnDialogOpened(IDialogParameters parameters) { DialogTitle = parameters.GetValue<string>("message"); } private string dialogTitle; public string DialogTitle { get { return dialogTitle; } set { SetProperty(ref dialogTitle, value); } } } } -
App.cs 注册对话框
csharpusing Prism.DryIoc; using Prism.Ioc; using Prism.Modularity; using Prism.Regions; using PrismCollection.ViewModels; using PrismCollection.Views; using System.Windows; namespace PrismCollection { /// <summary> /// Interaction logic for App.xaml /// </summary> public partial class App: PrismApplication { protected override Window CreateShell() { return Container.Resolve<MainWindow>(); } /// <summary> /// 用于导航 /// </summary> /// <param name="containerRegistry"></param> protected override void RegisterTypes(IContainerRegistry containerRegistry) { // 注册两个导航 containerRegistry.RegisterForNavigation<NavigationA>(); containerRegistry.RegisterForNavigation<NavigationB>(); // 注册区域 Container.Resolve<RegionManager>().RegisterViewWithRegion("RegionPage", typeof(RegionPageA)); // 注册弹窗 containerRegistry.RegisterDialog<DialogA, DialogAViewModel>("Albert_Dialog"); } protected override IModuleCatalog CreateModuleCatalog() { return new ConfigurationModuleCatalog(); } } } -
使用对话框服务,构造函数注入 IDialogService 服务
csharpprivate IDialogService _dialogService; private DelegateCommand dialogCommand; public DelegateCommand DialogCommand => dialogCommand ?? (dialogCommand = new DelegateCommand(ExecuteDialogCommand)); void ExecuteDialogCommand() { // 第二个参数可以传参 _dialogService.ShowDialog("Albert_Dialog",null,arg=>{ if(arg.Result == ButtonResult.OK){ } }); } public MainWindowViewModel(IDialogService dialogService,IEventAggregator eventAggregator,IRegionManager regionManager,IContainerExtension containerExtension) { this._dialogService = dialogService; }IDialogService 中有两个方法:
csharp//源码 public interface IDialogService : Object { Void Show(String name, IDialogParameters parameters, Action<IDialogResult> callback); Void ShowDialog(String name, IDialogParameters parameters, Action<IDialogResult> callback); }我们可以发现 Show 和 ShowDialog 函数都是一样形参,无非就是使用场景不一样
- name:所要调用对话框 view 的名字,当注册别名时,只能使用别名来调用
- parameters:IDialogParameters 接口类型参数,传入的提示消息,通常是 $"message={xxxx}" 格式,然后在 ViewModel 中 OnDialogOpened 方法通过IDialogParameters 接口的 GetValue 函数来获取
- callback:用于传入无返回值回调函数
有一些常见我们需要自定义对话框窗体,可以按照下面样式进行修改:
xml
 <prism:Dialog.WindowStyle>
     <Style TargetType="Window">
          <Setter Property="prism:Dialog.WindowStartupLocation" Value="CenterScreen" />
          <Setter Property="ShowInTaskbar" Value="False"/>
          <Setter Property="SizeToContent" Value="WidthAndHeight"/>
          <Setter Property="WindowStyle" Value="None"/>
     </Style>
 </prism:Dialog.WindowStyle>