前言
平板与手机之间最大的差别便是屏幕的大小,这种差别可能会导致同样的界面,在手机上看起来比较美观,但在平板上就有可能会出现控件过于大和长、元素之间空隙过大的情况。
所以我们要兼顾手机和平板的显示。为了解决这个问题并实现更灵活、模块化的界面设计,Android 引入了 Fragment。
Fragment 是什么
那么,Fragment 究竟是什么呢?简单来说,Fragment 是一种可以嵌入到 Activity 中、拥有自己布局和独立生命周期的可复用 UI 片段。
正是这种可嵌入和可复用的特性,Fragment 可以让程序可以更加充分、更加合理地利用大屏幕的空间(在平板上);通过切换不同的 Fragment 或在同一界面内使用多个 Fragment,来实现界面的导航和功能模块化(在手机上)。
实际上,你可以将 Fragment 理解为一个"迷你Activity"。和 Activity 类似,它也有自己的布局和独立的生命周期。
那怎么使用 Fragment 来充分利用平板屏幕的空间呢?
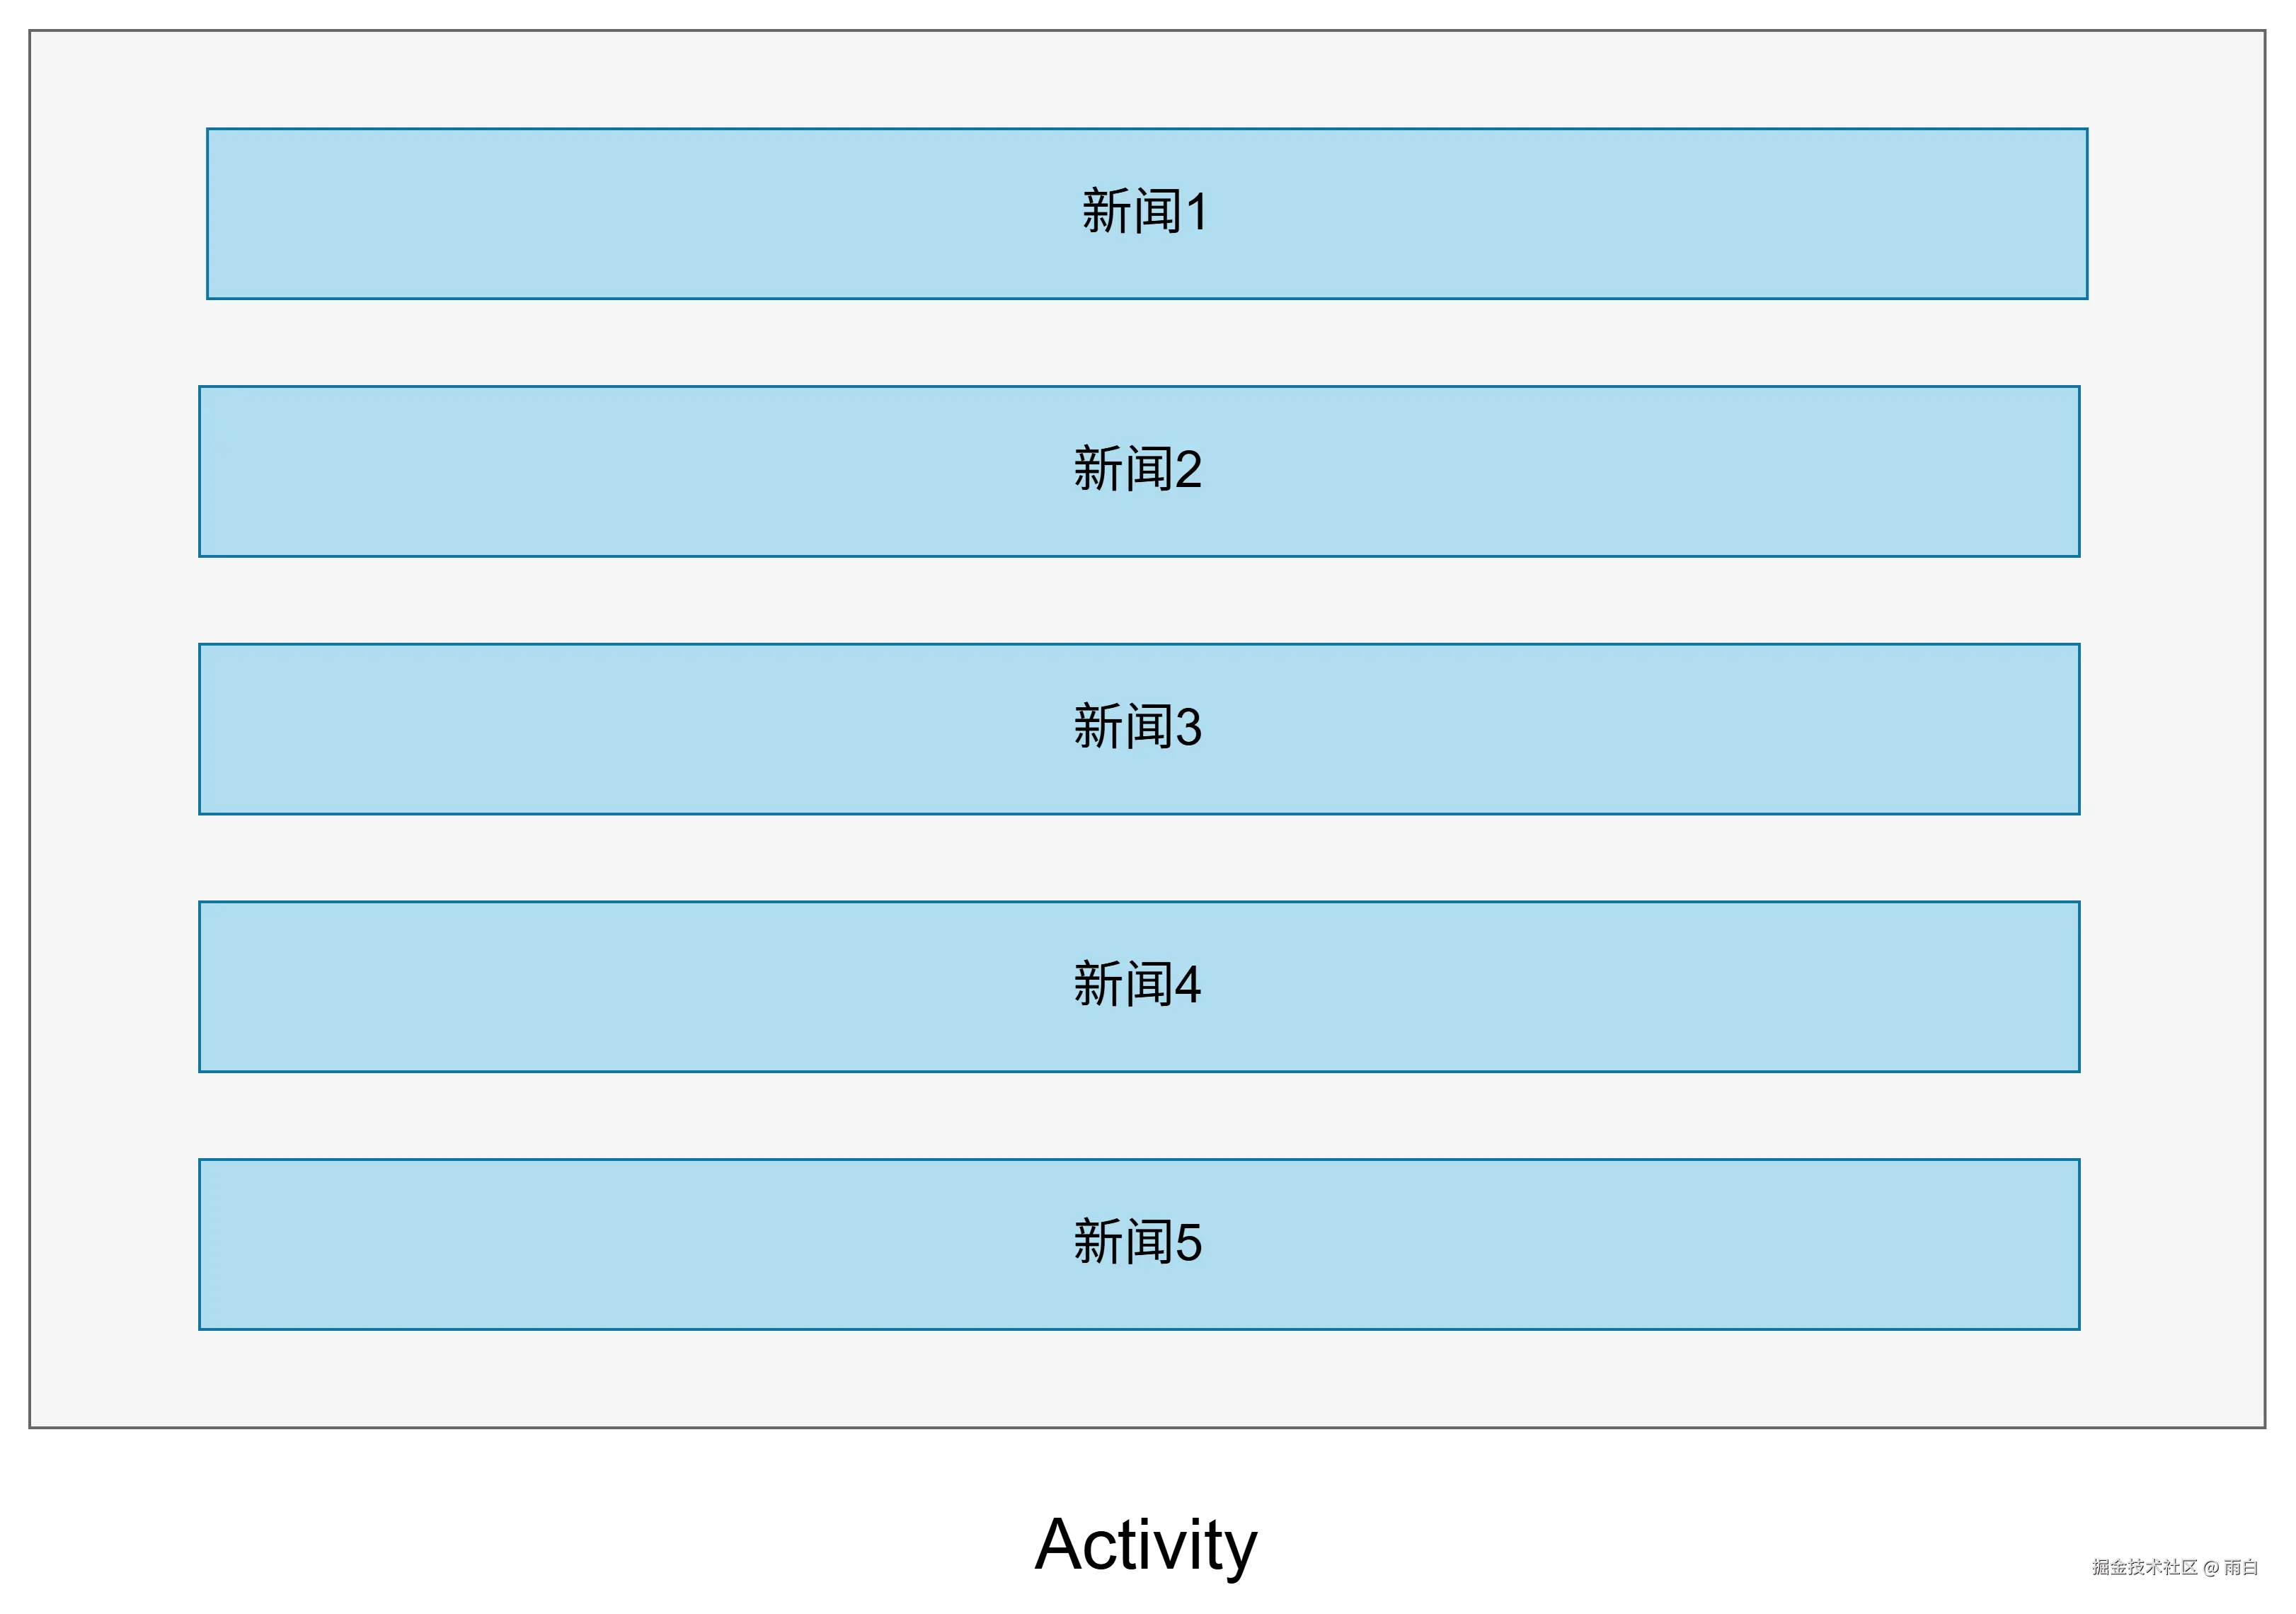
比如有一个新闻应用,其中有一个界面用来展示新闻列表,当点击任意一个新闻时,会打开另一个界面显示新闻的详细内容。如果是手机,我们可能会将新闻列表放在一个 Activity 中,将新闻的详细内容放在另一个 Activity 中,像下面这样:

平板也这样设计的话,新闻列表会过长,导致有大量空白区域。
所以我们会将新闻标题列表界面和新闻详细内容界面分别放在两个 Fragment 中,然后将这两个 Fragment 放到同一个 Activity 中,这样可以充分利用屏幕空间。

Fragment 的使用方式
我们现在来看看 Fragment 的用法,首先我们先在 Android Studio 中创建一个平板模拟器(Tablet)。

然后创建一个名为 FragmentTest 的 Empty Views Activity 项目。
简单用法
我们先来练练手:在一个 Activity 中添加两个 Fragment,并让这两个 Fragment 平分布局空间。
新建左侧 Fragment 的布局文件 left_fragment.xml,往布局中添加一个按钮,代码如下:
xml
<?xml version="1.0" encoding="utf-8"?>
<LinearLayout xmlns:android="http://schemas.android.com/apk/res/android"
    android:layout_width="match_parent"
    android:layout_height="match_parent"
    android:orientation="vertical">

    <Button
        android:id="@+id/button"
        android:layout_width="wrap_content"
        android:layout_height="wrap_content"
        android:layout_gravity="center_horizontal"
        android:text="Button" />

</LinearLayout>
然后新建右侧 Fragment 的布局文件 right_fragment.xml,设置背景色,并且添加一个文本控件,代码如下:
xml
<?xml version="1.0" encoding="utf-8"?>
<LinearLayout xmlns:android="http://schemas.android.com/apk/res/android"
    android:layout_width="match_parent"
    android:layout_height="match_parent"
    android:background="#f5f5f5"
    android:orientation="vertical">

    <TextView
        android:layout_width="wrap_content"
        android:layout_height="wrap_content"
        android:layout_gravity="center_horizontal"
        android:text="This is right fragment"
        android:textColor="#00BCD4"
        android:textSize="24sp" />
</LinearLayout>
新建一个 LeftFragment 类,继承自 Fragment。代码如下:
注意:选择
androidx.fragment.app包下的 Fragment,而不是系统内置的android.app.Fragment,因为系统内置的 Fragment 已经被废弃了。
kotlin
class LeftFragment : Fragment() {

    // 使用 ViewBinding 视图绑定
    // _binding 变量只在 onCreateView 和 onDestroyView 方法之间是非空的
    private var _binding: LeftFragmentBinding? = null
    //binding 属性只在 _binding 变量不为空时有效,也就是 onCreateView 和 onDestroyView 方法之间
    private val binding get() = _binding!!

    override fun onCreateView(
        inflater: LayoutInflater, container: ViewGroup?,
        savedInstanceState: Bundle?,
    ): View {
        _binding = LeftFragmentBinding.inflate(inflater, container, false)
        return binding.root
    }


    override fun onDestroyView() {
        super.onDestroyView()
        _binding = null // 在视图销毁时解除绑定,防止内存泄漏
    }
}
注意:这里我们使用了视图绑定来访问视图,
_bing变量持有绑定对象的引用,而binding属性只是对_binding变量的非空访问。还不熟悉的可以看官方文档
在上述代码中,我们重写了 Fragment 的 onCreateView() 方法,在方法内部,我们加载了布局并创建了绑定对象,最后将根视图的引用进行返回。在 onDestroyView() 中,我们清理了绑定对象的引用。
同样地,我们创建 RightFragment,代码如下所示:
kotlin
class RightFragment : Fragment() {

    private var _binding: RightFragmentBinding? = null
    private val binding get() = _binding!!

    override fun onCreateView(
        inflater: LayoutInflater,
        container: ViewGroup?,
        savedInstanceState: Bundle?,
    ): View {
        _binding = RightFragmentBinding.inflate(inflater, container, false)
        return binding.root
    }

    override fun onDestroyView() {
        super.onDestroyView()
        _binding = null
    }
}
然后修改 activity_main.xml 布局文件,修改后的代码如下:
xml
<?xml version="1.0" encoding="utf-8"?>
<LinearLayout xmlns:android="http://schemas.android.com/apk/res/android"
    android:layout_width="match_parent"
    android:layout_height="match_parent"
    android:orientation="horizontal">

    <androidx.fragment.app.FragmentContainerView
        android:id="@+id/leftFrag"
        android:name="com.example.fragmenttest.LeftFragment"
        android:layout_width="0dp"
        android:layout_height="match_parent"
        android:layout_weight="1" />

    <androidx.fragment.app.FragmentContainerView
        android:id="@+id/rightFrag"
        android:name="com.example.fragmenttest.RightFragment"
        android:layout_width="0dp"
        android:layout_height="match_parent"
        android:layout_weight="1" />
</LinearLayout>
我们通过了 <androidx.fragment.app.FragmentContainerView> 标签来往布局中添加 Fragment,使用时,需要通过 android:name 属性来指定当前要添加的 Fragment 类,填入全类名。FragmentContainerView 是承载 Fragment 的推荐容器,替代了之前使用的 <fragment>。
运行效果:

简单的使用知道了后,我们来看 Fragment 更加高级的用法。
动态添加Fragment
Fragment 可以在程序运行时动态地添加到 Activity 中。
我们新建一个 another_right_fragment.xml 布局文件,代码如下所示:
xml
<?xml version="1.0" encoding="utf-8"?>
<LinearLayout xmlns:android="http://schemas.android.com/apk/res/android"
    android:layout_width="match_parent"
    android:layout_height="match_parent"
    android:background="#FFEB3B"
    android:orientation="vertical">

    <TextView
        android:layout_width="wrap_content"
        android:layout_height="wrap_content"
        android:layout_gravity="center_horizontal"
        android:text="This is another right fragment"
        android:textColor="#00BCD4"
        android:textSize="24sp" />

</LinearLayout>
然后新建 AnotherRightFragment 作为另一个右侧的 Fragment,代码如下:
kotlin
class AnotherRightFragment : Fragment() {

    private var _binding: AnotherRightFragmentBinding? = null
    private val binding get() = _binding!!

    override fun onCreateView(
        inflater: LayoutInflater,
        container: ViewGroup?,
        savedInstanceState: Bundle?,
    ): View {
        _binding = AnotherRightFragmentBinding.inflate(inflater, container, false)
        return binding.root
    }

    override fun onDestroyView() {
        super.onDestroyView()
        _binding = null
    }
}
修改 activity_main.xml 布局文件,修改后:
xml
<?xml version="1.0" encoding="utf-8"?>
<LinearLayout xmlns:android="http://schemas.android.com/apk/res/android"
    android:layout_width="match_parent"
    android:layout_height="match_parent"
    android:orientation="horizontal">

    <androidx.fragment.app.FragmentContainerView
        android:id="@+id/leftFrag"
        android:name="com.example.fragmenttest.LeftFragment"
        android:layout_width="0dp"
        android:layout_height="match_parent"
        android:layout_weight="1" />

    <FrameLayout
        android:id="@+id/rightFrag"
        android:layout_width="0dp"
        android:layout_height="match_parent"
        android:layout_weight="1" />
</LinearLayout>
我们将右侧的装载 Fragment 的容器由 FragmentContainerView (静态加载)换成了 FrameLayout 帧布局。
然后在 LeftFragment 中添加一个方法为按钮注册点击事件。
kotlin
class LeftFragment : Fragment() {

    private var _binding: LeftFragmentBinding? = null
    private val binding get() = _binding!!

    private var onClick: () -> Unit = { }

    override fun onCreateView(
        inflater: LayoutInflater, container: ViewGroup?,
        savedInstanceState: Bundle?,
    ): View {
        _binding = LeftFragmentBinding.inflate(inflater, container, false)

        binding.button.setOnClickListener {
            onClick()
        }

        return binding.root
    }

    /**
     * 设置按钮的点击监听器
     */
    fun setButtonClickListener(onClick: () -> Unit) {
        this.onClick = onClick
    }

    override fun onDestroyView() {
        super.onDestroyView()
        _binding = null
    }
}
最后来到 MainActivity 中,使用代码往 FrameLayout 布局中添加内容,从而实现动态添加 Fragment 的功能。代码如下:
kotlin
class MainActivity : AppCompatActivity() {

    private lateinit var binding: ActivityMainBinding

    override fun onCreate(savedInstanceState: Bundle?) {
        super.onCreate(savedInstanceState)

        binding = ActivityMainBinding.inflate(layoutInflater)
        setContentView(binding.root)

        // 获取 LeftFragment 的实例
        val leftFragment = supportFragmentManager.findFragmentById(R.id.leftFrag) as? LeftFragment

        leftFragment?.let { fragment ->
            fragment.setButtonClickListener {
                replaceFragment(AnotherRightFragment())
            }
        }

        replaceFragment(RightFragment()) // 初始加载 RightFragment
    }

    private fun replaceFragment(fragment: Fragment) {
        val fragmentManager = supportFragmentManager
        val transaction = fragmentManager.beginTransaction()

        // 你也可以通过视图绑定获取右侧 FrameLayout 视图,从而获取其id
        // val containerView: FrameLayout = binding.rightFrag // 获取View对象
        // transaction.replace(containerView.id, fragment) // 使用其id

        // 直接使用ID
        transaction.replace(R.id.rightFrag, fragment)

        transaction.commit()
    }
}
我们利用 LeftFragment 中提供的 setButtonClickListener 自定义方法给左侧 Fragment 中的按钮注册了点击事件,然后调用了 replaceFragment 方法动态添加了 RightFragment。在按钮的点击回调中,我们也调用了 replaceFragment() 方法会将右侧的 Fragment 替换成 AnotherRightFragment。
在 replaceFragment() 方法中,我们先会获取 FragmentManager 的实例,然后通过 FragmentManager 的 beginTransaction() 方法开始一个事务,通过 FragmentTransaction 的 replace() 方法来添加或替换容器中的 Fragment,传入容器id和Fragment实例,最后调用 FragmentTransaction 的 commit() 方法来提交事务。
这样就完成了在 Activity 中动态添加 Fragment 的功能,运行效果:

在 Fragment 中实现返回栈
现在我们按下返回键会直接退出程序,如果我们想要实现类似返回栈的效果,按下返回键可以回到上一个 Fragment,该如何实现?
其实很简单,在提交事务之前,调用一下 FragmentTransaction 的 addToBackStack() 方法即可,它会将当前事务添加到返回栈中。
代码如下:
kotlin
private fun replaceFragment(fragment: Fragment) {
    val fragmentManager = supportFragmentManager
    val transaction = fragmentManager.beginTransaction()

    transaction.replace(R.id.rightFrag, fragment) // 使用容器id
    transaction.addToBackStack(null) // 将此事务添加到返回栈
    transaction.commit()
}
其中 addToBackStack 方法接收一个 name 参数,用来描述返回栈的状态,我们直接传入 null 即可。
现在的运行效果:点击按钮会将 AnotherRightFragment 添加到 Activity 中,按下返回键会移除 AnotherRightFragment ,回到之前的 RightFragment 界面,再次按下返回键,会移除 RightFragment 界面,右侧的 FrameLayout 容器会为空,如图所示:

再次按下返回键,程序才会退出。
Fragment和Activity之间的交互
虽然 Fragment 是嵌入在 Activity 中进行显示的,但它们之间是相对独立的组件,并没有什么方式来直接进行交互。但还是可以实现它们之间的通信和交互的。
如果你想要在 Activity 中调用 Fragment 中的方法:
其实我们之前的示例中已经展示了第一种方法,那就是通过 FragmentManager 的 findFragmentById 方法从布局文件中获取 Fragment 的实例,例如:
kotlin
// 获取 LeftFragment 的实例
val leftFragment = supportFragmentManager.findFragmentById(R.id.leftFrag) as? LeftFragment
然后我们就可以随意调用其内部的公有方法了,例如:
kotlin
leftFragment?.let { fragment ->
    fragment.setButtonClickListener {
        replaceFragment(AnotherRightFragment())
    }
}
另外,由于当前 Fragment 的容器是 FragmentContainerView,所以我们也可以通过 FragmentContainerView 的 getFragment() 方法来获取 Fragment 实例。像这样:
kotlin
// 获取 LeftFragment 的实例
val leftFragment = binding.leftFrag.getFragment<LeftFragment>()
leftFragment.let { fragment ->
    fragment.setButtonClickListener {
        replaceFragment(AnotherRightFragment())
    }
}
第二种是现代且直接的方式。但你要注意调用时机,确保 Fragment 已经成功添加到 FragmentManager 中了。
那在 Fragment 中又该如何获取其对应 Activity 实例呢?
超简单,可以直接调用 getActivity() 方法即可获取当前 Fragment 所对应的 Activity 实例,但它可能会返回空。更安全的方式是使用 requireActivity 方法。它会在 Fragment 未附加到 Activity 上时,抛出 IllegalStateException 异常,从而能够获取到一个非空的 Activity 实例,其实其内部只是进行了 if 判空,源码:
java
@NonNull
public final FragmentActivity requireActivity() {
    FragmentActivity activity = getActivity();
    if (activity == null) {
        throw new IllegalStateException("Fragment " + this + " not attached to an activity.");
    }
    return activity;
}
另外,在 Fragment 的 onAttach() 回调方法中,context 参数其实就是相关联的 Activity 的实例。
最后,不同的 Fragment 之间可以通信吗?
答案是肯定的。首先一个 Fragment 可以和与其相关联的 Activity 通信,而该 Activity 又可和另一个 Fragment 通信,所以能行。另外,你也可以通过使用共享的 ViewModel 来完成通信。