title: 如何在FastAPI中打造坚不可摧的安全防线?
date: 2025/06/20 11:33:15
updated: 2025/06/20 11:33:15
author: cmdragon
excerpt:
FastAPI的中间件机制允许对HTTP请求和响应进行拦截处理,适用于身份认证、日志记录、流量控制等场景。通过注册中间件,可以实现IP黑名单拦截、敏感词过滤等功能。集成JWT认证和角色权限验证,确保API的安全性。常见错误如422、401、500等可通过全局异常处理器进行统一处理。最佳实践包括启用HTTPS、使用环境变量管理敏感配置、定期更新依赖库等,以构建企业级安全的API服务。
categories:
- 后端开发
- FastAPI
tags:
- FastAPI
- 中间件
- 安全防护
- 请求拦截
- JWT认证
- 错误处理
- 最佳实践


扫描二维码
关注或者微信搜一搜:编程智域 前端至全栈交流与成长
发现1000+提升效率与开发的AI工具和实用程序:https://tools.cmdragon.cn/
1. FastAPI安全中间件与请求拦截处理详解
1.1 中间件基础原理
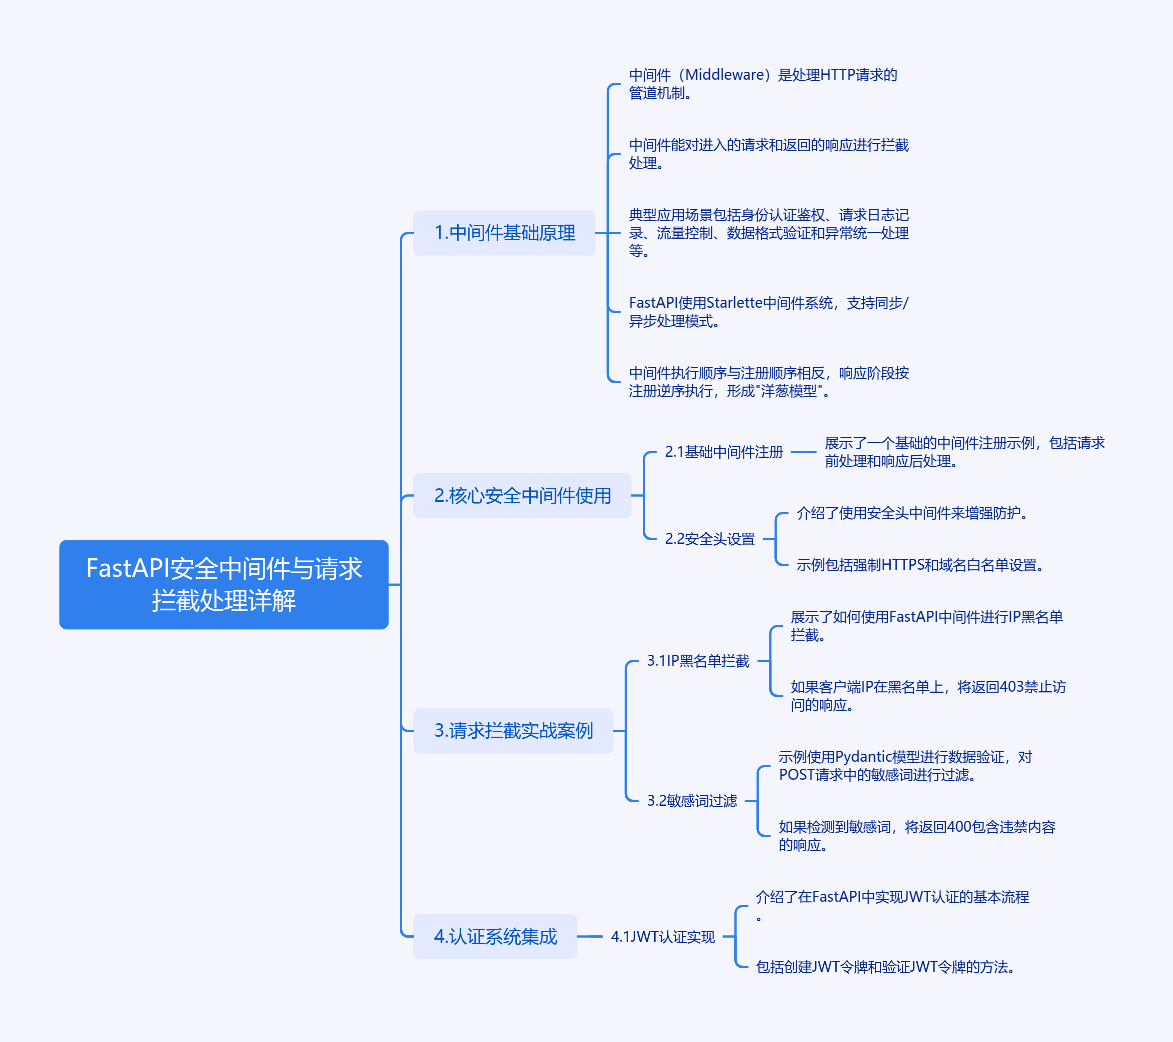
中间件(Middleware)是处理HTTP请求的管道机制,如同安检系统对旅客的逐层检查。在FastAPI中,中间件能对进入的请求和返回的响应进行拦截处理,典型应用场景包括:
- 身份认证鉴权
- 请求日志记录
- 流量控制
- 数据格式验证
- 异常统一处理
框架采用Starlette中间件系统,支持同步/异步处理模式。中间件执行顺序与注册顺序相反,响应阶段按注册逆序执行,形成"洋葱模型"。
1.2 核心安全中间件使用
1.2.1 基础中间件注册
python
from fastapi import FastAPI, Request
from starlette.middleware.base import BaseHTTPMiddleware

app = FastAPI()


class AuditMiddleware(BaseHTTPMiddleware):
    async def dispatch(self, request: Request, call_next):
        # 请求前处理
        print(f"收到 {request.method} 请求: {request.url}")

        # 传递请求到下级处理
        response = await call_next(request)

        # 响应后处理
        response.headers["X-Audit"] = "processed"
        return response


app.add_middleware(AuditMiddleware)
1.2.2 安全头设置
使用安全头中间件增强防护:
python
from fastapi.middleware.httpsredirect import HTTPSRedirectMiddleware
from fastapi.middleware.trustedhost import TrustedHostMiddleware

# 强制HTTPS
app.add_middleware(HTTPSRedirectMiddleware)

# 域名白名单
app.add_middleware(TrustedHostMiddleware, allowed_hosts=["*.example.com"])
1.3 请求拦截实战案例
1.3.1 IP黑名单拦截
python
from fastapi import FastAPI, Request, HTTPException
from fastapi.responses import JSONResponse

app = FastAPI()

BLACKLIST_IPS = {"192.168.1.100", "10.0.0.5"}


@app.middleware("http")
async def ip_filter(request: Request, call_next):
    client_ip = request.client.host
    if client_ip in BLACKLIST_IPS:
        return JSONResponse(
            status_code=403,
            content={"detail": "访问被拒绝"}
        )
    return await call_next(request)
1.3.2 敏感词过滤
使用Pydantic模型进行数据验证:
python
from pydantic import BaseModel
from typing import List


class ContentCheck(BaseModel):
    text: str
    banned_words: List[str] = ["暴力", "敏感词"]


@app.middleware("http")
async def content_filter(request: Request, call_next):
    # 拦截POST请求
    if request.method == "POST":
        body = await request.json()
        checker = ContentCheck(**body)

        # 检测敏感词
        for word in checker.banned_words:
            if word in checker.text:
                return JSONResponse(
                    status_code=400,
                    content={"error": "包含违禁内容"}
                )

    return await call_next(request)
1.4 认证系统集成
1.4.1 JWT认证实现
python
from fastapi.security import OAuth2PasswordBearer
from jose import JWTError, jwt
from datetime import datetime, timedelta

SECRET_KEY = "your-secret-key"
ALGORITHM = "HS256"
oauth2_scheme = OAuth2PasswordBearer(tokenUrl="token")


def create_jwt_token(data: dict):
    expire = datetime.utcnow() + timedelta(hours=1)
    return jwt.encode(
        {"exp": expire, **data},
        SECRET_KEY,
        algorithm=ALGORITHM
    )


async def validate_token(token: str = Depends(oauth2_scheme)):
    try:
        payload = jwt.decode(token, SECRET_KEY, algorithms=[ALGORITHM])
        return payload
    except JWTError:
        raise HTTPException(
            status_code=401,
            detail="无效的认证凭证"
        )
1.4.2 角色权限验证
python
from enum import Enum


class UserRole(str, Enum):
    ADMIN = "admin"
    USER = "user"


def check_permission(required_role: UserRole):
    def validator(user: dict = Depends(validate_token)):
        if user.get("role") != required_role:
            raise HTTPException(403, "权限不足")
        return user

    return validator


@app.get("/admin")
async def admin_dashboard(
        user: dict = Depends(check_permission(UserRole.ADMIN))
):
    return {"message": "管理员面板"}
1.5 课后Quiz
Q1:当收到403状态码时,可能是什么原因导致的?
A:访问被拒绝,常见于IP黑名单拦截、权限不足或资源不可访问的情况
Q2:如何防止中间件影响API性能?
A:通过异步处理、避免阻塞操作、设置合理的缓存机制和精简处理逻辑
Q3:JWT令牌应该存储在客户端的什么位置最安全?
A:推荐存储在HttpOnly的Cookie中,或使用安全的内存存储方式
1.6 常见错误处理
错误1:422 Unprocessable Entity
原因:请求体数据验证失败
解决方法:
- 检查请求数据是否符合Pydantic模型定义
- 查看返回的详细错误信息
- 使用try-except块捕获验证异常
错误2:401 Unauthorized
原因:认证信息缺失或无效
解决方法:
- 检查Authorization头是否正确携带
- 验证token是否过期或被篡改
- 确保认证依赖项正确注入
错误3:500 Internal Server Error
原因:未处理的服务器端异常
解决方法:
- 查看服务端日志定位错误堆栈
- 添加全局异常处理器
- 使用调试模式获取详细信息
python
# 全局异常处理示例
@app.exception_handler(HTTPException)
async def custom_exception_handler(request, exc):
    return JSONResponse(
        status_code=exc.status_code,
        content={"error": exc.detail}
    )
1.7 环境配置说明
运行要求:
- Python 3.7+
- FastAPI 0.68+
- Uvicorn 0.15+
安装命令:
bash
pip install fastapi==0.68.0
pip install uvicorn==0.15.0
pip install python-jose==3.3.0
pip install passlib==1.7.4
最佳实践:
- 生产环境启用HTTPS
- 敏感配置使用环境变量
- 定期更新依赖库版本
- 实施请求频率限制
- 启用访问日志审计
通过本文的实践示例和原理分析,开发者可以掌握FastAPI的安全中间件使用技巧,构建具备企业级安全防护能力的API服务。建议结合具体业务需求,选择合适的中间件组合方案。
余下文章内容请点击跳转至 个人博客页面 或者 扫码关注或者微信搜一搜:编程智域 前端至全栈交流与成长,阅读完整的文章:如何在FastAPI中打造坚不可摧的安全防线? | cmdragon's Blog
往期文章归档:
- 如何在FastAPI中实现权限隔离并让用户乖乖听话? | cmdragon's Blog
- 如何在FastAPI中玩转权限控制与测试,让代码安全又优雅? | cmdragon's Blog
- 如何在FastAPI中打造一个既安全又灵活的权限管理系统? | cmdragon's Blog
- FastAPI访问令牌的权限声明与作用域管理:你的API安全真的无懈可击吗? | cmdragon's Blog
- 如何在FastAPI中构建一个既安全又灵活的多层级权限系统? | cmdragon's Blog
- FastAPI如何用角色权限让Web应用安全又灵活? | cmdragon's Blog
- FastAPI权限验证依赖项究竟藏着什么秘密? | cmdragon's Blog
- 如何用FastAPI和Tortoise-ORM打造一个既高效又灵活的角色管理系统? | cmdragon's Blog
- JWT令牌如何在FastAPI中实现安全又高效的生成与验证? | cmdragon's Blog
- 你的密码存储方式是否在向黑客招手? | cmdragon's Blog
- 如何在FastAPI中轻松实现OAuth2认证并保护你的API? | cmdragon's Blog
- FastAPI安全机制:从OAuth2到JWT的魔法通关秘籍 | cmdragon's Blog
- FastAPI认证系统:从零到令牌大师的奇幻之旅 | cmdragon's Blog
- FastAPI安全异常处理:从401到422的奇妙冒险 | cmdragon's Blog
- FastAPI权限迷宫:RBAC与多层级依赖的魔法通关秘籍 | cmdragon's Blog
- JWT令牌:从身份证到代码防伪的奇妙之旅 | cmdragon's Blog
- FastAPI安全认证:从密码到令牌的魔法之旅 | cmdragon's Blog
- 密码哈希:Bcrypt的魔法与盐值的秘密 | cmdragon's Blog
- 用户认证的魔法配方:从模型设计到密码安全的奇幻之旅 | cmdragon's Blog
- FastAPI安全门神:OAuth2PasswordBearer的奇妙冒险 | cmdragon's Blog
- OAuth2密码模式:信任的甜蜜陷阱与安全指南 | cmdragon's Blog
- API安全大揭秘:认证与授权的双面舞会 | cmdragon's Blog
- 异步日志监控:FastAPI与MongoDB的高效整合之道 | cmdragon's Blog
- FastAPI与MongoDB分片集群:异步数据路由与聚合优化 | cmdragon's Blog
- FastAPI与MongoDB Change Stream的实时数据交响曲 | cmdragon's Blog
- 地理空间索引:解锁日志分析中的位置智慧 | cmdragon's Blog
- 异步之舞:FastAPI与MongoDB的极致性能优化之旅 | cmdragon's Blog
- 异步日志分析:MongoDB与FastAPI的高效存储揭秘 | cmdragon's Blog
- MongoDB索引优化的艺术:从基础原理到性能调优实战 | cmdragon's Blog
- 解锁FastAPI与MongoDB聚合管道的性能奥秘 | cmdragon's Blog
- 异步之舞:Motor驱动与MongoDB的CRUD交响曲 | cmdragon's Blog
- 异步之舞:FastAPI与MongoDB的深度协奏 | cmdragon's Blog
- 数据库迁移的艺术:FastAPI生产环境中的灰度发布与回滚策略 | cmdragon's Blog
- 数据库迁移的艺术:团队协作中的冲突预防与解决之道 | cmdragon's Blog
- 驾驭FastAPI多数据库:从读写分离到跨库事务的艺术 | cmdragon's Blog
- 数据库事务隔离与Alembic数据恢复的实战艺术 | cmdragon's Blog
- FastAPI与Alembic:数据库迁移的隐秘艺术 | cmdragon's Blog
- XML Sitemap