1.布尔值为false和true的条件

2. 案例------购物车
html
<!DOCTYPE html>
<html lang="en">
<head>
<meta charset="UTF-8" />
<meta http-equiv="X-UA-Compatible" content="IE=edge" />
<meta name="viewport" content="width=device-width, initial-scale=1.0" />
<link rel="stylesheet" href="./css/inputnumber.css" />
<link rel="stylesheet" href="./css/index.css" />
<title>购物车</title>
</head>
<body>
<div class="app-container" id="app">
<!-- 顶部banner -->
<div class="banner-box"><img src="./img/fruit.jpg" alt="" /></div>
<!-- 面包屑 -->
<div class="breadcrumb">
<span>🏠</span>
/
<span>购物车</span>
</div>
<!-- 购物车主体 -->
<div class="main">
<div class="table">
<!-- 头部 -->
<div class="thead">
<div class="tr">
<div class="th">选中</div>
<div class="th th-pic">图片</div>
<div class="th">单价</div>
<div class="th num-th">个数</div>
<div class="th">小计</div>
<div class="th">操作</div>
</div>
</div>
<!-- 身体 -->
<div class="tbody">
<!-- active: index%2:当 index%2 为真(即索引为奇数时),加上 active 这个类名;为假(索引为偶数时),不加 active。 -->
<div :class="{tr:true, active: item.isChecked}" v-for="(item,index) in fruitList" :key="item.id">
<div class="td"><input type="checkbox" v-model="item.isChecked" /></div>
<div class="td"><img :src="item.icon" alt="" /></div>
<div class="td">{{item.price}}</div>
<div class="td">
<div class="my-input-number">
<!-- disabled:禁用属性 (当item.num<=1)时,按钮禁用-->
<button class="decrease" @click="reduce(index)" :disabled="item.num<=1"> - </button>
<span class="my-input__inner">{{item.num}}</span>
<button class="increase" @click="add(index)"> + </button>
</div>
</div>
<div class="td">{{item.price*item.num}}</div>
<div class="td"><button @click="del(item.id)">删除</button></div>
</div>
<!-- <div class="tr">
<div class="td"><input type="checkbox" /></div>
<div class="td"><img src="./img/荔枝.png" alt="" /></div>
<div class="td">7</div>
<div class="td">
<div class="my-input-number">
<button disabled class="decrease"> - </button>
<span class="my-input__inner">1</span>
<button class="increase"> + </button>
</div>
</div>
<div class="td">14</div>
<div class="td"><button>删除</button></div>
</div> -->
</div>
</div>
<!-- 底部 -->
<div class="bottom">
<!-- 全选 -->
<label class="check-all">
<input type="checkbox" v-model="checkedAll" />
全选
</label>
<div class="right-box">
<!-- 所有商品总价 -->
<span class="price-box">总价 : ¥ <span class="price">{{amount}}</span></span>
<!-- 结算按钮 -->
<button class="pay">结算</button>
</div>
</div>
</div>
<!-- 空车 -->
<div class="empty">🛒空空如也</div>
</div>
<script src="./js/vue-2.7.14.js"></script>
<script>
const app = new Vue({
el: '#app',
data: {
// 水果列表
// 优先使用本地存储,如果没有本地存储的话,就默认使用默认数据
fruitList: JSON.parse(localStorage.getItem('fruitList')) || [
{
id: 1,
icon: './img/火龙果.png',
isChecked: true,
num: 2,
price: 6,
},
{
id: 2,
icon: './img/荔枝.png',
isChecked: false,
num: 7,
price: 20,
},
{
id: 3,
icon: './img/榴莲.png',
isChecked: false,
num: 3,
price: 40,
},
{
id: 4,
icon: './img/鸭梨.png',
isChecked: true,
num: 10,
price: 3,
},
{
id: 5,
icon: './img/樱桃.png',
isChecked: false,
num: 20,
price: 34,
},
],
},
// 侦听器存储
// deep: true:深度侦听。因为 fruitList 是一个对象(数组),里面的每个元素也是对象。只有加上 deep: true,才能侦听到 fruitList 内部对象属性的变化(比如数量、选中状态等)。
// handler(value):当 fruitList 发生变化时会自动执行的函数。value 就是变化后的 fruitList。
watch: {
fruitList: {
deep: true, //侦听对象属性的变化,必须加上
handler(value) {
localStorage.setItem('fruitList', JSON.stringify(value))
}
}
},
methods: {
del(id) {
// filter 是 JavaScript 数组的一个内置方法,它的主要作用是:
// 根据指定条件,从原数组中筛选出符合条件的元素,生成一个新数组。
// 例如,id 传入 3,那么所有 id 为 3 的水果会被移除,其他的都保留
this.fruitList = this.fruitList.filter(item => item.id !== id)
},
reduce(index) {
this.fruitList[index].num--
},
add(index) {
this.fruitList[index].num++
},
},
computed: {
//总价格
amount() {
// 先筛选出勾选的商品(isChecked为true)的商品
let result = this.fruitList.filter(item => item.isChecked)
return result.reduce((preValue, item) => {
return preValue + item.num * item.price
}, 0)
},
//总数
total() {
let result = this.fruitList.filter(item => item.isChecked)
return result.reduce((preValue, item) => {
return preValue + item.num
}, 0)
},
// 全选
checkedAll: {
get() {
return this.fruitList.every(item => item.isChecked === true)
},
set(value) {
this.fruitList.forEach(item => item.isChecked = value)
}
}
}
})
</script>
</body>
</html>3.Vue生命周期和生命周期的四个阶段
3.1 生命周期
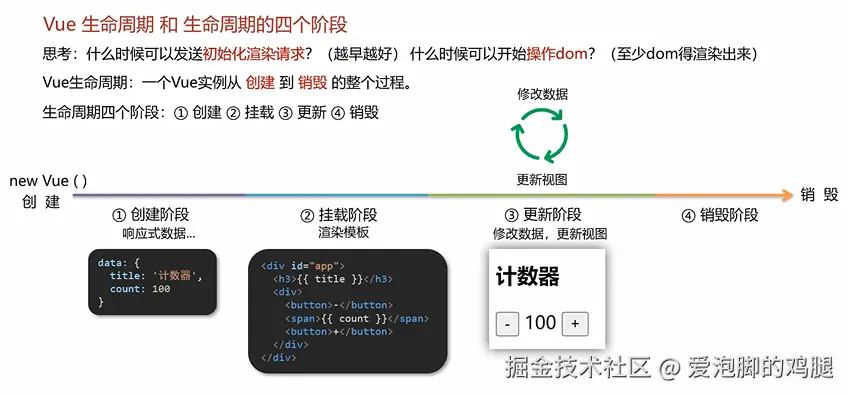
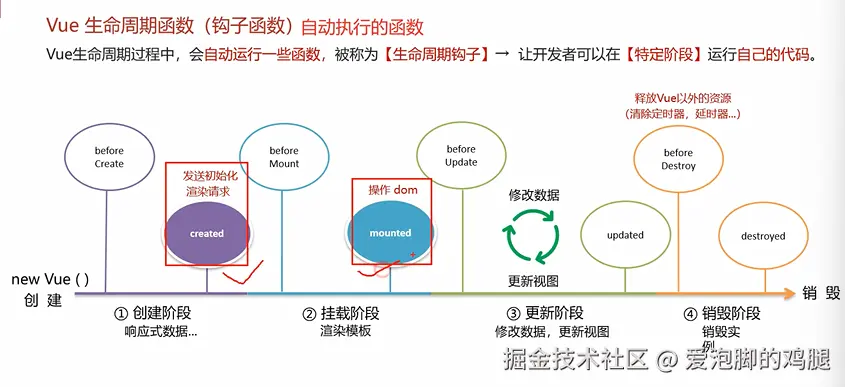
3.2 钩子函数
3.2.1 钩子函数使用
html
<!DOCTYPE html>
<html lang="en">

<head>
  <meta charset="UTF-8">
  <meta name="viewport" content="width=device-width, initial-scale=1.0">
  <title>Document</title>
</head>

<body>
  <div id="app">
    <h2>{{ title }}</h2>
    <div>
      <button @click="count--">-</button>
      <span>{{ count }}</span>
      <button @click="count++">+</button>
    </div>
   </div>
    <script src="./js/vue-2.7.14.js"></script>
    <script>
      const vm = new Vue({
        el: '#app',
        data: {
          title: '生命周期钩子函数演示',
          count: 100
        },
        // 创建阶段
        beforeCreate() {// 此时还不能调用data数据,也不能调用methods方法
          console.log('beforeCreate',
            this.title,
            this.count
          )
        },
        created() {// 此时可以调用data数据,调用methods方法
          console.log('created',
            this.title,
            this.count
          )
        },
        // 挂载阶段
        beforeMount() {// 此时不能调用DOM元素
          console.log('beforeMount',
            this.title,
            this.count
          )
        },
        mounted() {// 此时可以调用DOM元素
          console.log('mounted',
            this.title,
            this.count
          )
        },
        // 挂载阶段(渲染页面)
        beforeUpdate() {// 此时不能调用DOM元素
          console.log('beforeUpdate',
            document.querySelector('h2'),
          )
        },
        mounted() {// 此时可以调用DOM元素
          console.log('mounted',
            document.querySelector('h2'),
          )
        },
        //更新阶段
        //数据更新了,页面还没有更新
        beforeUpdate() {
          console.log('beforeUpdate', this.count, document.querySelector('span').innerHTML)
        },
        updated() {
          // 数据和页面都更新了
          console.log('updated', this.count, document.querySelector('span').innerHTML)
        },
        // 销毁阶段
        beforeDestroy() {
          console.log('beforeDestroy', this.count)
        },
        destroyed() {
          console.log('destroyed')
        }
      })
    </script>
</body>
结果:
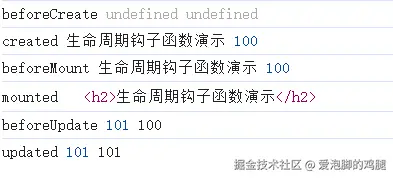
3.2.2 created和mounted的使用例子
3.2.2.1 created
html
<!DOCTYPE html>
<html lang="en">

<head>
  <meta charset="UTF-8">
  <meta http-equiv="X-UA-Compatible" content="IE=edge">
  <meta name="viewport" content="width=device-width, initial-scale=1.0">
  <title>Document</title>
  <style>
    * {
      margin: 0;
      padding: 0;
      list-style: none;
    }

    .news {
      display: flex;
      height: 120px;
      width: 600px;
      margin: 0 auto;
      padding: 20px 0;
      cursor: pointer;
    }

    .news .left {
      flex: 1;
      display: flex;
      flex-direction: column;
      justify-content: space-between;
      padding-right: 10px;
    }

    .news .left .title {
      font-size: 20px;
    }

    .news .left .info {
      color: #999999;
    }

    .news .left .info span {
      margin-right: 20px;
    }

    .news .right {
      width: 160px;
      height: 120px;
    }

    .news .right img {
      width: 100%;
      height: 100%;
      object-fit: cover;
    }
  </style>
</head>

<body>

  <div id="app">
    <ul>
      <li v-for="(item, index) in list" :key="item.id" class="news">
        <div class="left">
          <div class="title">{{ item.title }}</div>
          <div class="info">
            <span>{{ item.source }}</span>
            <span>{{ item.time }}</span>
          </div>
        </div>
        <div class="right">
          <img :src="item.img" alt="">
        </div>
      </li>
    </ul>
  </div>
  <script src="./js/vue-2.7.14.js"></script>
  <script src="./js/axios.js"></script>
  <script>
    // 接口地址:http://hmajax.itheima.net/api/news
    // 请求方式:get
    //     async 用于声明异步函数,配合 await 让异步操作更简单直观。
    // 在 Vue 的生命周期钩子(如 created)中加 async,可以直接用 await 等待数据请求完成后再赋值,页面渲染更自然。
    const app = new Vue({
      el: '#app',
      data: {
        list: []
      },
      async created() {
        // 1. 发送请求获取数据
        const res = await axios.get('http://hmajax.itheima.net/api/news')
        // 2. 更新到 list 中,用于页面渲染 v-for
        this.list = res.data.data
      }
    })
  </script>
</body>

</html>