Vben:Vue-Vben-Admin 是一个基于 Vue3.0、Vite、 Ant-Design-Vue、TypeScript 的后台解决方案,目标是为开发中大型项目提供开箱即用的解决方案。包括二次封装组件、utils、hooks、动态菜单、权限校验、按钮级别权限控制等功能。做过管理后台的同学都知道,table表格是一个频率特别高的东西,vben提供了特别丰富的使用方法,这里的总结,几乎能满足所有日常开发需求。
一、文档中关于table的一些配置说明
javascript
// https://doc.vvbin.cn/components/table.html#props
export const tableSetting = {
  rowKey: 'id',
  useSearchForm: true,   // 开启搜索表单
  showTableSetting: true,// 显示表格设置
  bordered: true,        // 显示边框

  // 以下配置都是默认值,后面是功能注解
  title:'',           // 表格标题
  formConfig: {       // 顶部搜索表单配置
    ...tableFormConfig
  },
  columns: {          // 列表信息
      ...BasicColumn
      // title, dataIndex, width 等
  },
  tableSetting: {
    rado: true,       // 显示刷新按钮
    size: true,       // 显示尺寸调整按钮
    setting: true,    // 显示字段调整按钮
    fullScreen: true, // 显示全屏按钮
  },
  api: ()=>{},        // 请求接口,可以直接将src/api内的函数直接传入
  dataSource:[],      // 表格数据,没有api的情况下设置
  striped: true,      // 斑马纹
  showIndexColumn: true,      // 显示序号
  clickToRowSelect: true,     // 点击行是否选中 checkbox 或者 radio。需要开启
  sortFn: ()=>{},             // 自定义排序方法
  filterFn: ()=>{},           // 自定义过滤方法
  inset: false,               // 取消表格默认padding
  autoCreatekey: true,        // 是否自动生成key
  showSummary: false,         // 是否显示合计
  summaryData:[],             // 自定义合计数据
  summaryDunc: ()=>{},        // 计算合计行的方法
  emptySatalsShowTable: true, // 在启用搜索表单的前提下,是否在表格没有数据的时候依旧显示
  isTreeTable: false,         // 是否树表
  beforeFetch: (param)=>{},   // 请求前对参数进行处理,param是所有参数
  afterFetch: (data)=>{return data},    // 请求之后对返回值进行处理,最后要把新data返回
  handleSearchInfoFn: ()=>{},           // 开启表单后,在请求之前处理搜索条件参数
  fetchSetting:'',  // 接口请求配置,可以配置请求的字段和响应的字段名
  canResize: true,  // 是否可以自适应高度
  immediate: true,  // 有api传入的情况下,组件加载是否立即请求
  searchInfo: {},   // 额外请求的参数
}
二、实例应用
1、data.ts,存储一些配置
这里要配置的是表格数据的数据索引、搜索表单
typescript
export const columns: BasicColumn[] = [
  {
    title: '车型',
    dataIndex: 'name',
    width: 100,
  },
  // ....各种对象索引
  {
    title: '更新时间',
    dataIndex: 'updateItem',
    customCell: (record) => {
      return { rowSpan: record.rowSpan };
    },
    customRender: ({ text }: { text: any; column: any }) => {
      return dayjs(text).format('YYYY-MM-DD HH:mm:ss');
    },
  },
  {
    title: '操作',
    dataIndex: 'action',
    width: 160,
    fixed: 'right',
  }
]

export const searchFormSchema: FormSchema[] = [
  {
    label: '车型',
    field: 'carCatalogId',
    component: 'ApiTreeSelect',
    slot: 'selectModel',
  },
  {
    label: '车型代号',
    field: 'carCatalogId',
    component: 'ApiSelect',
    componentProps: {
      api: getVehicleDicCode,  // select的数据-----1:通过接口获取
      labelField: 'code',
      valueField: 'carCatalogId',
      placeholder: '请选择',
      onChange: (val) => {
        // 变化
      }
    },
  },
  {
    label: '技能',
    field: 'words',
    component: 'Input',
    componentProps: ({ formModel }) => {  // props的定义----1:函数式
      return {
        disabled: !formModel.carCatalogId
      }
    }
  },
  {
    label: 'Coffee OS版本',
    field: 'coffeeOs',
    component: 'Select',
    componentProps: {     // props的定义----2:对象式
      options: [
          {label: '3.0', value: '3.0'},  // select的数据-----2:手动定义
          {label: '4.0', value: '4.0'},
      ],
    }
  },
];- width可以定义单个数据的宽度;
- dataIndex索引展示对应的数据,但是如果要写一些特殊的,可以用customRender进行自定义渲染;
- customCell和render的区别在于它用于自定义单元格本身属性,优先级更高;
2、模板使用
xml
<template>
<BasicTable @register="registerTable" class="voice-table voice-table-cars">
<template #tableTitle>表格标题</template>
<template #toolbar>
<a-button type="primary" @click="createInfo">配置技能</a-button>
</template>
<template #bodyCell="{ column, record }">
<template v-if="column.key === 'action'">
<TableAction :actions="createActions(record)" />
</template>
</template>
<template #form-selectModel="{ model, field }">
<TreeSelect v-model:value="model[field]" :tree-data="carModelData" placeholder="请选择"/>
</template>
</BasicTable>
</template>
<script lang="ts" setup>
import {ref} from 'vue';
import { useMessage } from '/@/hooks/web/useMessage';
import { BasicTable, useTable, TableAction, ActionItem} from '/@/components/Table';
import { columns, searchFormSchema } from './data';
import { getVehiclePage } from '/@/api/bonds/vehicle';
import { tableSetting, tableFormConfig } from '/@/views/common/uiSetting';
const selectedData:any = ref([]); // tag的展示
let selectKeys = []; // 表格的勾选id
const emits = defineEmits(['select']);
const { createMessage } = useMessage();
const [registerTable, { getSelectRowKeys, getForm, clearSelectedRowKeys, getSelectRows, getDataSource, setSelectedRowKeys, reloadTable, setTableData,setPagination }] =
useTable({
title:'表格标题2',
api: getVehiclePage,
columns,
formConfig: {
schemas: searchFormSchema,
...tableFormConfig,
},
formConfig: {
schemas: searchFormSchema,
...tableFormConfig,
},
rowSelection: {
type: 'checkbox',
onChange: selectChange,
},
maxHeight: 360,
...tableSetting,
showTableSetting: false,
// useSearchForm: false, // 如果不想用表格自带的搜索form
});
// 这里是对操作区域的定制
const createActions = (record: EditRecordRow): ActionItem[] => {
return [
{
icon: 'cil:featured-playlist',
tooltip: '详情',
onClick: handleInfo.bind(null, record),
},
{
icon: 'ant-design:delete-outlined',
tooltip: '删除',
color: 'error',
popConfirm: {
title: '是否确认删除',
placement: 'left',
confirm: handleDelete.bind(null, record),
},
},
] as ActionItem[];
};
// 监听选择变化
function selectChange(){
// 如果有其他条件可以用 getSelectRowKeys 重置所选项的key
const selectRows:any = getSelectRows(); // 获取所选
const currentTable = getDataSource(); // 获取当前table数据
selectedData.value = selectRows;
}
// 如果有提交操作
function save() {
const back = {
selectKeys: [].concat(selectKeys),
}
if(back.selectKeys.length<1){
createMessage.warning( '请勾选车型');
return;
}
emits('select', back);
close();
}
function close() {
getForm().resetFields(); // 重置table上面的search表单
clearSelectedRowKeys(); // 清除table
selectedData.value=[];
}
</script>
<style lang="less" >
// 这里写一点css
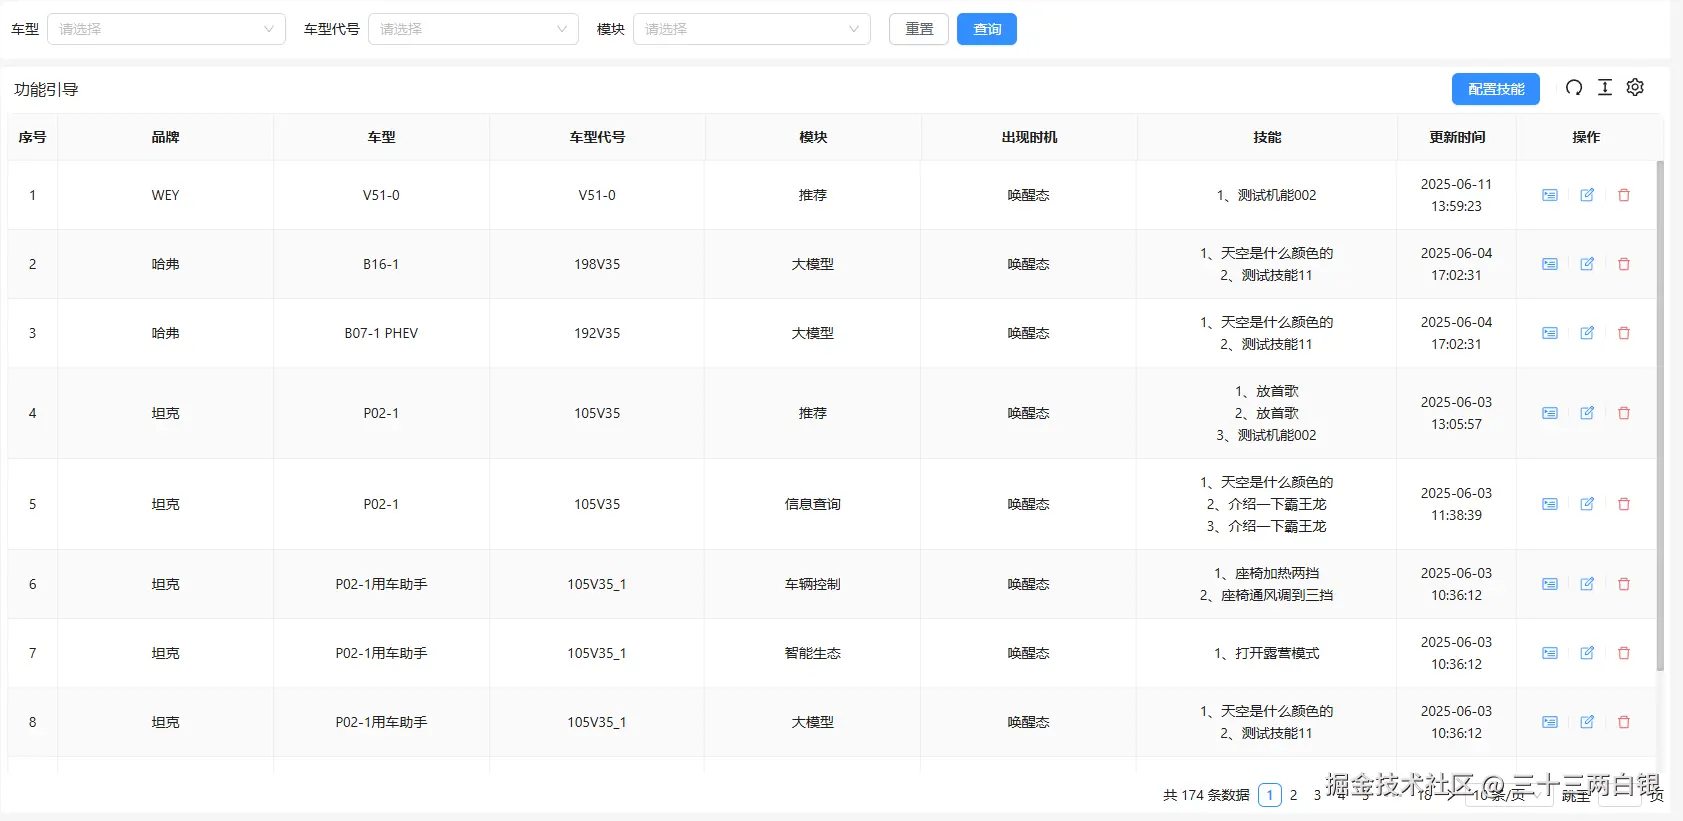
</style>这样你就能得到类似这样的一个结果:搜索、列表、分页
三、多种功能应用讲解
1、数据展示
- 首先这个表格是配置了api的,所以会自动请求数据,并通过columns配置的索引进行展示;
- 除了前面提到可以用customRender进行自定义渲染,还可以在模板中渲染,同样需要根据key来判断;
ini
// #bodyCell 中
<template v-if="column.key === 'fatherModuleCode'">
  {{ record.moduleCode === record.childModuleCode ? 0 : record.moduleCode}}
</template>- 一般我们都是展示表格的时候就请求数据,但是有时候也需要手动触发或者自主请求
kotlin
// 首先在useTable中设置
const [registerTable, { reloadTable, setTableData,setPagination }] = useTable({
    beforeFetch: (param)=>{},   // 请求前对参数进行处理,param是所有参数
    afterFetch: (data)=>{return data},    // 请求之后对返回值进行处理,最后要把新data返回
    //...等等其他设置
    immediate: false,
});
// 然后接口请求
API接口({ id }).then(data => {
  // 设置表格数据
  setTableData(data.list.records);
  // 设置表格的分页
  setPagination({ current: data.list.current, total: data.list.total});
})
2、表格操作区
- 首先在data.ts中的配置dataIndex为action的节点;
- 操作按钮通过#bodyCell插槽和createActions定义来实现,注意条件判断
v-if="column.key === 'action'"; 3、如果没有在data.ts中进行配置,可以在useTable传入的对象进行设置
less
const [registerTable, { reload: reloadTable, getDataSource }] = useTable({
    //...等等其他设置
    actionColumn: {
      width: 270,
      title: '操作',
      dataIndex: 'action',
      fixed: 'right',
    },
  });
3、表格标题
- 如上代码展示,在#tableTitle插槽直接写入;
- 另一种方式可以在useTable传入的对象进行设置,如果两个都写了,1的方法优先级更高
arduino
const [registerTable, { reload: reloadTable, getDataSource }] = useTable({
    //...等等其他设置
    title: '表格标题2',
  });
4、表格搜索
- 如代码所示,配置了searchFormSchema后,在useTable中加入即可;
- 可以在data配置里把某个label定义为槽,
slot: 'selectModel',模板中就可以使用#form-selectModel="{ model, field }"来渲染,TreeSelect是一个组件,上面没有具体实现; - 可以从车型代号和Coffee OS版本两个搜索项看出,对于一个下拉,可以采用接口请求的方式,也可以手动写入,注意options的形式
css
componentProps: {
  options: {label:'', value:''},
}- 监听搜索变化,虽然上面车型代号里已经配置了componentProps,看这个复杂一点的,写成回调方法,这样可以在onChange中就可以对搜索中其他值产生影响,注意这里
labelField和valueField是对api请求结果的一种提取;
javascript
componentProps: ({ formModel }) => {
  if(formModel.moduleId){
    return {
      api: getTTSLv2Dict,
      params: {
        moduleId: formModel.moduleId,
      },
      labelField: 'moduleName',
      valueField: 'moduleId',
      showSearch: true,
      onChange: (val,item) => {  // 这里对数据变化的监听有逻辑处理,
          formModel.moduleId = item.moduleId;
          formModel.moduleName = item.label;
          formModel.subModuleCode = undefined
        },
    };
  }else{
    delete formModel.childModuleId; // 因为是有二级关联,所以当它为空,它的二级菜单要清空
    return {
      placeholder: '请先选择模块',
    };
  }

}
5、如果是联动的数据,可以通过formModel.lv2Options设置另一个下拉框的options,在上面的onChange回调里:
ini
onChange: (val, values) => {
  formModel.moduleId = item.moduleId;
  formModel.lv2Options= values.nameList.map(item=>{
    return {
      label: item.name,
      value: item.id,
    }
  });
}- tableFormConfig是一个统一表格搜索配置,主要是ui
yaml
// 表格上搜索的表单设置
export const tableFormConfig = {
  // showAdvancedButton: false,
  // labelWidth: 140, // 设置左边文字区域宽度
  // autoSubmitOnEnter: true,
  baseColProps: { span: 4 },       // 默认每个搜索项目宽度
  actionColOptions: { span: 4 }    // 默认搜索确认取消按钮宽度
}
四、action操作的封装
后验证发现有错误,虽然封装逻辑没问题,具体问题和修改方法在这里:vban2.0中table的使用---action封装
因为很多时候,在一些中后台系统中,表格数据操作总是很频繁,并且ui一致,如果页面比较多,就会要到处都设置这个东西,后来就对它这些操作按钮做了封装。组件名为TableActionHolder
1、配置按钮信息,枚举
css
// 每个操作都有其对应的icon和tip信息
export const actionList = {
    del: {
      icon: 'ant-design:delete-outlined',
      tooltip:'删除',
      color: 'error',
      popConfirm: {
        title: '确认要删除此数据吗?',
        placement: 'topRight',
      },
    },
    edit: {
      icon: 'clarity:note-edit-line',
      tooltip: '编辑',
    },
    detail:  {
      icon: 'cil:featured-playlist',
      tooltip: '详情',
    },
}
2、组件模板定义
csharp
<template>
  <TableAction :actions="createActions(record)" />
</template>

<script lang="ts" setup>
  import {ref, watch} from 'vue';
  import { ActionItem, EditRecordRow, TableAction } from '/@/components/Table';
  import { actionList } from './data';

  const actionShow = ref<ActionItem[]>([]);
  const emits = defineEmits(['actionClick']);
  const props = defineProps({
    record: {
      type: Object,
      required: true,
      default: {}
    },
    actions: {
      type: Array as () => string[],
      requird: true,
      default: []
    },
    params: {
      type: Object as () => Record<string, any>,
      default: {}
    },
    extra: { // 自定义的部分,可能默认项不能满足需求
      type: Array as () => string[],
      default: []
    },
  })


  function actionClick(type){
    emits('actionClick', {type, record: props.record})
  }

  watch(()=>props.actions, (newVal: string[], oldVal)=>{
    actionShow.value = newVal.map(item=>{
      const newAct: ActionItem = {
        ...actionList[item],
        ... props.params[item]
      }
      newAct.popConfirm
        ? (newAct.popConfirm['confirm'] = actionClick.bind(null, item))
        : (newAct['onClick']= actionClick.bind(null, item));
      return newAct
    })
  }, { immediate: true })

  const createActions = (record: EditRecordRow): ActionItem[] => {
    const result = ([] as ActionItem[]).concat(actionShow.value, props.extra as ActionItem[]);
    return result;
  };

  // 组装数据结构 给 table的操作组件TableAction,可以参考前面的createActions
</script>
3、组件引入和事件接收
通过配置actions就可以展示对应的操作按钮,并在controllers获取事件点击类型,继而执行你想要的操作
xml
<template>
  <BasicTable @register="registerTable" :searchInfo="searchInfo" class="voice-table" >
    <template #bodyCell="{ column, record }">
      <template v-if="column.key === 'action'">
        <TableActionHolder :record="record" :actions="actions" :params="setActionParams(record)" @actionClick="controllers"/>
      </template>
    </template>
  </BasicTable>

</template>

<script lang="ts" setup>

  import TableActionHolder from '/@/views/components/TableActionHolder/index.vue';
  const actions = reactive(['detail','edit','del']);
  // 支持条件渲染
  const setActionParams = (record)=>{
    return {
      edit:{disabled: record.status !== 1},
      publish:{disabled: record.status !== 1,}
    }
  }
  // 操作按钮的事件回调
  function controllers({type, record}){
    switch (type){
      case "edit":
        handleEdit(record); // 回调执行对应的方法即可
        break;
      case "detail":
        handleInfo(record);
        break;
      case "del":
        handleDelete(record);
        break;
    }
  }

</script>