本文是系列文章的一部分:框架实战指南 - 基础知识
在上一章中,我们在App组件中构建了上下文菜单功能。此功能允许我们右键单击元素并获取可执行操作的列表。

该代码按我们预期的方式工作,但它不遵循 React、Angular 或 Vue 的基本模式:它不是组件化的。
让我们通过将上下文菜单代码移到其自己的组件中来解决这个问题。这样,我们就能更轻松地进行重构、代码清理等等。
html
<!-- ContextMenu.vue --><script setup>import { ref, onMounted, onUnmounted } from "vue";const props = defineProps(["isOpen", "x", "y"]);const emit = defineEmits(["close"]);const contextMenuRef = ref(null);function closeIfOutside(e) { const contextMenuEl = contextMenuRef.value; if (!contextMenuEl) return; const isClickInside = contextMenuEl.contains(e.target); if (isClickInside) return; emit("close");}onMounted(() => { document.addEventListener("click", closeIfOutside);});onUnmounted(() => { document.removeEventListener("click", closeIfOutside);});</script><template> <div v-if="props.isOpen" ref="contextMenuRef" tabIndex="0" :style="` position: fixed; top: ${props.y}px; left: ${props.x}px; background: white; border: 1px solid black; border-radius: 16px; padding: 1rem; `" > <button @click="emit('close')">X</button> This is a context menu </div></template>
html
<!-- App.vue --><script setup>import { ref } from "vue";import ContextMenu from "./ContextMenu.vue";const isOpen = ref(false);const mouseBounds = ref({ x: 0, y: 0,});const close = () => { isOpen.value = false;};const open = (e) => { e.preventDefault(); isOpen.value = true; mouseBounds.value = { x: e.clientX, y: e.clientY, };};</script><template> <div style="margin-top: 5rem; margin-left: 5rem"> <div @contextmenu="open($event)">Right click on me!</div> </div> <ContextMenu :isOpen="isOpen" :x="mouseBounds.x" :y="mouseBounds.y" @close="close()" /></template>您可能已经注意到,在此迁移过程中,我们最终删除了一项关键的辅助功能:当上下文菜单打开时, 我们不再在其上运行。focus
为什么要删除它?我们如何才能将它添加回来?
组件引用介绍
我们删除上下文菜单的焦点管理的原因是为了保留父级中上下文菜单的控制权。
虽然我们可以使用组件副作用处理程序.focus()将逻辑保留在组件中,但这有点混淆了。理想情况下,在框架中,你希望父组件负责子组件的行为 。****
这允许您在更多地方重复使用上下文菜单组件,理论上如果您想要使用该组件而不强制改变焦点。
为了实现这一点,我们需要将该.focus方法移出组件。如下所示:
js
/* This is valid JS, but is only pseudocode of what each framework is doing */// Child component
function onComponentRender() {	document.addEventListener("click", closeIfOutsideOfContext);	contextMenu.focus();}// Parent componentfunction openContextMenu(e) {	e.preventDefault();	setOpen(true);}
对此:
js
/* This is valid JS, but is only pseudocode of what each framework is doing */// Child component
function onComponentRender() {	document.addEventListener("click", closeIfOutsideOfContext);}// Parent componentfunction openContextMenu(e) {	e.preventDefault();	setOpen(true);	contextMenu.focus();}
虽然乍一看这似乎是一个简单的改变,但随之而来的是一个新的问题: OurcontextMenu现在位于组件内部。因此,我们不仅需要通过元素引用访问底层 DOM 节点,ContextMenu还需要访问组件实例。
幸运的是,每个框架都允许我们这样做!在实现focus逻辑之前,让我们深入了解一下组件引用的工作原理:
使用ref与元素节点相同的 API,您可以访问组件的实例:
html
<!-- Child.vue --><script setup>const pi = 3.14;function sayHi() { alert("Hello, world");}</script><template> <p>Hello, template</p></template>
html
<!-- Parent.vue --><script setup>import { ref, onMounted } from "vue";import Child from "./Child.vue";const childComp = ref();onMounted(() => { console.log(childComp.value);});</script><template> <Child ref="childComp" /></template>如果我们查看控制台输出,我们可能会看到一些意想不到的事情:
json
/* Proxy */ ({ "<target>": { /*...*/ }, "<handler>": { /*...*/ },});这是因为 Vue 在底层使用了代理来控制组件状态。不过请放心,这Proxy仍然是我们的组件实例。
将组件变量公开给引用
目前我们无法对此组件实例执行太多操作。如果我们将Parent组件更改为console.log,pi则 的值将Child:
html
<!-- Parent.vue --><script setup>import { ref, onMounted } from "vue";import Child from "./Child.vue";const childComp = ref();onMounted(() => { alert(childComp.value.pi);});</script><template> <Child ref="childComp" /></template>我们会看到目前的情况childComp.value.pi。undefined这是因为,默认情况下,Vuesetup script不会将内部变量"暴露"给外部的组件引用。
为了解决这个问题,我们可以使用 Vue 的defineExpose全局 API 来允许父组件访问子组件的变量和方法:
html
<!-- Child.vue --><script setup>const pi = 3.14;function sayHi() { alert("Hello, world");}defineExpose({ pi, sayHi,});</script><template> <p>Hello, template</p></template>因为我们现在可以访问组件实例,所以我们可以访问数据和调用方法,类似于从元素引用访问数据和调用方法的方式。
html
<!-- Parent.vue --><script setup>import { ref, onMounted } from "vue";import Child from "./Child.vue";const childComp = ref();onMounted(() => { alert(childComp.value.pi); childComp.value.sayHi();});</script><template> <Child ref="childComp" /></template>使用组件引用来聚焦我们的上下文菜单
现在我们已经充分了解了每个框架中的组件引用是什么样的,让我们将其添加到我们的组件中,以便在打开时App重新启用对组件的聚焦。ContextMenu
请记住,如果您看到:
scsssetTimeout(() => { doSomething();}, 0);这意味着我们希望将
doSomething调用推迟到所有其他任务完成后。我们在代码示例中使用了这种方式:"等到元素渲染完毕后再运行
.focus()"
html
<!-- ContextMenu.vue --><script setup>import { ref, onMounted, onUnmounted } from "vue";const props = defineProps(["isOpen", "x", "y"]);const emit = defineEmits(["close"]);const contextMenuRef = ref(null);// ...function focusMenu() { contextMenuRef.value.focus();}defineExpose({ focusMenu,});</script><template> <div v-if="props.isOpen" ref="contextMenuRef" tabIndex="0" :style="` position: fixed; top: ${props.y}px; left: ${props.x}px; background: white; border: 1px solid black; border-radius: 16px; padding: 1rem; `" > <button @click="emit('close')">X</button> This is a context menu </div></template>
html
<!-- App.vue --><script setup>import { ref } from "vue";import ContextMenu from "./ContextMenu.vue";const isOpen = ref(false);const mouseBounds = ref({ x: 0, y: 0,});const contextMenu = ref();const close = () => { isOpen.value = false;};const open = (e) => { e.preventDefault(); isOpen.value = true; mouseBounds.value = { x: e.clientX, y: e.clientY, }; setTimeout(() => { contextMenu.value.focusMenu(); }, 0);};</script><template> <div style="margin-top: 5rem; margin-left: 5rem"> <div @contextmenu="open($event)">Right click on me!</div> </div> <ContextMenu ref="contextMenu" :isOpen="isOpen" :x="mouseBounds.x" :y="mouseBounds.y" @close="close()" /></template>挑战
关于组件引用的信息不仅在理论上有用。您可以将其应用到您的代码库中,以启用构建组件的新方法。
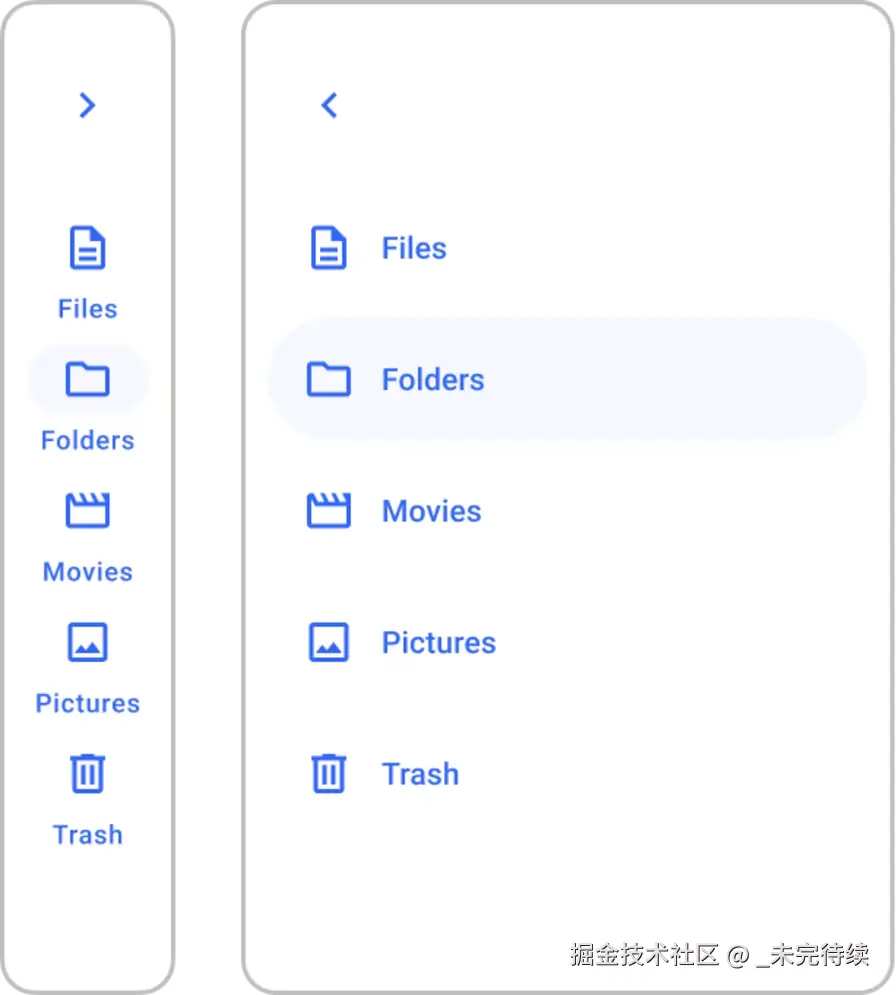
让我们通过构建一个可以展开和折叠的侧边栏组件来看一下实际效果。

为了给这个侧边栏添加额外的特殊交互,让我们这样做,当用户将屏幕缩小到一定尺寸时,它将自动折叠侧边栏。
为此,我们将:
- 设置我们的
App组件来处理左列和主列。 - 制作一个可以折叠和展开的侧边栏,以增大和缩小主列。
- 随着浏览器的扩大或缩小自动展开或折叠侧边栏。
让我们开始吧。
步骤 1:设置应用组件布局
让我们开始创建侧边栏!
我们的第一步是创建一个布局文件,其中包括左侧边栏和右侧的主要内容区域。
要做到这一点可能看起来像这样:
html
<!-- Layout.vue --><script setup>const props = defineProps(["sidebarWidth"]);</script><template> <div style="display: flex; flex-wrap: nowrap; min-height: 100vh"> <div :style="` width: ${props.sidebarWidth}px; height: 100vh; overflow-y: scroll; border-right: 2px solid #bfbfbf; `" > <slot name="sidebar" /> </div> <div style="width: 1px; flex-grow: 1"> <slot /> </div> </div></template>
html
<!-- App.vue --><script setup>import Layout from "./Layout.vue";</script><template> <Layout :sidebarWidth="150"> <template #sidebar><p>Sidebar</p></template> <p style="padding: 1rem">Hi there!</p> </Layout></template>第 2 步:制作可折叠侧边栏
现在我们有了一个粗略的侧边栏,我们将使用户可以手动折叠侧边栏。
这可以通过isCollapsed用户使用按钮切换状态来实现。
当isCollapsed为 时true,它只会显示切换按钮,但当isCollapsed为时false,它应该显示完整的侧边栏内容。
我们还将设置常量来支持此侧边栏区域的不同宽度(无论其是否折叠)。
html
<!-- Sidebar.vue --><script setup>import { ref } from "vue";const emit = defineEmits(["toggle"]);const isCollapsed = ref(false);function setAndToggle(v) { isCollapsed.value = v; emit("toggle", v);}function toggleCollapsed() { setAndToggle(!isCollapsed.value);}</script><template> <button v-if="isCollapsed" @click="toggleCollapsed()">Toggle</button> <div v-if="!isCollapsed"> <button @click="toggleCollapsed()">Toggle</button> <ul style="padding: 1rem"> <li>List item 1</li> <li>List item 2</li> <li>List item 3</li> <li>List item 4</li> <li>List item 5</li> <li>List item 6</li> </ul> </div></template>
html
<!-- App.vue --><script setup>import Layout from "./Layout.vue";import Sidebar from "./Sidebar.vue";import { ref } from "vue";const collapsedWidth = 100;const expandedWidth = 150;const width = ref(expandedWidth);function onToggle(isCollapsed) { if (isCollapsed) { width.value = collapsedWidth; return; } width.value = expandedWidth;}</script><template> <Layout :sidebarWidth="width"> <template #sidebar> <Sidebar @toggle="onToggle($event)" /> </template> <p style="padding: 1rem">Hi there!</p> </Layout></template>步骤 3:小屏幕上自动折叠侧边栏
最后,让我们在宽度小于 600px 的屏幕上自动折叠侧边栏。
我们可以使用副作用处理程序来添加屏幕调整大小的监听器。
然后,我们将使用类似于以下伪代码的框架特定代码根据屏幕大小展开或折叠侧边栏:
js
const onResize = () => { if (window.innerWidth < widthToCollapseAt) { sidebarRef.collapse(); } else if (sidebar.isCollapsed) { sidebarRef.expand(); }};window.addEventListener("resize", onResize);// Laterwindow.removeEventListener("resize", onResize);让我们来实现它:
html
<!-- Sidebar.vue --><script setup>import { ref } from "vue";const emits = defineEmits(["toggle"]);const isCollapsed = ref(false);const setAndToggle = (v) => { isCollapsed.value = v; emits("toggle", v);};const collapse = () => { setAndToggle(true);};const expand = () => { setAndToggle(false);};const toggleCollapsed = () => { setAndToggle(!isCollapsed.value);};defineExpose({ expand, collapse, isCollapsed,});</script><template> <button v-if="isCollapsed" @click="toggleCollapsed()">Toggle</button> <div v-if="!isCollapsed"> <button @click="toggleCollapsed()">Toggle</button> <ul style="padding: 1rem"> <li>List item 1</li> <li>List item 2</li> <li>List item 3</li> <li>List item 4</li> <li>List item 5</li> <li>List item 6</li> </ul> </div></template>
html
<!-- App.vue --><script setup>import { onMounted, onUnmounted, ref } from "vue";import Layout from "./Layout.vue";import Sidebar from "./Sidebar.vue";const collapsedWidth = 100;const expandedWidth = 150;const widthToCollapseAt = 600;const sidebar = ref();const width = ref(expandedWidth);const onToggle = (isCollapsed) => { if (isCollapsed) { width.value = collapsedWidth; return; } width.value = expandedWidth;};const onResize = () => { if (window.innerWidth < widthToCollapseAt) { sidebar.value.collapse(); } else if (sidebar.value.isCollapsed) { sidebar.value.expand(); }};onMounted(() => { window.addEventListener("resize", onResize);});onUnmounted(() => { window.removeEventListener("resize", onResize);});</script><template> <Layout :sidebarWidth="width"> <template #sidebar> <Sidebar ref="sidebar" @toggle="onToggle($event)" /> </template> <p style="padding: 1rem">Hi there!</p> </Layout></template>现在,当用户将屏幕调得太小时,侧边栏会自动折叠。这使得我们应用的其余部分在移动设备上的交互更加便捷。
说实话,这不一定是我在生产环境中构建这个组件的方式。相反,我可能会把"折叠"状态从组件本身"提升"
Sidebar到App组件本身。这将使我们能够更灵活地控制侧边栏的
isCollapsed状态,而无需使用组件引用。但是,如果您正在构建一个用于与多个应用程序交互的 UI 库,有时降低此状态可以减少共享此组件的应用程序之间的样板。