总结:
- 根据上篇文章使用train.py训练好权重文件后,再使用flask搭建后台接口,把检测的数据和图片传给前端,目前只支持监测图片
1. 与官方提供的restapi.py类似,创建一个py文件
ini
# YOLOv5 🚀 by Ultralytics, GPL-3.0 license
"""
Run a Flask REST API exposing one or more YOLOv5s models
"""

import argparse
import io
import numpy as np
from flask import Flask, request, jsonify
from PIL import Image
from utils.dataloaders import IMG_FORMATS, VID_FORMATS, LoadImages, LoadScreenshots, LoadStreams
import os
import cv2
import torch
from pathlib import Path
import sys
from models.common import DetectMultiBackend
from utils.general import (check_img_size,increment_path, non_max_suppression, scale_boxes)
from utils.plots import Annotator, colors
from utils.torch_utils import select_device, time_sync
import json
import base64
from lprr.plate import de_lpr,dr_plate
from flask_cors import CORS
import time

app = Flask(__name__)
# 解决前端跨域问题
CORS(app, resources={
    r"/yolo/*": {
        "origins": "http://localhost:8080",  # 允许的域名
        "methods": ["GET", "POST"],          # 允许的 HTTP 方法
        "allow_headers": ["Content-Type", "Authorization"],  # 允许的请求头
        "supports_credentials": True,         # 允许携带 Cookie
        "allow_headers": ["Content-Type", "Authorization", "access-token"]  # 添加 access-token
    }
})

models = {}
DETECTION_URL = "/yolo/lprnet"

FILE = Path(__file__).resolve()
ROOT = FILE.parents[0]  # YOLOv5 root directory
if str(ROOT) not in sys.path:
    sys.path.append(str(ROOT))  # add ROOT to PATH
ROOT = Path(os.path.relpath(ROOT, Path.cwd()))  # relative

def save_base64_to_jpg(base64_string, output_path):
    # 1. 解码Base64字符串
    image_data = base64.b64decode(base64_string)
    # 2. 转换为OpenCV图像
    nparr = np.frombuffer(image_data, np.uint8)
    img = cv2.imdecode(nparr, cv2.IMREAD_COLOR)
    # 3. 保存为JPG
    cv2.imwrite(output_path, img)

class Camera():
    @staticmethod
    def frames(url):
        weights = ROOT / 'runs/train/exp9/weights/best.pt'  # 训练好的权重路径
        imgsz = 640  # 模型输入图像尺寸
        device = select_device(0)  # 0 or 0,1,2,3 or cpu 没有gpu的记得改为cpu
        model = DetectMultiBackend(weights, device=device, dnn=False, data=ROOT / 'data/plate.yaml')

        stride, names, pt, jit, onnx, engine = model.stride, model.names, model.pt, model.jit, model.onnx, model.engine
        # 检查输入尺寸是否满足模型要求
        imgsz = check_img_size(imgsz, s=stride)  # check image size
        vid_path, vid_writer = [None], [None]

        half = False  # 半精度开关
        # 仅在有GPU且格式支持时启用
        half &= (pt or jit or onnx or engine) and device.type != 'cpu'  # FP16 supported on limited backends with CUDA
        if pt or jit:
            # 转换模型精度
            model.model.half() if half else model.model.float()

        dataset = LoadImages(url, img_size=imgsz)

        # #创建空白图像
        img = torch.zeros((1, 3, imgsz, imgsz), device=device)  # init img
        _ = model(img.half() if half else img) if device.type != 'cpu' else None  # run once
        for path, img, im0s, vid_cap, s in dataset:
                img = torch.from_numpy(img).to(device)
                img = img.half() if half else img.float()  # uint8 to fp16/32
                img /= 255.0  # 0 - 255 to 0.0 - 1.0
                if img.ndimension() == 3:
                    img = img.unsqueeze(0)

                # Inference
                t1 = time_sync()
                pred = model(img, augment=False, visualize=False)
                # nms
                pred = non_max_suppression(pred, conf_thres=0.25, iou_thres=0.45, classes=None, agnostic=False,
                                           max_det=1000)
                t2 = time_sync()

                for i, det in enumerate(pred):  # detections per image
                        # p, s, im0 = path, '', im0s
                        p, im0, frame = path, im0s.copy(), getattr(dataset, 'frame', 0)
                        p = Path(p)  # to Path
                        save_path = str('./data/' + p.name)
                        s += '%gx%g ' % img.shape[2:]
                        gn = torch.tensor(im0.shape)[[1, 0, 1, 0]]
                        annotator = Annotator(im0, line_width=3, example=str(names))
                        if det is not None and len(det):
                            results = []

                            det[:, :4] = scale_boxes(img.shape[2:], det[:, :4], im0.shape).round()
                            for c in det[:, -1].detach().unique():
                                n = (det[:, -1] == c).sum()
                                s += '%g %s, ' % (n, names[int(c)])
                            for *xyxy, conf, cls in det:
                                if float(conf) > 0.65:
                                    # 车牌识别函数
                                    plate = de_lpr(xyxy, im0)
                                    # 画车牌边框
                                    plateNum = dr_plate(im0, xyxy, plate)

                                    label = '%s %.2f' % (names[int(cls)], conf)
                                    class_name = model.names[int(cls)]
                                    results.append({
                                        "xmin": int(xyxy[0]),
                                        "ymin": int(xyxy[1]),
                                        "xmax": int(xyxy[2]),
                                        "ymax": int(xyxy[3]),
                                        "confidence": float(conf),
                                        "class": class_name,
                                        "plate": plateNum,
                                    })
                                    c = int(cls)
                                    # 这边是画出车牌边框和置信度
                                    # annotator.box_label(xyxy, label, color=colors(c, True))
                                    # cv2.imwrite(save_path, im0)

                        # rendered_img = im0.render()[0]  # 获取带标注的图片
                        # 3. 实时编码返回
                        _, buffer = cv2.imencode('.jpg', im0)
                        imgData =  base64.b64encode(buffer).decode('utf-8')
                        results.append({
                            "imgUrl": imgData
                        })
                        res = {
                            "data": results,
                            "code": 200
                        }
                        # 传给前端的数据
                        return jsonify(res)
                        # print('%sDone. (%.3fs)' % (s, t2 - t1))
                        # Save results (image with detections)
                        # if True:
                        #     if dataset.mode == 'image':
                        #         cv2.imwrite(save_path, im0)
                        #     else:  # 'video' or 'stream'
                        #         if vid_path[i] != save_path:  # new video
                        #             vid_path[i] = save_path
                        #             if isinstance(vid_writer[i], cv2.VideoWriter):
                        #                 vid_writer[i].release()  # release previous video writer
                        #             if vid_cap:  # video
                        #                 fps = vid_cap.get(cv2.CAP_PROP_FPS)
                        #                 w = int(vid_cap.get(cv2.CAP_PROP_FRAME_WIDTH))
                        #                 h = int(vid_cap.get(cv2.CAP_PROP_FRAME_HEIGHT))
                        #             else:  # stream
                        #                 fps, w, h = 30, im0.shape[1], im0.shape[0]
                        #             save_path = str(
                        #                 Path(save_path).with_suffix('.mp4'))  # force *.mp4 suffix on results videos
                        #             vid_writer[i] = cv2.VideoWriter(save_path, cv2.VideoWriter_fourcc(*'mp4v'), fps,
                        #                                             (w, h))
                        #             vid_writer[i].write(im0)
                        # cv2.namedWindow('img', cv2.WINDOW_NORMAL)
                        # cv2.imshow('img', im0)
                        # cv2.waitKey(0)

@app.route(DETECTION_URL, methods=['POST'])
def predict():
    # print(model)
    if request.method != 'POST':
        return

    if request.data:
        camera_tool = Camera()
        json_str = request.data.decode('utf-8')  # 或使用 response.content.decode('utf-8')
        # 步骤2:解析JSON
        imgFiles = json.loads(json_str).get("imgFiles")[0]
        timestamp_ms = int(time.time() * 1000)
        url = f"./uploadImg/{timestamp_ms}.jpg"
        save_base64_to_jpg(imgFiles, url)
        print(url,'request.data')
        return camera_tool.frames(url)

    if request.files.get('image'):
        # Method 1
        # with request.files["image"] as f:
        #     im = Image.open(io.BytesIO(f.read()))

        # Method 2
        im_file = request.files['image']
        im_bytes = im_file.read()
        im = Image.open(io.BytesIO(im_bytes))

        # if model in models:
        #     results = models[model](im, size=640)  # reduce size=320 for faster inference
        #     return results.pandas().xyxy[0].to_json(orient='records')


if __name__ == '__main__':
    app.run(host='0.0.0.0', port=5000)  # debug=True causes Restarting with stat
2. 使用vue3全家桶搭建的前端,前端页面简单写了一下,使用element-plus的upload组件封装的
<template>
>  <div class="container">
    <div style="height: 200px;">
        <UploadImgs ref="uploadImgsRef" @getImgs="getImgs" @delImg="delImg" :limitNum="1"></UploadImgs>
        <el-button @click="submitUpload" type="primary" size="small" style="margin-top: 12px">上传</el-button>
    </div>
    <div style="margin-top: 12px;border-top: 1px solid #000;padding-top: 12px;height: calc( 100% - 240px );" v-loading="loading" element-loading-text="图片检测中..." element-loading-background="rgba(122, 122, 122, 0.5)">
        <span style="font-size: 16px;">检测结果:</span>
        <span>{{yoloRes}}</span>
        <div style="width: 100%;height: calc( 100% - 60px );margin-top: 20px" v-if="yoloResImg.length">
            <el-image
                :src="yoloResImg[0]"
                :zoom-rate="1.2"
                :max-scale="7"
                :min-scale="0.2"
                :preview-src-list="yoloResImg"
                show-progress
                fit="cover"
            />
        </div>
    </div>
  </div>
</template>

<script setup>
import UploadImgs from "@/components/uploadImgs/index";
import { reactive,ref,watch,nextTick,computed,onMounted,onBeforeUnmount } from "vue";
import { uploadImg } from "@/apis/yoloImg"

let imgFiles = ref([]);
let yoloRes = ref(null)
let yoloResImg = ref([])
let loading = ref(false)

//子组件uploadImgs触发
const getImgs = async(imgs) => {
  let imgUid = imgs.file.uid
  //转为base64格式
  let reader = new FileReader();
  reader.readAsDataURL(imgs.file);
  reader.onload = async(file) => {
    let base64 = await blobToBase64(reader.result)
    const img = base64.replace(/^data:image\/\w+;base64,/, "");
    let obj = {
      img,
      imgUid
    }
    imgFiles.value.push(obj);
  };
};
//删除图片
const delImg = (uid) => {
  let index = imgFiles.value.findIndex( item => item.imgUid == uid)
  imgFiles.value.splice(index, 1)
}

// blob 转 base64
const blobToBase64 = (url) => {
  return new Promise((resolve, reject) => {
    let image = new Image();
    image.onload = function () {
      let canvas = document.createElement("canvas");
      canvas.width = this.naturalWidth;
      canvas.height = this.naturalHeight;
      // 将图片插入画布并开始绘制
      canvas.getContext("2d").drawImage(image, 0, 0);
      let result = canvas.toDataURL("image/jpeg", 0.3);
      resolve(result);
    };
    image.setAttribute("crossOrigin", "Anonymous");
    image.src = url;
    // 图片加载失败的错误处理
    image.onerror = () => {
      reject(new Error("urlToBase64 error"));
    };
  });
};
const submitUpload = () => {
    let uploadFiles = imgFiles.value.map( item => item.img )
    loading.value = true
    uploadImg({ imgFiles: uploadFiles }).then( res =>{
        console.log(res,'ssssssssssss');
        loading.value = false
        yoloRes.value = res[0]
        yoloResImg.value = [`data:image/jpeg;base64,${res[1].imgUrl}`]
    })
};
</script>
<style lang="scss" scoped>
.container{
    width: 100%;
    height: 100%;
    padding: 20px;
}
</style>- 这是前端获取的数据结构
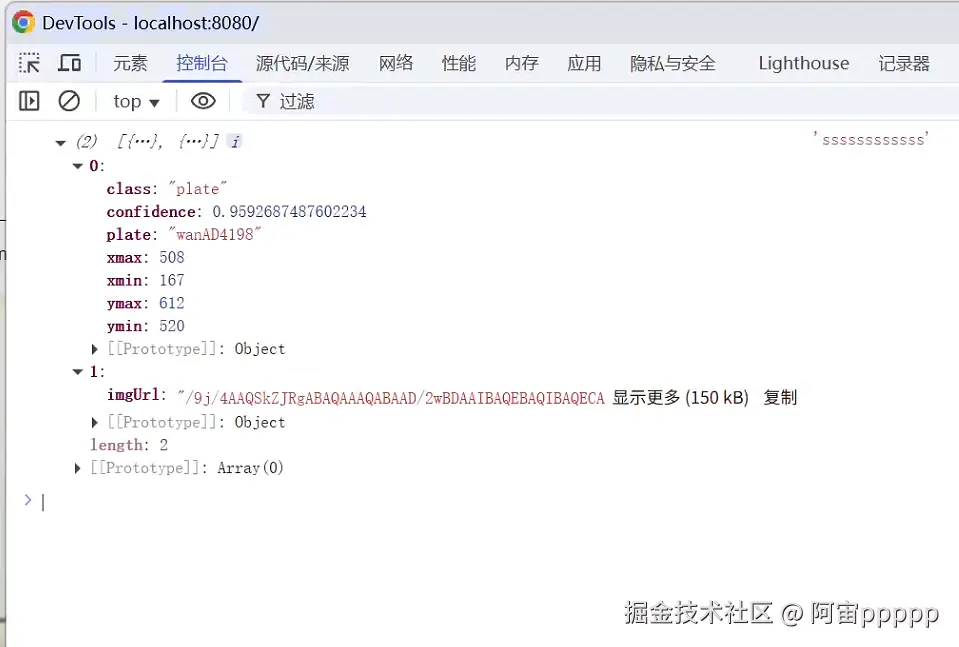
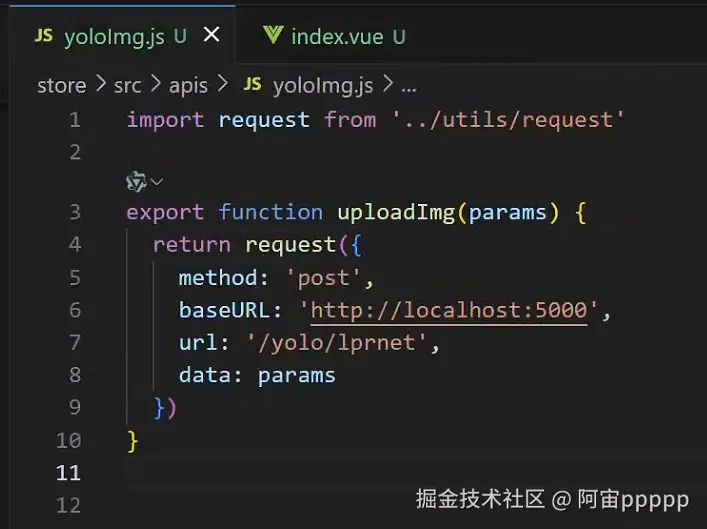
- 前端axios请求示例,前端传过去的是一个base64格式的图片
- 前端展示效果
