🏗️ 结构型设计模式:代码架构的魔法师
💡 温馨提示:本文将以轻松有趣的方式带你探索结构型设计模式的世界,就像在听一个关于"如何优雅地搭建积木城堡"的故事一样!
🚪 传送门 :在开始我们的"架构搭建之旅"之前,建议先通过这个 🎨 Java设计模式详解:让代码优雅如诗的秘密武器 了解设计模式的基础概念和整体架构,然后通过 🏭 创建型设计模式:对象诞生的艺术与智慧 学习对象创建的艺术,这样能让你更好地理解本文内容!就像玩游戏要先看新手教程一样!🎮
🎪 引言:为什么我们需要结构型设计模式?
arduino
🏗️ 场景:混乱的代码建筑工地 🏗️
┌─────────────────────────────────────┐
│ 💻 程序员小李的一天 💻 │
│ │
│ 😵 类之间的关系像蜘蛛网! │
│ 🔥 接口不兼容像语言不通! │
│ 🐛 代码耦合像胶水粘死! │
│ │
│ 💡 突然,结构型设计模式英雄出现了! │
│ 🦸♂️ "让我来拯救你的架构!" │
└─────────────────────────────────────┘结构型设计模式就像是"代码架构"的标准搭建流程,让类和对象之间的关系变得清晰、灵活、可维护。
本文将带你探索七种结构型设计模式,就像参观七个不同的"架构搭建工坊"一样有趣!
🎯 本文你将学到什么?
🎬 结构型设计模式英雄联盟 🎬
┌─────────────────────────────────────┐
│ 🦸♂️ 七位架构魔法师登场! │
│ │
│ 🔌 适配器侠:让不兼容的接口兼容 │
│ 🎨 装饰器侠:动态添加功能 │
│ 🛡️ 代理侠:控制对象访问 │
│ 🌉 桥接侠:分离抽象和实现 │
│ 🌳 组合侠:统一处理树形结构 │
│ 🏛️ 外观侠:简化复杂系统 │
│ 🦋 享元侠:共享细粒度对象 │
│ │
│ 🚀 准备好开始架构之旅了吗? │
└─────────────────────────────────────┘🔌 第一部分:适配器模式(Adapter Pattern)
arduino
🔌 适配器侠的登场 🔌
┌─────────────────────────────────────┐
│  🔌 适配器侠:我是接口翻译官!      │
│                                     │
│  💻 新系统:"我要用新接口!"        │
│  🔌 适配器侠:"我来翻译!"          │
│  💻 新系统:"接口不匹配!"          │
│  🔌 适配器侠:"我来适配!"          │
│                                     │
│  💡 核心思想:让不兼容的接口兼容    │
└─────────────────────────────────────┘
🏗️ 适配器模式UML类图
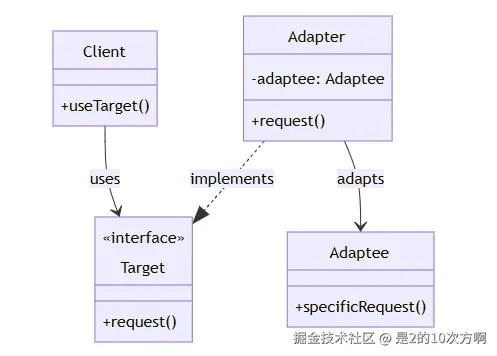
1.1 🎭 什么是适配器模式?
一句话理解:让不兼容的接口能够一起工作,就像电源适配器一样!
定义:将一个类的接口转换成客户希望的另外一个接口。适配器模式使得原本由于接口不兼容而不能一起工作的那些类可以一起工作。
应用场景:系统集成、第三方库适配、遗留系统改造、数据格式转换
1.2 🛠️ 适配器模式的实现方式
| 实现方式 | 特点 | 推荐度 |
|---|---|---|
| 类适配器 | 使用继承,简单直接 | ⭐⭐⭐ |
| 对象适配器 | 使用组合,更灵活 | ⭐⭐⭐⭐⭐ |
| 接口适配器 | 适配多个接口 | ⭐⭐⭐⭐ |
1.3 🛠️ 适配器模式的实现
1.3.1 🏗️ 类适配器模式
💡 小贴士:就像你继承了你爸爸的基因一样,类适配器通过继承来获得被适配类的功能!
特点:使用继承,简单直接,但不够灵活
csharp
// 目标接口
public interface Target {
    void request();
}

// 被适配的类
public class Adaptee {
    public void specificRequest() {
        System.out.println("被适配类的特殊请求");
    }
}

// 类适配器
public class ClassAdapter extends Adaptee implements Target {
    @Override
    public void request() {
        // 调用被适配类的方法
        specificRequest();
    }
}
1.3.2 🔗 对象适配器模式
💡 小贴士:就像你雇佣了一个翻译一样,对象适配器通过组合来使用被适配对象的功能!
特点:使用组合,更灵活,推荐使用
java
// 对象适配器
public class ObjectAdapter implements Target {
    private Adaptee adaptee;

    public ObjectAdapter(Adaptee adaptee) {
        this.adaptee = adaptee;
    }

    @Override
    public void request() {
        // 调用被适配对象的方法
        adaptee.specificRequest();
    }
}
1.4 🎯 实际应用示例
1.4.1 📝 日志系统适配器
💡 场景:你的新系统需要新的日志接口,但旧系统还在使用旧的日志接口,怎么办?
问题:新旧日志接口不兼容
typescript
// 新的日志接口
public interface NewLogger {
    void log(String message);
    void error(String message);
    void warn(String message);
}

// 旧的日志系统
public class OldLogger {
    public void logMessage(String message) {
        System.out.println("旧日志系统: " + message);
    }

    public void logError(String message) {
        System.err.println("旧日志系统错误: " + message);
    }
}

// 适配器
public class LoggerAdapter implements NewLogger {
    private OldLogger oldLogger;

    public LoggerAdapter(OldLogger oldLogger) {
        this.oldLogger = oldLogger;
    }

    @Override
    public void log(String message) {
        oldLogger.logMessage(message);
    }

    @Override
    public void error(String message) {
        oldLogger.logError(message);
    }

    @Override
    public void warn(String message) {
        oldLogger.logMessage("警告: " + message);
    }
}使用示例:
arduino
public class Client {
    public static void main(String[] args) {
        // 使用适配器
        OldLogger oldLogger = new OldLogger();
        NewLogger newLogger = new LoggerAdapter(oldLogger);

        // 新接口调用
        newLogger.log("这是一条日志");
        newLogger.error("这是一条错误");
        newLogger.warn("这是一条警告");
    }
}
🎨 第二部分:装饰器模式(Decorator Pattern)
arduino
🎨 装饰器侠的登场 🎨
┌─────────────────────────────────────┐
│  🎨 装饰器侠:我是功能化妆师!      │
│                                     │
│  ☕ 咖啡:"我要加糖!"               │
│  🎨 装饰器侠:"我来装饰!"          │
│  ☕ 咖啡:"我还要加牛奶!"           │
│  🎨 装饰器侠:"继续装饰!"          │
│                                     │
│  💡 核心思想:动态添加功能          │
└─────────────────────────────────────┘
🏗️ 装饰器模式UML类图
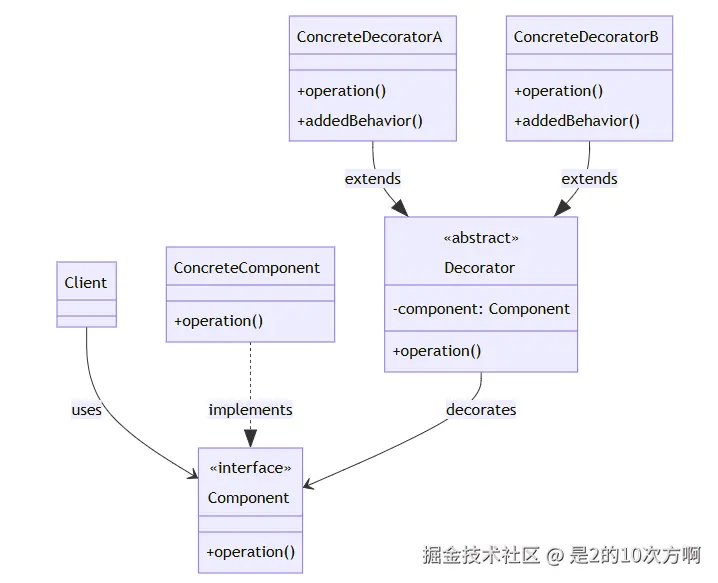
2.1 🎭 什么是装饰器模式?
一句话理解:动态地给对象添加功能,就像给咖啡加糖加奶一样!
定义:动态地给对象添加一些额外的职责,就增加功能来说,装饰器模式比生成子类更为灵活。
应用场景:功能扩展、避免子类爆炸、横切关注点(缓存、日志、权限)
2.2 🛠️ 装饰器模式的实现
2.2.1 🏗️ 基本结构
💡 小贴士:装饰器模式就像一个俄罗斯套娃,每个装饰器都包装着另一个组件!
核心组件:
- Component(组件) :被装饰的对象接口
- ConcreteComponent(具体组件) :被装饰的具体对象
- Decorator(装饰器) :装饰器抽象类
- ConcreteDecorator(具体装饰器) :具体的装饰器实现
java
// 抽象组件
public interface Component {
    void operation();
}

// 具体组件
public class ConcreteComponent implements Component {
    @Override
    public void operation() {
        System.out.println("具体组件的操作");
    }
}

// 抽象装饰器
public abstract class Decorator implements Component {
    protected Component component;

    public Decorator(Component component) {
        this.component = component;
    }

    @Override
    public void operation() {
        component.operation();
    }
}

// 具体装饰器A
public class ConcreteDecoratorA extends Decorator {
    public ConcreteDecoratorA(Component component) {
        super(component);
    }

    @Override
    public void operation() {
        super.operation();
        addedBehavior();
    }

    private void addedBehavior() {
        System.out.println("装饰器A添加的行为");
    }
}
2.3 🎯 实际应用示例
2.3.1 ☕ 咖啡装饰器
💡 场景:咖啡店需要为不同的咖啡添加不同的配料,每种配料都会影响价格和描述!
问题:如何灵活地为咖啡添加不同的配料?
typescript
// 咖啡接口
public interface Coffee {
    double getCost();
    String getDescription();
}

// 基础咖啡
public class SimpleCoffee implements Coffee {
    @Override
    public double getCost() {
        return 10.0;
    }

    @Override
    public String getDescription() {
        return "简单咖啡";
    }
}

// 咖啡装饰器抽象类
public abstract class CoffeeDecorator implements Coffee {
    protected Coffee coffee;

    public CoffeeDecorator(Coffee coffee) {
        this.coffee = coffee;
    }

    @Override
    public double getCost() {
        return coffee.getCost();
    }

    @Override
    public String getDescription() {
        return coffee.getDescription();
    }
}

// 牛奶装饰器
public class MilkDecorator extends CoffeeDecorator {
    public MilkDecorator(Coffee coffee) {
        super(coffee);
    }

    @Override
    public double getCost() {
        return super.getCost() + 2.0;
    }

    @Override
    public String getDescription() {
        return super.getDescription() + ", 加牛奶";
    }
}

// 糖装饰器
public class SugarDecorator extends CoffeeDecorator {
    public SugarDecorator(Coffee coffee) {
        super(coffee);
    }

    @Override
    public double getCost() {
        return super.getCost() + 1.0;
    }

    @Override
    public String getDescription() {
        return super.getDescription() + ", 加糖";
    }
}使用示例:
csharp
public class CoffeeShop {
    public static void main(String[] args) {
        // 基础咖啡
        Coffee coffee = new SimpleCoffee();
        System.out.println("价格: " + coffee.getCost() + ", 描述: " + coffee.getDescription());

        // 加牛奶
        coffee = new MilkDecorator(coffee);
        System.out.println("价格: " + coffee.getCost() + ", 描述: " + coffee.getDescription());

        // 再加糖
        coffee = new SugarDecorator(coffee);
        System.out.println("价格: " + coffee.getCost() + ", 描述: " + coffee.getDescription());
    }
}
🛡️ 第三部分:代理模式(Proxy Pattern)
arduino
🛡️ 代理侠的登场 🛡️
┌─────────────────────────────────────┐
│  🛡️ 代理侠:我是访问控制专家!      │
│                                     │
│  👤 客户:"我要租房!"               │
│  🛡️ 代理侠:"我来帮你!"            │
│  👤 客户:"我要见房东!"             │
│  🛡️ 代理侠:"通过我就可以了!"      │
│                                     │
│  💡 核心思想:控制对象访问           │
└─────────────────────────────────────┘
🏗️ 代理模式UML类图

3.1 🎭 什么是代理模式?
一句话理解:为对象提供一个代理,控制对这个对象的访问!
定义:为其他对象提供一种代理以控制对这个对象的访问。
应用场景:远程代理、虚拟代理、保护代理、缓存代理
3.2 🛠️ 代理模式的实现
3.2.1 🏗️ 基本结构
💡 小贴士:代理模式就像一个保镖,在客户和真实对象之间提供保护和控制!
核心组件:
- Subject(主题) :抽象接口
- RealSubject(真实主题) :被代理的真实对象
- Proxy(代理) :代理对象,控制对真实对象的访问
csharp
// 抽象主题
public interface Subject {
    void request();
}

// 真实主题
public class RealSubject implements Subject {
    @Override
    public void request() {
        System.out.println("真实主题的请求");
    }
}

// 代理
public class Proxy implements Subject {
    private RealSubject realSubject;

    public Proxy() {
        this.realSubject = new RealSubject();
    }

    @Override
    public void request() {
        // 前置处理
        preRequest();

        // 调用真实主题
        realSubject.request();

        // 后置处理
        postRequest();
    }

    private void preRequest() {
        System.out.println("代理前置处理");
    }

    private void postRequest() {
        System.out.println("代理后置处理");
    }
}
3.3 🎯 实际应用示例
3.3.1 🖼️ 虚拟代理(延迟加载)
💡 场景:图片加载很慢,但用户可能不会查看所有图片,如何优化?
问题:如何实现图片的延迟加载?
typescript
// 图片接口
public interface Image {
    void display();
}

// 真实图片
public class RealImage implements Image {
    private String filename;

    public RealImage(String filename) {
        this.filename = filename;
        loadFromDisk();
    }

    private void loadFromDisk() {
        System.out.println("加载图片: " + filename);
    }

    @Override
    public void display() {
        System.out.println("显示图片: " + filename);
    }
}

// 虚拟代理
public class ProxyImage implements Image {
    private RealImage realImage;
    private String filename;

    public ProxyImage(String filename) {
        this.filename = filename;
    }

    @Override
    public void display() {
        if (realImage == null) {
            realImage = new RealImage(filename);
        }
        realImage.display();
    }
}使用示例:
arduino
public class ImageViewer {
    public static void main(String[] args) {
        // 创建代理,此时不会加载图片
        Image image = new ProxyImage("photo.jpg");

        // 第一次显示时才会加载
        image.display();

        // 第二次显示时直接使用已加载的图片
        image.display();
    }
}
3.3.2 🔒 保护代理
💡 场景:不同用户有不同的权限,如何控制对敏感资源的访问?
问题:如何实现基于角色的访问控制?
csharp
// 用户接口
public interface User {
    void accessResource();
}

// 真实用户
public class RealUser implements User {
    private String role;

    public RealUser(String role) {
        this.role = role;
    }

    @Override
    public void accessResource() {
        System.out.println("用户访问资源");
    }

    public String getRole() {
        return role;
    }
}

// 保护代理
public class ProtectionProxy implements User {
    private RealUser realUser;

    public ProtectionProxy(RealUser realUser) {
        this.realUser = realUser;
    }

    @Override
    public void accessResource() {
        if ("admin".equals(realUser.getRole())) {
            realUser.accessResource();
        } else {
            System.out.println("权限不足,无法访问资源");
        }
    }
}使用示例:
java
public class AccessControl {
    public static void main(String[] args) {
        // 管理员用户
        RealUser admin = new RealUser("admin");
        User adminProxy = new ProtectionProxy(admin);
        adminProxy.accessResource(); // 可以访问

        // 普通用户
        RealUser user = new RealUser("user");
        User userProxy = new ProtectionProxy(user);
        userProxy.accessResource(); // 权限不足
    }
}
🌉 第四部分:桥接模式(Bridge Pattern)
arduino
🌉 桥接侠的登场 🌉
┌─────────────────────────────────────┐
│  🌉 桥接侠:我是抽象实现分离专家!  │
│                                     │
│  📱 遥控器:"我要控制电视!"        │
│  🌉 桥接侠:"我来桥接!"            │
│  📱 遥控器:"我要控制空调!"        │
│  🌉 桥接侠:"还是我来桥接!"        │
│                                     │
│  💡 核心思想:分离抽象和实现        │
└─────────────────────────────────────┘
🏗️ 桥接模式UML类图
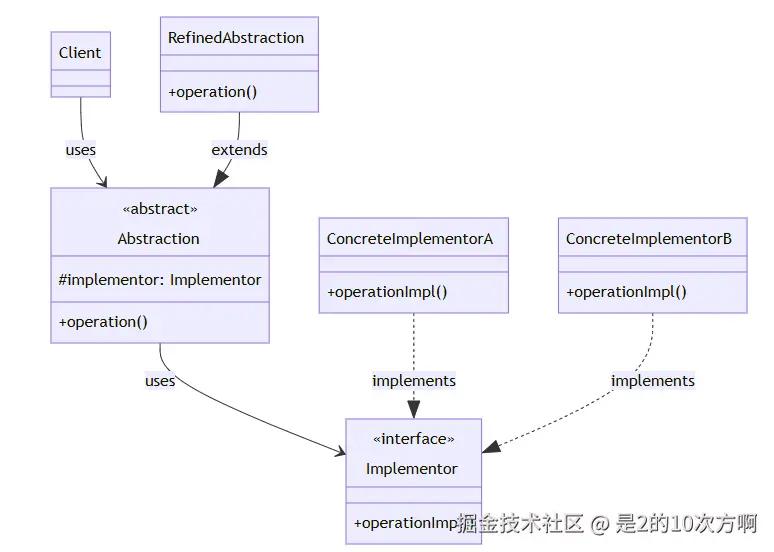
4.1 🎭 什么是桥接模式?
一句话理解:将抽象和实现分离,让它们可以独立变化!
定义:将抽象部分与实现部分分离,使它们都可以独立地变化。
应用场景:多维度变化、抽象实现分离、运行时切换实现
4.2 🛠️ 桥接模式的实现
4.2.1 🏗️ 基本结构
💡 小贴士:桥接模式就像一座桥,连接抽象和实现,让它们可以独立变化!
核心组件:
- Abstraction(抽象) :抽象类,持有实现者的引用
- RefinedAbstraction(精确抽象) :具体的抽象类
- Implementor(实现者) :实现接口
- ConcreteImplementor(具体实现者) :具体的实现类
csharp
// 实现接口
public interface Implementor {
    void operationImpl();
}

// 具体实现A
public class ConcreteImplementorA implements Implementor {
    @Override
    public void operationImpl() {
        System.out.println("具体实现A的操作");
    }
}

// 具体实现B
public class ConcreteImplementorB implements Implementor {
    @Override
    public void operationImpl() {
        System.out.println("具体实现B的操作");
    }
}

// 抽象类
public abstract class Abstraction {
    protected Implementor implementor;

    public Abstraction(Implementor implementor) {
        this.implementor = implementor;
    }

    public abstract void operation();
}

// 精确抽象
public class RefinedAbstraction extends Abstraction {
    public RefinedAbstraction(Implementor implementor) {
        super(implementor);
    }

    @Override
    public void operation() {
        System.out.println("精确抽象的操作");
        implementor.operationImpl();
    }
}
4.3 🎯 实际应用示例
4.3.1 🎨 图形绘制系统
💡 场景:需要支持不同形状和不同颜色的绘制,如何避免类的爆炸性增长?
问题:如何分离形状和颜色的变化?
java
// 绘制接口
public interface DrawAPI {
    void drawCircle(int radius, int x, int y);
    void drawRectangle(int width, int height, int x, int y);
}

// 红色绘制实现
public class RedDrawAPI implements DrawAPI {
    @Override
    public void drawCircle(int radius, int x, int y) {
        System.out.println("绘制红色圆形,半径: " + radius + ", 位置: (" + x + "," + y + ")");
    }

    @Override
    public void drawRectangle(int width, int height, int x, int y) {
        System.out.println("绘制红色矩形,宽: " + width + ", 高: " + height + ", 位置: (" + x + "," + y + ")");
    }
}

// 绿色绘制实现
public class GreenDrawAPI implements DrawAPI {
    @Override
    public void drawCircle(int radius, int x, int y) {
        System.out.println("绘制绿色圆形,半径: " + radius + ", 位置: (" + x + "," + y + ")");
    }

    @Override
    public void drawRectangle(int width, int height, int x, int y) {
        System.out.println("绘制绿色矩形,宽: " + width + ", 高: " + height + ", 位置: (" + x + "," + y + ")");
    }
}

// 形状抽象类
public abstract class Shape {
    protected DrawAPI drawAPI;

    public Shape(DrawAPI drawAPI) {
        this.drawAPI = drawAPI;
    }

    public abstract void draw();
}

// 圆形
public class Circle extends Shape {
    private int x, y, radius;

    public Circle(int x, int y, int radius, DrawAPI drawAPI) {
        super(drawAPI);
        this.x = x;
        this.y = y;
        this.radius = radius;
    }

    @Override
    public void draw() {
        drawAPI.drawCircle(radius, x, y);
    }
}

// 矩形
public class Rectangle extends Shape {
    private int x, y, width, height;

    public Rectangle(int x, int y, int width, int height, DrawAPI drawAPI) {
        super(drawAPI);
        this.x = x;
        this.y = y;
        this.width = width;
        this.height = height;
    }

    @Override
    public void draw() {
        drawAPI.drawRectangle(width, height, x, y);
    }
}使用示例:
java
public class DrawingDemo {
    public static void main(String[] args) {
        // 红色圆形
        Shape redCircle = new Circle(100, 100, 10, new RedDrawAPI());
        redCircle.draw();

        // 绿色矩形
        Shape greenRectangle = new Rectangle(100, 100, 20, 20, new GreenDrawAPI());
        greenRectangle.draw();
    }
}
🌳 第五部分:组合模式(Composite Pattern)
arduino
🌳 组合侠的登场 🌳
┌─────────────────────────────────────┐
│  🌳 组合侠:我是树形结构专家!      │
│                                     │
│  📁 文件夹:"我要包含文件!"        │
│  🌳 组合侠:"我来组合!"            │
│  📁 文件夹:"我还要包含文件夹!"     │
│  🌳 组合侠:"还是我来组合!"        │
│                                     │
│  💡 核心思想:统一处理树形结构      │
└─────────────────────────────────────┘
🏗️ 组合模式UML类图
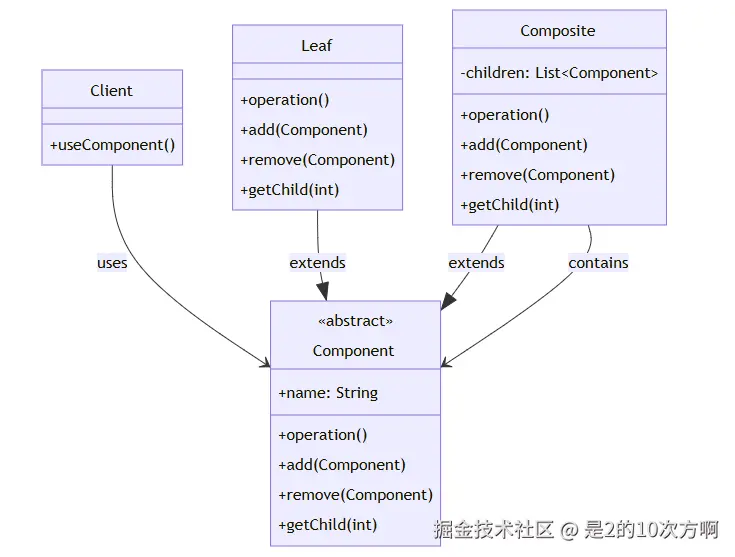
5.1 🎭 什么是组合模式?
一句话理解:将对象组合成树形结构,统一处理单个对象和组合对象!
定义:将对象组合成树形结构以表示"部分-整体"的层次结构。组合模式使得用户对单个对象和组合对象的使用具有一致性。
应用场景:树形结构、部分-整体层次结构、文件系统、菜单系统
5.2 🛠️ 组合模式的实现
5.2.1 🏗️ 基本结构
💡 小贴士:组合模式就像一个家族树,每个节点都可以是叶子(没有子节点)或分支(有子节点)!
核心组件:
- Component(组件) :抽象基类,定义叶子节点和组合节点的公共接口
- Leaf(叶子) :叶子节点,没有子节点
- Composite(组合) :组合节点,有子节点
java
// 抽象组件
public abstract class Component {
    protected String name;

    public Component(String name) {
        this.name = name;
    }

    public abstract void operation();
    public abstract void add(Component component);
    public abstract void remove(Component component);
    public abstract Component getChild(int index);
}

// 叶子节点
public class Leaf extends Component {
    public Leaf(String name) {
        super(name);
    }

    @Override
    public void operation() {
        System.out.println("叶子节点: " + name);
    }

    @Override
    public void add(Component component) {
        throw new UnsupportedOperationException("叶子节点不能添加子节点");
    }

    @Override
    public void remove(Component component) {
        throw new UnsupportedOperationException("叶子节点不能删除子节点");
    }

    @Override
    public Component getChild(int index) {
        throw new UnsupportedOperationException("叶子节点没有子节点");
    }
}

// 复合节点
public class Composite extends Component {
    private List<Component> children = new ArrayList<>();

    public Composite(String name) {
        super(name);
    }

    @Override
    public void operation() {
        System.out.println("复合节点: " + name);
        for (Component child : children) {
            child.operation();
        }
    }

    @Override
    public void add(Component component) {
        children.add(component);
    }

    @Override
    public void remove(Component component) {
        children.remove(component);
    }

    @Override
    public Component getChild(int index) {
        return children.get(index);
    }
}
5.3 🎯 实际应用示例
5.3.1 📁 文件系统
💡 场景:需要实现一个文件系统,支持文件和文件夹的树形结构!
问题:如何统一处理文件和文件夹?
java
// 文件系统组件
public abstract class FileSystemComponent {
    protected String name;

    public FileSystemComponent(String name) {
        this.name = name;
    }

    public abstract void display(int depth);
    public abstract long getSize();
}

// 文件
public class File extends FileSystemComponent {
    private long size;

    public File(String name, long size) {
        super(name);
        this.size = size;
    }

    @Override
    public void display(int depth) {
        String indent = "  ".repeat(depth);
        System.out.println(indent + "文件: " + name + " (" + size + " bytes)");
    }

    @Override
    public long getSize() {
        return size;
    }
}

// 文件夹
public class Directory extends FileSystemComponent {
    private List<FileSystemComponent> children = new ArrayList<>();

    public Directory(String name) {
        super(name);
    }

    public void add(FileSystemComponent component) {
        children.add(component);
    }

    public void remove(FileSystemComponent component) {
        children.remove(component);
    }

    @Override
    public void display(int depth) {
        String indent = "  ".repeat(depth);
        System.out.println(indent + "文件夹: " + name);
        for (FileSystemComponent child : children) {
            child.display(depth + 1);
        }
    }

    @Override
    public long getSize() {
        long totalSize = 0;
        for (FileSystemComponent child : children) {
            totalSize += child.getSize();
        }
        return totalSize;
    }
}使用示例:
csharp
public class FileSystemDemo {
    public static void main(String[] args) {
        // 创建文件系统结构
        Directory root = new Directory("根目录");

        Directory documents = new Directory("文档");
        documents.add(new File("报告.txt", 1024));
        documents.add(new File("简历.pdf", 2048));

        Directory pictures = new Directory("图片");
        pictures.add(new File("照片1.jpg", 5120));
        pictures.add(new File("照片2.jpg", 6144));

        root.add(documents);
        root.add(pictures);

        // 显示文件系统结构
        root.display(0);
        System.out.println("总大小: " + root.getSize() + " bytes");
    }
}
🏛️ 第六部分:外观模式(Facade Pattern)
arduino
🏛️ 外观侠的登场 🏛️
┌─────────────────────────────────────┐
│  🏛️ 外观侠:我是系统简化专家!      │
│                                     │
│  👤 客人:"我要入住!"               │
│  🏛️ 外观侠:"我来帮你!"            │
│  👤 客人:"我要订餐!"               │
│  🏛️ 外观侠:"还是我来帮你!"        │
│                                     │
│  💡 核心思想:简化复杂系统           │
└─────────────────────────────────────┘
🏗️ 外观模式UML类图
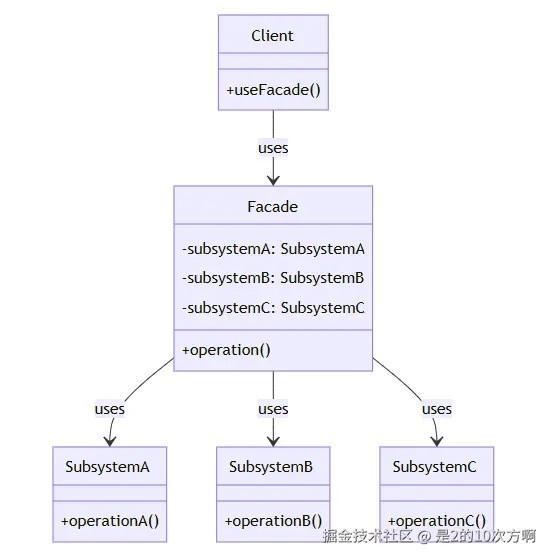
6.1 🎭 什么是外观模式?
一句话理解:为复杂系统提供一个简单的接口,就像酒店前台一样!
定义:为子系统中的一组接口提供一个一致的界面,外观模式定义了一个高层接口,这个接口使得这一子系统更加容易使用。
应用场景:简化复杂系统、降低耦合度、统一接口、分层架构
6.2 🛠️ 外观模式的实现
6.2.1 🏗️ 基本结构
💡 小贴士:外观模式就像一个总指挥,协调各个子系统完成复杂的任务!
核心组件:
- Facade(外观) :为子系统提供统一接口
- Subsystem(子系统) :复杂的子系统组件
csharp
// 子系统A
public class SubsystemA {
    public void operationA() {
        System.out.println("子系统A的操作");
    }
}

// 子系统B
public class SubsystemB {
    public void operationB() {
        System.out.println("子系统B的操作");
    }
}

// 子系统C
public class SubsystemC {
    public void operationC() {
        System.out.println("子系统C的操作");
    }
}

// 外观类
public class Facade {
    private SubsystemA subsystemA;
    private SubsystemB subsystemB;
    private SubsystemC subsystemC;

    public Facade() {
        subsystemA = new SubsystemA();
        subsystemB = new SubsystemB();
        subsystemC = new SubsystemC();
    }

    public void operation() {
        System.out.println("外观模式统一操作:");
        subsystemA.operationA();
        subsystemB.operationB();
        subsystemC.operationC();
    }
}
6.3 🎯 实际应用示例
6.3.1 💻 计算机启动外观
💡 场景:计算机启动需要协调CPU、内存、硬盘等多个子系统,如何简化这个过程?
问题:如何简化复杂的计算机启动过程?
csharp
// CPU子系统
public class CPU {
    public void freeze() {
        System.out.println("CPU冻结");
    }

    public void jump(long position) {
        System.out.println("CPU跳转到位置: " + position);
    }

    public void execute() {
        System.out.println("CPU执行");
    }
}

// 内存子系统
public class Memory {
    public void load(long position, byte[] data) {
        System.out.println("内存加载数据到位置: " + position);
    }
}

// 硬盘子系统
public class HardDrive {
    public byte[] read(long lba, int size) {
        System.out.println("硬盘读取数据,LBA: " + lba + ", 大小: " + size);
        return new byte[size];
    }
}

// 计算机外观
public class ComputerFacade {
    private CPU cpu;
    private Memory memory;
    private HardDrive hardDrive;

    public ComputerFacade() {
        cpu = new CPU();
        memory = new Memory();
        hardDrive = new HardDrive();
    }

    public void start() {
        System.out.println("计算机启动过程:");
        cpu.freeze();
        memory.load(0, hardDrive.read(0, 1024));
        cpu.jump(0);
        cpu.execute();
        System.out.println("计算机启动完成");
    }
}使用示例:
typescript
public class ComputerDemo {
    public static void main(String[] args) {
        // 使用外观模式启动计算机
        ComputerFacade computer = new ComputerFacade();
        computer.start();
    }
}
🦋 第七部分:享元模式(Flyweight Pattern)
arduino
🦋 享元侠的登场 🦋
┌─────────────────────────────────────┐
│  🦋 享元侠:我是内存优化专家!      │
│                                     │
│  📚 读者:"我要借书!"              │
│  🦋 享元侠:"我来共享!"            │
│  📚 读者:"我也要借同样的书!"      │
│  🦋 享元侠:"还是同一本!"          │
│                                     │
│  💡 核心思想:共享细粒度对象        │
└─────────────────────────────────────┘
🏗️ 享元模式UML类图
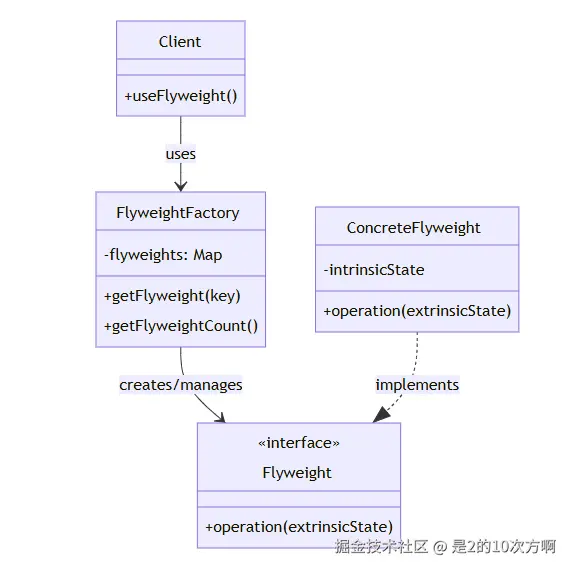
7.1 🎭 什么是享元模式?
一句话理解:共享细粒度对象,减少内存占用!
定义:运用共享技术有效地支持大量细粒度对象的复用。
应用场景:大量相似对象、内存优化、对象池、字符串池
7.2 🛠️ 享元模式的实现
7.2.1 🏗️ 基本结构
💡 小贴士:享元模式就像一个图书馆,相同的书只买一本,多个读者共享!
核心组件:
- Flyweight(享元) :抽象享元接口
- ConcreteFlyweight(具体享元) :具体的享元实现
- FlyweightFactory(享元工厂) :管理享元对象的创建和共享
typescript
// 享元接口
public interface Flyweight {
    void operation(String extrinsicState);
}

// 具体享元
public class ConcreteFlyweight implements Flyweight {
    private String intrinsicState;

    public ConcreteFlyweight(String intrinsicState) {
        this.intrinsicState = intrinsicState;
    }

    @Override
    public void operation(String extrinsicState) {
        System.out.println("具体享元: " + intrinsicState + ", 外部状态: " + extrinsicState);
    }
}

// 享元工厂
public class FlyweightFactory {
    private Map<String, Flyweight> flyweights = new HashMap<>();

    public Flyweight getFlyweight(String key) {
        Flyweight flyweight = flyweights.get(key);
        if (flyweight == null) {
            flyweight = new ConcreteFlyweight(key);
            flyweights.put(key, flyweight);
        }
        return flyweight;
    }

    public int getFlyweightCount() {
        return flyweights.size();
    }
}
7.3 🎯 实际应用示例
7.3.1 📝 字符享元
💡 场景:文本编辑器需要显示大量字符,如何优化内存使用?
问题:如何减少重复字符的内存占用?
arduino
// 字符享元
public class Character {
    private char symbol;
    private String font;
    private int size;

    public Character(char symbol, String font, int size) {
        this.symbol = symbol;
        this.font = font;
        this.size = size;
    }

    public void display(int x, int y) {
        System.out.println("字符: " + symbol + ", 字体: " + font + ", 大小: " + size + ", 位置: (" + x + "," + y + ")");
    }
}

// 字符工厂
public class CharacterFactory {
    private Map<String, Character> characters = new HashMap<>();

    public Character getCharacter(char symbol, String font, int size) {
        String key = symbol + font + size;
        Character character = characters.get(key);
        if (character == null) {
            character = new Character(symbol, font, size);
            characters.put(key, character);
        }
        return character;
    }

    public int getCharacterCount() {
        return characters.size();
    }
}

// 文本编辑器
public class TextEditor {
    private CharacterFactory characterFactory;
    private List<Character> characters = new ArrayList<>();

    public TextEditor() {
        characterFactory = new CharacterFactory();
    }

    public void addCharacter(char symbol, String font, int size, int x, int y) {
        Character character = characterFactory.getCharacter(symbol, font, size);
        characters.add(character);
        character.display(x, y);
    }

    public int getUniqueCharacterCount() {
        return characterFactory.getCharacterCount();
    }
}使用示例:
typescript
public class TextEditorDemo {
    public static void main(String[] args) {
        TextEditor editor = new TextEditor();

        // 添加相同的字符,但位置不同
        editor.addCharacter('A', "Arial", 12, 0, 0);
        editor.addCharacter('A', "Arial", 12, 10, 0);
        editor.addCharacter('A', "Arial", 12, 20, 0);

        // 添加不同的字符
        editor.addCharacter('B', "Arial", 12, 30, 0);

        System.out.println("唯一字符数量: " + editor.getUniqueCharacterCount());
    }
}
🎉 总结:结构型设计模式的智慧结晶
🏆 七位架构魔法师的完美谢幕 🏆
┌─────────────────────────────────────┐
│  🎭 我们学会了什么?               │
│                                     │
│  🔌 适配器侠:让不兼容的接口兼容    │
│  🎨 装饰器侠:动态添加功能          │
│  🛡️ 代理侠:控制对象访问            │
│  🌉 桥接侠:分离抽象和实现          │
│  🌳 组合侠:统一处理树形结构        │
│  🏛️ 外观侠:简化复杂系统            │
│  🦋 享元侠:共享细粒度对象          │
│                                     │
│  🚀 现在你也是架构魔法师了!        │
└─────────────────────────────────────┘
🎯 各模式的特点与选择指南
| 模式 | 核心特点 | 适用场景 | 推荐度 |
|---|---|---|---|
| 🔌 适配器模式 | 转换接口,使不兼容的类可以一起工作 | 系统集成、第三方库适配、遗留系统改造 | ⭐⭐⭐⭐⭐ |
| 🎨 装饰器模式 | 动态添加功能,避免子类爆炸 | 功能扩展、横切关注点、避免继承爆炸 | ⭐⭐⭐⭐⭐ |
| 🛡️ 代理模式 | 控制对象访问,提供额外功能 | 远程代理、虚拟代理、保护代理、缓存代理 | ⭐⭐⭐⭐⭐ |
| 🌉 桥接模式 | 分离抽象和实现,支持多维度变化 | 多维度变化、抽象实现分离、运行时切换 | ⭐⭐⭐⭐ |
| 🌳 组合模式 | 统一处理单个对象和组合对象 | 树形结构、部分-整体层次结构、文件系统 | ⭐⭐⭐⭐ |
| 🏛️ 外观模式 | 简化复杂系统的使用 | 简化复杂系统、降低耦合度、统一接口 | ⭐⭐⭐⭐ |
| 🦋 享元模式 | 共享细粒度对象,减少内存占用 | 大量相似对象、内存优化、对象池 | ⭐⭐⭐ |
💡 实践要点与最佳实践
🎯 选择策略
- 理解场景:根据具体需求选择合适的设计模式
- 避免过度设计:不是所有地方都需要使用设计模式
- 考虑性能:设计模式可能带来一定的性能开销
- 保持简单:优先选择简单的解决方案
🚀 实战建议
- 从简单开始:先尝试最简单的解决方案
- 渐进式重构:在需要时逐步引入设计模式
- 团队协作:确保团队成员都理解设计模式的使用
- 文档记录:记录设计模式的使用原因和效果
🌟 结语
通过深入理解这七种结构型设计模式,我们掌握了"代码架构的魔法":
- 适配器模式教会我们如何让不兼容的接口和谐共处
- 装饰器模式让我们学会动态扩展功能而不破坏原有结构
- 代理模式帮助我们控制对象访问,提供额外的保护层
- 桥接模式让我们学会分离抽象和实现,支持灵活的变化
- 组合模式教会我们如何统一处理复杂的树形结构
- 外观模式让我们学会简化复杂系统,提供友好的接口
- 享元模式帮助我们优化内存使用,提高系统性能
记住,设计模式不是银弹,而是工具箱中的利器。在实际项目中,要根据具体需求灵活运用,让代码既优雅又实用!
🎭 下一站预告:准备好迎接行为型设计模式的挑战了吗?让我们继续探索设计模式的奇妙世界!🚀
本文使用 markdown.com.cn 排版