写在开头
Hello,各位UU们好呀!
今是2025年08月03日上午10点,天挺黑,雨不停,这个周末基本没出门,吃饭全靠外卖。。。
然后,周末还尝了一下朋友给的自己泡的黄酒,挺辣的,说是喝了能生男孩....反正我是不信的。😂

回到正题,本次要分享的是关于在日期&日历组件,请诸君按需食用哈。
🎯需求背景
咱们在日常开发中,日期或日历组件几乎是每个前端开发者都会遇到的需求。
大多数时候我们的项目中肯定有一个组件库,如element-plus, antd 等等,这些组件库基本都是有日期这类标配组件,或者市面上也有很多现成库,能够轻松解决这类需求。
但是,如遇到比较有理想的产品经理时🤔,现成组件或魔改组件库可能都无法满足,此时自定义组件就很有必要。日期组件开发细节非常多,看似麻烦,但我们可以 "抽繁寻简",先聚焦解决其核心部分,接下来咱就一起来开启这段奇妙旅程吧,嘿嘿。
🚀基础教学
第一步:搭建基础HTML结构
咱们从最简单的布局来看,为了简单好理解,结构直接复制就行哈。
html
<!DOCTYPE html>
<html>
<body>
    <div class="calendar-wrapper">
        <h1>2025年08月</h1>
        <ul class="calendar">
            <li class="weekday">一</li>
            <li class="weekday">二</li>
            <li class="weekday">三</li>
            <li class="weekday">四</li>
            <li class="weekday">五</li>
            <li class="weekday">六</li>
            <li class="weekday">日</li>

            <li class="first-day">1</li>
            <li>2</li>
            <li class="today">3</li>
            <li>4</li>
            <li>5</li>
            <!-- 更多日期... -->
            <li>31</li>
        </ul>
    </div>
</body>
</html>
这里小编用了 ul 和 li 标签来构建日期结构,让它语义化更好,也便于 CSS Grid 布局。
第二步:CSS Grid 布局
样式咱们这里我们采用 Grid 布局,它能够快速来完成所需布局,其他方式当然也可以,如 Flex 等。
css
body {
padding: 0;
margin: 0;
display: flex;
justify-content: center;
align-items: center;
}
.calendar-wrapper {
border-radius: 20px;
padding: 30px;
box-shadow: 0 20px 40px rgba(0, 0, 0, 0.2);
width: 400px;
margin-top: 100px;
}
h1 {
text-align: center;
color: #333;
margin-bottom: 20px;
margin-top: 0;
}
/* 🎯 核心Grid布局 - 就这3行! */
.calendar {
display: grid;
grid-template-columns: repeat(7, 1fr);
gap: 1px;
list-style: none;
padding: 0;
margin: 0;
}
/* 8月1日从星期四开始 */
.first-day {
grid-column-start: 5;
}
.calendar li {
aspect-ratio: 1; /* 保持正方形 */
display: flex;
align-items: center;
justify-content: center;
border-radius: 8px;
font-weight: 500;
transition: all 0.2s ease;
}
.weekday {
background-color: #190f01;
color: #fff;
margin-bottom: 2px;
}
.calendar li:not(.weekday):hover {
background-color: #f4b225;
color: #fff;
transform: scale(1.1);
cursor: pointer;
}
.today {
background-color: #f4b225;
color: #fff;
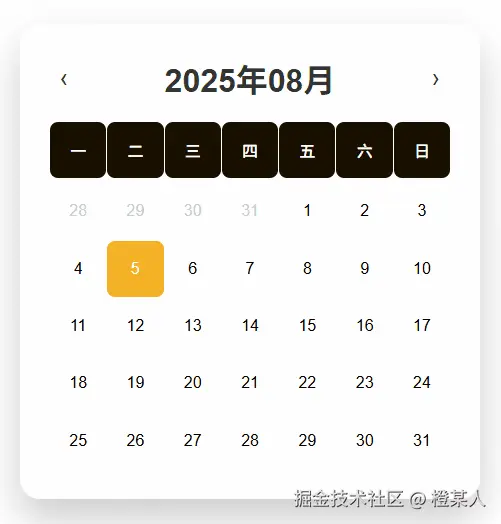
}效果:

非常简单的就完成日期组件的布局!🎉 核心就五行代码:
display: grid: 启用 Grid 布局grid-template-columns: repeat(7, 1fr): 创建7列等宽布局(一周7天)。gap: 1px: 设置网格间距。aspect-ratio: 1:让每个日期格子保持正方形,无论屏幕大小如何变化都能保持完美比例!✨grid-column-start: 5:让月份的第一天从正确的星期位置开始显示。比如8月1日是星期五,那就从第5列开始!
⚡高级教学
静态日历的基本布局就此完成啦,接下来,咱们用上 JS 来给它注入点灵魂。
我们要完成的功能有📜:
- 动态来生成 HTML 结构。
- 补全当前月份的上下月份的天数。
- 切换月份。
- 选择日期。
首先,我们需要一个更完整的HTML结构:
html
<div class="calendar-wrapper">
    <div class="header">
        <span class="arrow" id="prevMonth">‹</span>
        <h1 id="monthYear"></h1>
        <span class="arrow" id="nextMonth">›</span>
    </div>
    <ul class="calendar" id="calendar"></ul>
</div>
<div class="selected-date-info" id="selectedDateInfo">点击日期进行选择</div>
样式调整:
css
.header {
    display: flex;
    align-items: center;
    justify-content: space-between;
    margin-bottom: 20px;
}
h1 {
    text-align: center;
    color: #333;
    margin: 0;
    flex: 1;
}
.arrow {
    cursor: pointer;
    font-size: 24px;
    color: #333;
    padding: 10px;
    border-radius: 50%;
    transition: all 0.2s ease;
    user-select: none;
}
.other-month {
    color: #ccc;
}
.other-month:hover {
    background-color: #e0e0e0;
    color: #666;
}然后,JS 的核心代码,这里小编采用了 ES6 的 class 语法:
js
/**
* @name 日历类,用于生成和管理日期或日历相关的功能
*/
class Calendar {
constructor() {
this.currentDate = new Date();
this.today = new Date();
this.monthNames = [
'01月', '02月', '03月', '04月', '05月', '06月',
'07月', '08月', '09月', '10月', '11月', '12月'
];
this.weekdays = ['一', '二', '三', '四', '五', '六', '日'];
this.init();
}
/** @name 初始化 **/
init() {
this.bindEvents();
this.render();
}
/** @name 绑定事件 **/
bindEvents() {
document.getElementById('prevMonth').addEventListener('click', () => {
this.previousMonth();
});
document.getElementById('nextMonth').addEventListener('click', () => {
this.nextMonth();
});
}
/**
* @name 获取某月的第一天是星期几
* @param {number} year - 年份
* @param {number} month - 月份(0-11)
* @returns {number} 星期几(调整为周一开始:0=周一,6=周日)
*/
getFirstDayOfMonth(year, month) {
const firstDay = new Date(year, month, 1).getDay();
// 调整为周一开始:周日(0)变成6,其他减1
return firstDay === 0 ? 6 : firstDay - 1;
}
/**
* @name 获取某月的天数
* @param {number} year - 年份
* @param {number} month - 月份(0-11)
* @returns {number} 天数
*/
getDaysInMonth(year, month) {
return new Date(year, month + 1, 0).getDate();
}
/**
* @name 检查是否是今天
* @param {number} year - 年份
* @param {number} month - 月份(0-11)
* @param {number} day - 日期
* @returns {boolean} 是否是今天
*/
isToday(year, month, day) {
return year === this.today.getFullYear() &&
month === this.today.getMonth() &&
day === this.today.getDate();
}
/** @name 渲染组件 **/
render() {
const year = this.currentDate.getFullYear();
const month = this.currentDate.getMonth();
// 更新标题
document.getElementById('monthYear').textContent =
`${year}年${this.monthNames[month]}`;
// 清空
const calendar = document.getElementById('calendar');
calendar.innerHTML = '';
// 添加星期标题
this.weekdays.forEach(day => {
const li = document.createElement('li');
li.className = 'weekday';
li.textContent = day;
calendar.appendChild(li);
});
// 获取当月信息
const firstDay = this.getFirstDayOfMonth(year, month);
const daysInMonth = this.getDaysInMonth(year, month);
const daysInPrevMonth = this.getDaysInMonth(year, month - 1);
// 添加上个月的尾部日期
for (let i = firstDay - 1; i >= 0; i--) {
const li = document.createElement('li');
li.className = 'other-month';
li.textContent = daysInPrevMonth - i;
calendar.appendChild(li);
}
// 添加当月日期
for (let day = 1; day <= daysInMonth; day++) {
const li = document.createElement('li');
li.textContent = day;
if (this.isToday(year, month, day)) {
li.className = 'today';
}
calendar.appendChild(li);
}
// 添加下个月的开头日期,补齐6行
const totalCells = calendar.children.length;
const remainingCells = 42 - totalCells; // 6行 × 7列 = 42个格子
for (let day = 1; day <= remainingCells; day++) {
const li = document.createElement('li');
li.className = 'other-month';
li.textContent = day;
calendar.appendChild(li);
}
}
/** @name 上一个月 **/
previousMonth() {
this.currentDate.setMonth(this.currentDate.getMonth() - 1);
this.render();
}
/** @name 下一个月 **/
nextMonth() {
this.currentDate.setMonth(this.currentDate.getMonth() + 1);
this.render();
}
}
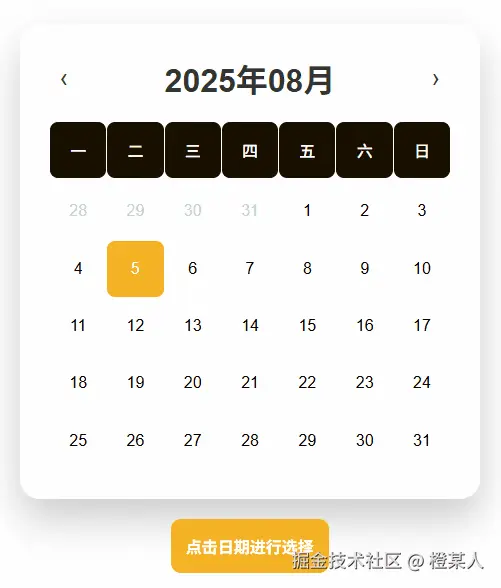
new Calendar();挺简单哈,就一个类搞定,设计思路⏰:
- 构造函数初始化基本数据。
init()方法负责初始化启动。render()方法负责渲染。bindEvents()方法负责事件绑定。
效果:
基于这个设计过程,咱们继续来实现日期的点击👆选择功能,这个稍微比较麻烦一些。
先把样式整上:
css
.selected {
    background-color: #007bff  !important;
    color: #fff;
    box-shadow: 0 0 0 2px #007bff;
}
.selected.today {
    background-color: #007bff;
    box-shadow: 0 0 0 2px #f4b225;
}
.selected-date-info {
    margin-top: 20px;
    padding: 15px;
    background-color: #f4b225;
    color: #fff;
    border-radius: 10px;
    text-align: center;
    font-size: 16px;
    min-height: 20px;
    font-weight: bold;
}
在 Calendar 类中添加选择功能相关的属性和方法:
js
class Calendar {
    constructor() {
        this.currentDate = new Date();
        this.today = new Date();
        this.selectedDate = null; // 新增:选中的日期

        // ...
    }
    bindEvents() {
        // ...
        // 添加点击的事件委托
        document.getElementById('calendar').addEventListener('click', (e) => {
            this.handleDateClick(e);
        });
    }
    /**
     * @name 处理日期点击事件
     * @param {Event} e - 点击事件
     */
    handleDateClick(e) {
        const target = e.target;
        // 只处理日期元素的点击,排除星期标题
        if (target.tagName === 'LI' && !target.classList.contains('weekday')) {
            const day = parseInt(target.textContent);
            const year = this.currentDate.getFullYear();
            let month = this.currentDate.getMonth();
            // 处理其他月份的日期
            if (target.classList.contains('other-month')) {
                // 判断是上个月还是下个月
                const firstDay = this.getFirstDayOfMonth(year, month);
                const daysInMonth = this.getDaysInMonth(year, month);
                const totalCurrentMonthCells = firstDay + daysInMonth;
                const clickedIndex = Array.from(target.parentNode.children).indexOf(target);
                if (clickedIndex < firstDay + 7) { // 上个月
                    month = month - 1;
                    if (month < 0) {
                        month = 11;
                        year = year - 1;
                    }
                } else { // 下个月
                    month = month + 1;
                    if (month > 11) {
                        month = 0;
                        year = year + 1;
                    }
                }
            }
            // 设置选中日期
            this.selectedDate = new Date(year, month, day);
            // 更新显示
            this.updateSelectedDateDisplay();
            this.updateCalendarSelection();
        }
    }
}
鼠标点击后,我们需要更新页面的选中状态,小编用两个方法来维护页面UI的变化:
js
/** @name 更新选中日期的显示 **/
updateSelectedDateDisplay() {
    const infoElement = document.getElementById('selectedDateInfo');
    if (this.selectedDate) {
        const year = this.selectedDate.getFullYear();
        const month = this.selectedDate.getMonth() + 1;
        const day = this.selectedDate.getDate();
        const weekDay = ['日', '一', '二', '三', '四', '五', '六'][this.selectedDate.getDay()];
        infoElement.textContent = `选中日期: ${year}年${month.toString().padStart(2, '0')}月${day.toString().padStart(2, '0')}日 星期${weekDay}`;
    } else {
        infoElement.textContent = '点击日期进行选择';
    }
}
 /** @name 更新选中状态 **/
updateCalendarSelection() {
    const calendarItems = document.querySelectorAll('#calendar li:not(.weekday)');
    // 清除所有选中状态
    calendarItems.forEach(item => {
        item.classList.remove('selected');
    });
    // 如果有选中日期,标记对应的日期元素
    if (this.selectedDate) {
        const selectedYear = this.selectedDate.getFullYear();
        const selectedMonth = this.selectedDate.getMonth();
        const selectedDay = this.selectedDate.getDate();
        const currentYear = this.currentDate.getFullYear();
        const currentMonth = this.currentDate.getMonth();
        // 只在当前显示的月份中标记选中状态
        if (selectedYear === currentYear && selectedMonth === currentMonth) {
            calendarItems.forEach(item => {
                if (parseInt(item.textContent) === selectedDay && !item.classList.contains('other-month')) {
                    item.classList.add('selected');
                }
            });
        }
    }
}
为了方便外部调用,提供一些实用的 API 方法:
js
/**
 * @name 获取选中的日期
 * @returns {Date|null} 选中的日期对象
 */
getSelectedDate() {
    return this.selectedDate;
}
/**
 * @name 设置选中的日期
 * @param {Date} date - 要选中的日期
 */
setSelectedDate(date) {
    this.selectedDate = date;
    this.updateSelectedDateDisplay();
    this.updateCalendarSelection();
}
/** @name 清除选中状态 **/
clearSelection() {
    this.selectedDate = null;
    this.updateSelectedDateDisplay();
    this.updateCalendarSelection();
}
最后,由于天数是根据月份动态渲染的,别忘了在月份切换时也要更新选中状态的显示:
js
previousMonth() {
    this.currentDate.setMonth(this.currentDate.getMonth() - 1);
    this.render();
    // 重新渲染后更新选中状态
    this.updateCalendarSelection();
}

nextMonth() {
    this.currentDate.setMonth(this.currentDate.getMonth() + 1);
    this.render();
    // 重新渲染后更新选中状态
    this.updateCalendarSelection();
}
效果:
📝 总结
通过这篇文章,咱们从零开始实现了一个完整的日期组件,整个过程中,最让小编印象深刻的就是 CSS Grid 的强大!在这种场景下,布局这块绝对非它莫属。👻
然后呢,学会了基础版本,你还可以继续扩展:
- 添加事件标记: 在特定日期显示小圆点。
- 日期选择功能: 支持单选或多选日期。
- 农历显示: 在公历下方显示农历。
- 主题切换: 支持多种颜色主题。
- 动画效果: 月份切换时的滑动动画。
- ...
那就没啦~😋
至此,本篇文章就写完啦,撒花撒花。

希望本文对你有所帮助,如有任何疑问,期待你的留言哦。
老样子,点赞+评论=你会了,收藏=你精通了。