前言
在即将到来的 vue3.6 中,我们可以通过往 script 上写一个 vapor 语法糖的形式开启 vapor 模式,即 <script setup vapor> ,本期文章就带大家揭晓 vapor 这个语法糖是如何被解析的
compiler-sfc 是 vue 解析的最开始阶段,在 compiler-sfc 中,有这样一个数据结构 SFCDescriptor,用于描述 sfc 的一些属性
packages\compiler-sfc\src\parse.ts
ts
export interface SFCDescriptor {
  filename: string
  source: string
  template: SFCTemplateBlock | null
  script: SFCScriptBlock | null
  scriptSetup: SFCScriptBlock | null
  styles: SFCStyleBlock[]
  customBlocks: SFCBlock[]
  cssVars: string[]
  slotted: boolean

  vapor?: boolean

  shouldForceReload: (prevImports: Record<string, ImportBinding>) => boolean
}
可以看到 vapor 作为一个可选属性出现在 SFCDescriptor 身上
我们再来看一段代码
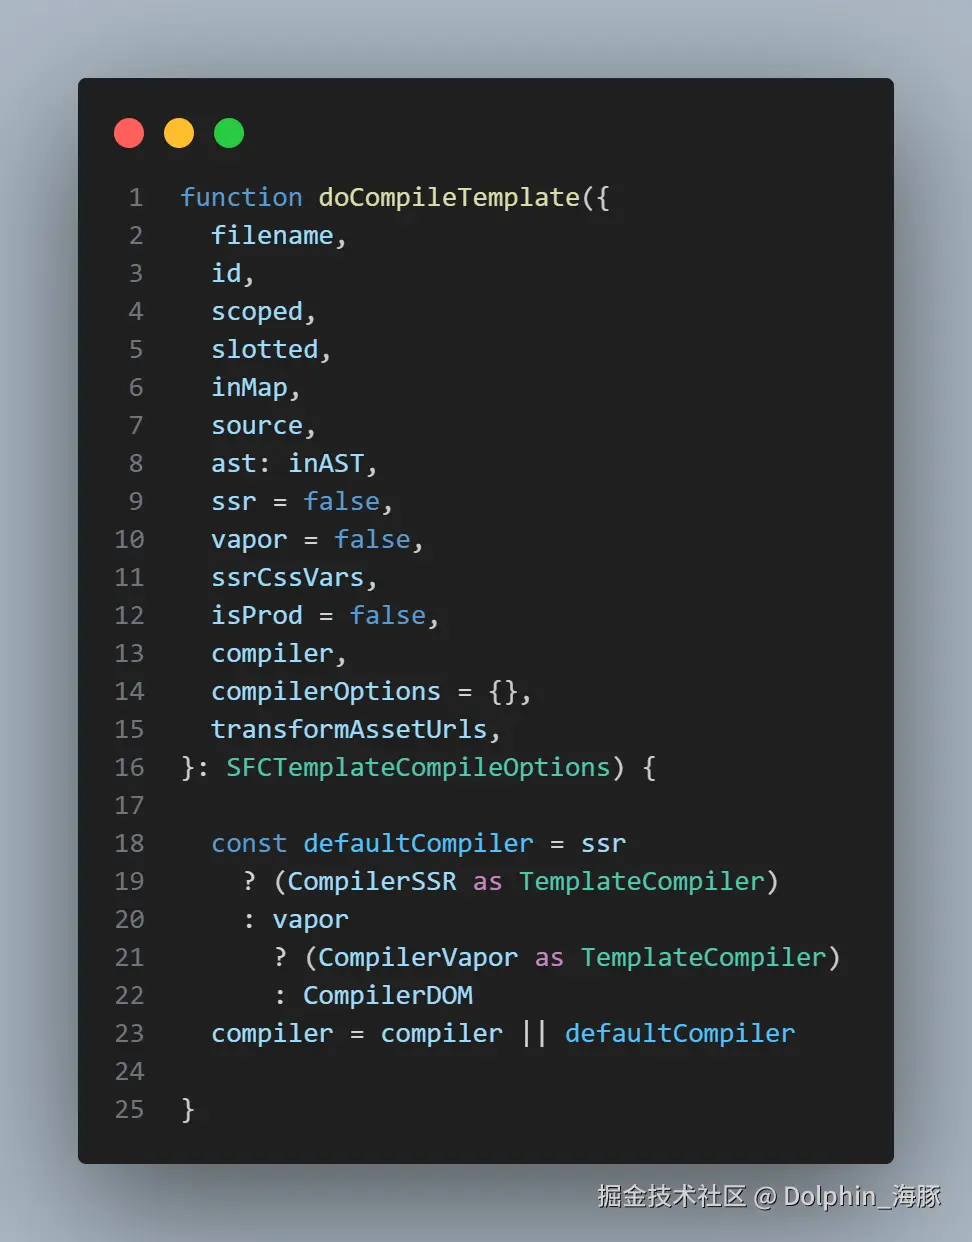
这里通过函数解构的入参 来决定 compiler-sfc 后续的 编译阶段 使用哪种 编译器来进行解析,其中就有 vapor ,而这个 vapor 就是 SFCDescriptor 身上的 vapor 属性
因此我们只要清楚 SFCDescriptor.vapor 是如何被赋值为 true 就了解了 vapor 语法糖是如何被解析的
在 vite-plugin-vue 中,有个函数 transformMain 会调用 core/compiler-sfc 中的 parse 方法得到 descriptor,其实就是 createDescriptor 函数
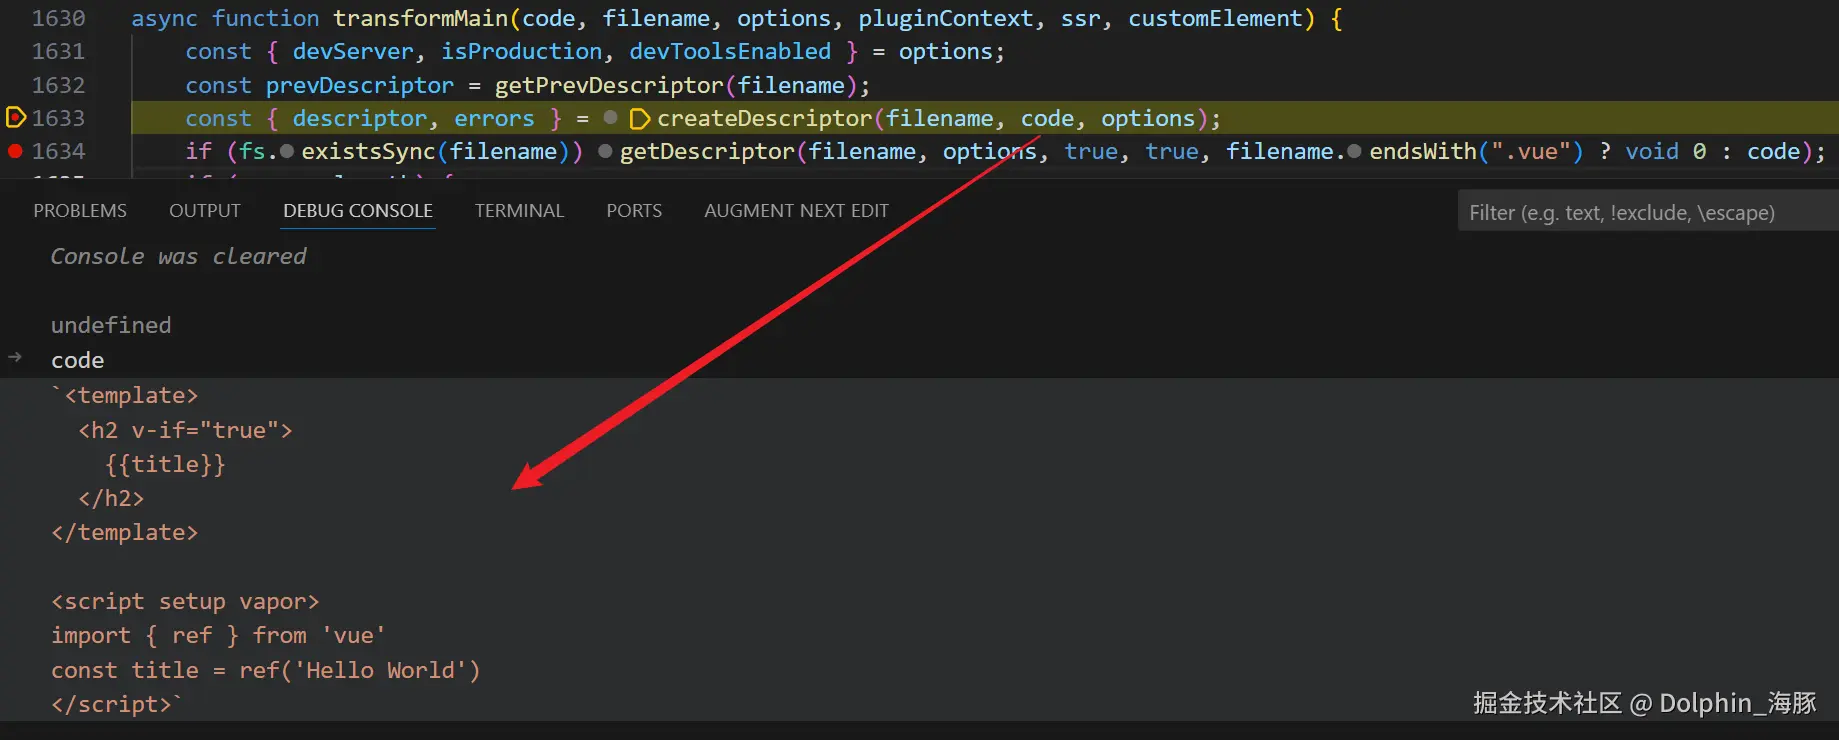
可以看到,调用 createDescriptor 时会将 vue 文件的 source 源码传入
而 createDescriptor 本质上调用的是 compiler.parse 去拿到 descriptor,这里的 parse 是 compiler-sfc 里面的
js
function createDescriptor(filename, source, { root, isProduction, sourceMap, compiler, template, features }, hmr = false) {
	const { descriptor, errors } = compiler.parse(source, {
		filename,
		sourceMap,
		templateParseOptions: template?.compilerOptions
	});
}
我们进入到 compiler-sfc 里的 parse 函数
compiler-sfc & parse
parse 函数我保留我们需要关注的地方大概就是如下这样
ts
export function parse(
  source: string,
  options: SFCParseOptions = {},
): SFCParseResult {

  const {
    sourceMap = true,
    filename = DEFAULT_FILENAME,
    sourceRoot = '',
    pad = false,
    ignoreEmpty = true,
    compiler = CompilerDOM,
    templateParseOptions = {},
  } = options

  const descriptor: SFCDescriptor = {
    filename,
    source,
    template: null,
    script: null,
    scriptSetup: null,
    styles: [],
    customBlocks: [],
    cssVars: [],
    slotted: false,
    vapor: false,
    shouldForceReload: prevImports => hmrShouldReload(prevImports, descriptor),
  }

  const ast = compiler.parse(source, {
    parseMode: 'sfc',
    prefixIdentifiers: true,
    ...templateParseOptions,
    onError: e => {
      errors.push(e)
    },
  })

  ast.children.forEach(node => {
    switch (node.tag) {
      case 'template':
      case 'script':
        const scriptBlock = createBlock(node, source, pad) as SFCScriptBlock
        descriptor.vapor ||= !!scriptBlock.attrs.vapor
        const isSetup = !!(scriptBlock.attrs.setup || scriptBlock.attrs.vapor)
        if (isSetup && !descriptor.scriptSetup) {
          descriptor.scriptSetup = scriptBlock
          break
        }
        if (!isSetup && !descriptor.script) {
          descriptor.script = scriptBlock
          break
        }
        errors.push(createDuplicateBlockError(node, isSetup))
        break
      case 'style':
    }
  })

  const result = {
    descriptor,
    errors,
  }

  parseCache.set(sourceKey, result)
  return result
}
可以很清晰地看到 compiler-sfc 的 parse 在调用了另一个 parse 拿到 ast 后,由 createBlock 去给 descriptor 的 vapor 赋值
那也就是说这里面的 parse 才是我们要关注的内容,看 source 如何变成了 ast
实际上,compiler-sfc 里面的 parse 来自于 compiler-dom 的 parse

可以看到 compiler-dom 里面的 parse 本质又是调用的 compiler-core 里面的 baseParse ,这么层层调用而非直接 调用 baseParse 的目的就是为了模块化分离,compiler-dom 会把浏览器环境特性 options 传入给 baseParse
接下来我将用一个非常简单的 vapor script 标签来带大家看 baseParse 如何解析出 ast 的,当然 vapor 应该是跟 setup 一起实现的,因为 vapor 不支持 OptionsAPI,这里简化了下
vue
<script vapor>
</script>
baseParse 出 ast
baseParse 的函数逻辑在我之前有篇文章【 vue3 的 parse 都做了啥】中也有提过,不过那篇文章主要讲解的 template 部分,大家感兴趣也可以看看
baseParse 函数主要逻辑如下
ts
export function baseParse(input: string, options?: ParserOptions): RootNode {
// 初始化 tokenizer
tokenizer.reset()
const root = (currentRoot = createRoot([], input))
// 解析出 ast
tokenizer.parse(currentInput)
root.loc = getLoc(0, input.length)
root.children = condenseWhitespace(root.children)
currentRoot = null
return root
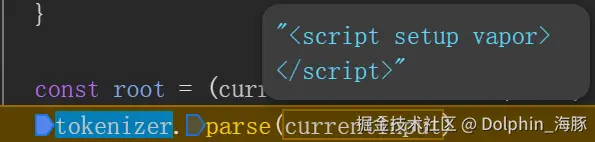
}baseParse 其实就两个步骤,甚至可以说是一个 步骤,tokenizer.parse 就完事了
当然在 tokenizer.parse 需要对 tokenizer 进行一个初始化
这其实是一个很常见的 语法解析,我在【 vue3 的 parse 都做了啥】 文章中讲 baseParse 也只是专注于 template 模板部分,这次我们只专注于 script 部分
在进入 tokenizer.parse 前我们需要熟悉下 tokenizer 里面的状态管理 和 CharCodes 这两枚举值,因为是枚举值可读性不好,所以展示出来
State 如下
ts
/** All the states the tokenizer can be in. */
export enum State {
  Text = 1,

  // interpolation
  InterpolationOpen,
  Interpolation,
  InterpolationClose,

  // Tags
  BeforeTagName, // After <
  InTagName,
  InSelfClosingTag,
  BeforeClosingTagName,
  InClosingTagName,
  AfterClosingTagName,

  // Attrs
  BeforeAttrName,
  InAttrName,
  InDirName,
  InDirArg,
  InDirDynamicArg,
  InDirModifier,
  AfterAttrName,
  BeforeAttrValue,
  InAttrValueDq, // "
  InAttrValueSq, // '
  InAttrValueNq,

  // Declarations
  BeforeDeclaration, // !
  InDeclaration,

  // Processing instructions
  InProcessingInstruction, // ?

  // Comments & CDATA
  BeforeComment,
  CDATASequence,
  InSpecialComment,
  InCommentLike,

  // Special tags
  BeforeSpecialS, // Decide if we deal with `<script` or `<style`
  BeforeSpecialT, // Decide if we deal with `<title` or `<textarea`
  SpecialStartSequence,
  InRCDATA,

  InEntity,

  InSFCRootTagName,
}
state 在 tokenizer 的 constructor 中会被初始化为 text :public state: State = State.Text,因此 state 开始时值为 1
CharCodes 如下
ts
export enum CharCodes {
  Tab = 0x9, // "\t"
  NewLine = 0xa, // "\n"
  FormFeed = 0xc, // "\f"
  CarriageReturn = 0xd, // "\r"
  Space = 0x20, // " "
  ExclamationMark = 0x21, // "!"
  Number = 0x23, // "#"
  Amp = 0x26, // "&"
  SingleQuote = 0x27, // "'"
  DoubleQuote = 0x22, // '"'
  GraveAccent = 96, // "`"
  Dash = 0x2d, // "-"
  Slash = 0x2f, // "/"
  Zero = 0x30, // "0"
  Nine = 0x39, // "9"
  Semi = 0x3b, // ";"
  Lt = 0x3c, // "<"
  Eq = 0x3d, // "="
  Gt = 0x3e, // ">"
  Questionmark = 0x3f, // "?"
  UpperA = 0x41, // "A"
  LowerA = 0x61, // "a"
  UpperF = 0x46, // "F"
  LowerF = 0x66, // "f"
  UpperZ = 0x5a, // "Z"
  LowerZ = 0x7a, // "z"
  LowerX = 0x78, // "x"
  LowerV = 0x76, // "v"
  Dot = 0x2e, // "."
  Colon = 0x3a, // ":"
  At = 0x40, // "@"
  LeftSquare = 91, // "["
  RightSquare = 93, // "]"
}
里面数字用到了 16 进制去表示对应的编码值,接下来会用到 Lt,Gt 以及一些字母
我们现在看下 tokenizer.parse ,我只保留了接下来会用到的逻辑
ts
  /**
   * Iterates through the buffer, calling the function corresponding to the current state.
   *
   * States that are more likely to be hit are higher up, as a performance improvement.
   */
  public parse(input: string): void {
    this.buffer = input
    while (this.index < this.buffer.length) {
      // 当前字符编码
      const c = this.buffer.charCodeAt(this.index)
      switch (this.state) {
        case State.Text: {
          this.stateText(c)
          break
        }
        case State.BeforeTagName: {
          this.stateBeforeTagName(c)
          break
        }
        case State.BeforeSpecialS: {
          this.stateBeforeSpecialS(c)
          break
        }
        case State.SpecialStartSequence: {
          this.stateSpecialStartSequence(c)
          break
        }
        case State.BeforeAttrName: {
          this.stateBeforeAttrName(c)
          break
        }
        case State.InAttrName: {
          this.stateInAttrName(c)
          break
        }
      }
      this.index++
    }
  }
可以看到,tokenizer.parse 会挨个遍历 vue 文件里面的字符串,
buffer 字符串:<script vapor> </script>
c 是当前字符串的编码数,比如我们熟知的 A 对应着 65
buffer 字符串的第一个字符为 <,编码数为 60,也就是 c 为 60。因此会去执行 stateText 状态转移函数
ts
  private stateText(c: number): void {
    if (c === CharCodes.Lt) {
      this.state = State.BeforeTagName
      this.sectionStart = this.index
    }
  }
当前第一个字符为 < ,会进入第一个 if 逻辑内,里面会将 state 转移为 BeforeTagName,也就是 < 之后
第二个字符为 s,会执行 stateBeforeTagName 函数
ts
  private stateBeforeTagName(c: number): void {
    if (c === CharCodes.ExclamationMark) {
      this.state = State.BeforeDeclaration
      this.sectionStart = this.index + 1
    } else if (c === CharCodes.Questionmark) {
      this.state = State.InProcessingInstruction
      this.sectionStart = this.index + 1
    } else if (isTagStartChar(c)) {
      this.sectionStart = this.index
      if (this.mode === ParseMode.BASE) {
        // no special tags in base mode
        this.state = State.InTagName
      } else if (this.inSFCRoot) {
        // SFC mode + root level
        // - everything except <template> is RAWTEXT
        // - <template> with lang other than html is also RAWTEXT
        this.state = State.InSFCRootTagName
      } else if (!this.inXML) {
        // HTML mode
        // - <script>, <style> RAWTEXT
        // - <title>, <textarea> RCDATA
        if (c === 116 /* t */) {
          this.state = State.BeforeSpecialT
        } else {
          this.state =
            c === 115 /* s */ ? State.BeforeSpecialS : State.InTagName
        }
      } else {
        this.state = State.InTagName
      }
    } else if (c === CharCodes.Slash) {
      this.state = State.BeforeClosingTagName
    } else {
      this.state = State.Text
      this.stateText(c)
    }
  }
s 位于 a-Z 之间,进入 第三个 if 分支:
mode 在 tokenizer.parse 前被赋值为了 HTML,因此步入到 !this.inXML 逻辑中,里面会将状态转移为 BeforeSpecialS
现在解析 c,进入 stateBeforeSpecialS 函数中
ts
  private stateBeforeSpecialS(c: number): void {
    if (c === Sequences.ScriptEnd[3]) {
      this.startSpecial(Sequences.ScriptEnd, 4)
    } else if (c === Sequences.StyleEnd[3]) {
      this.startSpecial(Sequences.StyleEnd, 4)
    } else {
      this.state = State.InTagName
      this.stateInTagName(c) // Consume the token again
    }
  }
tokenizer 遇到 s 开头的标签时,一般都是 script 或者 style,会对这两个标签进行判断,Sequences.ScriptEnd[3] 对应的字母就是 c,因此执行 startSpecial
ts
  private startSpecial(sequence: Uint8Array, offset: number) {
    this.enterRCDATA(sequence, offset)
    this.state = State.SpecialStartSequence
  }
将状态转移为 SpecialStartSequence,更新 index,现在对应字符 r,步入 stateSpecialStartSequence 函数中
ts
  private stateSpecialStartSequence(c: number): void {
    const isEnd = this.sequenceIndex === this.currentSequence.length
    const isMatch = isEnd
      ? // If we are at the end of the sequence, make sure the tag name has ended
        isEndOfTagSection(c)
      : // Otherwise, do a case-insensitive comparison
        (c | 0x20) === this.currentSequence[this.sequenceIndex]

    if (!isMatch) {
      this.inRCDATA = false
    } else if (!isEnd) {
      this.sequenceIndex++
      return
    }

    this.sequenceIndex = 0
    this.state = State.InTagName
    this.stateInTagName(c)
  }
这个函数用于验证特殊标签的开始序列是否完整匹配,目前 r 不是标签的尾部,也不是 完整标签,因此此时不会改变状态,this.sequenceIndex++ 后直接 return 到下一个 字符,依旧是这个状态,依旧执行这个函数
保持这个函数一直遍历到 空格,才会执行到 isEnd 为 true,最后才会更新状态为 InTagName,但此时还会执行 stateInTagName,里面又会进行状态转移
在 handleTagName 中将状态转移为 BeforeAttrName,会执行 stateBeforeAttrName
ts
  private stateBeforeAttrName(c: number): void {
    if (c === CharCodes.Gt) {
      this.cbs.onopentagend(this.index)
      if (this.inRCDATA) {
        this.state = State.InRCDATA
      } else {
        this.state = State.Text
      }
      this.sectionStart = this.index + 1
    } else if (c === CharCodes.Slash) {
      this.state = State.InSelfClosingTag
      if ((__DEV__ || !__BROWSER__) && this.peek() !== CharCodes.Gt) {
        this.cbs.onerr(ErrorCodes.UNEXPECTED_SOLIDUS_IN_TAG, this.index)
      }
    } else if (c === CharCodes.Lt && this.peek() === CharCodes.Slash) {
      // special handling for </ appearing in open tag state
      // this is different from standard HTML parsing but makes practical sense
      // especially for parsing intermediate input state in IDEs.
      this.cbs.onopentagend(this.index)
      this.state = State.BeforeTagName
      this.sectionStart = this.index
    } else if (!isWhitespace(c)) {
      if ((__DEV__ || !__BROWSER__) && c === CharCodes.Eq) {
        this.cbs.onerr(
          ErrorCodes.UNEXPECTED_EQUALS_SIGN_BEFORE_ATTRIBUTE_NAME,
          this.index,
        )
      }
      this.handleAttrStart(c)
    }
  }
Gt 就是闭合标签 >,但是此时还是 空格,里面的 if 都走不进去,因此状态还是 BeforeAttrName,又会匹配到当前函数,此时 字符 为 v (vapor 的开始)
v 在 stateBeforeAttrName 中会被执行 handleAttrStart 函数
ts
  private handleAttrStart(c: number) {
    if (c === CharCodes.LowerV && this.peek() === CharCodes.Dash) {
      this.state = State.InDirName
      this.sectionStart = this.index
    } else if (
      c === CharCodes.Dot ||
      c === CharCodes.Colon ||
      c === CharCodes.At ||
      c === CharCodes.Number
    ) {
      this.cbs.ondirname(this.index, this.index + 1)
      this.state = State.InDirArg
      this.sectionStart = this.index + 1
    } else {
      this.state = State.InAttrName
      this.sectionStart = this.index
    }
  }
此时状态被转移到了 InAttrName ,当前字符 a (vapor)会去执行 stateInAttrName
直到 > ,一直会在里面遍历当前状态,this.cbs.onattribname(this.sectionStart, this.index) 会切割出 vapor 字段
我们看下 onattribname
ts
  onattribname(start, end) {
    // plain attribute
    currentProp = {
      type: NodeTypes.ATTRIBUTE,
      name: getSlice(start, end),
      nameLoc: getLoc(start, end),
      value: undefined,
      loc: getLoc(start),
    }
  },
里面会将 vapor 作为 currentProp 的 name 字段给出去
至此,vapor 是如何被解析的,这个过程已经走完了
里面的状态如何转移,这个细节我们可以不用关心,自己 debug 走一遍就清楚了,我们需要清楚的是,<script vapor> 在解析的过程中,挨个字符会进行遍历,可能会有特殊字符处理,比如 <> 开闭标签,s 或者 空格 特殊字符,每个字符都会得到下一个状态,每个状态有每个状态的处理函数,而 vapor 则是在状态转移的过程中,会被判断为一个 name 属性抛出,给到当前层级的 props
createBlock 出 vapor 值
在拿到 ast 后,ast.children 会被 compiler-sfc 的 parse 函数进行遍历,ast.children 会有个 tag 属性为 script,script 就会去得到 scriptBlock 然后赋值给到 descriptor
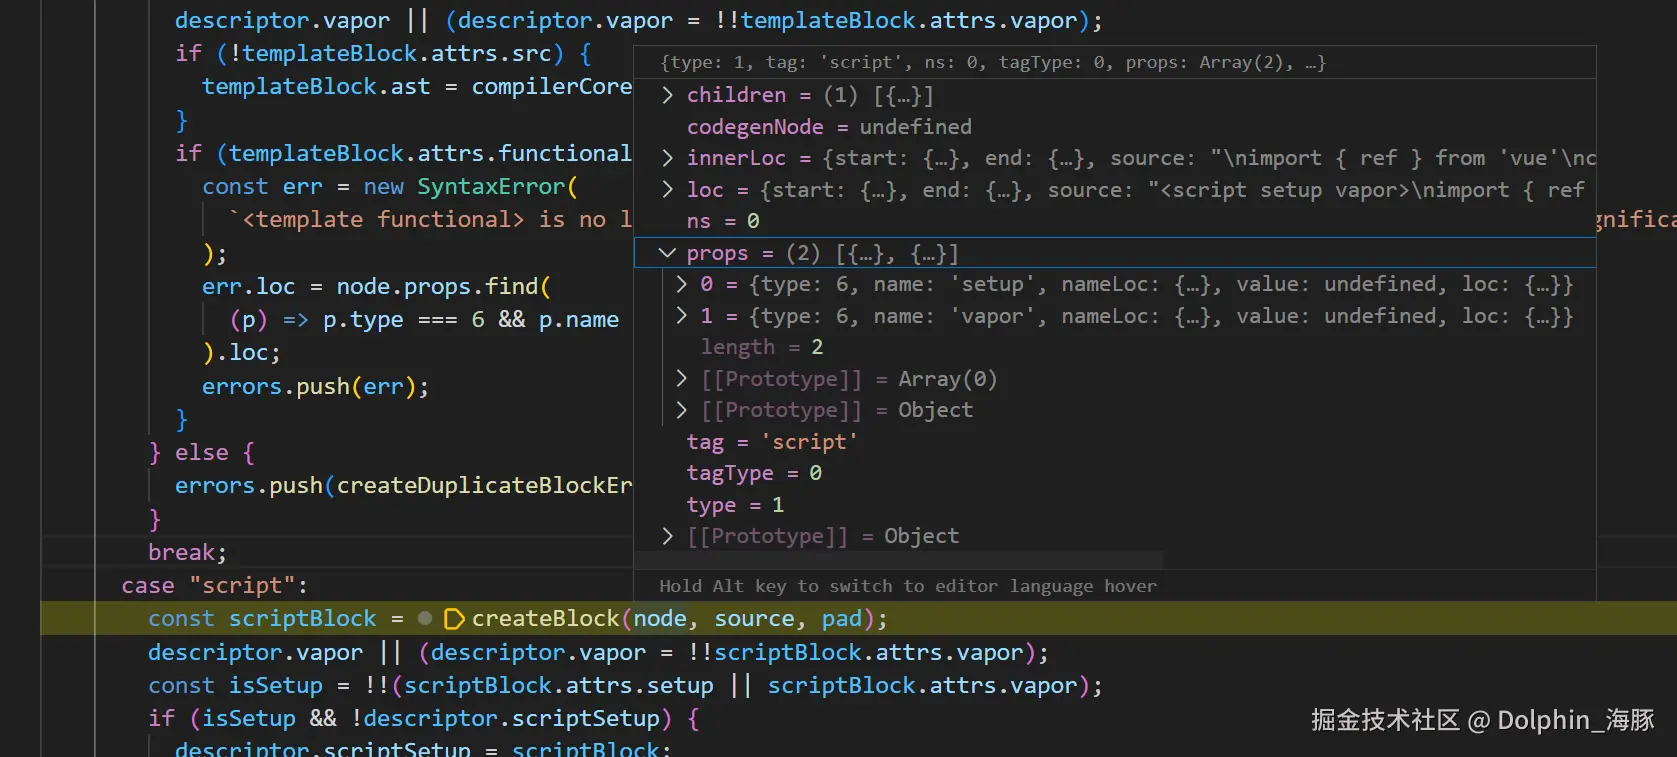
我们现在深入 createBlock 中,看它如何解析出 vapor 属性的
js
function createBlock(node, source, pad) {
  const type = node.tag;
  const loc = node.innerLoc;
  const attrs = {};
  const block = {
    type,
    content: source.slice(loc.start.offset, loc.end.offset),
    loc,
    attrs
  };
  if (pad) {
    block.content = padContent(source, block, pad) + block.content;
  }
  node.props.forEach((p) => {
    if (p.type === 6) {
      const name = p.name;
      attrs[name] = p.value ? p.value.content || true : true;
      if (name === "lang") {
        block.lang = p.value && p.value.content;
      } else if (name === "src") {
        block.src = p.value && p.value.content;
      } else if (type === "style") {
        if (name === "scoped") {
          block.scoped = true;
        } else if (name === "module") {
          block.module = attrs[name];
        }
      } else if (type === "script" && name === "setup") {
        block.setup = attrs.setup;
      }
    }
  });
  return block;
}
很清晰,直接一个遍历,拿到每个 props 的 name 属性放到 block.attrs 身上作为 key,value 被设置了 true,然后将 block return 出来
随后进行赋值 descriptor.vapor = !!scriptBlock.attrs.vapor
后续的逻辑就是依据 descriptor.vapor 判断 defaultCompiler 是否为 compilerVapor
总结
vapor 语法糖的解析和 setup 的解析一致,compiler-sfc 会调用 baseParse 拿到 ast 后,会遍历 ast 的 node 节点,针对 tag 为 script 类型的节点去单独用 createBlock 函数提取去 里面的 name 属性,若写了 <script setup vapor>,那么 就会有两个 name 属性,分别为 setup 和 vapor,然后给到 descriptor ,后续依据 descriptor.vapor 去决定使用何种 compiler 作后续的 解析
其实最复杂的逻辑在于 ast 的解析,里面会经历一系列的状态转移,根据每个字符判断提取 attribute