1、整体介绍
LangChain 是一个功能强大的开源框架,目标是简化和加速基于LLM模型的AI应用的开发过程。它通过提供一套标准化的工具、组件和接口,帮助开发者将LLM的强大能力与外部数据源、计算资源和复杂逻辑相结合,从而轻松构建从简单问答机器人到复杂Agent的各类应用。
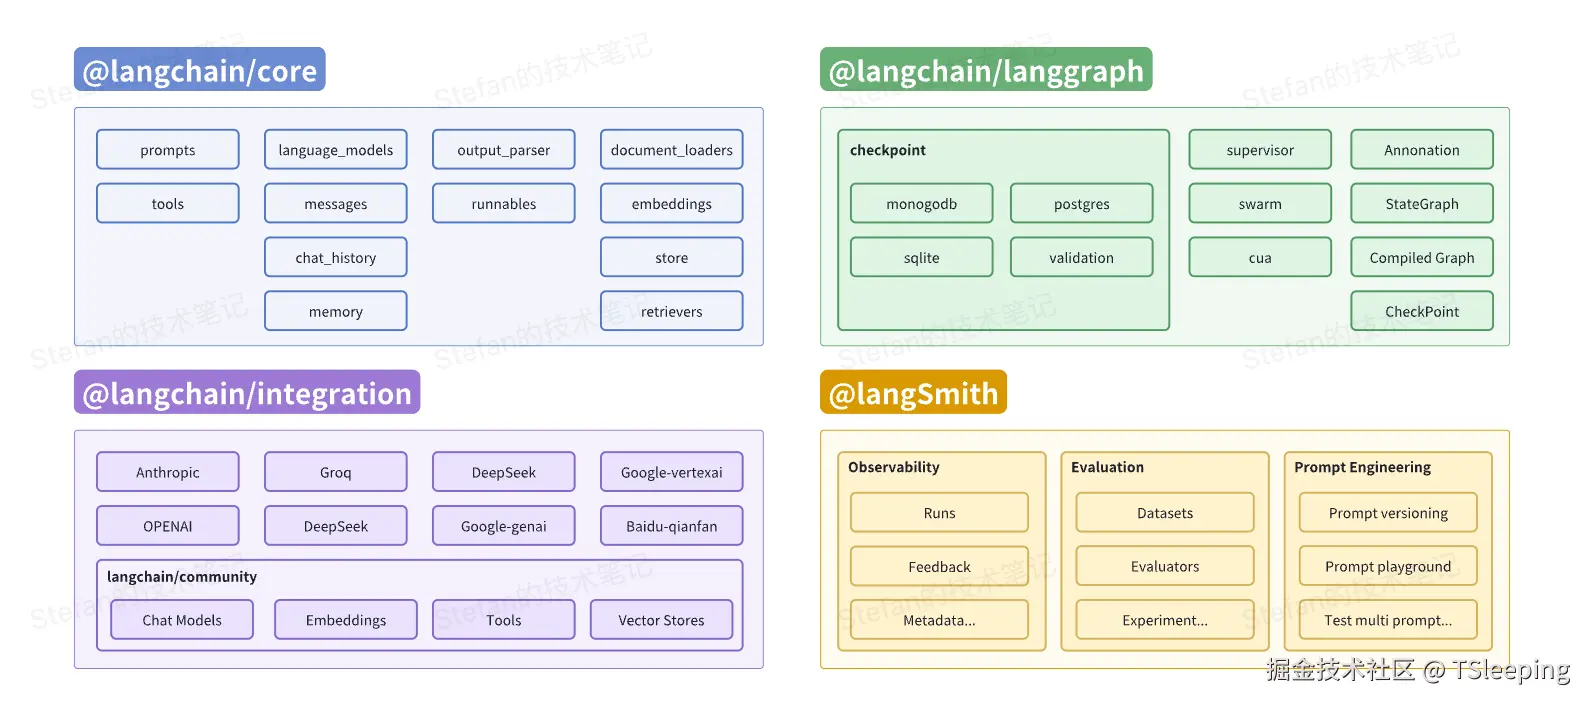
1.1 LangChain由哪些构成
- @langchain/core:基础核心库,它定义了标准的接口,如模型的输入(Prompt)和输出(Output Parser),并包含了强大的LangChain表达语言(LCEL),让开发者能够以声明式、流式处理的方式将组件"链接"在一起。
- @langchain/integration:三方集成库,包含对各类LLM、Vector Store、Tools的封装,依赖比较重的模型会发布独立的包(例如
@langchain/openai),其余都集成在@langchain/community。 - @langchain/langgraph:AI应用编排的框架,可以通过Graph的形式定义应用的控制流程,原生支持长期记忆、可定制化状态管理和HILT(human-in-the-loop)。
- @langSmith:用于构建AI应用的平台,专门为解决LLM应用的黑盒问题而生。提供模型的可观测性、效果评估和Prompt优化等能力。目前是商业服务,使用时需要注册并获取API Key。
1.2 LangChain提供了什么
- 标准化的组件和接口:LLM生态日新月异,不同模型的API和功能各不相同。LangChain提供了标准化的抽象接口,有效屏蔽了底层模型的差异,使得开发者可以专注于业务逻辑。
- 强大的应用编排能力:现在的AI应用往往不是单一调用LLM的结果,而是多个应用之间协同工作的复杂系统。LangGraph提供了基于Graph的编排能力,让构建可控、可预测的复杂Agent成为可能。
- 全面的可观测性和评估能力:LLM应用的黑盒特性给调试和优化带来了巨大的挑战,LangSmith为每次应用的运行提供详细的追踪日志,结合其评估功能,开发者可以在准确性和成本之间做出最佳平衡,持续优化用户体验。
2、核心组件
LangChain的核心思想是提供一系列可插拔的"乐高积木",开发者可以自由组合这些"积木"来构建应用,下面来介绍一下其中最重要的几块"积木"。
2.1 模型I/O - 应用的大脑
引言
在我们开始构建任何的AI应用之前,需要思考一个根本的问题,我们该如何与LLM模型进行对话?
直接调用模型的API当然可行,但想象一下,当你为OpenAI API写好了代码,但到了Google Gemini可能就无法完全使用,需要重新适配。LangChain的Chat Model组件,就扮演着一个通用适配器的角色,它提供了一个标准接口,让你的应用可以轻松地接入任何一个LLM模型,而你的核心代码无需改动,这个"适配器"主要由三大部分构成。
核心三要素
- 提示模板(Prompt Templates) :说明书,它是一个可以带有变量的文本模板,可以将你的指令和问题标准化,便于LLM模型理解。
- 模型(Chat Models) :LangChain提供了统一的接口,可以用同样的方式来调用不同的LLM模型,使得我们可以专注于业务逻辑开发,不用关心模型底层的实现细节。
- 输出解析器(Output Parser) :LLM模型返回的自然语言文本,而往往AI应用需要的是结构化的数据,这就需要输出解析器来将大语言模型的回答来转换成我们需要的JSON、XML等对象。
示例代码
typescript
import { ChatOpenAI } from "@langchain/openai";
import { ChatPromptTemplate } from "@langchain/core/prompts";
import { StringOutputParser } from "@langchain/core/output_parsers";

const prompt = ChatPromptTemplate.from_template("请将用户的提问 '{question}' 翻译成英文。")
const model = new ChatOpenAI({ model: "gpt-4o-mini", temperature: 0 });
const output_parser = new StringOutputParser();

// 用户输入
const input_data = {"question": "我喜欢用LangChain构建应用"};
const formatted_prompt = await prompt.invoke(input_data);
const result = await model.invoke(formatted_prompt);
const final_result = output_parser.parse(result);
2.2 LangChain表达式语言(LCEL)- 串联组件的胶水
引言
上述的这种手动、分步的调用方式是否感觉过于笨拙?LangChain表达式语言(LCEL)给出了一个优雅的答案:它允许我们使用管道能力,像搭积木一样将组件直接拼接起来,让数据在其中自动流动,下面我们就来探索这个强大的串联组件的胶水。
typescript
const chain = prompt.pipe(model).pipe(output_parser);核心:万物皆可 Runnable
在LCEL中,无论是提示词模板、模型或输出解析器,甚至由组件组合成的chain,都继承了一个通用的接口 Runnable。Runnable是一个标准接口,它意味这个对象可以执行,并且可以无缝接入到LCEL的链条中,即.pipe将前一个Runnable的输出,作为下一个Runnable的输入。

LCEL: 不止是连接
LCEL的价值远不止连接,在形成一个链条后,就可以获取一系列开箱即用的能力,而在此之前这些功能往往需要手动编写大量的代码来实现。
- 流式输出(Stream)
大语言模型的输出往往需要几秒钟的时间来返回一个完整的结果,这比一个应用在终端让用户感受响应式输出的阈值200~300ms,要高出很多。通过流式输出,可以让应用输出中间步骤的结果,从而看起来更响应式一些。
javascript
// ...
const stream = await chain.stream("Hello! Tell me about yourself.");
const chunks = [];
for await (const chunk of stream) {
  chunks.push(chunk);
  console.log(`${chunk.content}|`);
}- 并行处理(Parallel)
另一个很关键的特性就是并行处理,LangChain提供了RunnableMap的方法来并行地执行互不依赖的chain,并返回对应的结果。
typescript
const chain1 = /.../
const chain2 = /.../

const mapChain = RunnableMap.from({
  chain1: chain1,
  chain1: chain2,
});
const result = await mapChain.invoke({ topic: "xxx" });- 组合性(Composability)
LCEL最便利的点在于多个基于Runnable构建的链条,可以自由组合在一起,构建一个更复杂的链条,实现逻辑的复用和扩展。(LangGraph进一步拓展了这个能力,以图的形式来定义控制流程)
typescript
const chain = runnable1.pipe(runnable2).pipe(runnable3);2.3 增强检索生成(RAG) - 连接外部知识
引言
通过前面两个部分,我们已经看到LCEL这个强大的工具,可以清晰、快捷地定义任务执行流程,还可以通过流式处理的方式来提升应用的响应速度。
但仅依赖模型本身的输出,会出现模型的"幻觉"问题,即无法准确回答问题,最主要的原因是模型所回答的内容是基于它的训练数据,这往往是有限且过时的,尤其是在回答特定领域问题的时候。因此我们需要给模型提供可以连接外部知识库的能力,从而可以在更丰富的上下文中,来准确地回答专业的问题。
RAG核心思想:先检索,再生成
RAG(Retrieval Augmented Generation),增强检索生成。其核心思想是在处理用户输入的问题时,先不让LLM直接回答,而是从内部的知识库中寻找相关性最高的一些信息片段,将这些片段作为上下文,和原始的问题一起输入给LLM,让LLM基于这些新的知识来生成更准确的答案。
RAG的工作流程可以分成两个大的阶段,分别是离线生成索引和检索生成。
阶段一:离线生成索引
这个过程是从我们的知识库获取数据,并生成对应的索引,便于后续的查询,这个过程通常是离线进行的。具体来说可以分成四个步骤:加载文件、切分文本、生成Embedding、存储向量。
- 加载文件
使用Document Loader来加载文件对象,输出是一系列的文本。LangChain提供了很多内置的Loader,来读取不同类型的文件,整体上可以分成File loaders和Web loaders,均实现了BaseDocumentLoader类。
typescript
import { CSVLoader } from "@langchain/community/document_loaders/fs/csv";
const loader = new CSVLoader(/.../);
const data = await loader.load();- 切分文本
获取文件对应的文本后,需要将长文本切分成更小的文本块,一方面语义完整的文本块可以提升检索准确度,另一方面LLM模型都有上下文窗口的长度限制,无法将全部的文本传递过去。
LangChain提供几种TextSplitter,基于文本长度,文本结构以及文档结构,还有一种更好的基于语义来切分的,这会依赖于过程中调用Embedding model的能力。
typescript
import { RecursiveCharacterTextSplitter } from "@langchain/textsplitters";
const splitter = new RecursiveCharacterTextSplitter({
  chunkSize: 1000,
  chunkOverlap: 200,
});
const allSplits = await splitter.splitDocuments(docs);- 生成Embedding
Embedding是指将文本处理成可以代表其语义的向量表示,从而可以通过相似度算法来检索出输入问题相关的文本片段。Embedding模型最早是由Google发布的BERT,通过使用Transformer模型将文本嵌入到一个简单的向量表示。
LangChain也提供了很多内置的Embedding models,包括OpenAI,阿里通义千问,百度千帆和字节豆包等。
typescript
import { OpenAIEmbeddings } from "@langchain/openai";
const embeddings = new OpenAIEmbeddings({ model: "text-embedding-3-large"});
await embeddings.embedQuery("Hello, world!");- 存储向量
在生成所有文本的Embedding后,需要将这些向量存储起来,以便于在阶段二进行检索。LangChain提供向量存储的标准接口,需实现addDocument、deleteDocument和similaritySearch的关键方法。目前已实现40+内置的向量存储能力,包括Memory、Chroma和MongoDB等。
typescript
import { MemoryVectorStore } from "langchain/vectorstores/memory";
const vectorStore = new MemoryVectorStore();
vectorStore.addDocuments(documents)
阶段二:检索与生成
在运行时,当用户输入问题后,会先通过Embedding model将问题转换成向量,然后在Vector Store中检索出相似度最高的几个文本片段,将这些片段作为context输入给LLM。
typescript
import { StringOutputParser } from "@langchain/core/output_parsers";
import { RunnableSequence } from "@langchain/core/runnables"

// 1. 设置System Prompt,{context}变量
const SYSTEM_TEMPLATE = `Use the following pieces of context to answer the question at the end.
If you don't know the answer, just say that you don't know, don't try to make up an answer.
----------------
{context}`;

const prompt = ChatPromptTemplate.fromMessages([
  ["system", SYSTEM_TEMPLATE],
  ["human", "{question}"],
]);
// 2. 将vectorStore转换成Runnable对象
const vectorStoreRetriever = vectorStore.asRetriever();
// 3. 构建任务执行链
const chain = RunnableSequence.from([
  {
    context: vectorStoreRetriever.pipe(formatDocumentsAsString),
    question: new RunnablePassthrough(),
  },
  prompt,
  model,
  new StringOutputParser(),
]);
// 4. 输出结果
const answer = await chain.invoke("What did the president say about Justice Breyer?");
2.4 记忆 - 实现连续对话
引言
现在的应用不仅可以快速搭建,还可以连接外部知识库,更准确地回答问题。但其实我们很快就会发现一个问题,如果和LLM连续对话,且对话之间有上下文依赖时,LLM已经忘记上一轮的会话内容,可能会回答出完全错误的答案。这时候就需要为应用提供一个记忆模块,这就是LangChain的Memory组件的作用。
短期记忆
短期记忆是指应用在一次会话内,会记住所有的对话,具体实现上是在每次调用时,都将历史会话列表传递给LLM,LangGraph也提供了自动维护会话历史的checkpointer能力。在实际应用中,可能会出现历史会话过长,导致超过LLM上下文,这时可以通过过滤历史会话列表,总结历史会话等方式来降低历史消息的上下文长度。
typescript
import {
  START,
  END,
  MessagesAnnotation,
  StateGraph,
  MemorySaver,
} from "@langchain/langgraph";

const workflow = new StateGraph(MessagesAnnotation)
  // Define the node and edge
  .addNode("model", callModel)
  .addEdge(START, "model")
  .addEdge("model", END);
const memory = new MemorySaver();
const app = workflow.compile({ checkpointer: memory });
长期记忆
长期记忆是跨会话的,可以获取不同会话的历史对话记录。LangGraph通过在Store中通过特定的namespace和指定的key来管理所有会话,从而可以隔离不用用户,不同场景的会话列表。
typescript
import { InMemoryStore } from "@langchain/langgraph";

const store = new InMemoryStore();
const name = ["my-user", "chitchat"];
await store.put(name, "a-memory", {
    rules: ["User likes short, direct language", "User only speaks English & TypeScript"],
    "my-key": "my-value"
});
2.5 Agent - 赋予应用行动力
引言
现在的应用不仅可以快速搭建,连接外部知识库,还可以拥有记忆功能,看起来已经非常像一个智能体了。但目前为止,它还只是一个ChatBot,并不能帮你执行一些Action。例如帮你制定一个旅行计划,执行一段代码等等。在这一部分,我们将介绍如何通过Agent,赋予LLM模型行动力。
Agent vs Chain
理解Agent,最好的方式是对比我们之前熟悉的Chain。
- Chain:它的执行路径是预先设定好的,类似一条工厂的流水线,每个组件的工作和顺序都是开发者定义好的(A -> B -> C)。
- Agent:它的执行路径是由LLM在运行时决定的,它自主思考来调用哪些工具,然后这些工具在执行完后,将返回再输入给LLM,再决定下一步的行动。
Agent核心的思想就是让LLM去思考和决策,让它自己选择合适的工具来完成任务。
思考 -> 行动 -> 观察
那么Agent是如何工作的呢?它遵循一个典型的循环模式(又称ReAct框架)。
- 思考:LLM模型会根据用户的输入,和可利用的工具,来做思考并给出下一步的规划,比如"用户想知道天气,那应该调用一个可以查天气的工具"。
- 行动 :LLM决策调用某个工具,并确定该工具的输入参数,例如"调用
weather_search工具,输入是北京"。 - 观察:系统执行工具,并将工具返回的结果,作为一个观察的新信息返回给LLM。
- 重复:LLM收到这个观察结果后,再次进行思考阶段,来判断当前任务是否完成,如果完成了,就返回最后的答案;如果未完成,就开始新一轮的循环,直到任务完成。
开箱即用的Agent能力
LangGraph提供了开箱即用的创建Agent的能力。
typescript
import { createReactAgent } from "@langchain/langgraph/prebuilt";

const llm = await initChatModel("anthropic:claude-3-5-haiku-latest");
const agent = createReactAgent({  llm,  tools: [getWeather...]});
const response = await agent.invoke(
    { messages: [ { role: "user", content: "what is the weather in sf" } ] }
);
2.6 总结
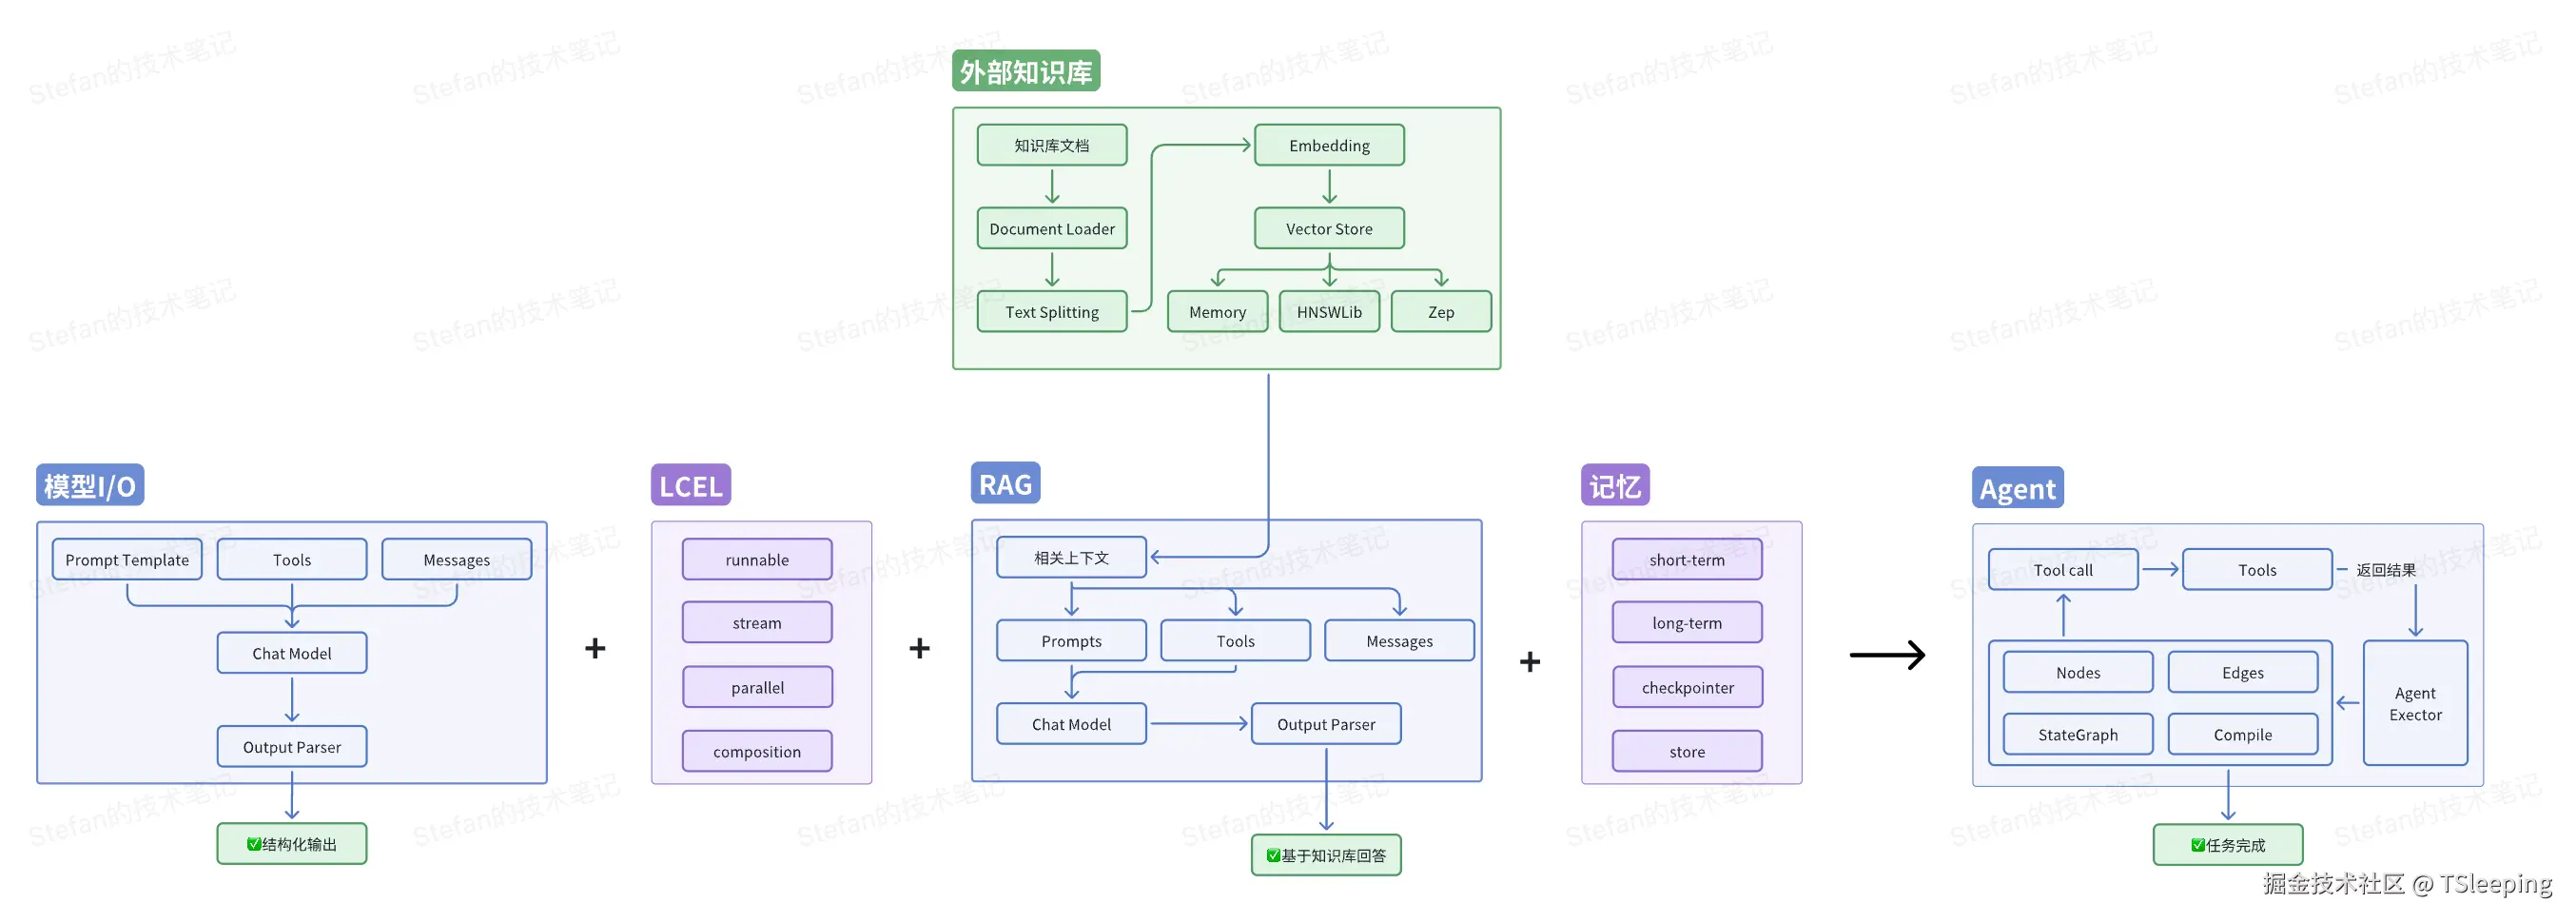
至此,我们已经走完LangChain的核心链路,当然LangChain还提供了其他非常多的场景能力,后面我们会单独展开介绍,让我们再回顾一下AI应用的拼图是如何一步一步拼接起来的:
- 从LLM模型的输入输出开始,搭建了一个简单的AI应用"大脑",核心三要素是Prompt模板、模型和输出解析器。
- 接着借助LangChain表达式语言(LCEL)这个万能胶水,可以快速,可复用地搭建数据流链路。核心的部分是万物皆可Runnable,并提供了流式传输、并行处理和组合性等能力。
- 然后通过RAG技术,让LLM可以连接外部的数据库,变得更博学,可以更准确地回答问题。核心的部分是离线生成索引,运行时检索和生成。
- 随后我们又给AI应用提供了记忆组件,赋予了短期记忆(单个会话)和长期记忆(跨多个会话),实现连续对话。
- 最后我们引入了Agent,赋予了应用行动力,可以与真实的世界来做互动。
3、Example - 搭建一个RAG
在这一部分,我们将综合应用之前提到的模型I/O、LCEL和RAG等内容,来搭建一个完整的,可以回答特定文档内容的问答助手,以《Attention Is All You Need》作为上下文内容。
3.1 环境配置
这次示例中需要用到两个模型,一个用来生成Embedding,另一个用于生成文本。考虑到国内的网络环境,Embedding模型选取了阿里通义千问提供的text-embedding模型,文本生成模型选取DeepSeek的deepseek-chat,因此前置需要分别申请这两个模型的API_KEY,并配置在根目录的.env文件中。
typescript
// alibaba api key apply address: https://bailian.console.aliyun.com/
// deepseek api key apply address: https://platform.deepseek.com/usage

// .env
ALIBABA_API_KEY="xxx"
DEEPSEEK_API_KEY="xxx"
3.2 离线生成索引
在完成环境配置后,先对文档进行处理生成索引。还记得之前在RAG部分提到的步骤么,先通过Document Loader加载文件,然后对文件进行切分,通过调用模型生成Embedding,最后存储到Vector Store中。这里我们的外部知识库是一个PDF文件,因此我们使用langChain内置的PDFLoader来加载。
typescript
 // src/retriever/index.ts
import { PDFLoader } from "@langchain/community/document_loaders/fs/pdf";
import { RecursiveCharacterTextSplitter } from "@langchain/textsplitters";
import { MemoryVectorStore } from "langchain/vectorstores/memory";
import { AlibabaTongyiEmbeddings } from "@langchain/community/embeddings/alibaba_tongyi";

export const generateRetriever = async () => {
  const loader = new PDFLoader("src/sources/1706.03762v7.pdf");
  const docs = await loader.load();
  const docsList = docs.flat();
  const textSplitter = new RecursiveCharacterTextSplitter({
    chunkSize: 500,
    chunkOverlap: 50,
  });
  const docSplits = await textSplitter.splitDocuments(docsList);
  const vectorStore = await MemoryVectorStore.fromDocuments(
    docSplits,
    new AlibabaTongyiEmbeddings()
  );
  const retriever = vectorStore.asRetriever();
  return retriever;
};
3.3 构建RAG链
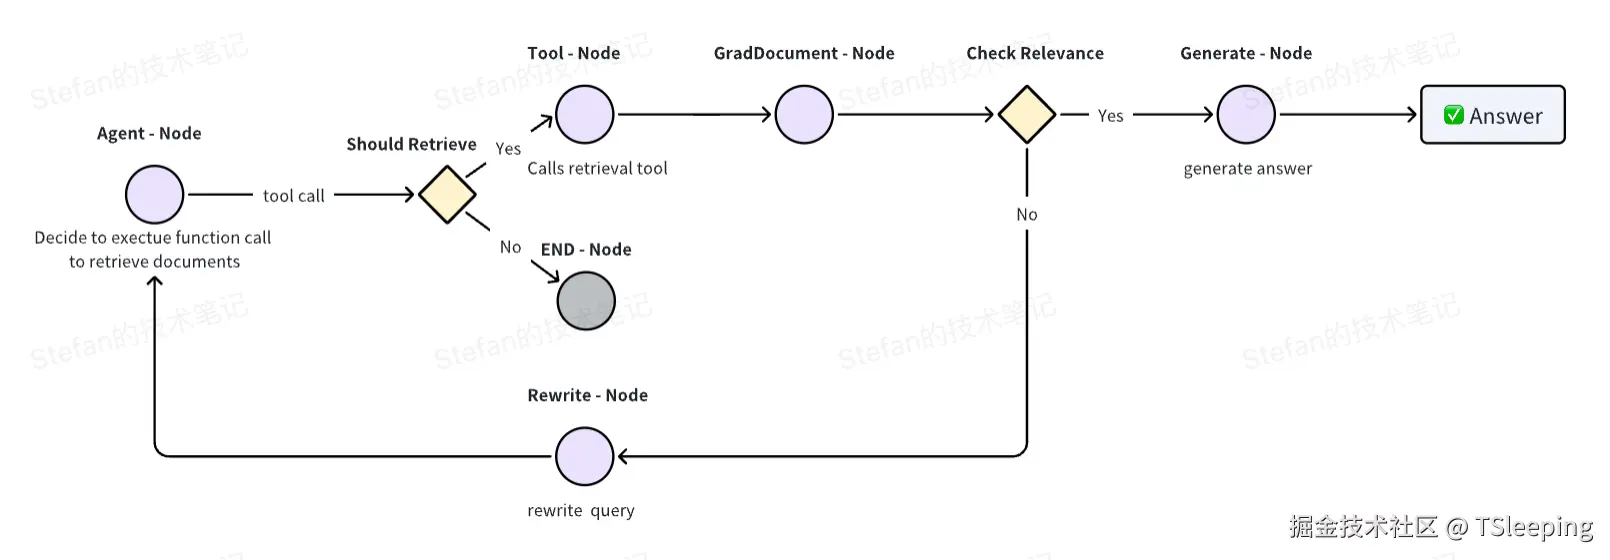
接下来我们需要构建RAG链,这里我们使用langGraph提供的基于图的编排能力,构建节点和边,然后将它们连接起来,最后生成完整的链。具体的步骤如下:
Agent节点,用于判断用户的问题是否需要调用Retriever工具执行,如果执行则流转至Tool节点,否则直接结束。Tool节点,用于执行Retriever方法返回与问题相似的文本片段,并通过GradDocument来计算与用户问题的相关性。Check Relevance可选边,用于判断生成的文本与问题是否相关,相关则流转至Generate节点,最后生成返回结果,否则流转至Rewrite节点。Rewrite节点,用于对用户的问题进行优化和重写,再返回到Agent节点,直至返回的内容与问题是相关的。
Base
第一步需要定义Graph的类型,以及对于创建Tool的工具类的方案,在后续创建Node时陆续会用到。
typescript
// src/agent/base.ts
export const GraphState = Annotation.Root({
  messages: Annotation<BaseMessage[]>({
    reducer: (x, y) => x.concat(y),
    default: () => [],
  }),
});

export const createTools = async (retriever: VectorStoreRetriever) => {
  const tool = createRetrieverTool(retriever, {
    name: "retrieve_attention_is_all_you_need",
    description:
      "Search and return information about the paper <Attention is All You Need>.",
  });
  return [tool as unknown as DynamicTool];
};
Nodes
第二步需要创建对应的节点,总共5个节点:Agent、Tool、GradeDocuments、Rewrite、Generate。
- Agent Node
typescript
// src/agent/nodes.ts
export function agentProxy(retriever: VectorStoreRetriever) {
  return async function (
    state: typeof GraphState.State
  ): Promise<Partial<typeof GraphState.State>> {
    console.log("---CALL AGENT---");
    const { messages } = state;
    // Find the AIMessage which contains the `give_relevance_score` tool call,
    // and remove it if it exists. This is because the agent does not need to know
    // the relevance score.
    const filteredMessages = messages.filter((message) => {
      if (
        "tool_calls" in message &&
        Array.isArray(message.tool_calls) &&
        message.tool_calls.length > 0
      ) {
        return message.tool_calls[0].name !== "give_relevance_score";
      }
      return true;
    });
    const tools = await createTools(retriever);
    const model = new ChatDeepSeek({
      model: CHAT_MODEL_NAME,
      temperature: 1,
      streaming: true,
    }).bindTools(tools);

    const response = await model.invoke(filteredMessages);
    return {
      messages: [response],
    };
  };
}- Tool Node
typescript
// src/agent/nodes.ts
export const createToolNode = async (retriever: VectorStoreRetriever) => {
  const tools = await createTools(retriever);
  const toolNode = new ToolNode<typeof GraphState.State>(tools);
  return toolNode;
};- GradDocuments Node
typescript
// src/agent/nodes.ts
export async function gradeDocuments(
  state: typeof GraphState.State
): Promise<Partial<typeof GraphState.State>> {
  console.log("---GET RELEVANCE---");

  const { messages } = state;
  const tool = {
    name: "give_relevance_score",
    description: "Give a relevance score to the retrieved documents.",
    schema: z.object({
      binaryScore: z.string().describe("Relevance score 'yes' or 'no'"),
    }),
  };

  const prompt = ChatPromptTemplate.fromTemplate(
    `You are a grader assessing relevance of retrieved docs to a user question.
  Here are the retrieved docs:
  \n ------- \n
  {context}
  \n ------- \n
  Here is the user question: {question}
  If the content of the docs are relevant to the users question, score them as relevant.
  Give a binary score 'yes' or 'no' score to indicate whether the docs are relevant to the question.
  Yes: The docs are relevant to the question.
  No: The docs are not relevant to the question.`
  );

  const model = new ChatDeepSeek({
    model: CHAT_MODEL_NAME,
    temperature: 1,
  }).bindTools([tool], {
    tool_choice: tool.name,
  });
  const chain = prompt.pipe(model);
  const lastMessage = messages[messages.length - 1];
  const score = await chain.invoke({
    question: messages[0].content as string,
    context: lastMessage.content as string,
  });

  return {
    messages: [score],
  };
}- Rewrite Node
typescript
// src/agent/nodes.ts
export async function rewrite(
  state: typeof GraphState.State
): Promise<Partial<typeof GraphState.State>> {
  console.log("---TRANSFORM QUERY---");

  const { messages } = state;
  const question = messages[0].content as string;
  const prompt = ChatPromptTemplate.fromTemplate(
    `Look at the input and try to reason about the underlying semantic intent / meaning. \n
Here is the initial question:
\n ------- \n
{question}
\n ------- \n
Formulate an improved question:`
  );

  // Grader
  const model = new ChatDeepSeek({
    model: CHAT_MODEL_NAME,
    temperature: 1,
    streaming: true,
  });
  const response = await prompt.pipe(model).invoke({ question });
  return {
    messages: [response],
  };
}- Generate Node
typescript
// src/agent/nodes.ts
export async function generate(
  state: typeof GraphState.State
): Promise<Partial<typeof GraphState.State>> {
  console.log("---GENERATE---");

  const { messages } = state;
  const question = messages[0].content as string;
  // Extract the most recent ToolMessage
  const lastToolMessage = messages
    .slice()
    .reverse()
    .find((msg) => msg._getType() === "tool");
  if (!lastToolMessage) {
    throw new Error("No tool message found in the conversation history");
  }

  const docs = lastToolMessage.content as string;

  const prompt = await pull<ChatPromptTemplate>("rlm/rag-prompt");

  const llm = new ChatDeepSeek({
    model: CHAT_MODEL_NAME,
    temperature: 1,
    streaming: true,
  });

  const ragChain = prompt.pipe(llm);

  const response = await ragChain.invoke({
    context: docs,
    question,
  });

  return {
    messages: [response],
  };
}
Edges
第三步是建立连接节点之间的边,这里主要有两个可选边的逻辑,shouldRetrieve和checkRelevance,前者用于判断是否需要调用retriever工具,后者判断调用工具结果与用户问题的相关性。
typescript
// src/agent/edges.ts

export function shouldRetrieve(state: typeof GraphState.State): string {
  const { messages } = state;
  console.log("---DECIDE TO RETRIEVE---");
  const lastMessage = messages[messages.length - 1];

  if (
    "tool_calls" in lastMessage &&
    Array.isArray(lastMessage.tool_calls) &&
    lastMessage.tool_calls.length
  ) {
    console.log("---DECISION: RETRIEVE---");
    return "retrieve";
  }
  // If there are no tool calls then we finish.
  return END;
}

export function checkRelevance(state: typeof GraphState.State): string {
  console.log("---CHECK RELEVANCE---");

  const { messages } = state;
  const lastMessage = messages[messages.length - 1];
  if (!("tool_calls" in lastMessage)) {
    throw new Error(
      "The 'checkRelevance' node requires the most recent message to contain tool calls."
    );
  }
  const toolCalls = (lastMessage as AIMessage).tool_calls;
  if (!toolCalls || !toolCalls.length) {
    throw new Error("Last message was not a function message");
  }

  if (toolCalls[0].args.binaryScore === "yes") {
    console.log("---DECISION: DOCS RELEVANT---");
    return "yes";
  }
  console.log("---DECISION: DOCS NOT RELEVANT---");
  return "no";
}
构建RAG链
最后一步就是基于这些节点和边,按照上面的流程图来构建完整的RAG链。
typescript
// src/agent/index.ts
export const createRagAgent = async (retriever: VectorStoreRetriever) => {
  // init action
  const toolNode = await createToolNode(retriever);
  const agent = agentProxy(retriever);

  // Define the graph and nodes
  const workflow = new StateGraph(GraphState)
    .addNode("agent", agent)
    .addNode("retrieve", toolNode)
    .addNode("gradDocuments", gradeDocuments)
    .addNode("rewrite", rewrite)
    .addNode("generate", generate);

  // Add edges
  workflow.addEdge(START, "agent");
  workflow.addConditionalEdges("agent", shouldRetrieve);
  workflow.addEdge("retrieve", "gradDocuments");
  workflow.addConditionalEdges("gradDocuments", checkRelevance, {
    yes: "generate",
    no: "rewrite",
  });
  workflow.addEdge("generate", END);
  workflow.addEdge("rewrite", "agent");

  // Add memory
  // const memory = new MemorySaver();

  // Compile
  const app = workflow.compile({
    // checkpointer: memory,
  });

  return app;
};
3.4 测试效果
到这里我们已经完整地构建了RAG链,接下来就该测试结果了。需要注意的是,在入口文件需要将.env通过dotenv来导入,这样才能调用对应的模型。
typescript
// src/index.ts

const initAgent = async () => {
  const retriever = await generateRetriever();
  const ragAgent = await createRagAgent(retriever);
  const threadId = uuidv4();
  const config = {
    configurable: {
      thread_id: threadId,
    },
  };
  const input1 = {
    messages: [
      new HumanMessage(
        "What's the model architecture of <Attention is All You Need>?"
      ),
    ],
  };
  const result1 = await ragAgent.invoke(input1, config);
  console.log(result1.messages[result1.messages.length - 1].content);
  const input2 = {
    messages: [
      new HumanMessage(
        "Could you please summary the performance or variation of this architecture?"
      ),
    ],
  };
  const result2 = await ragAgent.invoke(input2, config);
  console.log(result2.messages[result2.messages.length - 1].content);
};

initAgent();