1.下载离线安装包
1)确认CPU架构
下线离线安装包前,请先确认用于安装Ollama的服务器CPU架构:
执行以下命令进行查看:
bash
lscpu我的服务器是x86_64位的CPU,如下所示:
bash
Architecture:                    x86_64
CPU op-mode(s):                  32-bit, 64-bit
Byte Order:                      Little Endian
Address sizes:                   46 bits physical, 57 bits virtual
CPU(s):                          224
On-line CPU(s) list:             0-223
Thread(s) per core:              2
Core(s) per socket:              56
Socket(s):                       2
NUMA node(s):                    2
Vendor ID:                       GenuineIntel
CPU family:                      6
Model:                           143
Model name:                      Intel(R) Xeon(R) Platinum 8481C
Stepping:                        8
Frequency boost:                 enabled
CPU MHz:                         800.000
CPU max MHz:                     2001.0000
CPU min MHz:                     800.0000
BogoMIPS:                        4000.00
Virtualization:                  VT-x
L1d cache:                       5.3 MiB
L1i cache:                       3.5 MiB
L2 cache:                        224 MiB
L3 cache:                        210 MiB
NUMA node0 CPU(s):               0-55,112-167
NUMA node1 CPU(s):               56-111,168-223
Vulnerability Itlb multihit:     Not affected
Vulnerability L1tf:              Not affected
Vulnerability Mds:               Not affected
Vulnerability Meltdown:          Not affected
Vulnerability Mmio stale data:   Not affected
Vulnerability Retbleed:          Not affected
Vulnerability Spec store bypass: Mitigation; Speculative Store Bypass disabled via prctl and seccomp
Vulnerability Spectre v1:        Mitigation; usercopy/swapgs barriers and __user pointer sanitization
Vulnerability Spectre v2:        Mitigation; Enhanced IBRS, IBPB conditional, RSB filling, PBRSB-eIBRS SW sequence
Vulnerability Srbds:             Not affected
Vulnerability Tsx async abort:   Not affected
Flags:                           fpu vme de pse tsc msr pae mce cx8 apic sep mtrr pge mca cmov pat pse36 clflush dts acpi mmx fxsr sse sse2 ss ht tm pbe syscall nx pdpe1gb rdtscp lm constant_ts
                                 c art arch_perfmon pebs bts rep_good nopl xtopology nonstop_tsc cpuid aperfmperf tsc_known_freq pni pclmulqdq dtes64 monitor ds_cpl vmx smx est tm2 ssse3 sdbg f
                                 ma cx16 xtpr pdcm pcid dca sse4_1 sse4_2 x2apic movbe popcnt tsc_deadline_timer aes xsave avx f16c rdrand lahf_lm abm 3dnowprefetch cpuid_fault epb cat_l3 cat_l
                                 2 cdp_l3 invpcid_single intel_ppin cdp_l2 ssbd mba ibrs ibpb stibp ibrs_enhanced tpr_shadow vnmi flexpriority ept vpid ept_ad fsgsbase tsc_adjust bmi1 avx2 smep
                                  bmi2 erms invpcid cqm rdt_a avx512f avx512dq rdseed adx smap avx512ifma clflushopt clwb intel_pt avx512cd sha_ni avx512bw avx512vl xsaveopt xsavec xgetbv1 xsav
                                 es cqm_llc cqm_occup_llc cqm_mbm_total cqm_mbm_local split_lock_detect avx_vnni avx512_bf16 wbnoinvd dtherm ida arat pln pts avx512vbmi umip pku ospke waitpkg a
                                 vx512_vbmi2 gfni vaes vpclmulqdq avx512_vnni avx512_bitalg tme avx512_vpopcntdq la57 rdpid bus_lock_detect cldemote movdiri movdir64b enqcmd fsrm md_clear seria
                                 lize tsxldtrk pconfig arch_lbr amx_bf16 avx512_fp16 amx_tile amx_int8 flush_l1d arch_capabilities
2)下载安装介质
这里,我选择下载v0.3.6版本,根据我的CPU架构,我下载的文件为【ollama-linux-amd64】,该版本详细的文件清单地址如下:
https://github.com/ollama/ollama/releases/tag/v0.3.6
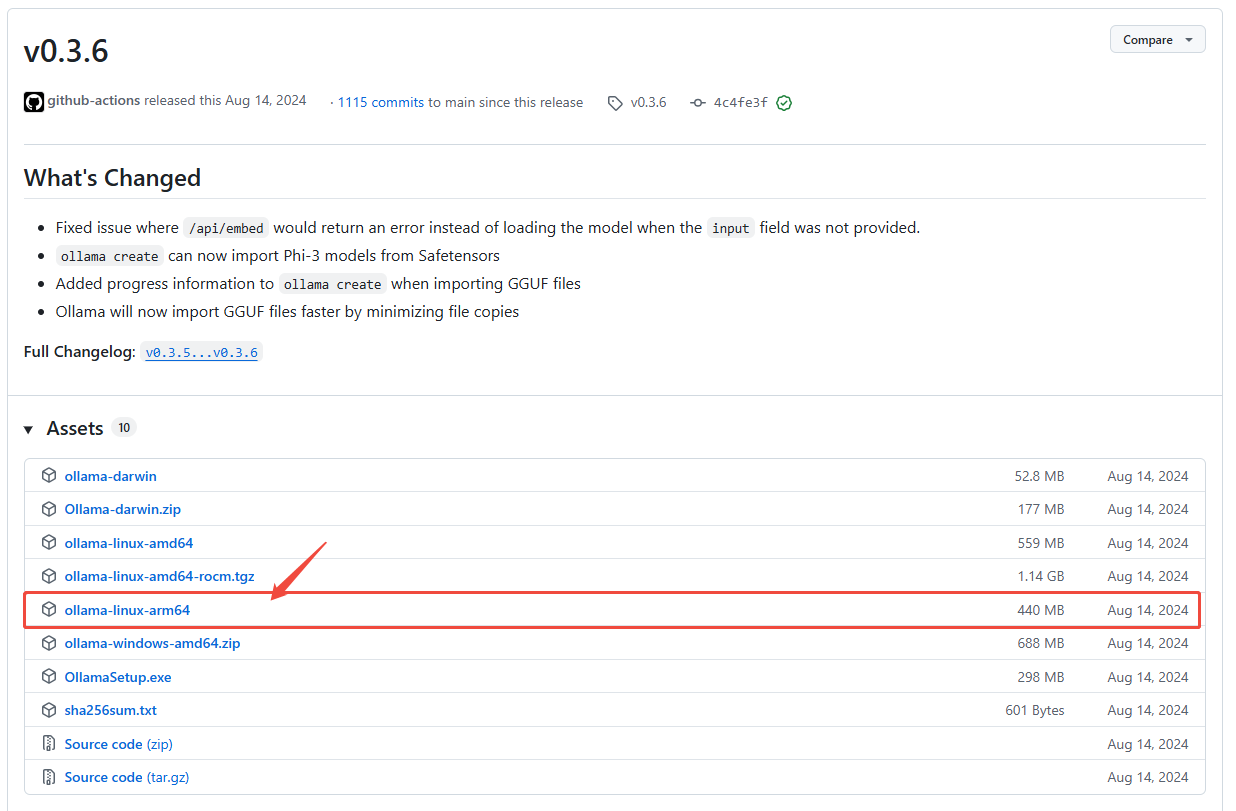 将该文件下载到服务器的【/root/tools/ollama-v.0.3.6】目录下,文件名保持为ollama-linux-amd64。
3)下载安装脚本
安装脚本需要从地址【https://github.com/ollama/ollama/blob/main/scripts/install.sh】下载,下载后,按下图两处进行修改,把安装脚本调整成离线安装脚本:

特别重要:
据观察,官网的该安装脚本会经常修改,可能导致与v0.3.6安装介质不配套了。这里,我把与v0.3.6安装介质配套的、调整后安装脚本内容完整地贴出来,大家可以直接复制并覆盖到install.sh文件进行使用:
bash
#!/bin/sh
# This script installs Ollama on Linux.
# It detects the current operating system architecture and installs the appropriate version of Ollama.

set -eu

status() { echo ">>> $*" >&2; }
error() { echo "ERROR $*"; exit 1; }
warning() { echo "WARNING: $*"; }

TEMP_DIR=$(mktemp -d)
cleanup() { rm -rf $TEMP_DIR; }
trap cleanup EXIT

available() { command -v $1 >/dev/null; }
require() {
    local MISSING=''
    for TOOL in $*; do
        if ! available $TOOL; then
            MISSING="$MISSING $TOOL"
        fi
    done

    echo $MISSING
}

[ "$(uname -s)" = "Linux" ] || error 'This script is intended to run on Linux only.'

ARCH=$(uname -m)
case "$ARCH" in
    x86_64) ARCH="amd64" ;;
    aarch64|arm64) ARCH="arm64" ;;
    *) error "Unsupported architecture: $ARCH" ;;
esac

KERN=$(uname -r)
case "$KERN" in
    *icrosoft*WSL2 | *icrosoft*wsl2) ;;
    *icrosoft) error "Microsoft WSL1 is not currently supported. Please upgrade to WSL2 with 'wsl --set-version <distro> 2'" ;;
    *) ;;
esac

VER_PARAM="${OLLAMA_VERSION:+?version=$OLLAMA_VERSION}"

SUDO=
if [ "$(id -u)" -ne 0 ]; then
    # Running as root, no need for sudo
    if ! available sudo; then
        error "This script requires superuser permissions. Please re-run as root."
    fi

    SUDO="sudo"
fi

NEEDS=$(require curl awk grep sed tee xargs)
if [ -n "$NEEDS" ]; then
    status "ERROR: The following tools are required but missing:"
    for NEED in $NEEDS; do
        echo "  - $NEED"
    done
    exit 1
fi

status "Downloading ollama..."
# [修改处-1]:这里使用了离线安装,因此下行已被我注释,避免下载安装包
# curl --fail --show-error --location --progress-bar -o $TEMP_DIR/ollama "https://ollama.com/download/ollama-linux-${ARCH}${VER_PARAM}"

for BINDIR in /usr/local/bin /usr/bin /bin; do
    echo $PATH | grep -q $BINDIR && break || continue
done

status "Installing ollama to $BINDIR..."
$SUDO install -o0 -g0 -m755 -d $BINDIR
# [修改处-2]:这里第75行被我注释了,再添加了76行,目的是指定离线安装包的文件名。
# $SUDO install -o0 -g0 -m755 $TEMP_DIR/ollama $BINDIR/ollama
$SUDO install -o0 -g0 -m755 ./ollama-linux-amd64  $BINDIR/ollama

install_success() {
    status 'The Ollama API is now available at 127.0.0.1:11434.'
    status 'Install complete. Run "ollama" from the command line.'
}
trap install_success EXIT

# Everything from this point onwards is optional.

configure_systemd() {
    if ! id ollama >/dev/null 2>&1; then
        status "Creating ollama user..."
        $SUDO useradd -r -s /bin/false -U -m -d /usr/share/ollama ollama
    fi
    if getent group render >/dev/null 2>&1; then
        status "Adding ollama user to render group..."
        $SUDO usermod -a -G render ollama
    fi
    if getent group video >/dev/null 2>&1; then
        status "Adding ollama user to video group..."
        $SUDO usermod -a -G video ollama
    fi

    status "Adding current user to ollama group..."
    $SUDO usermod -a -G ollama $(whoami)

    status "Creating ollama systemd service..."
    cat <<EOF | $SUDO tee /etc/systemd/system/ollama.service >/dev/null
[Unit]
Description=Ollama Service
After=network-online.target

[Service]
ExecStart=$BINDIR/ollama serve
User=ollama
Group=ollama
Restart=always
RestartSec=3
Environment="PATH=$PATH"

[Install]
WantedBy=default.target
EOF
    SYSTEMCTL_RUNNING="$(systemctl is-system-running || true)"
    case $SYSTEMCTL_RUNNING in
        running|degraded)
            status "Enabling and starting ollama service..."
            $SUDO systemctl daemon-reload
            $SUDO systemctl enable ollama

            start_service() { $SUDO systemctl restart ollama; }
            trap start_service EXIT
            ;;
    esac
}

if available systemctl; then
    configure_systemd
fi

if ! available lspci && ! available lshw; then
    warning "Unable to detect NVIDIA/AMD GPU. Install lspci or lshw to automatically detect and install GPU dependencies."
    exit 0
fi

check_gpu() {
    # Look for devices based on vendor ID for NVIDIA and AMD
    case $1 in
        lspci)
            case $2 in
                nvidia) available lspci && lspci -d '10de:' | grep -q 'NVIDIA' || return 1 ;;
                amdgpu) available lspci && lspci -d '1002:' | grep -q 'AMD' || return 1 ;;
            esac ;;
        lshw)
            case $2 in
                nvidia) available lshw && $SUDO lshw -c display -numeric | grep -q 'vendor: .* \[10DE\]' || return 1 ;;
                amdgpu) available lshw && $SUDO lshw -c display -numeric | grep -q 'vendor: .* \[1002\]' || return 1 ;;
            esac ;;
        nvidia-smi) available nvidia-smi || return 1 ;;
    esac
}

if check_gpu nvidia-smi; then
    status "NVIDIA GPU installed."
    exit 0
fi

if ! check_gpu lspci nvidia && ! check_gpu lshw nvidia && ! check_gpu lspci amdgpu && ! check_gpu lshw amdgpu; then
    install_success
    warning "No NVIDIA/AMD GPU detected. Ollama will run in CPU-only mode."
    exit 0
fi

if check_gpu lspci amdgpu || check_gpu lshw amdgpu; then
    # Look for pre-existing ROCm v6 before downloading the dependencies
    for search in "${HIP_PATH:-''}" "${ROCM_PATH:-''}" "/opt/rocm"; do
        if [ -n "${search}" ] && [ -e "${search}/lib/libhipblas.so.2" ]; then
            status "Compatible AMD GPU ROCm library detected at ${search}"
            install_success
            exit 0
        fi
    done

    status "Downloading AMD GPU dependencies..."
    $SUDO rm -rf /usr/share/ollama/lib
    $SUDO chmod o+x /usr/share/ollama
    $SUDO install -o ollama -g ollama -m 755 -d /usr/share/ollama/lib/rocm
    curl --fail --show-error --location --progress-bar "https://ollama.com/download/ollama-linux-amd64-rocm.tgz${VER_PARAM}" \
        | $SUDO tar zx --owner ollama --group ollama -C /usr/share/ollama/lib/rocm .
    install_success
    status "AMD GPU dependencies installed."
    exit 0
fi

# ref: https://docs.nvidia.com/cuda/cuda-installation-guide-linux/index.html#rhel-7-centos-7
# ref: https://docs.nvidia.com/cuda/cuda-installation-guide-linux/index.html#rhel-8-rocky-8
# ref: https://docs.nvidia.com/cuda/cuda-installation-guide-linux/index.html#rhel-9-rocky-9
# ref: https://docs.nvidia.com/cuda/cuda-installation-guide-linux/index.html#fedora
install_cuda_driver_yum() {
    status 'Installing NVIDIA repository...'
    case $PACKAGE_MANAGER in
        yum)
            $SUDO $PACKAGE_MANAGER -y install yum-utils
            $SUDO $PACKAGE_MANAGER-config-manager --add-repo https://developer.download.nvidia.com/compute/cuda/repos/$1$2/$(uname -m)/cuda-$1$2.repo
            ;;
        dnf)
            $SUDO $PACKAGE_MANAGER config-manager --add-repo https://developer.download.nvidia.com/compute/cuda/repos/$1$2/$(uname -m)/cuda-$1$2.repo
            ;;
    esac

    case $1 in
        rhel)
            status 'Installing EPEL repository...'
            # EPEL is required for third-party dependencies such as dkms and libvdpau
            $SUDO $PACKAGE_MANAGER -y install https://dl.fedoraproject.org/pub/epel/epel-release-latest-$2.noarch.rpm || true
            ;;
    esac

    status 'Installing CUDA driver...'

    if [ "$1" = 'centos' ] || [ "$1$2" = 'rhel7' ]; then
        $SUDO $PACKAGE_MANAGER -y install nvidia-driver-latest-dkms
    fi

    $SUDO $PACKAGE_MANAGER -y install cuda-drivers
}

# ref: https://docs.nvidia.com/cuda/cuda-installation-guide-linux/index.html#ubuntu
# ref: https://docs.nvidia.com/cuda/cuda-installation-guide-linux/index.html#debian
install_cuda_driver_apt() {
    status 'Installing NVIDIA repository...'
    curl -fsSL -o $TEMP_DIR/cuda-keyring.deb https://developer.download.nvidia.com/compute/cuda/repos/$1$2/$(uname -m)/cuda-keyring_1.1-1_all.deb

    case $1 in
        debian)
            status 'Enabling contrib sources...'
            $SUDO sed 's/main/contrib/' < /etc/apt/sources.list | $SUDO tee /etc/apt/sources.list.d/contrib.list > /dev/null
            if [ -f "/etc/apt/sources.list.d/debian.sources" ]; then
                $SUDO sed 's/main/contrib/' < /etc/apt/sources.list.d/debian.sources | $SUDO tee /etc/apt/sources.list.d/contrib.sources > /dev/null
            fi
            ;;
    esac

    status 'Installing CUDA driver...'
    $SUDO dpkg -i $TEMP_DIR/cuda-keyring.deb
    $SUDO apt-get update

    [ -n "$SUDO" ] && SUDO_E="$SUDO -E" || SUDO_E=
    DEBIAN_FRONTEND=noninteractive $SUDO_E apt-get -y install cuda-drivers -q
}

if [ ! -f "/etc/os-release" ]; then
    error "Unknown distribution. Skipping CUDA installation."
fi

. /etc/os-release

OS_NAME=$ID
OS_VERSION=$VERSION_ID

PACKAGE_MANAGER=
for PACKAGE_MANAGER in dnf yum apt-get; do
    if available $PACKAGE_MANAGER; then
        break
    fi
done

if [ -z "$PACKAGE_MANAGER" ]; then
    error "Unknown package manager. Skipping CUDA installation."
fi

if ! check_gpu nvidia-smi || [ -z "$(nvidia-smi | grep -o "CUDA Version: [0-9]*\.[0-9]*")" ]; then
    case $OS_NAME in
        centos|rhel) install_cuda_driver_yum 'rhel' $(echo $OS_VERSION | cut -d '.' -f 1) ;;
        rocky) install_cuda_driver_yum 'rhel' $(echo $OS_VERSION | cut -c1) ;;
        fedora) [ $OS_VERSION -lt '37' ] && install_cuda_driver_yum $OS_NAME $OS_VERSION || install_cuda_driver_yum $OS_NAME '37';;
        amzn) install_cuda_driver_yum 'fedora' '37' ;;
        debian) install_cuda_driver_apt $OS_NAME $OS_VERSION ;;
        ubuntu) install_cuda_driver_apt $OS_NAME $(echo $OS_VERSION | sed 's/\.//') ;;
        *) exit ;;
    esac
fi

if ! lsmod | grep -q nvidia; then
    KERNEL_RELEASE="$(uname -r)"
    case $OS_NAME in
        rocky) $SUDO $PACKAGE_MANAGER -y install kernel-devel kernel-headers ;;
        centos|rhel|amzn) $SUDO $PACKAGE_MANAGER -y install kernel-devel-$KERNEL_RELEASE kernel-headers-$KERNEL_RELEASE ;;
        fedora) $SUDO $PACKAGE_MANAGER -y install kernel-devel-$KERNEL_RELEASE ;;
        debian|ubuntu) $SUDO apt-get -y install linux-headers-$KERNEL_RELEASE ;;
        *) exit ;;
    esac

    NVIDIA_CUDA_VERSION=$($SUDO dkms status | awk -F: '/added/ { print $1 }')
    if [ -n "$NVIDIA_CUDA_VERSION" ]; then
        $SUDO dkms install $NVIDIA_CUDA_VERSION
    fi

    if lsmod | grep -q nouveau; then
        status 'Reboot to complete NVIDIA CUDA driver install.'
        exit 0
    fi

    $SUDO modprobe nvidia
fi


status "NVIDIA CUDA drivers installed."
处理好的离线安装脚本install.sh文件存放到安装介质ollama-v.0.3.6相同目录下,并确保安装脚本install.sh文件具有执行权限。

给安装脚本install.sh文件分配执行权限:
bash
chmod +x install.sh2.执行离线安装
进入【/root/tools/ollama-v.0.3.6】目录后执行以下命令进行安装:
bash
./install.sh3.配置大模型下载目录
创建大模型缓存目录ollama_cache:
bash
mkdir -p /root/ai/ollama-v.0.3.6/ollama_cache进入当前用户的home目录,用vim打开.bashrc文件进行修改:
bash
cd
vim ~/.bashrc
在.bashrc文件末尾,添加以下环境变量内容,用于指定大模型下载目录:
bash
# 配置OLLAMA_MODELS环境变量,指定大模型下载目录
export OLLAMA_MODELS=/root/ai/ollama-v.0.3.6/ollama_cache
保存后,执行以下命令使其生效:
bash
source .bashrc4.运行管理工具Ollama
执行以下命令启动Ollama大模型管理工具:
bash
ollama serve此时将会输出相应的日志:
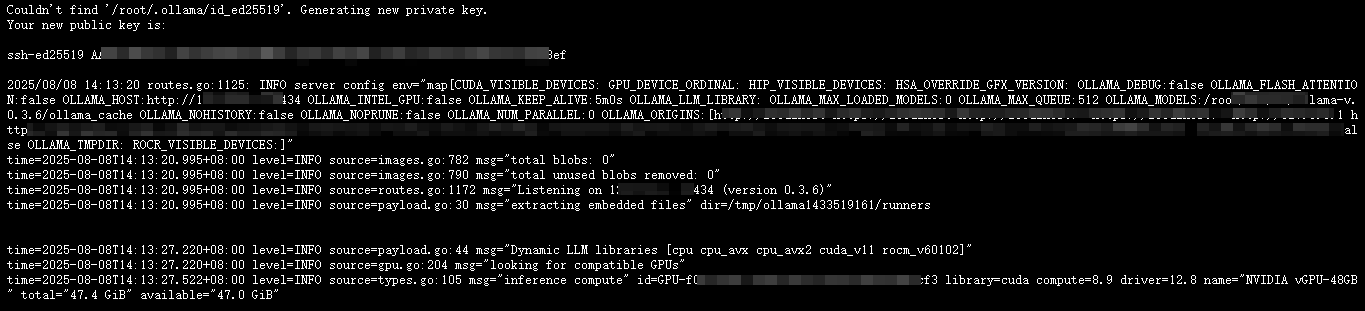 5.运行大模型
运行大模型前,可以使用以下命令查看已安装的大模型:
bash
ollama list在我的服务器上,返回信息如下:

运行大模型的命令如下:
bash
ollama run <大模型名称>这里以大模型qwen为例进行说明。通常,我们是需要先下载,但如果没有事先下载且服务器可以联网的情况下,执行运行命令也会自动下载,如下图所示:
 命令运行以后,我们可以输入文字验证效果,如下所示:

6.设置外网访问
首先,确认ollama服务的监听端口是多少:
bash
netstat -naop | grep ollama这里,返回的信息如下:

因此,只需要在/etc/profile文件的最末尾添加以下配置信息:
bash
# 配置ollama外网访问端口
export OLLAMA_HOST=0.0.0.0:11434
执行以下命令使其生效:
bash
source /etc/profile最后,需要重启下ollama服务才行。