在当今这个数字化的世界里,数据安全至关重要。无论是网上银行、即时通讯还是云存储,我们都依赖于强大的加密技术来保护我们的信息不被窃取或篡改。在这众多加密技术中,高级加密标准(AES)无疑是现代对称加密的基石。
AES 本身是一种块加密算法(Block Cipher),它以固定大小的块(对于 AES 是 16 字节)来处理数据。但如何安全、高效地加密一整条长于 16 字节的数据呢?这就需要引入 "块加密模式"(Block Cipher Mode of Operation)。这些模式定义了如何使用块加密算法来处理任意长度的数据。
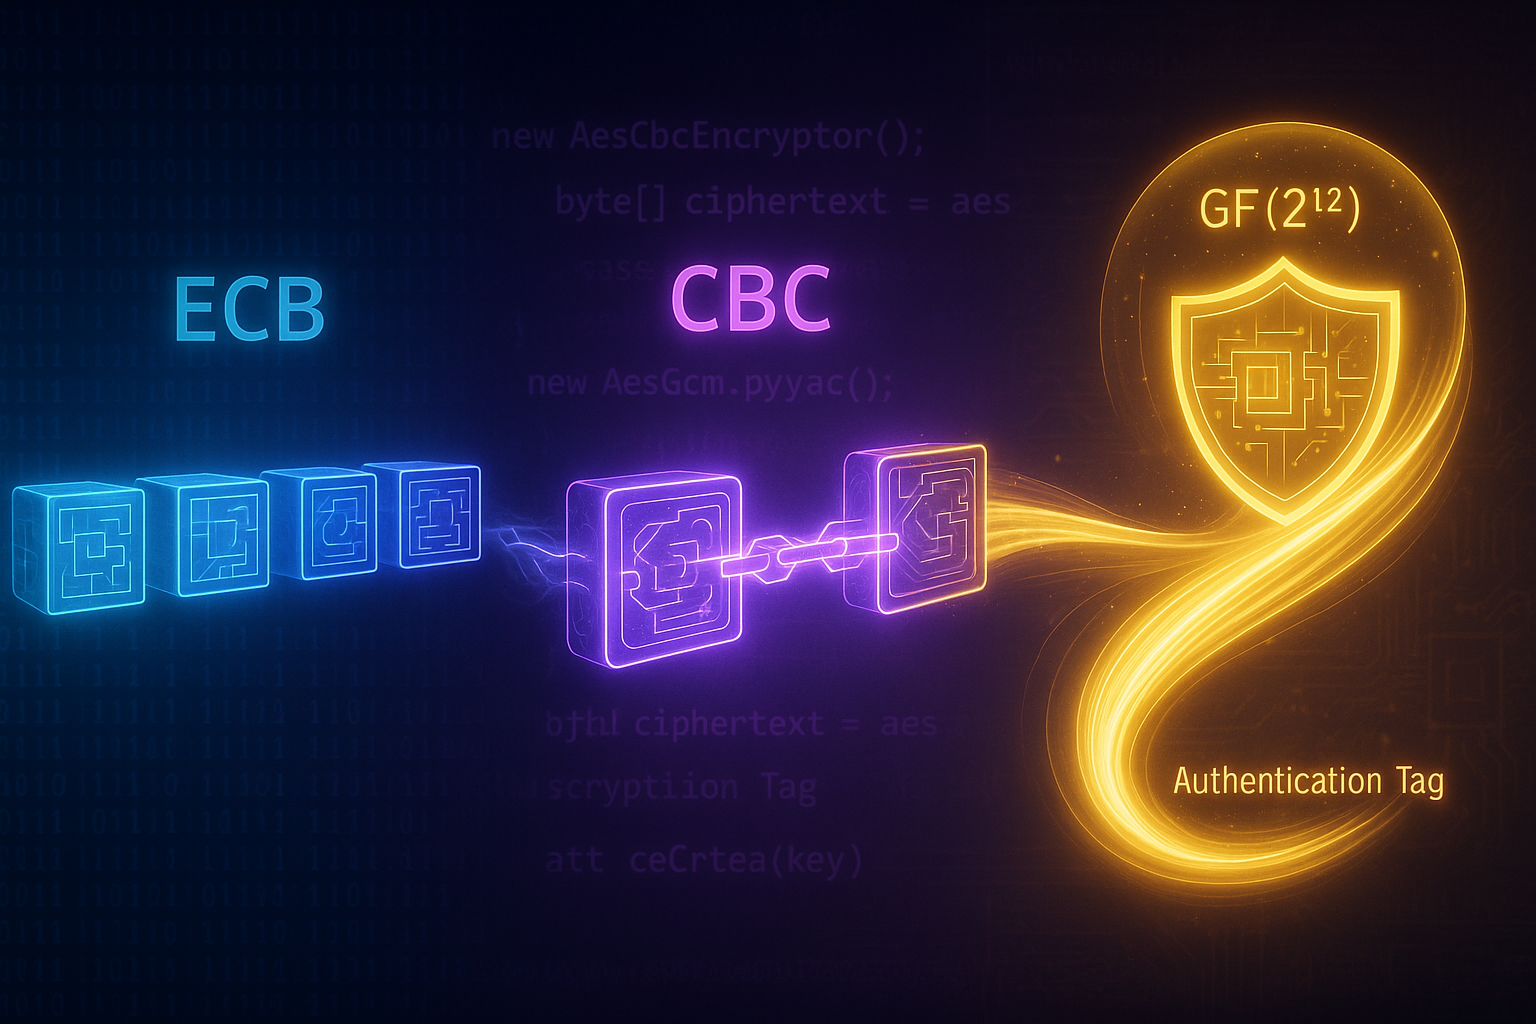
本文将带领大家穿越时空,回顾 AES 块加密模式从 70 年代至今的发展历程,主要聚焦于三个关键阶段:ECB -> CBC -> GCM。我们将深入探讨每个阶段的优缺点,并通过 C# 代码示例,直观地展示它们在实际应用中的工作方式和特性。
70年代:ECB 模式 (Electronic Codebook)
ECB 是最古老、最简单的块加密模式。它的工作原理非常直接:将明文数据分成固定大小的块(AES为16字节),然后使用相同的密钥对每个块进行独立的加密。
优点:
- 简单:实现非常简单。
- 可并行化:由于每个块的加密都是独立的,因此可以并行处理,加密速度快。
缺点:
- 安全性极低:这是 ECB 模式的致命缺陷。如果明文中存在重复的块,那么加密后的密文中也会出现相同的重复块。这会暴露原始数据的模式和结构,使得攻击者能够轻易地分析出一些信息。
传输方式:
ECB 模式的通信非常简单。通信双方只需要提前协商好密钥(通常通过非对称加密等带外方式),要传输的数据就是纯粹的密文。由于是分块加密,明文数据在加密前需要被填充(Padding)到块大小的整数倍。
值得一提的是,ECB 和 CBC 这些经典的块加密模式,其概念和设计可以追溯到上世纪70年代,最初是为当时的主流加密算法 DES 所设计的。后来,当 AES 在2001年成为新标准后,这些成熟的模式也被自然地沿用到了 AES 上。
C# 实现
在 C# 中,我们可以使用 System.Security.Cryptography.Aes 类来实现 ECB 加密。
csharp
using System;
using System.Security.Cryptography;
using System.Text;

public class EcbExample
{
    public static byte[] Encrypt(byte[] plainText, byte[] key)
    {
        using (var aes = Aes.Create())
        {
            aes.Key = key;
            aes.Mode = CipherMode.ECB;
            // PKCS7 padding is default and recommended
            aes.Padding = PaddingMode.PKCS7;

            using (var encryptor = aes.CreateEncryptor(aes.Key, aes.IV)) // IV is ignored in ECB mode
            {
                return encryptor.TransformFinalBlock(plainText, 0, plainText.Length);
            }
        }
    }

    public static byte[] Decrypt(byte[] cipherText, byte[] key)
    {
        using (var aes = Aes.Create())
        {
            aes.Key = key;
            aes.Mode = CipherMode.ECB;
            aes.Padding = PaddingMode.PKCS7;

            using (var decryptor = aes.CreateDecryptor(aes.Key, aes.IV)) // IV is ignored in ECB mode
            {
                return decryptor.TransformFinalBlock(cipherText, 0, cipherText.Length);
            }
        }
    }
}

// --- 测试 ---
byte[] key = new byte[] { 0x00, 0x01, 0x02, 0x03, 0x04, 0x05, 0x06, 0x07, 0x08, 0x09, 0x0A, 0x0B, 0x0C, 0x0D, 0x0E, 0x0F };
// 两个相同的块 "Hello, World! 1" 和 "Hello, World! 1"
byte[] plainText = Encoding.UTF8.GetBytes("Hello, World! 1Hello, World! 1");
byte[] payload = EcbExample.Encrypt(plainText, key);

// 观察输出,你会发现加密后的 Base64 字符串中存在重复的片段
Console.WriteLine($"Plain text blocks are identical, notice the repeating pattern in ciphertext:");
Console.WriteLine($"Payload length: {payload.Length}: {Convert.ToBase64String(payload)}");

byte[] decrypted = EcbExample.Decrypt(payload, key);
Console.WriteLine($"Decrypted: {Encoding.UTF8.GetString(decrypted)}");
输出如下:
Plain text blocks are identical, notice the repeating pattern in ciphertext:
Payload length: 32: 9YDAsBnGsYVSgd6jiGiPMAPy1HYfMI7/noh3zWZ/u3k=
Decrypted: Hello, World! 1Hello, World! 1
ECB 的缺陷:图像加密演示
为了更直观地展示 ECB 模式的缺陷,我们用它来加密一张 RGB24 格式的位图。我们将使用 OpenCvSharp4 库来处理图像数据。
注意: 此代码需要安装 OpenCvSharp4/OpenCvSharp4.runtime.win等 NuGet 包。
csharp
using OpenCvSharp4;

public static class EcbBitmapDemo
{
    public static void DemonstrateFlaw(byte[] imageBytes, byte[] key)
    {
        using (var originalBitmap = Cv2.ImDecode(imageBytes, ImreadModes.Color))
        {
            // 获取像素的原始字节数据
            byte[] pixelData = originalBitmap.AsSpan<byte>().ToArray();

            // 使用ECB模式加密像素数据
            // 注意:为了演示,我们只加密像素数据,文件头等元数据保持不变
            // 这也是为什么加密后文件仍能被识别为图片
            byte[] encryptedPixelData = EcbExample.Encrypt(pixelData, key);

			// 创建一个新的位图来存放加密后的数据
			using (var encryptedBitmap = new Mat(originalBitmap.Rows, originalBitmap.Cols, originalBitmap.Type()))
			{
				// 因为PKCS7填充可能会增加数据长度,而我们为了可视化,只需将加密后与原始图像等长的数据写回即可
				Marshal.Copy(encryptedPixelData[..encryptedBitmap.AsSpan<byte>().Length], 0, encryptedBitmap.Data, encryptedBitmap.AsSpan<byte>().Length);

                // 保存加密后的图像
                Cv2.ImWrite("encrypted_image.png", encryptedBitmap);
            }
        }
	}
}

// 调用
using HttpClient http = new();
byte[] imageBytes = await http.GetByteArrayAsync("https://cv-public.sdcb.pub/2025/qq-qrcode-dotnet666.jpg");
EcbBitmapDemo.DemonstrateFlaw(imageBytes, key);
// 此时查看输出的 `encrypted_image.png` 文件,你会发现图像的颜色变得混乱,但原始图像的轮廓依然清晰可见。
当您使用一张类似下面的图片进行加密时:

结果输出如下:
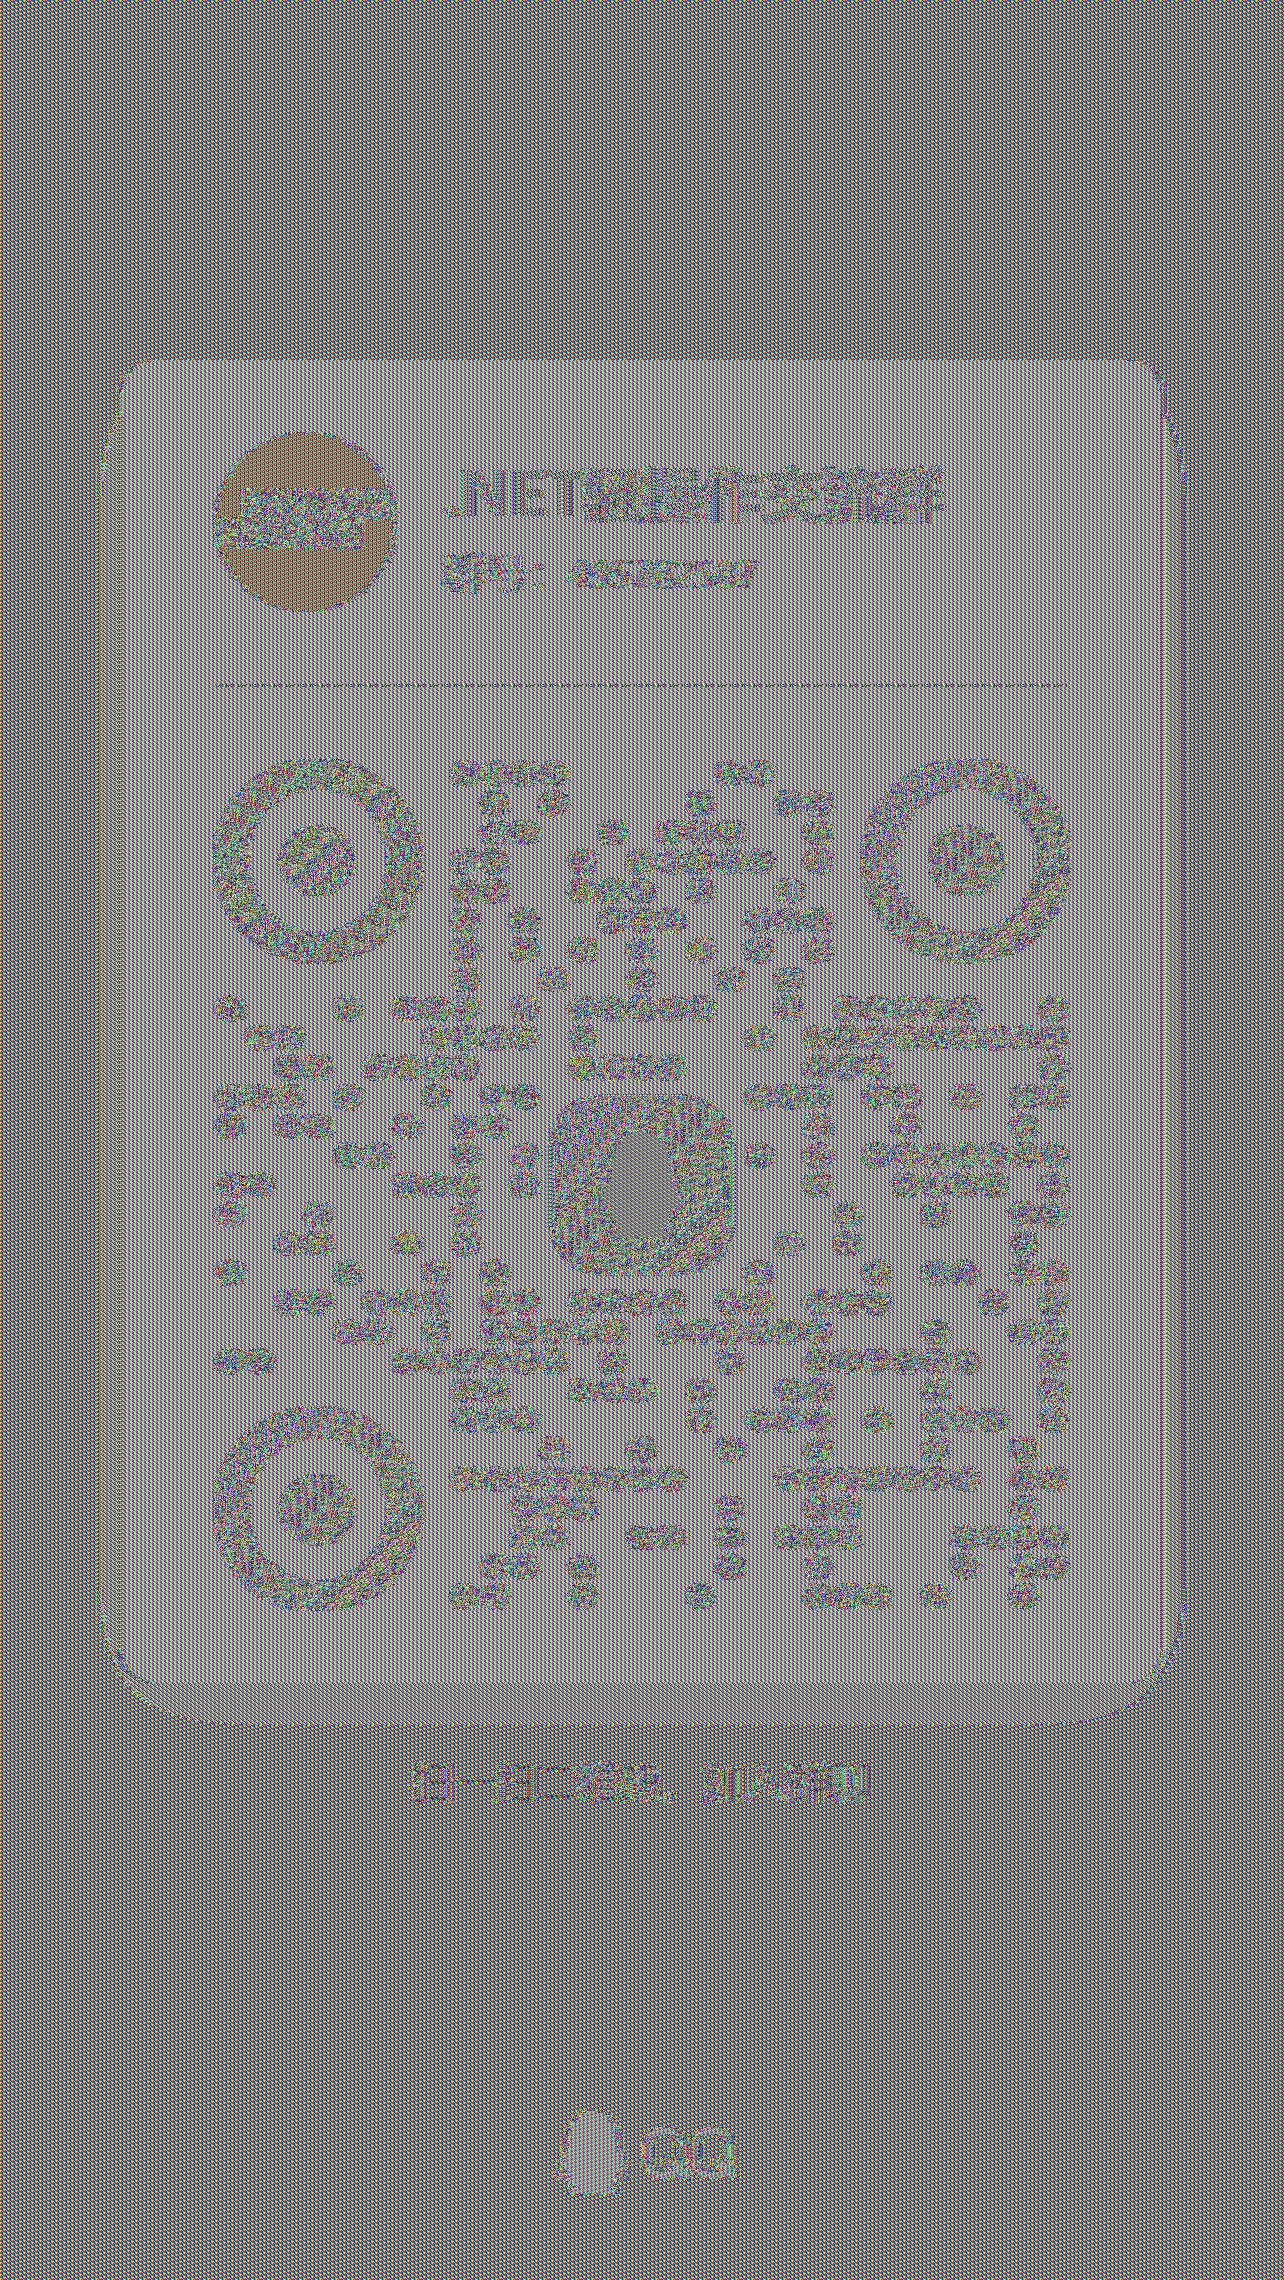
你会惊奇地发现,尽管图像的颜色变得混乱,但原始图像的轮廓,包括二维码、甚至文字等图案依然清晰可见!这是因为图像中大面积的相同颜色(例如背景的白色)被加密成了相同的密文块,从而暴露了原始数据的结构。这在现实世界的应用中是绝对不能接受的。
70年代末:CBC 模式 (Cipher Block Chaining)
为了解决 ECB 模式的安全问题,CBC 模式应运而生。它引入了一个名为**初始向量(Initialization Vector, IV)**的概念。
在 CBC 模式中,每个明文块在加密前,都会先与前一个密文块进行异或(XOR)操作。对于第一个明文块,由于没有"前一个密文块",它会与 IV 进行异或操作。
C_i = E_K(P_i \\oplus C_{i-1})
C_0 = E_K(P_0 \\oplus IV)
优点:
- 安全性高:通过引入 IV 和链式操作,即使明文块相同,产生的密文块也不同,成功掩盖了原文的模式。
- 广泛应用:是 TLS 1.2 等许多协议中长期使用的标准模式。
缺点:
- 加密过程无法并行:由于每个块的加密都依赖于前一个块的加密结果,因此加密过程是串行的,在需要高吞吐量的场景下性能受限。
- 解密过程可以并行:值得注意的是,解密过程(P_i = D_K(C_i) \\oplus C_{i-1})是可以并行的,因为解密每个块只需要当前密文块和前一个密文块。
- 容易受到填充预言攻击(Padding Oracle Attack):虽然 CBC 本身是安全的,但如果实现不当(例如,泄露了关于填充是否正确的错误信息),它可能会受到此类攻击。
传输方式:
CBC 模式下,传输的数据需要包含 IV 和密文。IV 是公开的,不需要保密,但必须是随机且每次加密都不同的。通常的做法是将 IV 放置在密文的前面一起传输。
C# 实现
csharp
public class CbcExample
{
    public static byte[] Encrypt(byte[] plainText, byte[] key)
    {
        using (var aes = Aes.Create())
        {
            aes.Key = key;
            aes.Mode = CipherMode.CBC; // 设置为 CBC 模式
            aes.Padding = PaddingMode.PKCS7;
            // Aes.Create() 会自动生成一个随机的 IV
            byte[] iv = aes.IV;

            using (var encryptor = aes.CreateEncryptor(aes.Key, aes.IV))
            {
                byte[] cipherText = encryptor.TransformFinalBlock(plainText, 0, plainText.Length);

                // 将 IV 和密文拼接在一起传输
                byte[] result = new byte[iv.Length + cipherText.Length];
                Buffer.BlockCopy(iv, 0, result, 0, iv.Length);
                Buffer.BlockCopy(cipherText, 0, result, iv.Length, cipherText.Length);

                return result;
            }
        }
    }

    public static byte[] Decrypt(byte[] cipherTextWithIv, byte[] key)
    {
        using (var aes = Aes.Create())
        {
            aes.Key = key;
            aes.Mode = CipherMode.CBC;
            aes.Padding = PaddingMode.PKCS7;

            // 从传输的数据中提取 IV
            byte[] iv = new byte[aes.BlockSize / 8];
            Buffer.BlockCopy(cipherTextWithIv, 0, iv, 0, iv.Length);

            // 提取真正的密文
            byte[] cipherText = new byte[cipherTextWithIv.Length - iv.Length];
            Buffer.BlockCopy(cipherTextWithIv, iv.Length, cipherText, 0, cipherText.Length);

            aes.IV = iv;

            using (var decryptor = aes.CreateDecryptor(aes.Key, aes.IV))
            {
                return decryptor.TransformFinalBlock(cipherText, 0, cipherText.Length);
            }
        }
    }
}

// --- 测试 ---
byte[] keyCbc = new byte[] { 0x10, 0x11, 0x12, 0x13, 0x14, 0x15, 0x16, 0x17, 0x18, 0x19, 0x1A, 0x1B, 0x1C, 0x1D, 0x1E, 0x1F };
byte[] payloadCbc = CbcExample.Encrypt(Encoding.UTF8.GetBytes("Hello, World!"), keyCbc);
// payload 是 IV + 密文
Console.WriteLine($"--- CBC Example ---");
Console.WriteLine($"Payload (IV+Cipher) length: {payloadCbc.Length}: {Convert.ToBase64String(payloadCbc)}");
byte[] decryptedCbc = CbcExample.Decrypt(payloadCbc, keyCbc);
Console.WriteLine($"Decrypted: {Encoding.UTF8.GetString(decryptedCbc)}");
输出如下:
--- CBC Example ---
Payload (IV+Cipher) length: 32: 065/eNjJAgk87D2EDs/VQy7nKIME2zDXZBivs6W2/c4=
Decrypted: Hello, World!
2007年:GCM 模式 (Galois/Counter Mode)
随着对性能和安全性的要求越来越高,CTR 和 GCM 模式应运而生。
CTR (Counter) 模式 是 GCM 的前身。它将块加密算法(如AES)转换成了一个流加密算法。它通过加密一个递增的"计数器"来生成一个密钥流,然后将这个密钥流与明文进行异或操作得到密文。由于每个计数器的加密都是独立的,CTR 模式完全可以并行化,性能极高。
GCM (Galois/Counter Mode) 则是 CTR 模式的"究极进化版"。它是一种认证加密(Authenticated Encryption, AE)模式,更准确地说是带有关联数据的认证加密(Authenticated Encryption with Associated Data, AEAD)。
GCM 模式 = CTR 模式加密 (提供机密性) + GMAC (提供完整性验证)
优点:
- 高性能:与 CTR 模式一样,GCM 的加解密过程都可以完全并行化,通常比 CBC 快得多,尤其是在有硬件加速支持的现代 CPU 上。
- 同时提供机密性和完整性 :GCM 在加密的同时会生成一个认证标签(Authentication Tag)。接收方在解密时,不仅需要密钥和 Nonce,还需要这个 Tag。如果密文或"关联数据"(如不加密的元数据)在传输过程中被篡改,Tag 验证就会失败,解密操作会直接抛出异常。这从根本上解决了 CBC 模式可能被篡改的问题。
- 流式处理:作为流加密模式,GCM 不需要对明文进行填充(Padding),可以处理任意长度的数据。
缺点:
- 实现复杂:GCM 的内部实现比 CBC 复杂得多。
- Nonce 复用是灾难性的 :与 IV 类似,GCM 使用一个称为 Nonce(Number used once)的值。Nonce 必须保证对于同一个密钥永远不重复使用。一旦 Nonce 被复用,会导致灾难性的安全后果,攻击者可以恢复出明文。Nonce 通常为 12 字节。
传输方式:
GCM 模式下,传输的数据通常包含 Nonce 、认证标签 (Tag) 和密文。这三者都是公开的,接收方需要全部这三样东西以及共享密钥才能成功解密和验证。
C# 实现
从 .NET Core 3.0 开始,C# 提供了 System.Security.Cryptography.AesGcm 类来原生支持 GCM 模式。
csharp
using System.Security.Cryptography;

public class GcmExample
{
    private const int NonceSize = 12; // 96 bits, a standard nonce size for GCM
    private const int TagSize = 16;   // 128 bits, a standard tag size for GCM

    public static byte[] Encrypt(byte[] plainText, byte[] key)
    {
        // Nonce must be random and unique for each encryption with the same key
        byte[] nonce = new byte[NonceSize];
        RandomNumberGenerator.Fill(nonce);

        byte[] tag = new byte[TagSize];
        byte[] cipherText = new byte[plainText.Length];

        using (var aesGcm = new AesGcm(key, TagSize))
        {
            aesGcm.Encrypt(nonce, plainText, cipherText, tag);
        }

        // For transmission, we concatenate nonce, tag, and ciphertext
        byte[] result = new byte[nonce.Length + tag.Length + cipherText.Length];
        Buffer.BlockCopy(nonce, 0, result, 0, nonce.Length);
        Buffer.BlockCopy(tag, 0, result, nonce.Length, tag.Length);
        Buffer.BlockCopy(cipherText, 0, result, nonce.Length + tag.Length, cipherText.Length);

        return result;
    }

    public static byte[] Decrypt(byte[] cipherTextWithNonceAndTag, byte[] key)
    {
        byte[] nonce = new byte[NonceSize];
        byte[] tag = new byte[TagSize];
        byte[] cipherText = new byte[cipherTextWithNonceAndTag.Length - NonceSize - TagSize];

        // Extract nonce, tag, and ciphertext from the payload
        Buffer.BlockCopy(cipherTextWithNonceAndTag, 0, nonce, 0, nonce.Length);
        Buffer.BlockCopy(cipherTextWithNonceAndTag, nonce.Length, tag, 0, tag.Length);
        Buffer.BlockCopy(cipherTextWithNonceAndTag, nonce.Length + tag.Length, cipherText, 0, cipherText.Length);

        byte[] decryptedData = new byte[cipherText.Length];

        using (var aesGcm = new AesGcm(key, TagSize))
        {
            // Decrypt will throw AuthenticationTagMismatchException if the tag is invalid
            aesGcm.Decrypt(nonce, cipherText, tag, decryptedData);
        }

        return decryptedData;
    }
}

// --- 测试 ---
byte[] keyGcm = new byte[] { 0x20, 0x21, 0x22, 0x23, 0x24, 0x25, 0x26, 0x27, 0x28, 0x29, 0x2A, 0x2B, 0x2C, 0x2D, 0x2E, 0x2F };
byte[] payloadGcm = GcmExample.Encrypt(Encoding.UTF8.GetBytes("Hello, World!"), keyGcm);
// payload 是 Nonce + Tag + 密文
Console.WriteLine($"\n--- GCM Example ---");
Console.WriteLine($"Payload (Nonce+Tag+Cipher) length: {payloadGcm.Length}: {Convert.ToBase64String(payloadGcm)}");
byte[] decryptedGcm = GcmExample.Decrypt(payloadGcm, keyGcm);
Console.WriteLine($"Decrypted: {Encoding.UTF8.GetString(decryptedGcm)}");
输出如下:
--- GCM Example ---
Payload (Nonce+Tag+Cipher) length: 41: mPSeXCj9iJYwUZ3RCAxbAFHVKPB5/POWtI/+Fx5dIRb1nlsPWwWX8kg=
Decrypted: Hello, World!
你可能想问,为什么长度是41呢?让我们算一算:
- Nonce: 12字节
- Tag: 16字节
- Ciphertext: 13字节("Hello, World!")
- 总长度: 12 + 16 + 13 = 41字节刚刚好,是这样来的,GCM不需要做任何填充。
完整性验证:CBC vs GCM
GCM 最重要的特性之一就是内置的完整性验证。如果密文在传输中被篡改,GCM 会立即发现并拒绝解密。而 CBC 模式则无法做到这一点,它会"成功"解密,但得到一堆乱码,应用程序需要自己去判断解密后的数据是否有效(比如,通过检查 JSON 反序列化是否成功)。
让我们来演示一下:
csharp
public static void TamperingDemo()
{
    Console.WriteLine("--- Tampering Demonstration ---");
    byte[] key = new byte[16];
    RandomNumberGenerator.Fill(key);
    // 1. 使用更长的明文,确保至少有两个密文块
    byte[] plainText = Encoding.UTF8.GetBytes("This is a much longer secret message to demonstrate the vulnerability!");

    // --- CBC Tampering ---
    Console.WriteLine("\nTesting CBC tampering...");
    byte[] cbcPayload = CbcExample.Encrypt(plainText, key);

    Console.WriteLine($"Original CBC payload length: {cbcPayload.Length} bytes.");
    // IV (16 bytes) + Ciphertext Block 1 (16 bytes) + ...
    // 我们篡改第一个密文块的第一个字节。
    // IV 在 payload 的索引 0-15,所以第一个密文块从索引 16 开始。
    int tamperIndex = 16;
    Console.WriteLine($"Tampering byte at index {tamperIndex}...");
    cbcPayload[tamperIndex] ^= 0xFF; // Flip the bits of this byte

    try
    {
        byte[] decryptedCbc = CbcExample.Decrypt(cbcPayload, key);
        Console.WriteLine("CBC Decryption SUCCEEDED (but data is corrupt):");
        Console.WriteLine($"Corrupted data: {Encoding.UTF8.GetString(decryptedCbc)}");
    }
    catch (CryptographicException e)
    {
        // 这次不应该会触发这个异常
        Console.WriteLine($"CBC Decryption failed unexpectedly with an exception: {e.Message}");
    }

    // --- GCM Tampering ---
    Console.WriteLine("\nTesting GCM tampering...");
    byte[] gcmPayload = GcmExample.Encrypt(plainText, key);
    // 同样篡改一个非末尾的字节
    gcmPayload[tamperIndex] ^= 0xFF; // Flip the bits of a ciphertext byte
    try
    {
        byte[] decryptedGcm = GcmExample.Decrypt(gcmPayload, key);
        // This line will NOT be reached
        Console.WriteLine("GCM Decryption SUCCEEDED. This should not happen!");
    }
    catch (System.Security.Cryptography.AuthenticationTagMismatchException) // 更具体的异常类型
    {
        Console.WriteLine("GCM Decryption FAILED as expected due to tag mismatch!");
	}
}

// --- 测试 ---
// TamperingDemo();
输出结果:
--- Tampering Demonstration ---

Testing CBC tampering...
Original CBC payload length: 96 bytes.
Tampering byte at index 16...
CBC Decryption SUCCEEDED (but data is corrupt):
Corrupted data: �NL�R� 17�+�\��%�nger secret message to demonstrate the vulnerability!

Testing GCM tampering...
GCM Decryption FAILED as expected due to tag mismatch!
这个演示清晰地表明:如果不用 GCM,服务器会成功解密被篡改的数据,只是解密后的内容是错误的。而 GCM 则能在解密阶段就直接通过认证标签验证失败来阻止这一切,为应用层提供了一道坚固的安全屏障。
性能对比:CBC vs GCM
为了展示 GCM 在性能上的优势,我们使用强大的 BenchmarkDotNet 库来进行一次基准测试。
注意: 此代码需要安装 BenchmarkDotNet NuGet 包。
csharp
using BenchmarkDotNet.Attributes;
using BenchmarkDotNet.Running;

[MemoryDiagnoser]
public class CryptoBenchmarks
{
    private byte[] _key;
    private byte[] _data;

    [Params(1024, 1024 * 1024)] // Test with 1KB and 1MB and 10MB of data
    public int DataSize;

    [GlobalSetup]
    public void Setup()
    {
        _key = new byte[16];
        RandomNumberGenerator.Fill(_key);

        _data = new byte[DataSize];
        RandomNumberGenerator.Fill(_data);
    }

    [Benchmark(Baseline = true)]
    public byte[] CbcRoundtrip()
    {
        byte[] encrypted = CbcExample.Encrypt(_data, _key);
        return CbcExample.Decrypt(encrypted, _key);
    }

    [Benchmark]
    public byte[] GcmRoundtrip()
    {
        byte[] encrypted = GcmExample.Encrypt(_data, _key);
        return GcmExample.Decrypt(encrypted, _key);
    }
}

// --- 运行测试 ---
// var summary = BenchmarkRunner.Run<CryptoBenchmarks>();
典型的基准测试结果:
| Method | DataSize | Mean | Error | StdDev | Ratio | RatioSD | Gen0 | Gen1 | Gen2 | Allocated | Alloc Ratio |
|---|---|---|---|---|---|---|---|---|---|---|---|
| CbcRoundtrip | 1024 | 3.242 μs | 0.0278 μs | 0.0260 μs | 1.00 | 0.01 | 0.6752 | - | - | 5.52 KB | 1.00 |
| GcmRoundtrip | 1024 | 2.410 μs | 0.0280 μs | 0.0248 μs | 0.74 | 0.01 | 0.5379 | - | - | 4.42 KB | 0.80 |
| CbcRoundtrip | 1048576 | 1,408.722 μs | 20.4198 μs | 18.1016 μs | 1.00 | 0.02 | 496.0938 | 496.0938 | 496.0938 | 4103.41 KB | 1.00 |
| GcmRoundtrip | 1048576 | 1,212.838 μs | 23.8959 μs | 23.4690 μs | 0.86 | 0.02 | 513.6719 | 513.6719 | 513.6719 | 4102.72 KB | 1.00 |
| CbcRoundtrip | 10485760 | 18,785.008 μs | 205.7381 μs | 171.8006 μs | 1.00 | 0.01 | 437.5000 | 437.5000 | 437.5000 | 40963.87 KB | 1.00 |
| GcmRoundtrip | 10485760 | 14,657.252 μs | 144.8966 μs | 135.5364 μs | 0.78 | 0.01 | 578.1250 | 578.1250 | 578.1250 | 40964.77 KB | 1.00 |
从基准测试结果中,我们可以得出以下核心结论:
- GCM 性能全面领先:在所有测试的数据规模下(1KB, 1MB, 10MB),GCM 模式的加密解密总耗时均优于 CBC 模式。
- 量化优势 :根据测试数据,GCM 的速度比 CBC 快约 14% 到 26%。例如,在处理 1MB 数据时,GCM 的耗时大约是 CBC 的 86%(Ratio = 0.86),处理 10MB 数据时优势扩大到 22%(Ratio = 0.78)。
- 性能优势来源 :这种性能差异主要源于算法的并行特性。虽然现代 CPU 的 AES-NI 硬件指令集同时加速了 CBC 和 GCM 的底层AES加密操作,但 GCM 的 CTR 核心使其加解密过程可以被高度并行化,从而获得了超越 CBC 串行加密的额外性能提升。
其它冷门的模式
除了主流的 ECB、CBC、GCM 外,还有一些其它模式:
- CFB (Cipher Feedback):类似于 CBC,也将块加密器转换为流加密器。它将前一个密文块加密后的结果与当前明文块异或来生成当前密文块。与 CBC 类似,加密无法并行。
- OFB (Output Feedback):它通过反复加密 IV 来生成一个与明文独立的密钥流,然后与明文异或。它也是一个流加密模式,但与 CFB/CBC 不同,它对传输错误不敏感(一个比特的错误只影响一个比特),但也因此容易受到恶意篡改。
这些模式现在已经较少使用,因为 GCM 提供了更好的性能和内置的安全性。
总结
我们一起回顾了 AES 块加密模式从简单到复杂,从只关注机密性到兼顾性能与完整性的演进之路:
- ECB:最简单的模式,因安全性问题基本被淘汰,只适用于极少数特殊场景。
- CBC:通过引入 IV 和链式操作解决了 ECB 的问题,成为了很长一段时间的行业标准,但存在加密串行和无内置完整性验证的缺点。
- GCM :现代加密的黄金标准。它结合了 CTR 模式的高性能和并行化能力,并加入了 GMAC 认证,同时提供了数据的机密性 、完整性 和真实性,是目前构建新系统时的首选。
这条发展路径清晰地展示了密码学在应对不断变化的安全威胁和性能需求时,是如何持续创新和完善的。作为开发者,理解这些模式的特性和适用场景,是构建安全、可靠系统的基础。
感谢阅读到这里,如果感觉本文对您有帮助,请不吝评论 和点赞 ,这也是我持续创作的动力!
也欢迎加入我的 .NET骚操作 QQ群:495782587,一起交流 .NET 和 AI 的各种有趣玩法!