二、.Nginx 架构和安装
2.1 Nginx 概述
2.1.1 Nginx 介绍
Nginx:engine X ,2002年开发,分为社区版和商业版(nginx plus ) 2019年3月11日 F5 Networks 6.7亿美元的价格收购 Nginx是免费的、开源的、高性能的HTTP和反向代理服务器、邮件代理服务器、以及TCP/UDP代理服务 器
解决C10K问题(10K Connections)
Nginx官网:http://nginx.org
nginx的其它的二次发行版:
- Tengine:由淘宝网发起的Web服务器项目。它在Nginx的基础上,针对大访问量网站的需求,添加 了很多高级功能和特性。Tengine的性能和稳定性已经在大型的网站如淘宝网,天猫商城等得到了 很好的检验。它的最终目标是打造一个高效、稳定、安全、易用的Web平台。从2011年12月开始, Tengine成为一个开源项目官网: http://tengine.taobao.org/
- OpenResty:基于 Nginx 与 Lua 语言的高性能 Web 平台, 章亦春团队开发,官网:http://openr esty.org/cn/
2.1.2 Nginx 功能介绍
- 静态的web资源服务器html,图片,js,css,txt等静态资源
- http/https协议的反向代理
- 结合FastCGI/uWSGI/SCGI等协议反向代理动态资源请求
- tcp/udp协议的请求转发(反向代理)
- imap4/pop3协议的反向代理
2.1.3 基础特性
- 模块化设计,较好的扩展性
- 高可靠性
- 支持热部署:不停机更新配置文件,升级版本,更换日志文件
- 低内存消耗:10000个keep-alive连接模式下的非活动连接,仅需2.5M内存
- event-driven,aio,mmap,sendfile
2.1.4Web 服务相关的功能
- 虚拟主机(server)
- 支持 keep-alive 和管道连接(利用一个连接做多次请求)
- 访问日志(支持基于日志缓冲提高其性能)
- url rewirte
- 路径别名
- 基于IP及用户的访问控制
- 支持速率限制及并发数限制
- 重新配置和在线升级而无须中断客户的工作进程
2.2 Nginx 架构和进程
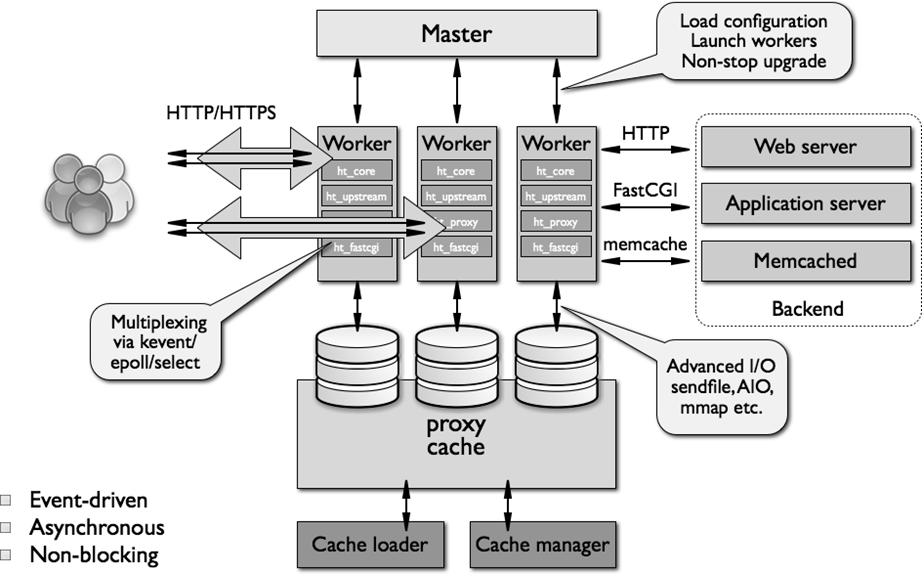
2.2.1 Nginx 进程结构
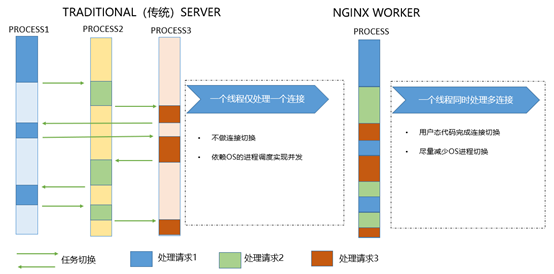
web请求处理机制
- 多进程方式:服务器每接收到一个客户端请求就有服务器的主进程生成一个子进程响应客户端,直 到用户关闭连接,这样的优势是处理速度快,子进程之间相互独立,但是如果访问过大会导致服务 器资源耗尽而无法提供请求
- 多线程方式:与多进程方式类似,但是每收到一个客户端请求会有服务进程派生出一个线程和此客 户端进行交互,一个线程的开销远远小于一个进程,因此多线程方式在很大程度减轻了web服务器 对系统资源的要求,但是多线程也有自己的缺点,即当多个线程位于同一个进程内工作的时候,可 以相互访问同样的内存地址空间,所以他们相互影响,一旦主进程挂掉则所有子线程都不能工作 了,IIS服务器使用了多线程的方式,需要间隔一段时间就重启一次才能稳定。
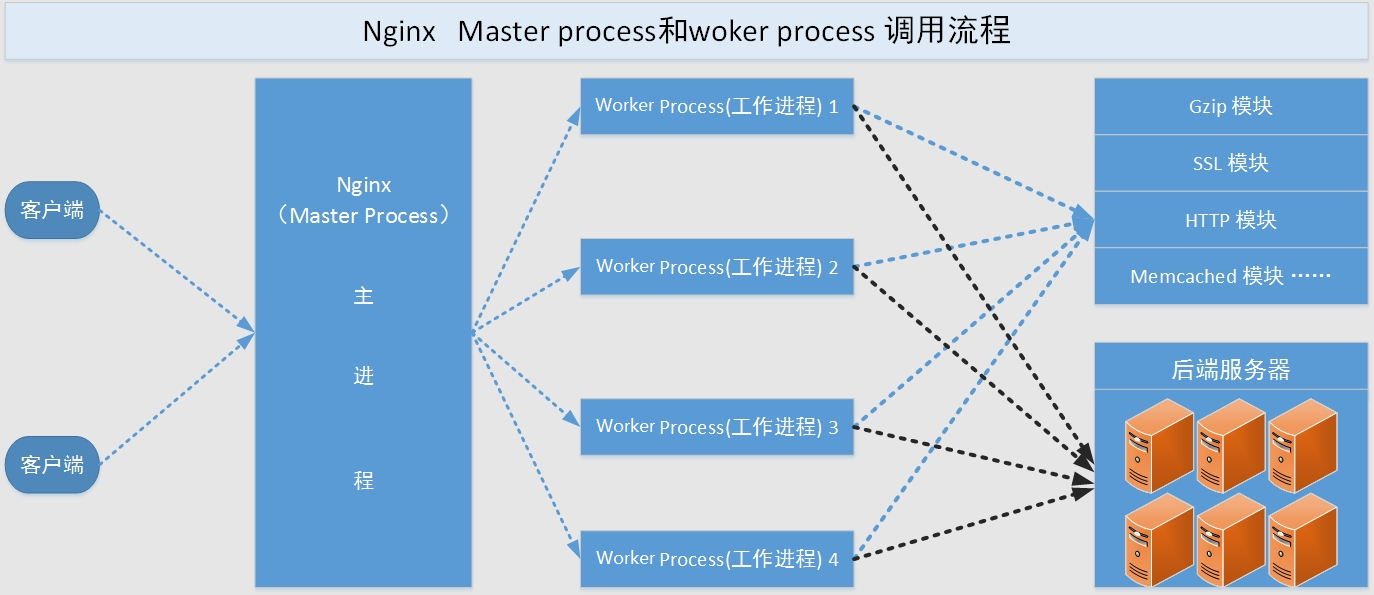
Nginx是多进程组织模型,而且是一个由Master主进程和Worker工作进程组成。
主进程(master process)的功能:
- 对外接口:接收外部的操作(信号)
- 对内转发:根据外部的操作的不同,通过信号管理 Worker
- 监控:监控 worker 进程的运行状态,worker 进程异常终止后,自动重启 worker 进程
- 读取Nginx 配置文件并验证其有效性和正确性
- 建立、绑定和关闭socket连接
- 按照配置生成、管理和结束工作进程
- 接受外界指令,比如重启、升级及退出服务器等指令
- 不中断服务,实现平滑升级,重启服务并应用新的配置
- 开启日志文件,获取文件描述符
- 不中断服务,实现平滑升级,升级失败进行回滚处理
- 编译和处理perl脚本
工作进程(worker process)的功能:
- 所有 Worker 进程都是平等的
- 实际处理:网络请求,由 Worker 进程处理
- Worker进程数量:一般设置为核心数,充分利用CPU资源,同时避免进程数量过多,导致进程竞争 CPU资源,
- 增加上下文切换的损耗
- 接受处理客户的请求
- 将请求依次送入各个功能模块进行处理
- I/O调用,获取响应数据
- 与后端服务器通信,接收后端服务器的处理结果
- 缓存数据,访问缓存索引,查询和调用缓存数据
- 发送请求结果,响应客户的请求
- 接收主程序指令,比如重启、升级和退出等
2.2.2 Nginx 进程间通信
- 工作进程是由主进程生成的,主进程使用fork()函数,在Nginx服务器启动过程中主进程根据配置文件决 定启动工作进程的数量,然后建立一张全局的工作表用于存放当前未退出的所有的工作进程,主进程生 成工作进程后会将新生成的工作进程加入到工作进程表中,并建立一个单向的管道并将其传递给工作进 程,该管道与普通的管道不同,它是由主进程指向工作进程的单向通道,包含了主进程向工作进程发出 的指令、工作进程ID、工作进程在工作进程表中的索引和必要的文件描述符等信息。
- 主进程与外界通过信号机制进行通信,当接收到需要处理的信号时,它通过管道向相关的工作进程发送 正确的指令,每个工作进程都有能力捕获管道中的可读事件,当管道中有可读事件的时候,工作进程就 会从管道中读取并解析指令,然后采取相应的执行动作,这样就完成了主进程与工作进程的交互。
bash
worker进程之间的通信原理基本上和主进程与worker进程之间的通信是一样的,只要worker进程之间能够
取得彼此的信息,建立管道即可通信,但是由于worker进程之间是完全隔离的,因此一个进程想要知道另外一
个进程的状态信息,就只能通过主进程来实现。
为了实现worker进程之间的交互,master进程在生成worker进程之后,在worker进程表中进行遍历,将该
新进程的PID以及针对该进程建立的管道句柄传递给worker进程中的其他进程,为worker进程之间的通信做
准备,当worker进程1向worker进程2发送指令的时候,首先在master进程给它的其他worker进程工作信息
中找到2的进程PID,然后将正确的指令写入指向进程2的管道,worker进程2捕获到管道中的事件后,解析指
令并进行相关操作,这样就完成了worker进程之间的通信。
另worker进程可以通过共享内存来通讯的,比如upstream中的zone,或者limit_req、limit_conn中的
zone等。操作系统提供了共享内存机制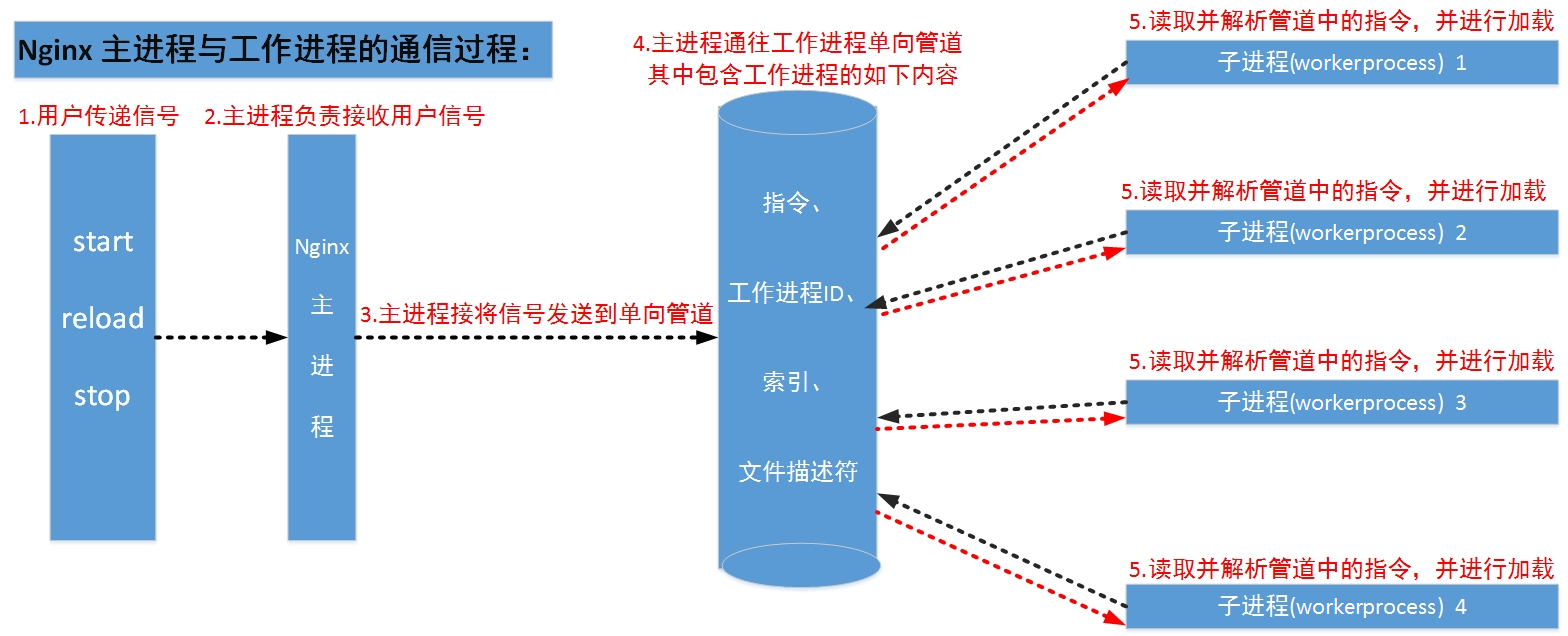
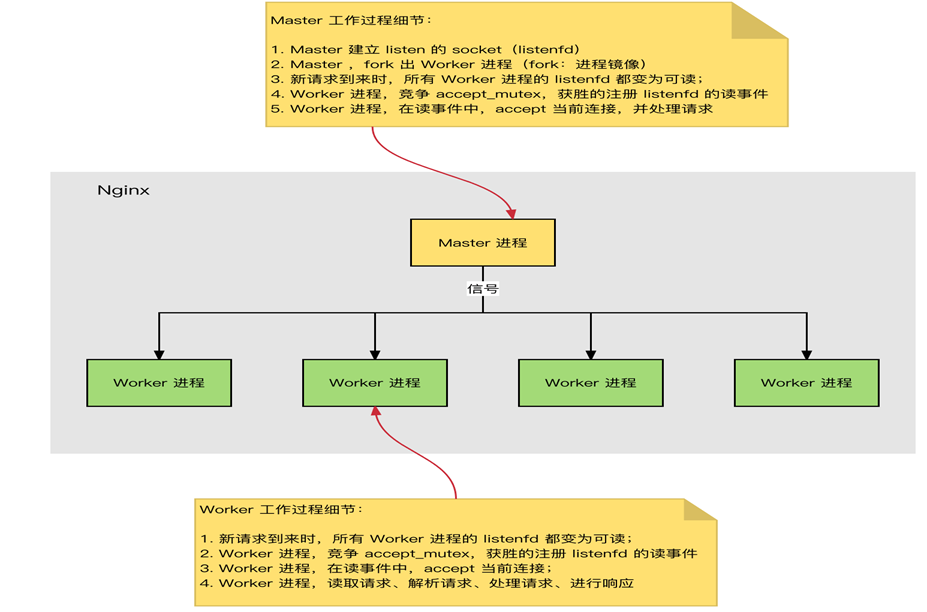
2.2.3Nginx 启动和 HTTP 连接建立
- Nginx 启动时,Master 进程,加载配置文件
- Master 进程,初始化监听的 socket
- Master 进程,fork 出多个 Worker 进程
- Worker 进程,竞争新的连接,获胜方通过三次握手,建立 Socket 连接,并处理请求
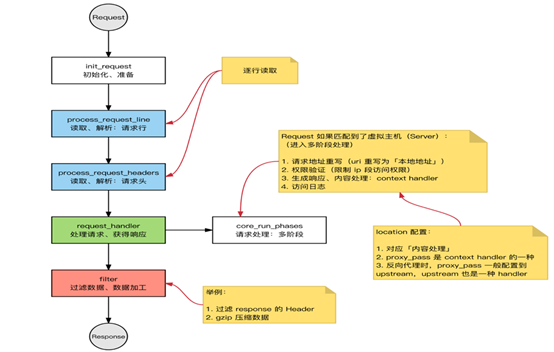
2.2.4HTTP 处理过程
2.3Nginx 模块介绍
nginx 有多种模块
- 核心模块:是 Nginx 服务器正常运行必不可少的模块,提供错误日志记录 、配置文件解析 、事件 驱动机制 、进程管理等核心功能 、
- 标准HTTP模块:提供 HTTP 协议解析相关的功能,比如: 端口配置 、 网页编码设置 、 HTTP响应 头设置 等等 可选HTTP模块:主要用于扩展标准的 HTTP 功能,让 Nginx 能处理一些特殊的服务,比如: Flash
- 多媒体传输 、解析 GeoIP 请求、 网络传输压缩 、 安全协议 SSL 支持等
- 邮件服务模块:主要用于支持 Nginx 的 邮件服务 ,包括对 POP3 协议、 IMAP 协议和 SMTP协议的 支持 Stream服务模块: 实现反向代理功能,包括TCP协议代理
- 第三方模块:是为了扩展 Nginx 服务器应用,完成开发者自定义功能,比如: Json 支持、 Lua 支 持等
nginx高度模块化,但其模块早期不支持DSO机制;1.9.11 版本支持动态装载和卸载
模块分类:
bash
核心模块:core module
标准模块:
 HTTP 模块: ngx_http_*
 HTTP Core modules   #默认功能
 HTTP Optional modules #需编译时指定
 Mail 模块: ngx_mail_*
 Stream 模块 ngx_stream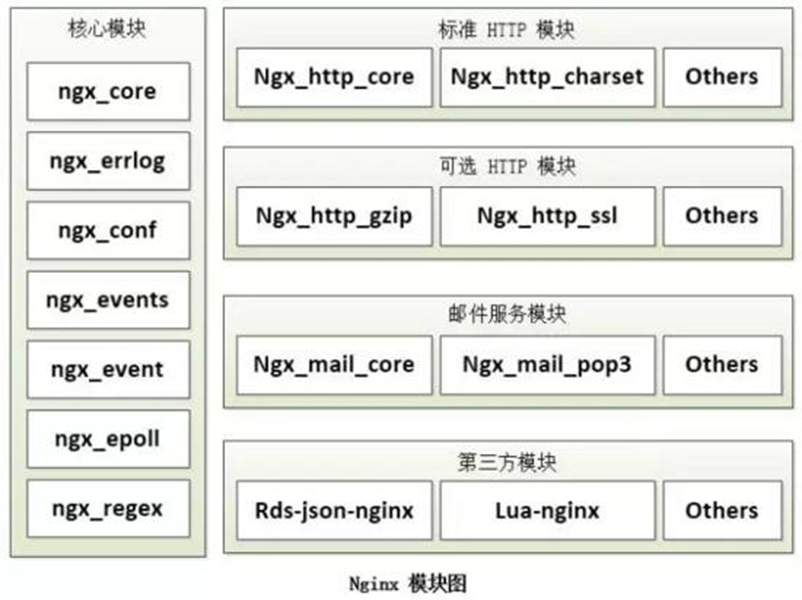
2.4 Nginx 安装
2.4.1 Nginx版本和安装方式
Nginx版本
- Mainline version 主要开发版本,一般为奇数版本号,比如1.19
- Stable version 当前最新稳定版,一般为偶数版本,如:1.20
- Legacy versions 旧的稳定版,一般为偶数版本,如:1.18
Nginx安装可以使用yum或源码安装,但是推荐使用源码编译安装
- yum的版本比较旧
- 编译安装可以更方便自定义相关路径
- 使用源码编译可以自定义相关功能,更方便业务的上的使用
2.4.2.Nginx 编译安装
编译器介绍
bash
源码安装需要提前准备标准的编译器,GCC的全称是(GNU Compiler collection),其有GNU开发,并以GPL即LGPL许可,是自由的类UNIX即苹果电脑Mac OS X操作系统的标准编译器,因为GCC原本只能处理C语言,所以原名为GNU C语言编译器,后来得到快速发展,可以处理C++,Fortran,pascal,objective2.4.2.1 编译安装 Nginx
官方源码包下载地址:https://nginx.org/en/download.html
编译安装示例:
bash
[root@Nginx ~]# dnf install gcc pcre-devel zlib-devel openssl-devel -y
[root@Nginx nginx]# tar zxf nginx-1.24.0.tar.gz
[root@Nginx nginx-1.24.0]# useradd -s /sbin/nologin -M nginx
[root@Nginx nginx]# cd nginx-1.24.0/
[root@Nginx nginx-1.24.0]# ls
auto CHANGES.ru configure html Makefile objs srcCHANGES conf contrib LICENSE man README
[root@Nginx nginx-1.24.0]# ./configure --prefix=/usr/local/nginx \ #指定配置文件安装目录
--user=nginx \ # 指定nginx运行用户
--group=nginx \ # 指定nginx运行组
--with-http_ssl_module \ # 支持https://
--with-http_v2_module \ # 支持http版本2
--with-http_realip_module \ # 支持ip透传
--with-http_stub_status_module \ # 支持状态页面
--with-http_gzip_static_module \ # 支持压缩
--with-pcre \ # 支持正则
--with-stream \ # 支持tcp反向代理
--with-stream_ssl_module \ # 支持tcp的ssl加密
--with-stream_realip_module # 支持tcp的透传ip
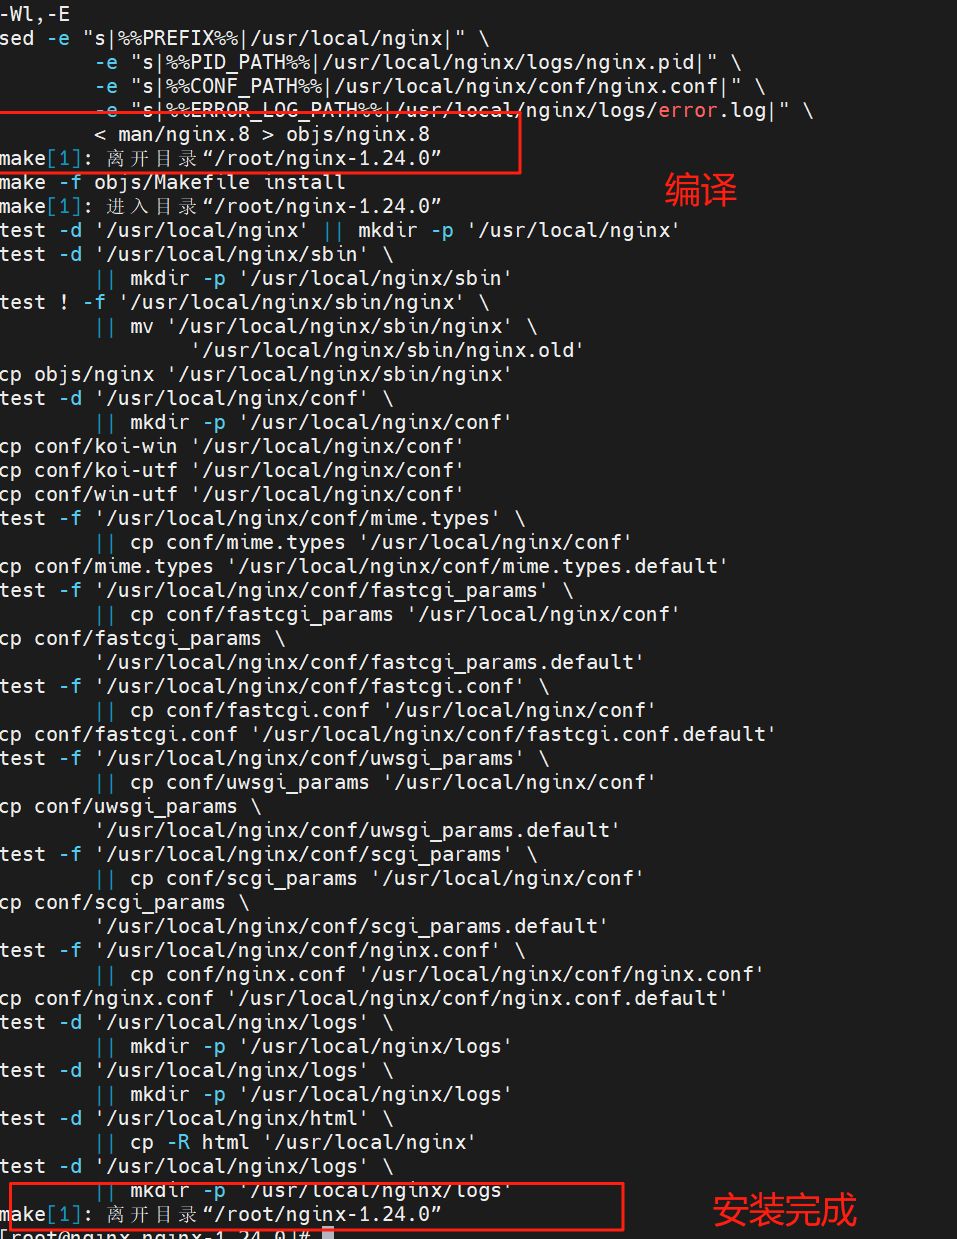
[root@Nginx nginx-1.24.0]# make && make install如果直接编译,会报错,缺少依赖包,所以要先安装依赖包,但一般情况下都是根据报错信息来装依赖包的

环境监测通过,接下来编译安装
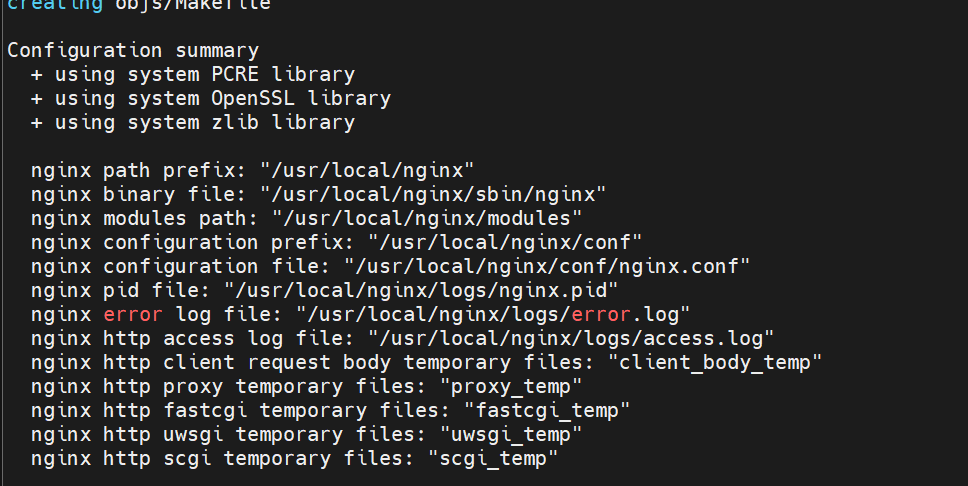
nginx完成安装以后,有四个主要的目录
bash
[root@Nginx nginx-1.24.0]# ls /usr/local/nginx/
conf  html  logs  sbin

conf:保存nginx所有的配置文件,其中nginx.conf是nginx服务器的最核心最主要的配置文件,其他的.conf则是用来配置nginx相关的功能的,例如fastcgi功能使用的是fastcgi.conf和fastcgi_params两个文件,配置文件一般都有一个样板配置文件,是以.default为后缀,使用时可将其复制并将default后缀去掉即可。

html目录中保存了nginx服务器的web文件,但是可以更改为其他目录保存web文件,另外还有一个50x的web文件是默认的错误页面提示页面。

logs:用来保存nginx服务器的访问日志错误日志等日志,logs目录可以放在其他路径,比如/var/logs/nginx里面。

sbin:保存nginx二进制启动脚本,可以接受不同的参数以实现不同的功能。
2.4.2.2 验证版本及编译参数
bash
[root@Nginx ~]# vim ~/.bash_profile #系统环境变量
export PATH=$PATH:/usr/local/nginx/sbin

[root@Nginx ~]# source  ~/.bash_profile

[root@nginx conf]# nginx -V
nginx version: nginx/1.24.0
built by gcc 11.4.1 20230605 (Red Hat 11.4.1-2) (GCC)
built with OpenSSL 3.0.7 1 Nov 2022
TLS SNI support enabled
configure arguments: --prefix=/usr/local/nginx --user=nginx --group=nginx --with-http_ssl_module --with-http_v2_module --with-http_realip_module --with-http_stub_status_module --with-http_gzip_static_module --with-pcre --with-stream --with-stream_ssl_module --with-stream_realip_module
2.4.2.3使用安装完成的二进制文件nginx
bash
[root@Nginx ~]# nginx -v
nginx version: nginx/1.18.0
Usage: nginx [-?hvVtTq] [-s signal] [-c filename] [-p prefix] [-g directives]
Options:
-?,-h         : this help
-v           : show version and exit
-V           : show version and configure options then exit     #显示版本和编译参数
-t           : test configuration and exit                      #测试配置文件是否异
-T           : test configuration, dump it and exit             #测试并打印
-q           : suppress non-error messages during configuration testing     #静默模式
-s signal     : send signal to a master process: stop, quit, reopen, reload     #发送信号,reload信号 会生成新的worker,但master不会重新生成
-p prefix     : set prefix path (default: /etc/nginx/)          #指定Nginx 目录
-c filename   : set configuration file (default: /etc/nginx/nginx.conf)         #配置文件路径
-g directives : set global directives out of configuration file #设置全局指令,注意和配置文件不要同时配置,否则冲突
2.6 平滑升级和回滚
有时候我们需要对Nginx版本进行升级以满足对其功能的需求,例如添加新模块,需要新功能,而此时Nginx又在跑着业务无法停掉,这时我们就可能选择平滑升级
2.6.1 平滑升级流程
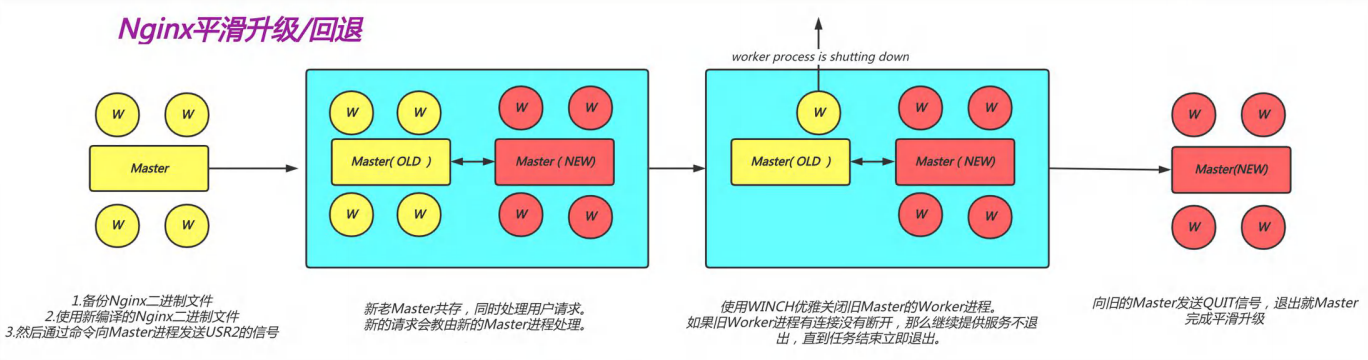
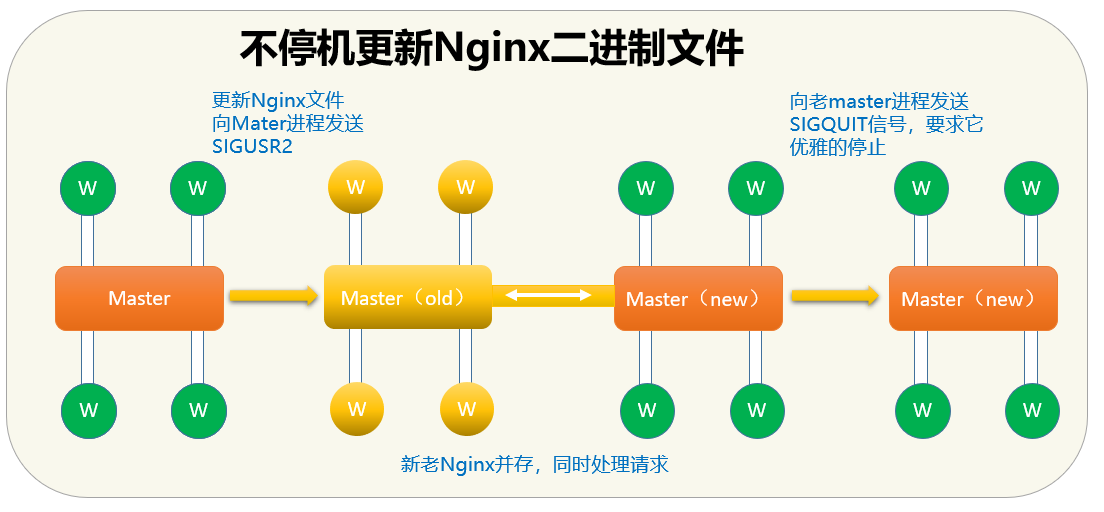
- 将旧Nginx二进制文件换成新Nginx程序文件(注意先备份)
- 向master进程发送USR2信号
- master进程修改pid文件名加上后缀.oldbin,成为nginx.pid.oldbin
- master进程用新Nginx文件启动新master进程成为旧master的子进程,系统中将有新旧两个Nginx主进程共同提供Web服务,当前新的请求仍然由旧Nginx的worker进程进行处理,将新生成的master进程的PID存放至新生成的pid文件nginx.pid
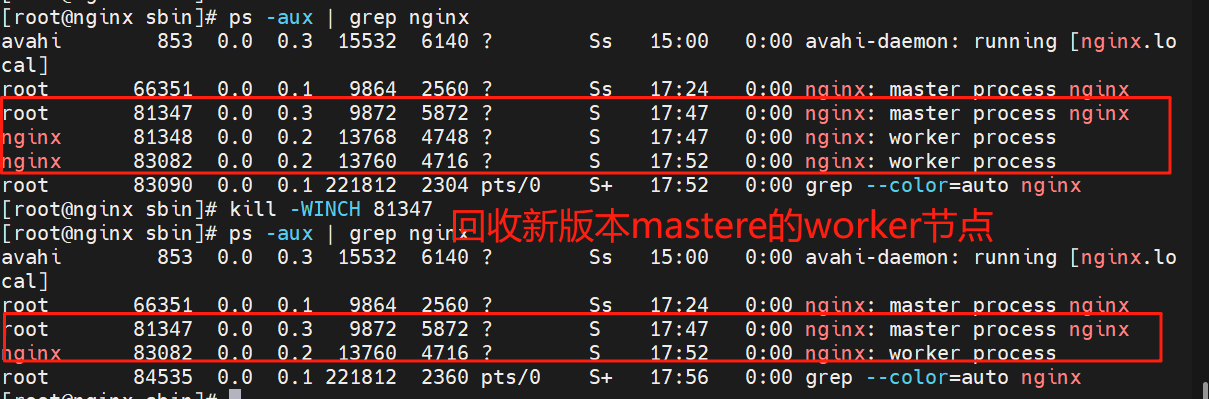
- 向旧的Nginx服务进程发送WINCH信号,使旧的Nginx worker进程平滑停止
- 向旧master进程发送QUIT信号,关闭老master,并删除Nginx.pid.oldbin文件
- 如果发现升级有问题,可以回滚∶向老master发送HUP,向新master发送QUIT
2.6.2 平滑升级和回滚案例
bash
#隐藏程序的版本信息保护服务器安全
[root@nginx ~]# cd nginx-1.24.0/
[root@nginx nginx-1.24.0]# cd src/
[root@nginx src]# cd core/
[root@nginx core]# vim nginx.h
[root@Nginx nginx]# tar zxf nginx-1.26.1.tar.gz
[root@Nginx nginx]# cd nginx-1.26.1/
#开始编译新版本
[root@Nginx nginx-1.26.1]# ./configure --with-http_ssl_module --with-http_v2_module --with-http_realip_module --with-http_stub_status_module --with-http_gzip_static_module --with-pcre --with-stream --with-stream_ssl_module --with-stream_realip_module
只要make无需要make install
root@Nginx nginx-1.26.1]# make
#查看两个版本
[root@Nginx nginx-1.26.1]# ll objs/nginx /usr/local/nginx/sbin/nginx
-rwxr-xr-x 1 root root 1239416 Jul 18 15:08 objs/nginx
-rwxr-xr-x 1 root root 5671488 Jul 18 11:41 /usr/local/nginx/sbin/nginx
#把之前的旧版的nginx命令备份
[root@Nginx ~]# cd /usr/local/nginx/sbin/、
[root@Nginx sbin]# cp nginx nginx.24
#把新版本的nginx命令复制过去
[root@Nginx sbin]# /bin/cp -f /root/nginx-1.26.1/objs/nginx /usr/local/nginx/sbin
#检测一下有没有问题
[root@Nginx sbin]# nginx -t
nginx: the configuration file /usr/local/nginx/conf/nginx.conf syntax is ok
nginx: configuration file /usr/local/nginx/conf/nginx.conf test is successful
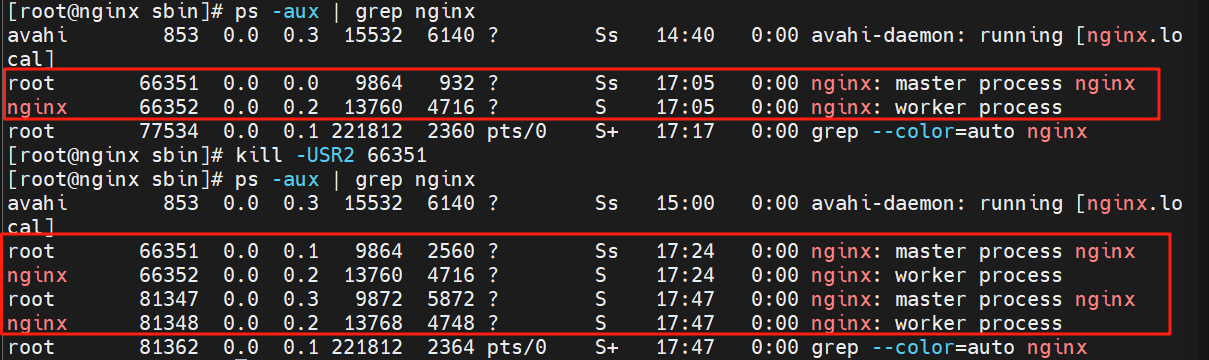
[root@Nginx sbin]# kill -USR2 48732 #旧版本nginx master ID 激活新版本程序
#USR2 平滑升级可执行程序,将存储有旧版本主进程PID的文件重命名为nginx.pid.oldbin,并启动新的nginx
#此时两个master的进程都在运行,只是旧的master不在监听,由新的master监听80
#此时Nginx开启一个新的master进程,这个master进程会生成新的worker进程,这就是升级后的Nginx进程,此时老的进程不会自动退出,但是当接收到新的请求不作处理而是交给新的进程处理。
[root@Nginx sbin]# ps aux | grep nginx
root 48732 0.0 0.1 9868 2436 ? Ss 14:17 0:00 nginx: master process /usr/local/nginx/sbin/nginx
nobody 48733 0.0 0.2 14200 4868 ? S 14:17 0:00 nginx: worker process
root 52075 0.0 0.3 9876 6528 ? S 15:41 0:00 nginx: master process /usr/local/nginx/sbin/nginx
nobody 52076 0.0 0.2 14208 4868 ? S 15:41 0:00 nginx: worker process
[root@Nginx sbin]# curl -I localhost
HTTP/1.1 200 OKServer: nginx/1.24.0 ##依旧是旧版本生生效
Date: Thu, 18 Jul 2024 07:45:58 GMT
Content-Type: text/html
Content-Length: 615Last-Modified: Thu, 18 Jul 2024 03:41:13 GMT
Connection: keep-alive
ETag: "66988ed9-267"
Accept-Ranges: bytes
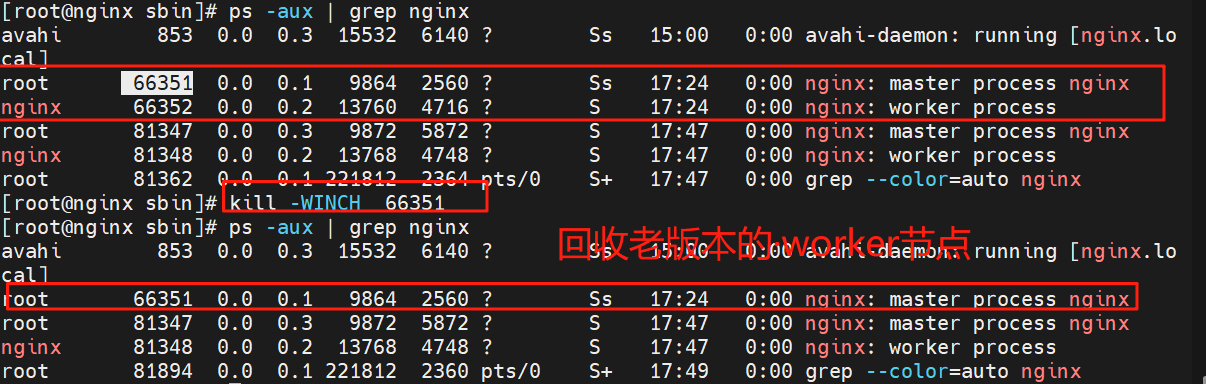
#回收旧版本
[root@Nginx sbin]# kill -WINCH 48732 #回收旧版本的master
[root@Nginx sbin]# ps aux | grep nginx
root 48732 0.0 0.1 9868 2436 ? Ss 14:17 0:00 nginx: master process /usr/local/nginx/sbin/nginx
root 52075 0.0 0.3 9876 6528 ? S 15:41 0:00 nginx: master process /usr/local/nginx/sbin/nginx
nobody 52076 0.0 0.2 14208 4868 ? S 15:41 0:00 nginx: worker process
#检测版本信息
[root@Nginx sbin]# curl -I localhost
HTTP/1.1 200 OKServer: nginx/1.26.1 #新版本生效
Date: Thu, 18 Jul 2024 07:59:45 GMT
Content-Type: text/html
Content-Length: 615Last-Modified: Thu, 18 Jul 2024 03:41:13 GMT
Connection: keep-alive
ETag: "66988ed9-267"
Accept-Ranges: bytes
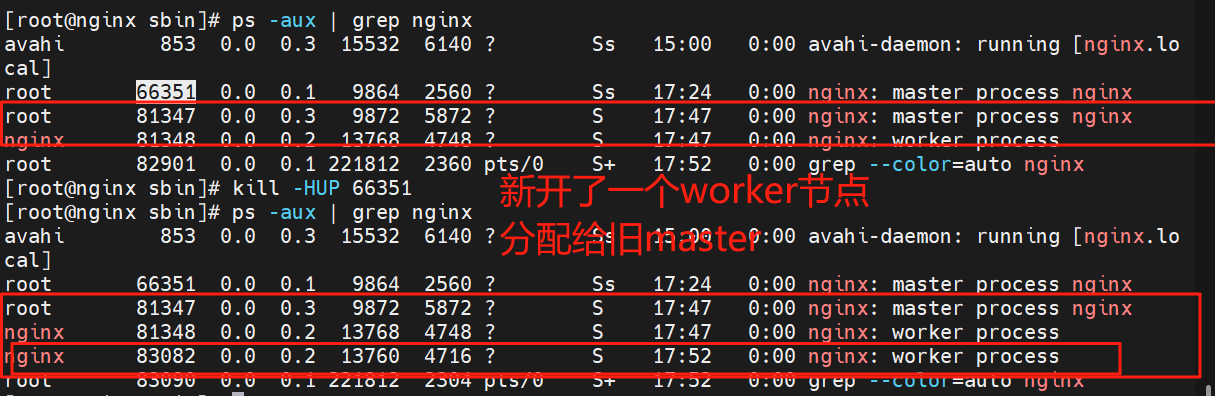
#回滚
#如果升级的版本发现问题需要回滚,可以重新拉起旧版本的worker
[root@Nginx sbin]# cp nginx nginx.26 #备份新版本
[root@Nginx sbin]# ls
nginx nginx.24 nginx.26
[root@Nginx sbin]# mv nginx.24 nginxmv: overwrite 'nginx'? y
[root@Nginx sbin]# kill -HUP 48732
[root@Nginx sbin]# ps aux | grep nginx
root 48732 0.0 0.1 9868 2436 ? Ss 14:17 0:00 nginx: master process /usr/local/nginx/sbin/nginx
root 52075 0.0 0.3 9876 6528 ? S 15:41 0:00 nginx: master process /usr/local/nginx/sbin/nginx
nobody 52076 0.0 0.2 14208 5124 ? S 15:41 0:00 nginx: worker process
nobody 52130 0.0 0.2 14200 4868 ? S 16:30 0:00 nginx: worker process
[root@Nginx sbin]# kill -WINCH 52075
[root@Nginx sbin]# ps aux | grep nginx
root 48732 0.0 0.1 9868 2436 ? Ss 14:17 0:00 nginx: master process /usr/local/nginx/sbin/nginx
root 52075 0.0 0.3 9876 6528 ? S 15:41 0:00 nginx: master process /usr/local/nginx/sbin/nginx
nobody 52130 0.0 0.2 14200 4868 ? S 16:30 0:00 nginx: worker process
root 52137 0.0 0.1 221664 2176 pts/0 S+ 16:31 0:00 grep --color=auto nginx
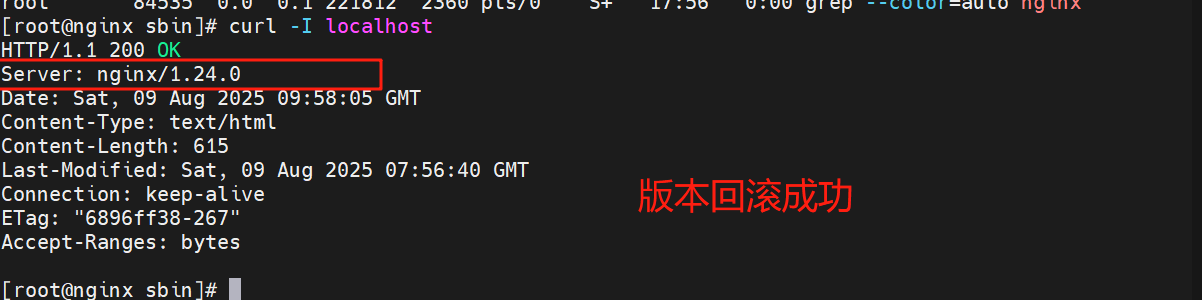
[root@Nginx sbin]# curl -I localhost
HTTP/1.1 200 OKServer: nginx/1.24.0 ##版本回滚完成
Date: Thu, 18 Jul 2024 08:31:51 GMT
Content-Type: text/html
Content-Length: 615Last-Modified: Thu, 18 Jul 2024 03:41:13 GMT
Connection: keep-alive
ETag: "66988ed9-267"
Accept-Ranges: bytes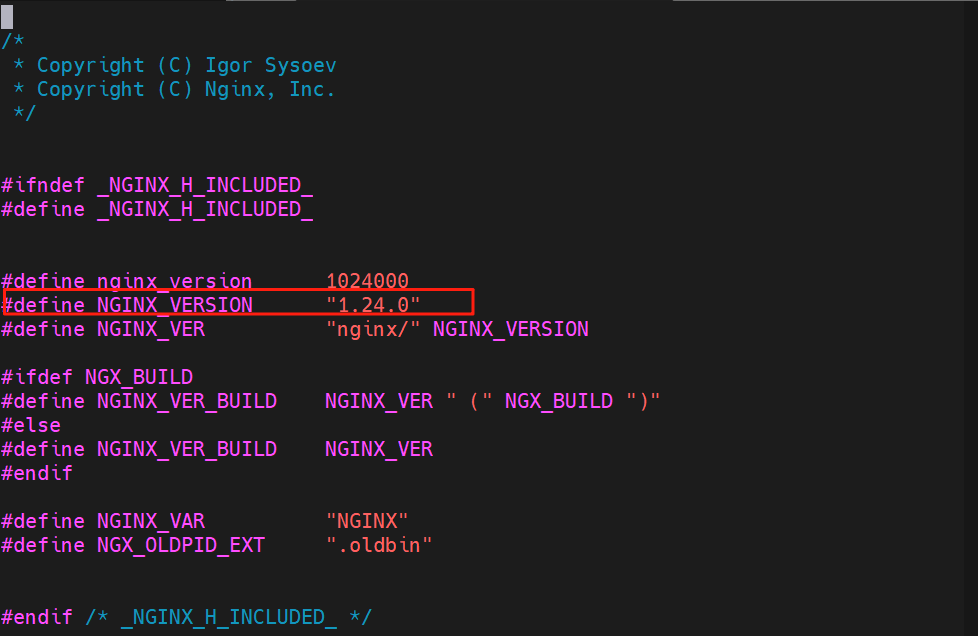

查看版本信息

回滚老版本
2.7编写启动脚本
systemd site:nginx.org
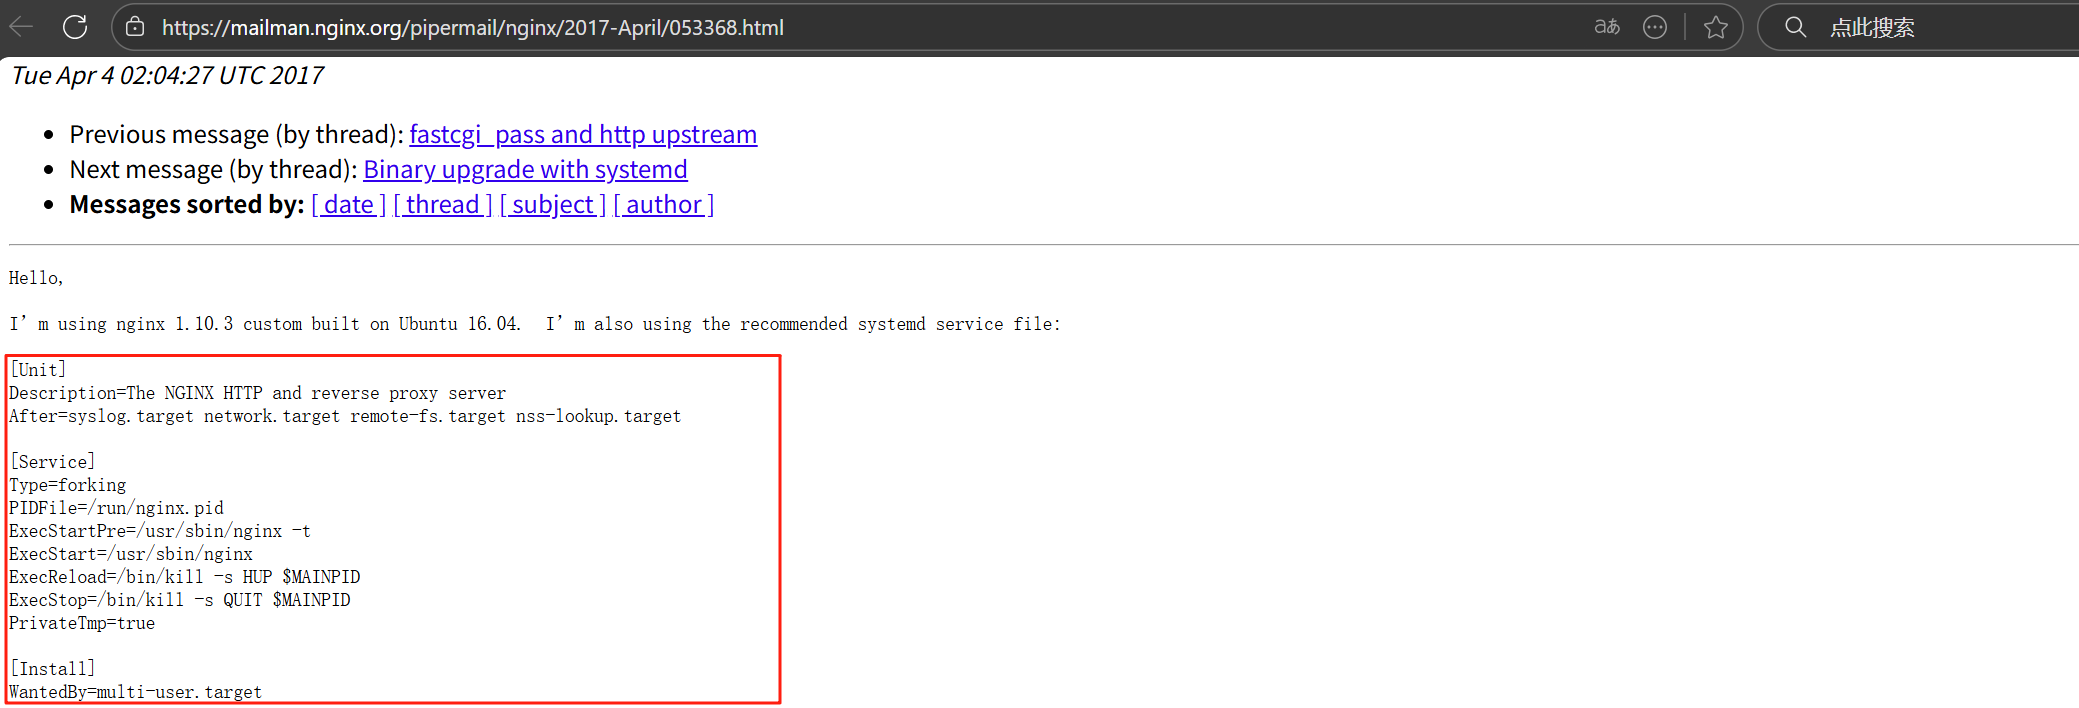
把该配置方到 /lib/ssytemd/ssytem/
bash
[root@nginx sbin]# cd /lib/systemd/system
[root@nginx system]# vim nginx.service


[Unit]
Description=The NGINX HTTP and reverse proxy server
After=syslog.target network.target remote-fs.target nss-lookup.target

[Service]
Type=forking
PIDFile=/usr/local/nginx/logs/nginx.pid   #自定义目录下的pid文件
ExecStartPre=/usr/local/nginx/sbin/nginx -t
ExecStart=/usr/local/nginx/sbin/nginx
ExecReload=/bin/kill -s HUP $MAINPID
ExecStop=/bin/kill -s QUIT $MAINPID
PrivateTmp=true

[Install]
WantedBy=multi-user.target
[root@nginx system]# systemctl daemon-reload #重新加载配置文件

[root@nginx logs]# systemctl enable --now nginx
[root@nginx logs]# systemctl status nginx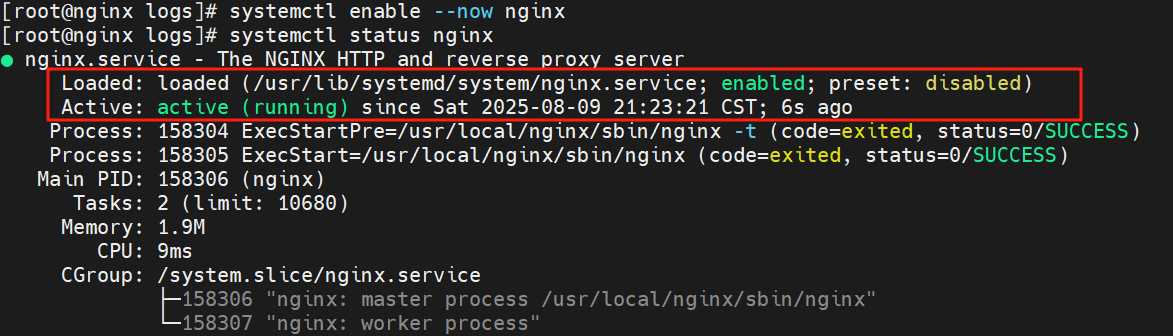
三、Nginx 核心配置详解
3.1 配置文件说明
nginx 官方帮助文档:http://nginx.org/en/docs/
Nginx的配置文件的组成部分:
- 主配置文件:nginx.conf
- 子配置文件: include conf.d/*.conf
- fastcgi, uwsgi,scgi 等协议相关的配置文件{LNMP--P(php,python,perl)}
- mime.types:支持的mime类型,MIME(Multipurpose Internet Mail Extensions)多用途互联网邮件扩展类型,MIME消息能包含文本、图像、音频、视频以及其他应用程序专用的数据,是设定某种扩展名的文件用一种应用程序来打开的方式类型,当该扩展名文件被访问的时候,浏览器会自动
- 使用指定应用程序来打开。多用于指定一些客户端自定义的文件名,以及一些媒体文件打开方式。
nginx 配置文件格式说明
配置文件由指令与指令块构成
每条指令以;分号结尾,指令与值之间以空格符号分隔
可以将多条指令放在同一行,用分号分隔即可,但可读性差,不推荐
指令块以{ }大括号将多条指令组织在一起,且可以嵌套指令块
include语句允许组合多个配置文件以提升可维护性
使用#符号添加注释,提高可读性
使用$符号使用变量
部分指令的参数支持正则表达式
Nginx 主配置文件的配置指令方式:
directive value [value2 ...];#参数 加值

注意
(1) 指令必须以分号结尾
(2) 支持使用配置变量
	内建变量:由Nginx模块引入,可直接引用
	自定义变量:由用户使用set命令定义,格式: set variable_name value;
	引用变量:$variable_name
主配置文件结构:四部分
main block:主配置段,即全局配置段,对http,mail都有效

#事件驱动相关的配置
event {
...
}

#http/https 协议相关配置段
http {
 ...}

#默认配置文件不包括下面两个块
#mail 协议相关配置段
mail {
...}

#stream 服务器相关配置段
stream {
...}
默认的nginx.conf 配置文件格式说明
bash
#全局配置端,对全局生效,主要设置nginx的启动用户/组,启动的工作进程数量,工作模式,Nginx的PID路径,日志路径等。
user nginx;   #user noboby #没有指定的话,默认noboby
worker_processes  1;    #启动工作进程数数量 #auto 开启自动匹配 不建议,建议手动绑定,减小开销
events {
#events        #设置快,主要影响nginx服务器与用户的网络连接,比如是否允许同时接受多个网络连接,使用哪种事件驱动模型
#处理请求,每个工作进程可以同时支持的最大连接数,是否开启对多工作进程下的网络连接进行序列化等。


    worker_connections  1024;
    #设置单个nginx工作进程可以接受的最大并发,作为web服务器的时候最大并发数为                         #worker_connections * worker_processes,作为反向代理的时候为                               #(worker_connections * worker_processes)/2}


http {
#http块是Nginx服务器配置中的重要部分,缓存、代理和日志格式定义等绝大多数功能和第三方模块都
#可以在这设置,http块可以包含多个server块,而一个server块中又可以包含多个location块,
#server块可以配置文件引入、MIME-Type定义、日志自定义、是否启用sendfile、连接超时时间和
#单个链接的请求上限等。
	include       mime.types;
	default_type application/octet-stream;
	sendfile       on; #作为web服务器的时候打开sendfile加快静态文件传输,指定是否使用                                #sendfile系统调用来传输文件
				#sendfile系统调用在两个文件描述符之间直接传递数据(完全在内核中操作)                               #从而避免了数据在内核缓冲区和用户缓冲区之间的拷贝,操作效率很高,被称之为零拷贝,                     #硬盘 >> kernel buffer (快速拷贝到kernelsocket buffer) >>协议栈。
	keepalive_timeout  65;       #长连接超时时间,单位是秒
	server {                     #设置一个虚拟机主机,可以包含自己的全局快,同时也可以包含多个location模块                  #比如本虚拟机监听的端口、本虚拟机的名称和IP配置,多个server 可以使用一个端口比如都使用                                #80端口提供web服务
		listen       80;         #配置server监听的端口

		server_name localhost;   #本server的名称,当访问此名称的时候nginx会调用当前serevr内部的配置进程匹配。
		location / {             #location其实是server的一个指令,为nginx服务器提供比较多而且灵活的指令                          #都是在location中体现的,主要是基于nginx接受到的请求字符串                                      #对用户请求的UIL进行匹配,并对特定的指令进行处理                                                #包括地址重定向、数据缓存和应答控制等功能都是在这部分实现                                        #另外很多第三方模块的配置也是在location模块中配置。
			root   html;         #相当于默认页面的目录名称,默认是安装目录的相对路径,可以使用绝对路径配置。
			index index.html index.htm;          #默认的页面文件名称
            }
            error_page   500 502 503 504 /50x.html;  #错误页面的文件名称
            location = /50x.html {                   #location处理对应的不同错误码的页面定义到/50x.html                                                #这个跟对应其server中定义的目录下。           root   html;                         #定义默认页面所在的目录
            }
     }

#和邮件相关的配置
#mail {
#               ...#
#}         mail 协议相关配置段

#tcp代理配置,1.9版本以上支持
#stream {#               ...#       }       stream 服务器相关配置段
#导入其他路径的配置文件
#include /apps/nginx/conf.d/*.conf}
3.2 全局配置
Main 全局配置段常见的配置指令分类正常运行必备的配置
- 优化性能相关的配置
- 用于调试及定位问题相关的配置
- 事件驱动相关的配置
全局配置说明:
bash
user nginx nginx; #启动Nginx工作进程的用户和组
worker_processes [number | auto]; #启动Nginx工作进程的数量,一般设为和CPU核心数相同
worker_cpu_affinity 00000001 00000010 00000100 00001000 | auto ;
#将Nginx工作进程绑定到指定的CPU核心,默认Nginx是不进行进程绑定的,绑定并不是意味着当前nginx进程独占以一核心CPU,但是可以保证此进程不运行在其他核心上,这就极大减少了nginx的工作进程在不同的cpu核心上的来回跳转,减少了CPU对进程的资源分配与回收以及内存管理等,因此可以有效的提升nginx服务器的性能。
CPU MASK: 00000001:0号CPU
00000010:1号CPU
10000000:7号CPU
#示例
worker_cpu_affinity 0001 0010 0100 1000;第0号---第3号
CPUworker_cpu_affinity 0101 1010;
#示例
worker_processes 4;
worker_cpu_affinity 00000010 00001000 00100000 10000000;
[root@centos8 ~]# ps axo pid,cmd,psr | grep nginx
31093 nginx: master process /apps 1
34474 nginx: worker process 1
34475 nginx: worker process 3
34476 nginx: worker process 5
34477 nginx: worker process 7
#错误日志记录配置,语法:error_log file [debug | info | notice | warn | error | crit | alert | emerg]
#error_log logs/error.log;
#error_log logs/error.log notice;
error_log /usr/local/nginx/logs/error.log error;
#pid文件保存路径
pid /usr/local/nginx/logs/nginx.pid;
worker_priority 0; #工作进程优先级,-20~20(19)
worker_rlimit_nofile 100000; #所有worker进程能打开的文件数量上限, #包括:Nginx的所有连接(例如与代理服务器的连接等) #而不仅仅是与客户端的连接 #另一个考虑因素是实际的并发连接数不能超过系统级别的最大打开文件数的限制 #最好与ulimit -n 或者limits.conf的值保持一致,
#修改pam限制
[root@Nginx ~]# sudo -u nginx ulimit -n1024
[root@Nginx ~]# vim /etc/security/limits.conf*
- nofile 100000
[root@Nginx ~]# sudo -u nginx ulimit -n100000
daemon off; #前台运行Nginx服务用于测试、docker等环境。
master_process off|on; #是否开启Nginx的master-worker工作模式,仅用于开发调试场景,默认为on
events {
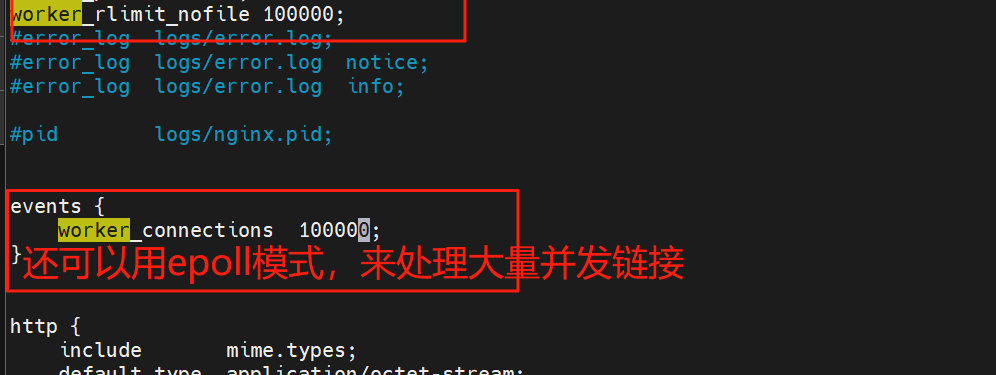
worker_connections 100000; #设置单个工作进程的最大并发连接数
use epoll; #使用epoll事件驱动, #Nginx支持众多的事件驱动, #比如:select、poll、epoll,只能设置在events模块中设置
accept_mutex on; #on为同一时刻一个请求轮流由work进程处理, #而防止被同时唤醒所有worker #避免多个睡眠进程被唤醒的设置,默认为off #新请求会唤醒所有worker进程,此过程也称为"惊群"-会增加负载 #因此nginx刚安装完以后要进行适当的优化。建议设置为on
multi_accept on; #on时Nginx服务器的每个工作进程可以同时接受多个新的网络连接 #此指令默认为off,
#即默认为一个工作进程只能一次接受一个新的网络连接 #打开后几个同接受多个。建议设置为on 打开可以接受多个后一起发送
}示例: 实现 nginx 的高并发配置----优化策略
bash
[root@nginx conf]# ulimit -n
1024
#默认最多打开1024个
[root@nginx conf]#ulimit -n 100000
#ab压缩-httpd-tools提供 用来测试访问压力
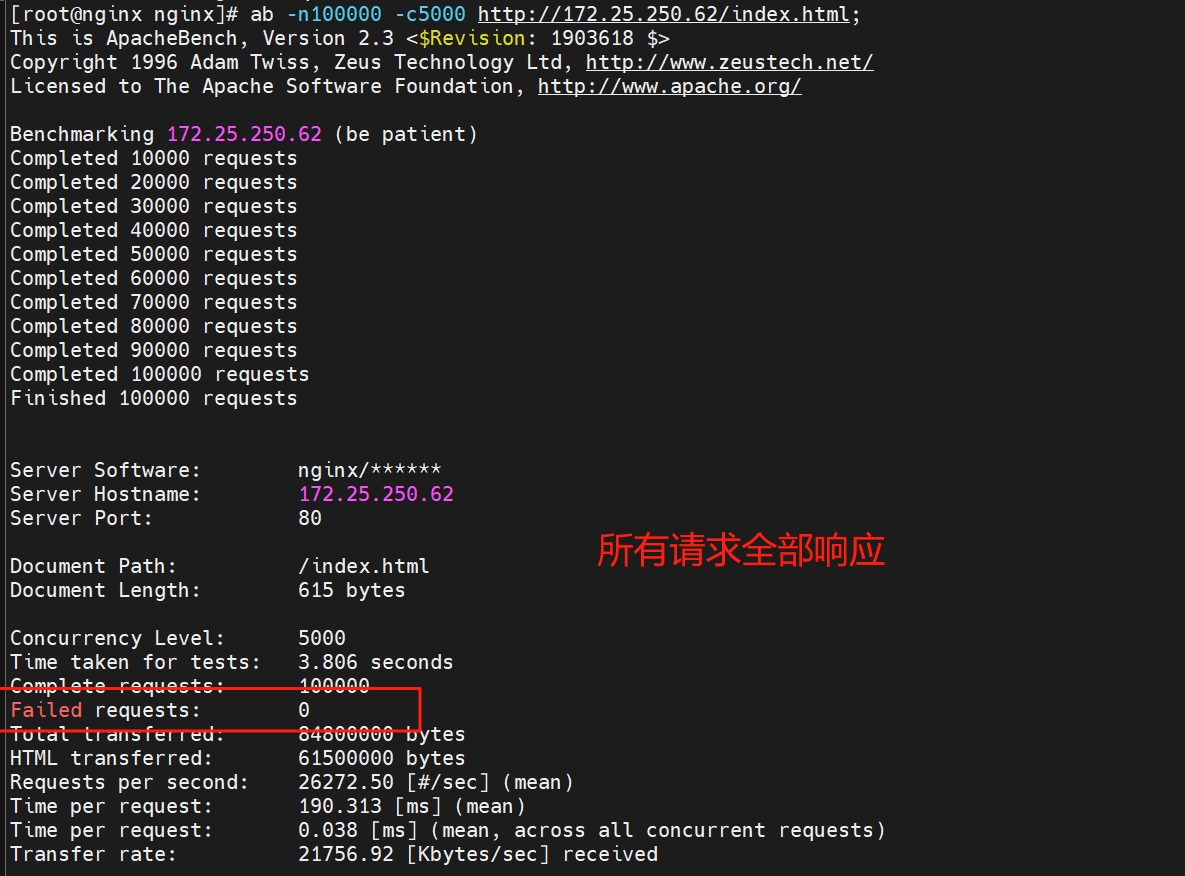
[root@nginx conf]# ab -n100000 -c5000 http://172.25.250.62/index.html
This is ApacheBench, Version 2.3 <$Revision: 1903618 $>
Copyright 1996 Adam Twiss, Zeus Technology Ltd, http://www.zeustech.net/
Licensed to The Apache Software Foundation, http://www.apache.org/
Benchmarking 172.25.250.62 (be patient)
socket: Too many open files (24)
#抗压失败
#默认配置不支持高并发,并报错
[root@nginx nginx]# tail logs/error.log
2025/08/09 22:19:17 [crit] 178300#0: accept4() failed (24: Too many open files)
2025/08/09 22:19:17 [crit] 178300#0: *167970 open() "/usr/local/nginx/html/index.html" failed (24: Too many open files), client: 172.25.250.62, server: localhost, request: "GET /index.html HTTP/1.0", host: "172.25.250.62"
2025/08/09 22:19:17 [crit] 178300#0: *167970 open() "/usr/local/nginx/html/50x.html" failed (24: Too many open files), client: 172.25.250.62, server: localhost, request: "GET /index.html HTTP/1.0", host: "172.25.250.62"
2025/08/09 22:19:18 [crit] 178300#0: accept4() failed (24: Too many open files)
2025/08/09 22:19:18 [crit] 178300#0: *180766 open() "/usr/local/nginx/html/index.html" failed (24: Too many open files), client: 172.25.250.62, server: localhost, request: "GET /index.html HTTP/1.0", host: "172.25.250.62"
2025/08/09 22:19:18 [crit] 178300#0: *180766 open() "/usr/local/nginx/html/50x.html" failed (24: Too many open files), client: 172.25.250.62, server: localhost, request: "GET /index.html HTTP/1.0", host: "172.25.250.62"
2025/08/09 22:19:19 [crit] 178300#0: accept4() failed (24: Too many open files)
2025/08/09 22:19:19 [crit] 178300#0: *198780 open() "/usr/local/nginx/html/index.html" failed (24: Too many open files), client: 172.25.250.62, server: localhost, request: "GET /index.html HTTP/1.0", host: "172.25.250.62"
2025/08/09 22:19:19 [crit] 178300#0: *198780 open() "/usr/local/nginx/html/50x.html" failed (24: Too many open files), client: 172.25.250.62, server: localhost, request: "GET /index.html HTTP/1.0", host: "172.25.250.62"
2025/08/09 22:19:29 [crit] 178300#0: accept4() failed (24: Too many open files)
#修改配置
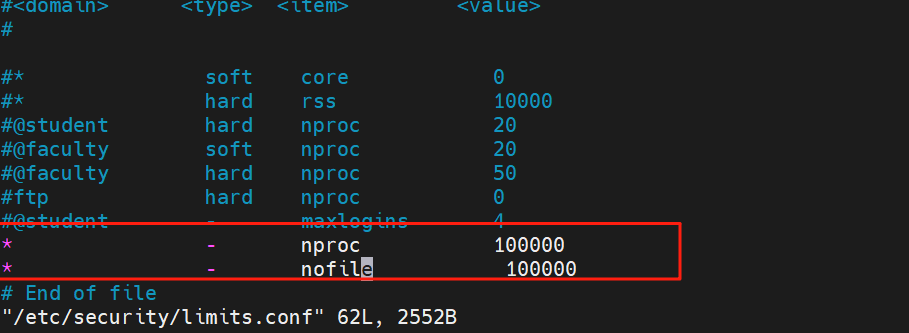
[root@Nginx ~]# vim /etc/security/limits.conf
#需要在nginx服务启动前开,若服务已经起,则需ulimit -n 100000 让配置文件生效
* - nproc 100000
* - nofile 100000
#*所有人 -软限制硬限制为同一值 程序可打开文件个数 100000
[root@Nginx ~]# vim /usr/local/nginx/conf/nginx.conf
worker_rlimit_nofile 100000;
[root@Nginx ~]# systemctl restart nginx
测试:
3.3 http 配置块
bash
#在响应报文中将指定的文件扩展名映射至MIME对应的类型
include           /etc/nginx/mime.types;
default_type     application/octet-stream;          #除mime.types中的类型外                                                    				#指定其它文件的默认MIME类型,浏览器一般会提示下载

types {
	text/html html;
	image/gif gif;
	image/jpeg jpg;
	}
示例:识别php文件为text/html
bash
[root@nginx nginx]# vim html/index.php

<?php
  phpinfo();
?>

[root@nginx nginx]# curl -I 172.25.250.62/index.php
HTTP/1.1 200 OK
Server: nginx/******
Date: Sat, 09 Aug 2025 14:25:35 GMT
Content-Type: application/octet-stream
Content-Length: 22
Last-Modified: Sat, 09 Aug 2025 14:25:05 GMT
Connection: keep-alive
ETag: "68975a41-16"
Accept-Ranges: bytes

3.4 核心配置示例
基于不同的IP、不同的端口以及不用得域名实现不同的虚拟主机,依赖于核心模块ngx_http_core_module实现。
3.4.1 新建一个 PC web 站点
bash
#定义子配置文件路径
[root@Nginx ~]# mkdir  /usr/local/nginx/conf.d/
[root@centos8 ~]# vim /usr/local/nginx/conf/nginx.conf
http {    ......
include /usr/local/nginx/conf.d/*.conf;     #在配置文件的最后面添加此行                                                                 #注意不要放在最前面,会导致前面的命令无法生效
}


#创建虚拟主机网站配置
[root@Nginx ~]# vim /usr/local/nginx/conf.d/vhosts.conf
server{
    listen  80;
    server_name tomcat.gee.org;
    root    /web/html;
    index   index.html;
}


root@Nginx ~]# mkdir  -p /we/html
[root@Nginx ~]# echo web_html > /web/html/index.html

[root@Nginx ~]# nginx -s reload

#访问测试
[root@nginx conf.d]# curl tomcat.gee.org
web_html
3.4.2 root 与 alias
root:指定web的家目录,在定义location的时候,文件的绝对路径等于 root+location
root示例:
bash
server{
    listen  80;
    server_name tomcat.gee.org;
    root    /web/html;
    index   index.html;
    location /test {
        root /mnt/;   #必须建立 /mnt/test 这个文件
    }


}

[root@nginx conf.d]# mkdir -p /mnt/test

[root@nginx conf.d]# echo web_mnt > /mnt/test/index.html

[root@nginx conf.d]# nginx -s reload

\#重启Nginx并访问测试

[root@nginx conf.d]# curl tomcat.gee.org/test/
web_mnt
alias:定义路径别名,会把访问的路径重新定义到其指定的路径,文档映射的另一种机制;仅能用于location上下文,此指令使用较少
alias示例:
bash
server{
listen 80;
server_name tomcat.gee.org;
root /web/html;
index index.html;
location /test {
root /mnt/; #/mnt/test文件 才是真实访问的文件
}
location /test1 {
alias /mnt/test1; #真实访问的文件路径
}
}
location /test { #注意test后不要加/
\#使用alias的时候uri后面如果加了斜杠,则下面的路径配置必须加斜杠,否则403
alias /mnt/test1; #当访问test的时候,会显示alias定义的/mnt/test1里面的内容
#重启Nginx并访问测试
[root@node100 ~]# curl lee.timinglee.org/alias/
dirtest page
location中使用root指令和alias指令的意义不同
root    #给定的路径对应于location中的/uri左侧的/
alias   #给定的路径对应于location中的/uri的完整路径
3.4.3 location 的详细使用
- 在一个server中location配置段可存在多个,用于实现从uri到文件系统的路径映射;
- ngnix会根据用户请求的URI来检查定义的所有location,按一定的优先级找出一个最佳匹配,
- 而后应用其配置在没有使用正则表达式的时候,nginx会先在server中的多个location选取匹配度最高的一个uri
- uri是用户请求的字符串,即域名后面的web文件路径
- 然后使用该location模块中的正则url和字符串,如果匹配成功就结束搜索,并使用此location处理此请求。
\
bash
#语法规则:
location [ = | ~ | ~* | ^~ ] uri { ... }
= #用于标准uri前,需要请求字串与uri精确匹配,大小敏感,如果匹配成功就停止向下匹配并立即处理请求
^~ #用于标准uri前,表示包含正则表达式,并且匹配以指定的正则表达式开头 #对uri的最左边部分做匹配检查,不区分字符大小写
~ #用于标准uri前,表示包含正则表达式,并且区分大小写
~* #用于标准uri前,表示包含正则表达式,并且不区分大写
不带符号 #匹配起始于此uri的所有的uri
\ #用于标准uri前,表示包含正则表达式并且转义字符。可以将 . * ?等转义为普通符号
\#匹配优先级从高到低:
=, ^~, ~/~*, 不带符号3.4.3.1 匹配案例-精确匹配
在server部分使用location配置一个web界面,例如:当访问nginx 服务器的/logo.jpg的时候要显示指定html文件的内容,精确匹配一般用于匹配组织的logo等相对固定的URL,匹配优先级最高
1.精确匹配 logo
bash
[root@Nginx ~]# mkdir /webdata/nginx/timinglee.org/lee/images -p
[root@Nginx ~]# ls /webdata/nginx/timinglee.org/lee/images
[root@Nginx ~]# vim /usr/local/nginx/conf.d/vhosts.conf
server {
listen 80;
server_name lee.timinglee.org;
location / {
root /webdata/nginx/timinglee.org/lee/html;
}
location = /logo.png {
root /webdata/nginx/timinglee.org/lee/images;
}
}
\#上传logo.jpg图片到/webdata/nginx/timinglee.org/lee/images,重启Nginx并访问测试
#访问测试:http://www.timinglee.org/logo.png3.4.3.2 匹配案例-区分大小写
~ 实现区分大小写的模糊匹配. 以下范例中,
如果访问uri中包含大写字母的logo.PNG,则以下location匹配logo.png条件不成功
因为 ~ 区分大小写,当用户的请求被执行匹配时发现location中定义的是小写的png,
本次访问的uri匹配失败,后续要么继续往下匹配其他的location(如果有),要么报错给客户端
bash
server {
listen 80;
server_name lee.timinglee.org;
location / {
root /webdata/nginx/timinglee.org/lee/html;
}
location ~ /logo.PNG {
root /webdata/nginx/timinglee.org/lee/images;
}
}
\#重启Nginx并访问测试
\#http://www.timinglee.org/logo.PNG #访问失败,系统中没有logo.PNG文件3.4.3.3 匹配案例-不区分大小写
~* 用来对用户请求的uri做模糊匹配,uri中无论都是大写、都是小写或者大小写混合,此模式也都会匹配,通常使用此模式匹配用户request中的静态资源并继续做下一步操作,此方式使用较多
注意: 此方式中,对于Linux文件系统上的文件仍然是区分大小写的,如果磁盘文件不存在,仍会提示404
bash
server {
listen 80;
server_name lee.timinglee.org;
location / {
root /webdata/nginx/timinglee.org/lee/html;
}
location ~* /logo.PNG {
root /webdata/nginx/timinglee.org/lee/images;
}
}
\#重启Nginx并访问测试
\#http://www.timinglee.org/logo.png3.4.3.4 匹配案例-URI开始
bash
[root@Nginx ~]# mkdir /webdata/nginx/timinglee.org/lee/images/images{1,2}
[root@Nginx ~]# echo image1 >
/webdata/nginx/timinglee.org/lee/images/images1/index.html
[root@Nginx ~]# echo image1 >
/webdata/nginx/timinglee.org/lee/images/images2/index.html
server {
listen 80;
server_name lee.timinglee.org;
location / {
root /webdata/nginx/timinglee.org/lee/html;
}
location ^~ /images {
root /webdata/nginx/timinglee.org/lee/images; index index.html;
}
location /images1 {
root /webdata/nginx/timinglee.org/lee/images;
}
}
\#重启Nginx并访问测试,实现效果是访问/images1和/images2返回内容一样
[root@node100 ~]# curl 172.25.254.200/images1/
image1
[root@node100 ~]# curl 172.25.254.200/images2/
image13.4.3.5 匹配案例-文件名后缀
bash
[root@Nginx ~]# mkdir /webdata/nginx/timinglee.org/lee/images
#上传一个图片到/webdata/nginx/timinglee.org/lee/images
server {
listen 80;
server_name lee.timinglee.org;
location / {
root /webdata/nginx/timinglee.org/lee/html;
}
location ~* \.(gif|jpg|jpeg|bmp|png|tiff|tif|ico|wmf|js|css)$ { root /webdata/nginx/timinglee.org/lee/images;
index index.html;
}
}
\#重启Nginx并访问测试
172.25.254.200/logo.png3.4.3.6 匹配案例-优先级
bash
server{
    listen  80;
    server_name tomcat.gee.org;
    root    /web/html;
    index   index.html;
    location = /test {
        return 200 "punct =\n";   #精准匹配
    }

    location ^~ /test {
        return 200 "punct ^~\n"; #匹配以/test 开头的
    }

    location ~* /test {
        return 200 "punct ~*\n";
    }

    location ~ /test {
        return 200 "punct ~\n"; #匹配包含/test且区分大小写
    }

    location ~* \.(png|css|jpg)$  {
        return 200 "punct ~*\n  #匹配以png|css|jpg结尾的且不区分大小写
    }
}


\#匹配优先级:=, ^~, ~/~*,/

location优先级:(location =) > (location ^~ 路径) > (location ~,~* 正则顺序) > (location 完整路径) > (location 部分起始路径) > (/)

3.4.3.7 生产使用案例
\
bash
#直接匹配网站根会加速Nginx访问处理

location = /index.html {

  ......;

}

location / {

  ......;

}

\#静态资源配置方法1

location ^~ /static/ {

  ......;

}

\#静态资源配置方法2,应用较多

location ~* \.(gif|jpg|jpeg|png|css|js|ico)$ {

......;

}

\#多应用配置

location ~* /app1 {

 ......;

}

location ~* /app2 {

......;

}
3.4.4 Nginx 账户认证功能
由 ngx_http_auth_basic_module 模块提供此功能
示例:
bash
[root@nginx conf.d]# dnf install httpd-tools-2.4.57-5.el9.x86_64 -y
[root@nginx conf.d]# htpasswd -cmd /usr/local/nginx/.htpasswd admin
New password:
Re-type new password:
Adding password for user admin
[root@Nginx ~]# htpasswd -cmb /usr/local/nginx/conf/.htpasswd admin lee #-b 表示非交互建立用户认证 -c 创建 -m 用户
Adding password for user admin
#[root@Nginx ~]# htpasswd -mb /usr/local/nginx/conf/.htpasswd lee lee
#Adding password for usr
[root@nginx conf.d]# cat /usr/local/nginx/.htpasswd
admin:cNhlBY32jOUHw
[root@Nginx ~]# vim vhost.conf
server{
listen 80;
root /web/html;
index index.html;
# location = /test {
# return 200 "punct =\n";
# }
#
# location ^~ /test {
# return 200 "punct ^~\n";
# }
#
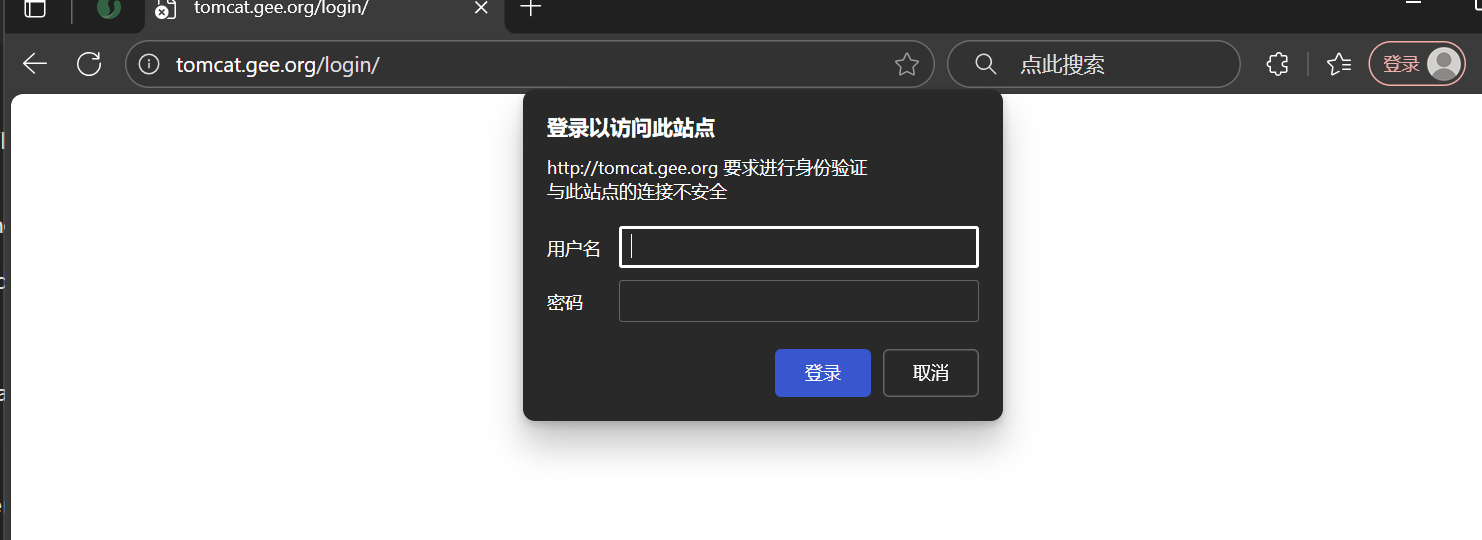
location /login/{
root /web/;
index index.html;
auth_basic "password please";
auth_basic_user_file /usr/local/nginx/.htpasswd;
}
}
\#重启Nginx并访问测试
[root@nginx conf.d]# curl tomcat.gee.org/login/ -u admin:123
login

3.4.5 自定义错误页面
自定义错误页,同时也可以用指定的响应状态码进行响应, 可用位置:http, server, location, if in location
bash
error_page code ... [=[response]] uri;示例:
bash
listen 80;

server_name www.timinglee.org;

error_page  500 502 503 504 /error.html; #后面跟指定文件
location = /error.html {

  root /data/nginx/html;

}

\#重启nginx并访问不存在的页面进行测试
示例:自定义错误页面
bash
[root@Nginx ~]# mkdir /web/errorpage

[root@Nginx ~]# echo error page > /web/errorpage/error.html

server{
    listen  80;
    server_name tomcat.gee.org;
    root    /web/html;
    index   index.html;
    error_page 500 502 404 403 /errorpage/error.html;


    location /errorpage{
        root /web/;
    }
}
~


测试:


[root@nginx conf.d]# curl tomcat.gee.org/llll
error page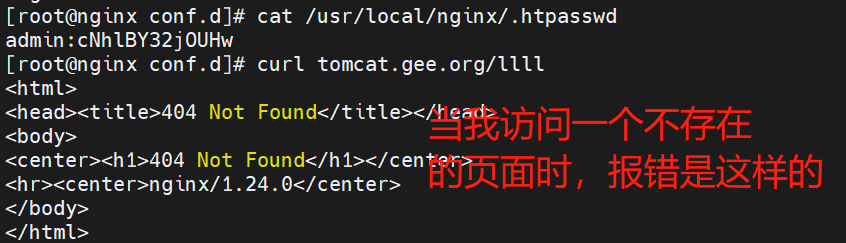

3.4.6 自定义错误日志
可以自定义错误日志,实现站日志独立
bash
Syntax: error_log file [level];

Default:

error_log logs/error.log error;

Context: main, http, mail, stream, server, location

level: debug, info, notice, warn, error, crit, alert, emerg
示例:
bash
[root@nginx ~]# cd /usr/local/nginx/conf.d/
[root@nginx conf.d]# vi vhost.conf


server{
    listen  80;
    server_name tomcat.gee.org;
    root    /web/html;
    index   index.html;
    error_page 500 502 404 403 /errorpage/error.html;
    access_log /usr/local/nginx/gee.access.log;
    error_log /usr/local/nginx/gee.error.log

    location /errorpage{
        root /web/;
    }
}


\#重启nginx并访问不存在的页面进行测试并验证是在指定目录生成新的日志文件
3.4.7 检测文件是否存在
try_files会按顺序检查文件是否存在,返回第一个找到的文件或文件夹(结尾加斜线表示为文件夹),如果所有文件或文件夹都找不到,会进行一个内部重定向到最后一个参数。只有最后一个参数可以引起一个内部重定向,之前的参数只设置内部URI的指向。最后一个参数是回退URI且必须存在,否则会出现内部500错误。
语法格式
bash
Syntax: try_files file ... uri;

try_files file ... =code;

Default: ---

Context: server, location
示例: 如果不存在页面, 就转到default.html页面
bash
[root@Nginx ~]# echo default> /web/errorpage/default.html
[root@Nginx ~]# vim /usr/local/nginx/conf.d/vhost.conf
server{
listen 80;
server_name tomcat.gee.org;
root /web/html;
index index.html;
error_page 500 502 404 403 /errorpage/error.html;
access_log /usr/local/nginx/gee.access.log;
error_log /usr/local/nginx/gee.error.log;
try_files $uri $uri.html $uri/index.html /errorpage/default.html;
#会遍历该行所有uri当访问文件都不存在时,会访问/error/default.html
location = /40x.html {
root /webdata/nginx/timinglee/lee/errors;
}
}
测试:
[root@nginx conf.d]# curl tomcat.gee.org/a/
default
3.4.8 长连接配置
一般配置在主配置文件下
bash
keepalive_timeout timeout [header_timeout]; #设定保持连接超时时长,0表示禁止长连接,默认为75s
\#通常配置在http字段作为站点全局配置
keepalive_requests 数字; #在一次长连接上所允许请求的资源的最大数量 #默认为100次,建议适当调大,比如:500示例:
keepalive_requests 3;
keepalive_timeout 65 60;
#开启长连接后,返回客户端的会话保持时间为60s,单次长连接累计请求达到指定次数请求或65秒就会被断
开,第二个数字60为发送给客户端应答报文头部中显示的超时时间设置为60s:如不设置客户端将不显示超时时间。
Keep-Alive:timeout=60 #浏览器收到的服务器返回的报文
#如果设置为0表示关闭会话保持功能,将如下显示:
#Connection:close 浏览器收到的服务器返回的报文
#使用命令测试:
bash
[root@node100 ~]# telnet lee.timinglee.org 80Trying 172.25.254.200...
Connected to lee.timinglee.org.
Escape character is '^]'.
GET / HTTP/1.1 ##输入动作
HOST: lee.timinglee.org ##输入访问HOST
\##输入回车
HTTP/1.1 200 OK
Server: nginx/1.24.0
Date: Sat, 20 Jul 2024 12:54:16 GMT
Content-Type: text/html
Content-Length: 15
Last-Modified: Sat, 20 Jul 2024 08:49:12 GMTConnection: keep-alive
ETag: "669b7a08-f"
Accept-Ranges: bytes
172.25.254.200
GET / HTTP/1.1 #第二次操作
HOST: lee.timinglee.org #第二次操作
#第二次操作
HTTP/1.1 200 OK
Server: nginx/1.24.0
Date: Sat, 20 Jul 2024 12:54:25 GMT
Content-Type: text/html
Content-Length: 15
Last-Modified: Sat, 20 Jul 2024 08:49:12 GMTConnection: close
ETag: "669b7a08-f"
Accept-Ranges: bytes
172.25.254.200
Connection closed by foreign host. #自动断开链接
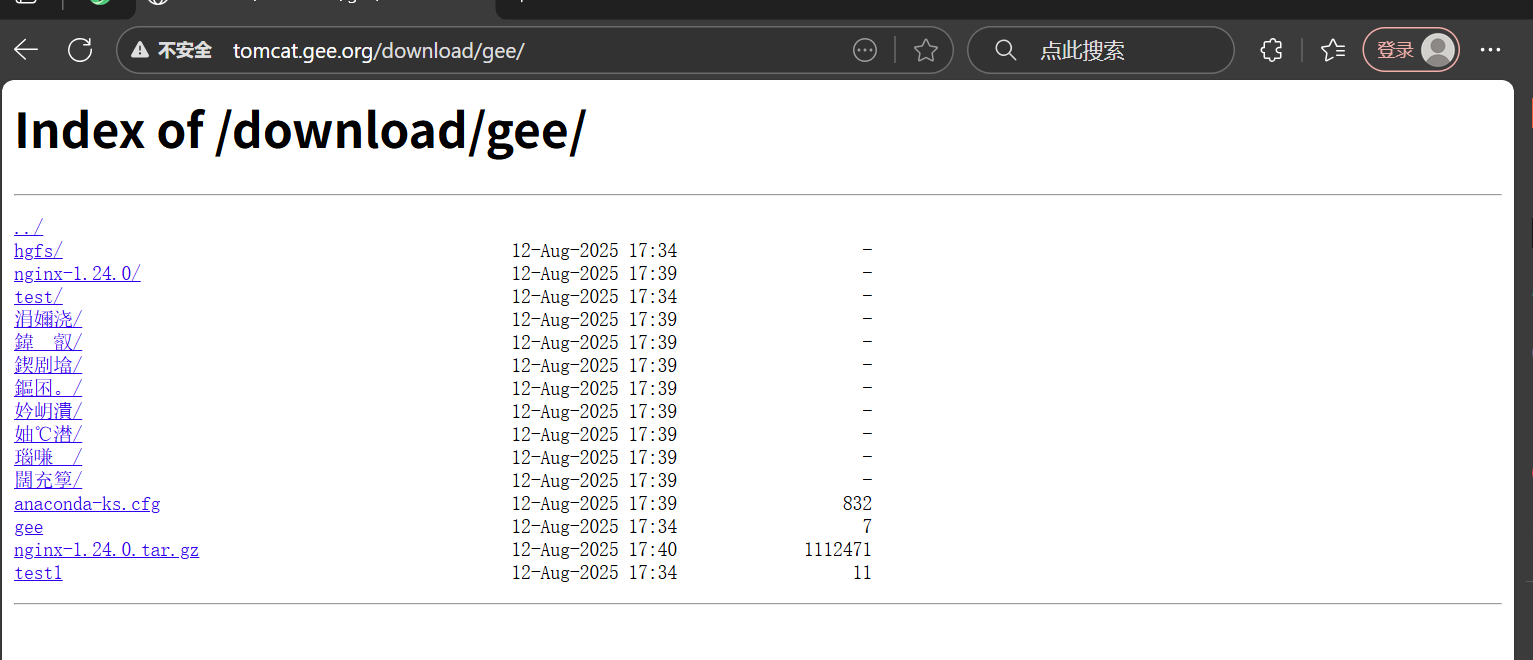
3.4.9 作为下载服务器配置
ngx_http_autoindex_module 模块处理以斜杠字符 "/" 结尾的请求,并生成目录列表,可以做为下载服务配置使用
相关指令:
bash
autoindex on | off;             #自动文件索引功能,默为off

autoindex_exact_size on | off;  #计算文件确切大小(单位bytes),off 显示大概大小(单位K、M),默认on

autoindex_localtime on | off ;  #显示本机时间而非GMT(格林威治)时间,默认off

autoindex_format html | xml | json | jsonp;         #显示索引的页面文件风格,默认html

limit_rate rate;        #限制响应客户端传输速率(除GET和HEAD以外的所有方法),单位B/s,bytes/second,                        									#默认值0,表示无限制,此指令由

ngx_http_core_module提供

set $limit_rate 4k;     #也可以通变量限速,单位B/s,同时设置,此项优级高.
示例:实现下载站点
\
bash
#注意:download不需要index.html文件
[root@Nginx ~]# mkdir /web/download #建立下载目录
[root@Nginx ~]# vim /usr/local/nginx/conf.d/vhosts.conf
server {
isten 80;
server_name tomcat.gee.org;
root /webdata/nginx/timinglee.org/lee;
access_log /var/log/nginx/access.log;
error_log /var/log/nginx/error.log;
try_files $uri $uri.html $uri/index.html /error/default.html;
location = /40x.html {
root /webdata/nginx/timinglee/lee/errors;
}
location /download {
root /web/;
autoindex on; #自动索引功能
autoindex_exact_size on; #计算文件确切大小(单位bytes),此为默认值,off只显示大概大小(单位kb、mb、gb)
autoindex_localtime on; #on表示显示本机时间而非GMT(格林威治)时间,默为为off显示GMT时间
set $limit_rate 1024k; #限速,默认不限速 }
}
\#重启Nginx并访问测试下载页面