vue3生命周期函数
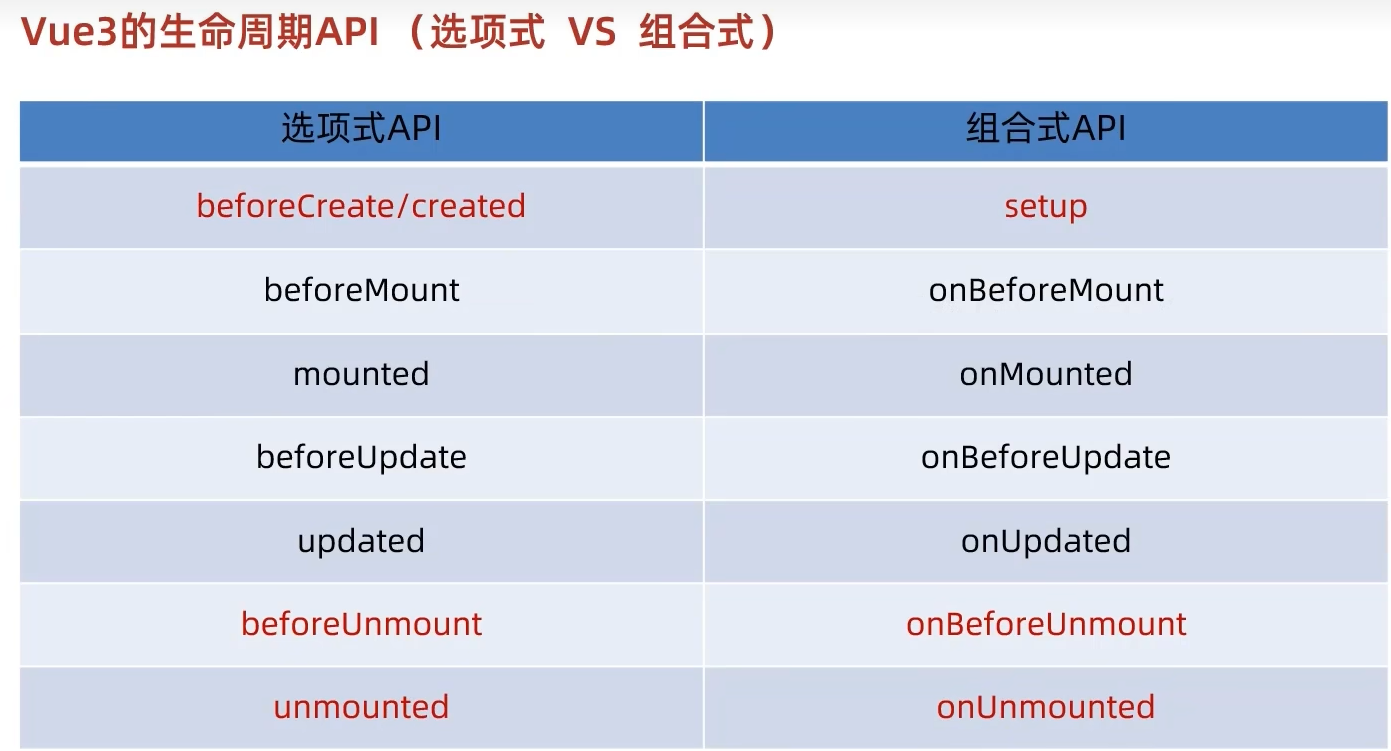
生命周期钩子名称对比表
| 阶段 | Vue 2 选项式 API | Vue 3 组合式 API | 说明 |
|---|---|---|---|
| 创建前 | beforeCreate |
onBeforeCreate(已废弃) |
Vue 3 中 setup() 替代 |
| 创建完成 | created |
setup()(替代) |
setup 是入口,代替 beforeCreate 和 created |
| 挂载前 | beforeMount |
onBeforeMount() |
名称一致 |
| 挂载完成 | mounted |
onMounted() |
名称一致 |
| 更新前 | beforeUpdate |
onBeforeUpdate() |
名称一致 |
| 更新完成 | updated |
onUpdated() |
名称一致 |
| 卸载前 | beforeDestroy |
onBeforeUnmount() |
名称变更! |
| 卸载完成 | destroyed |
onUnmounted() |
名称变更! |
| 错误捕获 | errorCaptured |
onErrorCaptured() |
名称一致 |
| 激活(keep-alive) | activated |
onActivated() |
名称一致 |
| 停用(keep-alive) | deactivated |
onDeactivated() |
名称一致 |
| 调试:依赖追踪 | 无 | onRenderTracked() |
Vue 3 新增,开发模式专用 |
| 调试:触发更新 | 无 | onRenderTriggered() |
Vue 3 新增,开发模式专用 |
⚠️ 重要 :Vue 3 中 没有
beforeDestroy和destroyed,它们被重命名为onBeforeUnmount和onUnmounted。
详细对比与示例
1️⃣ beforeCreate & created → 被 setup() 替代
Vue 2 写法:
export default {
  beforeCreate() {
    console.log('组件创建前');
  },
  created() {
    console.log('组件创建完成');
    this.fetchData();
  },
  methods: {
    fetchData() { /* ... */ }
  }
}
Vue 3 写法(<script setup>):
<script setup>
import { onMounted } from 'vue';

// setup() 函数体直接执行,替代 beforeCreate 和 created
console.log('组件创建完成');

function fetchData() { /* ... */ }

onMounted(() => {
  fetchData();
});
</script>
✅ 说明 :Vue 3 的
setup()在组件实例创建后、onBeforeMount之前执行,等价于 Vue 2 的beforeCreate+created。
2️⃣ beforeMount / mounted → onBeforeMount / onMounted
Vue 2:
export default {
  mounted() {
    console.log('DOM 已挂载');
    this.$refs.input.focus();
  }
}
Vue 3:
<script setup>
import { onMounted, ref } from 'vue';

const input = ref(null);

onMounted(() => {
  console.log('DOM 已挂载');
  input.value.focus();
});
</script>
✅ 名称一致,行为一致。
3️⃣ beforeUpdate / updated → onBeforeUpdate / onUpdated
Vue 2:
export default {
  updated() {
    console.log('组件已更新');
  }
}
Vue 3:
<script setup>
import { onUpdated } from 'vue';

onUpdated(() => {
  console.log('组件已更新');
});
</script>
✅ 完全一致。
4️⃣ beforeDestroy / destroyed → onBeforeUnmount / onUnmounted(⚠️ 名称变更)
Vue 2:
export default {
  beforeDestroy() {
    this.timer && clearInterval(this.timer);
    window.removeEventListener('resize', this.handleResize);
  },
  destroyed() {
    console.log('组件已销毁');
  }
}
Vue 3:
<script setup>
import { onMounted, onBeforeUnmount } from 'vue';

let timer = null;

onMounted(() => {
  timer = setInterval(() => { /* ... */ }, 1000);
  window.addEventListener('resize', handleResize);
});

// ✅ 注意:是 onBeforeUnmount,不是 beforeDestroy
onBeforeUnmount(() => {
  if (timer) clearInterval(timer);
  window.removeEventListener('resize', handleResize);
  console.log('组件即将卸载');
});

// onUnmounted 也可用
onUnmounted(() => {
  console.log('组件已卸载');
});
</script>
🔴 重点 :
beforeDestroy→onBeforeUnmount,destroyed→onUnmounted这是 唯一命名不一致 的地方,迁移时务必注意!
5️⃣ activated / deactivated → onActivated / onDeactivated
Vue 2:
export default {
  activated() {
    console.log('组件被激活');
  },
  deactivated() {
    console.log('组件被缓存');
  }
}
Vue 3:
<script setup>
import { onActivated, onDeactivated } from 'vue';

onActivated(() => {
  console.log('组件被激活');
});

onDeactivated(() => {
  console.log('组件被缓存');
});
</script>
✅ 名称一致,行为一致。
6️⃣ Vue 3 新增调试钩子
import { onRenderTracked, onRenderTriggered } from 'vue';

onRenderTracked((event) => {
  console.log('依赖被追踪:', event);
});

onRenderTriggered((event) => {
  console.log('更新被触发:', event);
});
💡 仅在开发模式有效,用于调试响应式系统,Vue 2 无对应功能。
🔄 生命周期执行顺序(Vue 2 vs Vue 3 完全一致)
setup()                   ← 替代 beforeCreate + created
  ↓
onBeforeMount()           ← beforeMount
  ↓
onMounted()               ← mounted
  ↓
onBeforeUpdate()          ← beforeUpdate
  ↓
onUpdated()               ← updated
  ↓
onBeforeUnmount()         ← beforeDestroy
  ↓
onUnmounted()             ← destroyed
✅ 执行顺序完全相同,只是写法和部分名称变化。
生命周期执行顺序示例
import {
  onBeforeMount,
  onMounted,
  onBeforeUpdate,
  onUpdated,
  onBeforeUnmount,
  onUnmounted
} from 'vue';

export default {
  setup() {
    console.log('1. setup');

    onBeforeMount(() => {
      console.log('2. onBeforeMount');
    });

    onMounted(() => {
      console.log('3. onMounted');
    });

    onBeforeUpdate(() => {
      console.log('4. onBeforeUpdate');
    });

    onUpdated(() => {
      console.log('5. onUpdated');
    });

    onBeforeUnmount(() => {
      console.log('6. onBeforeUnmount');
    });

    onUnmounted(() => {
      console.log('7. onUnmounted');
    });

    return {};
  }
};
✅ Vue 3 的优势(组合式 API)
| 优势 | 说明 |
|---|---|
| 逻辑复用更强 | 可在任意 .js 文件中使用生命周期钩子,封装可复用逻辑(如 useMouse.js) |
| 更好的 TypeScript 支持 | 类型推导更准确 |
减少 this 混乱 |
不再依赖 this,避免箭头函数中 this 指向问题 |
| 按逻辑组织代码 | 不再分散在 data、methods、watch 中,而是按功能组织 |
🚀 迁移建议
beforeDestroy→onBeforeUnmountdestroyed→onUnmountedcreated逻辑移到setup()中- 所有生命周期钩子前加
on前缀并从vue导入 - 优先使用
<script setup>+ 组合式 API
✅ 总结
| 对比项 | Vue 2 | Vue 3 |
|---|---|---|
| 核心变化 | 选项式 API | 组合式 API(推荐) |
| 生命周期名称 | beforeDestroy, destroyed |
onBeforeUnmount, onUnmounted |
| 入口函数 | created |
setup() |
| 写法 | 选项对象 | 导入函数 |
| 逻辑复用 | mixins(有缺陷) | 自定义 Hook(推荐) |
| 调试能力 | 一般 | 增强(onRenderTracked 等) |
💡 一句话总结 :
Vue 3 的生命周期"行为不变、顺序不变",只是"写法更新、命名微调、能力增强" 。掌握
onBeforeUnmount和onUnmounted的命名变化,就能轻松迁移!
以前的选项api还可以用吗
选项式 API 在 Vue 3 中依然有效
你完全可以像 Vue 2 那样写代码:
<!-- Vue 3 中完全支持的选项式 API -->
<script>
export default {
  name: 'MyComponent',

  // ✅ data
  data() {
    return {
      count: 0,
      message: 'Hello Vue 3'
    }
  },

  // ✅ 生命周期钩子(注意:名称已更新)
  created() {
    console.log('组件创建完成');
  },
  mounted() {
    console.log('组件已挂载');
  },
  // ⚠️ 注意:Vue 3 中是 beforeUnmount 和 unmounted
  beforeUnmount() {
    console.log('组件即将卸载');
  },
  unmounted() {
    console.log('组件已卸载');
  },

  // ✅ methods
  methods: {
    increment() {
      this.count++;
    }
  },

  // ✅ computed
  computed: {
    doubleCount() {
      return this.count * 2;
    }
  },

  // ✅ watch
  watch: {
    count(newVal, oldVal) {
      console.log(`count 从 ${oldVal} 变为 ${newVal}`);
    }
  }
}
</script>

<template>
  <div>
    <p>{{ message }}</p>
    <p>Count: {{ count }}</p>
    <p>Double: {{ doubleCount }}</p>
    <button @click="increment">+1</button>
  </div>
</template>
✅ 这段代码在 Vue 3 中可以直接运行,无需修改。
2️⃣ 与 Vue 2 的主要区别(仅两处)
| 功能 | Vue 2 | Vue 3(选项式 API) |
|---|---|---|
| 销毁前钩子 | beforeDestroy |
beforeUnmount |
| 销毁完成钩子 | destroyed |
unmounted |
🔴 重要 :这是唯一不兼容的地方。
如果你从 Vue 2 迁移,需要将:
beforeDestroy→ 改为beforeUnmountdestroyed→ 改为unmounted
3️⃣ Vue 3 推荐使用 <script setup>(组合式 API)
虽然选项式 API 可用,但 Vue 3 官方更推荐使用 <script setup>,因为它:
-
更好的逻辑复用(自定义 Hook)
-
更强的 TypeScript 支持
-
更灵活的代码组织(按功能而非选项分组)
-
更接近 React Hooks 的开发体验
{{ message }}
Count: {{ count }}
Double: {{ doubleCount }}
4️⃣ 你可以在同一个项目中混合使用
Vue 3 允许你:
-
新组件用
<script setup>(组合式 API) -
老组件保留选项式 API
-
甚至在一个组件中混合使用(不推荐)
✅ 这是合法的,但不建议混合使用,会造成代码混乱。
5️⃣ 官方态度
- Vue 团队明确表示:选项式 API 不会废弃
- 它仍然是 Vue 3 的一等公民
- 适合:
- 简单组件
- 初学者
- 从 Vue 2 迁移的项目
✅ 总结
| 问题 | 回答 |
|---|---|
| Vue 2 的选项式 API 在 Vue 3 中还能用吗? | ✅ 能用!完全支持 |
| 是否需要修改? | ⚠️ 只需将 beforeDestroy → beforeUnmount destroyed → unmounted |
| 是否推荐使用? | 👍 适合简单场景、迁移项目、初学者 但官方更推荐 <script setup> |
| 会不会被废弃? | ❌ 不会,Vue 团队承诺长期支持 |
💡 建议:
- 新项目:优先学习和使用
<script setup>(组合式 API)- 老项目迁移:可以先保留选项式 API,逐步重构
- 团队协作:统一风格,避免混合使用
所以,放心使用!Vue 3 对选项式 API 的支持非常友好,你有充分的时间去学习和过渡到组合式 API。