✔零知IDE 是一个真正属于国人自己的开源软件平台,在开发效率上超越了Arduino平台并且更加容易上手,大大降低了开发难度。零知开源在软件方面提供了完整的学习教程和丰富示例代码,让不懂程序的工程师也能非常轻而易举的搭建电路来创作产品,测试产品。快来动手试试吧!
✔访问零知实验室,获取更多实战项目和教程资源吧!
目录
(1)项目概述
本项目基于STM32F407VET6主控芯片的零知增强板,结合TCS230高精度颜色传感器和ST7789显示屏,开发了一套专业的颜色识别系统。系统通过创新的独立通道校准算法,实现了对RGB颜色的高精度识别,并能将检测结果以直观的UI界面展示,同时提供标准的HEX颜色代码输出。项目优化了颜色识别过程中的通道干扰问题 和校准流程。
(2)项目亮点
>采用TCS230传感器,支持1600万色识别
>RGB三通道独立校准,解决通道干扰问题
>分区显示传感器数据和检测结果
>带错误检测的三步校准流程
>多次采样平均算法,抗干扰能力强
(3)项目难点及解决方案
问题描述:在识别纯色时,其他通道值偏高(如识别绿色时红蓝值偏高)
解决方案:
>独立通道校准算法
>多次采样平均值滤波
>通道干扰补偿机制
一、硬件系统部分
1.1 硬件清单
| 组件 | 型号 | 数量 |
|---|---|---|
| 主控板 | 零知增强板(STM32F407VET6) | 1 |
| 颜色传感器 | TCS230 | 1 |
| 显示屏 | ST7789 (240x320) | 1 |
| 按钮 | 轻触开关 | 1 |
| 杜邦线 | 20cm | 若干 |
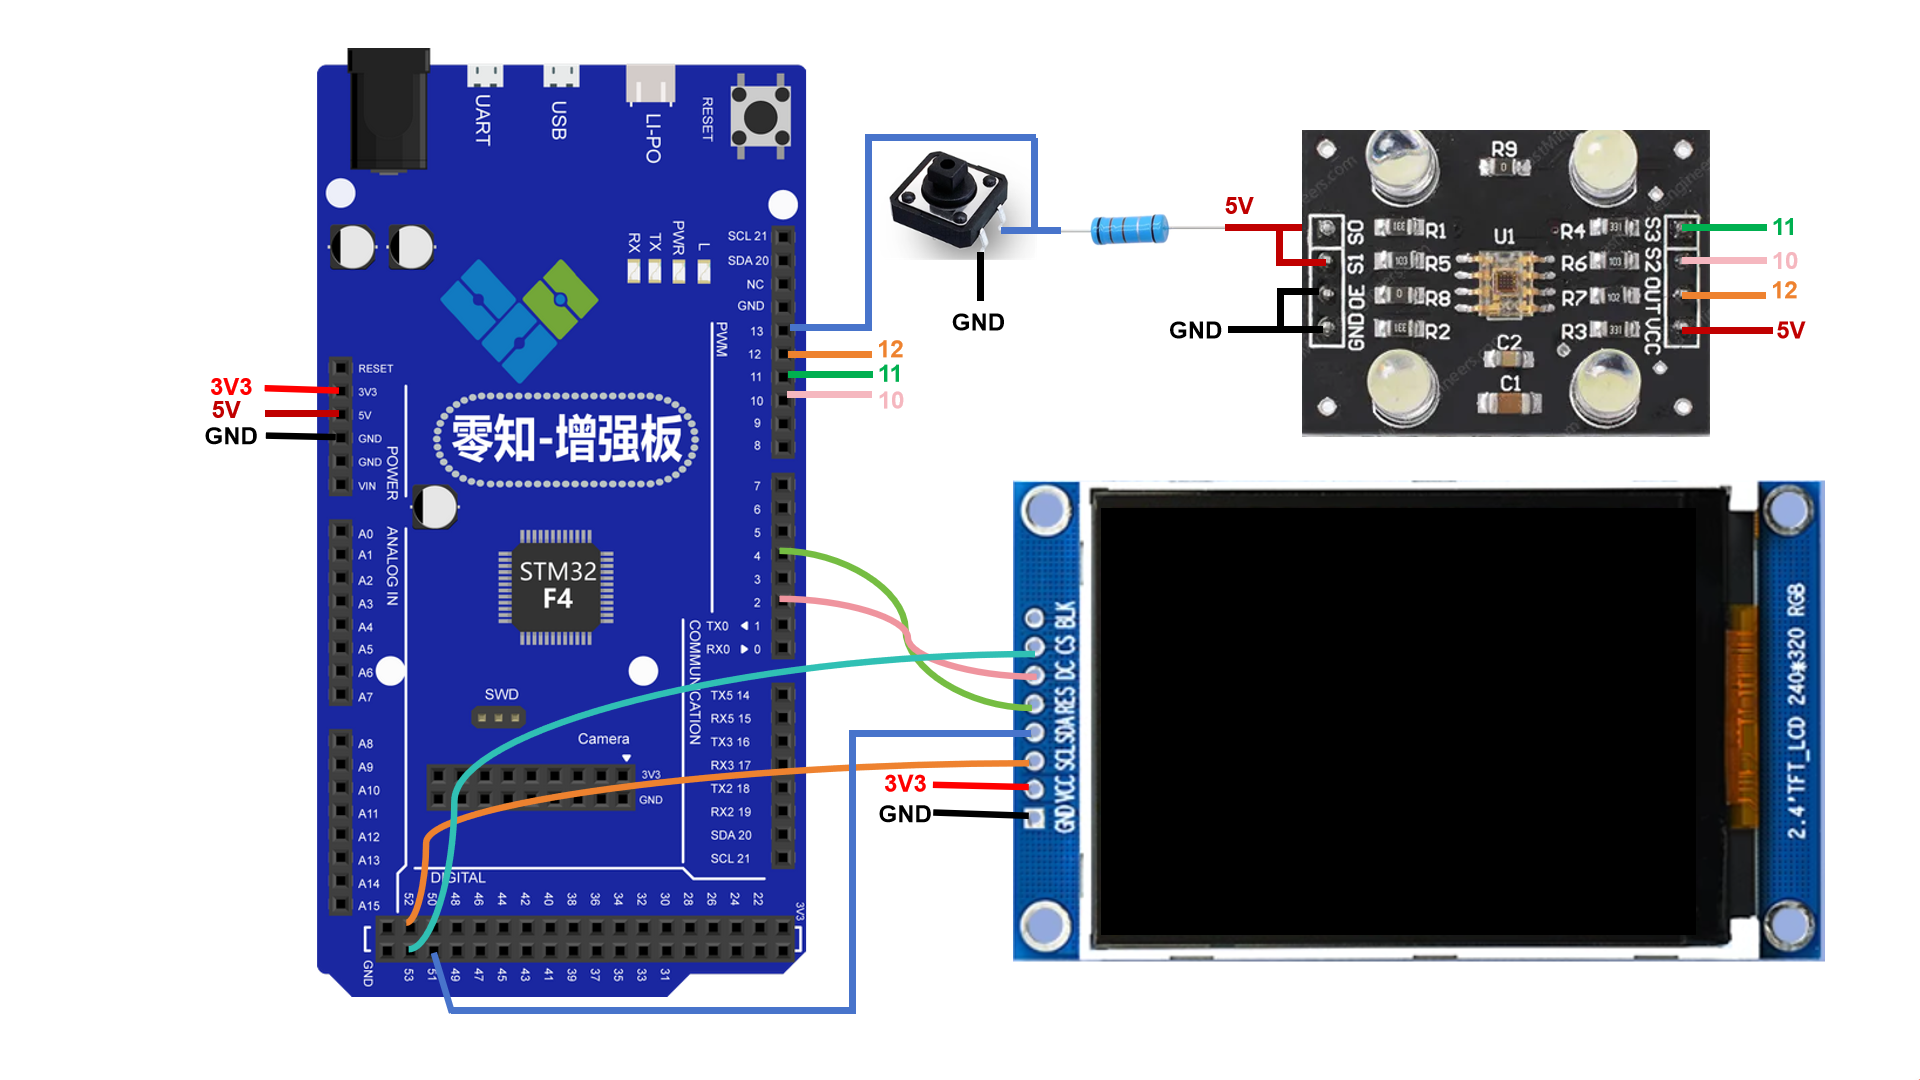
1.2 接线方案
| TCS230传感器 | ST7789显示屏(SPI) | 零知增强板 |
|---|---|---|
| VCC | VCC | 5V / 3.3V |
| GND | GND | GND |
| / | SCL | 52 (SPI1 SCL) |
| / | SDA | 51 (SPI1 MOSI) |
| / | RES | 47 |
| / | DC | 49 |
| / | CS | 53 |
| S2 | / | 10 |
| S3 | / | 11 |
| OUT | / | 12 |
| 按钮 | / | 13 |
ps:TCS230传感器S1、S0接5V电源,OE接GND
1.3 硬件连接图
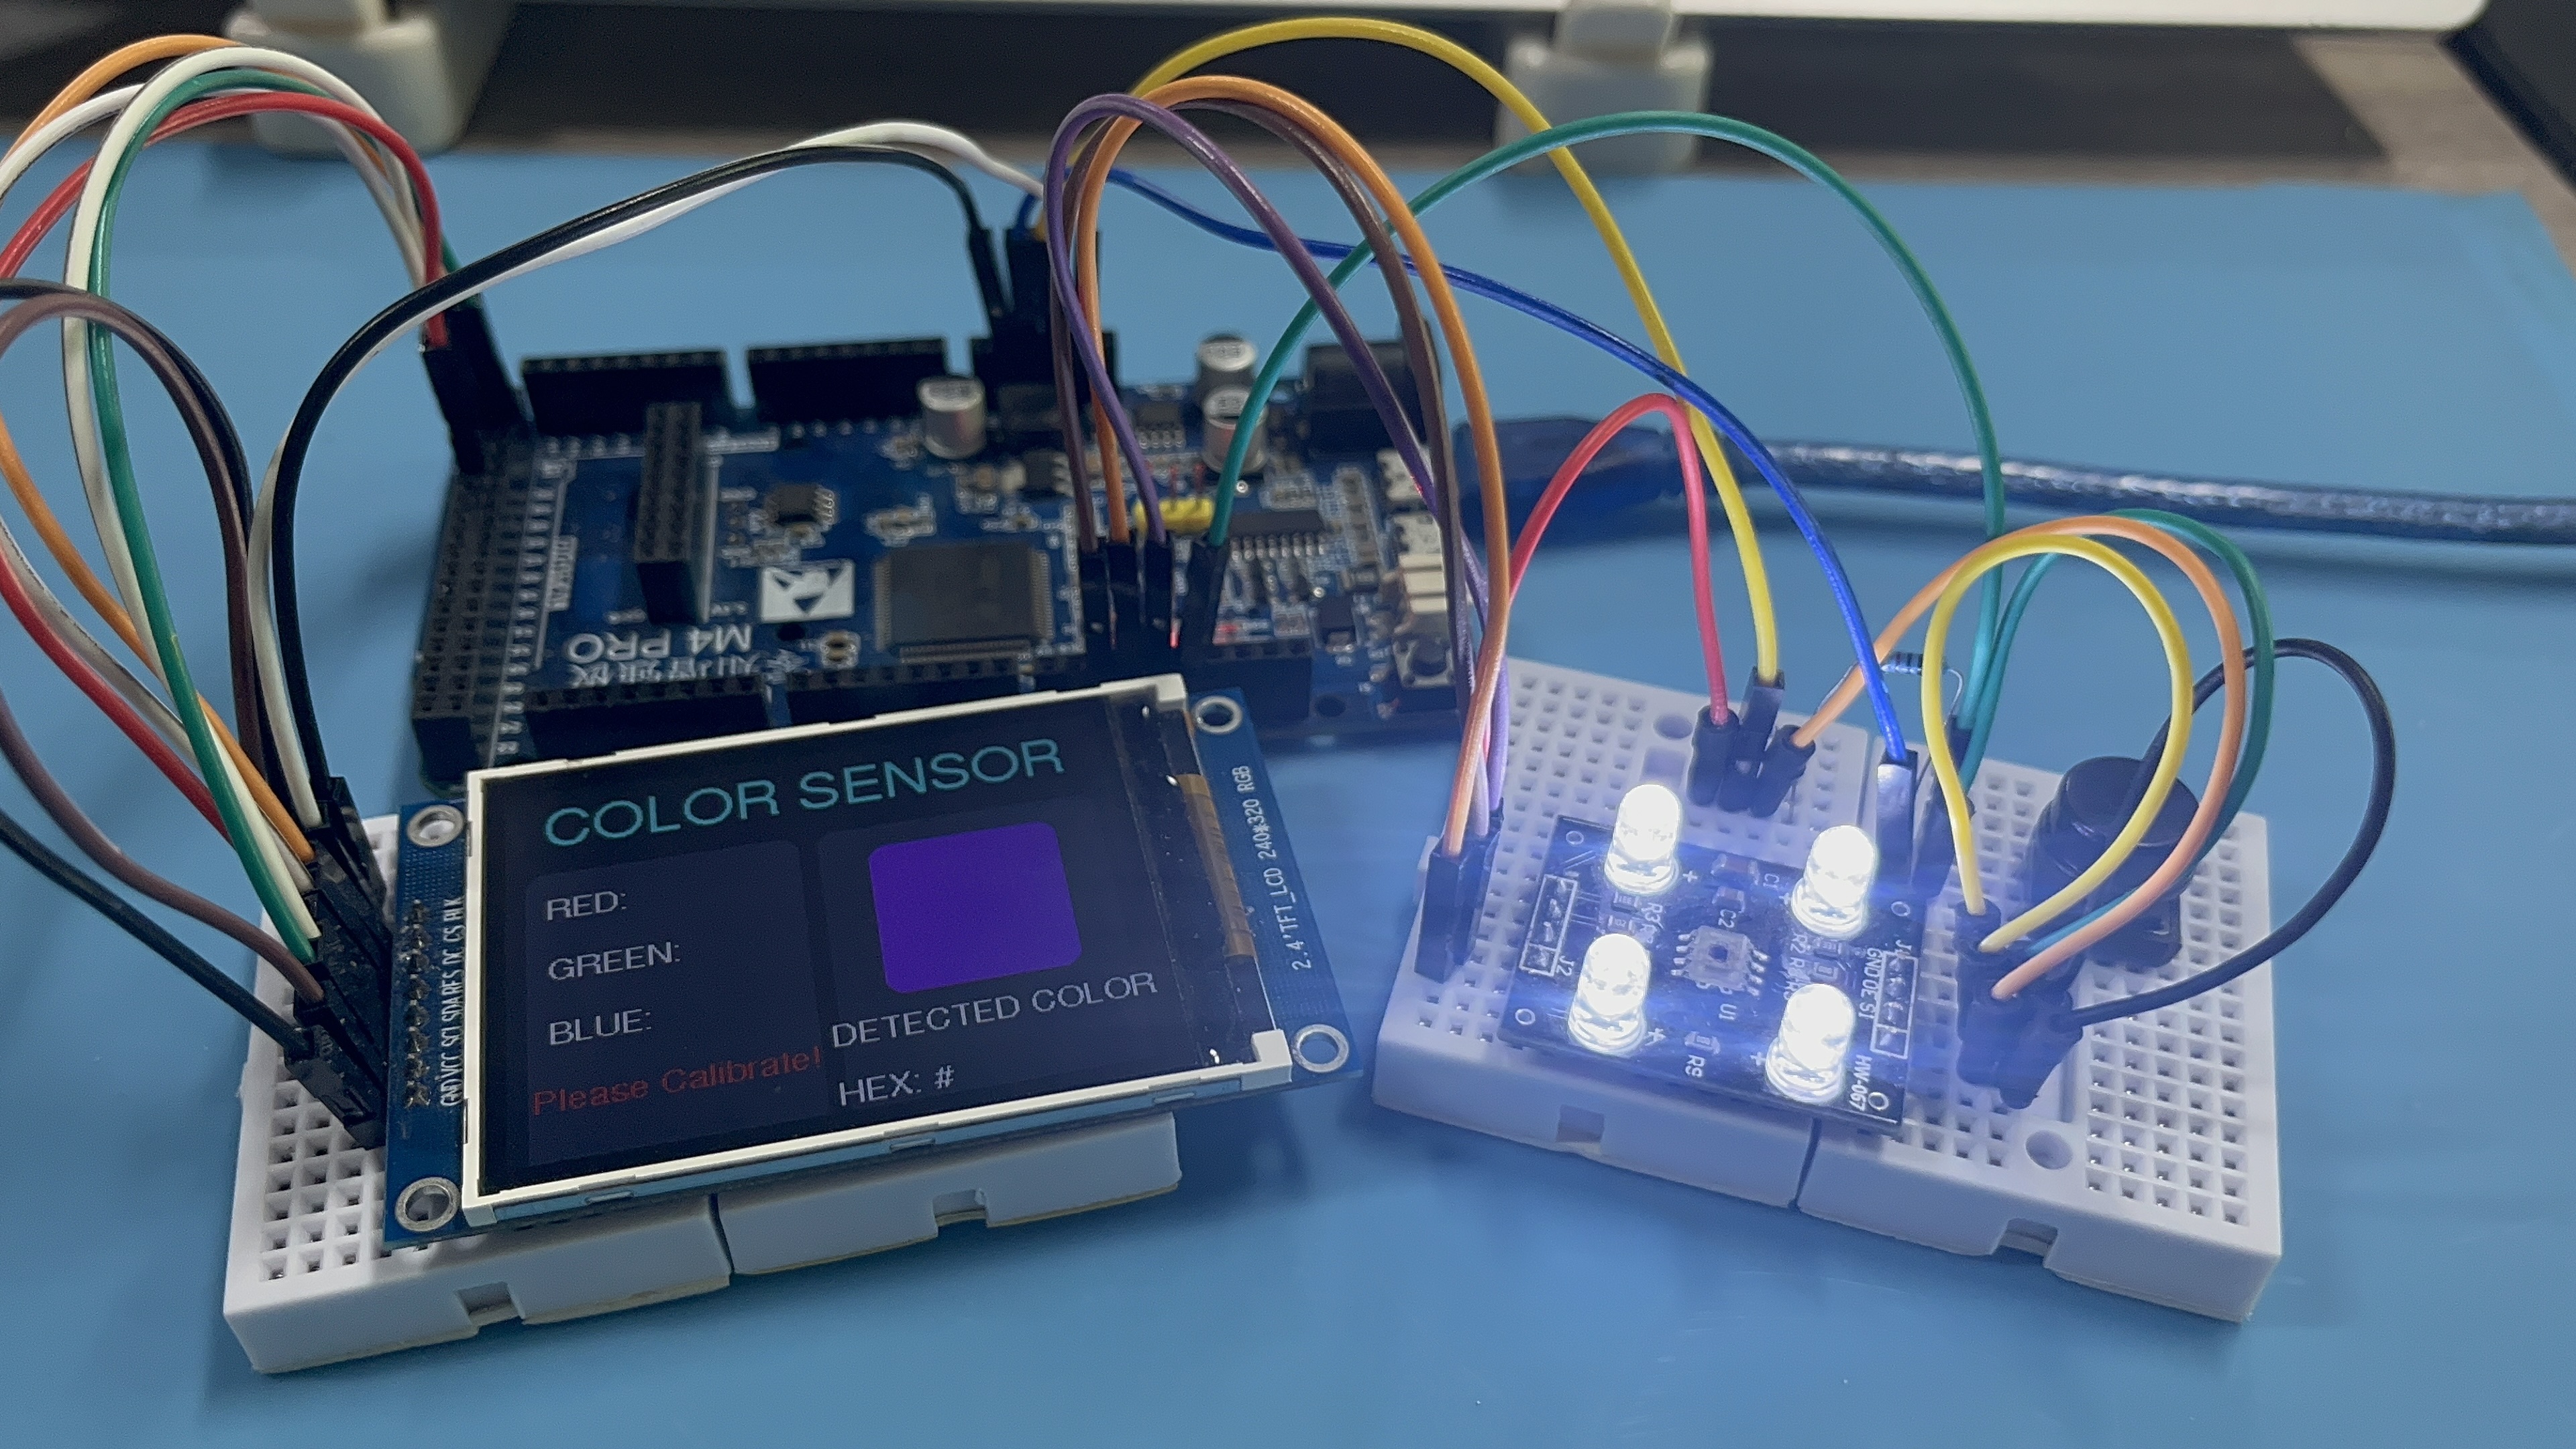
1.4 实物连接图
二、软件架构设计
2.1 系统初始化
cpp
void setup() {
  Serial.begin(9600);
  tft.init(240, 320);          // 初始化240x320显示屏
  tft.setRotation(3);           // 横向显示
  tft.fillScreen(BACKGROUND);   // 设置背景色
  drawUI();                     // 绘制UI界面

  // 初始化传感器引脚
  pinMode(s2, OUTPUT);
  pinMode(s3, OUTPUT);
  pinMode(out, INPUT);
  pinMode(button, INPUT_PULLUP);

  showMessage("Please Calibrate!", WARNING_COLOR);
}
2.2 主循环逻辑
cpp
void loop() {
  // 检查串口校准命令
  if (Serial.available()) {
    char c = Serial.read();
    if (c == 'c' || c == 'C') {
      calibrate(); // 执行校准
    }
  }

  // 检查按钮是否按下
  if (digitalRead(button) == LOW) {
    detectColor(); // 执行颜色检测
    delay(300);    // 简单消抖
  }
}
2.3 颜色检测算法
cpp
void detectColor() {
  // 多次采样取平均值
  int r_sum = 0, g_sum = 0, b_sum = 0;
  const int samples = 3;

  for (int i = 0; i < samples; i++) {
    color();
    r_sum += red;
    g_sum += green;
    b_sum += blue;
    delay(50); // 采样间隔
  }

  red = r_sum / samples;
  green = g_sum / samples;
  blue = b_sum / samples;

  // 映射到0-255范围(使用独立通道校准)
  red = constrain(map(red, cal_min_r, cal_max_r, 255, 0), 0, 255);
  green = constrain(map(green, cal_min_g, cal_max_g, 255, 0), 0, 255);
  blue = constrain(map(blue, cal_min_b, cal_max_b, 255, 0), 0, 255);

  // 更新显示
  updateColorDisplay();

  // 串口输出
  Serial.print("R: "); Serial.print(red);
  Serial.print(" G: "); Serial.print(green);
  Serial.print(" B: "); Serial.println(blue);
}
2.4 系统校准
cpp
void calibrate() {
  // 重置校准值
  cal_min_r = 10000; cal_min_g = 10000; cal_min_b = 10000;
  cal_max_r = 0; cal_max_g = 0; cal_max_b = 0;

  // 第一步:黑色校准(取最大值)
  showMessage("BLACK surface", HIGHLIGHT);
  waitForButton(); // 等待按钮按下

  for (int i = 0; i < 5; i++) {
    color();
    cal_max_r = max(cal_max_r, red);
    // ... 其他通道类似
    Serial.print("Black Sample R="); Serial.println(red);
  }

  // 第二步:白色校准(取最小值)
  showMessage("WHITE surface", HIGHLIGHT);
  waitForButton(); // 等待按钮按下

  for (int i = 0; i < 5; i++) {
    color();
    cal_min_r = min(cal_min_r, red);
    // ... 其他通道类似
    Serial.print("White Sample R="); Serial.println(red);
  }

  // 校准值验证
  if (cal_min_r >= cal_max_r) {
    showMessage("Invalid Calibration!", WARNING_COLOR);
  } else {
    showMessage("Cal Success!", SUCCESS_COLOR);
  }
}
2.5 颜色数据采集
cpp
void color() {
  // 读取红色分量
  digitalWrite(s2, LOW);
  digitalWrite(s3, LOW);
  red = pulseIn(out, digitalRead(out) == HIGH ? LOW : HIGH);

  // 读取蓝色分量
  digitalWrite(s3, HIGH);
  blue = pulseIn(out, digitalRead(out) == HIGH ? LOW : HIGH);

  // 读取绿色分量
  digitalWrite(s2, HIGH);
  green = pulseIn(out, digitalRead(out) == HIGH ? LOW : HIGH);
}
2.6 完整代码
cpp
/*
  TCS230 Color Recognizer with ST7789 Display
  Designed for 零知IDE 零知增强板
  Display Rotation: 3 (Landscape)
  Filename: ColorSensor_TCS230_ST7789_Optimized.ino
*/

#include <Adafruit_GFX.h>
#include <Adafruit_ST7789.h>
#include <SPI.h>
#include <Fonts/FreeSans18pt7b.h>  // 大字体用于标题
#include <Fonts/FreeSans12pt7b.h>  // 中字体用于按钮
#include <Fonts/FreeSans9pt7b.h>   // 小字体用于数值

// ST7789 显示屏引脚定义
#define TFT_CS   53
#define TFT_DC   49
#define TFT_RST  47

Adafruit_ST7789 tft = Adafruit_ST7789(TFT_CS, TFT_DC, TFT_RST);

// 颜色定义
#define BACKGROUND    0x2104  // 深灰色背景
#define PANEL_COLOR   0x39C7  // 面板蓝灰色
#define TEXT_COLOR    0xFFFF  // 白色文字
#define HIGHLIGHT     0x07FF  // 青色高亮
#define WARNING_COLOR 0xF800  // 红色警告
#define SUCCESS_COLOR 0x07E0  // 绿色成功提示

// UI 尺寸定义
#define PANEL_WIDTH 140
#define COLOR_BOX_SIZE 100
#define MARGIN 10

// 颜色传感器引脚
const int s2 = 10;
const int s3 = 11;
const int out = 12;
const int button = 13;

// 颜色变量
int red = 0;
int green = 0;
int blue = 0;

// 独立通道校准值
int cal_min_r = 10000; // 初始化为较大值
int cal_min_g = 10000;
int cal_min_b = 10000;
int cal_max_r = 0;     // 初始化为较小值
int cal_max_g = 0;
int cal_max_b = 0;

// 校准状态
unsigned long lastCalibration = 0;
bool calibrated = false;

void setup() {
  Serial.begin(9600);

  // 初始化显示屏
  tft.init(240, 320);          // 初始化240x320显示屏
  tft.setRotation(3);           // 横向显示
  tft.invertDisplay(false);
  tft.fillScreen(BACKGROUND);   // 设置背景色

  // 绘制UI界面
  drawUI();

  // 初始化颜色传感器引脚
  pinMode(s2, OUTPUT);
  pinMode(s3, OUTPUT);
  pinMode(out, INPUT);
  pinMode(button, INPUT_PULLUP);

  // 初始校准提示
  showMessage("Please Calibrate!", WARNING_COLOR);
}

void loop() {
  // 检查串口校准命令
  if (Serial.available()) {
    char c = Serial.read();
    if (c == 'c' || c == 'C') {
      calibrate();
    }
  }

  // 检查按钮是否按下
  if (digitalRead(button) == LOW) {
    detectColor();
    delay(300); // 简单消抖
  }
}

void drawUI() {
  // 清屏
  tft.fillScreen(BACKGROUND);

  // 绘制标题
  tft.setFont(&FreeSans18pt7b);
  tft.setTextColor(HIGHLIGHT);
  tft.setCursor(20, 40);
  tft.print("COLOR SENSOR");

  // 左侧信息面板
  tft.fillRoundRect(MARGIN, 60, PANEL_WIDTH, 240, 10, PANEL_COLOR);

  // 传感器标签
  tft.setFont(&FreeSans9pt7b);
  tft.setTextColor(TEXT_COLOR);

  // 调整间距防止重叠
  tft.setCursor(MARGIN + 10, 90);
  tft.print("RED:");

  tft.setCursor(MARGIN + 10, 130);
  tft.print("GREEN:");

  tft.setCursor(MARGIN + 10, 170);
  tft.print("BLUE:");

  tft.setCursor(MARGIN + 10, 210);
  tft.print("STATUS:");

  // 校准按钮
  tft.fillRoundRect(MARGIN + 10, 250, PANEL_WIDTH - 20, 40, 5, HIGHLIGHT);
  tft.setFont(&FreeSans12pt7b);
  tft.setCursor(MARGIN + 25, 280);
  tft.print("CALIBRATE");

  // 右侧颜色显示区域
  tft.fillRoundRect(PANEL_WIDTH + MARGIN*2, 60, 320 - PANEL_WIDTH - MARGIN*3, 240, 10, PANEL_COLOR);
  uint16_t detectedColor = tft.color565(204, 0, 255);
  // 颜色显示框
  tft.fillRoundRect(PANEL_WIDTH + MARGIN*3 + 15, 75, COLOR_BOX_SIZE, COLOR_BOX_SIZE, 10, detectedColor);

  // 颜色框标签
  tft.setFont(&FreeSans9pt7b);
  tft.setCursor(PANEL_WIDTH + MARGIN*2 - 5, 200);
  tft.print("DETECTED COLOR");

  // RGB值显示区域
  tft.setCursor(PANEL_WIDTH + MARGIN*2 - 5, 235);
  tft.print("HEX: #");
}

void detectColor() {
  // 多次采样取平均值
  int r_sum = 0, g_sum = 0, b_sum = 0;
  const int samples = 3;

  for (int i = 0; i < samples; i++) {
    color();
    r_sum += red;
    g_sum += green;
    b_sum += blue;
    delay(50); // 采样间隔
  }

  red = r_sum / samples;
  green = g_sum / samples;
  blue = b_sum / samples;

  // 映射到0-255范围(使用独立通道校准)
  red = constrain(map(red, cal_min_r, cal_max_r, 255, 0), 0, 255);
  green = constrain(map(green, cal_min_g, cal_max_g, 255, 0), 0, 255);
  blue = constrain(map(blue, cal_min_b, cal_max_b, 255, 0), 0, 255);

  // 更新显示
  updateColorDisplay();

  // 串口输出
  Serial.print("R: "); Serial.print(red);
  Serial.print(" G: "); Serial.print(green);
  Serial.print(" B: "); Serial.println(blue);
}

void updateColorDisplay() {
  // 转换为16位颜色值
  uint16_t detectedColor = tft.color565(red, green, blue);

  // 更新颜色框
  tft.fillRoundRect(PANEL_WIDTH + MARGIN*3 + 15, 75, COLOR_BOX_SIZE, COLOR_BOX_SIZE, 10, detectedColor);

  // 转换为十六进制格式
  char hexColor[7];
  sprintf(hexColor, "%02X%02X%02X", red, green, blue);

  // 更新HEX值显示
  tft.setFont(&FreeSans9pt7b);
  tft.fillRect(PANEL_WIDTH + MARGIN*3 + 40, 220, 80, 30, PANEL_COLOR); // 清除旧值
  tft.setCursor(PANEL_WIDTH + MARGIN*3 + 45, 235);
  tft.setTextColor(TEXT_COLOR);
  tft.print(hexColor);

  // 更新传感器数值显示
  tft.fillRect(MARGIN + 70, 70, 60, 30, PANEL_COLOR);   // 清除旧红色值
  tft.fillRect(MARGIN + 91, 110, 30, 30, PANEL_COLOR);  // 清除旧绿色值
  tft.fillRect(MARGIN + 90, 150, 30, 30, PANEL_COLOR);  // 清除旧蓝色值

  tft.setCursor(MARGIN + 90, 90);
  tft.print(red);

  tft.setCursor(MARGIN + 91, 130);
  tft.print(green);

  tft.setCursor(MARGIN + 90, 170);
  tft.print(blue);

  // 更新校准状态
  if (calibrated) {
    tft.fillRect(MARGIN , 190, 130, 30, PANEL_COLOR);
    tft.setCursor(MARGIN + 25, 210);
    tft.setTextColor(SUCCESS_COLOR);
    tft.print("Calibrated!");
  }
}

void calibrate() {
  // 重置校准值
  cal_min_r = 10000;  cal_min_g = 10000;  cal_min_b = 10000;
  cal_max_r = 0;  cal_max_g = 0;  cal_max_b = 0;

  // 第一步:黑色校准
  showMessage("BLACK surface", HIGHLIGHT);
  Serial.println("Calibration Step 1: Place BLACK surface and press button");

  // 等待按钮按下
  while (digitalRead(button)) {
    if (Serial.available() && Serial.read() == 'x') {
      showMessage("Cal Canceled", WARNING_COLOR);
      return;
    }
  }

  // 读取黑色值(多次采样取最大)
  for (int i = 0; i < 5; i++) {
    color();
    cal_max_r = max(cal_max_r, red);
    cal_max_g = max(cal_max_g, green);
    cal_max_b = max(cal_max_b, blue);
    delay(100);
    Serial.print("Black Sample ");
    Serial.print(i+1);
    Serial.print(": R="); Serial.print(red);
    Serial.print(" G="); Serial.print(green);
    Serial.print(" B="); Serial.println(blue);
  }

  // 第二步:白色校准
  showMessage("WHITE surface", HIGHLIGHT);
  Serial.println("Calibration Step 2: Place WHITE surface and press button");

  // 等待按钮按下
  while (digitalRead(button)) {
    if (Serial.available() && Serial.read() == 'x') {
      showMessage("Cal Canceled", WARNING_COLOR);
      return;
    }
  }

  // 读取白色值(多次采样取最小)
  for (int i = 0; i < 5; i++) {
    color();
    cal_min_r = min(cal_min_r, red);
    cal_min_g = min(cal_min_g, green);
    cal_min_b = min(cal_min_b, blue);
    delay(100);
    Serial.print("White Sample ");
    Serial.print(i+1);
    Serial.print(": R="); Serial.print(red);
    Serial.print(" G="); Serial.print(green);
    Serial.print(" B="); Serial.println(blue);
  }

  calibrated = true;
  lastCalibration = millis();

  // 显示成功信息
  showMessage("Cal Success!", SUCCESS_COLOR);
  Serial.println("Calibration complete!");

  // 输出详细校准信息
  Serial.println("Calibration Values:");
  Serial.print("R min/max: "); Serial.print(cal_min_r); Serial.print("/"); Serial.println(cal_max_r);
  Serial.print("G min/max: "); Serial.print(cal_min_g); Serial.print("/"); Serial.println(cal_max_g);
  Serial.print("B min/max: "); Serial.print(cal_min_b); Serial.print("/"); Serial.println(cal_max_b);

  // 验证校准值
  if (cal_min_r >= cal_max_r || cal_min_g >= cal_max_g || cal_min_b >= cal_max_b) {
    showMessage("Invalid Calibration!", WARNING_COLOR);
    Serial.println("ERROR: Invalid calibration values! White min should be LESS than black max.");
    delay(3000);
  }

  // 3秒后恢复状态显示
  delay(3000);
  updateColorDisplay();
}

void color() {
  // 读取红色分量
  digitalWrite(s2, LOW);
  digitalWrite(s3, LOW);
  red = pulseIn(out, digitalRead(out) == HIGH ? LOW : HIGH);

  // 读取蓝色分量
  digitalWrite(s3, HIGH);
  blue = pulseIn(out, digitalRead(out) == HIGH ? LOW : HIGH);

  // 读取绿色分量
  digitalWrite(s2, HIGH);
  green = pulseIn(out, digitalRead(out) == HIGH ? LOW : HIGH);
}

void showMessage(const char* msg, uint16_t color) {
  tft.fillRect(MARGIN, 190, PANEL_WIDTH, 40, PANEL_COLOR);
  tft.setFont(&FreeSans9pt7b);
  tft.setTextColor(color);
  tft.setCursor(MARGIN + 2, 210);
  tft.print(msg);
}
三、操作过程及数据展示
3.1 操作步骤
(1)确保Adafruit_GFX、Adafruit_ST7789库安装,将程序上传到零知IDE,驱动屏幕初始化,屏幕提示"Please Calibrate!"说明传感器需要进行校准操作。
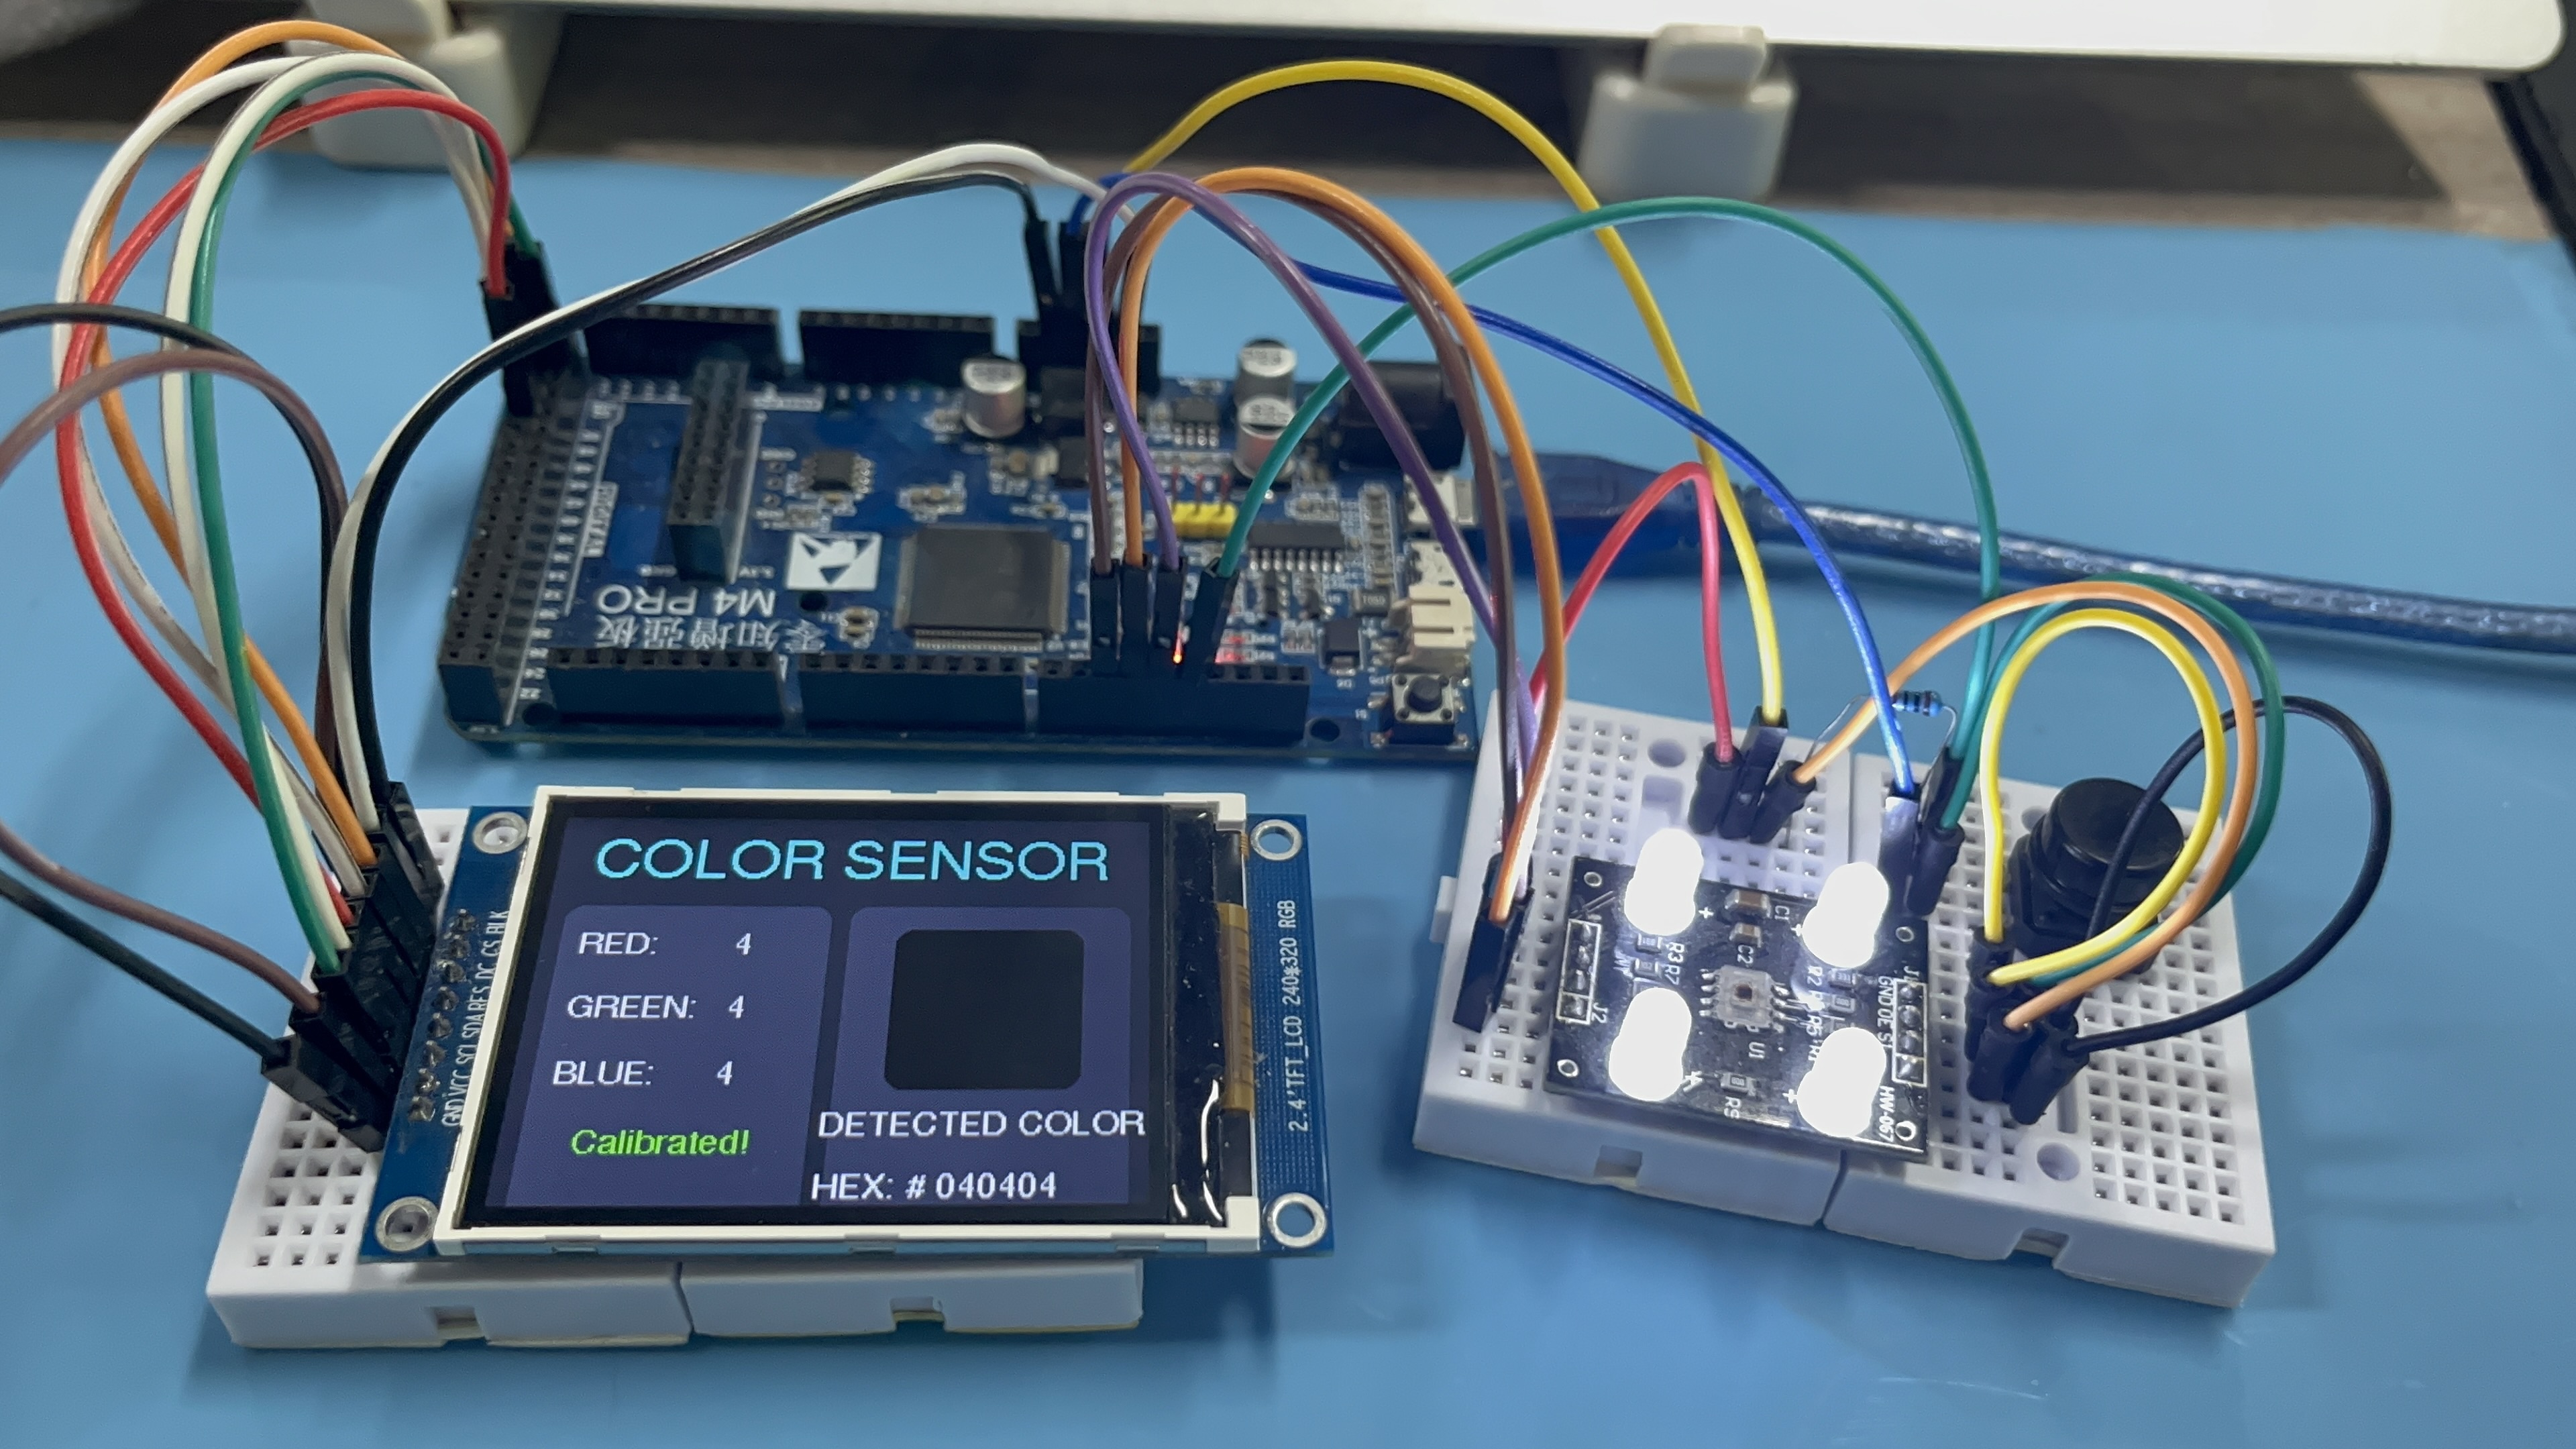
(2)打开串口监视器设置为9600波特率,发送 'c' 开始校准,按照提示放置黑色参考物和白色参考物并按下按钮校准,屏幕提示"Calibrated"的时候说明校准成功:
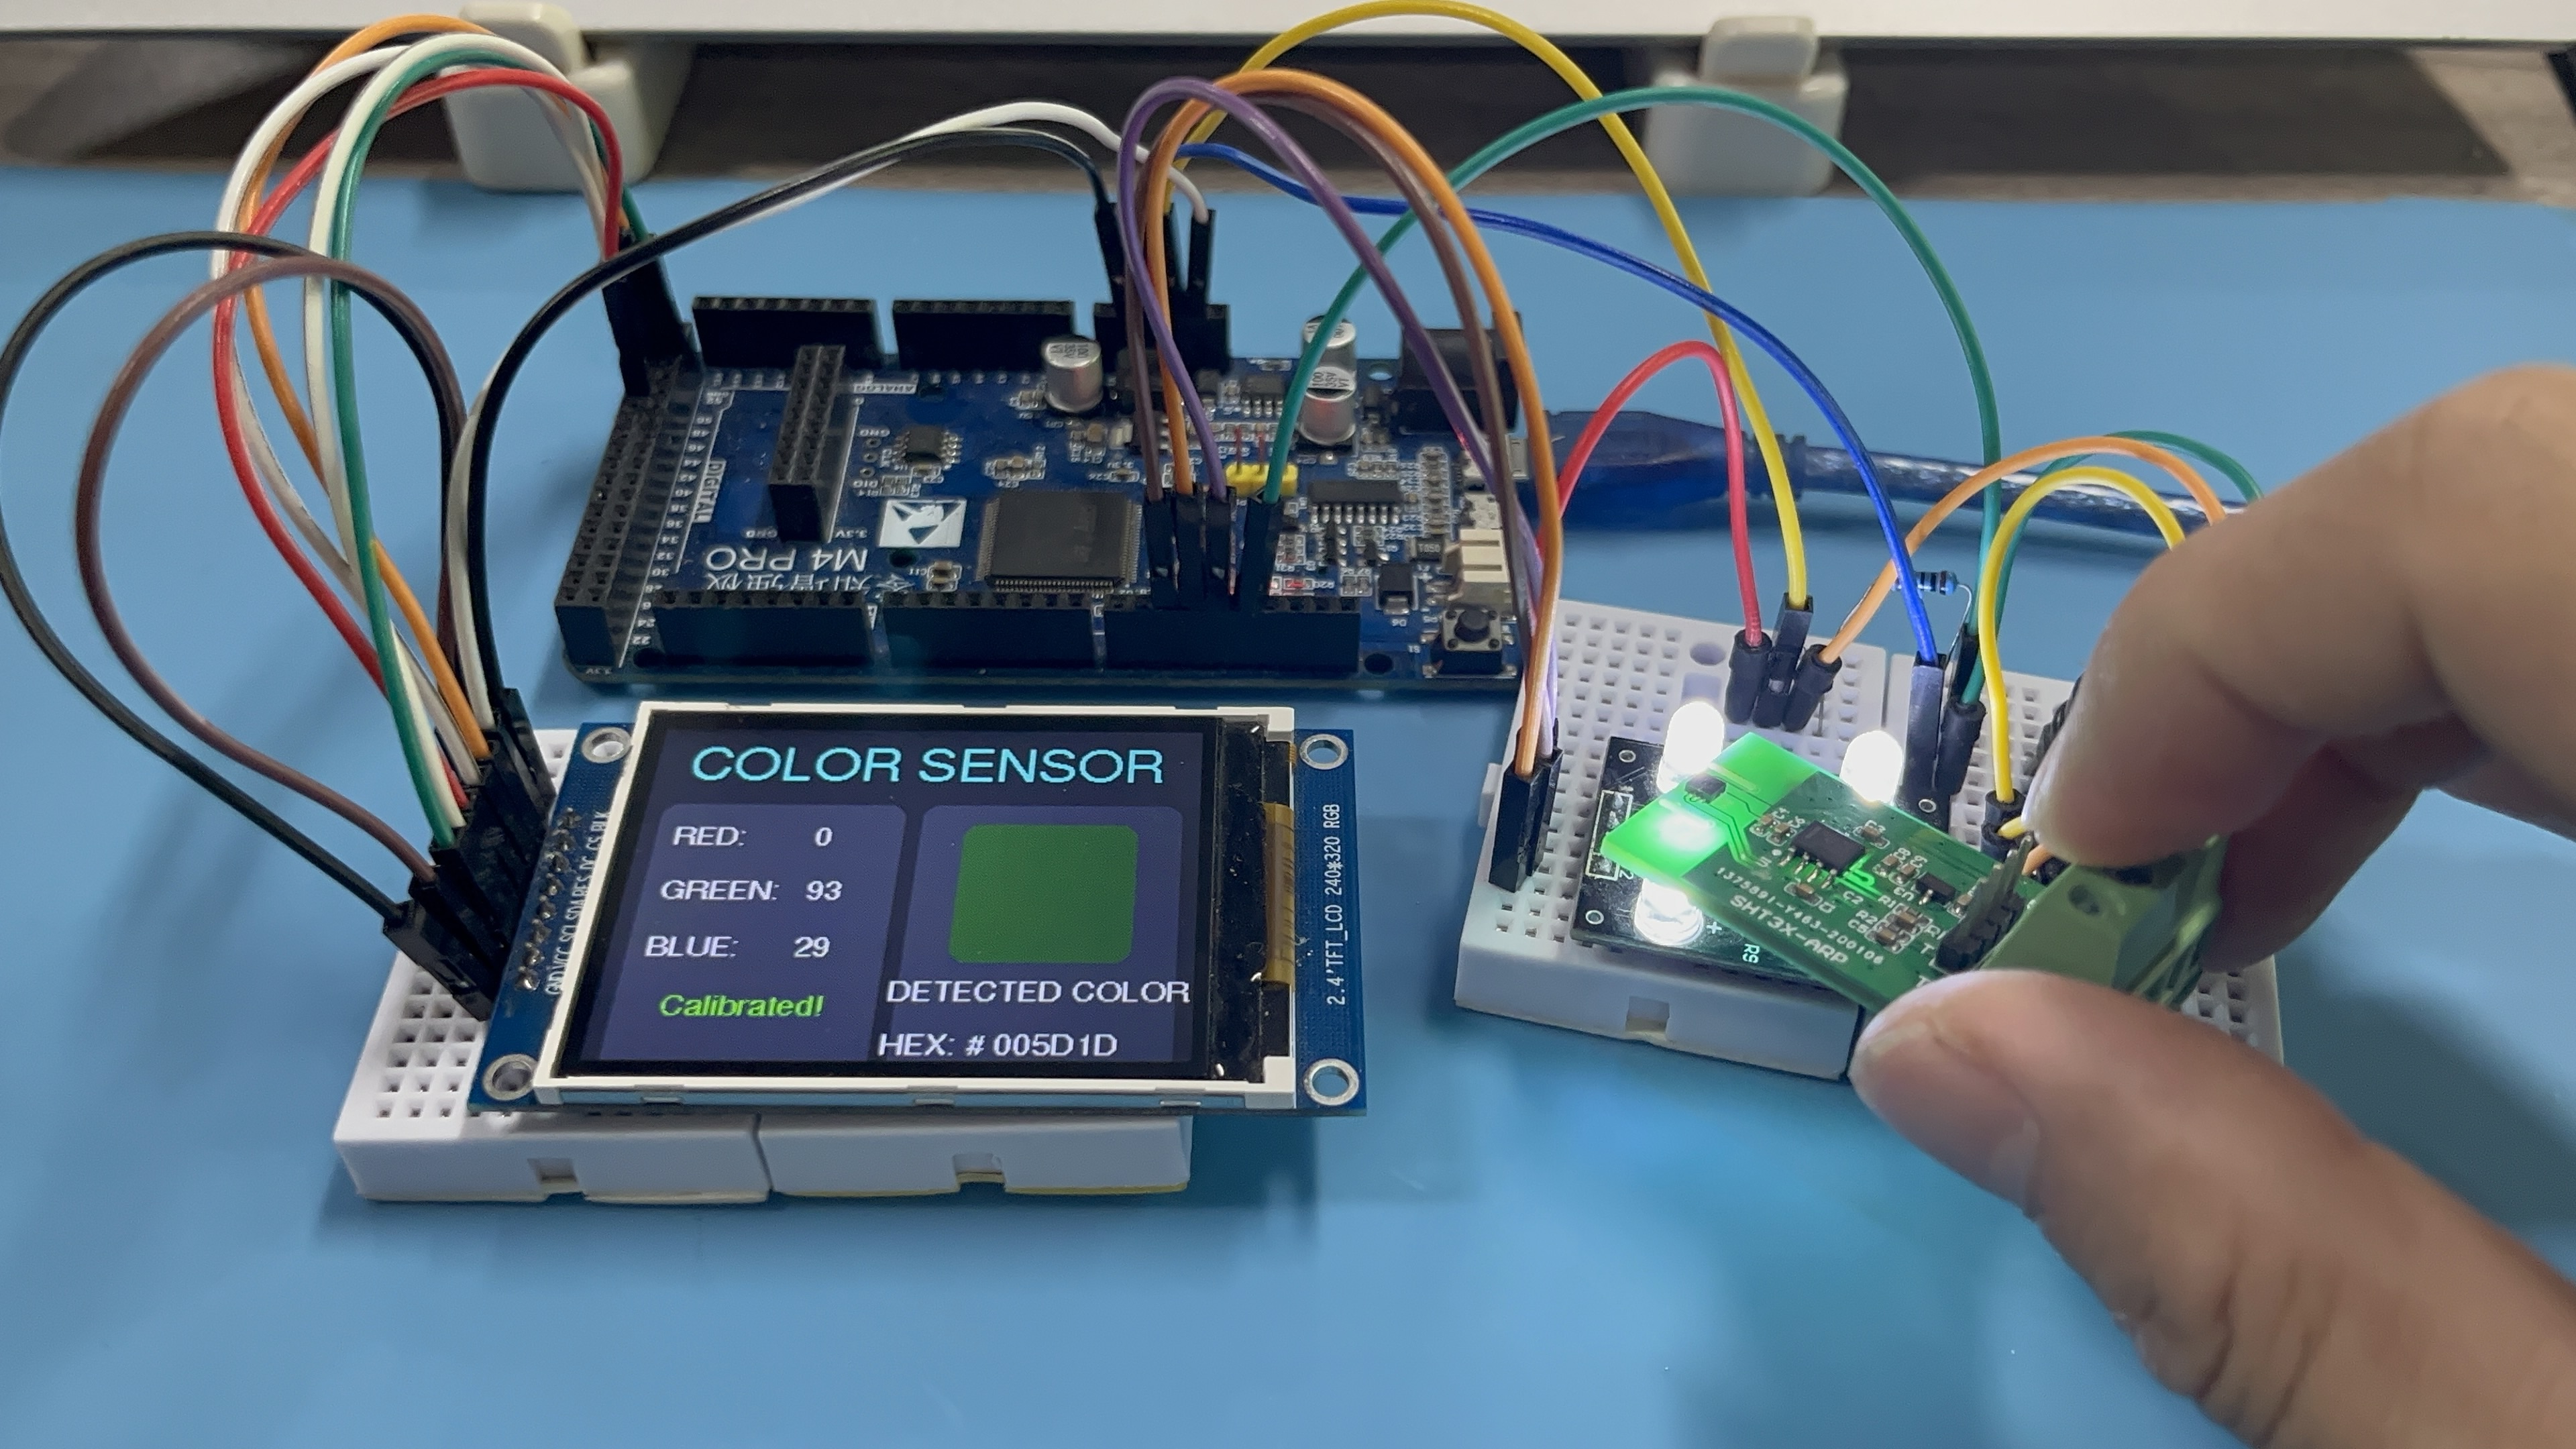
(3)按下按钮识别当前颜色,查看显示屏上的颜色和HEX值,当前识别到的绿色物体HEX为"#005D1D":
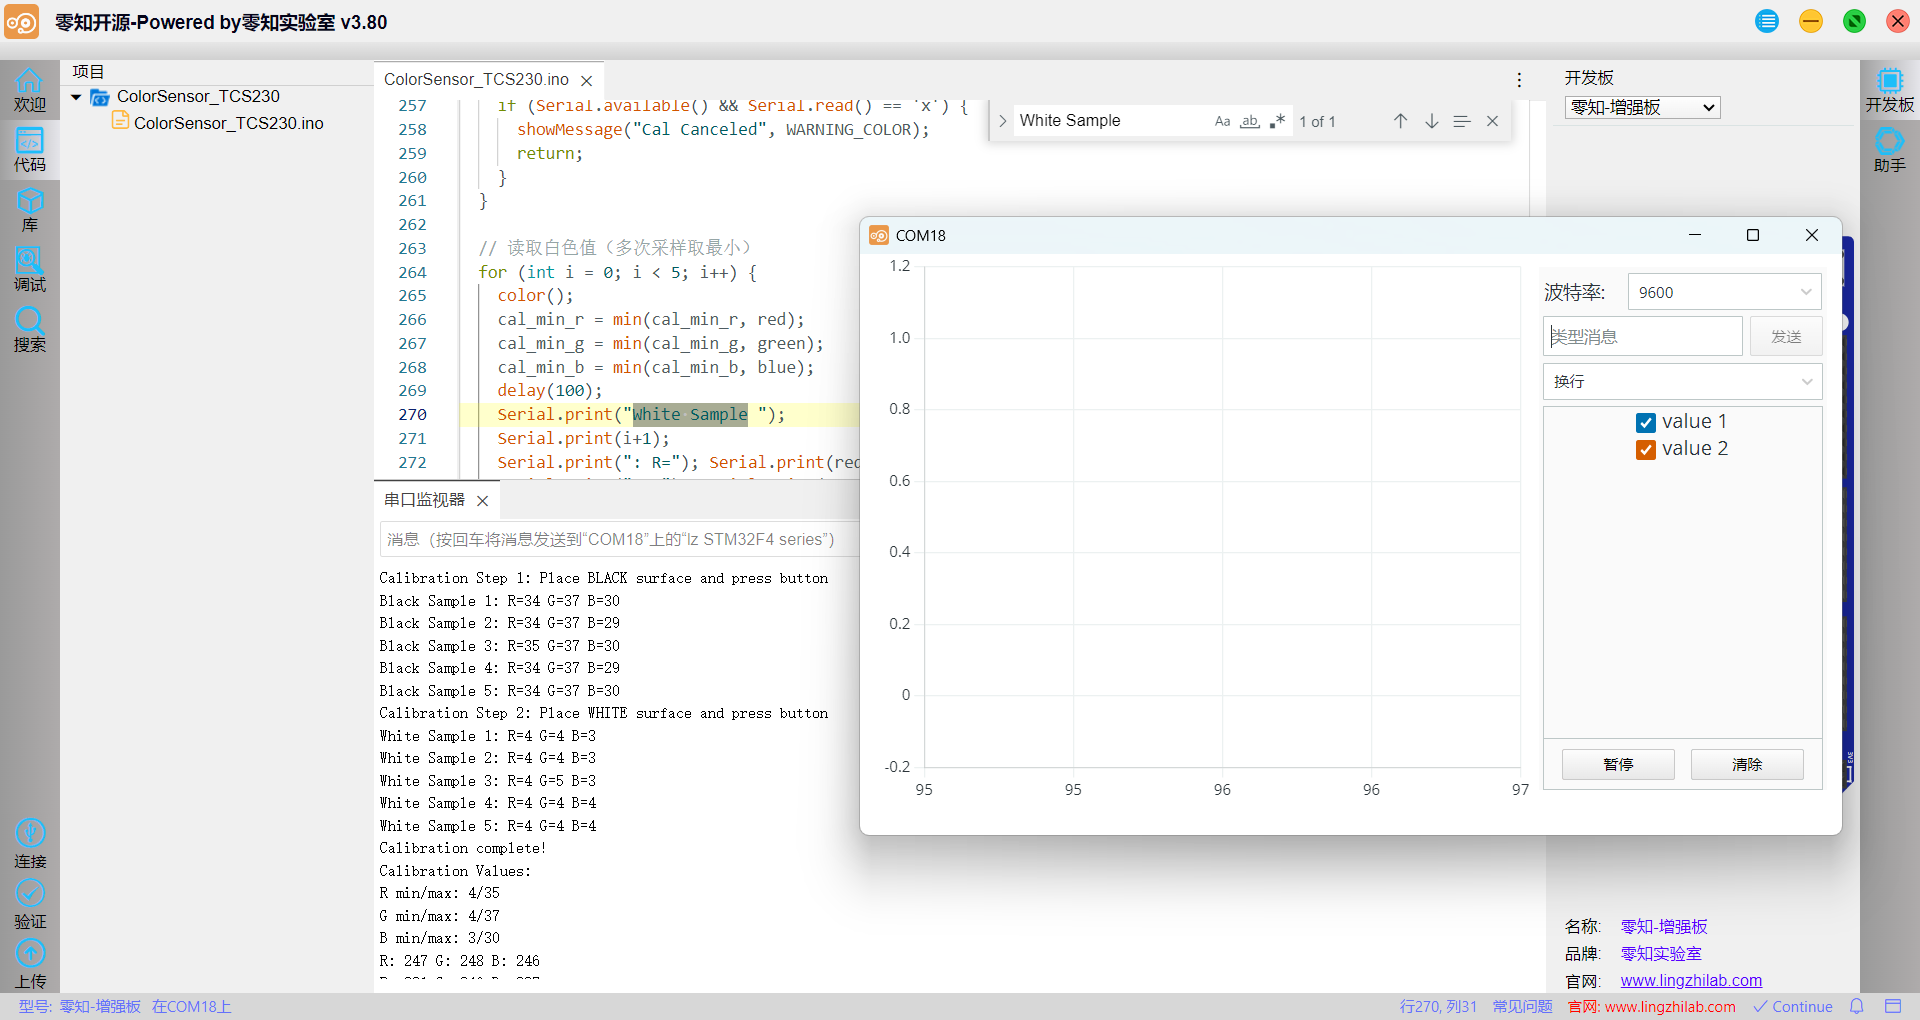
3.2 校准过程演示
按照串口打印的提示内容观察校准过程和校准数据:
3.3 识别效果视频展示
TCS230颜色识别器进行校准和颜色数据读取
分别放置黑色、白色参考物进行校准,接着进行颜色识别
四、TCS230技术原理
4.1 工作原理
TCS230是可编程颜色光频率转换器,由光电二极管阵列和电流-频率转换器组成:
>64个光电二极管(16个红,16个绿,16个蓝,16个白)
>可配置的输出频率比例(S0、S1引脚)
>可选择的滤波器(S2、S3引脚)
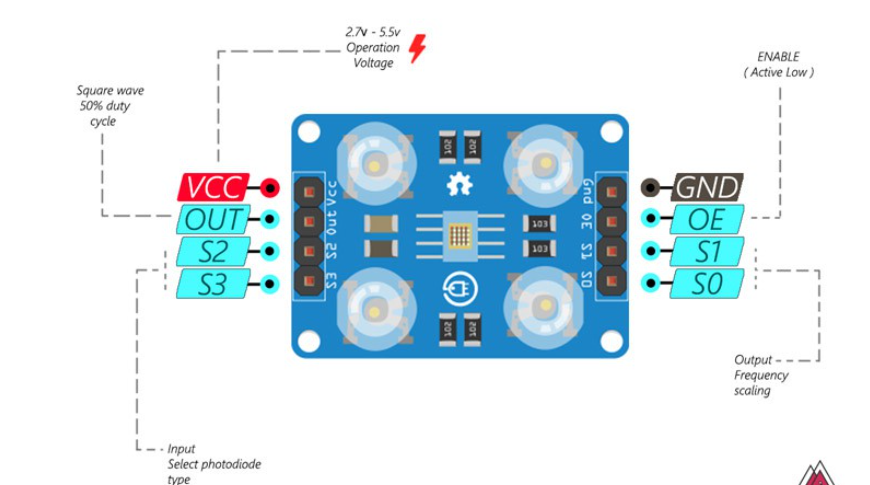
4.2 工作模式配置
每16个光电二极管并联连接,因此使用两个控制引脚S2和S3,我们可以选择读取哪个。如果我们想要检测红色,我们可以通过根据表格将两个引脚设置为低逻辑电平来使用16个红色滤波光电二极管,根据以下配置可以选择对应的滤波器:
| S2 | S3 | 选择的滤波器 |
|---|---|---|
| 0 | 0 | 红色 |
| 0 | 1 | 蓝色 |
| 1 | 0 | 无滤波器 |
| 1 | 1 | 绿色 |
五、常见问题指引
Q1: 为什么校准后颜色识别不准确?
A: 可能原因:
参考物不标准(使用专业黑/白参考卡)
环境光变化(保持稳定光照)
传感器距离不当(保持2-5cm距离)
Q2: 如何判断校准是否成功?
A: 检查串口输出的校准值:
白色值(min)应小于黑色值(max)
各通道值比例应接近
观察黑色校准值是否合理
Q3: HEX值显示不正确怎么办?
A: 检查步骤:
确认校准成功
检查颜色映射范围(0-255)
验证HEX转换函数
确保显示屏初始化正确
Q4: 如何提高识别精度?
A: 优化建议:
增加采样次数(修改samples值)
使用遮光罩减少环境光影响
固定传感器与物体的距离
六、结论
项目成功实现了基于STM32F407VET6的高精度颜色识别系统,通过以下创新点解决了颜色识别中的关键问题:
>独立通道校准算法:显著提高了颜色识别准确性
>三步校准流程:简化操作并确保校准质量
>实时数据显示:提供详细的校准和识别反馈
>直观UI设计:展示颜色信息和传感器数据
项目资源:
TCS230用户手册:TCS230数据手册
显示屏库文件:ST7789驱动库
本项目已在零知增强板上全面测试通过,欢迎在评论区分享您的实现经验和改进建议!点击了解更多零知开发教程:
https://www.lingzhilab.com/freesources.html