用 SwiftUI 打造一个 iOS「设置」界面
在开发 iOS App 时,我们常常需要构建「设置页面」。原生的 Settings.bundle 虽然能提供系统级设置,但多数情况下我们更希望在应用内部实现一套「拟系统」的设置界面。
本文将带你从 0 到 1,用 SwiftUI 写出一个高度还原 iOS 设置风格的组件库,包括:
- 可复用的设置行组件(SettingRow)
- 分组容器(SettingsSection)
- 多类型行支持(开关、导航、输入框、详情、按钮等)
- 完整 Demo 界面(SettingsView)
最终效果如下 👇(几乎就是 iOS 设置的翻版):
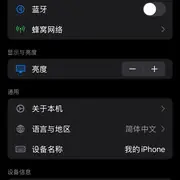
(你可以运行代码自己体验,UI 风格完全遵循 iOS 官方人机界面规范)
1. 定义图标类型
我们首先需要一个「图标枚举」,为不同的设置项绑定系统 SF Symbols 图标和颜色。这样能确保代码整洁,也方便后续扩展:
swift
enum SettingIconType {
    case general, notifications, privacy, screen, battery, wifi, bluetooth, cellular
    case language, keyboard, accessibility, storage, camera, photos
    case appstore, safari, mail, messages, facetime, music
    case resetSettings, exportData, deviceInfo

    var icon: String {
        switch self {
        case .general: return "gear"
        case .wifi: return "wifi"
        case .battery: return "battery.100"
        // 其他略...
        default: return "gear"
        }
    }

    var color: Color {
        switch self {
        case .wifi: return .blue
        case .battery: return .green
        case .resetSettings: return .red
        default: return .gray
        }
    }
}
这里用到了 SF Symbols,几乎可以覆盖绝大多数系统图标需求。
2. 设置行类型
不同的行需要不同的交互:有的跳转,有的开关,有的输入文字。我们用枚举 SettingRowType 来抽象这些类型:
swift
enum SettingRowType {
    case navigation(action: () -> Void)
    case toggle(binding: Binding<Bool>)
    case detail(text: String, action: (() -> Void)? = nil)
    case stepper(value: Binding<Double>, range: ClosedRange<Double>, step: Double = 1.0)
    case picker(selection: Binding<String>, options: [String], action: (() -> Void)? = nil)
    case textField(text: Binding<String>, placeholder: String = "")
    case display(text: String)
    case button(style: ButtonStyle = .normal, action: () -> Void)

    enum ButtonStyle {
        case normal, destructive, prominent
    }
}这种写法的好处是:所有 UI 类型都集中在一个枚举中,扩展时只需要新增 case。
3. 复用的行组件 SettingRow
接下来就是核心组件 ------ SettingRow。它接收一个 SettingIconType(图标)、一个标题、一个 SettingRowType(类型),自动渲染出对应的 UI。
swift
struct SettingRow: View {
    let iconType: SettingIconType
    let title: String
    let type: SettingRowType

    var body: some View {
        HStack(spacing: 12) {
            Image(systemName: iconType.icon)
                .foregroundColor(iconType.color)
                .frame(width: 25, height: 25)
                .overlay(
                    RoundedRectangle(cornerRadius: 6)
                        .stroke(Color(.systemGray5), lineWidth: 1)
                )

            Text(title)
                .font(.system(size: 17))

            Spacer()

            rightContent
        }
        .padding(.horizontal, 16)
        .frame(minHeight: 44)
        .background(Color(.secondarySystemGroupedBackground))
        .contentShape(Rectangle())
        .onTapGesture { handleTap() }
    }
}
核心逻辑在 rightContent ------它会根据不同的 SettingRowType 渲染出右侧的 Toggle、Chevron、Stepper、TextField 等控件。
4. 分组容器 SettingsSection
iOS 设置页面通常会分组显示,每组有 Header/Footer。我们写一个 SettingsSection 来包裹行组件:
swift
struct SettingsSection<Content: View>: View {
    let header: String?
    let footer: String?
    @ViewBuilder var content: Content

    var body: some View {
        VStack(alignment: .leading, spacing: 6) {
            if let header = header {
                Text(header.uppercased())
                    .font(.footnote)
                    .foregroundColor(Color(.secondaryLabel))
                    .padding(.horizontal)
            }

            VStack(spacing: 0) {
                content
            }
            .background(Color(.secondarySystemGroupedBackground))
            .clipShape(RoundedRectangle(cornerRadius: 10))
            .padding(.horizontal)

            if let footer = footer {
                Text(footer)
                    .font(.footnote)
                    .foregroundColor(Color(.secondaryLabel))
                    .padding(.horizontal)
            }
        }
    }
}
这样我们就能用类似 UIKit 的 TableView Section 的方式组织 UI。
5. 完整示例 SettingsView
最后,写一个完整页面示例,把 Wi-Fi、蓝牙、亮度、语言等都组合起来:
swift
struct SettingsView: View {
    @State private var wifiEnabled = true
    @State private var bluetoothEnabled = false
    @State private var brightness: Double = 50
    @State private var deviceName = "我的 iPhone"
    @State private var language = "简体中文"

    var body: some View {
        ScrollView {
            VStack(spacing: 20) {
                // 连接
                SettingsSection(header: "连接") {
                    SettingRow.toggle(iconType: .wifi, title: "Wi-Fi", isOn: $wifiEnabled)
                    SettingRow.toggle(iconType: .bluetooth, title: "蓝牙", isOn: $bluetoothEnabled)
                    SettingRow.navigation(iconType: .cellular, title: "蜂窝网络") {
                        print("进入蜂窝网络")
                    }
                }

                // 显示与亮度
                SettingsSection(header: "显示与亮度") {
                    SettingRow(iconType: .screen, title: "亮度", type: .stepper(value: $brightness, range: 0...100, step: 5))
                }

                // 通用
                SettingsSection(header: "通用") {
                    SettingRow.navigation(iconType: .general, title: "关于本机") {
                        print("关于本机")
                    }
                    SettingRow.detail(iconType: .language, title: "语言与地区", detail: language) {
                        print("选择语言")
                    }
                    SettingRow(iconType: .keyboard, title: "设备名称", type: .textField(text: $deviceName, placeholder: "输入名称"))
                }

                // 设备信息
                SettingsSection(header: "设备信息", footer: "这些信息用于识别您的设备") {
                    SettingRow.display(iconType: .deviceInfo, title: "型号", value: "iPhone 15 Pro")
                    SettingRow.display(iconType: .deviceInfo, title: "iOS 版本", value: "17.5.1")
                }

                // 重置
                SettingsSection(footer: "重置设置不会删除数据") {
                    SettingRow.button(iconType: .resetSettings, title: "重置所有设置", style: .destructive) {
                        print("重置")
                    }
                    SettingRow.button(iconType: .exportData, title: "导出数据", style: .prominent) {
                        print("导出")
                    }
                }
            }
            .padding(.vertical)
        }
        .background(Color(.systemGroupedBackground))
    }
}
6. 总结
通过这种方式,我们实现了一个:
✅ 高度还原 iOS 系统设置的界面
✅ 可复用的 SettingRow 组件,支持导航/开关/输入等多种类型
✅ 分组化 SettingsSection,完全符合系统风格
✅ 简单扩展,方便日后增加新类型
如果你正在开发一个需要「偏系统风格」的 App,这套代码可以作为你的基础设置模块,直接拿来用。
👉 源码已贴全,可以直接复制到项目中运行。
如果你觉得有帮助,点个赞 👍 或收藏 🔖,下次写 UI 时就能快速用上啦!