哨兵模式介绍
哨兵概述
Redis Sentinel,即Redis哨兵,其核心功能是主节点的自动故障转移。
-
核心作用
高可用保障:自动监控主节点状态,实现故障自动转移(failover)
配置管理:统一管理节点拓扑信息,客户端自动获取最新配置
通知告警:通过API通知管理员集群状态变更
-
关键特性
分布式架构:至少需3个哨兵节点(避免脑裂)
故障判定机制:
主观下线(SDOWN):单个哨兵判定节点不可用
客观下线(ODOWN):超过quorum数量的哨兵确认节点故障
-
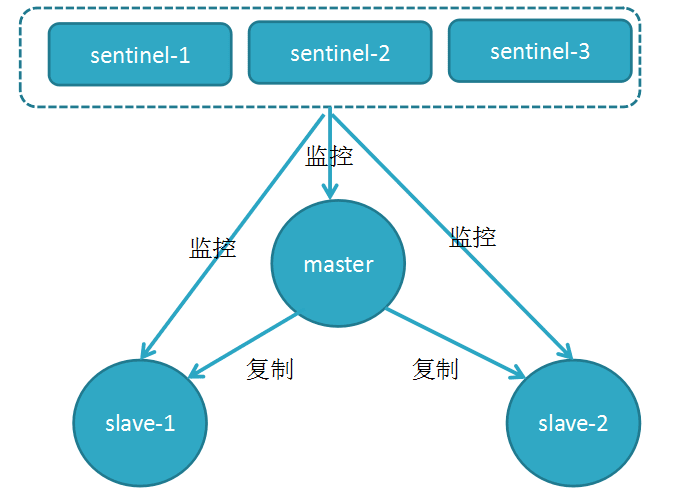
主要架构
-
特性功能
监控(Monitoring):哨兵会不断地检查主节点和从节点是否运作正常。
自动故障转移(Automatic failover):当主节点不能正常工作时,哨兵会开始自动故障转移操作,它会将失效主节点的其中一个从节点升级为新的主节点,并让其他从节点改为复制新的主节点。
配置提供者(Configuration provider):客户端在初始化时,通过连接哨兵来获得当前Redis服务的主节点地址。
通知(Notification):哨兵可以将故障转移的结果发送给客户端。
其中,监控和自动故障转移功能,使得哨兵可以及时发现主节点故障并完成转移;而配置提供者和通知功能,则需要在与客户端的交互中才能体现。
集群概述

组建过程
在主从集群中,主库上有一个名为 sentinel:hello 的频道,不同哨兵就是通过它来相互发现,实现互相通信的。
- 如图所示,哨兵 1 把自己的 IP(172.24.8.11)和端口(26579)发布到 sentinel:hello 频道上,哨兵 2 和 3 订阅了该频道。
- 那么此时,哨兵 2 和 3 就可以从这个频道直接获取哨兵 1 的 IP 地址和端口号。
- 然后,哨兵 2、3 可以和哨兵 1 建立网络连接。
通过这个方式,哨兵 2 和 3 也可以建立网络连接,于是哨兵集群就组建成功。相互之间可以通过网络连接进行通信,如对主库有没有下线进行判断和协商。
监控节点
哨兵监控所有Redis集群节点的过程如下:
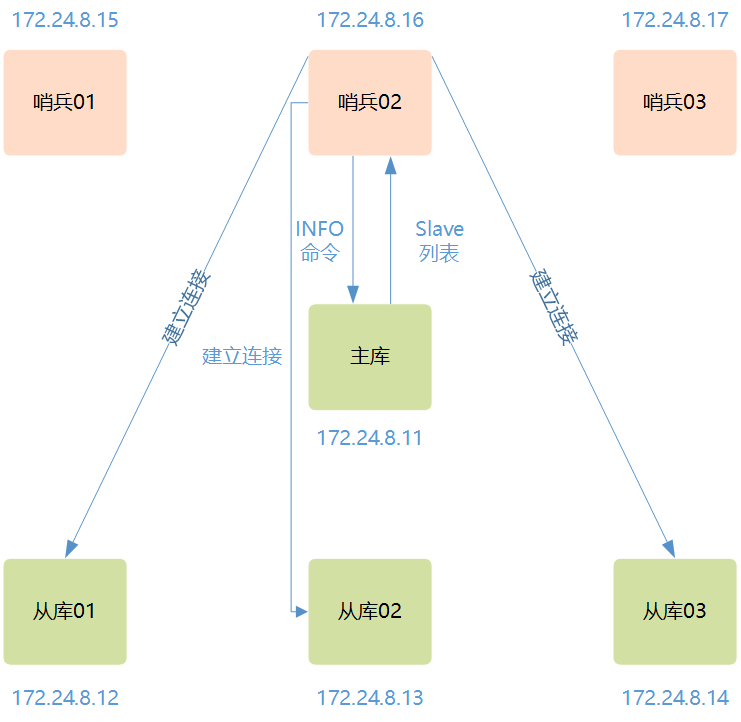
哨兵向主库发送 INFO 命令来完成的。
- 就图所示,哨兵 2 给主库发送 INFO 命令,主库接受到这个命令后,就会把从库列表返回给哨兵。
- 接着,哨兵就可以根据从库列表中的连接信息,和每个从库建立连接,并在这个连接上持续地对从库进行监控。
- 哨兵 1 和 3 可以通过相同的方法和从库建立连接。
关键特性
最小部署:3个Sentinel节点(避免脑裂)
无中心架构:所有Sentinel节点等价
客户端透明:通过Sentinel获取当前主节点地址
集群选举
- 投票过程
主要概念:
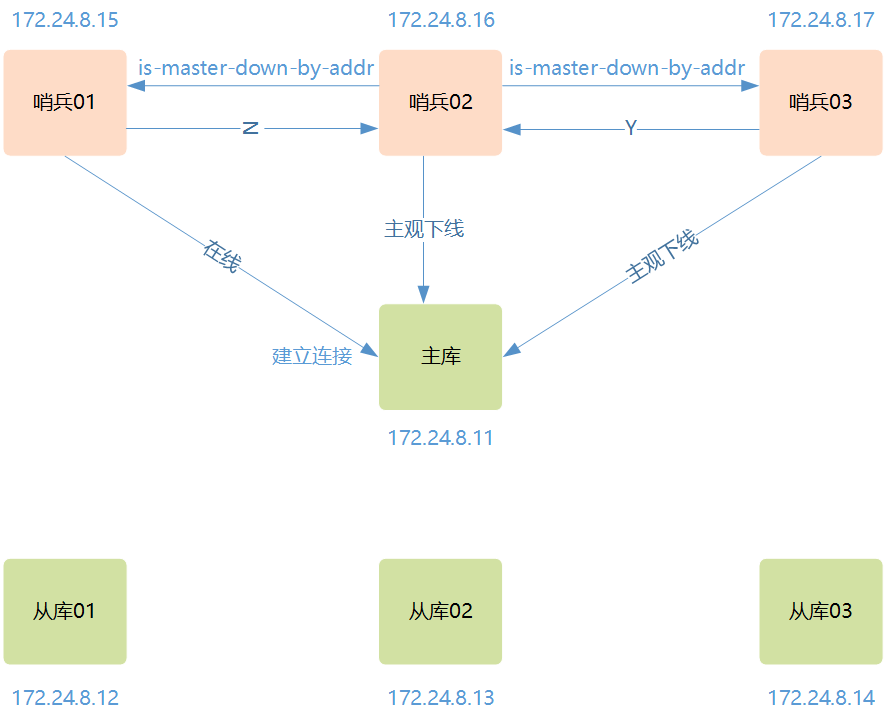
主观下线(SDOWN):单个Sentinel判定节点不可达,即任何一个哨兵都是可以监控探测,并作出Redis节点下线的判断。
客观下线(ODOWN):超过quorum数量的Sentinel确认节点故障,即由哨兵集群共同决定Redis节点是否下线。
Raft算法:Sentinel集群选举Leader执行故障转移。
- 判定过程
- 当某个哨兵(如上图中的哨兵2)判断主库"主观下线"后,就会给其他哨兵发送 is-master-down-by-addr 命令。
- 其他哨兵会根据自己和主库的连接情况,做出 Y 或 N 的响应,Y 相当于赞成票,N 相当于反对票。
- 如果赞成票数(这里是2)是大于等于哨兵配置文件中的 quorum 配置项(比如这里如果是quorum=2), 则可以判定主库客观下线了。
- 自动切换流程
- 选举新主节点(基于优先级/偏移量/ID)
- 其他从节点切换复制新主
- 旧主恢复后变为从节点
选举/共识机制:为了避免哨兵的单点情况发生,所以需要一个哨兵的分布式集群。作为分布式集群,必然涉及共识问题(即选举问题);同时故障的转移和通知都只需要一个主的哨兵节点就可以了。
哨兵的选举机制其实很简单,采用个Raft选举算法: 选举的票数大于等于num(sentinels)/2+1时,将成为领导者,如果没有超过,继续选举。
任何一个想成为 Leader 的哨兵,要满足两个条件:
- 拿到半数以上的赞成票;
- 拿到的票数同时还需要大于等于哨兵配置文件中的 quorum 值。
以 3 个哨兵为例,假设此时的 quorum 设置为 2,那么,任何一个想成为 Leader 的哨兵只要拿到 2 张赞成票即可。
注意:
- 哨兵集群中判断主库"客观下线",是由过半数哨兵节点"主观下线"从而做出的判断;
- 哨兵集群中完成主库切换,是必须一个哨兵必须拿到超过多数的选票才能发起投票选出新的leader。
- 选主过程
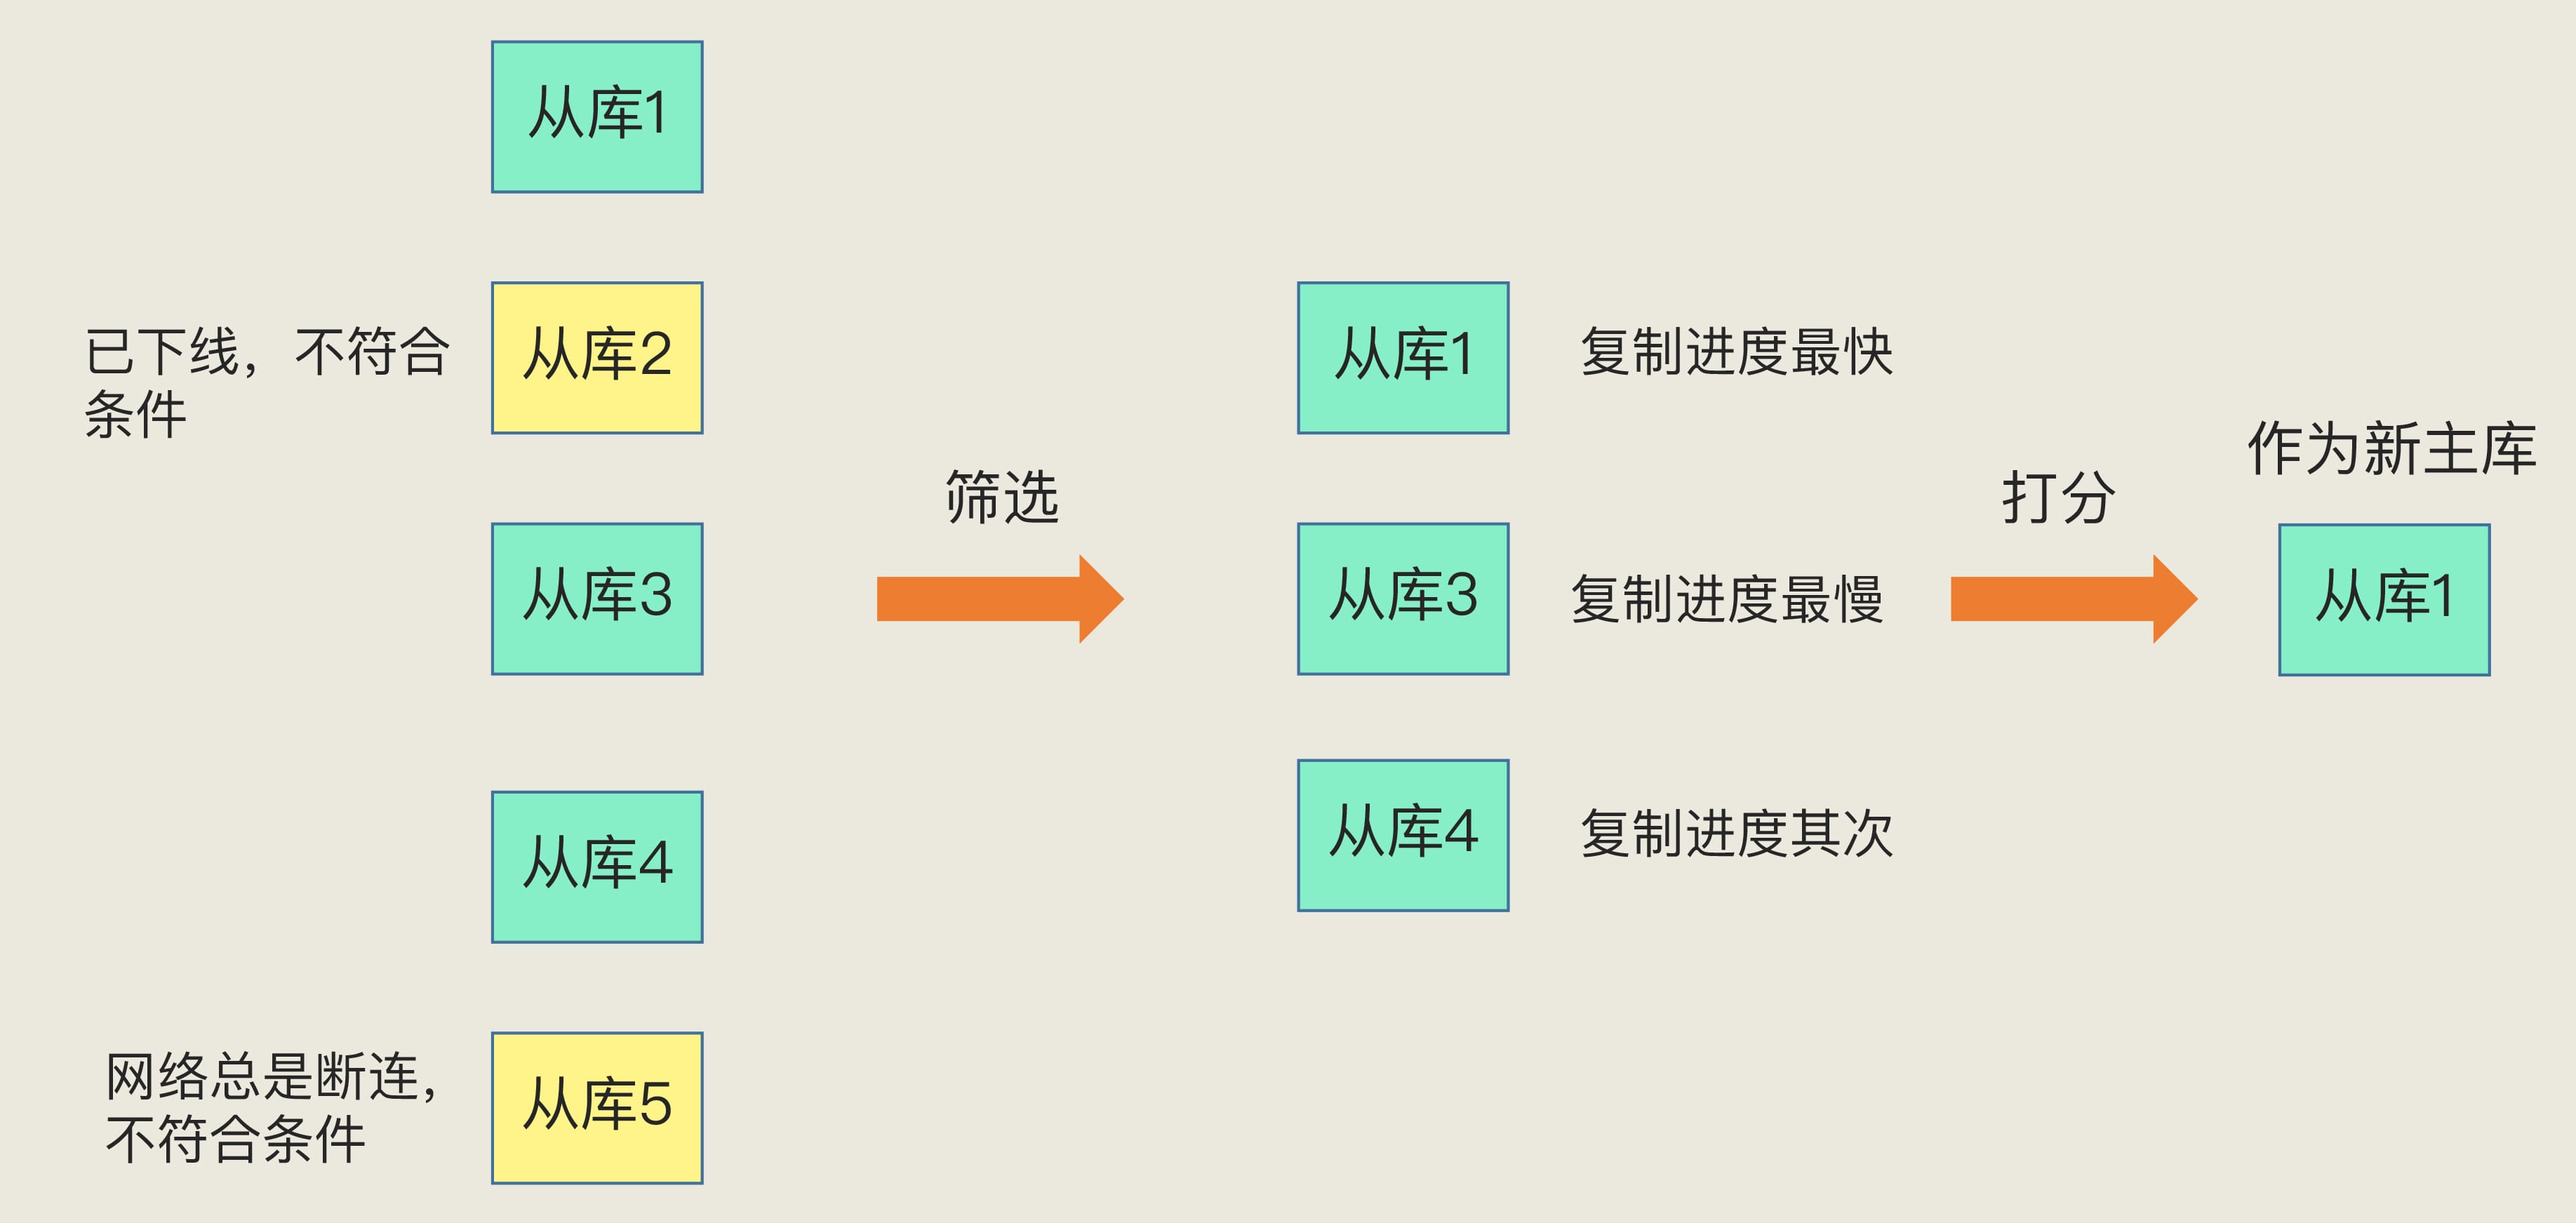
- 过滤掉不健康的(下线或断线),没有回复过哨兵ping响应的从节点
- 选择salve-priority从节点优先级最高(redis.conf)的
- 选择复制偏移量最大,只复制最完整的从节点
参考: Redis进阶 - 高可用:哨兵机制(Redis Sentinel)详解
哨兵模式实战
环境准备
- 安全预设
根据实际情况,关闭防火墙和SELinux。
bash
[root@redis01 ~]# systemctl disable firewalld --now
[root@redis01 ~]# sed -i 's/=enforcing/=disabled/g' /etc/selinux/config
注意:以上操作需要在所有节点上执行。
- 节点规划
| 角色 | 主机名 | IP地址 | 运行服务 | 逻辑名称 |
|---|---|---|---|---|
| Redis Master | redis01 | 172.24.8.11 | Redis + Sentinel | mymaster |
| Redis Slave | redis02 | 172.24.8.12 | Redis + Sentinel | mymaster |
| Redis Slave | redis03 | 172.24.8.13 | Redis + Sentinel | mymaster |
| Sentinel | sentinel01 | 172.24.8.14 | Sentinel | mymaster |
| Sentinel | sentinel02 | 172.24.8.15 | Sentinel | mymaster |
| Sentinel | sentinel03 | 172.24.8.16 | Sentinel | mymaster |
提示:官方允许Redis也充当哨兵节点。mymaster是哨兵监控的主节点的逻辑名称,并不是主机名,可以自定义,用于标识一个Redis主从集群(可以监控多个集群,每个集群有不同的逻辑名)。
如上节点规划期容错能力如下:
| 节点数 | 多数决数 | 允许故障数 | 脑裂风险 |
|---|---|---|---|
| 3 | 2 | 1 | 中 |
| 5 | 3 | 2 | 低 |
| 6 | 4 | 2 | 低 |
- 配置主机名
建议配置内部主机名解析。
shell
[root@redis01 ~]# cat >> /etc/hosts << EOF
172.24.8.11 redis01
172.24.8.12 redis02
172.24.8.13 redis03
172.24.8.14 sentinel01
172.24.8.15 sentinel02
172.24.8.16 sentinel03
EOF
时钟服务
主从架构建议保证时钟服务正确,具体时钟配置参考:NTP服务器
- ntpd服务查看
bash
[root@redis01 ~]# ntpq -np
     remote           refid      st t when poll reach   delay   offset  jitter
==============================================================================
*116.62.13.223   100.100.61.92    2 u   28   64  377   34.750   24.098   4.261
+203.107.6.88 100.107.25.114 2 u 13 64 377 47.745 18.287 8.121- chrony服务查看
bash
[root@redis01 ~]# chronyc sources -v变量准备
为实现自动化部署,自动化分发相关文件,提前定义相关主机名、IP组、变量等。
shell
[root@redis01 ~]# vim redisnodes.sh                             #确认相关主机名和IP
#!/bin/bash
#***************************************************************#
# ScriptName: redisnodes.sh
# Author: xhy
# Create Date: 2025-02-22 01:44
# Modify Author: xhy
# Modify Date: 2025-02-22 01:44
# Version: v1
#***************************************************************#

# 集群 REDIS 机器 IP 数组
export REDIS_IPS=(172.24.8.11 172.24.8.12 172.24.8.13)

# 集群 REDIS IP 对应的主机名数组
export REDIS_NAMES=(redis01 redis02 redis03)

# 集群 SENTINEL 机器 IP 数组
export ALL_IPS=(172.24.8.11 172.24.8.12 172.24.8.13 172.24.8.14 172.24.8.15 172.24.8.16)

# 集群 SENTINEL IP 对应的主机名数组
export ALL_NAMES=(redis01 redis02 redis03 sentinel01 sentinel02 sentinel03)
互信配置
为了方便远程分发文件和执行命令,本方案配置 redis01 节点到其它节点的 ssh信任关系,即免秘钥管理所有其他节点。
shell
[root@redis01 ~]# source redisnodes.sh                                #载入变量

[root@redis01 ~]# wget http://down.linuxsb.com/myshell/mkpublickey.sh
[root@redis01 ~]# vi mkpublickey.sh                                    #确认IP

[root@redis01 ~]# bash mkpublickey.sh redhat123
提示:如上仅需在 redis01 节点上操作。
Redis安装前置优化
shell
[root@redis01 ~]# chmod +x *.sh
[root@redis01 ~]# source redisnodes.sh
[root@redis01 ~]# for all_ip in ${ALL_IPS[@]}
  do
    echo -e "\n\n\033[33m[INFO] >>> ${all_ip}...\033[0m"
    sleep 2
    scp -rp /etc/hosts root@${all_ip}:/etc/hosts
    ssh root@${all_ip} "echo 'vm.overcommit_memory=1' > /etc/sysctl.d/redis-sysctl.conf"
    ssh root@${all_ip} "sysctl -p /etc/sysctl.d/redis-sysctl.conf"
    ssh root@${all_ip} "echo 'echo never > /sys/kernel/mm/transparent_hugepage/enabled' >> /etc/rc.d/rc.local"
  done
提示:如上仅需在 redis01 上操作。
编译安装
建议使用编译安装。
shell
[root@redis01 ~]# source redisnodes.sh
[root@redis01 ~]# for all_ip in ${ALL_IPS[@]}
  do
    echo -e "\n\n\033[33m[INFO] >>> ${all_ip}...\033[0m"
    sleep 2
    scp -rp /etc/hosts root@${all_ip}:/etc/hosts
    ssh root@${all_ip} "mkdir -p /tmp/redis-tmp /etc/redis/ /var/log/redis/"
    ssh root@${all_ip} << EOF
	  REIDS_VER=8.0.3
	  DOWNLOAD_URL="https://mirrors.huaweicloud.com/redis"
	  curl -L "\${DOWNLOAD_URL}/redis-\${REIDS_VER}.tar.gz" -o "/tmp/redis-\${REIDS_VER}.tar.gz"
	  tar xzvf "/tmp/redis-\${REIDS_VER}.tar.gz" -C /tmp/redis-tmp --strip-components=1 --no-same-owner
	  cd /tmp/redis-tmp
	  make -j4
	  make install PREFIX=/usr/local/redis
	  echo 'PATH=/usr/local/redis/bin:\$PATH' > /etc/profile.d/redis.sh
	  source /etc/profile.d/redis.sh
	  redis-cli -v
EOF
  done
提示:所有主从节点+纯哨兵节点都需要安装Redis,如上可实现所有节点循环编译完成安装。
服务redis服务单元
通过服务单元的方式管理Redis是更推荐的方式,更符合最佳实践。
shell
[root@redis01 ~]# vim /usr/lib/systemd/system/redis-server.service
[Unit]
Description=Redis Server Manager
After=network.target
After=network-online.target
Wants=network-online.target
Documentation=https://redis.io/documentation

[Service]
ExecStart=/usr/local/redis/bin/redis-server /etc/redis/redis01_6379.conf
ExecStop=/usr/local/redis/bin/redis-cli shutdown
#Restart=on-failure
RestartSec=5
Type=forking

[Install]
WantedBy=multi-user.target

[root@redis01 ~]# for redis_ip in ${REDIS_IPS[@]}
  do
    echo -e "\n\n\033[33m[INFO] >>> ${redis_ip}...\033[0m"
    sleep 2
    scp -rp /usr/lib/systemd/system/redis-server.service root@${redis_ip}:/usr/lib/systemd/system/
    ssh root@${redis_ip} "mkdir -p /run/redis"
  done
提示:所有主从节点都建议使用服务单元的方式管理。
Redis 主节点配置
shell
[root@redis01 ~]# mkdir -p /var/lib/redis/redis01/          #创建Redis RDB持久化文件保存路径

[root@redis01 ~]# cp /tmp/redis-tmp/redis.conf /etc/redis/redis01_6379.conf

[root@redis01 ~]# vim /etc/redis/redis01_6379.conf
#......
# 核心配置项:
bind 0.0.0.0 -::1                       # 允许所有IP连接
protected-mode no                       # 关闭保护模式
port 6379
daemonize yes                           # 开启后台运行
logfile "/var/log/redis/redis01.log"
dir "/var/lib/redis/redis01"

# 主从复制相关
repl-backlog-size 64mb                  # 复制积压缓冲区大小(建议1-2倍内存)
repl-backlog-ttl 3600                   # 缓冲区保留时间(秒)
repl-diskless-sync yes                  # 启用无盘复制(推荐)
repl-diskless-sync-delay 5              # 等待更多从节点加入(秒)
requirepass "StrongPassword123!"        # 基于安全考虑增加验证

[root@redis01 ~]# systemctl daemon-reload
[root@redis01 ~]# systemctl enable redis-server.service --now
[root@redis01 ~]# systemctl status redis-server.service
Redis 从节点配置
- redis02节点
shell
[root@redis02 ~]# mkdir -p /var/lib/redis/redis01/      #创建Redis RDB持久化文件保存路径

[root@redis02 ~]# cp /tmp/redis-tmp/redis.conf /etc/redis/redis01_6379.conf

[root@redis02 ~]# vim /etc/redis/redis01_6379.conf
#......
# 核心配置项:
bind 0.0.0.0 -::1                       # 允许所有IP连接
protected-mode no                       # 关闭保护模式
port 6379
daemonize yes
logfile "/var/log/redis/redis01.log"
dir "/var/lib/redis/redis01"

# 主从复制配置
replicaof 172.24.8.11 6379              # 关键配置:指定主节点
replica-read-only yes                   # 默认,从节点只读(推荐)
repl-diskless-load disabled             # 默认,从节点禁用无盘加载(避免风险)
masterauth "StrongPassword123!"         # 如果主节点有密码需配置

[root@redis02 ~]# systemctl daemon-reload
[root@redis02 ~]# systemctl enable redis-server.service --now
[root@redis03 ~]# systemctl status redis-server.service

[root@redis02 ~]# scp -rp /etc/redis/redis01_6379.conf root@redis03:/etc/redis/
提示:Redis03节点也需要使用相同的配置。
- redis03节点
shell
[root@redis03 ~]# mkdir -p /var/lib/redis/redis01/     #创建Redis RDB持久化文件保存路径

[root@redis03 ~]# systemctl daemon-reload
[root@redis03 ~]# systemctl enable redis-server.service --now
[root@redis03 ~]# systemctl status redis-server.service
主从复制验证
- 状态验证
在主从节点上查看两个节点的状态。
shell
[root@redisclient ~]# redis-cli -h redis01 -p 6379
redis01:6379> AUTH StrongPassword123!
OK
redis01:6379> INFO replication
# Replication
role:master
connected_slaves:2
slave0:ip=172.24.8.12,port=6379,state=online,offset=462,lag=0
slave1:ip=172.24.8.13,port=6379,state=online,offset=462,lag=1
#......
redis01:6379> exit

[root@redisclient ~]# redis-cli -h redis02 -p 6379
redis02:6379> INFO replication
# Replication
role:slave
master_host:172.24.8.11
master_port:6379
#......
redis02:6379> exit

[root@redisclient ~]# redis-cli -h redis03 -p 6379
redis03:6379> INFO replication
# Replication
role:slave
master_host:172.24.8.11
master_port:6379
#......
哨兵配置获取
从默认源码包中复制哨兵模式配置模板。
shell
[root@redis01 ~]# cp -rp /tmp/redis-tmp/sentinel.conf /etc/redis/sentinel01_26379.conf哨兵模式配置
- redis01配置
shell
[root@redis01 ~]# cat > /etc/redis/sentinel01_26379.conf << EOF
protected-mode no

# 默认,对外提供服务的端口
port 26379
# 开启后台运行
daemonize yes
# 设置哨兵日志文件
logfile "/var/log/redis/sentinel01.log"
# 哨兵sentinel工作目录
dir "/var/lib/redis/sentine01"

# 指定Redis主节点主机IP地址和端口
sentinel monitor mymaster 172.24.8.11 6379 2
# 配置连接密码,此处的密码需要与 redis.conf里面配置的连接密码一致
sentinel auth-pass mymaster StrongPassword123!
# 设置了主机多少毫秒无响应,则认为服务异常
sentinel down-after-milliseconds mymaster 30000
# 主备切换时,最多有多少个slave同时对新的master进行同步,这里设置为默认的1
sentinel parallel-syncs mymaster 1
# 故障转移的超时时间毫秒
sentinel failover-timeout mymaster 180000
# 8.0版本后必须显式声明才能自动发现
sentinel announce-ip 172.24.8.11
# 8.0版本后必须显式声明才能自动发现
sentinel announce-port 26379
sentinel resolve-hostnames no
sentinel announce-hostnames no
EOF- 配置服务单元
通过服务单元的方式管理Redis是更推荐的方式,更符合最佳实践。
shell
[root@redis01 ~]# vim /usr/lib/systemd/system/redis-sentinel.service
[Unit]
Description=Redis Sentinel
After=network.target
After=network-online.target
Wants=network-online.target
Documentation=https://redis.io/documentation

[Service]
ExecStart=/usr/local/redis/bin/redis-sentinel /etc/redis/sentinel01_26379.conf
ExecStop=/usr/local/redis/bin/redis-cli -p 26379 shutdown
Restart=always
RestartSec=5
Type=forking

[Install]
WantedBy=multi-user.target- 配置分发
将服务单元和配置文件分发至所有其他节点,针对sentinel announce-ip和sentinel announce-port每个节点单独配置。
shell
[root@redis01 ~]# for all_ip in ${ALL_IPS[@]}
  do
    echo -e "\n\n\033[33m[INFO] >>> ${all_ip}...\033[0m"
    sleep 2
    ssh root@${all_ip} "mkdir -p /var/lib/redis/sentine01"
    scp -rp /etc/redis/sentinel01_26379.conf root@${all_ip}:/etc/redis/
    scp -rp /usr/lib/systemd/system/redis-sentinel.service root@${all_ip}:/usr/lib/systemd/system/
  done

[root@redis02 ~]# vim /etc/redis/sentinel01_26379.conf
#......
sentinel announce-ip 172.24.8.12                    # 8.0版本后必须显式声明才能自动发现
#......

[root@redis02 ~]# vim /etc/redis/sentinel01_26379.conf
#......
sentinel announce-ip 172.24.8.13                    # 8.0版本后必须显式声明才能自动发现
#......

[root@redis02 ~]# vim /etc/redis/sentinel01_26379.conf
#......
sentinel announce-ip 172.24.8.14                    # 8.0版本后必须显式声明才能自动发现
#......

[root@redis02 ~]# vim /etc/redis/sentinel01_26379.conf
#......
sentinel announce-ip 172.24.8.15                    # 8.0版本后必须显式声明才能自动发现
#......

[root@redis02 ~]# vim /etc/redis/sentinel01_26379.conf
#......
sentinel announce-ip 172.24.8.16                    # 8.0版本后必须显式声明才能自动发现
#......
哨兵服务启动
所有节点相同配置,然后启动哨兵服务。
shell
[root@redis01 ~]# for all_ip in ${ALL_IPS[@]}
  do
    echo -e "\n\n\033[33m[INFO] >>> ${all_ip}...\033[0m"
    sleep 5
    ssh root@${all_ip} "systemctl daemon-reload"
    ssh root@${all_ip} "systemctl enable redis-sentinel.service --now"
    ssh root@${all_ip} "systemctl restart redis-sentinel.service"
    ssh root@${all_ip} "systemctl status redis-sentinel.service"
  done
参考: 高可用之战:Redis Sentinal(哨兵模式)
确认验证
shell
[root@redis01 ~]# redis-cli -h redis01 -p 26379 sentinel sentinels mymaster | grep 172          #能查询到其他5个哨兵
172.24.8.15
172.24.8.14
172.24.8.13
172.24.8.12
172.24.8.16

[root@redis01 ~]# redis-cli -h redis01 -p 26379 sentinel ckquorum mymaster                      #确认仲裁节点
OK 6 usable Sentinels. Quorum and failover authorization can be reached
故障转移
在redis01上模拟redis服务异常。
shell
[root@redis01 ~]# systemctl status redis-server.service 观察reids01上的哨兵日志。
shell
[root@redis01 ~]# tail -f /var/log/redis/sentinel01.log
#......
11386:X 24 Jul 2025 03:16:24.638 # +sdown master mymaster 172.24.8.11 6379
11386:X 24 Jul 2025 03:16:25.196 * Sentinel new configuration saved on disk
11386:X 24 Jul 2025 03:16:25.196 # +new-epoch 1
11386:X 24 Jul 2025 03:16:25.199 * Sentinel new configuration saved on disk
11386:X 24 Jul 2025 03:16:25.199 # +vote-for-leader c81a743bfa9e6b64efc9618b8600c0941452976e 1
11386:X 24 Jul 2025 03:16:25.797 # +odown master mymaster 172.24.8.11 6379 #quorum 6/2
11386:X 24 Jul 2025 03:16:25.798 * Next failover delay: I will not start a failover before Thu Jul 24 03:22:26 2025
11386:X 24 Jul 2025 03:16:26.039 # +config-update-from sentinel c81a743bfa9e6b64efc9618b8600c0941452976e 172.24.8.14 26379 @ mymaster 172.24.8.11 6379
11386:X 24 Jul 2025 03:16:26.039 # +switch-master mymaster 172.24.8.11 6379 172.24.8.12 6379
11386:X 24 Jul 2025 03:16:26.040 * +slave slave 172.24.8.13:6379 172.24.8.13 6379 @ mymaster 172.24.8.12 6379
11386:X 24 Jul 2025 03:16:26.040 * +slave slave 172.24.8.11:6379 172.24.8.11 6379 @ mymaster 172.24.8.12 6379
11386:X 24 Jul 2025 03:16:26.050 * Sentinel new configuration saved on disk
11386:X 24 Jul 2025 03:16:56.099 # +sdown slave 172.24.8.11:6379 172.24.8.11 6379 @ mymaster 172.24.8.12 6379