文章目录
- 一、什么是Eureka
- 二、原理理解
- 三、构建步骤
-
- [1. eureka-server](#1. eureka-server)
- 2.eureka-client
- 四、Eureka:集群环境配置
- 五、对比和Zookeeper区别
-
- [1. 回顾CAP原则](#1. 回顾CAP原则)
- [2. ACID是什么?](#2. ACID是什么?)
- [3. CAP是什么?](#3. CAP是什么?)
- [4. CAP理论的核心](#4. CAP理论的核心)
- [5. 作为分布式服务注册中心,Eureka比Zookeeper好在哪里?](#5. 作为分布式服务注册中心,Eureka比Zookeeper好在哪里?)
一、什么是Eureka
- Netflix在涉及Eureka时,遵循的就是API原则.
- Eureka是Netflix的核心模块之一。Eureka是基于REST的服务,用于定位服务,以实现云端中间件层服务发现和故障转移,服务注册与发现对于微服务来说是非常重要的,有了服务注册与发现,只需要使用服务的标识符,就可以访问到服务,而不需要修改服务调用的配置文件了,功能类似于Dubbo的注册中心,比如Zookeeper。
二、原理理解
-
Eureka基本的架构
-
Springcloud 封装了Netflix公司开发的Eureka模块来实现服务注册与发现 (对比Zookeeper).
-
Eureka采用了C-S的架构设计,EurekaServer作为服务注册功能的服务器,他是服务注册中心.
-
而系统中的其他微服务,使用Eureka的客户端连接到EurekaServer并维持心跳连接。这样系统的维护人员就可以通过EurekaServer来监控系统中各个微服务是否正常运行,Springcloud 的一些其他模块 (比如Zuul) 就可以通过EurekaServer来发现系统中的其他微服务,并执行相关的逻辑.
-
Eureka 包含两个组件:Eureka Server 和 Eureka Client.
-
Eureka Server 提供服务注册,各个节点启动后,回在EurekaServer中进行注册 ,这样Eureka Server中的服务注册表中将会储存所有课用服务节点的信息,服务节点的信息可以在界面中直观的看到.
-
Eureka Client 是一个Java客户端,用于简化EurekaServer的交互,客户端同时也具备一个内置的,使用轮询负载算法的负载均衡器。在应用启动后,将会向EurekaServer发送心跳 (默认周期为30秒) 。如果Eureka Server在多个心跳周期内没有接收到某个节点的心跳,EurekaServer将会从服务注册表中把这个服务节点移除掉 (默认周期为90s).
三大角色
- Eureka Server:提供服务的注册与发现
- Service Provider:服务生产方,将自身服务注册到Eureka中,从而使服务消费方能够找到
- Service Consumer:服务消费方,从Eureka中获取注册服务列表,从而找到消费服务
三、构建步骤
1. eureka-server
建立 springcloud-eureka-7001 模块
pom.xml 配置
xml
<project xmlns="http://maven.apache.org/POM/4.0.0" xmlns:xsi="http://www.w3.org/2001/XMLSchema-instance"
         xsi:schemaLocation="http://maven.apache.org/POM/4.0.0 http://maven.apache.org/xsd/maven-4.0.0.xsd">
    <modelVersion>4.0.0</modelVersion>
    <parent>
        <groupId>com.qf</groupId>
        <artifactId>springcloud-netflix</artifactId>
        <version>1.0-SNAPSHOT</version>
    </parent>

    <artifactId>springcloud-eureka-7001</artifactId>
    <packaging>jar</packaging>

    <name>springcloud-eureka-7001</name>
    <url>http://maven.apache.org</url>

    <properties>
        <project.build.sourceEncoding>UTF-8</project.build.sourceEncoding>
    </properties>

    <dependencies>
        <!-- https://mvnrepository.com/artifact/org.springframework.cloud/spring-cloud-starter-eureka-server -->
        <!--导入Eureka Server依赖-->
        <dependency>
            <groupId>org.springframework.cloud</groupId>
            <artifactId>spring-cloud-starter-eureka-server</artifactId>
            <version>1.4.6.RELEASE</version>
        </dependency>
        <!--热部署工具-->
        <dependency>
            <groupId>org.springframework.boot</groupId>
            <artifactId>spring-boot-devtools</artifactId>
        </dependency>
    </dependencies>
</project>
application.yml
yml
server:
  port: 7001
# Eureka配置
eureka:
  instance:
    # Eureka服务端的实例名字
    hostname: 127.0.0.1
  client:
    # 表示是否向 Eureka 注册中心注册自己(这个模块本身是服务器,所以不需要)
    register-with-eureka: false
    # fetch-registry如果为false,则表示自己为注册中心,客户端的化为 ture
    fetch-registry: false
    # Eureka监控页面~
    service-url:
      defaultZone: http://${eureka.instance.hostname}:${server.port}/eureka/
启动类
java
import org.springframework.boot.SpringApplication;
import org.springframework.boot.autoconfigure.SpringBootApplication;
import org.springframework.cloud.netflix.eureka.server.EnableEurekaServer;

@SpringBootApplication
@EnableEurekaServer
public class EurekaServer_7001 {
    public static void main(String[] args) {
        SpringApplication.run(EurekaServer_7001.class,args);
    }
}
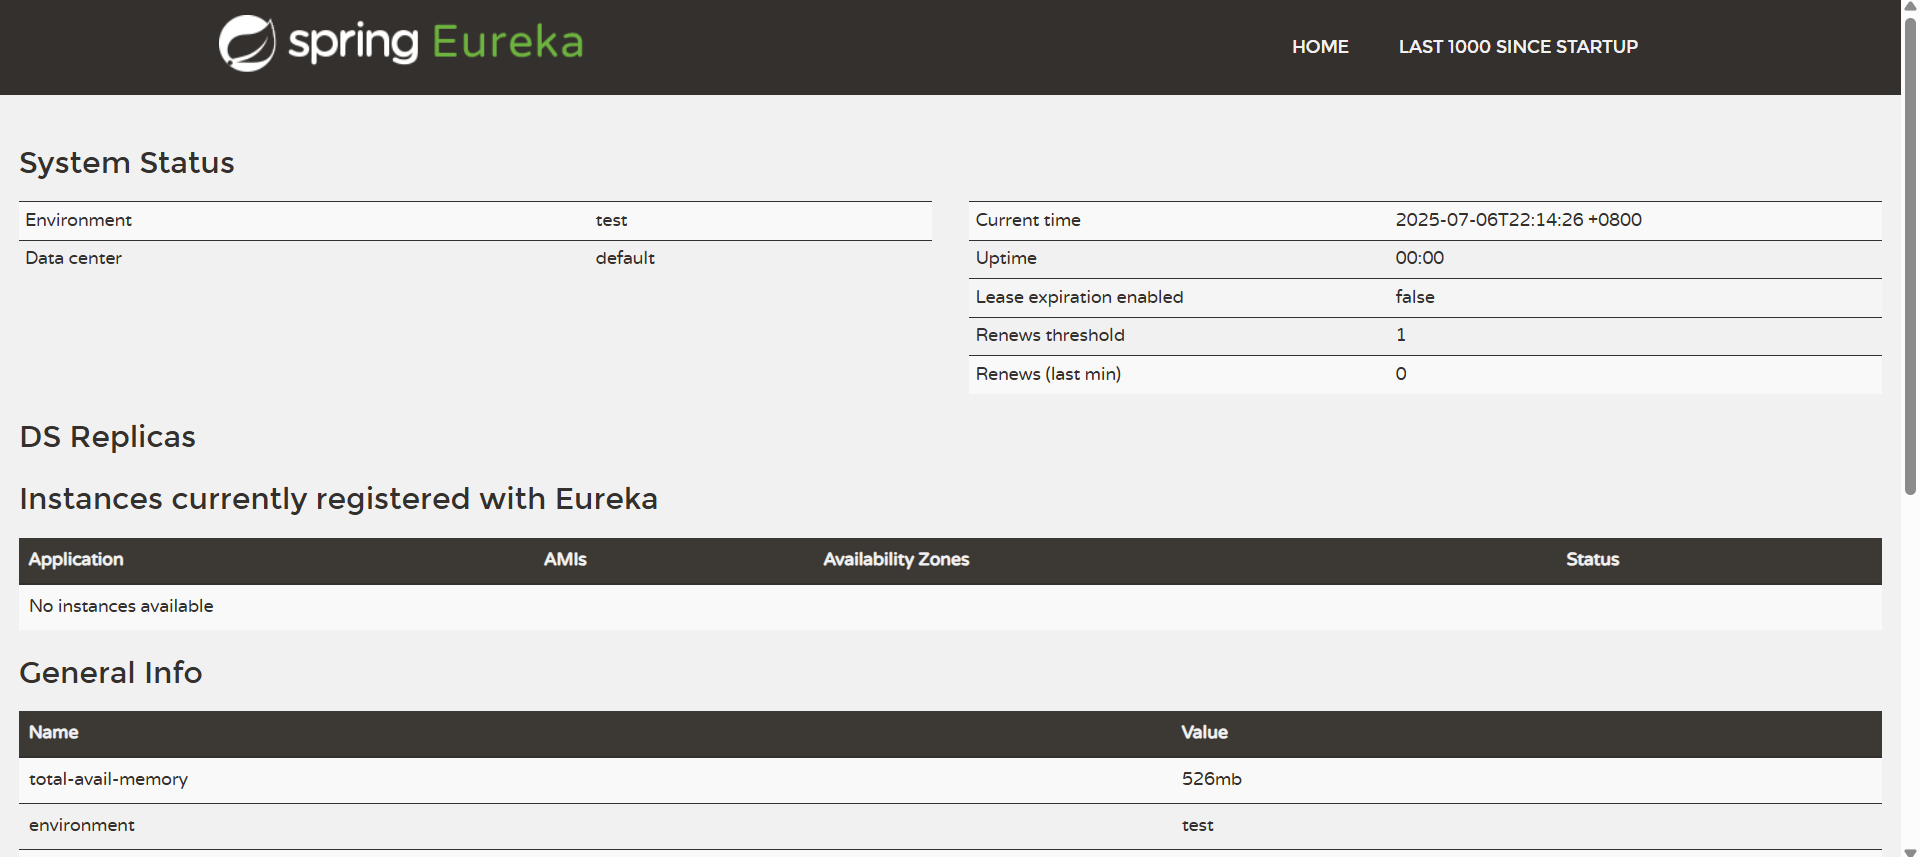
启动成功后访问 http://localhost:7001/ 得到以下页面
2.eureka-client
调整之前创建的springlouc-provider-dept-8001(在上一章中创建)
1.导入Eureca依赖
xml
<!--Eureka依赖-->
<!-- https://mvnrepository.com/artifact/org.springframework.cloud/spring-cloud-starter-eureka -->
<dependency>
    <groupId>org.springframework.cloud</groupId>
    <artifactId>spring-cloud-starter-eureka</artifactId>
    <version>1.4.6.RELEASE</version>
</dependency>
2.application中新增Eureca配置
yml
# Eureka配置:配置服务注册中心地址
eureka:
  client:
    service-url:
      defaultZone: http://localhost:7001/eureka/
3.为主启动类添加@EnableEurekaClient注解
java
import org.springframework.boot.SpringApplication;
import org.springframework.boot.autoconfigure.SpringBootApplication;
import org.springframework.cloud.netflix.eureka.EnableEurekaClient;

@SpringBootApplication
@EnableEurekaClient
public class DeptProvider {

    public static void main(String[] args) {

        SpringApplication.run(DeptProvider.class,args);
    }
}
启动服务
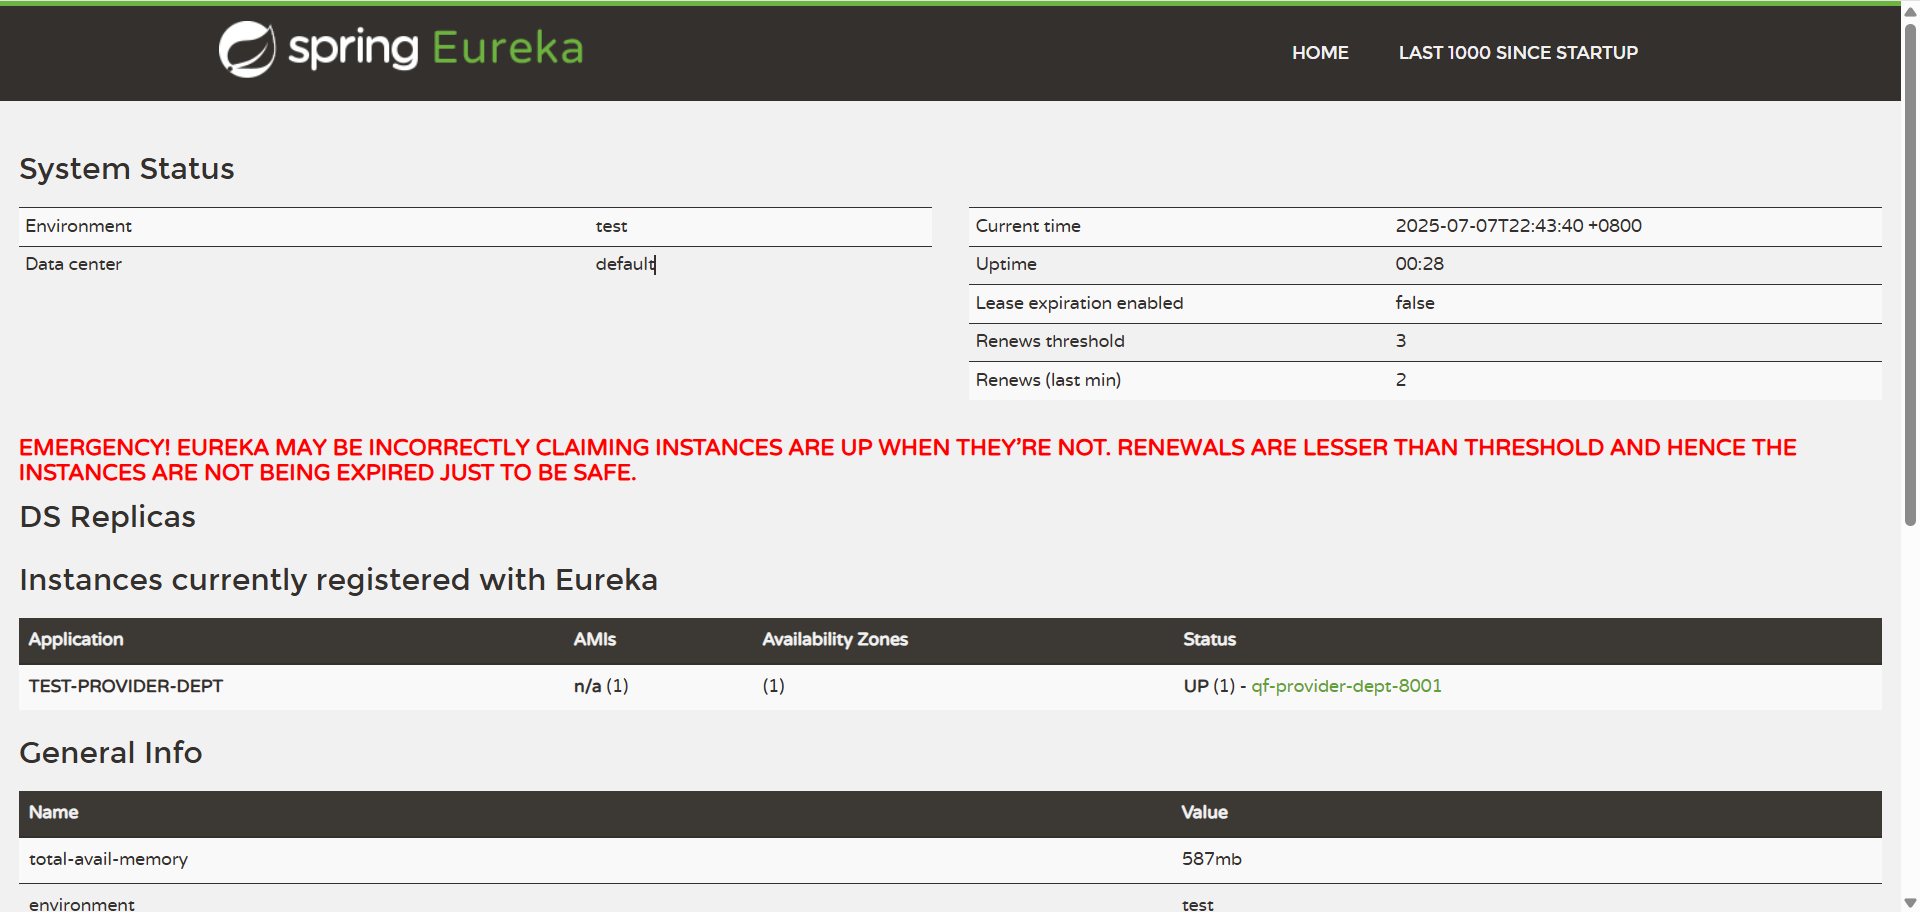
红色的提示为热部署时重启了服务,eureka发出的警告
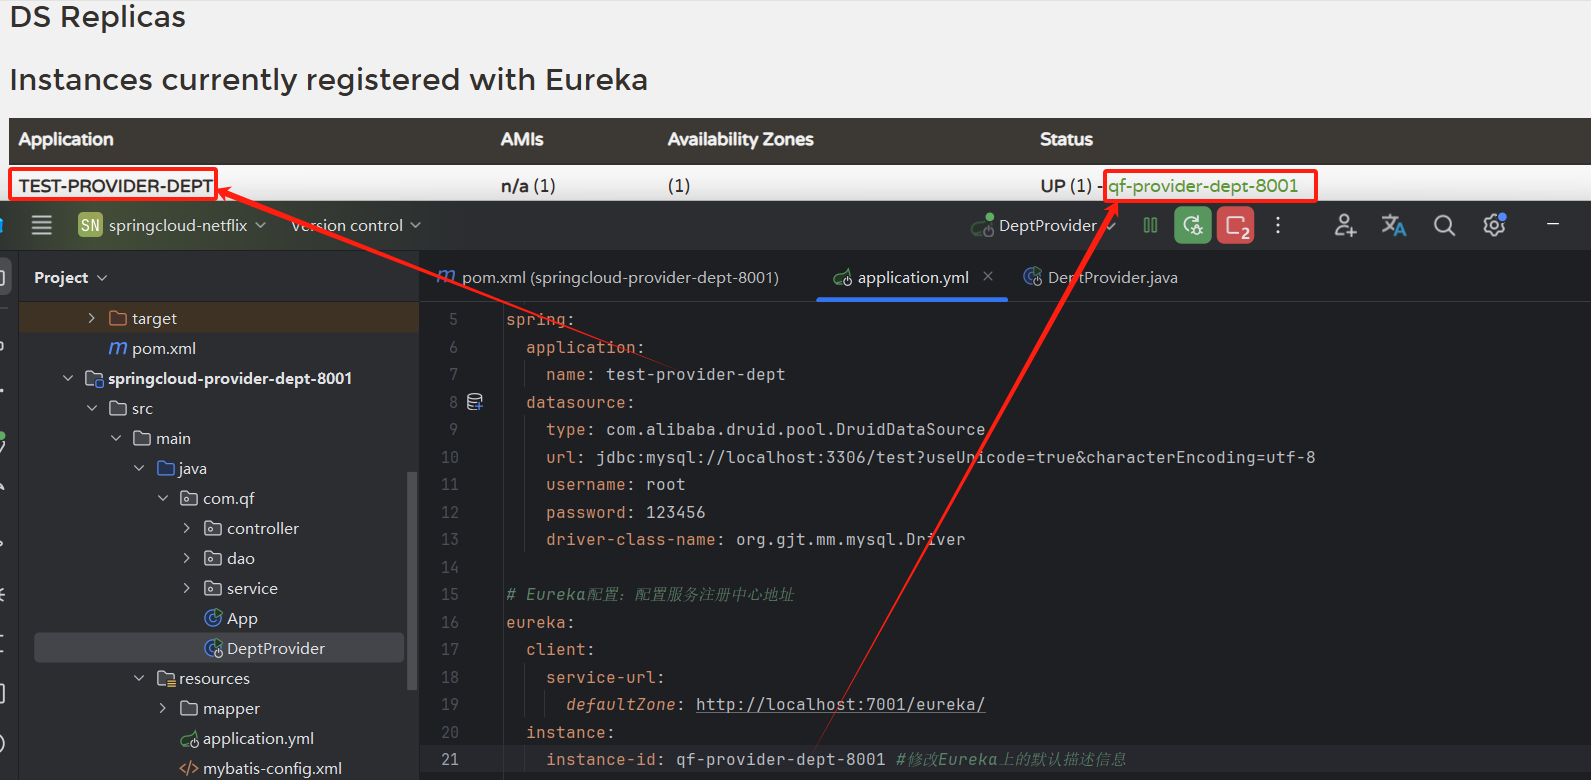
修改Eureka上的默认描述信息
对应的名称
配置关于服务加载的监控信息
xml
<!--actuator完善监控信息-->
<dependency>
    <groupId>org.springframework.boot</groupId>
    <artifactId>spring-boot-starter-actuator</artifactId>
</dependency>
application.yml中添加配置
yml
# info配置 actuator完善监控信息
info:
  # 项目的名称
  app.name: qf-springcloud
  # 公司的名称
  app.desc: 部门生产者
  order.index: 1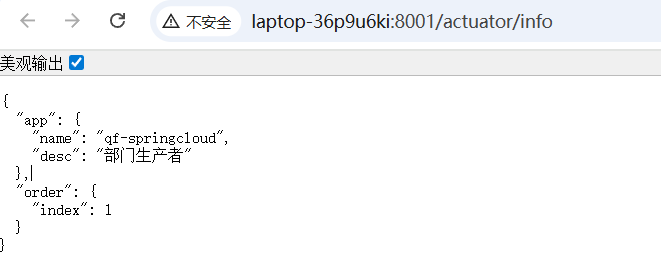
Eureka自我保护机制
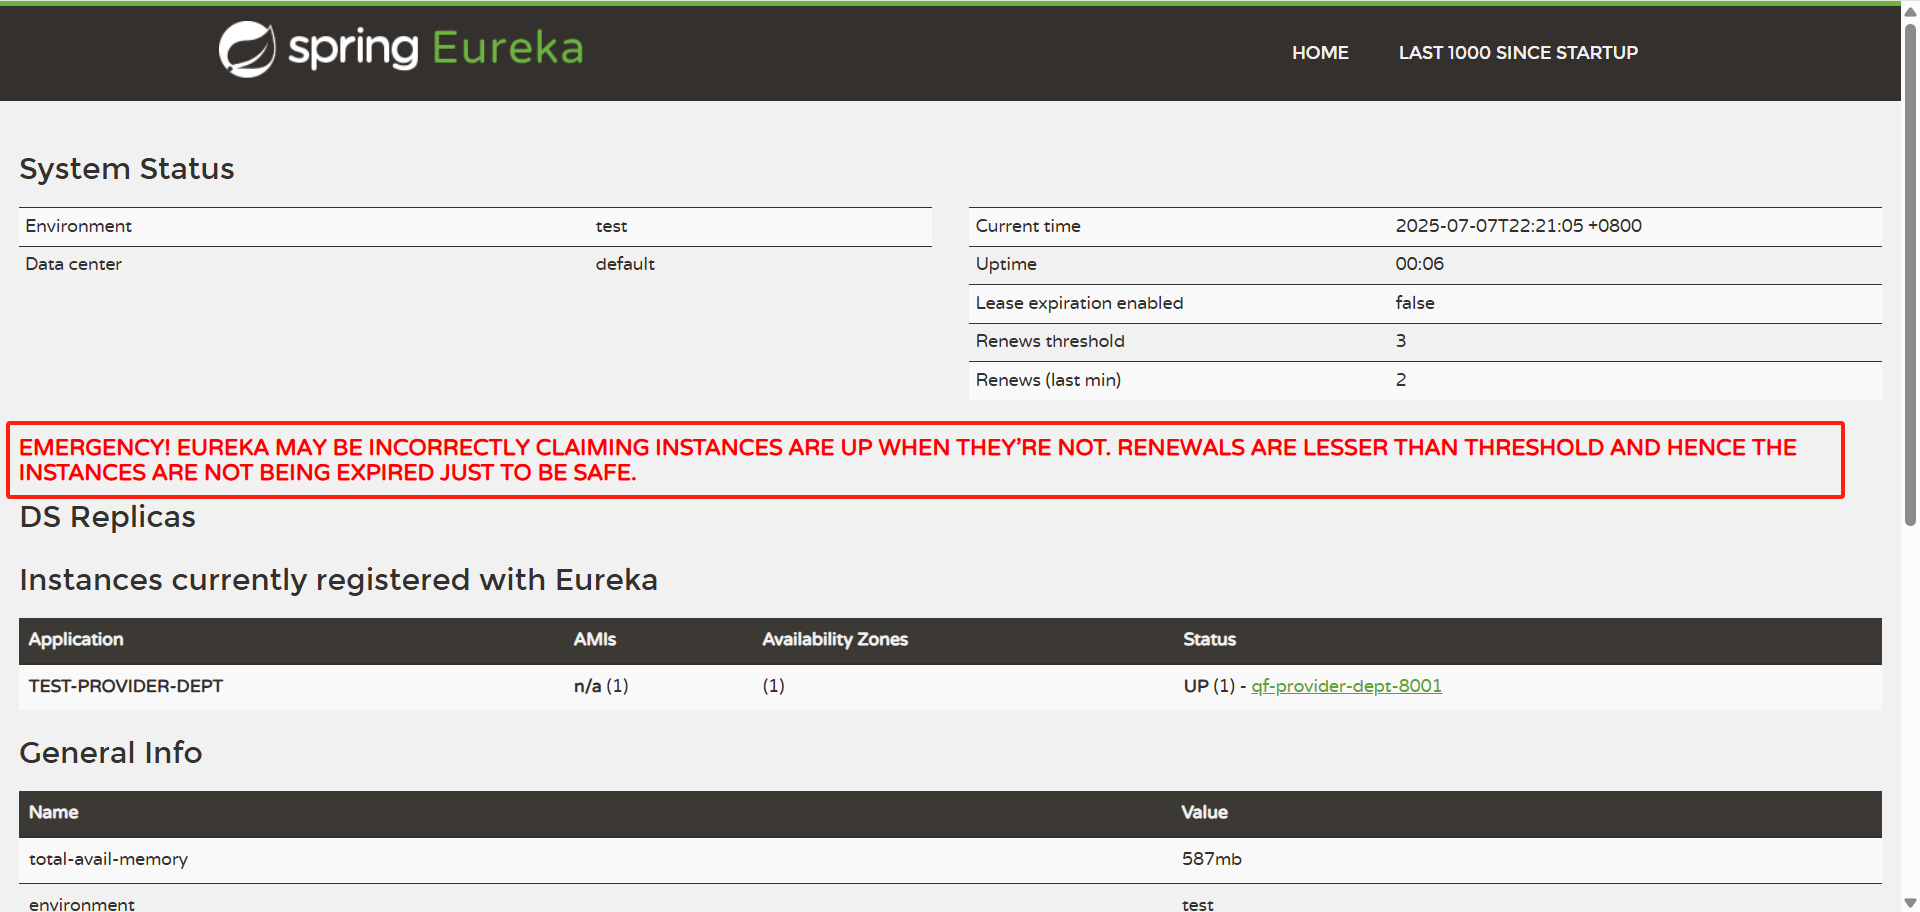
EureKa自我保护机制:好死不如赖活着
一句话总结就是:某时刻某一个微服务不可用,eureka不会立即清理,依旧会对该微服务的信息进行保存!
- 默认情况下,当eureka server在一定时间内没有收到实例的心跳,便会把该实例从注册表中删除(默认是90秒)。
- 但是,如果短时间内丢失大量的实例心跳,便会触发eureka server的自我保护机制,比如在开发测试时,需要频繁地重启微服务实例,但是我们很少会把eureka server一起重启(因为在开发过程中不会修改eureka注册中心),当一分钟内收到的心跳数大量减少时,会触发该保护机制。
- 可以在eureka管理界面看到Renews threshold和Renews(last min),当后者(最后一分钟收到的心跳数)小于前者(心跳阈值)的时候,触发保护机制,会出现红色的警告:
EMERGENCY!EUREKA MAY BE INCORRECTLY CLAIMING INSTANCES ARE UP WHEN THEY'RE NOT.RENEWALS ARE LESSER THAN THRESHOLD AND HENCE THE INSTANCES ARE NOT BEGING EXPIRED JUST TO BE SAFE.从警告中可以看到,eureka认为虽然收不到实例的心跳,但它认为实例还是健康的,eureka会保护这些实例,不会把它们从注册表中删掉。 - 该保护机制的目的是避免网络连接故障,在发生网络故障时,微服务和注册中心之间无法正常通信,但服务本身是健康的,不应该注销该服务,如果eureka因网络故障而把微服务误删了,那即使网络恢复了,该微服务也不会重新注册到eureka server了。
- 因为只有在微服务启动的时候才会发起注册请求,后面只会发送心跳和服务列表请求,这样的话,该实例虽然是运行着,但永远不会被其它服务所感知。
- 所以,eureka server在短时间内丢失过多的客户端心跳时,会进入自我保护模式,该模式下,eureka会保护注册表中的信息,不在注销任何微服务,当网络故障恢复后,eureka会自动退出保护模式。自我保护模式可以让集群更加健壮。
- 但是我们在开发测试阶段,需要频繁地重启发布,如果触发了保护机制,则旧的服务实例没有被删除,这时请求有可能跑到旧的实例中,而该实例已经关闭了,这就导致请求错误,影响开发测试。所以,在开发测试阶段,我们可以把自我保护模式关闭,只需在eureka server配置文件中加上如下配置即可:
eureka.server.enable-self-preservation=false【不推荐关闭自我保护机制】
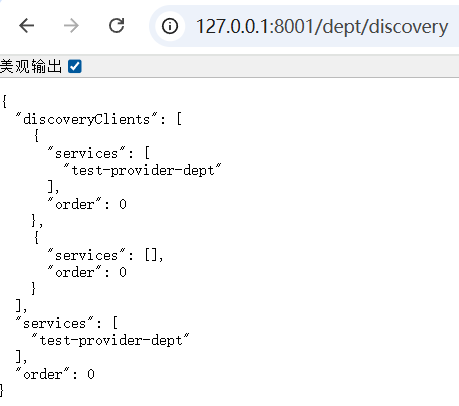
注册进来的微服务,获取一些消息
(团队开发会用到)
DeptController
java
import org.springframework.cloud.client.discovery.DiscoveryClient;
/**
 * DiscoveryClient 可以用来获取一些配置的信息,得到具体的微服务!
 */
@Autowired
private DiscoveryClient client;

/**
 * 获取一些注册进来的微服务的信息~,
 *
 * @return
 */
@GetMapping("/dept/discovery")
public Object discovery() {

    // 获取微服务列表的清单
    List<String> services = client.getServices();
    System.out.println("discovery=>services:" + services);
    // 得到一个具体的微服务信息,通过具体的微服务id,applicaioinName;
    List<ServiceInstance> instances = client.getInstances("SPRINGCLOUD-PROVIDER-DEPT");
    for (ServiceInstance instance : instances) {

        System.out.println(
                instance.getHost() + "\t" + // 主机名称
                        instance.getPort() + "\t" + // 端口号
                        instance.getUri() + "\t" + // uri
                        instance.getServiceId() // 服务id
        );
    }
    return this.client;
}
主启动类中加入@EnableDiscoveryClient 注解
java
import org.springframework.boot.SpringApplication;
import org.springframework.boot.autoconfigure.SpringBootApplication;
import org.springframework.cloud.client.discovery.EnableDiscoveryClient;
import org.springframework.cloud.netflix.eureka.EnableEurekaClient;

@EnableEurekaClient
@EnableDiscoveryClient
@SpringBootApplication
public class DeptProvider {
    public static void main(String[] args) {
        SpringApplication.run(DeptProvider.class,args);
    }
}
结果如图:
四、Eureka:集群环境配置
创建Eureka集群环境:创建springcloud-eureka-7002、springcloud-eureka-7003 模块
1.为pom.xml添加依赖 (与springcloud-eureka-7001相同)
xml
<!--导包~-->
<dependencies>
    <!-- https://mvnrepository.com/artifact/org.springframework.cloud/spring-cloud-starter-eureka-server -->
    <!--导入Eureka Server依赖-->
    <dependency>
        <groupId>org.springframework.cloud</groupId>
        <artifactId>spring-cloud-starter-eureka-server</artifactId>
        <version>1.4.6.RELEASE</version>
    </dependency>
    <!--热部署工具-->
    <dependency>
        <groupId>org.springframework.boot</groupId>
        <artifactId>spring-boot-devtools</artifactId>
    </dependency>
</dependencies>
2.application.yml配置(与springcloud-eureka-7001相同)
yml
server:
  port: 7002
# Eureka配置
eureka:
  instance:
    # Eureka服务端的实例名字
    hostname: 127.0.0.1
  client:
    # 表示是否向 Eureka 注册中心注册自己(这个模块本身是服务器,所以不需要)
    register-with-eureka: false
    # fetch-registry如果为false,则表示自己为注册中心,客户端的化为 ture
    fetch-registry: false
    # Eureka监控页面~
    service-url:
      defaultZone: http://${eureka.instance.hostname}:${server.port}/eureka/
3.主启动类(与springcloud-eureka-7001相同)
java
import org.springframework.boot.SpringApplication;
import org.springframework.boot.autoconfigure.SpringBootApplication;
import org.springframework.cloud.netflix.eureka.server.EnableEurekaServer;

@SpringBootApplication
@EnableEurekaServer
public class EurekaServer {
    public static void main(String[] args) {
        SpringApplication.run(EurekaServer.class,args);
    }
}
启动搭建的eureka7002、7003并进行访问
4.配置hosts(可以跳过)
在 C:\Windows\System32\drivers\etc\hosts 中设置配置
127.0.0.1 eureka7001.com
127.0.0.1 eureka7002.com
127.0.0.1 eureka7003.com
不配置则在以下配置文件中配置eureka.instance.hostname: 127.0.0.1
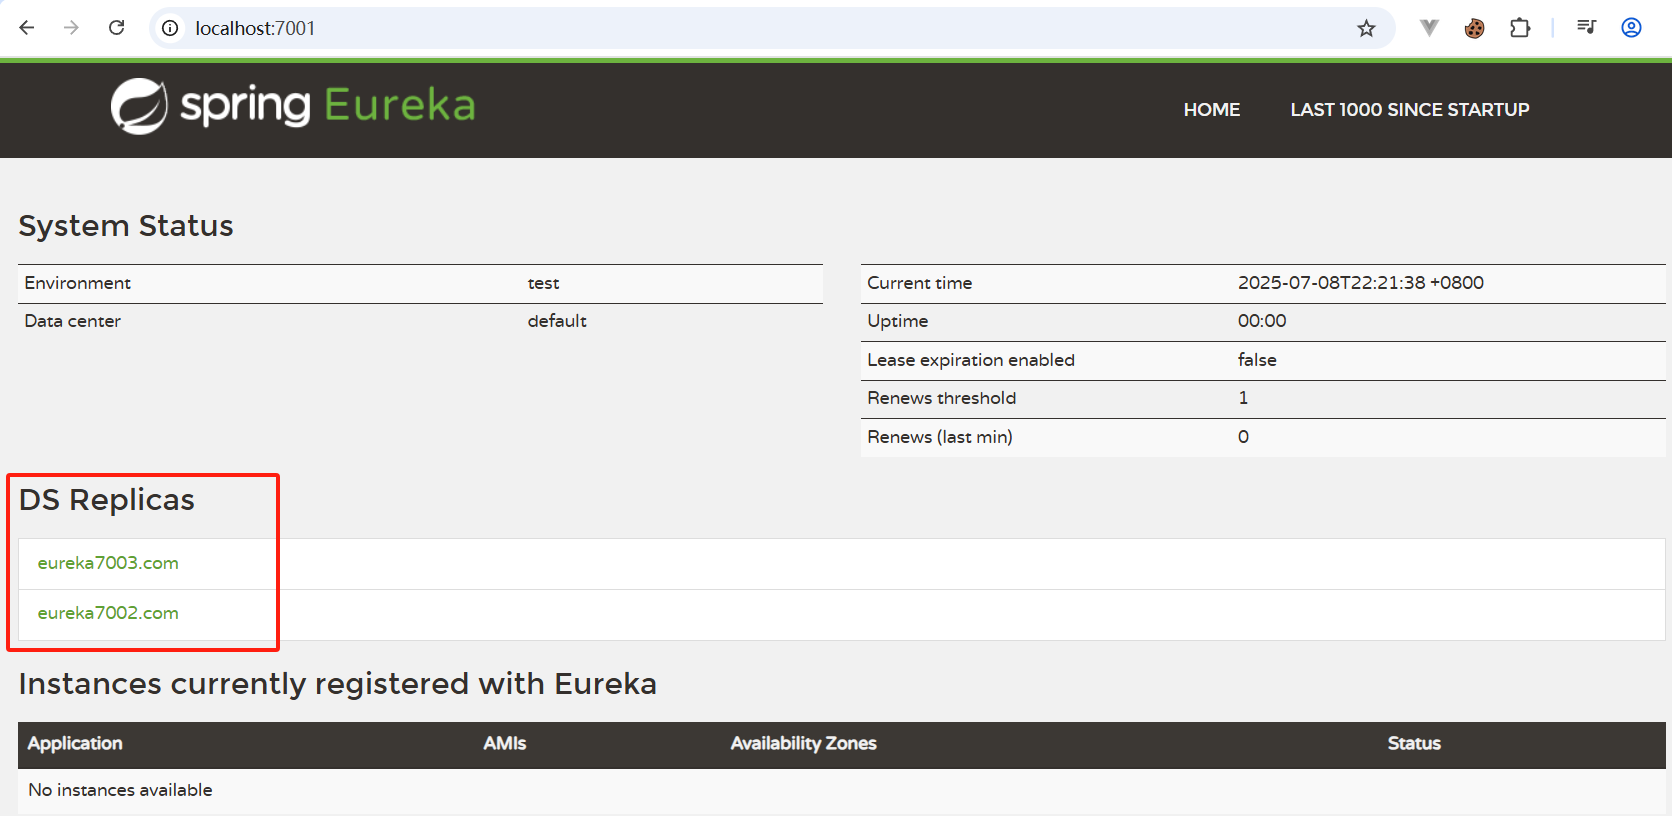
5.eureka配置集群信息
7001端口服务
yml
server:
  port: 7001
# Eureka配置
eureka:
  instance:
    # Eureka服务端的实例名字
#    hostname: 127.0.0.1
    # 在 C:\Windows\System32\drivers\etc\hosts 中设置配置
    hostname: eureka7001.com
  client:
    # 表示是否向 Eureka 注册中心注册自己(这个模块本身是服务器,所以不需要)
    register-with-eureka: false
    # fetch-registry如果为false,则表示自己为注册中心,客户端的化为 ture
    fetch-registry: false
    # Eureka监控页面~
    service-url:
      # 单机
#      defaultZone: http://${eureka.instance.hostname}:${server.port}/eureka/
#       集群
      defaultZone: http://eureka7002.com:7002/eureka/,http://eureka7003.com:7003/eureka/
7002端口服务
yml
server:
  port: 7002
# Eureka配置
eureka:
  instance:
    # Eureka服务端的实例名字
    #    hostname: 127.0.0.1
    # 在在 C:\Windows\System32\drivers\etc\hosts 中设置配置
    hostname: eureka7002.com
  client:
    # 表示是否向 Eureka 注册中心注册自己(这个模块本身是服务器,所以不需要)
    register-with-eureka: false
    # fetch-registry如果为false,则表示自己为注册中心,客户端的化为 ture
    fetch-registry: false
    # Eureka监控页面~
    service-url:
      # 单机
      #      defaultZone: http://${eureka.instance.hostname}:${server.port}/eureka/
      #       集群
      defaultZone: http://eureka7001.com:7001/eureka/,http://eureka7003.com:7003/eureka/
7003端口服务
yml
server:
  port: 7003
# Eureka配置
eureka:
  instance:
    # Eureka服务端的实例名字
    #    hostname: 127.0.0.1
    # 在在 C:\Windows\System32\drivers\etc\hosts 中设置配置
    hostname: eureka7003.com
  client:
    # 表示是否向 Eureka 注册中心注册自己(这个模块本身是服务器,所以不需要)
    register-with-eureka: false
    # fetch-registry如果为false,则表示自己为注册中心,客户端的化为 ture
    fetch-registry: false
    # Eureka监控页面~
    service-url:
      # 单机
      #      defaultZone: http://${eureka.instance.hostname}:${server.port}/eureka/
      #       集群
      defaultZone: http://eureka7001.com:7001/eureka/,http://eureka7002.com:7002/eureka/
启动eureka集群
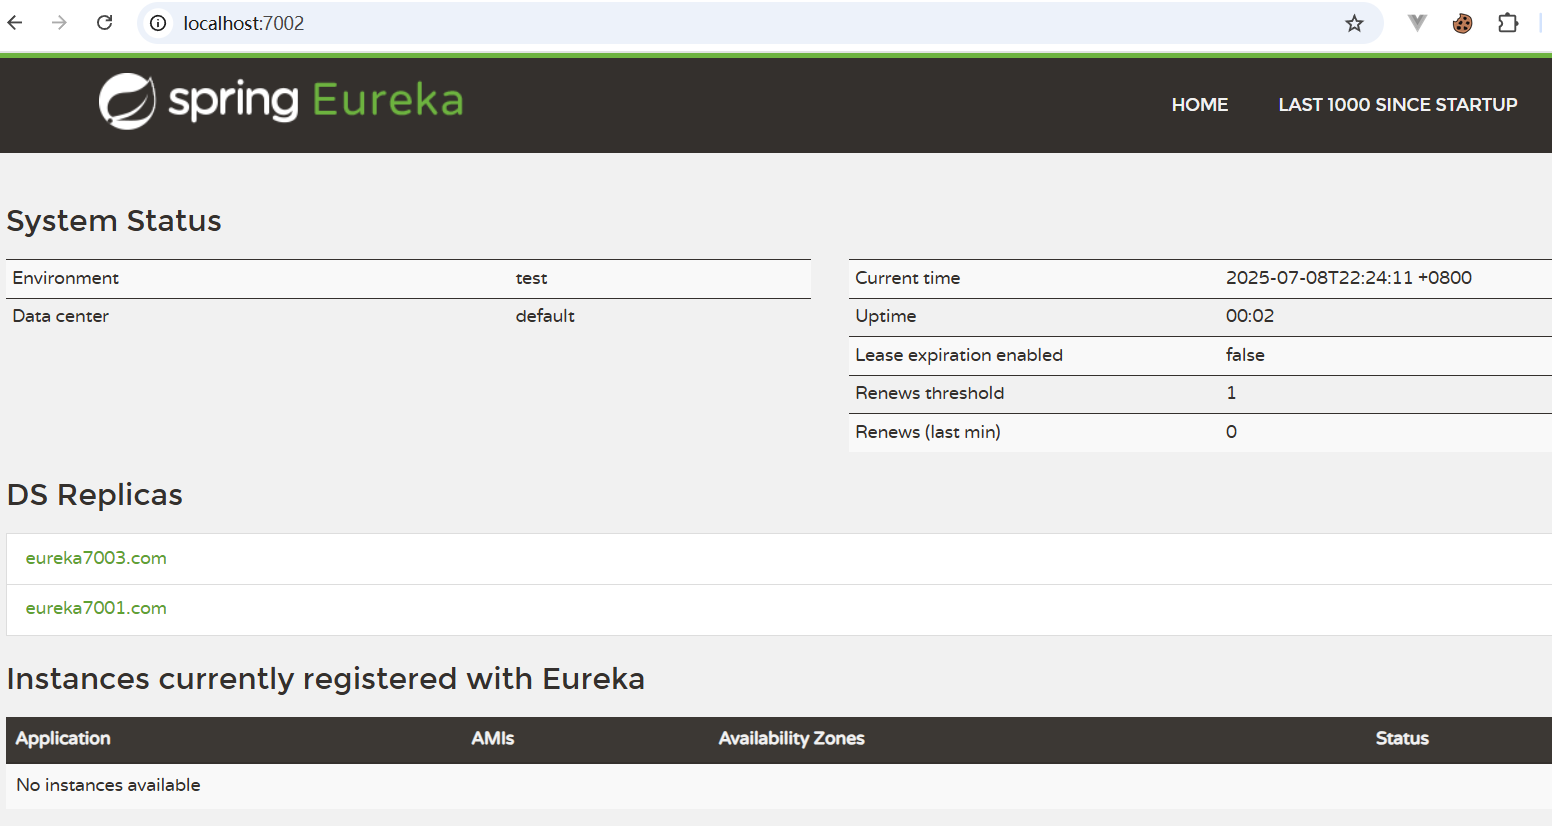
6.生产者配置
修改eureka.client.service-url.defaultZone
yml
server:
  port: 8001
  servlet:
    context-path: /
spring:
  application:
    name: test-provider-dept
  datasource:
    type: com.alibaba.druid.pool.DruidDataSource
    url: jdbc:mysql://localhost:3306/test?useUnicode=true&characterEncoding=utf-8
    username: root
    password: 123456
    driver-class-name: org.gjt.mm.mysql.Driver

mybatis:
  type-aliases-package: com.qf.pojo
  config-location: classpath:mybatis-config.xml
  mapper-locations: classpath:mapper/*.xml

# Eureka配置:配置服务注册中心地址
eureka:
  client:
    service-url:
#      defaultZone: http://localhost:7001/eureka/
      defaultZone: http://eureka7001.com:7001/eureka/,http://eureka7002.com:7002/eureka/,http://eureka7003.com:7003/eureka/
  instance:
    instance-id: qf-provider-dept-8001 #修改Eureka上的默认描述信息

# info配置 actuator完善监控信息
info:
  # 项目的名称
  app.name: qf-springcloud
  # 公司的名称
  app.desc: 部门生产者
  order.index: 1
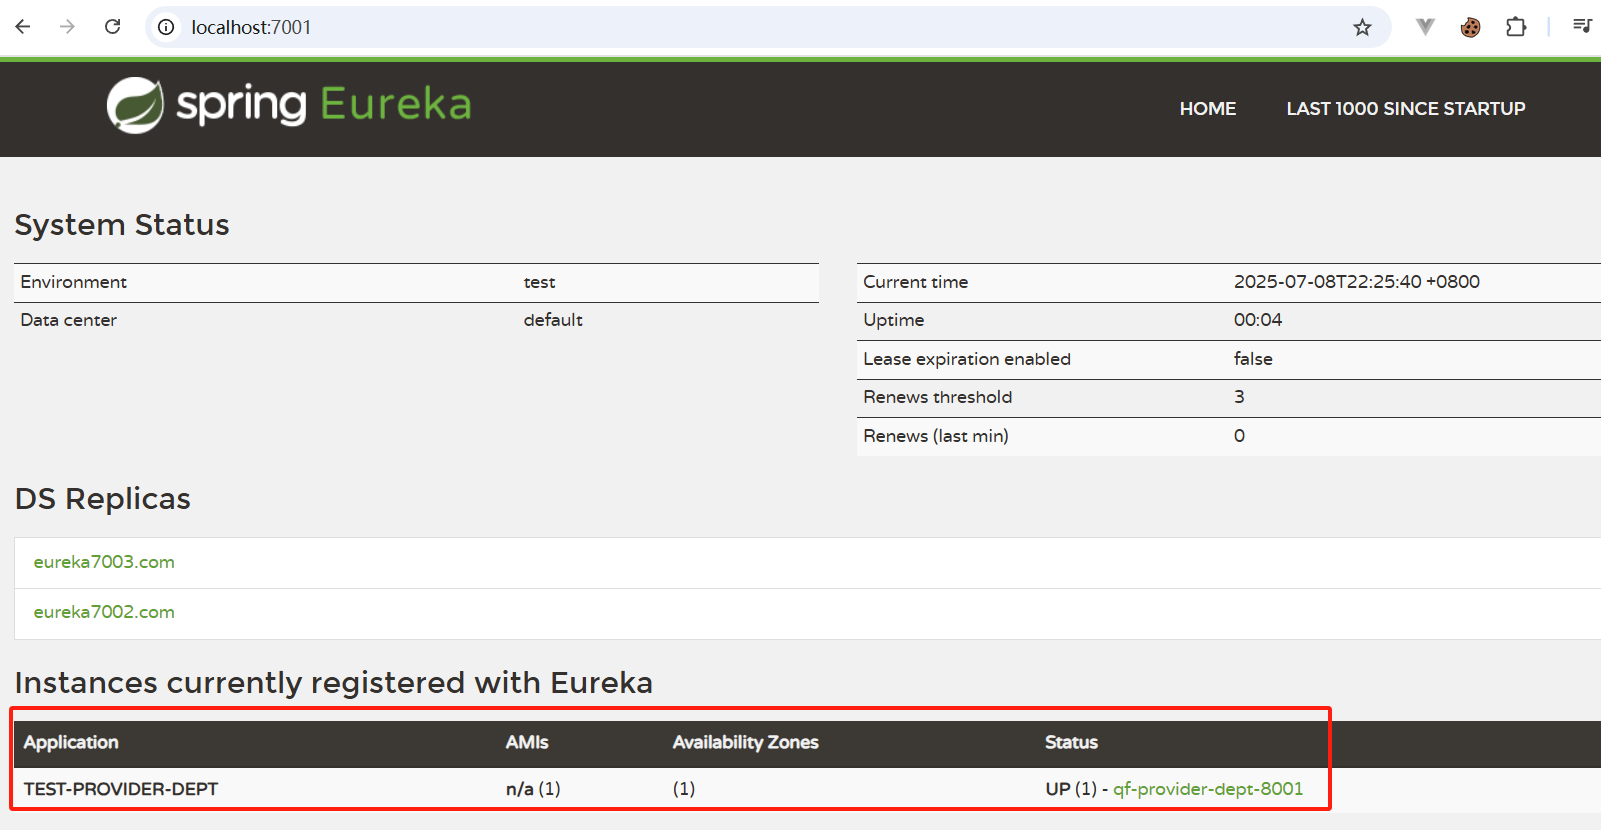
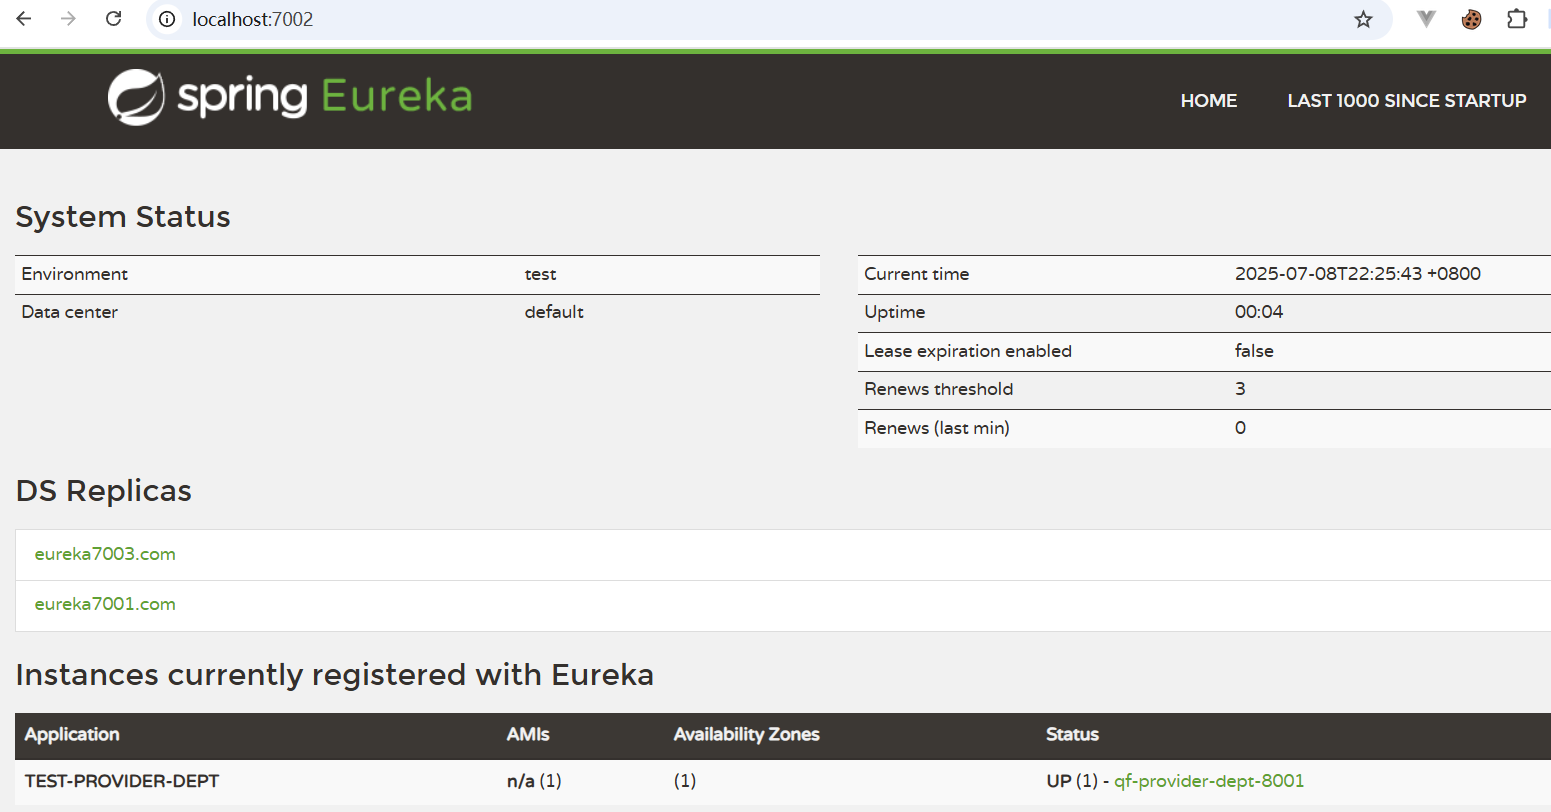
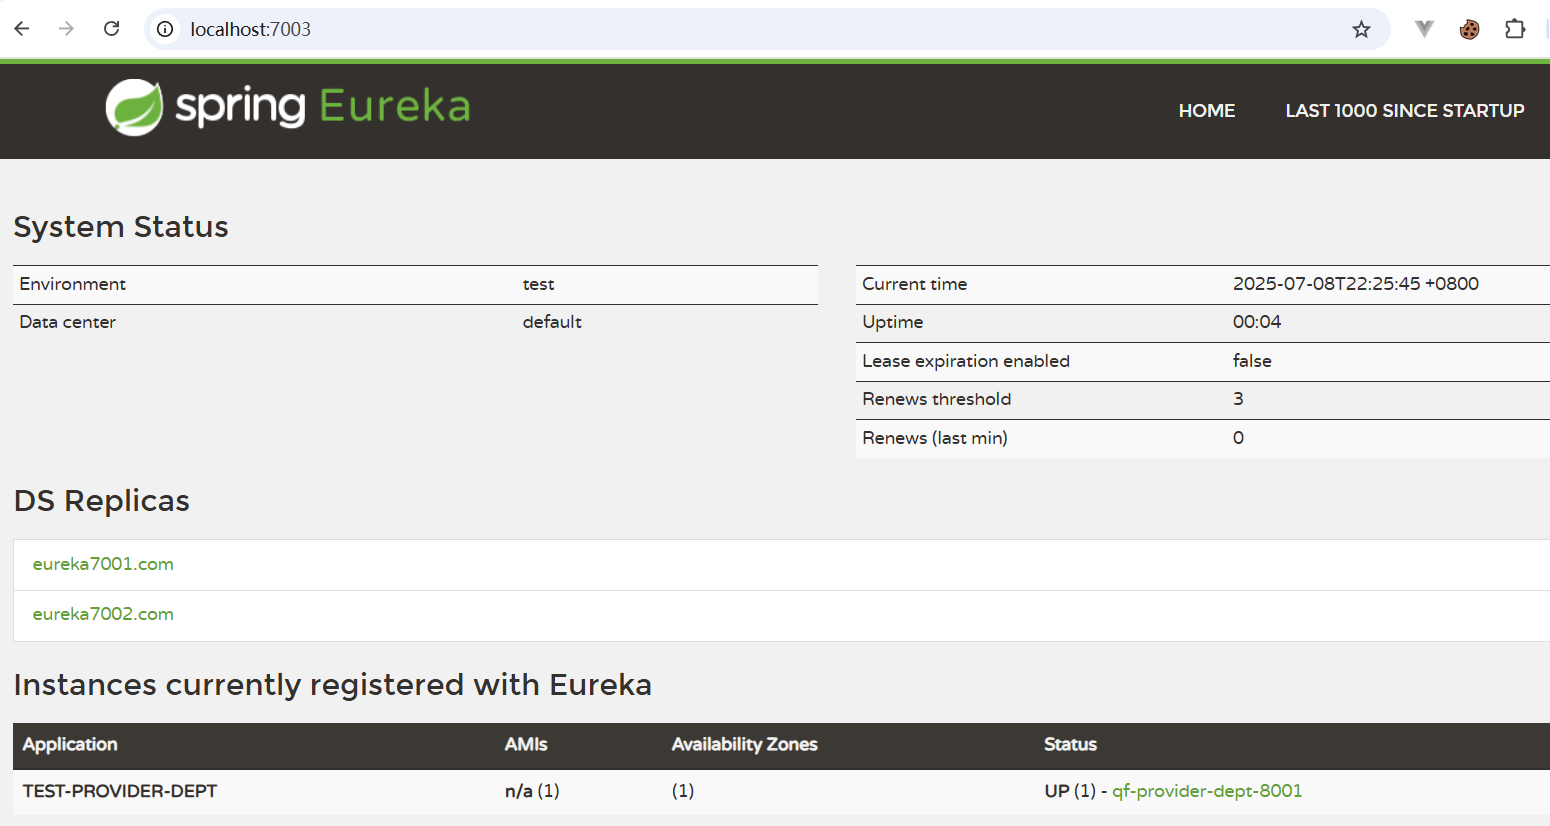
启动项目
7001
7002
7003
五、对比和Zookeeper区别
1. 回顾CAP原则
RDBMS (MySQL\Oracle\sqlServer) => ACID
NoSQL (Redis\MongoDB) => CAP
2. ACID是什么?
- A (Atomicity) 原子性
- C (Consistency) 一致性
- I (Isolation) 隔离性
- D (Durability) 持久性
3. CAP是什么?
- C (Consistency) 强一致性
- A (Availability) 可用性
- P (Partition tolerance) 分区容错性
CAP的三进二:CA、AP、CP
4. CAP理论的核心
- 一个分布式系统不可能同时很好的满足一致性,可用性和分区容错性这三个需求
- 根据CAP原理,将NoSQL数据库分成了满足CA原则,满足CP原则和满足AP原则三大类
- CA:单点集群,满足一致性,可用性的系统,通常可扩展性较差
- CP:满足一致性,分区容错的系统,通常性能不是特别高
- AP:满足可用性,分区容错的系统,通常可能对一致性要求低一些
5. 作为分布式服务注册中心,Eureka比Zookeeper好在哪里?
著名的CAP理论指出,一个分布式系统不可能同时满足C (一致性) 、A (可用性) 、P (容错性),由于分区容错性P再分布式系统中是必须要保证的,因此我们只能再A和C之间进行权衡。
- Zookeeper 保证的是 CP ---> 满足一致性,分区容错的系统,通常性能不是特别高
- Eureka 保证的是 AP ---> 满足可用性,分区容错的系统,通常可能对一致性要求低一些
Zookeeper保证的是CP
当向注册中心查询服务列表时,我们可以容忍注册中心返回的是几分钟以前的注册信息,但不能接收服务直接down掉不可用。也就是说,服务注册功能对可用性的要求要高于一致性。
但zookeeper会出现这样一种情况,当master节点因为网络故障与其他节点失去联系时,剩余节点会重新进行leader选举。问题在于,选举leader的时间太长,30-120s,且选举期间整个zookeeper集群是不可用的,这就导致在选举期间注册服务瘫痪。
在云部署的环境下,因为网络问题使得zookeeper集群失去master节点是较大概率发生的事件,虽然服务最终能够恢复,但是,漫长的选举时间导致注册长期不可用,是不可容忍的。
Eureka保证的是AP
Eureka看明白了这一点,因此在设计时就优先保证可用性。Eureka各个节点都是平等的,几个节点挂掉不会影响正常节点的工作,剩余的节点依然可以提供注册和查询服务。
而Eureka的客户端在向某个Eureka注册时,如果发现连接失败,则会自动切换至其他节点,只要有一台Eureka还在,就能保住注册服务的可用性,只不过查到的信息可能不是最新的。
除此之外,Eureka还有之中自我保护机制,如果在15分钟内超过85%的节点都没有正常的心跳,那么Eureka就认为客户端与注册中心出现了网络故障,此时会出现以下几种情况:
- Eureka不在从注册列表中移除因为长时间没收到心跳而应该过期的服务
- Eureka仍然能够接受新服务的注册和查询请求,但是不会被同步到其他节点上 (即保证当前节点依然可用)
- 当网络稳定时,当前实例新的注册信息会被同步到其他节点中
因此,Eureka可以很好的应对因网络故障导致部分节点失去联系的情况,而不会像zookeeper那样使整个注册服务瘫痪
Spring Cloud Netflix学习笔记01
Spring Cloud Netflix学习笔记02-Eureka
Spring Cloud Netflix学习笔记03-Ribbon
Spring Cloud Netflix学习笔记04-Feign