1. 前言
为什么要自己实现 ESLint?
在现代前端开发中,ESLint 已经成为不可或缺的代码质量保障工具。但是,作为开发者,我们是否真正理解它的工作原理?通过从零实现一个 Mini-ESLint,我们可以:
- 深入理解 AST(抽象语法树):掌握代码是如何被解析和分析的
- 学习编译原理实践:将理论知识转化为实际的工程能力
- 掌握工具链开发:了解如何构建开发者工具
- 提升代码分析能力:为后续开发更复杂的代码工具打基础
核心技术栈
| 技术组件 | 选择方案 | 选择理由 |
|---|---|---|
| 解析器 | Espree | ESLint 官方解析器,ESTree 标准兼容 |
| 开发语言 | TypeScript | 类型安全,开发体验好 |
| 构建工具 | esbuild | 构建速度快,配置简单 |
| 测试框架 | Vitest | 现代化,与 Vite 生态兼容 |
| CLI 框架 | Commander.js | 功能完善,社区成熟 |
2. 整体架构设计与实现
2.1 整体架构设计
2.1.1 基础类设计
我们可以把代码分析,找出问题的过程中设计的变量和方法,都封装在一个名为 Linter 的类中。可以把它理解成代码分析流程的抽象,它是 mini-eslint 的核心,通过 new 生成分析实例后,我们可以通过分析实例来驱动整个分析流程。 下面是 Linter 基础类的代码框架简化版演示:
typescript
/**
 * Linter 基础类
 * 这是 mini-eslint 的核心类,封装了代码分析流程的抽象
 * 设计理念:
 * - 单一职责:专注于代码分析流程编排
 * - 异步优先:支持大规模文件并行处理
 * - 可扩展性:插件化规则系统
 */
export class Linter {
  /** 文件模式列表,支持 glob 语法 */
  private filePatterns: string[];

  /** 加载的规则实例列表 */
  private rules: Rule[];

  /** 收集的错误信息 */
  private errors: LintError[];

  /** 合并后的配置对象 */
  private config: any;

  /** 异步分析完成标志 */
  private analysisComplete: Promise<void>;

  /**
   * 构造函数 - 初始化分析实例
   * @param options 配置选项
   */
  constructor(options: { files: string[]; configFile?: string }) {
    // 1. 存储文件模式
    this.filePatterns = options.files;
    this.errors = [];

    // 2. 配置系统初始化
    this.config = this.loadConfig(options.configFile);

    // 3. 规则系统激活
    this.initRules();

    // 4. 启动异步分析流程
    this.analysisComplete = this.startAnalysis();
  }

  /**
   * 配置加载与合并
   * 支持 JSON 和 JS 格式的配置文件
   */
  private loadConfig(configFile?: string): any {
    // 配置文件加载逻辑
    // 支持用户配置覆盖默认配置
    return {}; // 简化实现
  }

  /**
   * 规则系统初始化
   * 根据配置加载和过滤规则
   */
  private initRules(): void {
    // 规则加载和实例化逻辑
    this.rules = [];
  }

  /**
   * 启动分析流程
   * 文件扫描 → 解析 → 规则应用
   */
  private async startAnalysis(): Promise<void> {
    // 1. 文件发现与扫描
    const files = await this.scanFiles();

    // 2. 并行文件解析
    await this.parseFiles(files);
  }

  /**
   * 文件扫描系统
   * 将 glob 模式转换为具体文件列表
   */
  private async scanFiles(): Promise<string[]> {
    // glob 模式匹配逻辑
    // 去重和过滤处理
    return [];
  }

  /**
   * 并行文件解析
   * 同时处理多个文件以提升性能
   */
  private async parseFiles(files: string[]): Promise<void> {
    // Promise.all 并行处理
    await Promise.all(files.map((file) => this.parseFile(file)));
  }

  /**
   * 单文件解析核心流程
   * 源代码 → AST → 规则应用
   */
  private async parseFile(filePath: string): Promise<void> {
    try {
      // 1. 读取源代码
      const sourceCode = this.readSourceCode(filePath);

      // 2. 生成 AST
      const ast = this.parseToAST(sourceCode, filePath);

      // 3. 应用规则分析
      await this.analyzeAST(ast, filePath, sourceCode);
    } catch (error) {
      // 错误处理和报告
      this.handleParseError(error, filePath);
    }
  }

  /**
   * 源代码读取
   */
  private readSourceCode(filePath: string): string {
    // 文件读取逻辑
    return "";
  }

  /**
   * AST 解析
   * 使用 Espree 解析器生成抽象语法树
   */
  private parseToAST(sourceCode: string, filePath: string): any {
    // Espree 解析配置
    // 支持 JSX、TypeScript 等
    return {};
  }

  /**
   * AST 分析与规则应用
   * 遍历 AST 节点,触发规则检查
   */
  private async analyzeAST(
    ast: any,
    filePath: string,
    sourceCode: string
  ): Promise<void> {
    // 遍历所有激活的规则
    for (const rule of this.rules) {
      // 创建规则上下文
      const context = this.createRuleContext(rule, filePath);

      // 创建规则监听器
      const listener = rule.create(context);

      // 遍历 AST 应用规则
      this.traverseAST(ast, listener);
    }
  }

  /**
   * 创建规则上下文
   * 为规则提供报告错误的能力
   */
  private createRuleContext(rule: any, filePath: string): any {
    return {
      report: (data: any) => {
        // 收集错误信息
        this.errors.push({
          ...data,
          filePath,
          ruleId: rule.meta.name,
        });
      },
      options: this.getRuleOptions(rule),
      getSourceCode: () => this.getSourceCode(filePath),
    };
  }

  /**
   * AST 遍历
   * 深度优先遍历,触发节点事件
   */
  private traverseAST(ast: any, listener: any): void {
    // 深度优先遍历逻辑
    // 触发节点进入和退出事件
  }

  /**
   * 获取规则配置选项
   */
  private getRuleOptions(rule: any): any[] {
    // 解析规则配置选项
    return [];
  }

  /**
   * 错误处理
   */
  private handleParseError(error: any, filePath: string): void {
    // 分类处理语法错误和解析错误
    console.error(`解析文件 ${filePath} 时出错:`, error);
  }

  /**
   * 获取源代码
   */
  private getSourceCode(filePath: string): string {
    // 返回指定文件的源代码
    return "";
  }

  /**
   * 获取分析结果
   * 等待所有异步分析完成后返回错误列表
   */
  public async getErrors(): Promise<LintError[]> {
    // 等待分析完成
    await this.analysisComplete;
    return this.errors;
  }

  /**
   * 获取分析统计信息
   */
  public getStats(): AnalysisStats {
    return {
      filesProcessed: this.filePatterns.length,
      errorsFound: this.errors.length,
      rulesApplied: this.rules.length,
    };
  }
}
基础类中包括输入的文件模式列表、规则列表、错误信息列表、配置、分析完成的 Promise、配置文件加载方法、规则初始化方法、文件扫描和解析方法、批量文件解析方法、单个文件解析方法、抽象语法树分析方法、规则选项获取方法、错误信息获取方法。这些在后续我们都会具体介绍实现。
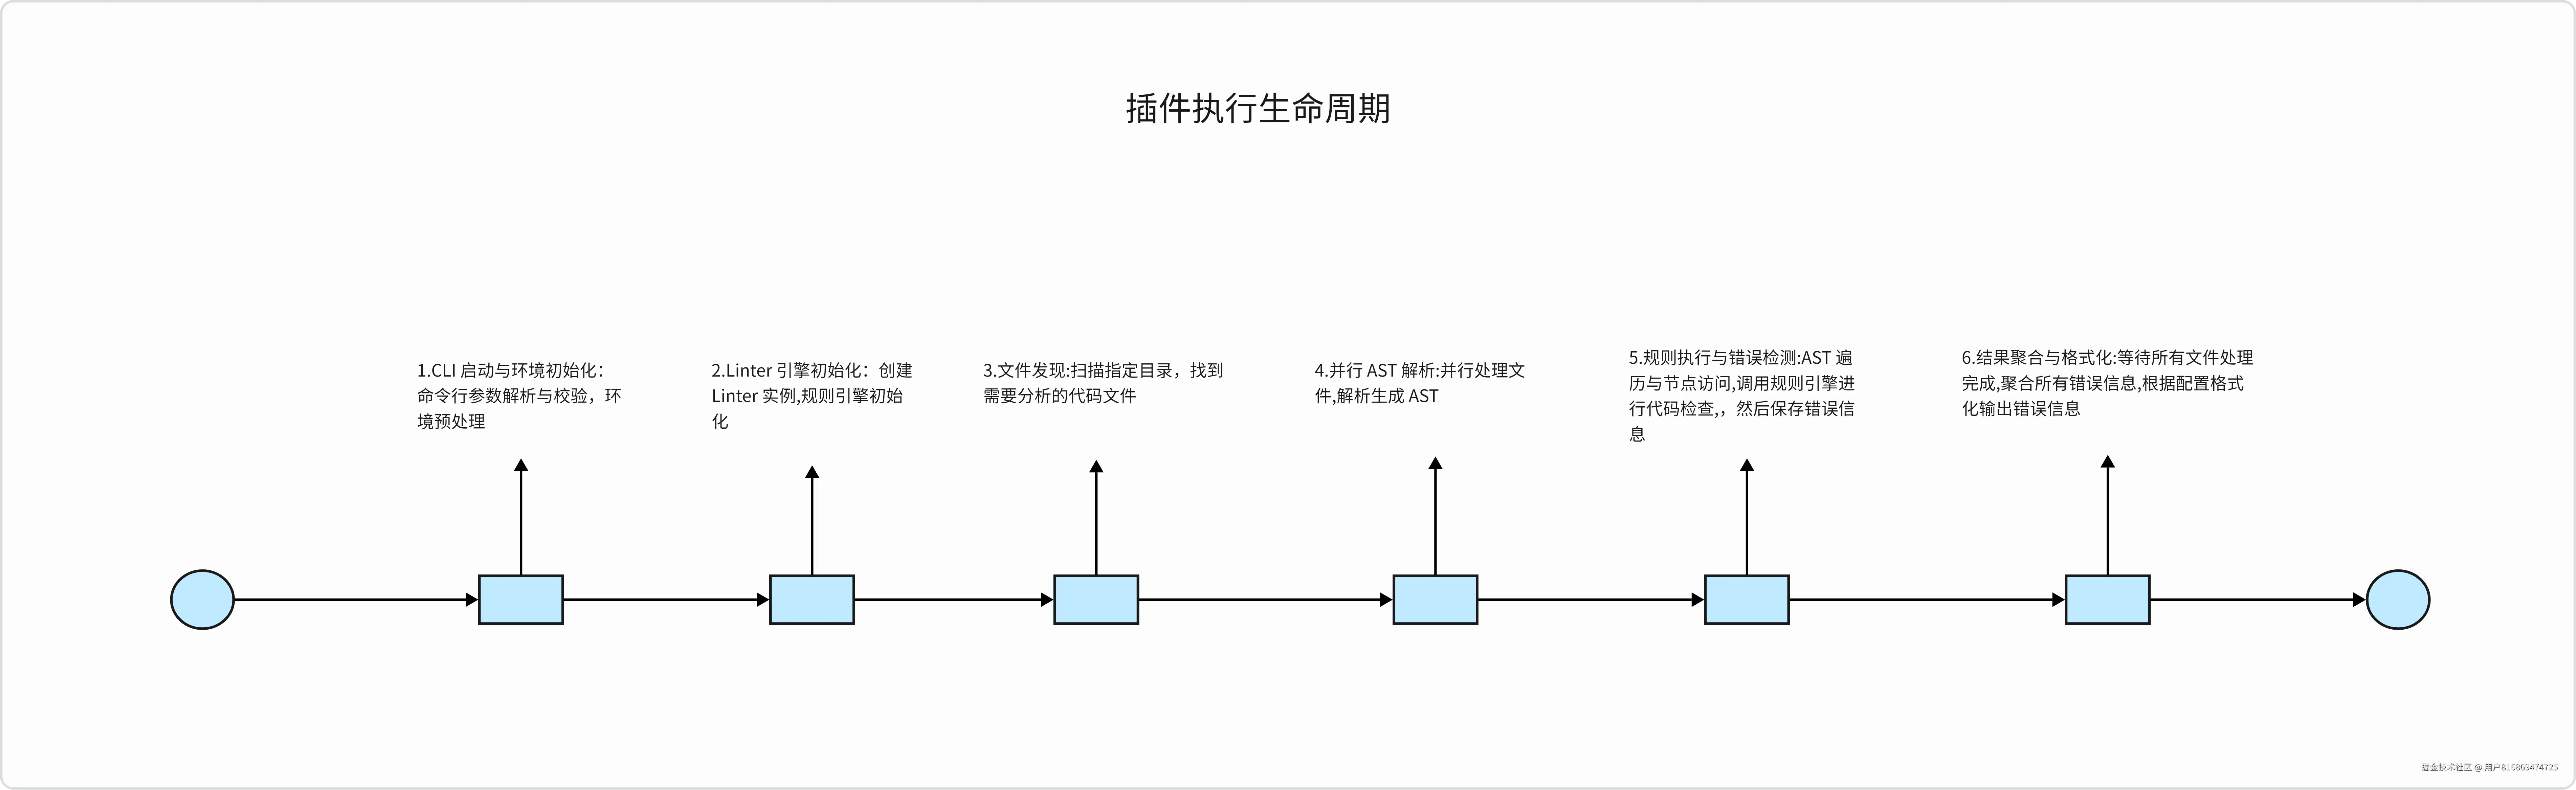
2.1.2 执行生命周期
我们根据 mini-eslint 入口函数 cli 的详细调用链路,将工具的执行时序梳理后,可以得到 mini-eslint 的执行生命周期:
2.1.3 模块架构图
仅仅靠一个 Linter 基础类是无法完成依赖调用分析整个流程的,它是分析工具的核心,但不是全部,我们还需要其它模块来辅助它完成分析任务,代码分析工具的架构设计如下图:
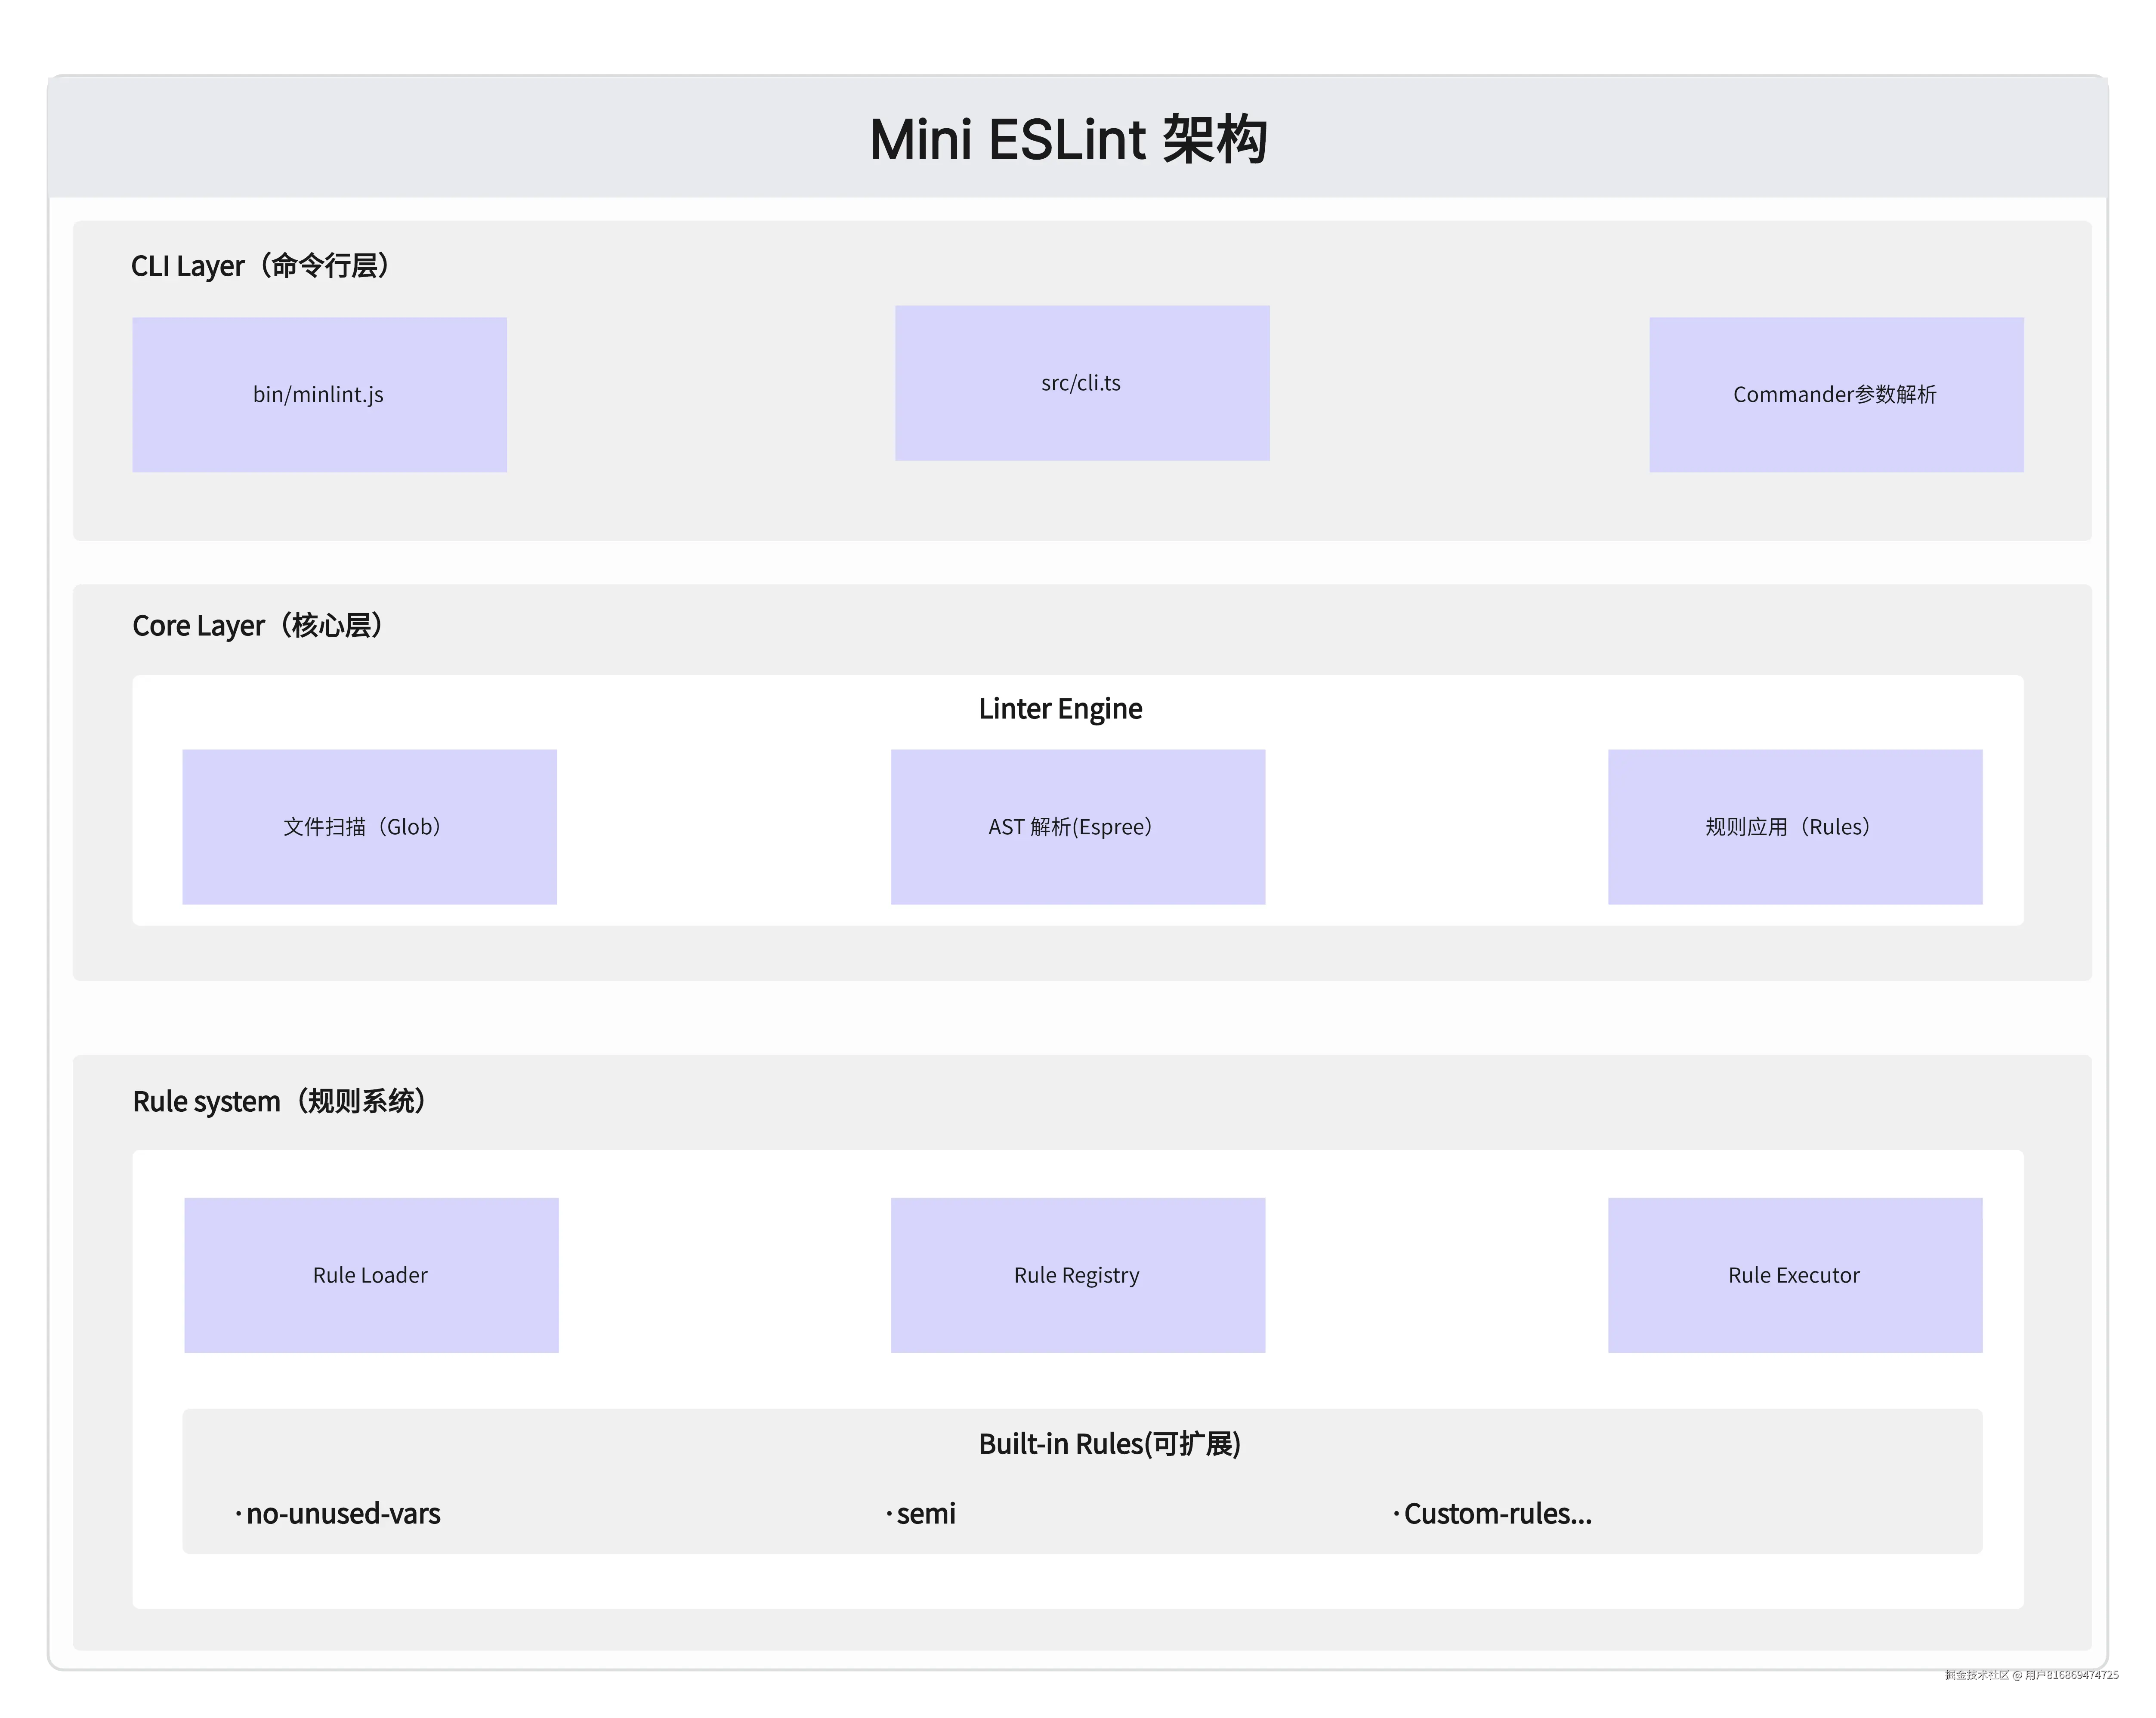
模块间通信原则:
- 核心层向上提供稳定 API
- 规则层通过插件机制扩展
- 命令行层负责用户交互
可以对照完整代码来理解 mini-eslint 的代码组织模式。
2.3 具体实现
2.3.1 AST 处理与工具
AST 解析与处理详解
什么是 AST(抽象语法树)?
抽象语法树(Abstract Syntax Tree,简称 AST)是源代码语法结构的树形抽象表示。它将代码的语法结构以层次化的节点形式组织,每个节点代表源代码中的一个语法构造。
为什么需要 AST?
在代码静态分析中,AST 具有以下重要作用:
- 结构化表示:将线性的源代码转换为结构化的树形数据
- 语法无关性:抽象掉具体的语法细节,专注于语义结构
- 便于分析:通过遍历树节点可以系统地分析代码模式
- 位置信息:保留代码在源文件中的精确位置,便于错误定位
AST 节点类型详解
让我们通过具体示例了解常见的 AST 节点类型:
1. 字面量(Literal)节点
javascript
// 各种字面量及其对应的 AST 节点类型
let name = "xl"; // 'xl' → StringLiteral(字符串字面量)
let age = 20; // 20 → NumericLiteral(数字字面量)
2. 标识符(Identifier)节点
javascript
// 标识符:变量名、函数名、属性名等
import { glob } from "glob"; // glob → Identifier
let name = "xl"; // name → Identifier
3. 语句(Statement)节点
javascript
// 语句:代码执行的基本单位
return userData; // ReturnStatement(返回语句)
if (condition) {
  doSomething();
} // IfStatement(条件语句)
4. 声明(Declaration)节点
javascript
// 声明:特殊的语句类型,用于声明变量、函数、类等
let name = "xl"; // VariableDeclaration(变量声明)
let age = 20; // VariableDeclaration(变量声明)
import fs from "fs"; // ImportDeclaration(导入声明)
5. 导入导出节点
javascript
// 默认导入
import React from "react"; // ImportDeclaration + ImportDefaultSpecifier

// 命名导入
import { useState, useEffect } from "react"; // ImportDeclaration + ImportSpecifier

// 命名空间导入
import * as fs from "fs"; // ImportDeclaration + ImportNamespaceSpecifier

// 混合导入
import React, { Component } from "react"; // ImportDeclaration + 多种 Specifier

// 默认导出
export default function App() {} // ExportDefaultDeclaration

// 命名导出
export const config = {}; // ExportNamedDeclaration

// 重新导出
export { Button } from "./components"; // ExportNamedDeclaration + ExportSpecifier
AST 可视化工具
为了更好地理解 AST 结构,推荐使用以下工具:
-
- 在线 AST 可视化工具
- 支持多种编程语言和解析器
- 实时显示代码对应的 AST 结构
- 可以切换不同的 parser(如 espree、babel 等)
-
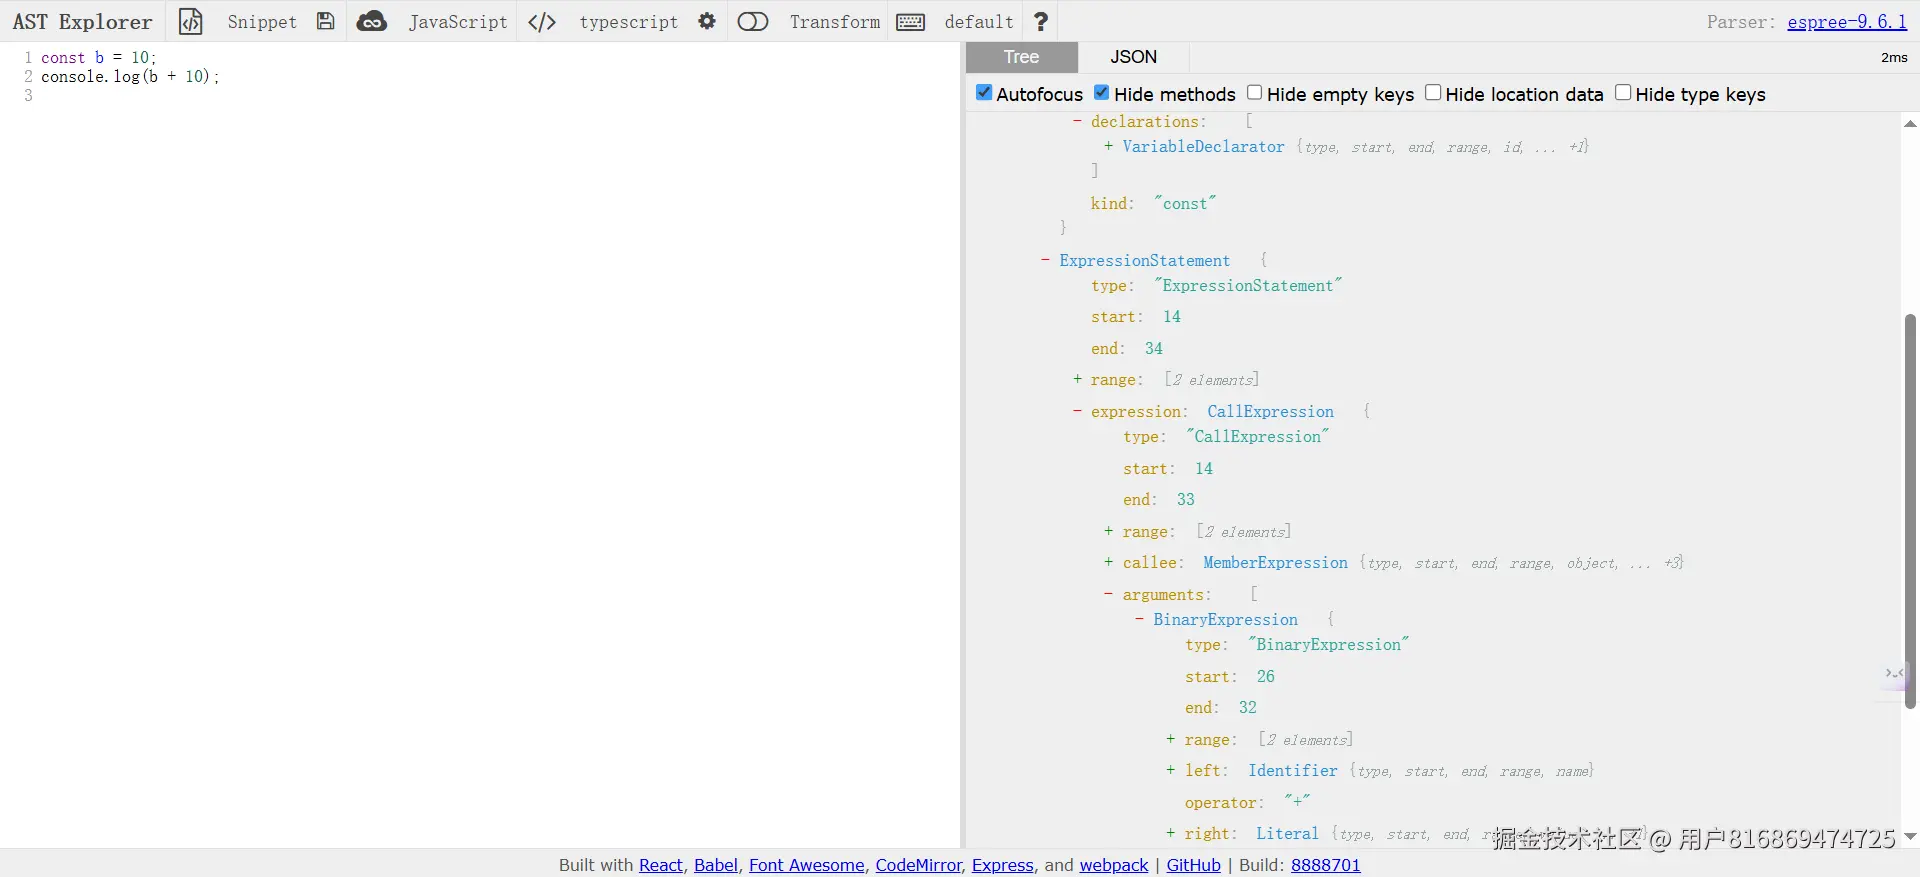
使用示例
javascript// 在 AST Explorer 中输入这段代码 const message = "Hello World"; console.log(message); // 可以看到对应的 AST 结构: // Program // └── VariableDeclaration // └── VariableDeclarator // ├── Identifier (message) // └── Literal ("Hello World") // └── ExpressionStatement // └── CallExpression // ├── MemberExpression // │ ├── Identifier (console) // │ └── Identifier (log) // └── Identifier (message)
在 Mini ESLint 中的 AST 应用
在我们的 Mini ESLint 实现中,AST 的处理流程如下:
- 解析阶段:使用 Espree 将源代码解析为 AST
- 遍历阶段:深度优先遍历所有节点
- 规则应用:每个规则监听特定类型的节点事件
- 错误收集:规则在检测到问题时报告错误信息
2.3.2 CLI 启动与环境初始化
CLI 模式概述
CLI 模式即命令行模式,可以配合 npm script 来驱动,入口为可执行脚本。命令行模式在分析前会对命令行参数以及配置文件参数进行校验,对分析环境进行预处理。
项目入口与构建流程
1. 可执行文件入口
项目通过 package.json 中的 bin 字段定义了可执行命令(指定可执行文件的路径):
json
{
  "bin": {
    "minlint": "bin/minlint.js"
  }
}
bin/minlint.js 作为可执行脚本的入口,第一行的 #!/usr/bin/env node 表示该文件是一个可执行脚本:
js
#!/usr/bin/env node

require("../dist/cli.js");
CLI 核心实现
依赖导入与程序初始化
js
import { Command } from "commander";
import chalk from "chalk";
import fs from "fs";
import path from "path";

import { version } from "../package.json";
import { Linter } from "./linter";
import { stylish } from "./formatter/stylish";

const program = new Command();

// 程序标题
console.log(chalk.bold.cyan("\n=== MiniESLint ===") + " 轻量级代码检查工具\n");

program
  .name("mini-eslint")
  .description("一个轻量级代码检查工具")
  .version(version, "-v, --version", "显示版本号")
  .argument(
    "[files...]",
    '要检查的文件或glob模式(默认: "src/**/*.{js,ts,jsx,tsx}")'
  )
  .option("-c, --config <path>", '配置文件路径(默认: ".minlintrc.{json,js}")')
  .action(async (files: string[], options: any) => {
    try {
      // 处理配置文件路径
      let configFile = options.config;
      if (!configFile) {
        const defaultConfigPaths = [
          path.join(process.cwd(), ".minlintrc.json"),
          path.join(process.cwd(), ".minlintrc.js"),
        ];
        for (const configPath of defaultConfigPaths) {
          if (fs.existsSync(configPath)) {
            configFile = configPath;
            break;
          }
        }
      }

      // 处理文件路径
      if (files.length === 0) {
        files = ["src/**/*.{js,ts,jsx,tsx}"];
        if (!fs.existsSync(path.join(process.cwd(), "src"))) {
          console.log(
            chalk.yellow("注意: 'src' 目录不存在,将检查当前目录下的所有JS文件")
          );
          files = ["**/*.{js,ts,jsx,tsx}"];
        }
      }

      // 初始化Linter并执行检查
      const linter = new Linter({ files, configFile });
      const errors = await linter.getErrors();
      stylish(errors);

      // 设置退出码
      process.exitCode = errors.length > 0 ? 1 : 0;
    } catch (error) {
      console.error(error);
      process.exit(1);
    }
  });

// 解析命令行参数
program.parse(process.argv);
上述代码使用了这些核心依赖包:
- commander: 命令行参数解析和命令定义
- chalk: 终端彩色输出
- fs/path: Node.js 内置文件系统和路径处理模块
核心处理流程:
- 配置文件自动发现(优先用户指定,其次查找默认配置)
- 文件路径智能处理(默认 src 目录,回退到当前目录)
- Linter 引擎初始化和执行
- 结果格式化输出和退出码设置
2.3.3 Linter 核心引擎实现
Linter 类架构设计
类属性设计说明
typescript
export class Linter {
  private filePatterns: string[]; // 文件模式数组,支持 glob 语法
  private rules: Rule[]; // 加载的规则实例列表
  private errors: LintError[]; // 收集的错误信息
  private config; // 合并后的配置对象
  private analysisComplete: Promise<void>; // 异步分析完成标志
}
为什么这样设计?
- 异步架构 :
analysisCompletePromise 确保所有文件分析完成后才返回结果 - 错误收集 :
errors数组集中管理所有文件的检查结果 - 配置驱动 :
config对象控制规则启用状态和选项 - 规则实例化 :
rules数组包含所有激活的规则实例
Linter 核心引擎实现
typescript
constructor(options: { files: string[]; configFile?: string }) {
  this.filePatterns = options.files;
  this.errors = [];
  this.rules = [];

  // 配置文件加载与合并
  if (options.configFile) {
    this.config = this.loadConfigFile(options.configFile);
  } else {
    this.config = defaultConfig;
  }

  // 规则初始化
  this.initRules();

  // 启动异步文件扫描和解析流程
  this.analysisComplete = this.scanAndParseFiles();
}
初始化流程说明:
- 文件模式存储:将用户提供的文件模式(支持 glob 语法)存储到 filePatterns 属性
- 错误容器初始化:创建空的错误数组用于收集所有检查结果
- 配置系统启动:根据是否提供配置文件路径,选择加载用户配置或使用默认配置
- 规则系统激活:调用 initRules() 方法加载和过滤规则
- 异步分析启动:立即开始文件扫描和解析流程,但不阻塞构造函数返回
配置系统解析
配置文件加载是 Linter 初始化的关键步骤,它决定了哪些规则会被应用以及如何应用:
typescript
private loadConfigFile(configFilePath: string) {
  try {
    const configFileContent = fs.readFileSync(configFilePath, "utf-8");
    const fileExtension = path.extname(configFilePath);

    let userConfig;
    if (fileExtension === ".json") {
      userConfig = JSON.parse(configFileContent);  // JSON 格式解析
    } else if (fileExtension === ".js") {
      const absolutePath = path.resolve(configFilePath);
      userConfig = require(absolutePath);          // JS 模块加载
    } else {
      throw new Error(`不支持的配置文件格式: ${fileExtension}`);
    }

    // 配置合并策略:用户配置覆盖默认配置
    const mergedConfig = mergeConfigs(defaultConfig, userConfig);
    return mergedConfig;
  } catch (error) {
    console.warn(`读取配置文件失败,使用默认配置: ${error.message}`);
    return defaultConfig;
  }
}
这个方法实现配置加载机制:支持 JSON 和 JS 两种格式;使用 path.resolve() 确保 require 能正确加载 JS 配置文件;配置加载失败时自动降级到默认配置,保证 Linter 始终能够运行。配置合并策略让用户可以只覆盖需要修改的部分,而不必重新定义整个配置。
文件发现与扫描系统
文件扫描是 Linter 工作流程的第一步,需要将用户提供的文件模式转换为具体的文件列表:
typescript
private async scanAndParseFiles(): Promise<void> {
  let allMatchedFiles: string[] = [];

  // 遍历每个文件模式
  for (const pattern of this.filePatterns) {
    try {
      const matchedFiles = await glob(pattern, {
        ignore: "node_modules/**",    // 性能优化:忽略依赖目录
        absolute: false,              // 使用相对路径便于显示
      });
      allMatchedFiles.push(...matchedFiles);
    } catch (error) {
      console.error(`处理文件模式 "${pattern}" 时出错:`, error);
    }
  }

  // 去重处理(避免重复文件)
  const uniqueFiles = [...new Set(allMatchedFiles)];
  await this.parseMultipleFiles(uniqueFiles);
}
这个方法的目的是获取需要分析的文件列表:自动忽略 node_modules 目录避免扫描大量无关文件,使用 Set 数据结构自动去重,错误隔离确保单个模式失败不影响其他模式。扫描完成后直接调用批量解析方法。
配置合并策略,将用户配置与默认配置合并,用户配置优先级高:
typescript
export function mergeConfigs(defaultConfig: any, userConfig: any): any {
  const merged = { ...defaultConfig };

  if (userConfig.rules) {
    merged.rules = { ...defaultConfig.rules, ...userConfig.rules };
  }

  return merged;
}
并行文件解析架构
并行处理策略同时解析多个文件:
typescript
private async parseMultipleFiles(files: string[]): Promise<void> {
  // Promise.all 实现并行处理,提升性能
  await Promise.all(
    files.map(async (file) => {
      try {
        await this.parseSingleFile(file);
      } catch (error) {
        console.error(`解析文件 ${file} 时出错:`, error);
        // 单文件错误不中断整体流程
      }
    })
  );
}
单文件 AST 解析流程
单文件解析是整个 Linter 系统的核心环节,它将源代码转换为可分析的 AST 结构:
typescript
async parseSingleFile(filePath: string) {
  try {
    // 1. 读取源代码
    const sourceCode = fs.readFileSync(filePath, "utf-8");

    // 2. 文件类型检测
    const fileExtension = path.extname(filePath);
    const isJSXFile = fileExtension === ".jsx" || fileExtension === ".tsx";

    // 3. 解析器配置
    const parserOptions = {
      ecmaVersion: "latest" as const,
      sourceType: "module" as const,
      ecmaFeatures: {
        jsx: isJSXFile,              // 动态启用 JSX 支持
        globalReturn: false,
        impliedStrict: true,
      },
      range: true,                   // 字符位置信息
      loc: true,                     // 行列位置信息
      comments: true,                // 注释保留
      tokens: true,                  // Token 信息
    };

    // 4. 生成 AST
    const abstractSyntaxTree = espree.parse(sourceCode, parserOptions);

    // 5. AST 分析
    await this.analyzeAbstractSyntaxTree(abstractSyntaxTree, filePath, sourceCode);

    return abstractSyntaxTree;
  } catch (error) {
    // 错误分类处理
    if (error instanceof SyntaxError) {
      console.error(`✗ 语法错误 ${filePath}:`, error.message);
    } else {
      console.error(`✗ 解析错误 ${filePath}:`, error);
    }
    throw error;
  }
}
这个方法目的是将代码解析成 AST:首先读取源代码内容,然后根据文件扩展名动态配置解析器(JSX 支持),接着使用 Espree 生成 AST,最后调用分析方法应用规则。错误处理区分了语法错误和其他解析错误,为用户提供更精确的错误信息。位置信息的保留确保了后续错误报告的准确性。
AST 遍历与规则应用
AST 遍历是 Linter 的核心机制,通过深度优先遍历访问每个节点,并触发对应的规则监听器:
typescript
// ast-utils.ts 中的 traverse 函数 - 核心遍历逻辑
export function traverse(ast: AST, listener: RuleListener) {
  const visit = (node: ASTNode, parent: ASTNode | null = null) => {
    if (!node || typeof node !== "object") return;

    // 触发节点进入事件
    if (node.type && typeof listener[node.type] === "function") {
      listener[node.type](node);
    }

    // 处理退出事件(如 'Program:exit')
    if (node.type && typeof listener[`${node.type}:exit`] === "function") {
      // 先遍历子节点,再调用退出方法
      for (const key in node) {
        if (key === "type" || key === "loc" || key === "range") continue;
        const child = node[key];
        if (Array.isArray(child)) {
          child.forEach((item) => visit(item, node));
        } else {
          visit(child, node);
        }
      }
      listener[`${node.type}:exit`](node);
      return;
    }

    // 递归遍历子节点
    for (const key in node) {
      if (key === "type" || key === "loc" || key === "range") continue;
      const child = node[key];
      if (Array.isArray(child)) {
        child.forEach((item) => visit(item, node));
      } else {
        visit(child, node);
      }
    }
  };

  visit(ast); // 从根节点开始遍历
}
这个函数实现了深度优先遍历,支持节点进入和退出事件,能够正确处理数组类型的子节点,并跳过元数据属性。遍历过程中会触发规则监听器的相应方法,实现了事件驱动的规则应用机制。
规则应用过程中,系统会为每个激活的规则创建监听器,并通过 traverse 函数应用到 AST 上:
typescript
// 规则应用与错误收集的核心逻辑
async analyzeAbstractSyntaxTree(ast: AST, filePath: string, sourceCode: string) {
  try {
    for (const rule of this.rules) {
      const ruleOptions = this.getRuleOptions(rule);
      const ruleName = rule.meta.name;
      const ruleConfig = this.config?.rules?.[ruleName];

      // 解析错误级别
      let severity: "error" | "warn" = "error";
      if (ruleConfig === "warn" ||
          (Array.isArray(ruleConfig) && ruleConfig[0] === "warn")) {
        severity = "warn";
      }

      // 创建规则上下文和监听器
      const listener = rule.create({
        report: (data) => {
          this.errors.push({
            ...data,
            filePath,
            severity,
          });
        },
        options: ruleOptions,
        getSourceCode: () => sourceCode,
      });

      // 应用规则到 AST
      traverse(ast, listener);
    }
  } catch (error) {
    console.error(`分析 ${filePath} 的抽象语法树时出错:`, error);
  }
}
这段代码遍历所有激活的规则,为每个规则创建上下文对象(包含 report 函数用于收集错误),然后通过 traverse 函数将规则监听器应用到 AST 上,实现代码检查。错误级别的解析让用户可以灵活控制问题的严重程度。
错误信息管理
错误信息管理采用异步机制:
typescript
async getErrors(): Promise<LintError[]> {
  await this.analysisComplete;
  return this.errors;
}
getErrors 方法通过等待 analysisComplete Promise 确保所有异步分析任务完成,然后返回错误列表。
2.3.4 规则系统架构
规则系统是 Mini-ESLint 的核心组件,负责定义、加载、管理和执行各种代码检查规则。它采用插件化架构,支持规则的动态加载和配置驱动的执行。
规则接口设计
核心接口定义:
typescript
export interface Rule {
  meta: {
    name: string; // 规则名称,用于配置和错误报告
    docs: string; // 规则文档说明
    schema: any; // 规则选项的 JSON Schema
  };
  create(ctx: RuleContext): RuleListener; // 规则工厂函数
}

export interface RuleContext {
  report: (data: {
    // 错误报告函数
    node: ASTNode;
    // 错误信息
    message: string;
    // 规则 ID
    ruleId: string;
    line: number;
    column: number;
  }) => void;
  options?: string[]; // 规则配置选项
  getSourceCode: () => string; // 获取源代码函数
}

export interface RuleListener {
  [key: string]: (node: ASTNode) => void; // AST 节点监听器映射
}
我们设计的规则主要有 meta 和 create 两个部分,meta 部分定义了规则的元数据,如规则名称、文档说明和选项的 JSON Schema。create 部分是一个工厂函数,根据上下文创建规则监听器,在规则监听器中实现具体的检查逻辑,然后通过 ctx.report 函数报告错误。这样做到好处是:
- 规则的定义和实现分离,规则定义只关注元数据和选项,而具体的检查逻辑在 create 方法中实现,符合单一职责原则。
- 规则的动态创建和配置,通过 create 方法根据上下文创建规则监听器,实现了规则的动态加载和配置。
- 规则的可扩展性,通过定义规则接口和上下文对象,支持规则的扩展和定制。
- 规则的错误报告,通过 ctx.report 函数报告错误,确保错误信息格式一致。
具体接口设计原理:
- create 方法采用工厂模式,根据上下文创建规则监听器,实现了规则的动态创建和配置。
typescript
// 工厂模式的实际应用示例
const ruleContext = {
  report: (data) => this.errors.push(data),
  options: this.getRuleOptions(rule),
  getSourceCode: () => sourceCode,
};

// 每次分析都创建新的监听器实例
const listener = rule.create(ruleContext);- RuleListener 接口通过节点类型名称映射到处理函数,实现了对特定 AST 节点的监听和处理。我们只需要处理我们关注的节点类型即可,每种节点类型的处理可以逻辑分离。
typescript
// 事件驱动的监听器示例
const listener: RuleListener = {
  // 监听变量声明节点
  VariableDeclarator: (node) => {
    // 处理变量声明逻辑
  },

  // 监听标识符节点
  Identifier: (node) => {
    // 处理标识符逻辑
  },

  // 监听程序退出事件
  "Program:exit": (node) => {
    // 程序分析完成后的清理工作
  },
};- RuleContext 提供规则执行所需的所有上下文信息,如错误报告函数、规则选项和源代码获取函数。我们可以在规则监听器中通过 ctx 访问这些信息,统一的 report 函数确保错误信息格式一致,options 数组支持复杂的规则配置,getSourceCode 支持需要分析原始代码的高级规则。
typescript
// 上下文注入的完整示例
interface RuleContext {
  // 错误报告函数 - 核心功能
  report: (data: {
    node: ASTNode; // 问题节点
    message: string; // 错误描述
    ruleId: string; // 规则标识
    line: number; // 行号
    column: number; // 列号
  }) => void;

  // 规则配置选项 - 灵活配置
  options?: string[]; // 如 ["always", "never"]

  // 源代码获取 - 高级分析
  getSourceCode: () => string; // 获取完整源代码
}
规则实现模式分析
我们通过两个规则讲解一下怎么实现规则:
- Semi 规则:
-
规则名称:semi
-
规则文档:要求在语句末尾添加分号
-
规则选项:always 或 never
-
规则实现:在 create 方法中监听 Statement 节点,判断语句是否以分号结尾,根据选项判断是否报告错误。
分析一下上面的介绍,我们需要在对应的节点做判断,违反规则的时候立即返回,代码如下:
typescript
export default {
  meta: {
    name: "semi",
    docs: "Require or disallow semicolons instead of ASI",
    schema: {
      enum: ["always", "never"],
      default: "always",
    },
  },
  create(ctx: RuleContext): RuleListener {
    const defaultConfig = ctx.options?.[0] || "always";
    const isSemicolonRequired = defaultConfig === "always";
    const sourceCode = ctx.getSourceCode();
    const types = [
      "VariableDeclaration", // 变量声明: const a = 1;
      "ExpressionStatement", // 表达式语句: console.log();
      "ReturnStatement", // 返回语句: return value;
      "ThrowStatement", // 抛出语句: throw new Error();
      "BreakStatement", // 中断语句: break;
      "ContinueStatement", // 继续语句: continue;
      "ImportDeclaration", // 导入语句: import { a } from 'b';
      "ExportNamedDeclaration", // 命名导出: export { a };
      "ExportDefaultDeclaration", // 默认导出: export default a;
      "ExportAllDeclaration", // 全部导出: export * from 'module';
    ];

    // 检查分号的通用函数
    function checkSemicolon(node: ASTNode) {
      const lastToken = sourceCode.charAt(node.end - 1);
      const hasSemicolon = lastToken === ";";

      const { line, endColumn } = getNodeLocation(node);
      if (isSemicolonRequired && !hasSemicolon) {
        // 缺少分号:报告应该添加分号的位置(语句结束位置)
        ctx.report({
          node: node,
          message: `Missing semicolon.`,
          ruleId: "semi",
          line: line,
          column: endColumn,
        });
      } else if (!isSemicolonRequired && hasSemicolon) {
        // 多余分号:报告分号本身的位置
        ctx.report({
          node: node,
          message: `Extra semicolon.`,
          ruleId: "semi",
          line: line,
          column: endColumn,
        });
      }
    }

    // 动态生成监听器对象
    const listeners: RuleListener = {};
    types.forEach((type) => {
      listeners[type] = checkSemicolon;
    });
    return listeners;
  },
};
在 create 函数的实现中,代码首先解析配置选项来确定是否需要分号,然后定义了一个不同 AST 节点类型的数组(如变量声明、表达式语句、返回语句等),这些都是需要分号的语句类型。核心的 checkSemicolon 函数负责检查每个节点是否符合分号规则:它通过检查节点末尾字符来判断是否存在分号,然后根据配置要求报告相应的错误(缺少分号或多余分号)。最后,代码动态生成监听器对象,为每种节点类型绑定相同的检查函数,实现了高效的事件驱动检查机制。这种设计体现了 ESLint 规则系统的核心特点:配置驱动、事件监听和精确错误报告。
- no-unused-vars 规则
-
规则名称:no-unused-vars
-
规则文档:不允许定义未使用的变量
-
规则选项:无
同样分析一下这个规则,我们需要记录所有声明的变量,在 Identifier 节点中记录所有使用的变量,最后遍历所有声明的变量,判断是否有未被使用的变量。代码如下:
typescript
export default {
  meta: {
    name: "no-unused-vars",
    docs: "disallow unused variables",
    schema: [],
  },
  create(ctx: RuleContext): RuleListener {
    // 存储所有声明的变量
    const declared = new Set<string>();
    // 存储所有使用的变量
    const used = new Set<string>();
    // 存储变量声明节点信息,用于报告错误时定位
    const declaredInfo = new Map<string, ASTNode>();
    // 临时存储正在处理的变量声明
    const declaredUsed = new Set<string>();
    // 存储所有导出的变量
    const exportedVars = new Set<string>();

    return {
      // 处理变量声明
      VariableDeclarator(node) {
        declared.add(node.id.name);
        declaredUsed.add(node.id.name);
        declaredInfo.set(node.id.name, node);
      },
      // 处理标识符(变量使用)
      Identifier(node) {
        if (!declaredUsed.has(node.name)) {
          used.add(node.name);
        }
      },
      // 处理导出声明
      ExportNamedDeclaration(node) {
        // 处理 export const/let/var 声明
        if (
          node.declaration &&
          node.declaration.type === "VariableDeclaration"
        ) {
          const declarations = node.declaration.declarations;
          for (const decl of declarations) {
            if (decl.id && decl.id.type === "Identifier") {
              // 将导出的变量添加到已使用集合中
              used.add(decl.id.name);
              exportedVars.add(decl.id.name);
            }
          }
        }
      },

      // 变量声明处理完成后的清理
      "VariableDeclarator:exit"(node) {
        if (node.id && node.id.type === "Identifier") {
          declaredUsed.delete(node.id.name);
        }
      },

      // 程序结束时检查未使用的变量
      "Program:exit"() {
        for (const name of declared) {
          const node = declaredInfo.get(name)!;
          const { line, startColumn } = getNodeLocation(node);
          if (!used.has(name)) {
            ctx.report({
              node: declaredInfo.get(name)!,
              message: `'${name}' is declared but never used`,
              ruleId: "no-unused-vars",
              line,
              column: startColumn,
            });
          }
        }
      },
    };
  },
};
在 create 函数的实现中,代码使用了五个关键的数据结构:declared Set 存储所有声明的变量名,used Set 存储所有被使用的变量名,declaredInfo Map 存储变量声明节点信息用于错误定位,declaredUsed Set 临时存储正在处理的变量声明,以及 exportedVars Set 存储导出的变量。规则通过监听多种 AST 节点事件来实现检测逻辑:VariableDeclarator 处理变量声明,Identifier 处理变量使用,ExportNamedDeclaration 处理导出声明(将导出的变量标记为已使用),VariableDeclarator:exit 进行清理工作,最后在 Program:exit 事件中遍历所有声明的变量,对于未被使用的变量报告错误。这种设计体现了状态管理型规则的特点:需要在整个 AST 遍历过程中维护状态,并在最后进行统一检查和报告。
规则实现指南
第一步:确定规则类型
即时检测型规则:
-
适用于语法检查、格式检查
-
在遍历到节点时立即检查
-
无需维护复杂状态
-
示例:分号检查、缩进检查 状态管理型规则:
-
适用于语义分析、依赖关系检查
-
需要收集信息后统一分析
-
使用 Program:exit 进行最终检查
-
示例:未使用变量、循环依赖
第二步:设计规则结构
typescript
export default {
  meta: {
    name: "your-rule-name",
    docs: "规则描述",
    schema: [], // 或具体的配置模式
  },
  create(ctx: RuleContext): RuleListener {
    // 1. 解析配置选项
    const options = ctx.options || [];

    // 2. 初始化状态(如果需要)
    const state = new Map();

    // 3. 定义检查函数
    function checkNode(node: ASTNode) {
      // 检查逻辑
    }

    // 4. 返回监听器
    return {
      NodeType: checkNode,
      "Program:exit": () => {
        /* 最终检查 */
      },
    };
  },
};
第三步:选择监听的 AST 节点
常用节点类型:
- VariableDeclarator : 变量声明
- Identifier : 标识符
- FunctionDeclaration : 函数声明
- CallExpression : 函数调用
- Program:exit : 程序结束
第四步:实现检查逻辑
关键要素:
- 准确的错误定位 :使用 getNodeLocation() 获取精确位置
- 清晰的错误消息 :提供有意义的错误描述
- 性能优化 :避免重复计算,合理使用数据结构
- 边界情况处理 :考虑各种特殊情况
第五步:错误报告
typescript
ctx.report({
  node: problemNode, // 问题节点
  message: "错误描述", // 清晰的错误消息
  ruleId: "rule-name", // 规则标识
  line: lineNumber, // 行号
  column: columnNumber, // 列号
});
2.3.5 格式化器与输出
格式化器与输出系统是 mini-eslint 用户体验的重要组成部分,负责将检测到的错误信息以友好、清晰的方式呈现给用户。
格式化器架构设计
1. 格式化器接口
格式化器采用函数式设计,接收 LintError[] 数组作为输入:
typescript
export function stylish(errors: LintError[]): void {
  // 格式化逻辑
}
2. 数据结构
格式化器处理的核心数据结构是 LintError:
typescript
export interface LintError {
  node: ASTNode; // AST 节点信息
  message: string; // 错误描述
  ruleId: string; // 规则标识
  filePath: string; // 文件路径
  severity?: "error" | "warn"; // 错误级别
  line: number; // 行号
  column: number; // 列号
}
Stylish 格式化器实现
1. 错误分组与排序
typescript
// 按文件分组错误
const errorsByFile = errors.reduce<Record<string, LintError[]>>(
  (acc, error) => {
    if (!acc[error.filePath]) {
      acc[error.filePath] = [];
    }
    acc[error.filePath].push(error);
    return acc;
  },
  {}
);

// 对文件中的错误按行号排序
fileErrors.sort((a, b) => a.line - b.line || a.column - b.column);
2. 彩色输出
使用 chalk 库实现彩色输出,提升用户体验:
typescript
// 根据错误级别设置不同的颜色
const severityColor = severity === "error" ? chalk.red : chalk.yellow;
const severityText = severity === "error" ? "error" : "warning";

console.log(
  `  ${location}  ` +
    `${severityColor(severityText)}  ` +
    `${error.message}  ` +
    `${chalk.gray(ruleName)}`
);
3. 统计信息展示
typescript
// 统计错误和警告的数量
let errorCount = 0;
let warningCount = 0;

// 智能复数处理
function pluralize(word: string, count: number): string {
  return count === 1 ? word : `${word}s`;
}

// 显示总结信息
const total = errorCount + warningCount;
const summary = [
  `✖ ${total} ${pluralize("problem", total)}`,
  `(${errorCount} ${pluralize("error", errorCount)},`,
  `${warningCount} ${pluralize("warning", warningCount)})`,
].join(" ");
输出格式规范
1. 文件级别输出
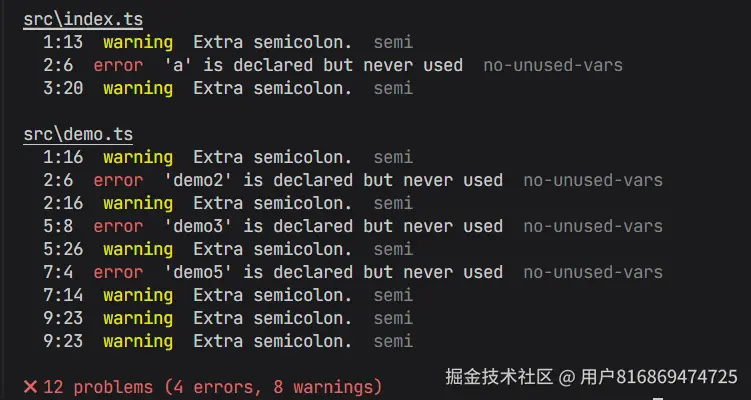
2. 无错误输出

3. 颜色编码
- 🔴 错误 (error): 红色显示
- 🟡 警告 (warning): 黄色显示
- 🟢 成功: 绿色显示
- 🔘 规则名: 灰色显示
3. 测试体系建设
3.1 测试框架选型与配置
3.1.1 测试框架选择
Jest vs Vitest 对比分析
在选择测试框架时,我们主要对比了两个现代化的测试框架:
| 框架 | 优势 | 劣势 |
|---|---|---|
| Jest | • 生态成熟,社区活跃度高 • 开箱即用,零配置启动 • 完整的测试功能包(快照、模拟、覆盖率) • 舒适的 API(it 和 expect) • 大量第三方库和插件支持 | • 启动速度相对较慢 • 对 TypeScript 和 ES 模块支持需要额外配置 • 内存占用较高 • 配置复杂度随项目增长而增加 |
| Vitest | • 原生 TypeScript 和 ES 模块支持 • 更快的运行速度和启动时间 • Jest API 兼容,迁移成本低 • 内置热模块替换 (HMR) • 现代化架构设计 | • 相对较新,生态还在发展中 • 社区资源和插件相对较少 • 某些边缘场景可能不如 Jest 稳定 |
选择 Vitest 的核心原因
Mini-ESLint 项目最终选择 Vitest 作为测试框架,主要基于以下考虑:
-
现代化技术栈匹配
- 项目使用 TypeScript 和 ES 模块,Vitest 原生支持无需复杂配置
- 避免了 Jest 在处理现代 JavaScript 特性时的配置复杂性
-
性能优势显著
- 即使项目没有使用 Vite,Vitest 仍能提供更快的测试运行速度
- 默认的监视模式通过热模块替换提供更好的开发体验
- 冷启动和热更新都比 Jest 快数倍
-
API 兼容性
- 提供与大多数 Jest API 和生态系统库的兼容性
- 在大多数项目中可以作为 Jest 的直接替代品
- 学习成本极低,团队可以快速上手
-
简化的配置管理
- 减少了配置和维护多个工具链的复杂性
- 对于使用 esbuild 构建的项目,Vitest 仍然是一个优秀的选择
- 统一的现代化工具链体验
实际收益
选择 Vitest 后,我们在开发过程中获得了:
- 更流畅的测试驱动开发体验
- 零配置的 TypeScript 支持
- 简化的项目配置管理
虽然 Jest 在生态成熟度上仍有优势,但Vitest 提供了更好的开发体验,更详细的vitest介绍,可以参考官网。
3.1.2 测试配置
package.json 测试脚本配置
json
{
  "scripts": {
    "test": "vitest run",
    "test:watch": "vitest",
    "test:coverage": "vitest run --coverage"
  },
  "devDependencies": {
    "vitest": "^3.2.4",
    "@types/node": "^24.1.0"
  }
}
3.2 测试架构设计
3.2.1 测试分层策略
- 单元测试(Unit Tests)
- 规则测试 :每个 ESLint 规则的独立测试
- 工具函数测试 :AST 遍历、配置合并等工具函数
- 组件测试 :Linter 类、CLI 模块等核心组件
- 集成测试(Integration Tests)
- 端到端流程测试 :从文件扫描到错误输出的完整流程
- 配置系统测试 :配置文件加载、规则应用等集成场景
- 多文件处理测试 :批量文件分析和并行处理
3.3 核心测试实现
3.3.1 Linter 引擎测试
测试辅助函数设计
typescript
// 创建临时测试文件
function createTempFile(fileName: string, content: string): string {
  const tempDir = path.join(__dirname, "temp");
  if (!fs.existsSync(tempDir)) {
    fs.mkdirSync(tempDir, { recursive: true });
  }
  const filePath = path.join(tempDir, fileName);
  fs.writeFileSync(filePath, content, "utf-8");
  return filePath;
}

// 清理临时文件
function cleanupTempFiles() {
  const tempDir = path.join(__dirname, "temp");
  if (fs.existsSync(tempDir)) {
    fs.rmSync(tempDir, { recursive: true, force: true });
  }
}

// 创建临时配置文件
function createTempConfig(config: any): string {
  const configPath = path.join(__dirname, "temp", ".minlintrc.json");
  fs.writeFileSync(configPath, JSON.stringify(config, null, 2), "utf-8");
  return configPath;
}
测试覆盖范围
typescript
describe("Linter类测试", () => {
  beforeEach(() => {
    cleanupTempFiles();
  });

  afterEach(() => {
    cleanupTempFiles();
  });

  describe("构造函数和初始化", () => {
    it("应该正确初始化Linter实例", async () => {
      const testFile = createTempFile("test.js", "const a = 1;");
      const linter = new Linter({ files: [testFile] });

      expect(linter).toBeInstanceOf(Linter);

      const errors = await linter.getErrors();
      expect(Array.isArray(errors)).toBe(true);
    });

    it("应该使用默认配置当没有提供配置文件时", async () => {
      const testFile = createTempFile("test.js", "const a = 1");
      const linter = new Linter({ files: [testFile] });

      const errors = await linter.getErrors();
      // 默认配置包含semi规则,检测缺少分号
      expect(errors.some((error) => error.ruleId === "semi")).toBe(true);
    });

    it("应该正确加载JSON配置文件", async () => {
      const testFile = createTempFile("test.js", "const a = 1");
      const config = {
        rules: {
          semi: "off",
          "no-unused-vars": "error",
        },
      };
      const configFile = createTempConfig(config);

      const linter = new Linter({ files: [testFile], configFile });
      const errors = await linter.getErrors();

      // semi规则关闭,无分号错误
      expect(errors.some((error) => error.ruleId === "semi")).toBe(false);
      // 有未使用变量错误
      expect(errors.some((error) => error.ruleId === "no-unused-vars")).toBe(
        true
      );
    });

    it("应该在配置文件不存在时使用默认配置", async () => {
      const testFile = createTempFile("test.js", "const a = 1");
      const nonExistentConfig = path.join(__dirname, "nonexistent.json");

      const linter = new Linter({
        files: [testFile],
        configFile: nonExistentConfig,
      });
      const errors = await linter.getErrors();

      expect(Array.isArray(errors)).toBe(true);
    });
  });

  describe("文件扫描和解析", () => {
    it("应该正确扫描单个JavaScript文件", async () => {
      const testFile = createTempFile("test.js", "const a = 1");
      const linter = new Linter({ files: [testFile] });

      const errors = await linter.getErrors();
      expect(errors.length).toBeGreaterThan(0);
      // 检查文件路径
      expect(errors[0].filePath).toContain("test.js");
      expect(path.basename(errors[0].filePath)).toBe(path.basename(testFile));
    });

    // 路径标准化辅助函数
    function normalizeFilePath(filePath: string): string {
      return path.resolve(filePath).replace(/\\/g, "/");
    }

    function containsFile(filePaths: string[], targetFile: string): boolean {
      const normalizedTarget = normalizeFilePath(targetFile);
      return filePaths.some((filePath) => {
        const normalizedPath = normalizeFilePath(filePath);
        return (
          normalizedPath.includes(path.basename(targetFile)) ||
          normalizedPath === normalizedTarget
        );
      });
    }

    it("应该正确扫描多个文件", async () => {
      const testFile1 = createTempFile("test1.js", "const a = 1");
      const testFile2 = createTempFile("test2.js", "const b = 2");

      const linter = new Linter({ files: [testFile1, testFile2] });
      const errors = await linter.getErrors();

      const filePaths = errors.map((error) => error.filePath);
      expect(containsFile(filePaths, testFile1)).toBe(true);
      expect(containsFile(filePaths, testFile2)).toBe(true);
    });

    it("应该正确处理glob模式", async () => {
      createTempFile("glob1.js", "const a = 1");
      createTempFile("glob2.js", "const b = 2");

      // 使用绝对路径构建glob模式
      const tempDir = path.join(__dirname, "temp");
      const globPattern = path.join(tempDir, "*.js").replace(/\\/g, "/");

      const linter = new Linter({ files: [globPattern] });
      const errors = await linter.getErrors();

      // 验证找到了两个文件的错误
      const uniqueFiles = [
        ...new Set(errors.map((error) => path.basename(error.filePath))),
      ];
      expect(uniqueFiles).toContain("glob1.js");
      expect(uniqueFiles).toContain("glob2.js");
      expect(errors.length).toBeGreaterThan(0);
    });

    it("应该正确处理JSX文件", async () => {
      const jsxContent = `
        import React from 'react';
        const Component = () => <div>Hello</div>
        export default Component;
      `;
      const testFile = createTempFile("test.jsx", jsxContent);

      const linter = new Linter({ files: [testFile] });
      const errors = await linter.getErrors();

      // 能够解析JSX文件
      expect(Array.isArray(errors)).toBe(true);
    });

    it("应该正确处理TypeScript文件", async () => {
      const tsContent = `
        interface User {
          name: string;
          age: number;
        }
        const user: User = { name: 'John', age: 30 }
      `;
      const testFile = createTempFile("test.ts", tsContent);

      const linter = new Linter({ files: [testFile] });
      const errors = await linter.getErrors();

      expect(Array.isArray(errors)).toBe(true);
    });

    it("应该正确处理语法错误", async () => {
      const invalidCode = "const a = {";
      const testFile = createTempFile("invalid.js", invalidCode);

      const linter = new Linter({ files: [testFile] });

      // 语法错误不应导致程序崩溃
      await expect(linter.getErrors()).resolves.toBeDefined();
    });
  });

  describe("规则应用和错误检测", () => {
    it("应该正确设置错误严重级别", async () => {
      const testFile = createTempFile("test.js", "const a = 1");
      const config = {
        rules: {
          semi: "warn",
          "no-unused-vars": "error",
        },
      };
      const configFile = createTempConfig(config);

      const linter = new Linter({ files: [testFile], configFile });
      const errors = await linter.getErrors();

      const semiError = errors.find((error) => error.ruleId === "semi");
      const unusedVarError = errors.find(
        (error) => error.ruleId === "no-unused-vars"
      );

      expect(semiError?.severity).toBe("warn");
      expect(unusedVarError?.severity).toBe("error");
    });

    it("应该正确处理关闭的规则", async () => {
      const testFile = createTempFile("test.js", "const a = 1");
      const config = {
        rules: {
          semi: "off",
          "no-unused-vars": "off",
        },
      };
      const configFile = createTempConfig(config);

      const linter = new Linter({ files: [testFile], configFile });
      const errors = await linter.getErrors();

      expect(errors.length).toBe(0);
    });
  });

  describe("错误信息格式", () => {
    it("应该包含正确的错误信息格式", async () => {
      const testFile = createTempFile("test.js", "const a = 1");
      const linter = new Linter({ files: [testFile] });

      const errors = await linter.getErrors();
      expect(errors.length).toBeGreaterThan(0);

      const error = errors[0];
      expect(error).toHaveProperty("node");
      expect(error).toHaveProperty("message");
      expect(error).toHaveProperty("ruleId");
      expect(error).toHaveProperty("filePath");
      expect(error).toHaveProperty("line");
      expect(error).toHaveProperty("column");
      expect(error).toHaveProperty("severity");

      expect(typeof error.message).toBe("string");
      expect(typeof error.ruleId).toBe("string");
      expect(typeof error.filePath).toBe("string");
      expect(typeof error.line).toBe("number");
      expect(typeof error.column).toBe("number");
      expect(["error", "warn"]).toContain(error.severity);
    });

    it("应该包含正确的位置信息", async () => {
      const testFile = createTempFile("test.js", "const a = 1");
      const linter = new Linter({ files: [testFile] });

      const errors = await linter.getErrors();
      const error = errors[0];

      expect(error.line).toBeGreaterThan(0);
      expect(error.column).toBeGreaterThanOrEqual(0);
    });
  });

  describe("异步处理", () => {
    it("应该正确处理异步文件解析", async () => {
      const testFiles = [
        createTempFile("test1.js", "const a = 1"),
        createTempFile("test2.js", "const b = 2"),
        createTempFile("test3.js", "const c = 3"),
      ];

      const linter = new Linter({ files: testFiles });
      const errors = await linter.getErrors();

      // 处理所有文件
      const uniqueFiles = [...new Set(errors.map((error) => error.filePath))];
      expect(uniqueFiles.length).toBe(3);
    });

    it("getErrors方法应该等待分析完成", async () => {
      const testFile = createTempFile("test.js", "const a = 1");
      const linter = new Linter({ files: [testFile] });

      // 立即调用getErrors,等待分析完成
      const errors = await linter.getErrors();
      expect(Array.isArray(errors)).toBe(true);
    });
  });

  describe("边界情况", () => {
    it("应该处理空文件", async () => {
      const testFile = createTempFile("empty.js", "");
      const linter = new Linter({ files: [testFile] });

      const errors = await linter.getErrors();
      expect(Array.isArray(errors)).toBe(true);
    });

    it("应该处理只有注释的文件", async () => {
      const testFile = createTempFile(
        "comments.js",
        "// This is a comment\n/* Another comment */"
      );
      const linter = new Linter({ files: [testFile] });

      const errors = await linter.getErrors();
      expect(Array.isArray(errors)).toBe(true);
    });

    it("应该处理不存在的文件模式", async () => {
      const nonExistentPattern = path.join(__dirname, "nonexistent", "*.js");
      const linter = new Linter({ files: [nonExistentPattern] });

      const errors = await linter.getErrors();
      expect(Array.isArray(errors)).toBe(true);
      expect(errors.length).toBe(0);
    });

    it("应该处理复杂的代码结构", async () => {
      const complexCode = `
        function fibonacci(n) {
          if (n <= 1) return n
          return fibonacci(n - 1) + fibonacci(n - 2)
        }

        class Calculator {
          constructor() {
            this.result = 0
          }

          add(a, b) {
            return a + b
          }
        }

        const calc = new Calculator()
        const fib5 = fibonacci(5)
        console.log(calc.add(fib5, 10))
      `;

      const testFile = createTempFile("complex.js", complexCode);
      const linter = new Linter({ files: [testFile] });

      const errors = await linter.getErrors();
      expect(Array.isArray(errors)).toBe(true);
    });
  });
});
3.3.2 规则系统测试
测试辅助函数设计
typescript
// 辅助函数:解析代码生成AST
function parseCode(code: string): AST {
  return espree.parse(code, {
    ecmaVersion: "latest",
    sourceType: "module",
    loc: true,
    range: true,
  }) as AST;
}

// 辅助函数:创建模拟上下文
function createContext() {
  const errors: any[] = [];
  const sourceCode = new Map<string, string>();

  return {
    errors,
    context: {
      report: (data: any) => errors.push(data),
      getSourceCode: () => sourceCode.get("code") || "",
      options: [] as string[],
    },
    setSourceCode: (code: string) => sourceCode.set("code", code),
  };
}
规则测试代码:
typescript
describe("Semi规则测试", () => {
  it("应该检测出缺少分号的情况 (always模式)", () => {
    // 准备测试代码和上下文
    const code = "const a = 1\nconst b = 2;";
    const { context, errors, setSourceCode } = createContext();
    setSourceCode(code);
    context.options = ["always"];

    // 创建规则监听器并应用到AST
    const listener = Semi.create(context);
    const ast = parseCode(code);
    traverse(ast, listener);

    // 验证结果
    expect(errors.length).toBe(1);
    expect(errors[0].message).toContain("Missing semicolon");
    expect(errors[0].ruleId).toBe("semi");
  });

  it("不应该检测缺少分号的情况 (always模式)", () => {
    // 准备测试代码和上下文 - 所有语句都有分号
    const code = "const a = 1;\nconst b = 2;";
    const { context, errors, setSourceCode } = createContext();
    setSourceCode(code);
    context.options = ["always"];

    // 创建规则监听器并应用到AST
    const listener = Semi.create(context);
    const ast = parseCode(code);
    traverse(ast, listener);

    // 验证结果 - 不应该有错误
    expect(errors.length).toBe(0);
  });

  it("应该检测出多余分号的情况 (never模式)", () => {
    // 准备测试代码和上下文
    const code = "const a = 1;\nconst b = 2";
    const { context, errors, setSourceCode } = createContext();
    setSourceCode(code);
    context.options = ["never"];

    // 创建规则监听器并应用到AST
    const listener = Semi.create(context);
    const ast = parseCode(code);
    traverse(ast, listener);

    // 验证结果
    expect(errors.length).toBe(1);
    expect(errors[0].message).toContain("Extra semicolon");
    expect(errors[0].ruleId).toBe("semi");
  });

  it("不应该检测多余分号的情况 (never模式)", () => {
    // 准备测试代码和上下文 - 所有语句都没有分号
    const code = "const a = 1\nconst b = 2";
    const { context, errors, setSourceCode } = createContext();
    setSourceCode(code);
    context.options = ["never"];

    // 创建规则监听器并应用到AST
    const listener = Semi.create(context);
    const ast = parseCode(code);
    traverse(ast, listener);

    // 验证结果 - 不应该有错误
    expect(errors.length).toBe(0);
  });
});
4. 最后
项目总结
通过本文的学习,我们从零开始实现了一个功能完整的 Mini-ESLint 代码检查工具。这个项目不仅帮助我们深入理解了 ESLint 的工作原理,更重要的是让我们掌握了以下核心技能:
- AST 抽象语法树的解析与遍历:理解代码如何被结构化表示和分析
- 规则系统的设计与实现:学会如何构建可扩展的插件化架构
- CLI 工具开发:了解如何构建用户友好的命令行工具
- TypeScript 工程实践:体验类型安全的开发流程
项目仓库
🔗 GitHub 仓库地址 :github.com/lzj2000/min...
后续功能规划
目前 Mini-ESLint 只具备了基本的代码检查功能,还有很多待完善的功能,包括更多的规则、自动修复、插件、忽略文件、并行优化等等,感兴趣的可以尝试实现。