背景
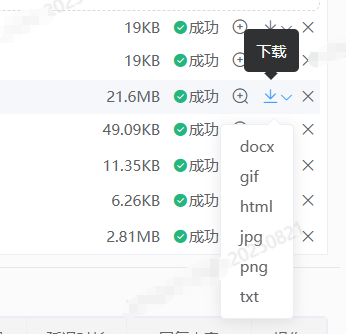
当前 elementui 的文件上传组件在上传完文件之后只支持删除,用户希望可以看到附件信息,还可以预览自己刚刚上传但未提交的文件,还希望可以下载,因为公司的下载功能当前是通过 OnlyOffice 实现了文件格式转换,所以我们需要对 el-upload 做二次封装,从而实现这些功能。
效果
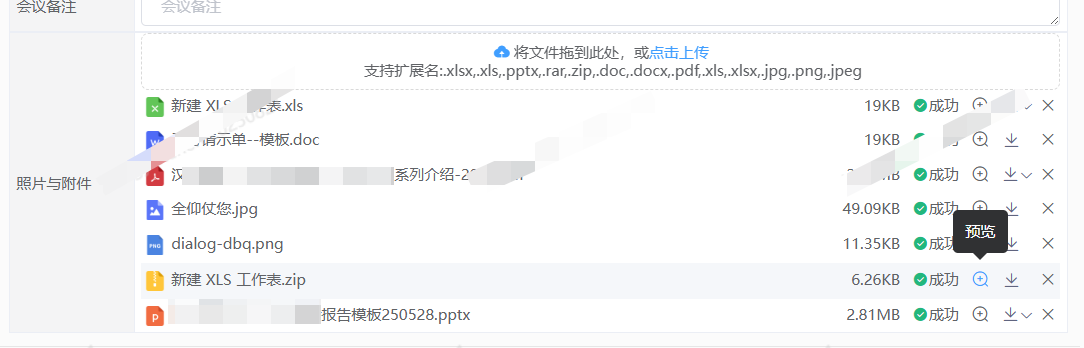
图片直接用查看器打开,文档则用OnlyOffice打开。

实现方案
1. 隐藏掉 elementui 组件自带的文件列表
博主选这个了这个方案,主要是想预防其他同事在用我的组件时因不知情而传入了file-list,更加友好高效,想怎么用都行。
css
::v-deep .el-upload-list{
  display: none;
}
或者也可以直接设置不显示文件上传列表,
java
'show-file-list': false,
2.写自己的文件列表和事件、样式
页面
html
<template>
<div class="file-upload-wrap">
  <!-- 上传区域 -->
  <div class="top-upload" v-if="showEdit">
    <el-upload
      :key="fileTable.length"
      ref="fileUploadComponent"
      :data="formData"
      :action="doUpload"
      :headers="headerFiles"
      :multiple="multiple"
      :before-upload="beforeUpload"
      v-bind="$attrs"
      :accept="acceptType"
      :class="{ 'file-upload-container':showType==='icons'}"
      v-on="$listeners"
    >
      <slot name="pre-content" />
      <div v-if="showType === 'icons' && showUpload" class="file-upload-icons-container">
        <div class="el-upload__text">
          <span><i class="el-icon-upload" type="primary"/> </span>
          <span v-if="$attrs.drag">将文件拖到此处,或</span><em>点击上传</em>
        </div>
        <div slot="tip" class="el-upload__tip">支持扩展名:{{ acceptType }}</div>
      </div>
      <el-button v-if="showType === 'buttons' && showUpload" :size="size" type="primary">点击上传</el-button>
      <slot name="after-content" />
    </el-upload>
  </div>
  <!-- 文件列表 -->
  <div>
    <div v-for="(fileItem, fileIndex) in fileTable" :key="fileIndex" class="file-list-class">
      <div><img :src="getImgSrc(fileItem)" :alt="fileItem.name" class="img-class" :key="fileItem.id" />{{ fileItem.name}}</div>
      <div class="right-buts-class">
        <div class="size-text">{{ fileItem.size }}</div>
        <div><i class="el-icon-success" style="color:#22b77d;margin-right: 1px;"/>成功</div>
        <div>
          <el-tooltip class="item" effect="dark" content="预览" placement="top">
            <i class="el-icon-zoom-in icon-but-class" @click="check(fileItem)"/>
          </el-tooltip>
        </div>
        <div class="convert-class">
          <el-tooltip class="item" effect="dark" content="下载" placement="top">
            <convert :scrop="{row: fileItem}" size="mini" :key="fileItem.id">
              <i class="el-icon-download icon-but-class2" slot="convertSlot"/>
            </convert>
          </el-tooltip>
        </div>
        <div>
          <el-tooltip class="item" effect="dark" content="删除" placement="top">
            <i class="el-icon-close icon-but-class2" @click="fileRemove(fileItem)" v-if="showEdit"/>
          </el-tooltip>
        </div>
      </div>
    </div>
  </div>
  <!-- 图片查看 -->
  <el-image-viewer
    v-if="showViewer"
    :on-close="closeViewer"
    :url-list="[imageUrl]"
  />
</div>
</template>
方法
javascript
    getImgSrc(fileItem) {
      const fileTypeIcons = {
        '.file': 'file.png',
        '.html': 'html.png',
        '.psd': 'psd.png',

        '.doc': 'doc.png',
        '.docx': 'doc.png',
        '.xls': 'xls.png',
        '.xlsx': 'xls.png',
        '.ppt': 'ppt.png',
        '.pptx': 'ppt.png',
        '.pdf': 'pdf.png',

        '.jpg': 'jpg.png',
        '.jpeg': 'jpg.png',
        '.png': 'png.png',
        '.gif': 'gif.png',
        '.tiff': 'tiff.png',
        '.txt': 'txt.png',
        '.zip': 'zip.png',
        '.rar': 'zip.png',
        '.xml': 'xml.png',
        '.cad': 'cad.png',
      };
      // 获取文件后缀名
      const fileName = fileItem.name || '';
      const lastDotIndex = fileName.lastIndexOf('.');
      const ext = lastDotIndex > -1 ? fileName.substring(lastDotIndex).toLowerCase() : '';
      const iconName = fileTypeIcons[ext] || 'unknown.png';
      return `@/../images/${iconName}`;
    },
    check(data) {
      const imgType = ['jpg', 'jpeg', 'png', 'gif', 'tiff']
      if (data?.url && imgType.indexOf(data?.type)>-1) {
        this.imageUrl = this.getImageUrl(data?.url)
        this.showViewer = true
        return
      }
      return opendFileByOnlyOffice(data)
    },
    fileRemove(data) {
      this.$refs.fileUploadComponent.handleRemove(data)
    },
样式
javascript
<style lang="scss" scoped>
::v-deep .el-upload-list{
  display: none;
}
.file-upload-container {
  width: 100%;
  display: inline-grid;
  text-align: center;
  height: 45px;
  ::v-deep .el-upload-dragger{
    height: 45px;
    width: 100%;
    display: flex;
    justify-content: center;
    align-items: anchor-center;
  }
  .top-upload{
    width: 100%;
  }
}
.file-upload-wrap{
  width: 100%;
  display: flex;
  flex-direction: column;
}

::v-deep .el-icon-upload{
  font-size: 14px;
  color: #409EFF;
}
.el-upload__tip{
  width: 100%;
  margin: 0px;
}
.el-upload__text{
  display: flex;
  flex-direction: row;
  justify-content: center;
  width: 100%;
  height: 15px;
}
.icon-but-class{
  margin-left: 10px;
  font-size: 14px!important;
  &:hover{
    cursor: pointer;
    color: #409EFF;
  }
}
.icon-but-class2{
  font-size: 14px!important;
  &:hover{
    cursor: pointer;
    color: #409EFF;
  }
}
.file-list-class{
  display: flex;
  justify-content: space-between;
  padding: 3px;
  &:hover{
    background-color: #f5f7fa;
  }
}
.size-text{
  margin-right: 10px;
}
.img-class{
  width: 16px;
  vertical-align: middle;
  margin-right: 5px;;
}
.right-buts-class{
  display: inline-flex;
  flex-direction: row;
}
.convert-class{
  width: 40px;
  ::v-deep .moka-convert-selector{
    padding: 0px;
    color: #60647f;
    font-size: 14px!important;
    &:hover{
      color: #409EFF;
    }
  }
  ::v-deep .el-icon--right{
    margin: 0px;
  }
}

.el-icon-upload{
  display: inline;
  font-size: 14px !important;
  margin-right: 3px;
  line-height: normal !important;
}
</style>
3.用法
页面中使用
html
<file-upload-wrap
  ref="attachmentFileUpload"
  :showEdit="hasEditPermission"
  v-bind="filesUploadAttr"
  :on-success="(response, file, fileList) => filesUploadSuccess(response, file, fileList)"
  :on-remove="(file, fileList) => filesUploadRemove(file, fileList)"
  :uploadFileList="scrop.row.attachment"
/>
相关方法
javascript
filesUploadSuccess(response, file, fileList) {
  if (!file.response.code === 200) return;
  this.messageData.attachment_id = fileList.map(upfiles => upfiles?.response?.data?.id || upfiles.id)
  const newData = fileList.map(upfiles => upfiles?.response?.data || upfiles)
  this.$set(this.messageData, 'attachment', newData);
},
filesUploadRemove(file, fileList) {
  this.messageData.attachment_id = fileList.map(upfiles => upfiles?.response?.data?.id || upfiles.id)
  const newData = fileList.map(upfiles => upfiles?.response?.data || upfiles)
  this.$set(this.messageData, 'attachment', newData);
},
这样就大功告成啦!