背景
近期接到了一个关于地图的需求,大致分为:自定义地图撒点、撒点点击、聚合、地理逆解析、轨迹(轨迹回放/暂停动画/倍速/进度条拖拽)、输入提示、点位拾取等。基本上涵盖了大部分常见的高德地图api。在开发过程中,踩了不少坑,在求助chatGPT和查看官网API手册后,也算稀稀拉拉完成的1.0版本的开发。 注:自定义撒点的样式是根据点位的type来决定的,不同的类型对应的文字颜色和icon不同。icon图片放到项目目录中,只要api能访问到就行。 在此做一个总结,封装了所有用的的api。
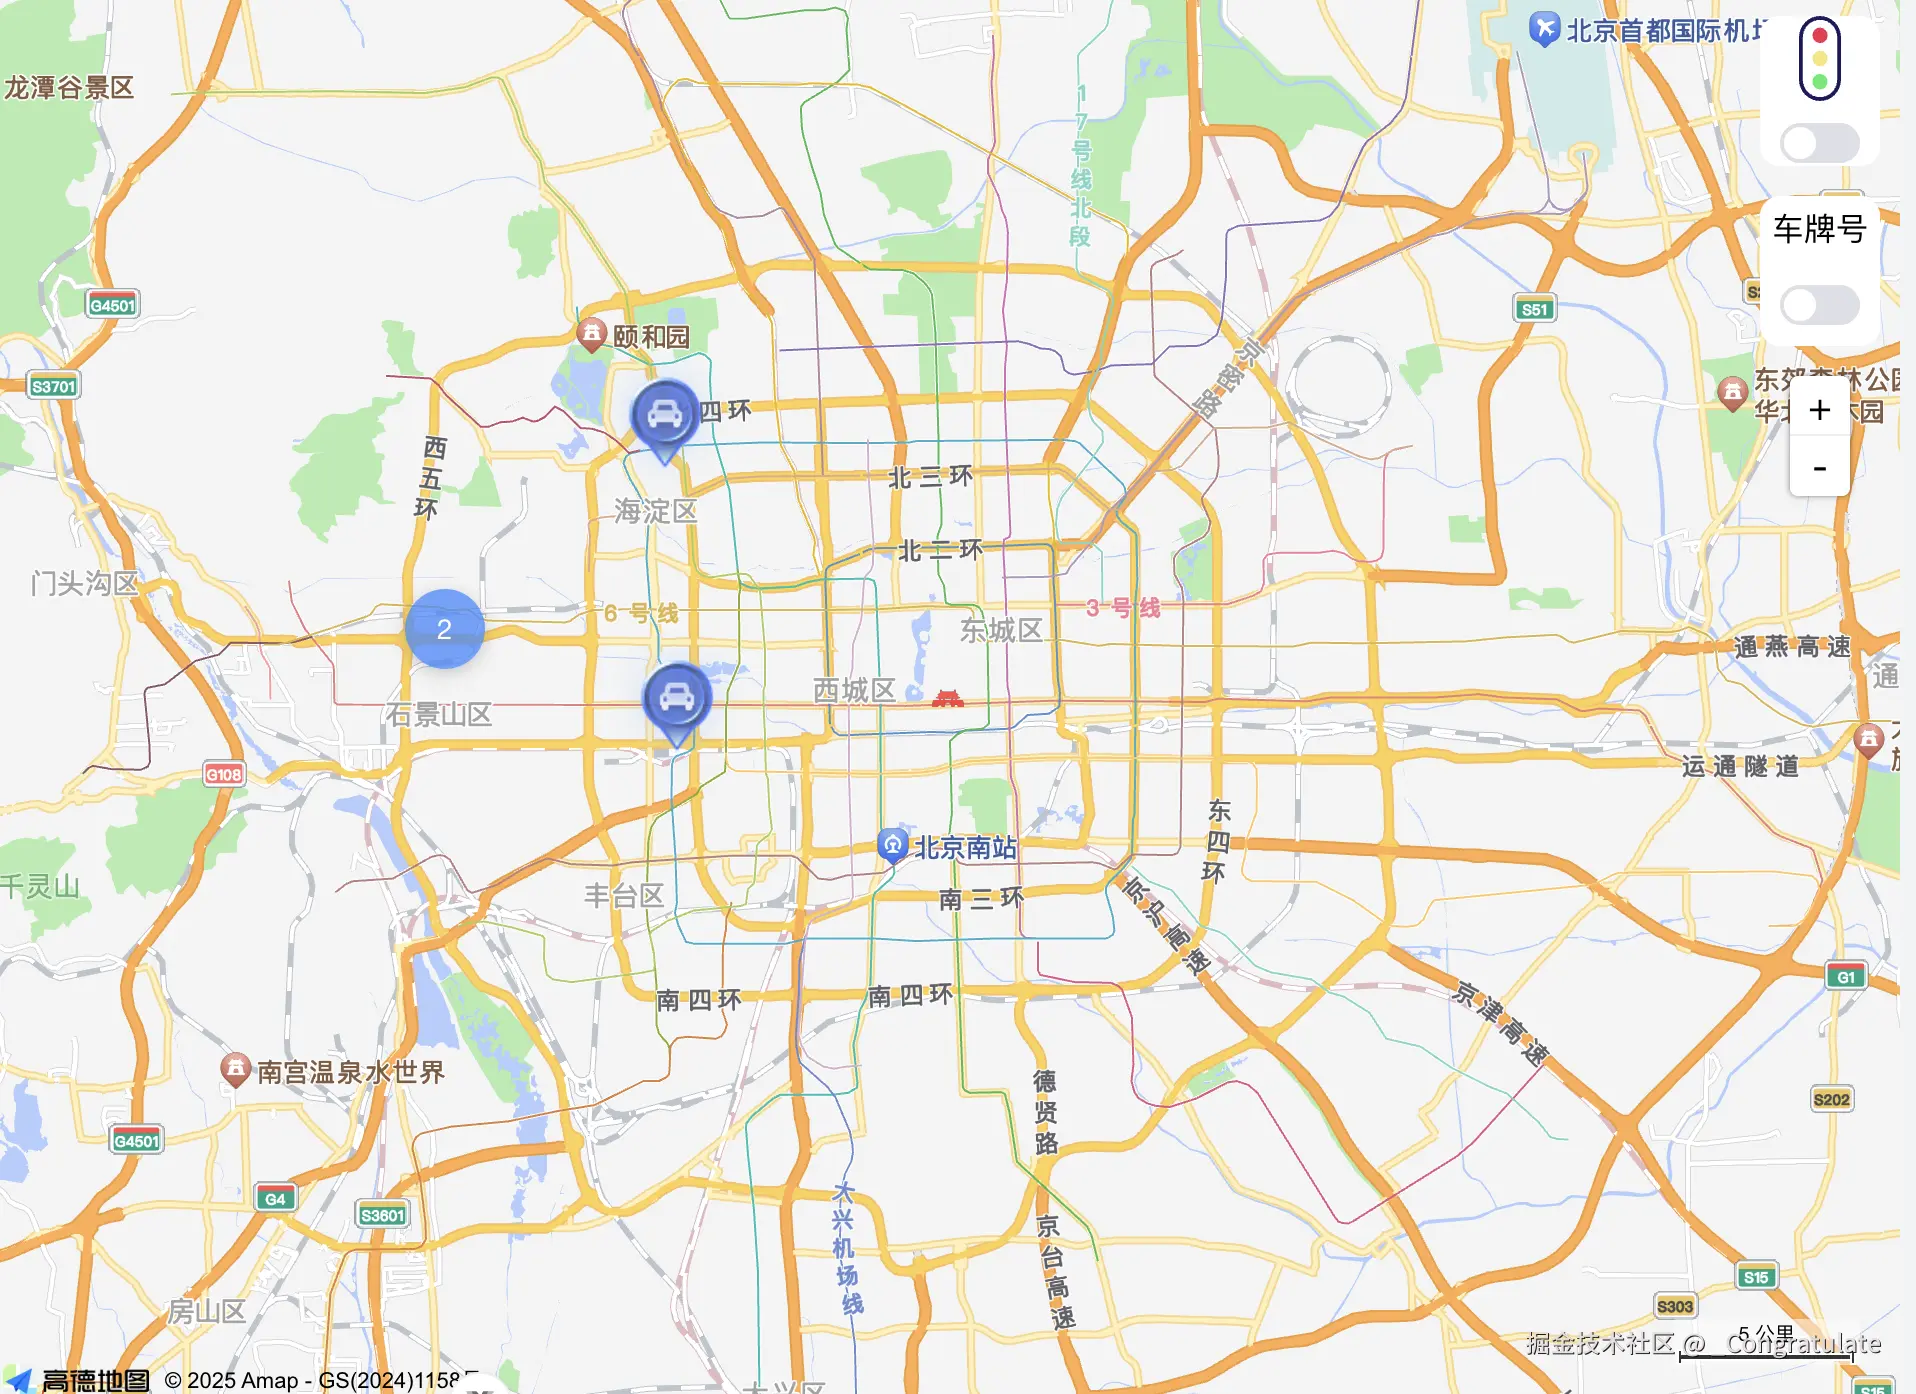
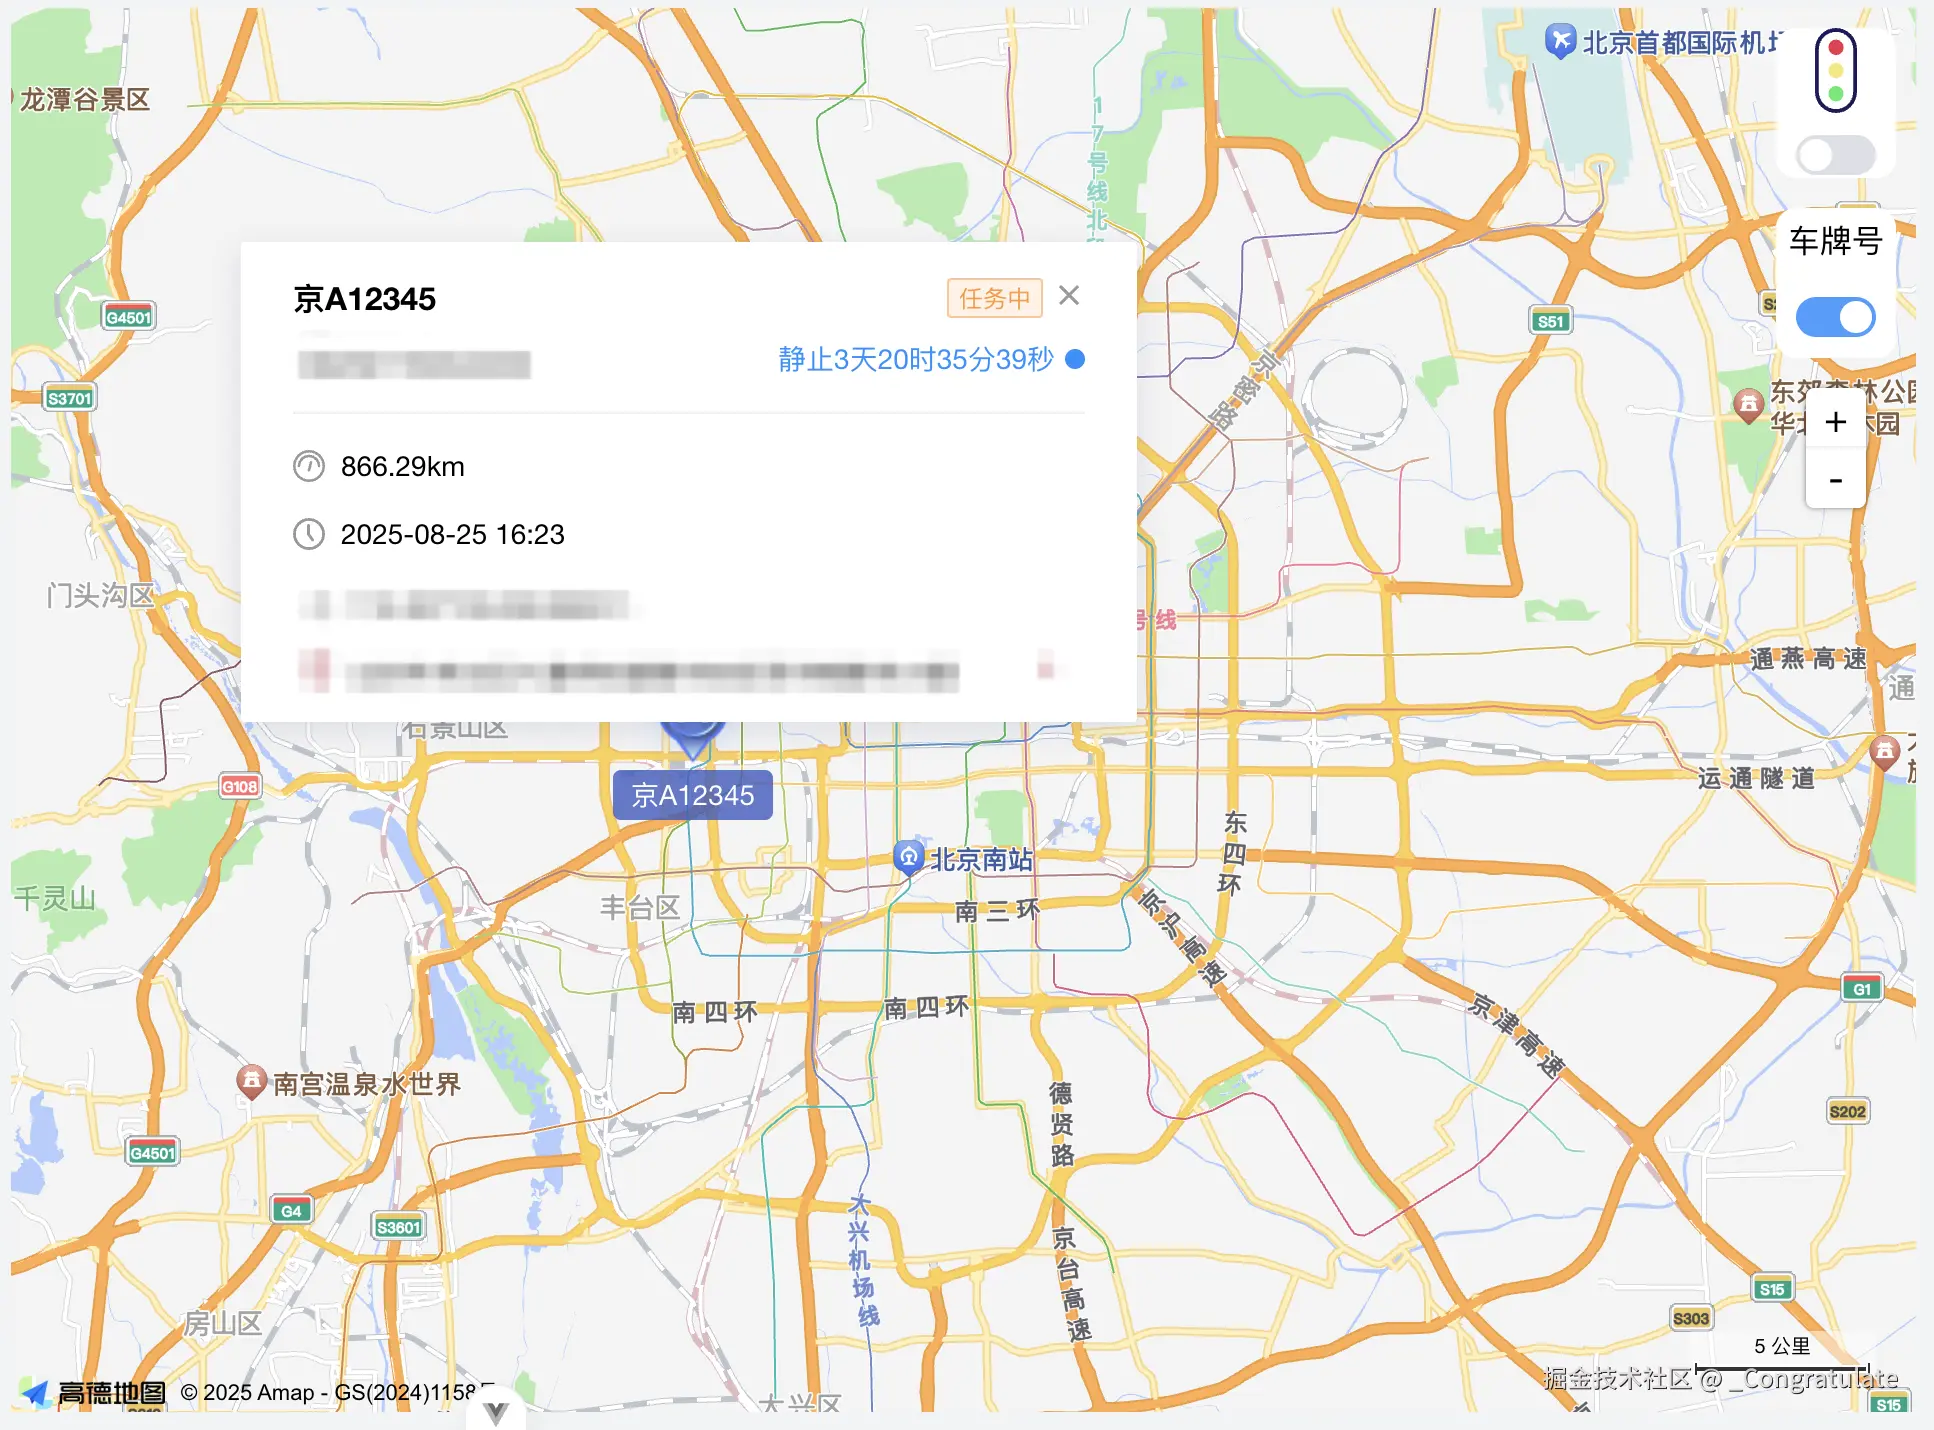
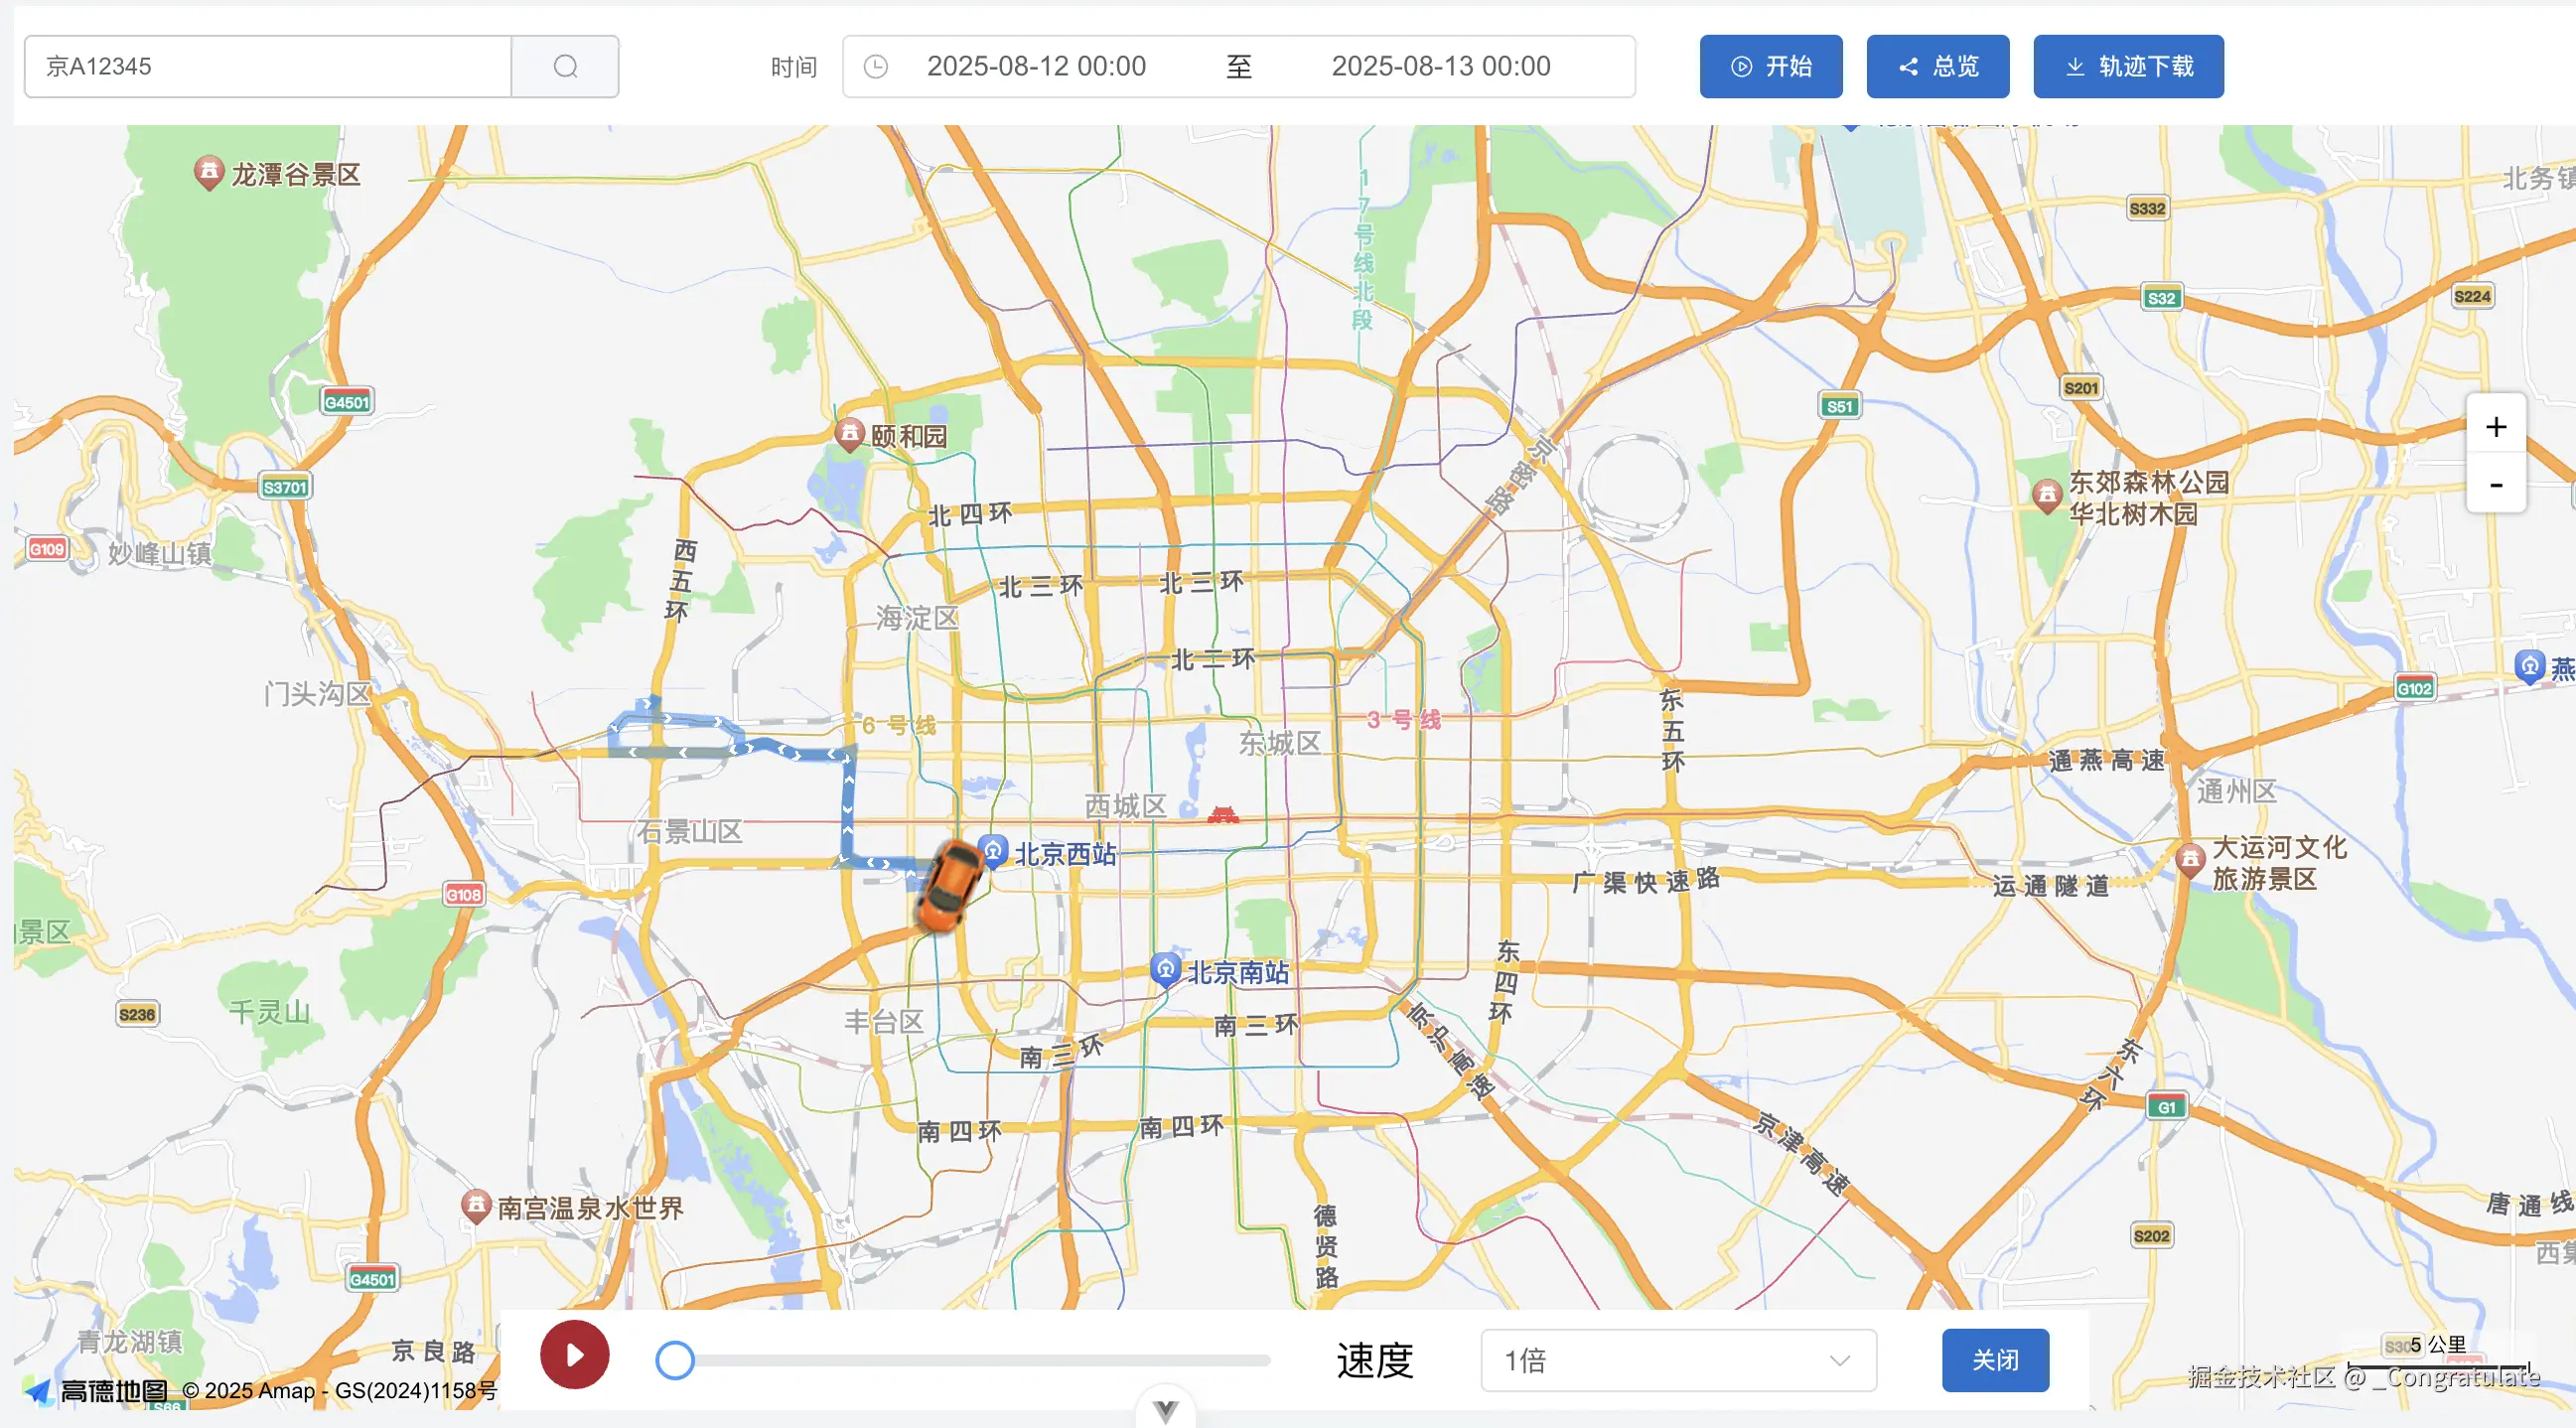
截图
撒点、聚合
弹窗、显示车牌
轨迹回放
代码
类型约束
ts
import "@amap/amap-jsapi-types"

export interface InitMapParams extends AMap.MapOptions {
	/** 容器ID */
	elId: string
}

export interface Markers {
	id: string
	position: [number, number]
	type: "online" | "charging" | "stop" // 类型: 在线、充电
	clickCallBack?: (params: any) => void
	showCarId: boolean
}
1、起手一个class
ts
export default class MapLoader {}2、地图初始化、插件注入、地图销毁
这块就比较简单了,大概写一下
ts
export default class MapLoader {
    private mapLoader: any
    private trafficLayer: any // 实时交通图层
    private labelMarkerMap: Map<string, any> = new Map() // 标记集合
    private infoWindow: any // 信息窗体
    private geocoder: any // 地理编码
    private autoComplete: any
    private defaultMarker: any // 默认点标记
    private overviewPolyline: any // 全览轨迹线
    private singleMarker: any // 单个点标记
    private cluster: any = null
    private clusterData: Array<{ lnglat: [number, number]; data: Markers }> = []

    public initMap(params: InitMapParams) {
		if (!params.elId) {
			console.error("elId is required")
			return
		}
		;(window as any)._AMapSecurityConfig = {
			securityJsCode: ""
		}
		AMapLoader.load({
			key: "",
			version: "2.0"
		})
			.then((AMap) => {
				this.mapLoader = new AMap.Map(params.elId, {
					// 设置地图容器id
					viewMode: "2D", // 是否为3D地图模式
					zoom: params.zoom ?? 11, // 初始化地图级别
					center: params.center || [116.397428, 39.90923] // 初始化地图中心点位置
				})
				AMap.plugin(
					[
						"AMap.Scale",
						"AMap.ToolBar",
						"AMap.Geocoder",
						"AMap.AutoComplete",
						"AMap.MoveAnimation",
						"AMap.MarkerCluster"
					],
					() => {
						const scale = new AMap.Scale({
							position: {
								right: "20px",
								top: "85vh"
							}
						})
						this.mapLoader.addControl(scale)
						const toolBar = new AMap.ToolBar({
							//地图缩放插件
							position: {
								right: "25px",
								top: "190px"
							}
						})
						this.mapLoader.addControl(toolBar)
						this.geocoder = new AMap.Geocoder({
							city: "010" // city 指定进行编码查询的城市,支持传入城市名、adcode 和 citycode
						})
						const opt = {
							city: "010"
						}
						this.autoComplete = new AMap.Autocomplete(opt)
					}
				)
			})
			.catch((e) => {
				console.error(e)
			})
	}

        public destroyMap() {
            this.hasInitMap()
            this.mapLoader.destroy()
        }
}
3、交通图添加和移除
ts
export default class MapLoader {
    // 加载实时交通图层
	public loadTrafficLayer() {
		this.hasInitMap()
		if (this.trafficLayer) {
			return
		}
		this.trafficLayer = new AMap.TileLayer.Traffic({
			autoRefresh: true, //是否自动刷新
			interval: 180 //刷新间隔,默认180s
		})
		this.mapLoader.add(this.trafficLayer)
	}
	// 移除实时交通图层
	public removeTrafficLayer() {
		this.hasInitMap()
		this.mapLoader.remove(this.trafficLayer)
		this.trafficLayer = null
	}
}
4、批量添加点标记
这块需要注意的是:点标记是根据type来决定icon的;因为有聚合的需求,所以撒点是通过聚合的非聚合状态字段来完成的(最开始的版本是没有聚合的,所以直接遍历数据生成的海量点位)。代码中也有一些其他关于点位的方法(移除,获取),仅仅给大家提供个思路。
点位添加时可以传入一个回调,当点位点击时,会将相关的点位信息给回调,用于完成后续的流程,比如弹窗
ts
// 用于生成单个点 DOM(根据 online/charging/stop 显示对应图标 & 车牌文字)
	private buildSingleMarkerDOM(item: Markers): HTMLElement {
		const wrap = document.createElement("div")
		wrap.style.width = "80px"
		wrap.style.height = "80px"
		wrap.style.position = "relative"
		wrap.style.transform = "translate(-35px,-40px)" // 居中
		wrap.style.display = "flex"
		wrap.style.justifyContent = "center"
		const img = document.createElement("img")
		img.src =
			item.type === "online"
				? "/green.png"
				: item.type === "charging"
				? "/purple.png"
				: "/blue.png"
		img.style.width = "70px"
		img.style.height = "80px"
		img.style.display = "block"
		wrap.appendChild(img)

		if (item.showCarId) {
			const tag = document.createElement("div")
			tag.innerText = item.id
			tag.style.width = "100%"
			tag.style.textAlign = "center"
			tag.style.position = "absolute"
			tag.style.left = "50%"
			tag.style.top = "66px"
			tag.style.transform = "translateX(-50%)"
			tag.style.fontSize = "14px"
			tag.style.color = "#fff"
			tag.style.padding = "2px 6px"
			tag.style.borderRadius = "4px"
			tag.style.background =
				item.type === "online"
					? "rgba(36,152,48,0.80)"
					: item.type === "charging"
					? "rgba(125,36,152,0.80)"
					: "rgba(57,90,192,0.80)"
			wrap.appendChild(tag)
		}
		return wrap
	}
	// 创建/更新聚合(聚合时显示气泡,散开时显示自定义单点)
	private createOrUpdateCluster() {
		this.mapLoader.plugin(["AMap.MarkerCluster"], () => {
			const options = {
				gridSize: 80,
				maxZoom: 18,
				// 非聚合点(散开状态)
				renderMarker: (ctx: any) => {
					const item: Markers = ctx.data[0].data
					const dom = this.buildSingleMarkerDOM(item)
					ctx.marker.setContent(dom)
					// 单击回调
					ctx.marker.off("click") // 避免重复绑定
					ctx.marker.on("click", () => item.clickCallBack?.(item.id))
				},
				// 聚合点
				renderClusterMarker: (ctx: any) => {
					const count = ctx.count
					const div = document.createElement("div")
					const size = count > 100 ? 56 : count > 50 ? 48 : 40
					div.style.width = `${size}px`
					div.style.height = `${size}px`
					div.style.borderRadius = "50%"
					div.style.display = "flex"
					div.style.alignItems = "center"
					div.style.justifyContent = "center"
					div.style.color = "#fff"
					div.style.fontSize = "14px"
					div.style.boxShadow = "0 2px 8px rgba(0,0,0,.2)"
					div.style.background =
						count > 100
							? "rgba(220,53,69,.85)"
							: count > 50
							? "rgba(255,153,0,.8)"
							: "rgba(51,136,255,.75)"
					div.innerText = String(count)
					ctx.marker.setContent(div)
				}
			}

			if (this.cluster) {
				// 已有聚合 → 直接更新数据
				this.cluster.setMap && this.cluster.setMap(null)
				this.cluster = new (window as any).AMap.MarkerCluster(
					this.mapLoader,
					this.clusterData,
					options
				)
			} else {
				this.cluster = new (AMap as any).MarkerCluster(
					this.mapLoader,
					this.clusterData,
					options
				)
			}
		})
	}

	// 批量添加标记点
	public addMarkers(markersParams: Markers[]) {
		this.hasInitMap()
		// 保存"点数据"(注意:这里是 dataOptions 数组,而不是 Marker 实例)
		this.clusterData = markersParams.map((item) => ({
			lnglat: item.position as [number, number],
			data: item
		}))
		this.createOrUpdateCluster()
	}
	public removeAllMarkers() {
		this.hasInitMap()
		if (this.cluster) this.cluster.setData([])
		this.clusterData = []
		this.labelMarkerMap.clear()
	}

	public removeMarker(id: string) {
		this.hasInitMap()
		this.clusterData = this.clusterData.filter((p) => p.data.id !== id)
		if (this.cluster) this.cluster.setData(this.clusterData)
		this.labelMarkerMap.delete(id)
	}

	public getAllMarkers() {
		this.hasInitMap()
		return this.clusterData.map((p) => p.data)
	}
5、展示弹窗
这个需求主要的是,因为涉及一些动态传参,如果直接使用html模版+模版字符串是没办法做的,所以这块是通过h函数渲染了vue组件
ts
public showInfoWindow(params: any, closeWindow: Function) {
        if (this.infoWindow) {
                const { _originOpts } = this.infoWindow
                const oldCarData = _originOpts.content._vnode.props.carData
                if (oldCarData.id === params.id) {
                        return
                }
                this.closeInfoWindow()
        }
        const element = document.createElement("div")
        const _infoWindow = h(infoWIndow, {
                carData: params,
                closeInfoWindow: closeWindow
        })
        const app = createApp(_infoWindow)
        app.mount(element)
        this.infoWindow = new AMap.InfoWindow({
                isCustom: true, //使用自定义窗体
                content: element,
                offset: new AMap.Pixel(-230, -270)
        })
        this.infoWindow.open(this.mapLoader, [
                Number(params.lng),
                Number(params.lat)
        ])
}
public closeInfoWindow() {
        if (this.infoWindow) {
                this.infoWindow.close()
                this.infoWindow = null
        }
}
6、逆编码、点位拾取
这个就比较简单了
ts
	// 逆编码
	public geocoderAddress(lng: string, lat: string) {
		const lnglat = [Number(lng), Number(lat)]
		return new Promise((resolve, reject) => {
			this.geocoder.getAddress(lnglat, function (status: any, result: any) {
				if (status === "complete" && result.info === "OK") {
					// result为对应的地理位置详细信息
					resolve(result.regeocode.formattedAddress)
				} else {
					reject(result)
				}
			})
		})
	}
	// 输入提示
	public placeSearch(keyword: string, callback: Function) {
		this.autoComplete.search(keyword, function (status: any, result: any) {
			callback(status, result)
		})
	}
	// 地图点击,拾取点位,出参中通过e.lnglat.getLng()和e.lnglat.getLat()取经纬度
	public mapClick(callback: Function) {
		this.mapLoader.on("click", (e: any) => {
			if (this.defaultMarker) {
				this.mapLoader.remove(this.defaultMarker)
				this.defaultMarker = null
			}
			const lng = e.lnglat.getLng()
			const lat = e.lnglat.getLat()
			this.defaultMarker = new AMap.Marker({
				position: new AMap.LngLat(lng, lat)
			})
			this.mapLoader.add(this.defaultMarker)
			callback(e)
		})
	}
	// 销毁地图点击事件
	public destroyMapClick() {
		this.mapLoader.off("click", () => {})
	}
7、轨迹回放、总览
这个是我写的比较久的,主要是进度发生变化,如何合并过去和未来的轨迹。移动时如何标记已经走过的路线。 思路是过去和未来分别存储两个字段,最后将两个字段同时渲染。其实整个轨迹回放用的只有高德动画api,只是处理动画过程中的进度,合并等问题。
在调用drawPolyline方法时,可以传入moving回调和moveEnd回调,用来获取动画过程中和动画结束。调用drawPolyline方法后会返回总距离、动画相关方法。用于外部控制动画
因为还有总览的需求,总览和轨迹回放还不一样,总览直接渲染路线就行,需要注意的是,总览和轨迹回放是互斥的,都需要将对方的变量置为初始值
ts
/**
	 * @description 轨迹回放
	 * @param points 轨迹点数组
	 * @param movingFn 轨迹移动时的回调函数
	 * @param moveEnd 地图移动事件结束回调
	 * @returns {totalDistance: number,startAnimation: Function,pauseAnimation: Function,continueAnimation: Function,moveToIndex: Function}
	 */
	public drawPolyline(points: any[], movingFn: Function, moveEnd: Function) {
		this.hasInitMap()
		this.mapLoader.on("moveend", () => {
			moveEnd && moveEnd()
		})
		const marker: any = new AMap.Marker({
			map: this.mapLoader,
			position: points[0],
			icon: "/car.png",
			offset: new AMap.Pixel(-13, -26)
		})
		const polyline = new AMap.Polyline({
			path: points,
			showDir: true,
			strokeColor: "#28F", //线颜色
			// strokeOpacity: 1,     //线透明度
			strokeWeight: 6, //线宽
			strokeStyle: "solid" //线样式
		})
		const passedPolyline = new AMap.Polyline({
			strokeColor: "red", //线颜色
			strokeWeight: 6 //线宽
		})
		const totalDistance = AMap.GeometryUtil.distanceOfLine(points)
		let currentPassedPolyline: any = []
		marker.on("moving", (e: any) => {
			const passedDistance = AMap.GeometryUtil.distanceOfLine([
				...currentPassedPolyline,
				...e.passedPath
			])
			const percent = Math.round((passedDistance / totalDistance) * 100)
			// 返回两个参数,第一个参数为当前轨迹点,第二个参数为百分比
			movingFn && movingFn({ movingData: e, percent })
			passedPolyline.setPath([...currentPassedPolyline, ...e.passedPath])
			this.mapLoader.setCenter(e.target.getPosition(), true)
		})
		this.mapLoader.add([polyline, passedPolyline])
		this.mapLoader.setFitView()
		return {
			// 轨迹总距离
			totalDistance,
			// 开始轨迹动画,入参为:速度,起始索引
			startAnimation: (speed = 1, fromIndex = 0) => {
				marker.moveAlong(points.slice(fromIndex), {
					duration: 500 / speed, //可根据实际采集时间间隔设置
					// JSAPI2.0 是否延道路自动设置角度在 moveAlong 里设置
					autoRotation: true
				})
			},
			// 暂停动画
			pauseAnimation: () => {
				marker.pauseMove()
			},
			// 继续动画
			continueAnimation: () => {
				marker.resumeMove()
			},
			// 跳转到指定索引
			moveToIndex: (index: number) => {
				marker.setPosition(points[index])
				currentPassedPolyline = points.slice(0, index + 1)
				passedPolyline.setPath(currentPassedPolyline)
			},
			removePolyine: () => {
				marker.pauseMove()
				this.mapLoader.remove([polyline, passedPolyline])
				this.mapLoader.remove(marker)
			}
		}
	}
	// 渲染所有轨迹-总览轨迹
	public renderAllPolyline(points: any[]) {
		this.hasInitMap()
		this.overviewPolyline = new AMap.Polyline({
			path: points,
			showDir: true,
			strokeColor: "#28F", //线颜色
			// strokeOpacity: 1,     //线透明度
			strokeWeight: 6, //线宽
			strokeStyle: "solid" //线样式
		})
		this.overviewPolyline.setPath(points)
		this.mapLoader.add(this.overviewPolyline)
		this.mapLoader.setFitView()
	}
	// 移除总览轨迹
	public removeOverviewPolyline() {
		if (this.overviewPolyline) {
			this.mapLoader.remove(this.overviewPolyline)
			this.overviewPolyline = null
		}
	}
大体的MapLoader类就是这样,下边主要写一下轨迹回放
轨迹回放
template:
vue
<div class="container>
        <div id="trajectory-map"></div>
		<div class="video-tools" v-if="hasStart && !isAllPolyline">
			<div class="play-icon">
				<SvgPlay v-if="isPlay" @click="onPause" />
				<SvgPause v-if="!isPlay" @click="onPlay" />
			</div>
			<el-slider v-model="sliderValue" @change="onSliderChange" size="large" />
			<div class="slider-text">速度</div>
			<el-select
				v-model="speedValue"
				@change="onSpeedChange"
				style="width: 200px"
			>
				<el-option label="1倍" :value="1" />
				<el-option label="3倍" :value="3" />
				<el-option label="5倍" :value="5" />
			</el-select>
			<el-button type="danger" @click="onCancel">关闭</el-button>
		</div>
</div>
script:
这块需要注意的是,请求数据后自动开始播放、进度条控制、速度控制三者之间的互斥关系以及理清进度Index和所有点位数据的关系。虽然使用的都是drawPolyline方法返回的方法。我的思路是: 1、请求数据后自动开始播放调用startAnimation 2、进度条变化时,根据滑动条百分比,对应到原始数据中,再调用moveToIndex方法,将原始数据分割,这样已走过的路和未走的路会有颜色上的区分
vue
<script lang="ts" setup>
const mapLoader = ref<any>(null)
const isPlay = ref<boolean>(false)
const hasStart = ref<boolean>(false)
const sliderValue = ref<number>(0)
const speedValue = ref<number>(1)
const points = ref<any[]>([])
const mapPolylineFn = ref<any>({})
const currentIndex = ref<number>(0)
const needContinuePlay = ref<boolean>(false) // 暂停后,如果没有拖动进度条,则继续播放,否则执行startAnimation
const isAllPolyline = ref<boolean>(false)
const mapReady = ref<boolean>(false)
let pendingAction: (() => void) | null = null


function initMap() {
	mapLoader.value = new MapLoader()
	mapLoader.value.initMap({
		elId: "trajectory-map",
		zoom: 12
	})
}

function getPointsById() {
	return new Promise<void>((resolve, reject) => {
		const params = {
			// 请求参数
		}
		getCarHistory(params)
			.then((res: any) => {
				if (res.length === 0) {
					reject()
				}
				const tempRes = JSON.parse(JSON.stringify(res))
				tempRes.forEach((item: any) => {
					item[0] = Number(item[0])
					item[1] = Number(item[1])
				})
				points.value = tempRes
				resolve()
			})
			.catch(() => {
				reject()
			})
	})
}

function drawMoving({ percent }: any) {
	sliderValue.value = percent
	if (sliderValue.value === 100) {
		isPlay.value = false
		return
	}
	// 根据百分比更新当前索引
	const targetIndex = Math.floor(points.value.length * percent)
	currentIndex.value = targetIndex
}

function onPlay() {
	isPlay.value = !isPlay.value
	// 播放完后,重置数据
	if (sliderValue.value >= 100) {
		sliderValue.value = 0
		currentIndex.value = 0
		needContinuePlay.value = false
		mapPolylineFn.value.moveToIndex(0)
	}
	if (needContinuePlay.value) {
		mapPolylineFn.value.continueAnimation()
		return
	}
	mapPolylineFn.value.startAnimation(speedValue.value, currentIndex.value)
}
function onPause() {
	needContinuePlay.value = true
	isPlay.value = !isPlay.value
	mapPolylineFn.value.pauseAnimation()
}

function onSpeedChange() {
	if (isPlay.value) {
		isPlay.value = false
		needContinuePlay.value = false
		mapPolylineFn.value.pauseAnimation()
		const targetIndex = Math.round(
			(sliderValue.value / 100) * points.value.length
		)
		currentIndex.value = targetIndex
		mapPolylineFn.value.moveToIndex(targetIndex)
	}
}
/**
 * 滑块拖动时,暂停动画,并根据滑块值更新当前轨迹索引
 * 同时不需要继续执行动画,而是重新开始动画
 */
function onSliderChange(val: any) {
	needContinuePlay.value = false
	isPlay.value = false
	mapPolylineFn.value.pauseAnimation()
	const targetIndex = Math.round((val / 100) * points.value.length)
	currentIndex.value = targetIndex
	mapPolylineFn.value.moveToIndex(targetIndex)
}

// 全览
function renderAllPolyline() {
	isAllPolyline.value = true
	if (points.value.length === 0) {
		goStart("fn")
	} else {
		hasStart.value = false
		needContinuePlay.value = false
		isPlay.value = false
		mapPolylineFn.value && mapPolylineFn.value.removePolyine()
		mapLoader.value.renderAllPolyline(points.value)
	}
}
// 地图移动结束后重新执行轨迹绘制
function mapReadyFn() {
	pendingAction && pendingAction()
	pendingAction = null
}
// 开始,需要区分是总览函数调用还是按钮点击事件触发。如果是按钮触发,则需要将重置
function goStart(type: "btn" | "fn") {
	if (type === "btn") {
		mapPolylineFn.value && mapPolylineFn.value?.removePolyine?.()
		isAllPolyline.value = false
		speedValue.value = 1
		currentIndex.value = 0
		isPlay.value = false
	}
	if (searchForm.id === "" || searchForm.time.length === 0) {
		ElMessage.error("请输入查询条件")
		return
	}
	getPointsById().then(() => {
		if (isAllPolyline.value) {
			mapLoader.value.removeOverviewPolyline()
			mapLoader.value.renderAllPolyline(points.value)
		} else {
			hasStart.value = true
			mapPolylineFn.value = mapLoader.value.drawPolyline(
				points.value,
				drawMoving,
				mapReadyFn
			)
			// 如果地图移动事件未完成,则缓存play方法,等待地图移动完成后再执行
			if (mapReady.value) {
				onPlay()
			} else {
				pendingAction = () => onPlay()
			}
		}
	})
}
// 关闭
function onCancel() {
	hasStart.value = false
	isPlay.value = false
	isAllPolyline.value = false
	speedValue.value = 1
	currentIndex.value = 0
	mapPolylineFn.value.removePolyine()
}
// 下载
function downloadFn() {
	// 下载。。。
}

onMounted(() => {
	initMap()
})

watch(
	() => route.query,
	(query: any) => {
		if (query.id) {
			searchForm.id = query.id
			searchForm.imei = query.imei ?? ""
		}
	},
	{ immediate: true }
)
</script>
结束语
轨迹回放的相关代码如上。mapLoader中其他的方法在此就不做调用的示例了。代码写的还是不完善,请大家多多指教。这一篇纯是一个记录(以后不用重复造轮子了,能省则省) 完结