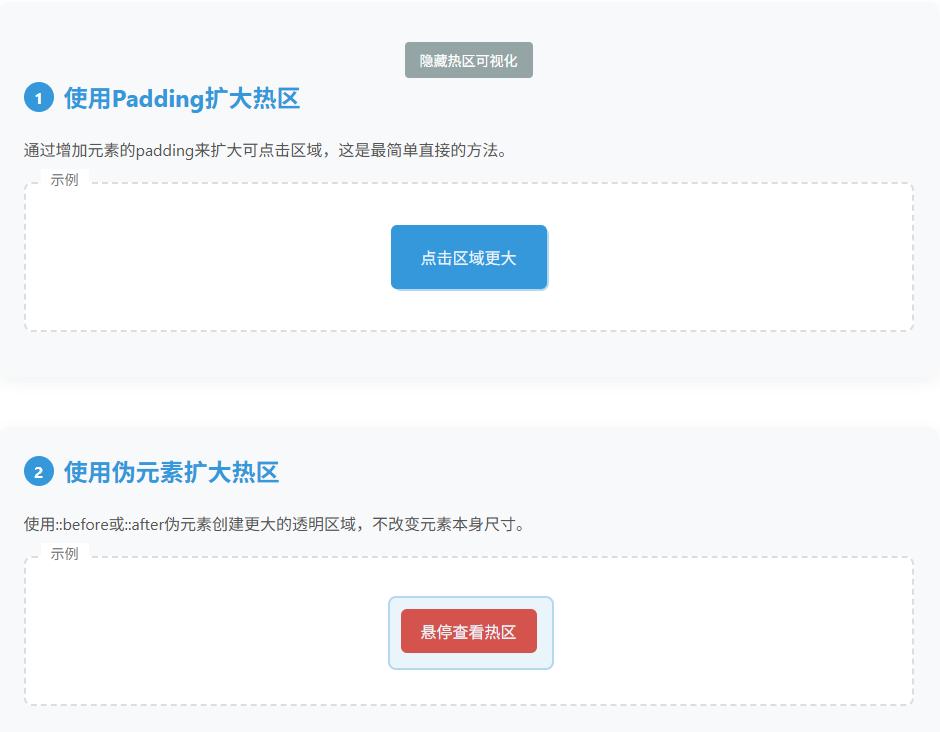
CSS扩大点击热区示例

代码示例:
javascript
<!DOCTYPE html>
<html lang="zh-CN">
<head>
    <meta charset="UTF-8">
    <meta name="viewport" content="width=device-width, initial-scale=1.0">
    <title>CSS扩大点击热区示例</title>
    <style>
        * {
            box-sizing: border-box;
            margin: 0;
            padding: 0;
        }

        body {
            font-family: 'Segoe UI', Tahoma, Geneva, Verdana, sans-serif;
            line-height: 1.6;
            color: #333;
            background: linear-gradient(135deg, #f5f7fa 0%, #c3cfe2 100%);
            padding: 20px;
            min-height: 100vh;
        }

        .container {
            max-width: 1000px;
            margin: 0 auto;
            padding: 30px;
            background: white;
            border-radius: 15px;
            box-shadow: 0 10px 30px rgba(0, 0, 0, 0.1);
        }

        h1 {
            text-align: center;
            margin-bottom: 40px;
            color: #2c3e50;
            position: relative;
        }

        h1:after {
            content: '';
            display: block;
            width: 60px;
            height: 4px;
            background: #3498db;
            margin: 10px auto;
            border-radius: 2px;
        }

        .method {
            margin-bottom: 50px;
            padding: 25px;
            border-radius: 10px;
            background: #f8f9fa;
            box-shadow: 0 5px 15px rgba(0, 0, 0, 0.05);
        }

        h2 {
            color: #3498db;
            margin-bottom: 20px;
            display: flex;
            align-items: center;
        }

        h2 span {
            background: #3498db;
            color: white;
            width: 30px;
            height: 30px;
            display: flex;
            align-items: center;
            justify-content: center;
            border-radius: 50%;
            margin-right: 10px;
            font-size: 16px;
        }

        .description {
            margin-bottom: 20px;
            color: #555;
        }

        .example {
            display: flex;
            justify-content: center;
            align-items: center;
            height: 150px;
            position: relative;
            background: white;
            border: 2px dashed #ddd;
            border-radius: 8px;
            margin: 20px 0;
            padding: 20px;
        }

        .example-title {
            position: absolute;
            top: -15px;
            left: 15px;
            background: white;
            padding: 0 10px;
            font-size: 14px;
            color: #777;
        }

        /* 方法1: 使用padding扩大热区 */
        .btn-padding {
            padding: 20px 30px;
            background: #3498db;
            color: white;
            border: none;
            border-radius: 6px;
            cursor: pointer;
            font-size: 16px;
            transition: all 0.3s;
        }

        .btn-padding:hover {
            background: #2980b9;
            transform: translateY(-2px);
        }

        /* 方法2: 使用伪元素扩大热区 */
        .btn-pseudo {
            position: relative;
            padding: 10px 20px;
            background: #e74c3c;
            color: white;
            border: none;
            border-radius: 6px;
            cursor: pointer;
            font-size: 16px;
            z-index: 1;
        }

        .btn-pseudo::before {
            content: '';
            position: absolute;
            top: -15px;
            left: -15px;
            right: -15px;
            bottom: -15px;
            z-index: -1;
        }

        /* 方法3: 使用border扩大热区 */
        .btn-border {
            padding: 10px 20px;
            background: #2ecc71;
            color: white;
            border: 10px solid transparent;
            border-radius: 6px;
            cursor: pointer;
            font-size: 16px;
            transition: all 0.3s;
        }

        .btn-border:hover {
            background: #27ae60;
        }

        /* 方法4: 使用transform扩大热区 */
        .btn-transform {
            padding: 10px 20px;
            background: #9b59b6;
            color: white;
            border: none;
            border-radius: 6px;
            cursor: pointer;
            font-size: 16px;
            position: relative;
            overflow: visible;
        }

        .btn-transform::after {
            content: '';
            position: absolute;
            top: 50%;
            left: 50%;
            width: 150%;
            height: 150%;
            transform: translate(-50%, -50%);
            z-index: -1;
        }

        .visual-area {
            position: absolute;
            border: 2px solid rgba(52, 152, 219, 0.3);
            background: rgba(52, 152, 219, 0.1);
            pointer-events: none;
            z-index: 10;
            border-radius: 8px;
        }

        .toggle-visual {
            display: block;
            margin: 15px auto 0;
            padding: 8px 15px;
            background: #95a5a6;
            color: white;
            border: none;
            border-radius: 4px;
            cursor: pointer;
            font-size: 14px;
            transition: background 0.3s;
        }

        .toggle-visual:hover {
            background: #7f8c8d;
        }

        .tip {
            text-align: center;
            margin-top: 30px;
            padding: 15px;
            background: #fff8e1;
            border-left: 4px solid #ffc107;
            border-radius: 4px;
            font-size: 14px;
        }

        @media (max-width: 768px) {
            .container {
                padding: 15px;
            }

            .method {
                padding: 15px;
            }
        }
    </style>
</head>
<body>
    <div class="container">
        <h1>CSS扩大点击热区方法</h1>

        <div class="method">
          <button class="toggle-visual" id="toggleVisual">显示热区可视化</button>
            <h2><span>1</span>使用Padding扩大热区</h2>
            <p class="description">通过增加元素的padding来扩大可点击区域,这是最简单直接的方法。</p>
            <div class="example">
                <span class="example-title">示例</span>
                <button class="btn-padding" onclick="alert('点击了按钮')">点击区域更大</button>
            </div>
        </div>

        <div class="method">
            <h2><span>2</span>使用伪元素扩大热区</h2>
            <p class="description">使用::before或::after伪元素创建更大的透明区域,不改变元素本身尺寸。</p>
            <div class="example">
                <span class="example-title">示例</span>
                <button class="btn-pseudo" onclick="alert('点击了按钮')">悬停查看热区</button>
            </div>
        </div>

        <div class="method">
            <h2><span>3</span>使用透明Border扩大热区</h2>
            <p class="description">通过添加透明边框来扩大点击区域,不影响元素内部布局。</p>
            <div class="example">
                <span class="example-title">示例</span>
                <button class="btn-border" onclick="alert('点击了按钮')">我有透明边框</button>
            </div>
        </div>

        <div class="method">
            <h2><span>4</span>使用Transform扩大热区</h2>
            <p class="description">使用伪元素并通过transform放大,创建更大的点击区域。</p>
            <div class="example">
                <span class="example-title">示例</span>
                <button class="btn-transform" onclick="alert('点击了按钮')">Transform热区</button>
            </div>
        </div>


        <div class="tip">
            <p><strong>提示:</strong> 在移动设备上,扩大点击热区非常重要,建议最小点击区域为44×44像素,以提高可访问性和用户体验。</p>
        </div>
    </div>

    <script>
        document.addEventListener('DOMContentLoaded', function() {
            const toggleBtn = document.getElementById('toggleVisual');
            let visualsVisible = false;
            let visualElements = [];

            toggleBtn.addEventListener('click', function() {
                if (!visualsVisible) {
                    // 创建热区可视化
                    const examples = document.querySelectorAll('.example');

                    examples.forEach(example => {
                        const btn = example.querySelector('button');
                        const rect = btn.getBoundingClientRect();
                        const exampleRect = example.getBoundingClientRect();

                        const visual = document.createElement('div');
                        visual.className = 'visual-area';

                        // 根据不同的方法设置不同的热区大小
                        if (btn.classList.contains('btn-padding')) {
                            visual.style.width = rect.width + 'px';
                            visual.style.height = rect.height + 'px';
                            visual.style.top = (rect.top - exampleRect.top) + 'px';
                            visual.style.left = (rect.left - exampleRect.left) + 'px';
                        }
                        else if (btn.classList.contains('btn-pseudo')) {
                            visual.style.width = (rect.width + 30) + 'px';
                            visual.style.height = (rect.height + 30) + 'px';
                            visual.style.top = (rect.top - exampleRect.top - 15) + 'px';
                            visual.style.left = (rect.left - exampleRect.left - 15) + 'px';
                        }
                        else if (btn.classList.contains('btn-border')) {
                            visual.style.width = (rect.width) + 'px';
                            visual.style.height = (rect.height) + 'px';
                            visual.style.top = (rect.top - exampleRect.top) + 'px';
                            visual.style.left = (rect.left - exampleRect.left) + 'px';
                        }
                        else if (btn.classList.contains('btn-transform')) {
                            visual.style.width = (rect.width * 1.5) + 'px';
                            visual.style.height = (rect.height * 1.5) + 'px';
                            visual.style.top = (rect.top - exampleRect.top - (rect.height * 0.25)) + 'px';
                            visual.style.left = (rect.left - exampleRect.left - (rect.width * 0.25)) + 'px';
                        }

                        example.appendChild(visual);
                        visualElements.push(visual);
                    });

                    toggleBtn.textContent = '隐藏热区可视化';
                    visualsVisible = true;
                } else {
                    // 移除所有可视化元素
                    visualElements.forEach(visual => {
                        visual.remove();
                    });
                    visualElements = [];

                    toggleBtn.textContent = '显示热区可视化';
                    visualsVisible = false;
                }
            });
        });
    </script>
</body>
</html>
方法说明
-
Padding方法:通过增加按钮的内边距来直接扩大点击区域,简单有效。
-
伪元素方法:使用::before或::after伪元素创建更大的透明区域,不改变元素本身尺寸。
-
透明Border方法:添加透明边框扩大点击区域,不影响元素内部布局。
-
Transform方法:使用伪元素并通过transform属性放大,创建更大的点击区域。
使用建议
-
对于简单的按钮,使用padding方法最为直接
-
当需要保持元素尺寸不变时,使用伪元素或透明border方法
-
在移动端开发中,确保点击区域至少为44×44像素
-
使用可视化工具检查热区大小是否符合要求
这个页面包含了所有方法的可视化示例,您可以点击"显示热区可视化"按钮来查看每个按钮的实际可点击区域。