一. 前言
Modal 是一个无服务器云计算系统 ,为人工智能和机器学习提供容器 ,以及一些云计算的任务。
这一篇主要是对其概念做一个整理 ,以及一些简单的使用。
Modal 的特性 :
- 无服务器架构 :开发者无需关心底层服务器的维护,只需关注代码逻辑(不需要自己去指定GPU等,直接提供算力)
- 按量付费的计费方式 : 只有在代码执行期间才会产生费用
二. 三步理解平台的玩法
2.1 一键启动一个云端项目
环境安装
python
pip install modal
python -m modal setup
代码准备
python
"""
Modal 基础示例 - Hello World
功能:演示最基本的 Modal 应用结构,包括 App 定义、函数装饰器和本地入口点
运行:modal run 01_hello_world.py
"""
import modal

# 1. 定义一个 App,作为组织代码的命名空间
app = modal.App("hello-world-app")

# 2. 使用 @app.function() 装饰器将普通 Python 函数转变为云函数
@app.function()
def square(x):
    print("这段代码正在云端运行!")
    return x * x

# 3. 使用 @app.local_entrypoint() 定义一个本地入口,用于从命令行调用
@app.local_entrypoint()
def main():
    # 使用 .remote() 调用云函数
    print("42 的平方是:", square.remote(42))
运行项目
shell
modal run 01_hello_world.py

PS D:\ai\modal> modal run 01_hello_world.py
✓ Initialized. View run at https://modal.com/apps/123/main/ap-123123
✓ Created objects.
├── 🔨 Created mount D:\ai\modal\01_hello_world.py
└── 🔨 Created function square.
这段代码正在云端运行!
42 的平方是: 1764
Stopping app - local entrypoint completed.
✓ App completed. View run at https://modal.com/apps/123/main/ap-123123
控制面板里面查看执行过程


2.2 配置资源
- 核心代码 :* @app.function(image=image, gpu="H100:4")*
python
"""
GPU 使用示例
功能:演示如何在 Modal 中请求和使用 GPU 资源
特点:支持单个和多个 GPU 配置(A10G、H100 等)
运行:modal run 05_gpu_usage.py
"""
import modal

app = modal.App("gpu-app")
image = modal.Image.debian_slim().pip_install("torch")

# 请求一个 NVIDIA A10G GPU
@app.function(image=image, gpu="A10G")
def use_gpu():
    import torch
    if torch.cuda.is_available():
        print("GPU is available:", torch.cuda.get_device_name(0))
    else:
        print("GPU not found!")

# 请求 4 个 H100 GPU
@app.function(image=image, gpu="H100:4")
def use_multi_gpu():
    import torch
    print(f"Found {torch.cuda.device_count()} GPUs.")

@app.local_entrypoint()
def main():
    use_gpu.remote()
    use_multi_gpu.remote()
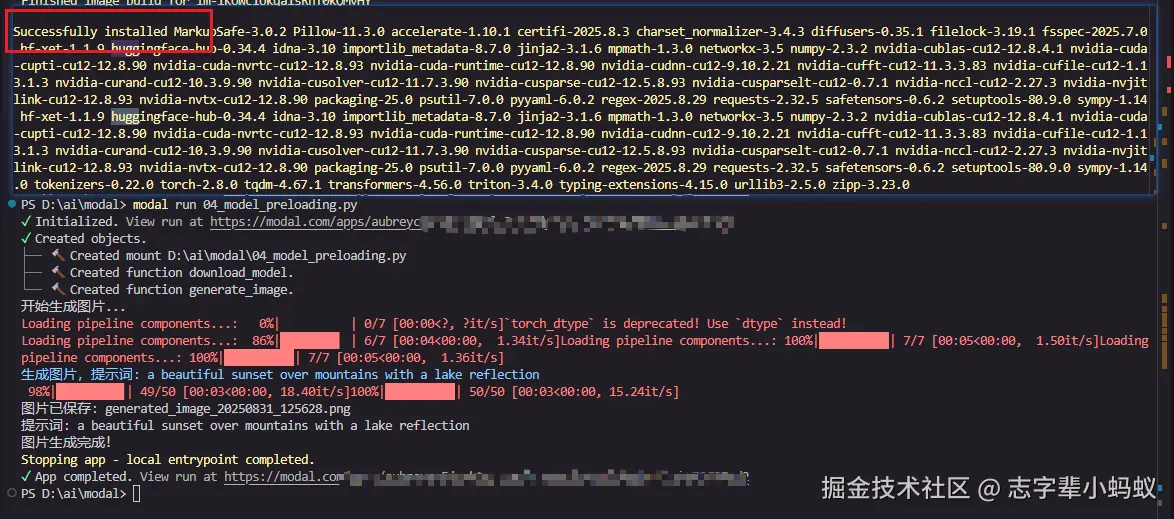
2.3 使用huggingface模型
首先需要准备一个密钥

下载模型后使用
python
"""
模型预加载示例
功能:演示如何在镜像构建时预加载大型模型(如 Stable Diffusion)
特点:使用 run_function 在构建时下载模型,运行时直接使用
注意:需要先创建 Modal 密钥:
  modal secret create huggingface-secret HF_TOKEN=your_hf_token_here
运行:modal run 04_model_preloading.py
"""
import modal
import os

app = modal.App("model-preloading-app")

# Hugging Face 密钥,用于下载私有模型
# 注意:需要先在 Modal 中创建名为 "huggingface-secret" 的密钥
hf_secret = modal.Secret.from_name("huggingface-secret")


def download_model():
    # 这个函数在镜像构建时运行一次
    from diffusers import StableDiffusionPipeline

    model_id = "runwayml/stable-diffusion-v1-5"
    pipe = StableDiffusionPipeline.from_pretrained(
        model_id, use_auth_token=os.environ["HF_TOKEN"]
    )
    # 将模型保存到镜像内的 /model 目录
    pipe.save_pretrained("/model")


# 构建镜像时运行 download_model 函数
image = (
    modal.Image.debian_slim()
    .pip_install("diffusers[torch]", "transformers")
    .run_function(download_model, secrets=[hf_secret])
)


@app.function(image=image, gpu="A10G")
def generate_image(prompt: str = "a photo of an astronaut riding a horse on mars"):
    # 函数运行时,模型已经存在于 /model 目录
    from diffusers import StableDiffusionPipeline
    import torch
    import io
    from datetime import datetime

    pipe = StableDiffusionPipeline.from_pretrained(
        "/model", torch_dtype=torch.float16
    ).to("cuda")

    print(f"生成图片,提示词: {prompt}")
    image = pipe(prompt).images[0]

    # 将图片转换为字节数据
    img_bytes = io.BytesIO()
    image.save(img_bytes, format='PNG')
    img_bytes.seek(0)

    # 生成文件名(包含时间戳)
    timestamp = datetime.now().strftime("%Y%m%d_%H%M%S")
    filename = f"generated_image_{timestamp}.png"

    return {
        "image_data": img_bytes.getvalue(),
        "filename": filename,
        "prompt": prompt
    }


@app.local_entrypoint()
def main():
    # 可以自定义提示词
    prompt = "a beautiful sunset over mountains with a lake reflection"

    print("开始生成图片...")
    result = generate_image.remote(prompt)

    # 保存图片到当前文件夹
    with open(result["filename"], "wb") as f:
        f.write(result["image_data"])

    print(f"图片已保存: {result['filename']}")
    print(f"提示词: {result['prompt']}")
    print("图片生成完成!")


三. 常见功能点
3.1 零散行为
python
// 安装依赖包 :
image = modal.Image.debian_slim().apt_install("git", "ffmpeg")


// 控制资源 :
@app.function(cpu=8, memory=16384)

// 添加网络接口 :
@app.web_endpoint(method="GET")

// 定时任务 :
@app.function(schedule=modal.Cron("5 4 * * *"))
3.2 复杂功能点
Volumns 卷使用
python
# 函数一:下载并保存数据到 Volume
@app.function(volumes={MODEL_DIR: model_volume})
def download_data():
    model_path = pathlib.Path(MODEL_DIR) / "data.txt"
    if not model_path.exists():
        print("下载数据...")
        model_path.write_text("这是模型数据")
        # 必须 commit 才能使更改对其他函数可见
        model_volume.commit()
        print("数据已保存并提交到 Volume。")

# 函数二:从 Volume 读取数据
@app.function(volumes={MODEL_DIR: model_volume})
def use_data():
    model_path = pathlib.Path(MODEL_DIR) / "data.txt"
    # 需要 reload() 来获取最新版本的数据
    model_volume.reload()
    if model_path.exists():
        content = model_path.read_text()
        print(f"从 Volume 中读取到数据: '{content}'")
    else:
        print("在 Volume 中未找到数据。")
总结
可以简单体验一下 AI 的一些功能 ,消耗比较高 ,但是简单入门应该够了 。
demo 案例 : gitee.com/antblack/ai...
最后的最后 ❤️❤️❤️👇👇👇
- 👈 欢迎关注 ,超200篇优质文章,未来持续高质量输出 🎉🎉
- 🔥🔥🔥 系列文章集合,高并发,源码应有尽有 👍👍
- 走过路过不要错过 ,知识无价还不收钱 ❗❗