流程
自定义 ViewGroup 的流程为:
-
重写
onMeasure方法遍历并测量每个子 View,将每个子 View 的实际位置和尺寸暂存下来。(有些子 View 可能需要重新测量)
根据测量结果,计算自己的尺寸,然后调用
setMeasuredDimension(width, height)保存。 -
重写
onLayout方法遍历子 View,调用它们的
layout()方法并传入每个子 View 的位置和尺寸。
实现简易的 TagLayout
其大致效果是这样的:

实现 TagView
我们先来实现标签部分。
准备工作:创建 TagView,继承自 AppCompatTextView。
首先添加内边距。
kotlin
class TagView @JvmOverloads constructor(
    context: Context,
    attrs: AttributeSet? = null,
    defStyleAttr: Int = 0,
) : AppCompatTextView(context, attrs, defStyleAttr) {

    private val paddingHorizontal = 10.dp
    private val paddingVertical = 5.dp

    init {
        setPadding(
            paddingHorizontal.toInt(),
            paddingVertical.toInt(),
            paddingHorizontal.toInt(),
            paddingVertical.toInt()
        )
    }
}
然后绘制圆角背景即可。
kotlin
init {
    // ...
    setTextColor(Color.WHITE)
}


private val colors = intArrayOf(
    Color.parseColor("#FFEB3B"),
    Color.parseColor("#FF5722"),
    Color.parseColor("#9C27B0"),
    Color.parseColor("#3F51B5"),
    Color.parseColor("#009688"),
    Color.parseColor("#795548"),
    Color.parseColor("#607D8B"),
    Color.parseColor("#E91E63"),
    Color.parseColor("#CDDC39"),
    Color.parseColor("#4CAF50"),
    Color.parseColor("#FF9800"),
)

private val myPaint = Paint(Paint.ANTI_ALIAS_FLAG).apply { // 使用 ANTI_ALIAS_FLAG 抗锯齿
    color = colors.random()
    style = Paint.Style.FILL
}

override fun onDraw(canvas: Canvas) {
    // 先绘制背景,再调用 super.onDraw 绘制文本,防止文本被覆盖
    canvas.drawRoundRect(0f, 0f, width.toFloat(), height.toFloat(), 16.dp, 16.dp, myPaint)
    super.onDraw(canvas)
}
在布局中使用:
xml
<?xml version="1.0" encoding="utf-8"?>
<LinearLayout xmlns:android="http://schemas.android.com/apk/res/android"
xmlns:app="http://schemas.android.com/apk/res-auto"
android:layout_width="match_parent"
android:layout_height="match_parent"
android:orientation="horizontal">
<com.example.customview.TagView
android:layout_width="wrap_content"
android:layout_height="wrap_content"
android:text="Kotlin" />
<com.example.customview.TagView
android:layout_width="wrap_content"
android:layout_height="wrap_content"
android:text="Java" />
<com.example.customview.TagView
android:layout_width="wrap_content"
android:layout_height="wrap_content"
android:text="Tag" />
<com.example.customview.TagView
android:layout_width="wrap_content"
android:layout_height="wrap_content"
android:text="Android" />
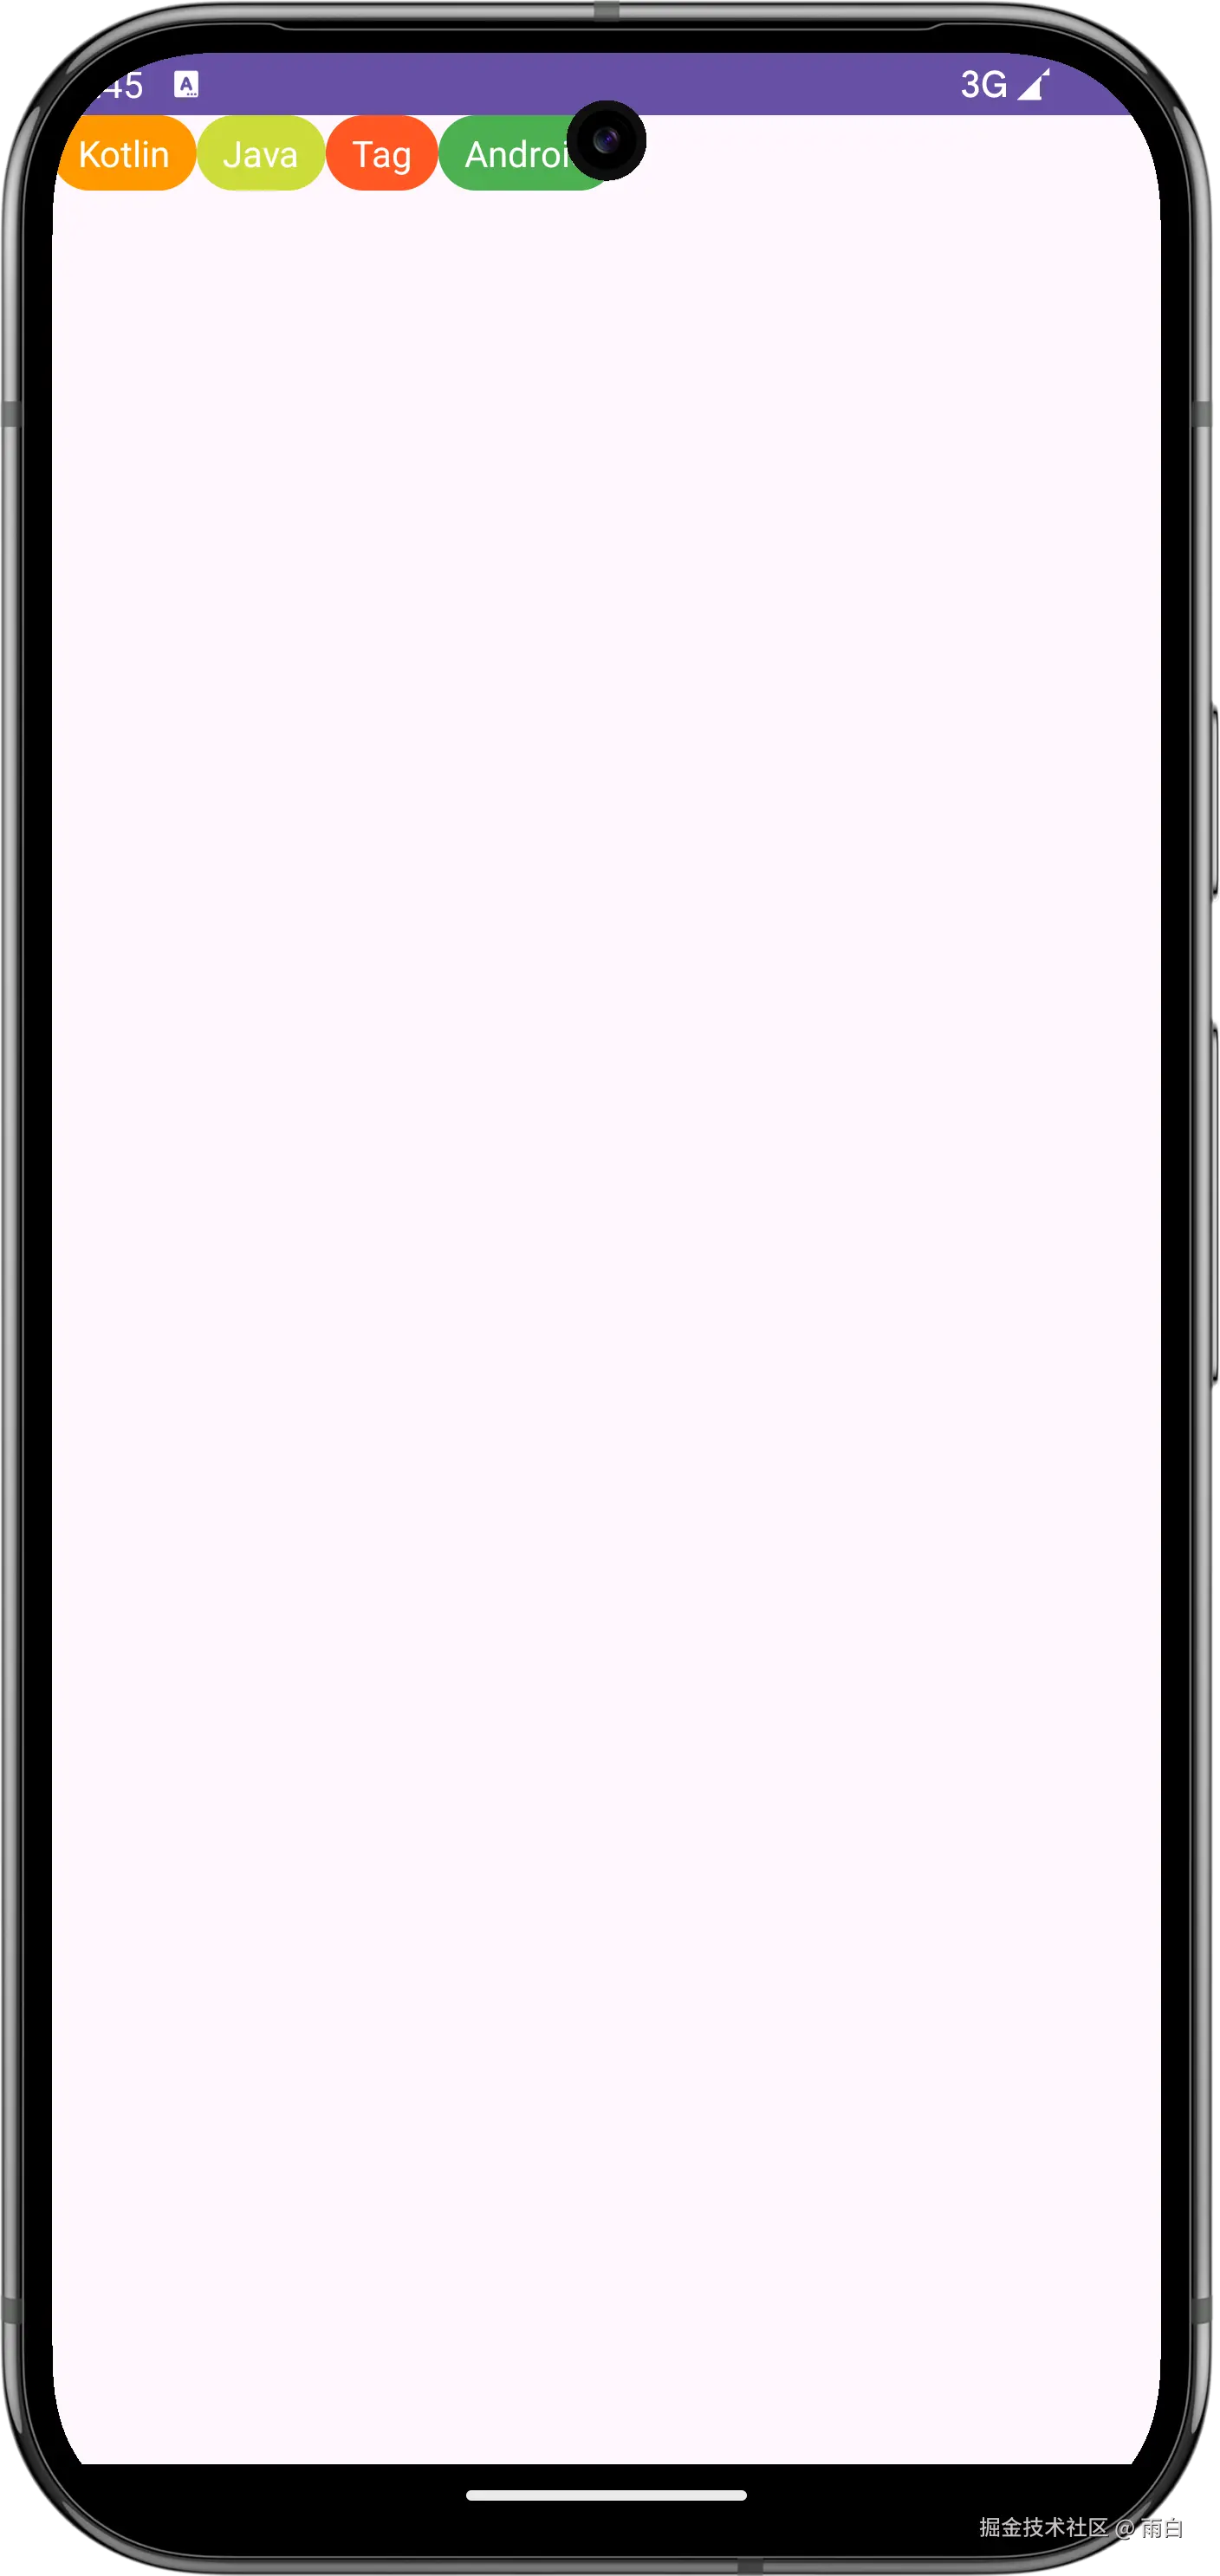
</LinearLayout>运行效果:
实现 TagLayout
然后实现标签布局(目前先实现单行标签)。
创建 TagLayout,继承自 ViewGroup,实现 onLayout 抽象方法:
kotlin
class TagLayout @JvmOverloads constructor(
    context: Context, attrs: AttributeSet? = null, defStyleAttr: Int = 0
) : ViewGroup(context, attrs, defStyleAttr) {
    override fun onLayout(changed: Boolean, l: Int, t: Int, r: Int, b: Int) {

    }
}
我们先按照步骤,搭出大致框架:
kotlin
class TagLayout @JvmOverloads constructor(
    context: Context, attrs: AttributeSet? = null, defStyleAttr: Int = 0,
) : ViewGroup(context, attrs, defStyleAttr) {

    // 每个子View的边界
    private val childrenBounds = mutableListOf<Rect>()

    @SuppressLint("DrawAllocation")
    override fun onMeasure(widthMeasureSpec: Int, heightMeasureSpec: Int) {
        // 遍历并测量子View
        for ((index, child) in children.withIndex()) {
            val childWidthMeasureSpec = 0
            val childHeightMeasureSpec = 0
            child.measure(childWidthMeasureSpec, childHeightMeasureSpec)

            // 获取或创建用于存储子View边界的Rect对象
            val childBounds =
                childrenBounds.getOrNull(index) ?: Rect().also { childrenBounds.add(it) }
        }

        // 计算自身尺寸
        val selfWidth = 0
        val selfHeight = 0
        setMeasuredDimension(selfWidth, selfHeight)
    }

    override fun onLayout(changed: Boolean, l: Int, t: Int, r: Int, b: Int) {
        // 遍历并布局每个子View
        for ((index, child) in children.withIndex()) {
            val childBounds = childrenBounds[index]
            child.layout(childBounds.left, childBounds.top, childBounds.right, childBounds.bottom)
        }
    }
}
然后填充每个值,首先是我们对子 View 的具体尺寸要求 childWidthMeasureSpec 和 childHeightMeasureSpec,我们需要结合开发者填入的尺寸要求,以及当前的可用空间得出。
其中第一个可以通过子 View 的 getLayoutParams() 方法获取,第二个需要根据父 View 传入的尺寸要求,以及当前已使用空间得出。
如果我们手动来计算的话,代码会是下面这样的:
kotlin
@SuppressLint("DrawAllocation")
override fun onMeasure(widthMeasureSpec: Int, heightMeasureSpec: Int) {

    // 规格参数
    val widthSpecMode = MeasureSpec.getMode(widthMeasureSpec)
    val widthSpecSize = MeasureSpec.getSize(widthMeasureSpec)
    val heightSpecMode = MeasureSpec.getMode(heightMeasureSpec)
    val heightSpecSize = MeasureSpec.getSize(heightMeasureSpec)

    // 布局中已使用的空间
    var widthSizeUsed = 0 // 当前行已使用的宽度
    var heightSizeUsed = 0 // 已布局完成的所有行所占的总高度

    // 遍历并测量子View
    for ((index, child) in children.withIndex()) {
        // 获取子View的布局参数
        val params = child.layoutParams
        var childWidthMeasureSpec: Int
        var childHeightMeasureSpec: Int

        // 计算宽度 MeasureSpec
        when (params.width) {
            // 子 View 希望和父容器的剩余空间一样大
            LayoutParams.MATCH_PARENT -> {
                // 如果父容器有精确尺寸或最大尺寸,子 View 就必须精确地填充该剩余空间。
                childWidthMeasureSpec =
                    if (widthSpecMode == MeasureSpec.EXACTLY || widthSpecMode == MeasureSpec.AT_MOST) {
                        MeasureSpec.makeMeasureSpec(
                            widthSpecSize - widthSizeUsed, MeasureSpec.EXACTLY
                        )
                    }
                    // 如果父容器没有尺寸限制 (UNSPECIFIED),那么 MATCH_PARENT 就没有意义。
                    else { // UNSPECIFIED
                        MeasureSpec.makeMeasureSpec(0, MeasureSpec.UNSPECIFIED)
                    }
            }
            // 子 View 希望尺寸刚好能包裹其内容
            LayoutParams.WRAP_CONTENT -> {
                // 如果父容器有精确尺寸或最大尺寸,那么子 View 的尺寸不能超过该限制。
                childWidthMeasureSpec =
                    if (widthSpecMode == MeasureSpec.EXACTLY || widthSpecMode == MeasureSpec.AT_MOST) {
                        MeasureSpec.makeMeasureSpec(
                            widthSpecSize - widthSizeUsed, MeasureSpec.AT_MOST
                        )
                    }
                    // 如果父容器没有尺寸限制,子 View 就可以是任意它需要的大小。
                    else {
                        MeasureSpec.makeMeasureSpec(0, MeasureSpec.UNSPECIFIED)
                    }
            }
            // 子 View 是一个固定尺寸
            else -> {
                // 让子 View 获得它明确要求的精确尺寸。
                childWidthMeasureSpec =
                    MeasureSpec.makeMeasureSpec(params.width, MeasureSpec.EXACTLY)
            }
        }

        // 计算高度 MeasureSpec
        when (params.height) {
            LayoutParams.MATCH_PARENT -> {
                childHeightMeasureSpec =
                    if (heightSpecMode == MeasureSpec.EXACTLY || heightSpecMode == MeasureSpec.AT_MOST) {
                        MeasureSpec.makeMeasureSpec(
                            heightSpecSize - heightSizeUsed, MeasureSpec.EXACTLY
                        )
                    } else {
                        MeasureSpec.makeMeasureSpec(0, MeasureSpec.UNSPECIFIED)
                    }
            }

            LayoutParams.WRAP_CONTENT -> {
                childHeightMeasureSpec =
                    if (heightSpecMode == MeasureSpec.EXACTLY || heightSpecMode == MeasureSpec.AT_MOST) {
                        MeasureSpec.makeMeasureSpec(
                            heightSpecSize - heightSizeUsed, MeasureSpec.AT_MOST
                        )
                    } else {
                        MeasureSpec.makeMeasureSpec(0, MeasureSpec.UNSPECIFIED)
                    }
            }

            else -> {
                childHeightMeasureSpec =
                    MeasureSpec.makeMeasureSpec(params.height, MeasureSpec.EXACTLY)
            }
        }
        // 测量子 View
        child.measure(childWidthMeasureSpec, childHeightMeasureSpec)

        // 获取或创建用于存储子View边界的Rect对象
        // ...
    }

    // 计算自身尺寸
    // ...
}
而这一大段得出 MeasureSpec 的代码其实几乎是固定的,为此,Android 给我们提供了 measureChildWithMargins 方法,我们可以简化上述代码。同时,因为这个方法中会访问子 View 的外边距,所以要求子 View 的 LayoutParams 是 MarginLayoutParams 类型,否则会因强转失败抛出异常。所以,我们还要重写 generateLayoutParams 方法。
kotlin
@SuppressLint("DrawAllocation")
override fun onMeasure(widthMeasureSpec: Int, heightMeasureSpec: Int) {
    // 布局中已使用的空间
    var widthSizeUsed = 0
    var heightSizeUsed = 0

    // 遍历并测量子View
    for ((index, child) in children.withIndex()) {
        // 测量子 View
        measureChildWithMargins(
            child,
            widthMeasureSpec,
            widthSizeUsed,
            heightMeasureSpec,
            heightSizeUsed
        )

        // 获取或创建用于存储子View边界的Rect对象
        val childBounds =
            childrenBounds.getOrNull(index) ?: Rect().also { childrenBounds.add(it) }
    }

    // 计算自身尺寸
    val selfWidth = 0
    val selfHeight = 0
    setMeasuredDimension(selfWidth, selfHeight)
}


override fun generateLayoutParams(attrs: AttributeSet?): LayoutParams {
    return MarginLayoutParams(context, attrs)
}
然后我们来完成单行布局的逻辑。
在单行布局中,widthSizeUsed 累加了所有子 View 的宽度,也恰好是下一个子 View 的左侧坐标 (left)。
heightSizeUsed 因为所有 View 都在同一行,所以其值始终为 0,也就是所有子 View 的顶部坐标 (top)。
另外,对于 TagLayout 自身尺寸的计算,在单行布局中,我们使用 widthSizeUsed(子 View 宽度之和)以及 maxHeight(最高子 View 的高度)。
kotlin
@SuppressLint("DrawAllocation")
override fun onMeasure(widthMeasureSpec: Int, heightMeasureSpec: Int) {
// 布局中已使用的空间
var widthSizeUsed = 0
var heightSizeUsed = 0 // 单行布局中,此值始终为0
// 总高度
var maxHeight = 0
// 遍历并测量子View
for ((index, child) in children.withIndex()) {
// 测量子 View
measureChildWithMargins(
child,
widthMeasureSpec,
widthSizeUsed, // 传入当前行已用宽度,作为子View的测量约束
heightMeasureSpec,
heightSizeUsed
)
// 保存子View的边界
val childBounds =
childrenBounds.getOrNull(index) ?: Rect().also { childrenBounds.add(it) }
// 这里,widthSizeUsed 和 heightSizeUsed 恰好是当前子View的左上角坐标
childBounds.set(
widthSizeUsed,
heightSizeUsed,
widthSizeUsed + child.measuredWidth,
heightSizeUsed + child.measuredHeight
)
// 累加子 View 的测量宽度
widthSizeUsed += child.measuredWidth
// 当前行最高子View的高度
maxHeight = max(maxHeight, child.measuredHeight)
}
// 计算自身尺寸
val selfWidth = widthSizeUsed
val selfHeight = maxHeight
setMeasuredDimension(selfWidth, selfHeight)
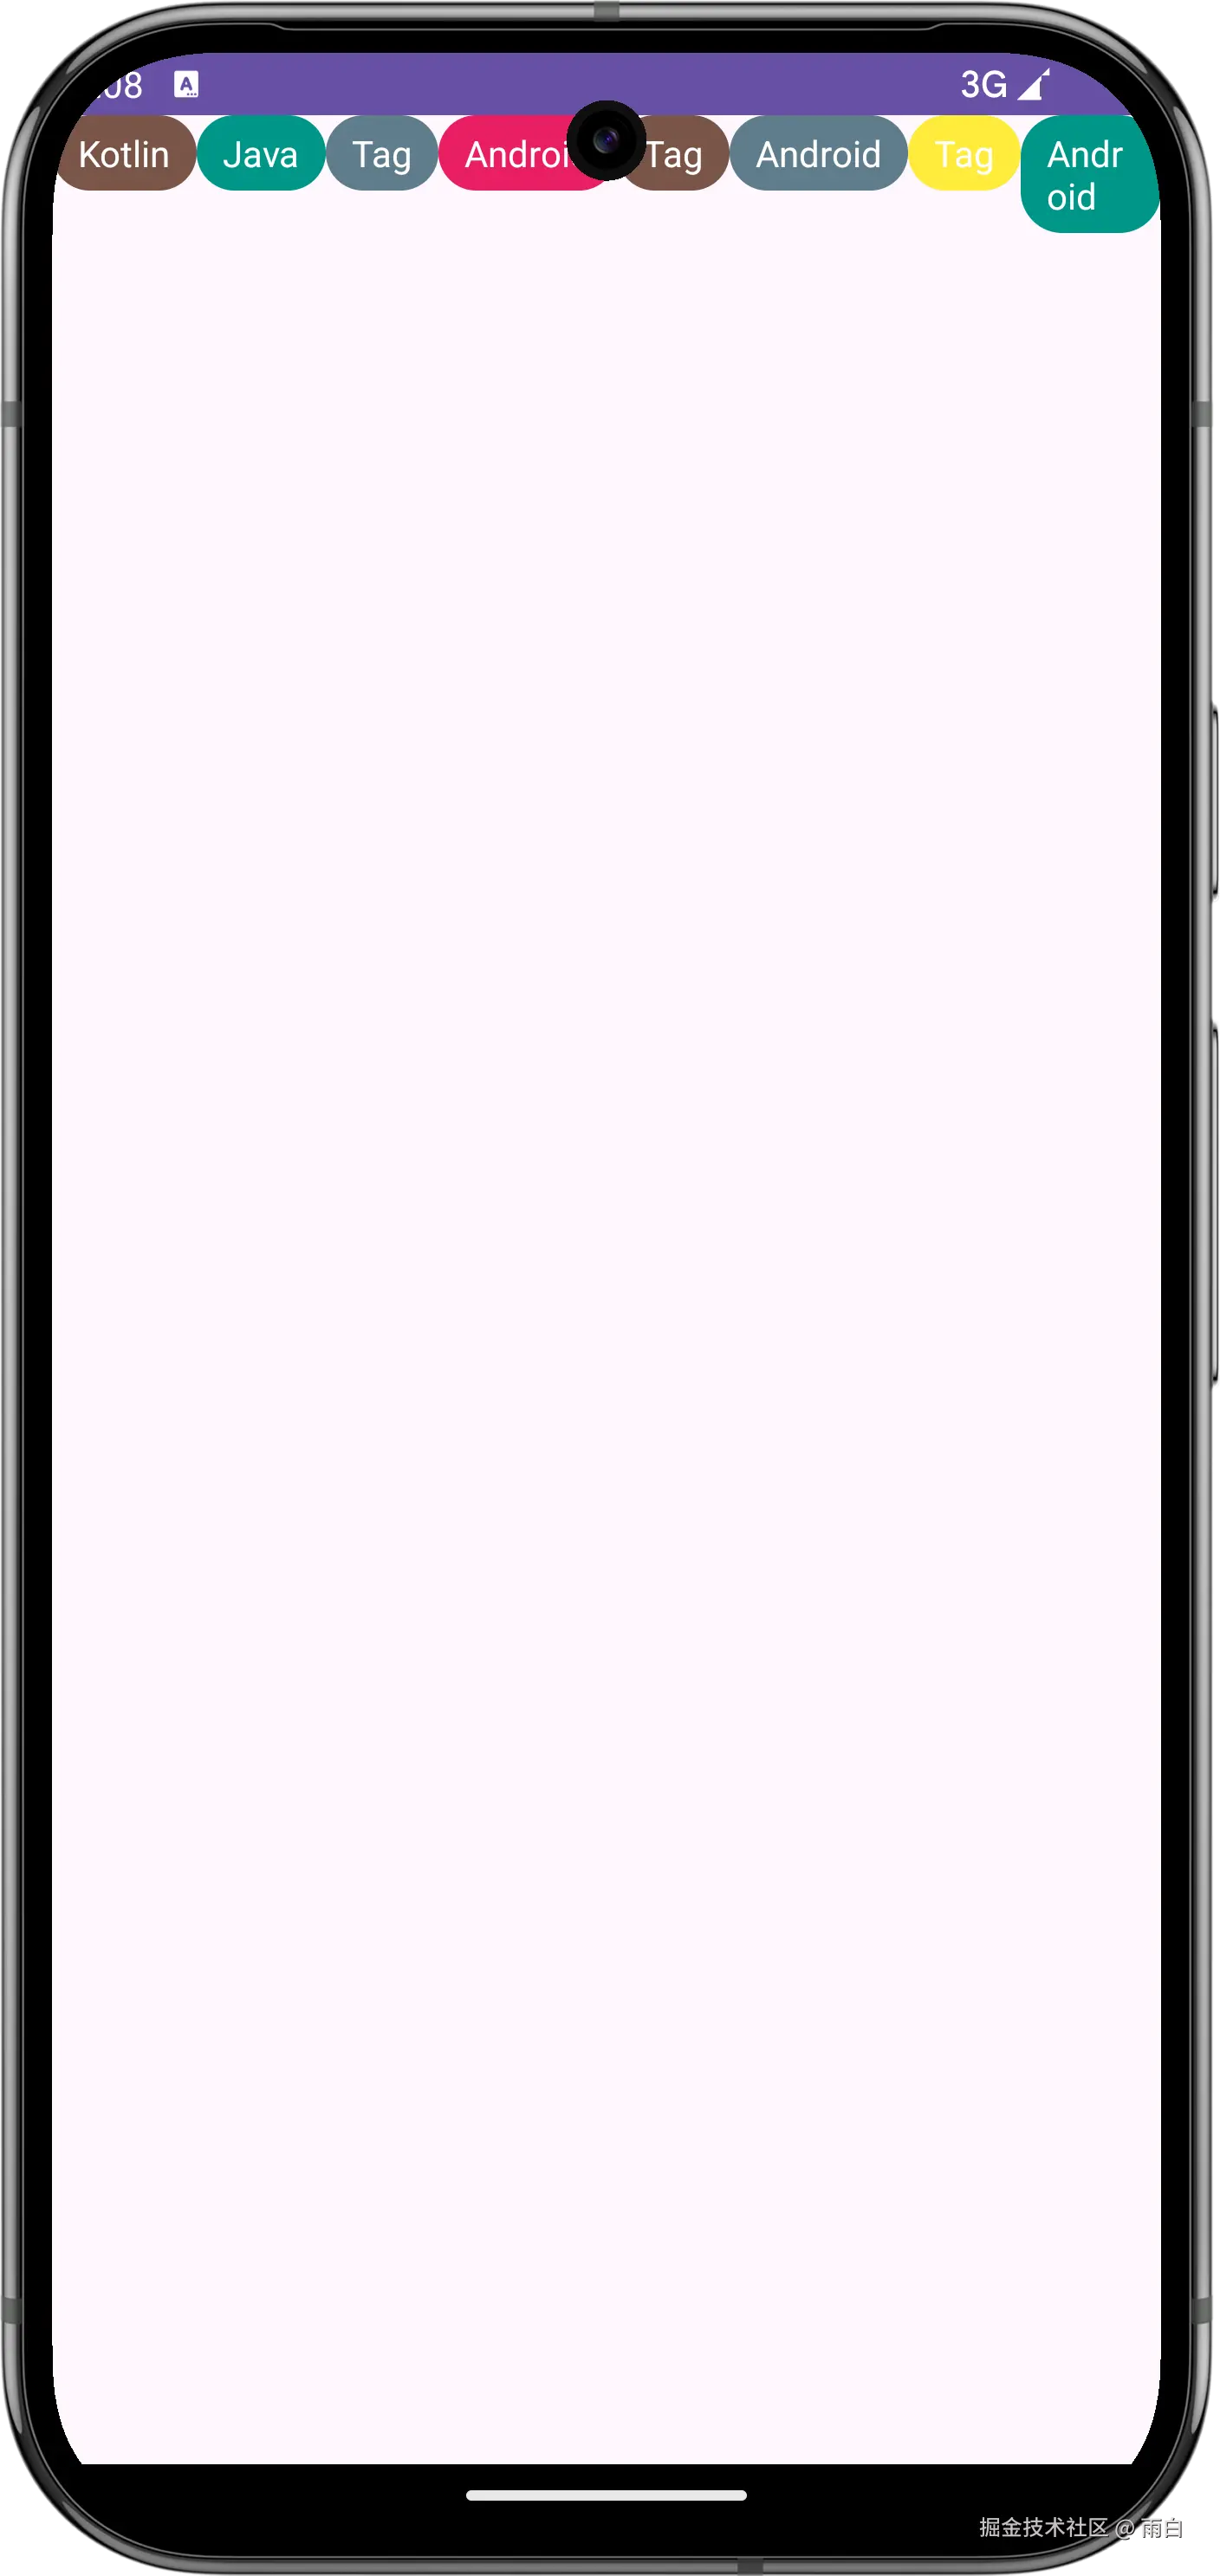
}在布局中使用我们的 TagLayout,运行效果如下,可以看到超出屏幕的标签已经显示不出来了。
现在单行显示没问题了,接着完成多行显示。
在多行布局中,widthSizeUsed 现在只记录当前行的已用宽度。换行时,被重置为 0。heightSizeUsed 记录所有已布局完成的行的总高度。换行时,会累加上一行的最大高度,作为当前行的顶部坐标 (top)。
如何判断当前标签需要另起一行?
我们可以分两次测量,第一次测量给子 View 充足的宽度。如果它想要的宽度,加上当前行已使用的宽度,大于 TagLayout 的总宽度,那就说明需要另起一行了。
所以代码为:
kotlin
@SuppressLint("DrawAllocation")
override fun onMeasure(widthMeasureSpec: Int, heightMeasureSpec: Int) {
// 已使用的尺寸
var widthSizeUsed = 0 // 当前行的已用宽度
var heightSizeUsed = 0 // 所有已完成行的总高度
// 总高度和总宽度
var maxHeight = 0
var maxWidth = 0
val widthSpecSize = MeasureSpec.getSize(widthMeasureSpec)
val widthSpecMode = MeasureSpec.getMode(widthMeasureSpec)
// 遍历并测量子View
for ((index, child) in children.withIndex()) {
// 测量子View
// 预测量
measureChildWithMargins(
child,
widthMeasureSpec,
0, // 🔍 先传0,让它测量出自己的期望宽度
heightMeasureSpec,
heightSizeUsed
)
// 判断预测量后的宽度是否会超出总宽度
if (child.measuredWidth + widthSizeUsed > widthSpecSize && widthSpecMode != MeasureSpec.UNSPECIFIED) {
// 如果超出,则需要换行
// 更新总高度,累加上一行的高度
heightSizeUsed = maxHeight
// 重置行宽,新的一行从0开始
widthSizeUsed = 0
// 正式测量
measureChildWithMargins(
child,
widthMeasureSpec,
widthSizeUsed,
heightMeasureSpec,
heightSizeUsed
)
}
// 保存子View的边界
val childBounds = childrenBounds.getOrNull(index) ?: Rect().also { childrenBounds.add(it) }
childBounds.set(
widthSizeUsed,
heightSizeUsed,
widthSizeUsed + child.measuredWidth,
heightSizeUsed + child.measuredHeight
)
// 更新状态
widthSizeUsed += child.measuredWidth
maxWidth = max(maxWidth, widthSizeUsed)
maxHeight = max(maxHeight, heightSizeUsed + child.measuredHeight)
}
// 计算自身尺寸
val selfWidth = maxWidth
val selfHeight = maxHeight
setMeasuredDimension(selfWidth, selfHeight)
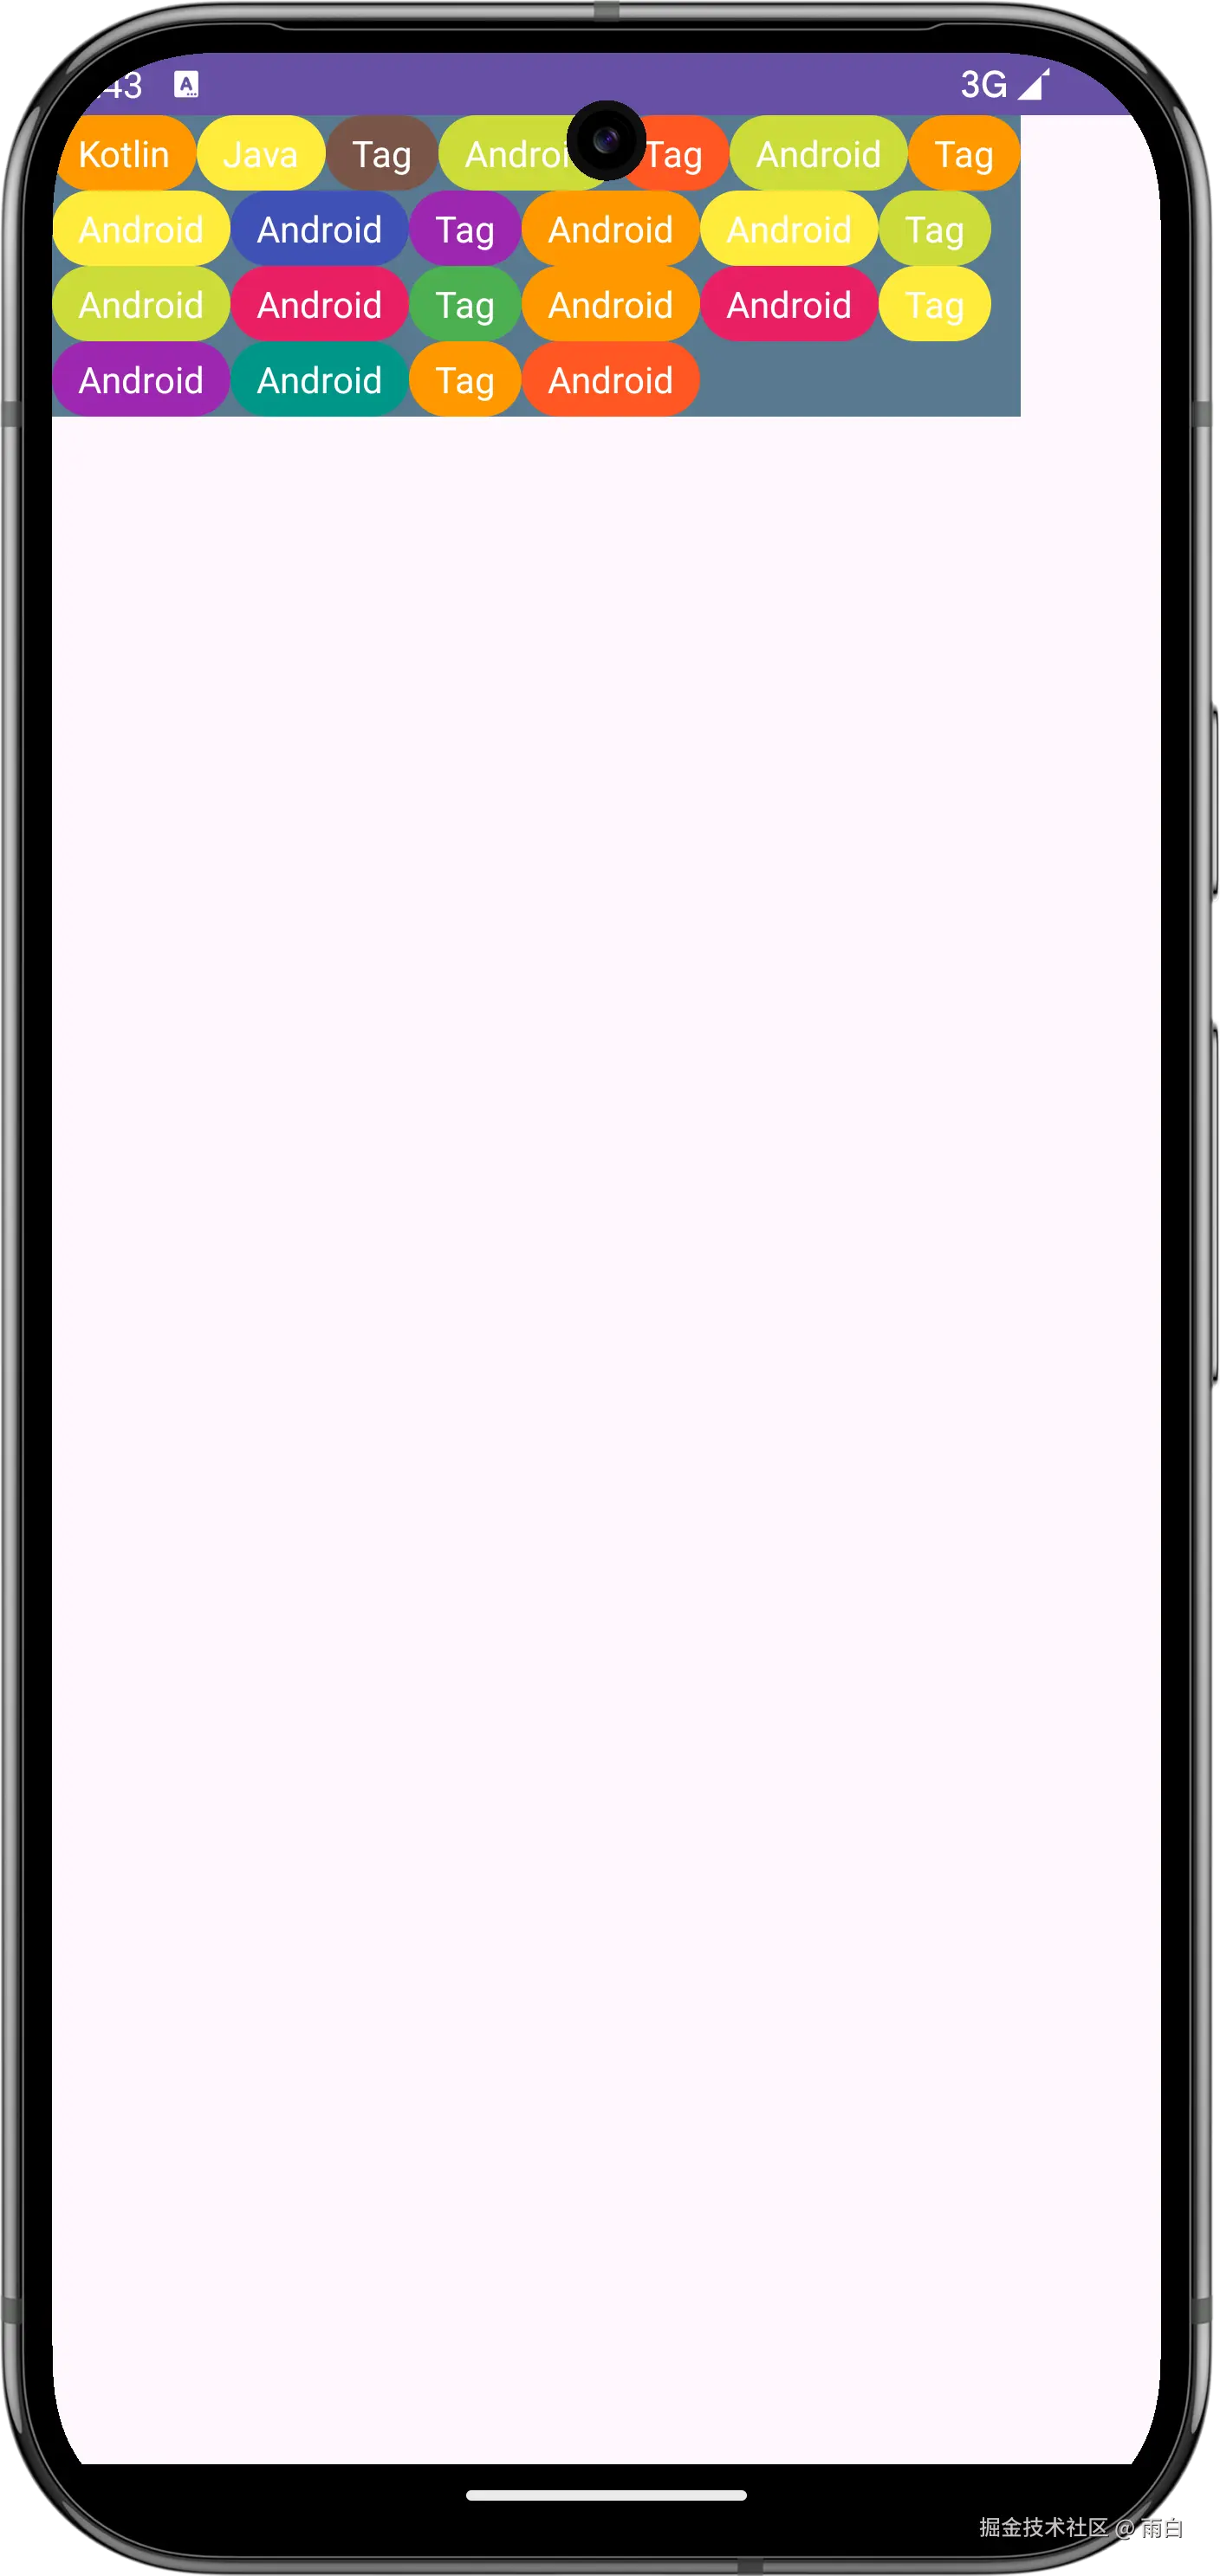
}给布局加个背景,方便查看尺寸大小。运行效果为:
你还可以使用 resolveSize 方法来修正布局的尺寸,以便响应父 View 传来的 MeasureSpec。
kotlin
// 计算自身尺寸
val selfWidth = maxWidth
val selfHeight = maxHeight
setMeasuredDimension(resolveSize(selfWidth, widthMeasureSpec), resolveSize(selfHeight, heightMeasureSpec))
例如,还是上述布局,宽度为 match_parent,高度为 wrap_content,运行效果将会是:
