作为一名开发者,我一直想要一个能够完美展示自己项目作品的平台。市面上虽然有GitHub、个人博客等展示方式,但总感觉缺少一些视觉冲击力和现代感。我希望能够创建一个既有科技感又实用的项目展示平台,不仅能够清晰地展示项目信息,还能给访问者带来震撼的视觉体验。经过几个月的构思和开发,SoftHub------一个融合了科幻美学与实用功能的现代化项目展示平台终于诞生了。
项目构思与技术选型
在开始编码之前,我花了不少时间思考这个项目展示平台的核心理念。我希望这个平台不仅仅是一个简单的项目列表,而是要具备强烈的视觉冲击力和沉浸式的用户体验。我想要创造一种科幻电影般的氛围,让访问者在浏览项目的同时,也能感受到技术的魅力和未来感。
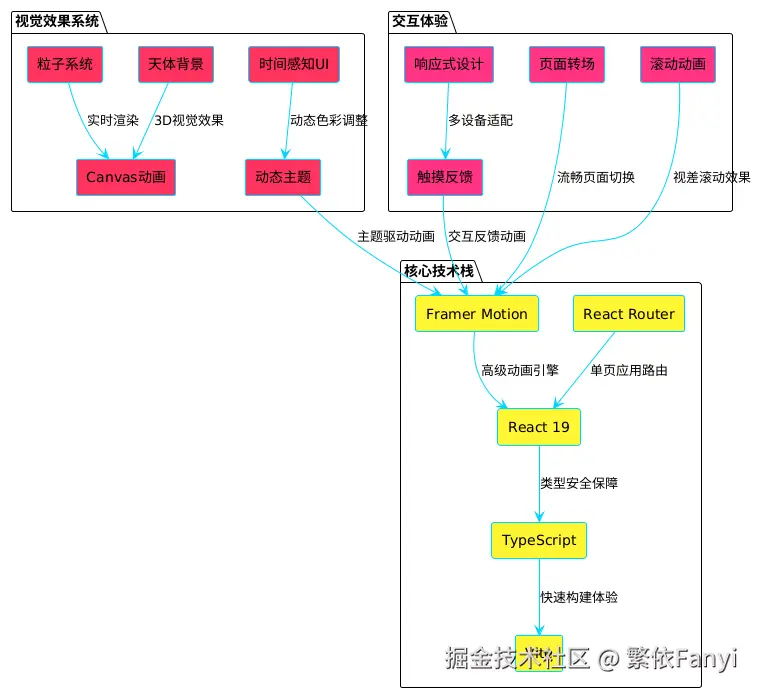
经过反复权衡,我最终选择了React + TypeScript + Vite的技术栈。React的组件化开发模式非常适合构建这种视觉效果丰富的应用,TypeScript能够提供强类型支持,确保复杂动画逻辑的稳定性,而Vite则能带来极快的开发体验,让我能够快速迭代视觉效果。为了实现科幻风格的视觉效果,我引入了Framer Motion动画库来处理复杂的页面转场和交互动画,同时还自己实现了粒子系统和天体背景动画来营造太空科幻的氛围。
项目架构设计
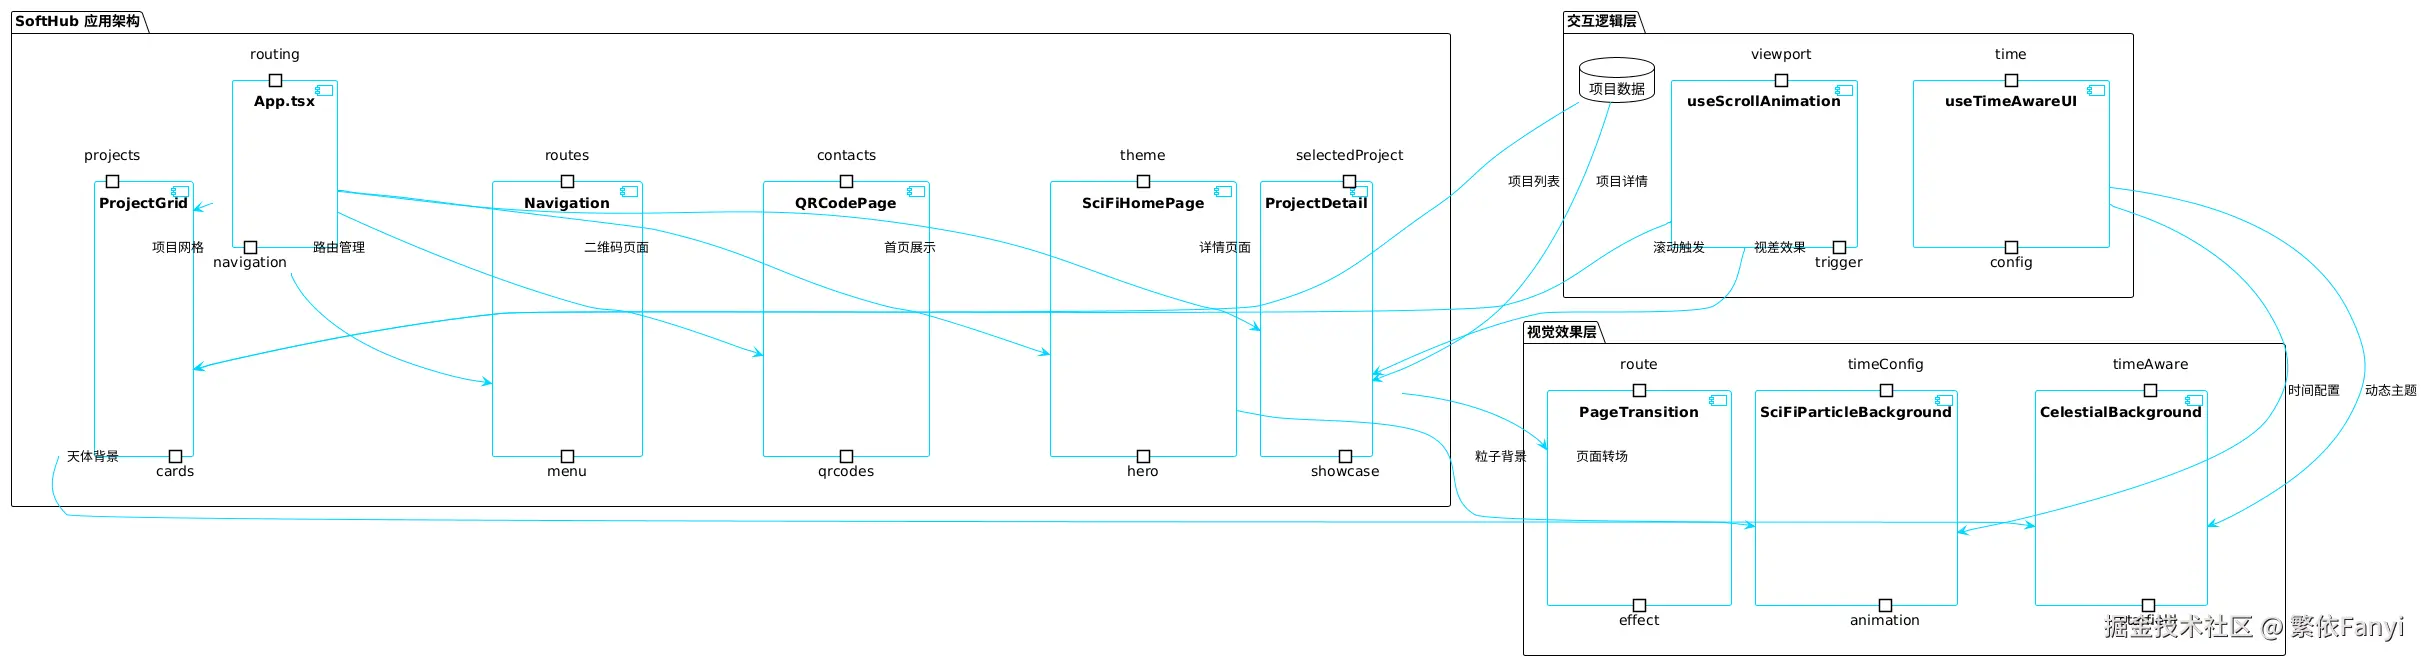
在正式开发之前,我设计了整个应用的架构。SoftHub采用了模块化的单页应用(SPA)架构,主要包含几个核心模块:科幻风格首页模块、项目展示网格模块、项目详情模块、二维码生成模块和多种视觉背景系统。整个应用的数据流采用了React的状态管理模式,通过自定义Hook来管理视觉效果、时间感知UI和滚动动画等复杂交互状态。
核心功能实现
时间感知UI系统设计
项目最独特的功能之一是时间感知UI系统。我希望这个平台能够根据当前时间动态调整视觉效果,营造出更加沉浸式的体验。通过分析一天中不同时段的光线变化和色彩心理学,我设计了一套完整的时间感知配色系统。
typescript
interface TimeAwareConfig {
  primaryColor: string;
  secondaryColor: string;
  particleDensity: number;
  animationIntensity: number;
  glowIntensity: number;
}

const useTimeAwareUI = (): TimeAwareConfig => {
  const [timeConfig, setTimeConfig] = useState<TimeAwareConfig>({
    primaryColor: '#00A3FF',
    secondaryColor: '#0066CC',
    particleDensity: 50,
    animationIntensity: 1.0,
    glowIntensity: 15
  });

  useEffect(() => {
    const updateTimeAwareUI = () => {
      const now = new Date();
      const hour = now.getHours();
      const minute = now.getMinutes();

      let config = { ...timeConfig };

      // 根据时间段调整主题色彩
      if (hour >= 6 && hour < 12) {
        // 清晨:清新的蓝色调
        config.primaryColor = '#00A3FF';
        config.secondaryColor = '#0066CC';
        config.glowIntensity = 12;
      } else if (hour >= 12 && hour < 18) {
        // 下午:温暖的青色调
        config.primaryColor = '#00D4FF';
        config.secondaryColor = '#0099CC';
        config.glowIntensity = 18;
      } else if (hour >= 18 && hour < 22) {
        // 傍晚:神秘的紫色调
        config.primaryColor = '#6A5ACD';
        config.secondaryColor = '#483D8B';
        config.glowIntensity = 20;
      } else {
        // 深夜:深邃的蓝紫色调
        config.primaryColor = '#1E1E3F';
        config.secondaryColor = '#2D2D5F';
        config.glowIntensity = 25;
      }

      // 根据分钟微调颜色亮度
      const minuteFactor = minute / 60;
      config.primaryColor = adjustColorBrightness(config.primaryColor, minuteFactor * 0.1);

      setTimeConfig(config);
    };

    updateTimeAwareUI();
    const interval = setInterval(updateTimeAwareUI, 60000);

    return () => clearInterval(interval);
  }, []);

  return timeConfig;
};
这个系统不仅仅是简单的颜色切换,它还会影响粒子密度、动画强度和发光效果,让整个界面呈现出随时间变化的动态美感。当用户在不同时间访问网站时,会看到完全不同的视觉风格,这种细节上的用心让平台具有了独特的生命力。
科幻粒子背景系统
为了营造科幻太空的氛围,我开发了一个复杂的粒子背景系统。这个系统不仅仅是简单的粒子动画,而是一个完整的视觉生态系统,包含了粒子生成、运动轨迹计算、粒子间连接、性能优化等多个层面的技术实现。
typescript
interface Particle {
  x: number;
  y: number;
  speedX: number;
  speedY: number;
  size: number;
  color: string;
  opacity: number;
  life: number;
  maxLife: number;
}

const SciFiParticleBackground: React.FC = () => {
  const canvasRef = useRef<HTMLCanvasElement>(null);
  const { primaryColor, secondaryColor, particleDensity, animationIntensity } = useTimeAwareUI();

  useEffect(() => {
    const canvas = canvasRef.current;
    if (!canvas) return;

    const ctx = canvas.getContext('2d');
    if (!ctx) return;

    // 动态调整画布尺寸
    const resizeCanvas = () => {
      canvas.width = window.innerWidth;
      canvas.height = window.innerHeight;
    };

    // 创建粒子系统 - 根据屏幕尺寸和性能动态调整粒子数量
    const particles: Particle[] = [];
    const particleCount = Math.floor(window.innerWidth * window.innerHeight / 20000 * particleDensity / 50);

    for (let i = 0; i < particleCount; i++) {
      particles.push({
        x: Math.random() * canvas.width,
        y: Math.random() * canvas.height,
        speedX: (Math.random() - 0.5) * 0.5 * animationIntensity,
        speedY: (Math.random() - 0.5) * 0.5 * animationIntensity,
        size: Math.random() * 2 + 0.5,
        color: Math.random() > 0.5 ? primaryColor : secondaryColor,
        opacity: Math.random() * 0.8 + 0.2,
        life: Math.random() * 1000 + 500,
        maxLife: Math.random() * 1000 + 500
      });
    }

    // 粒子更新逻辑
    const updateParticle = (particle: Particle) => {
      particle.x += particle.speedX;
      particle.y += particle.speedY;
      particle.life--;

      // 边界检测和循环
      if (particle.x < 0) particle.x = canvas.width;
      if (particle.x > canvas.width) particle.x = 0;
      if (particle.y < 0) particle.y = canvas.height;
      if (particle.y > canvas.height) particle.y = 0;

      // 生命周期管理
      if (particle.life <= 0) {
        particle.life = particle.maxLife;
        particle.opacity = Math.random() * 0.8 + 0.2;
      }

      // 动态透明度变化
      particle.opacity = Math.sin(particle.life / particle.maxLife * Math.PI) * 0.8 + 0.2;
    };

    // 粒子连接系统 - 创造网络效果
    const connectParticles = (particles: Particle[], context: CanvasRenderingContext2D) => {
      for (let a = 0; a < particles.length; a++) {
        for (let b = a + 1; b < Math.min(a + 10, particles.length); b++) {
          const dx = particles[a].x - particles[b].x;
          const dy = particles[a].y - particles[b].y;
          const distance = Math.sqrt(dx * dx + dy * dy);

          if (distance < 120) {
            const opacity = (120 - distance) / 120 * 0.3;
            context.strokeStyle = `rgba(0, 212, 255, ${opacity})`;
            context.lineWidth = 0.5;
            context.beginPath();
            context.moveTo(particles[a].x, particles[a].y);
            context.lineTo(particles[b].x, particles[b].y);
            context.stroke();
          }
        }
      }
    };

    // 高性能动画循环
    let lastTime = 0;
    const targetFPS = 30;
    const frameInterval = 1000 / targetFPS;
    let animationId: number;

    const animate = (currentTime: number) => {
      animationId = requestAnimationFrame(animate);

      const deltaTime = currentTime - lastTime;
      if (deltaTime < frameInterval) return;

      lastTime = currentTime;

      // 清空画布
      ctx.fillStyle = 'rgba(10, 10, 10, 0.1)';
      ctx.fillRect(0, 0, canvas.width, canvas.height);

      // 更新和绘制粒子
      particles.forEach(particle => {
        updateParticle(particle);

        ctx.fillStyle = `rgba(${hexToRgb(particle.color)}, ${particle.opacity})`;
        ctx.beginPath();
        ctx.arc(particle.x, particle.y, particle.size, 0, Math.PI * 2);
        ctx.fill();
      });

      // 绘制粒子连接
      connectParticles(particles, ctx);
    };

    resizeCanvas();
    window.addEventListener('resize', resizeCanvas);
    animate(0);

    return () => {
      window.removeEventListener('resize', resizeCanvas);
      cancelAnimationFrame(animationId);
    };
  }, [primaryColor, secondaryColor, particleDensity, animationIntensity]);

  return (
    <canvas
      ref={canvasRef}
      className="fixed inset-0 pointer-events-none z-0"
      style={{ background: 'radial-gradient(ellipse at center, #1a1a2e 0%, #0a0a0a 100%)' }}
    />
  );
};
这个粒子系统的设计考虑了多个方面的优化:首先是性能优化,通过限制帧率和减少不必要的计算来确保流畅运行;其次是视觉效果的丰富性,粒子不仅有基本的运动,还有生命周期、透明度变化和相互连接等复杂效果;最后是与时间感知系统的深度集成,粒子的颜色、密度和动画强度都会根据时间动态调整。
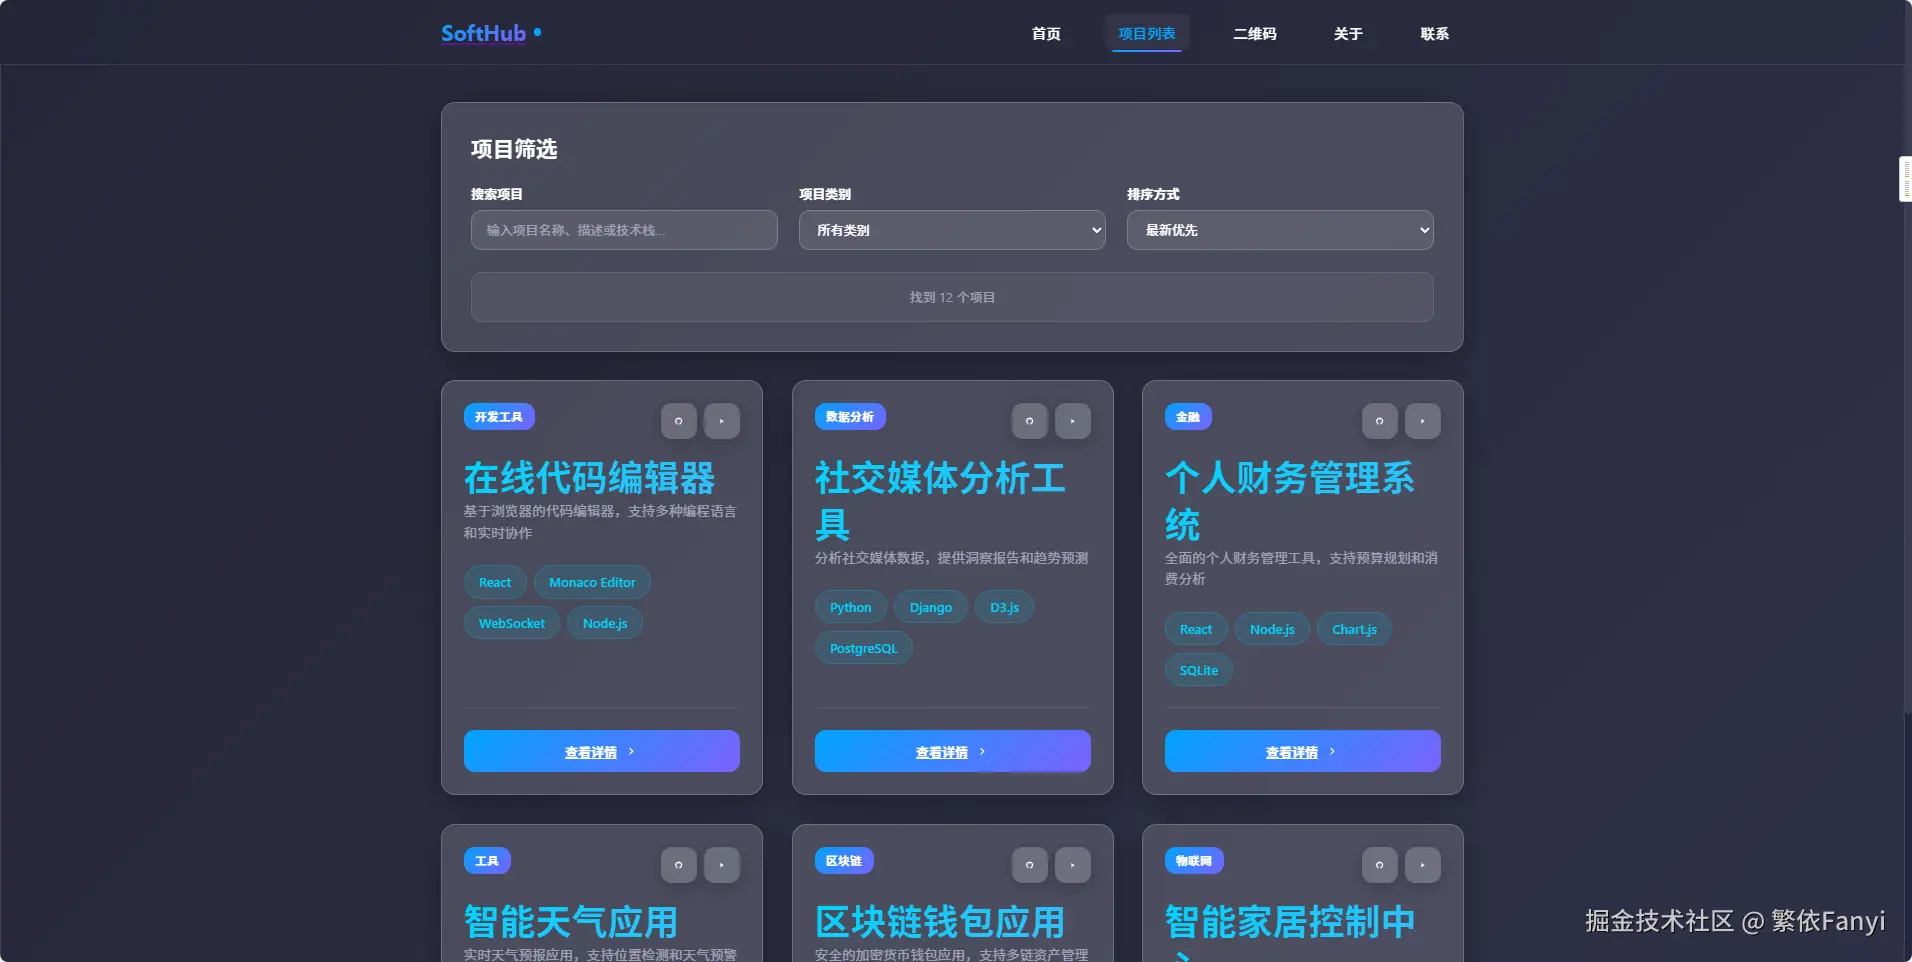
项目展示与交互设计
项目展示是这个平台的核心功能。我设计了一个多层次的项目展示系统,包括首页的精选项目网格、完整的项目列表页面和详细的项目展示页面。每个层级都有不同的展示重点和交互方式,确保用户能够从不同角度了解项目信息。
在ProjectGrid组件中,我实现了一个响应式的项目卡片网格系统。每个项目卡片都包含了项目的核心信息,并且具有丰富的悬停效果和点击交互。
typescript
interface Project {
  id: number;
  title: string;
  description: string;
  image: string;
  tags: string[];
  category: string;
  status: 'completed' | 'in-progress' | 'planning';
  githubUrl?: string;
  liveUrl?: string;
  downloadUrl?: string;
}

const ProjectCard: React.FC<ProjectCardProps> = ({ project, index }) => {
  return (
    <motion.div
      className="project-card"
      initial={{ opacity: 0, y: 50 }}
      animate={{ opacity: 1, y: 0 }}
      transition={{
        duration: 0.6,
        delay: index * 0.1,
        type: "spring",
        stiffness: 100
      }}
      whileHover={{
        y: -10,
        boxShadow: "0 20px 40px rgba(0, 212, 255, 0.3)",
        transition: { duration: 0.3 }
      }}
    >
      <div className="project-image-container">
        <img
          src={project.image}
          alt={project.title}
          className="project-image"
        />
        <div className="project-overlay">
          <div className="project-actions">
            <Link
              to={`/project/${project.id}`}
              className="action-button primary"
            >
              查看详情
            </Link>
            {project.liveUrl && (
              <a
                href={project.liveUrl}
                target="_blank"
                rel="noopener noreferrer"
                className="action-button secondary"
              >
                在线预览
              </a>
            )}
          </div>
        </div>
      </div>

      <div className="project-content">
        <h3 className="project-title">{project.title}</h3>
        <p className="project-description">{project.description}</p>

        <div className="project-tags">
          {project.tags.map(tag => (
            <span key={tag} className="project-tag">
              {tag}
            </span>
          ))}
        </div>

        <div className="project-meta">
          <span className={`project-status ${project.status}`}>
            {project.status === 'completed' ? '已完成' :
             project.status === 'in-progress' ? '开发中' : '计划中'}
          </span>
        </div>
      </div>
    </motion.div>
  );
};
为了让项目展示更加生动,我还实现了一个复杂的滚动动画系统。当用户滚动页面时,项目卡片会依次出现,每个卡片都有独特的入场动画,创造出一种电影般的视觉效果。
typescript
const useScrollAnimation = (threshold: number = 0.1) => {
  const ref = useRef<HTMLDivElement>(null);
  const [isVisible, setIsVisible] = useState(false);

  useEffect(() => {
    const observer = new IntersectionObserver(
      ([entry]) => {
        if (entry.isIntersecting) {
          setIsVisible(true);
        }
      },
      { threshold }
    );

    if (ref.current) {
      observer.observe(ref.current);
    }

    return () => {
      if (ref.current) {
        observer.unobserve(ref.current);
      }
    };
  }, [threshold]);

  return { ref, isVisible };
};
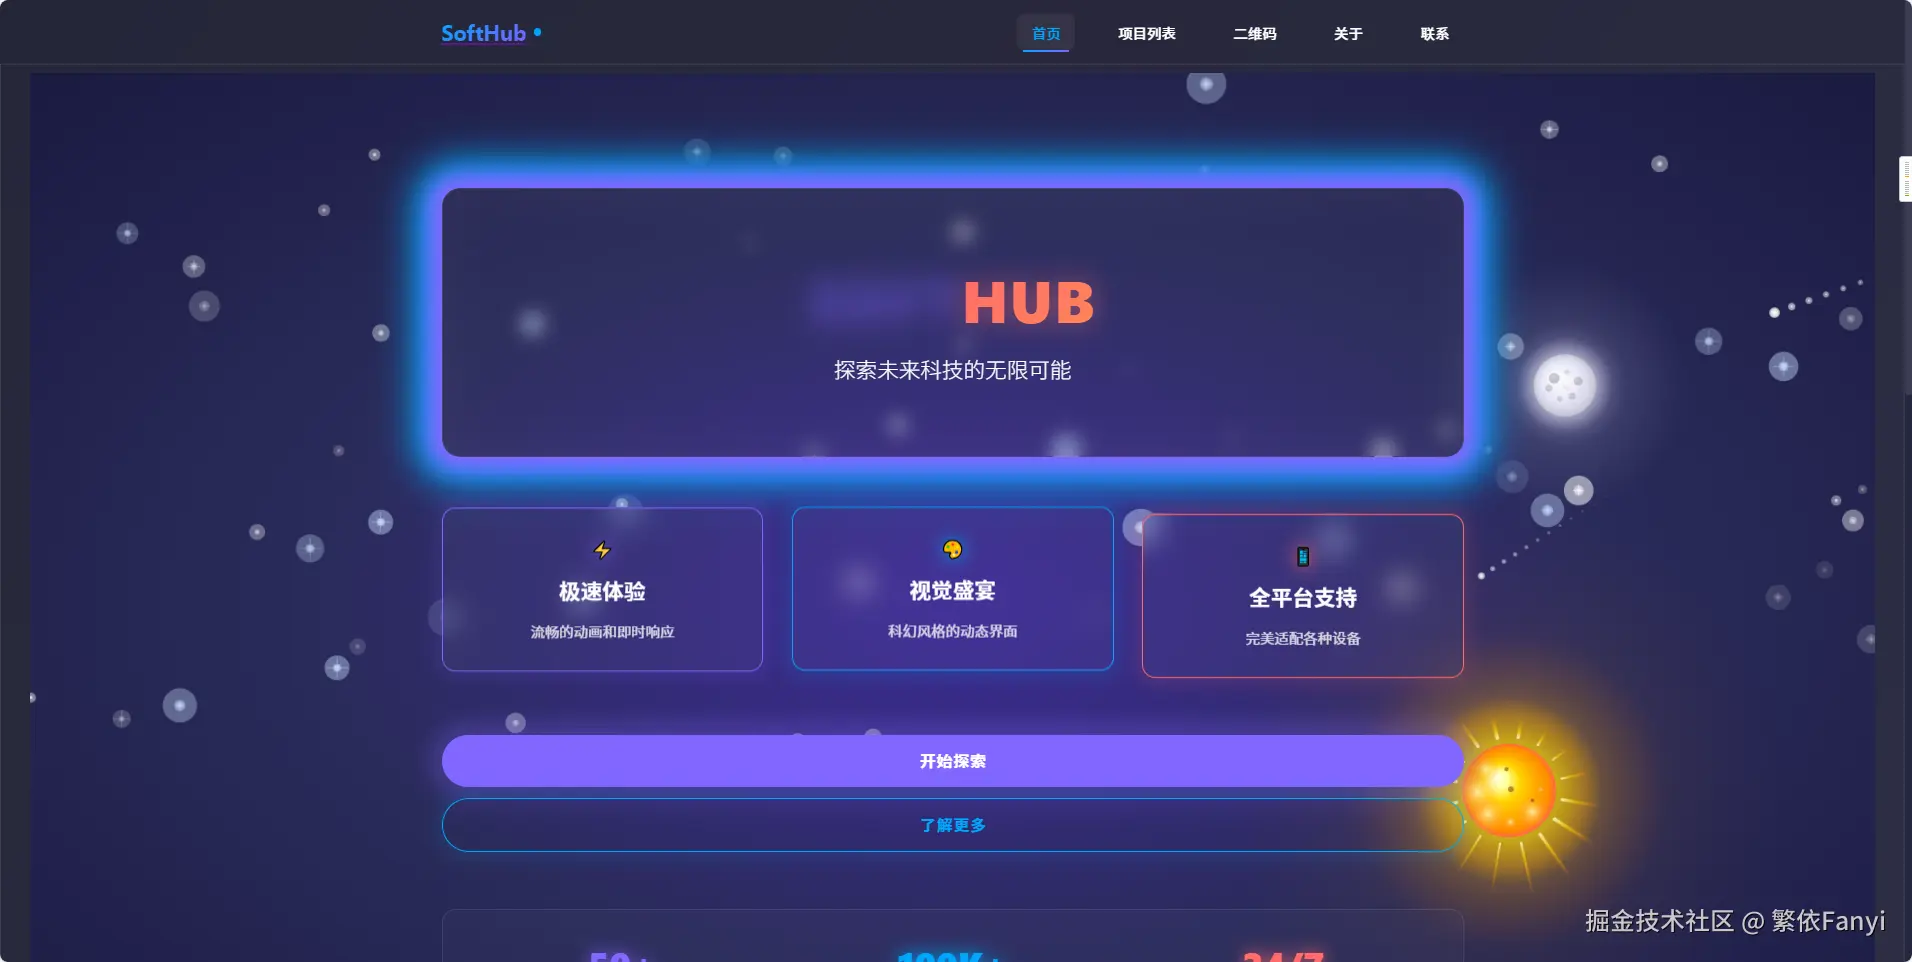
科幻风格首页设计
首页是整个平台的门面,我希望它能够立即抓住访问者的注意力,传达出强烈的科技感和未来感。SciFiHomePage组件是我花费最多心思设计的部分,它不仅仅是一个静态的展示页面,而是一个充满动态效果的沉浸式体验空间。
typescript
const SciFiHomePage: React.FC = () => {
  const {
    primaryColor,
    secondaryColor,
    glowIntensity,
    animationIntensity
  } = useTimeAwareUI();

  // 使用useMemo优化配置对象,避免不必要的重渲染
  const heroStyle = React.useMemo(() => ({
    '--primary-glow': `0 0 20px ${glowIntensity}px ${primaryColor}`,
    '--secondary-glow': `0 0 15px ${glowIntensity * 0.8}px ${secondaryColor}`,
    '--primary-color': primaryColor,
    '--secondary-color': secondaryColor,
  }), [primaryColor, secondaryColor, glowIntensity]);

  const containerVariants = {
    hidden: { opacity: 0 },
    visible: {
      opacity: 1,
      transition: {
        delayChildren: 0.3,
        staggerChildren: 0.2
      }
    }
  };

  const itemVariants = {
    hidden: { y: 20, opacity: 0 },
    visible: {
      y: 0,
      opacity: 1,
      transition: {
        type: "spring" as const,
        stiffness: 100
      }
    }
  };

  return (
    <div className="scifi-hero" style={heroStyle}>
      <SciFiParticleBackground />

      <motion.div
        className="hero-content"
        variants={containerVariants}
        initial="hidden"
        animate="visible"
      >
        <motion.div className="hero-title-container" variants={itemVariants}>
          <h1 className="hero-title">
            <span className="title-main">SoftHub</span>
            <span className="title-sub">未来科技项目展示平台</span>
          </h1>
        </motion.div>

        <motion.div className="hero-description" variants={itemVariants}>
          <p>探索创新技术的无限可能,展示前沿项目的卓越成果</p>
        </motion.div>

        <motion.div className="hero-actions" variants={itemVariants}>
          <TouchButton
            variant="primary"
            size="large"
            className="hero-button"
            onClick={() => document.getElementById('projects')?.scrollIntoView({ behavior: 'smooth' })}
          >
            探索项目
          </TouchButton>

          <TouchButton
            variant="outline"
            size="large"
            className="hero-button"
            onClick={() => window.open('/qrcodes', '_blank')}
          >
            联系方式
          </TouchButton>
        </motion.div>

        <motion.div className="hero-stats" variants={itemVariants}>
          <div className="stat-item">
            <span className="stat-number">15+</span>
            <span className="stat-label">完成项目</span>
          </div>
          <div className="stat-item">
            <span className="stat-number">8</span>
            <span className="stat-label">技术栈</span>
          </div>
          <div className="stat-item">
            <span className="stat-number">3</span>
            <span className="stat-label">年经验</span>
          </div>
        </motion.div>
      </motion.div>

      <div className="hero-scroll-indicator">
        <motion.div
          className="scroll-arrow"
          animate={{ y: [0, 10, 0] }}
          transition={{ repeat: Infinity, duration: 2 }}
        >
          ↓
        </motion.div>
      </div>
    </div>
  );
};
首页的设计采用了多层次的视觉结构:最底层是动态的粒子背景,中间层是渐变色彩和光效,最上层是文字内容和交互元素。通过精心调配的CSS变量系统,整个首页的色彩会随着时间感知系统动态变化,创造出一种活生生的视觉体验。
我特别注重了首页的性能优化,使用了React.useMemo来缓存样式对象,避免不必要的重渲染。同时,所有的动画都经过精心调校,确保在不同性能的设备上都能流畅运行。
应用详情与下载管理
当用户点击某个应用卡片时,会弹出一个详细的应用信息模态框。这个模态框包含了应用的完整信息,包括详细描述、功能特性、系统要求、版本历史等。我特别注重这个组件的信息架构设计,确保用户能够快速找到他们需要的信息。
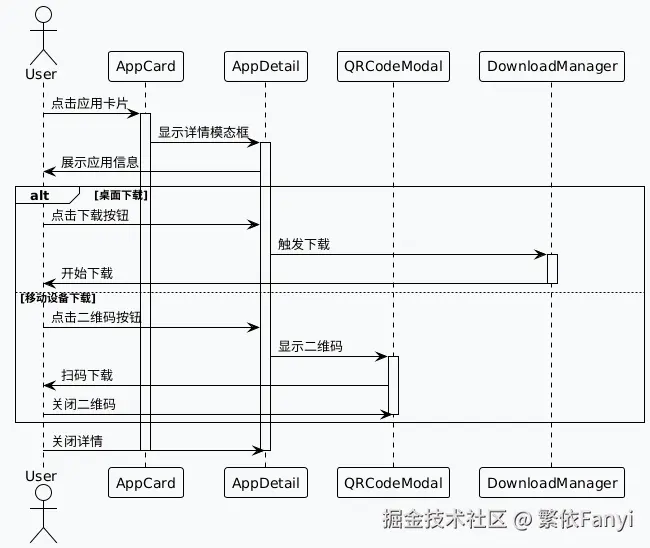
在AppDetail组件中,我实现了多种下载方式。对于桌面用户,提供直接下载链接;对于移动设备用户,则生成二维码供扫描下载。这种设计考虑了不同使用场景的需求,让用户能够选择最适合的下载方式。
typescript
const AppDetail: React.FC<AppDetailProps> = ({ app, onClose, onShowQR }) => {
  const handleDownload = () => {
    // 检测设备类型
    const isMobile = /Android|webOS|iPhone|iPad|iPod|BlackBerry|IEMobile|Opera Mini/i.test(navigator.userAgent);

    if (isMobile) {
      onShowQR();
    } else {
      window.open(app.downloadUrl, '_blank');
    }
  };

  return (
    <motion.div
      className="fixed inset-0 bg-black bg-opacity-50 flex items-center justify-center z-50"
      initial={{ opacity: 0 }}
      animate={{ opacity: 1 }}
      exit={{ opacity: 0 }}
      onClick={onClose}
    >
      <motion.div
        className="bg-white rounded-lg max-w-4xl max-h-[90vh] overflow-y-auto m-4"
        initial={{ scale: 0.9, opacity: 0 }}
        animate={{ scale: 1, opacity: 1 }}
        exit={{ scale: 0.9, opacity: 0 }}
        onClick={(e) => e.stopPropagation()}
      >
        <div className="p-6">
          <div className="flex items-start justify-between mb-6">
            <div className="flex items-center">
              <img
                src={app.icon}
                alt={app.name}
                className="w-16 h-16 rounded-lg mr-4"
              />
              <div>
                <h2 className="text-2xl font-bold text-gray-900">{app.name}</h2>
                <p className="text-gray-600">{app.developer}</p>
                <div className="flex items-center mt-1">
                  <StarIcon className="w-5 h-5 text-yellow-400 mr-1" />
                  <span className="text-gray-600">{app.rating}</span>
                  <span className="text-gray-400 ml-2">({app.downloads} 下载)</span>
                </div>
              </div>
            </div>
            <button
              onClick={onClose}
              className="text-gray-400 hover:text-gray-600"
            >
              <XIcon className="w-6 h-6" />
            </button>
          </div>

          <div className="grid grid-cols-1 lg:grid-cols-3 gap-6">
            <div className="lg:col-span-2">
              <div className="mb-6">
                <h3 className="text-lg font-semibold mb-2">应用描述</h3>
                <p className="text-gray-600 leading-relaxed">{app.description}</p>
              </div>

              <div className="mb-6">
                <h3 className="text-lg font-semibold mb-2">主要功能</h3>
                <ul className="list-disc list-inside text-gray-600 space-y-1">
                  {app.features.map((feature, index) => (
                    <li key={index}>{feature}</li>
                  ))}
                </ul>
              </div>

              {app.screenshots.length > 0 && (
                <div className="mb-6">
                  <h3 className="text-lg font-semibold mb-2">应用截图</h3>
                  <div className="grid grid-cols-2 gap-2">
                    {app.screenshots.map((screenshot, index) => (
                      <img
                        key={index}
                        src={screenshot}
                        alt={`${app.name} 截图 ${index + 1}`}
                        className="rounded-lg border"
                      />
                    ))}
                  </div>
                </div>
              )}
            </div>

            <div>
              <div className="bg-gray-50 rounded-lg p-4 mb-4">
                <h3 className="font-semibold mb-3">应用信息</h3>
                <div className="space-y-2 text-sm">
                  <div className="flex justify-between">
                    <span className="text-gray-600">版本</span>
                    <span>{app.version}</span>
                  </div>
                  <div className="flex justify-between">
                    <span className="text-gray-600">大小</span>
                    <span>{app.size}</span>
                  </div>
                  <div className="flex justify-between">
                    <span className="text-gray-600">分类</span>
                    <span>{app.category}</span>
                  </div>
                </div>
              </div>

              <div className="bg-gray-50 rounded-lg p-4 mb-4">
                <h3 className="font-semibold mb-3">系统要求</h3>
                <div className="space-y-2 text-sm">
                  <div>
                    <span className="text-gray-600">操作系统:</span>
                    <span>{app.systemRequirements.os.join(', ')}</span>
                  </div>
                  <div>
                    <span className="text-gray-600">内存:</span>
                    <span>{app.systemRequirements.memory}</span>
                  </div>
                  <div>
                    <span className="text-gray-600">存储空间:</span>
                    <span>{app.systemRequirements.storage}</span>
                  </div>
                </div>
              </div>

              <button
                onClick={handleDownload}
                className="w-full bg-blue-600 text-white py-3 px-4 rounded-lg hover:bg-blue-700 transition-colors font-medium"
              >
                立即下载
              </button>

              <button
                onClick={onShowQR}
                className="w-full mt-2 border border-gray-300 text-gray-700 py-3 px-4 rounded-lg hover:bg-gray-50 transition-colors"
              >
                生成二维码
              </button>
            </div>
          </div>
        </div>
      </motion.div>
    </motion.div>
  );
};
二维码功能实现
考虑到现代用户经常需要在移动设备上下载软件,我特别实现了二维码下载功能。使用qrcode.react库,我能够动态生成包含下载链接的二维码,用户只需要用手机扫描就能直接跳转到下载页面。
QRCodeModal组件不仅仅是简单地显示二维码,我还添加了一些贴心的功能,比如显示下载链接的文本版本,方便用户复制分享,以及提供不同尺寸的二维码选项来适应不同的使用场景。
typescript
const QRCodeModal: React.FC<QRCodeModalProps> = ({ app, onClose }) => {
  const [qrSize, setQrSize] = useState(200);

  return (
    <motion.div
      className="fixed inset-0 bg-black bg-opacity-50 flex items-center justify-center z-50"
      initial={{ opacity: 0 }}
      animate={{ opacity: 1 }}
      exit={{ opacity: 0 }}
      onClick={onClose}
    >
      <motion.div
        className="bg-white rounded-lg p-6 max-w-md w-full m-4"
        initial={{ scale: 0.9, opacity: 0 }}
        animate={{ scale: 1, opacity: 1 }}
        exit={{ scale: 0.9, opacity: 0 }}
        onClick={(e) => e.stopPropagation()}
      >
        <div className="text-center">
          <h3 className="text-lg font-semibold mb-4">扫码下载 {app.name}</h3>

          <div className="flex justify-center mb-4">
            <QRCode
              value={app.downloadUrl}
              size={qrSize}
              level="M"
              includeMargin={true}
            />
          </div>

          <div className="mb-4">
            <label className="block text-sm text-gray-600 mb-2">二维码尺寸</label>
            <div className="flex justify-center space-x-2">
              {[150, 200, 250].map(size => (
                <button
                  key={size}
                  onClick={() => setQrSize(size)}
                  className={`px-3 py-1 rounded text-sm ${
                    qrSize === size
                      ? 'bg-blue-600 text-white'
                      : 'bg-gray-200 text-gray-700 hover:bg-gray-300'
                  }`}
                >
                  {size}px
                </button>
              ))}
            </div>
          </div>

          <div className="mb-4 p-3 bg-gray-50 rounded text-sm">
            <p className="text-gray-600 mb-1">下载链接:</p>
            <p className="text-blue-600 break-all">{app.downloadUrl}</p>
          </div>

          <div className="flex space-x-3">
            <button
              onClick={() => navigator.clipboard.writeText(app.downloadUrl)}
              className="flex-1 bg-gray-600 text-white py-2 px-4 rounded hover:bg-gray-700 transition-colors"
            >
              复制链接
            </button>
            <button
              onClick={onClose}
              className="flex-1 border border-gray-300 text-gray-700 py-2 px-4 rounded hover:bg-gray-50 transition-colors"
            >
              关闭
            </button>
          </div>
        </div>
      </motion.div>
    </motion.div>
  );
};
回顾整个开发过程,我深深感受到了现代前端开发的魅力和挑战。技术在不断进步,用户的期望也在不断提高,作为开发者需要持续学习和改进!