前言:由于私有化的时候需要用到idass(统一登陆),本地ip为:127.0.0.1:8080,统一登陆地址为:11.123.456.10,统一登陆后,idass服务无法跨ip种植cookie,于是乎,想自己写一个浏览器插件自动种植所需页面的cookie和token等凭证(每次调试手动种植cookie太费劲了😭)
什么是浏览器插件
想象一下,你的浏览器是个老实巴交的打工仔,每天只会按部就班地干活。插件就是给它装备的"外挂"
比如:
- 屏蔽鸡汤文弹窗,装个广告拦截
- 想在电商网站自动比价,写个比价插件
- 替换网页所有的图片
从零开始造轮子
核心文件结构
perl
my-extension/
├── manifest.json       # 插件配置文件
├── icons/              # 图标(16x16, 48x48, 128x128)用于工具栏小图标,扩展管理页图标,商店展示大图标
├── popup/             # 弹出窗口
├── content-scripts/   # 注入页面的脚本
└── background/           # 后台脚本
1. manifest.json
json
{
  // 必须字段:清单版本(Chrome 推荐使用 V3)
  "manifest_version": 3,

  // 插件名称(展示在商店和浏览器工具栏)
  "name": "My Extension",

  // 插件版本(格式为 x.x.x)
  "version": "1.0",

  // 插件描述(简洁说明功能)
  "description": "A demo extension",

  // 图标配置(不同尺寸用于不同场景)
  "icons": {
    "16": "icons/icon16.png",   // 工具栏小图标
    "48": "icons/icon48.png",   // 扩展管理页图标
    "128": "icons/icon128.png"  // 商店展示大图标
  },

  // 权限申请(访问浏览器API的权限列表)
  "permissions": [
    "activeTab",    // 访问当前激活标签页
    "storage",      // 使用本地存储(chrome.storage)
    "scripting"     // 动态执行脚本(Manifest V3 新增)
  ],

  // 浏览器工具栏按钮配置
  "action": {
    "default_icon": "icons/icon16.png",  // 默认图标
    "default_popup": "popup/popup.html", // 点击弹出的页面
    "default_title": "点击我"            // 鼠标悬停提示
  },

  // 后台脚本(Manifest V3 使用 Service Worker)
  "background": {
    "service_worker": "background/sw.js",
    "type": "module"  // 可选:支持ES模块
  },

  // 内容脚本(注入到匹配的网页中)
  "content_scripts": [
    {
      "matches": ["https://*.example.com/*"], // 匹配的URL模式
      "js": ["content-scripts/main.js"],      // 注入的JS文件
      "css": ["content-scripts/style.css"],  // 注入的CSS文件
      "run_at": "document_end"               // 注入时机(document_idle/document_start)
    }
  ],

  // 选项页(用户配置页面)
  "options_page": "options/options.html"
}
2. Content Script
- 内容脚本用于操作当前网页的dom,比如自动高亮页面的关键词
css
// content-scripts/main.js
document.querySelectorAll('p').forEach(p => {
  p.innerHTML = p.innerHTML.replace(/重要/g, '<span style="background:yellow">重要</span>');
});
3. Popup
- 点击浏览器工具栏图标展示的一个弹窗
xml
<!DOCTYPE html>
<html>
  <head>
    <title>Webpage Demo</title>
  </head>
  <body>
    <h3>hello world</h3>
  </body>
</html>
这样写的话点击浏览器插件就会出现hello world 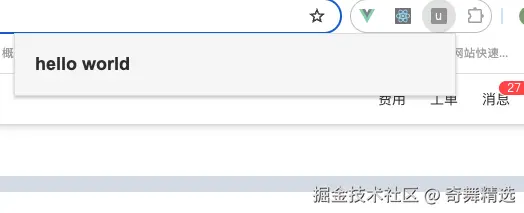
4. Background Script
- 在浏览器的后台运行
- 用于监听浏览器事件,跨标签通信等全局事件
比如写一个最简单的通过本地存储去存储comment列表
ini
chrome.runtime.onMessage.addListener((message, sender, sendResponse) => {
  if (message.action === 'getComments') {
    chrome.storage.local.get(['comments'], (result) => {
      const comments = result.comments || []
      sendResponse(comments);
    });
  }

  if (message.action === 'saveComment') {
    chrome.storage.local.get(['comments'], (result) => {
      const comments = result.comments || []
      comments.push(message.comment);
      chrome.storage.local.set({ ['comments']: comments }, () => {
        sendResponse({ status: 'saved' });
      });
    });
  }
});
1. chrome.runtime.onMessage.addListener(...)
- 给整个插件注册一个"消息监听器"。
- 任何从 popup.js、content-script 或其他地方用 chrome.runtime.sendMessage 发送到后台(background.js)的消息,都会进入这里
2. if (message.action === 'getComments')
-
触发条件:收到一个 action 字段是 'getComments' 的消息。
-
功能:
- 从 chrome.storage.local 里读取键名是 'comments' 的数据。
- 读取成功后,通过 sendResponse 把结果返回给发送消息的一方
3. if (message.action === 'saveComment')
-
触发条件:收到一个 action 字段是 'saveComment' 的消息。
-
功能:
- 先读取现有的 'comments'。
- 把新的评论 message.comment 加到 comments 里面。
- 然后重新用 chrome.storage.local.set 把更新后的 comments 保存回去。
- 保存成功后,调用 sendResponse({ status: 'saved' }) 告知保存成功。
实战demo
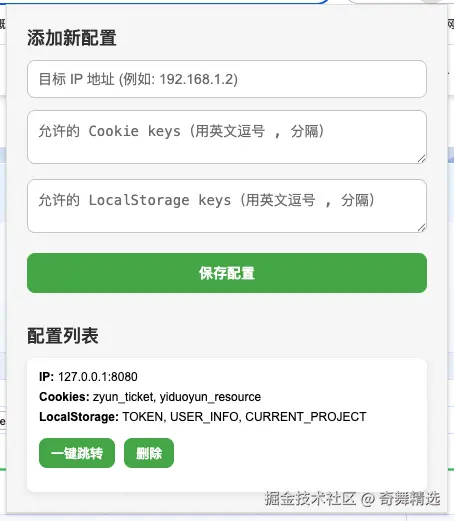
接前言来开发,先列下需求:
- 首先需要三个输入框,输入目标ip地址,允许的cookie keys,以及localStorage keys
- 插件还需要支持保存配置的功能
- 支持一键跳转到目标ip页面,并且会携带当前页面允许的cookie keys以及localStorage keys种植到目标页面去
首先需要一个可视化的操作弹窗:
1. popup.html
xml
<body>

  <h3>添加新配置</h3>
  <input type="text" id="target-ip" placeholder="目标 IP 地址 (例如: 192.168.1.2)" />
  <textarea id="cookie-keys" placeholder="允许的 Cookie keys(用英文逗号 , 分隔)"></textarea>
  <textarea id="storage-keys" placeholder="允许的 LocalStorage keys(用英文逗号 , 分隔)"></textarea>
  <button id="save-config">保存配置</button>

  <h3>配置列表</h3>
  <div id="config-list"></div>

  <script src="popup.js"></script>
</body>
接下来是处理弹窗逻辑的js文件
2. popup.js
ini
// 获取元素
const targetIpInput = document.getElementById('target-ip');
const cookieKeysInput = document.getElementById('cookie-keys');
const storageKeysInput = document.getElementById('storage-keys');
const configListDiv = document.getElementById('config-list');
const saveButton = document.getElementById('save-config');

// 保存新配置
saveButton.addEventListener('click', () => {
  const targetIp = targetIpInput.value.trim();
  const cookieKeys = cookieKeysInput.value.split(',').map(k => k.trim()).filter(k => k);
  const storageKeys = storageKeysInput.value.split(',').map(k => k.trim()).filter(k => k);

  if (!targetIp) {
    alert('请输入目标 IP 地址');
    return;
  }

  const newConfig = { targetIp, cookieKeys, storageKeys };

  chrome.storage.local.get(['configs'], (result) => {
    const configs = result.configs || [];
    configs.push(newConfig);
    chrome.storage.local.set({ configs }, () => {
      renderConfigs();
      targetIpInput.value = '';
      cookieKeysInput.value = '';
      storageKeysInput.value = '';
    });
  });
});

// 渲染已有配置
function renderConfigs() {
  configListDiv.innerHTML = '';
  chrome.storage.local.get(['configs'], (result) => {
    const configs = result.configs || [];
    configs.forEach((config, index) => {
      const div = document.createElement('div');
      div.className = 'config-item';
      div.innerHTML = `
        <div><strong>IP:</strong> ${config.targetIp}</div>
        <div><strong>Cookies:</strong> ${config.cookieKeys.join(', ')}</div>
        <div><strong>LocalStorage:</strong> ${config.storageKeys.join(', ')}</div>
        <button data-index="${index}" class="run-btn">一键跳转</button>
        <button data-index="${index}" class="delete-btn">删除</button>
      `;
      configListDiv.appendChild(div);
    });

    // 绑定按钮
    document.querySelectorAll('.run-btn').forEach(btn => {
      btn.addEventListener('click', (e) => {
        const idx = e.target.dataset.index;
        startCopy(configs[idx]);
      });
    });

    document.querySelectorAll('.delete-btn').forEach(btn => {
      btn.addEventListener('click', (e) => {
        const idx = e.target.dataset.index;
        configs.splice(idx, 1);
        chrome.storage.local.set({ configs }, renderConfigs);
      });
    });
  });
}

// 开始同步并跳转
function startCopy(config) {
  chrome.tabs.query({ active: true, currentWindow: true }, ([tab]) => {
    chrome.runtime.sendMessage({
      action: 'copyData',
      config,
      sourceUrl: tab.url
      tabId: tab.id
    }, (response) => {
      if (!response.success) {
        alert('同步失败!');
      }
    });
  });
}

// 初始化
renderConfigs();
给按钮添加点击事件以及渲染配置都是很基础的,重点说一下startCopy这个方法
chrome.tabs.query({ active: true, currentWindow: true }, (tab) => {...})
-
通过 chrome.tabs.query 方法,查询当前激活的标签页(active tab)
-
参数 { active: true, currentWindow: true }:
- active: true ------ 只找当前窗口中正在激活中的 tab(比如你打开的页面)。
- currentWindow: true ------ 限制只在当前浏览器窗口里找,不跨窗口
-
返回的是一个数组,通常数组里只有一个元素,目的是拿到当前页面的url
chrome.runtime.sendMessage({ action: 'copyData', config, sourceUrl: tab.url }, (response) => {...})
- 拿到当前页面后,就用 chrome.runtime.sendMessage 发送一个消息到后台脚本 background.js
- 参数会携带配置的url,以及允许的keys
- 然后就是会处理background回应的错误信息,这里主要是发消息,主要逻辑都在background.js内部
3. background.js
javascript
chrome.runtime.onMessage.addListener((message, sender, sendResponse) => {
  if (message.action === 'copyData') {
    const { config, sourceUrl, tabId } = message;
    const urlObj = new URL(sourceUrl);
    const domain = urlObj.hostname;

    // 读取 cookie
    chrome.cookies.getAll({ domain }, (cookies) => {
      const allowedCookies = cookies.filter(c => config.cookieKeys.includes(c.name));

      // 设置到目标 IP
      allowedCookies.forEach(cookie => {
        chrome.cookies.set({
          url: `http://${config.targetIp}`,
          name: cookie.name,
          value: cookie.value,
          path: cookie.path,
          secure: cookie.secure,
          httpOnly: cookie.httpOnly,
          sameSite: cookie.sameSite
        });
      });
      // 存储 localStorage
      chrome.tabs.sendMessage(tabId, {
        action: 'storeData',
        config
      });
      // 发送消息给 content script 处理 localStorage
      chrome.tabs.create({ url: `http://${config.targetIp}` }, (tab) => {
        // 注意:要等新页面加载完成后才能注入 localStorage 操作
        chrome.tabs.onUpdated.addListener(function listener(tab_id, info) {
          if (tab_id === tab.id && info.status === 'complete') {
            chrome.tabs.onUpdated.removeListener(listener); // 移除监听,避免多次触发
            // 给目标tabId发送消息
            chrome.tabs.sendMessage(tab_id, {
              action: 'copyLocalStorage',
              config
            });
          }
        });
      });

      sendResponse({ success: true });
    });

    return true; // 异步
  }
});
整体功能
- ✅ 从当前页面读取 cookie(指定 keys)
- ✅ 把这些 cookie 写到目标 IP
- ✅ 新开一个 tab 跳转到目标 IP
- ✅ 在目标 IP 页面注入 localStorage 数据
1. 监听消息
javascript
chrome.runtime.onMessage.addListener((message, sender, sendResponse) => {- chrome.runtime.onMessage.addListener:监听插件内部发送的消息
- message:收到的消息内容(action, config, sourceUrl)
- sender:发送消息的 tab 信息(sender.tab)
- sendResponse:回调函数,异步返回一个响应
2. 取出配置和源地址,并且读取cookie
ini
const { config, sourceUrl } = message;
const urlObj = new URL(sourceUrl);
const domain = urlObj.hostname;
chrome.cookies.getAll({ domain }, (cookies) => {})
3. 把 cookie 写到目标 IP
php
allowedCookies.forEach(cookie => {
  chrome.cookies.set({
    url: `http://${config.targetIp}`,
    name: cookie.name,
    value: cookie.value,
    path: cookie.path,
    secure: cookie.secure,
    httpOnly: cookie.httpOnly,
    sameSite: cookie.sameSite
  });
});
4. 打开新标签页跳转到目标 IP
javascript
chrome.tabs.create({ url: `http://${config.targetIp}` }, (tab) => {})5. 等新页面加载完成,再注入 localStorage
ini
chrome.tabs.onUpdated.addListener(function listener(tabId, info) {
  if (tabId === tab.id && info.status === 'complete') {
    chrome.tabs.onUpdated.removeListener(listener);
    chrome.tabs.sendMessage(tabId, {
      action: 'copyLocalStorage',
      config
    });
  }
});
6. return true;
最后返回ture是因为:
- Chrome 规定:如果 sendResponse 是异步调用,必须 return true,否则页面收不到回调
注意点
下面就是处理注入localStorage的逻辑了,为什么不能在backgroud里直接种植呢?
- 因为backgroud.js相当于一个大脑,他能调用插件的所有api,但是他不能操作页面的内容
- 它无法直接读取网页里的 DOM、localStorage、执行页面里的 JS
- 下面就是content-script.js 了
4. content-script.js
ini
chrome.runtime.onMessage.addListener((message, sender, sendResponse) => {
  if (message.action === 'copyLocalStorage') {
    // 当页面跳转到目标 IP 后,恢复 localStorage
    if (window.location.hostname.match(/^(\d{1,3}.){3}\d{1,3}$/)) {
      console.log('页面跳转到目标 IP');
      chrome.storage.local.get(['tempStorageData'], (result) => {
        console.log(result, 'result');
        const data = result.tempStorageData || {};
        Object.keys(data).forEach(key => {
          localStorage.setItem(key, data[key]);
        });
        chrome.storage.local.remove('tempStorageData');
      });
    }
  }
  if (message.action === 'storeData') {
    const { storageKeys } = message.config;
    const storageData = {};

    storageKeys.forEach(key => {
      console.log(localStorage.getItem(key));
      const value = localStorage.getItem(key);
      if (value !== null) {
        storageData[key] = value;
      }
    });
    console.log(storageData,'storageData');
    chrome.storage.local.set({ tempStorageData: storageData });
  }
});
这里面的逻辑很简单了,利用了一个临时缓存tempStorageData去种植localStorage
5.附上配置文件
json
{
  "manifest_version": 3, // 指定使用 Manifest V3,这是 Chrome 插件目前推荐的新版本
  "name": "unlogin-plug-in", // 插件的名称
  "version": "1.0.0", // 插件版本号
  "description": "unlogin-plug-in", // 插件描述

  "permissions": [
    "storage", // 允许使用 chrome.storage API,本地存储数据
    "cookies", // 允许读取和设置 cookie
    "tabs", // 允许访问和操作浏览器标签页信息
    "scripting" // 允许使用 chrome.scripting 注入脚本
  ],

  "host_permissions": [
    "<all_urls>" // 允许访问所有网站的页面,比如读取 cookie、注入脚本等
  ],

  "action": {
    "default_popup": "popup.html" // 点击插件图标时,弹出的界面 HTML 文件
  },

  "background": {
    "service_worker": "background.js" // 后台脚本,使用 service worker 方式运行
  },

  "content_scripts": [
    {
      "matches": ["<all_urls>"], // 指定在哪些页面注入 content-script,这里是所有页面
      "js": ["content-script.js"] // 被注入的脚本文件,处理当前页面的 localStorage、DOM 操作等
    }
  ]
}
小小测试了一下,功能大体是OK的😄
在这里插入图片描述