在这篇文章中,主要讲解仿真软件的消息栏
那在我们的仿真软件中,消息栏是分为三部分的
- 系统提示消息【包括打开某个窗口,系统出现了某个警告,错误,网络连接等等】
- 画布操作消息【对画布的一切操作都会记录在上面,类似于一个历史操作步骤】
- 仿真控制器【控制仿真的组件】
如图一,二,三
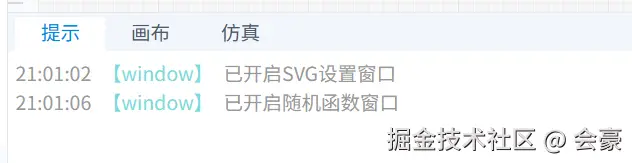
图一 提示消息

图二 画布操作
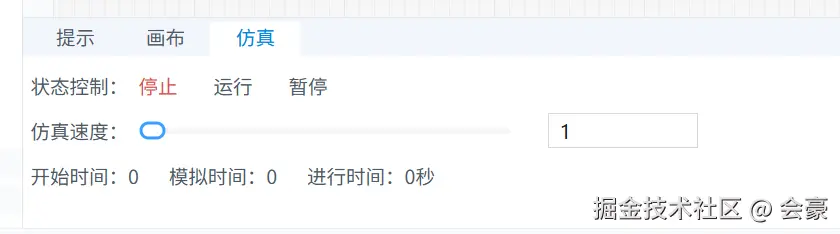
图三 仿真控制器
在这三个组件中,只有图二不需要和主进程进行通信,提示消息需要监听主进程发送的消息,比如说当有其他渲染进程有重要消息时,就需要通过主进程将消息传递给提示组件
其他渲染进程📢 --> 主进程 --> 👂消息组件
首先说一下提示和画布操作,这两个有异曲同工的地方
提示和画布
先看代码 message.ts
ts
import { defineStore } from 'pinia'
import { CanvasOperateType, Message } from '@renderer/types/message'
import { generateUUID } from '@renderer/utils/utils'
import dayjs from 'dayjs'
import { nextTick } from 'vue'

export const useMessageStore = defineStore('message', {
  state: () => ({
    activeTab: 'prompt' as 'prompt' | 'canvas' | 'simControler',

    prompt: [] as Message[],
    messageContentRef: null as HTMLElement | null,
    showNewMessage: false as boolean,

    canvasOperate: [] as CanvasOperateType[],
    canvasOperateContentRef: null as HTMLElement | null
  }),
  actions: {
    //切换tab
    changeTab(tab: 'prompt' | 'canvas' | 'simControler') {
      this.activeTab = tab
    },

    //添加信息
    addPrompt(message: Message) {
      const msg = {} as Message
      //设置id
      msg.id = generateUUID()
      //获取当前时间
      msg.time = dayjs().format('HH:mm:ss')

      msg.content = message.content
      msg.source = message.source
      msg.type = message.type

      //判断当前消息内容是否和上一条消息内容一样
      if (this.prompt.length > 0 && this.prompt[this.prompt.length - 1].content === msg.content) {
        //获取上一条消息的次数,如果没有就默认为1
        const count = this.prompt[this.prompt.length - 1].count || 1
        //设置当前消息的次数
        msg.count = count + 1
        //删除上一条消息
        this.prompt.pop()
      }

      //判断消息是否超过了200条
      if (this.prompt.length > 200) {
        //删除前一百条
        this.prompt.splice(0, 100)
      }
      this.prompt.push(msg)

      if (this.activeTab !== 'prompt') {
        this.showNewMessage = true
      }

      nextTick(() => {
        //将messageContentRef滚动条滚动到最后
        if (this.messageContentRef) {
          this.messageContentRef.scrollTop = this.messageContentRef.scrollHeight
        }
      })
    },

    //添加画布操作信息
    addCanvasOperate(message: CanvasOperateType) {
      const msg = {} as CanvasOperateType
      //设置id
      msg.id = generateUUID()
      //获取当前时间
      msg.time = dayjs().format('HH:mm:ss')

      msg.content = message.content
      msg.source = message.source
      msg.otherMsg = message.otherMsg

      this.judgeCanvasOperate(msg)
      nextTick(() => {
        //将canvasOperateContentRef滚动条滚动到最后
        if (this.canvasOperateContentRef) {
          this.canvasOperateContentRef.scrollTop = this.canvasOperateContentRef.scrollHeight
        }
      })
    },

    //对画布操作进行判断
    judgeCanvasOperate(msg: CanvasOperateType) {
      //判断当前消息内容是否和上一条消息内容一样
      if (
        this.canvasOperate.length > 0 &&
        this.canvasOperate[this.canvasOperate.length - 1].content === msg.content
      ) {
        //获取上一条消息的次数,如果没有就默认为1
        const count = this.canvasOperate[this.canvasOperate.length - 1].count || 1
        //设置当前消息的次数
        msg.count = count + 1
        //删除上一条消息
        this.canvasOperate.pop()
      }

      //判断消息是否超过了200条
      if (this.canvasOperate.length > 200) {
        this.canvasOperate.splice(0, 100)
      }

      this.canvasOperate.push(msg)
    },

    //清除消息
    clearMessage() {
      if (this.activeTab === 'prompt') {
        this.prompt = []
      } else {
        this.canvasOperate = []
      }
    }
  }
})
提示的数据格式和画布操作的格式是差不多的
ts
export interface Message {
  id?: string
  time?: string
  source?: string
  content: string
  type?: 'info' | 'warning' | 'error' | 'success'
  count?: number
}

export interface CanvasOperateType {
  id?: string
  time?: string
  source: string
  content: string
  otherMsg?: string
  count?: number
}- id:位移ID值,可以采用UUID形式
- time:当前消息的时间
- source:消息来源于哪个地方
- content:消息内容
- type:消息类型
- count:当消息和上一条消息重复时,此count就会+1
那此时我们就需要考虑一下,怎么去监听主进程的消息,在我的上一篇文章,属性栏里面其实已经讲过,属性栏数据是来源于主进程的,那么同理,我们也需要写一个监听事件
ts
  //监听主进程发送的消息数据
  window.electron.ipcRenderer.on('mainProcessMsg', (e, data): void => {
    useMessageStore().addPrompt(data)
  })
然后这个方法需要放到main.ts里面区立即执行
那么在我们的主进程中,也同样需要一个方法,这个方法起到统一接收消息,然后将消息传递给渲染进程,代码如下
ts
import { mainWindow } from '../..'

//给渲染进程的消息框发消息
export const sendMsgToRender = (
  source: string,
  content: string,
  type?: 'info' | 'warning' | 'error' | 'success'
): void => {
  const data = {
    source,
    content,
    type
  }
  //判断mainWindow是否存在
  if (mainWindow) {
    mainWindow?.webContents?.send('mainProcessMsg', data)
  }
}
那么至此我们的消息栏已经将核心讲解完毕了,关于仿真控制器的部分,我需要留到后面和仿真引擎一起讲解