最近在做 Android 项目的时候,需要在 NativeActivity 中动态加载 so 。运行的时候,抛出了异常
Caused by: java.lang.IllegalArgumentException: Unable to find native library using classloader: dalvik.system.PathClassLoader
在 NativeActivity 中可以看到
java
@Override
protected void onCreate(Bundle savedInstanceState) {
...
BaseDexClassLoader classLoader = (BaseDexClassLoader) getClassLoader();
String path = classLoader.findLibrary(libname);
if (path == null) {
throw new IllegalArgumentException("Unable to find native library " + libname +
" using classloader: " + classLoader.toString());
}
...
}在上面的源码中,可以知道,NativeActivity 要是通过 BaseDexClassLoader#findLibrary 方法去查找 so 的路径,然后进行判空。上面提到的异常,就是因为找不到这个 so 的 path, 抛处理的异常。
在这个异常之后有几个疑问
- 第一个问题是: so 的加载过程是怎样的,so 是如何和现在运行的代码联系起来的?
- 第二个问题是: classLoader 通过 findLibrary 方法去查找 so 的 path, 这些path 有什么,是怎样来的?
- 第三个问题是:classLoader 是怎么来的,在哪里生成的?
带着这三个问题去找答案,下面就是对三个问题答案的寻找过程。
正文
本文通过讲述 Android 动态链接库 so 的加载过来,已经 so 的加载原理,可以对加载的整个流程有个清晰的认识,有助于对后续学习热修复有比较好的帮助。
下面代码分析的源码都是以 Android 9.0 版。
1 Android So 的加载过程
在 Android 添加 so 有两种方式,一种是调用 load(String filename) 方法,传递进去的是路径;另一种是调用 loadLibrary(String libname) 方式,传递进去的是 so 的名称
System.load("/storage/emulated/0/libnative-lib.so") 全路径 System.loadLibrary("native-lib"); so 的名字
1.1 System#loadLibrary
\> java/lang/System.java
java
public static void loadLibrary(String libname) {
    Runtime.getRuntime().loadLibrary0(VMStack.getCallingClassLoader(), libname);
}
1.2 Runtime#loadLibrary0
\>java/lang/Runtime.java
java
private synchronized void loadLibrary0(ClassLoader loader, Class<?> callerClass, String libname) {
...
String libraryName = libname;
if (loader != null && !(loader instanceof BootClassLoader)) {
//① ClassLoader#findLibrary 查找 so 的文件名称,见 1.4节
String filename = loader.findLibrary(libraryName);
if (filename == null &&
(loader.getClass() == PathClassLoader.class ||
loader.getClass() == DelegateLastClassLoader.class)) {
// ② 如果通过 ClassLoader 找不到,则会通过 System 默认路径去找
filename = System.mapLibraryName(libraryName);
}
if (filename == null) {
throw new UnsatisfiedLinkError(loader + " couldn't find "" +
System.mapLibraryName(libraryName) + """);
}
// ③ Native 加载
String error = nativeLoad(filename, loader);
if (error != null) {
throw new UnsatisfiedLinkError(error);
}
return;
}
// ClassLoader 为空的时候
getLibPaths();
String filename = System.mapLibraryName(libraryName);
String error = nativeLoad(filename, loader, callerClass);
if (error != null) {
throw new UnsatisfiedLinkError(error);
}
}
// 最终通过 Native 来加载
private static native String nativeLoad(String filename, ClassLoader loader, Class<?> caller)- 当 loader 不为空是,通过 ClassLoader#findLibrary() 查看 so 是否存在
- 当 loader 为空是,则从默认目录 mLibPaths 中查找
1.3 Runtime#getLibPaths
\>java/lang/Runtime.java
java
// 获取 Lib 默认路径
private String[] getLibPaths() {
if (mLibPaths == null) {
synchronized(this) {
if (mLibPaths == null) {
mLibPaths = initLibPaths();
}
}
}
return mLibPaths;
}
private static String[] initLibPaths() {
String javaLibraryPath = System.getProperty("java.library.path");
if (javaLibraryPath == null) {
return EmptyArray.STRING;
}
String[] paths = javaLibraryPath.split(":");
for (int i = 0; i < paths.length; ++i) {
if (!paths[i].endsWith("/")) {
paths[i] += "/";
}
}
return paths;
}initLibPaths 路径是默认的 lib 路径 返回的路径是
/system/lib/ /vendor/lib/ /product/lib/
1.4 BaseDexClassLoader.findLibrary
通过 ClassLoader 查找 so
\> libcore/dalvik/src/main/java/dalvik/system/BaseDexClassLoader.java
java
@Override
public String findLibrary(String name) {
    return pathList.findLibrary(name);
}
pathList 是 DexPathList
1.5 DexPathList#findLibrary
\>libcore/dalvik/src/main/java/dalvik/system/DexPathList.java
java
public String findLibrary(String libraryName) {
// 通过 so 的名称拼接成文件路径
String fileName = System.mapLibraryName(libraryName);
for (NativeLibraryElement element : nativeLibraryPathElements) {
String path = element.findNativeLibrary(fileName);
if (path != null) {
return path;
}
}
return null;
}例如 System.mapLibraryName(native-lib) 返回的是 libnative-lib.so
nativeLibraryPathElements 是 native library 路径的集合, 它的是 DexPathList 初始化的时候赋值,详见 1.7节
1.6 DexPathList$NativeLibraryElement#findNativeLibrary
\>libcore/dalvik/src/main/java/dalvik/system/DexPathList.java
java
public String findNativeLibrary(String name) {
maybeInit();
if (zipDir == null) {
String entryPath = new File(path, name).getPath();
// 能打开并且只读的 so
if (IoUtils.canOpenReadOnly(entryPath)) {
return entryPath;
}
} else if (urlHandler != null) {
String entryName = zipDir + '/' + name;
if (urlHandler.isEntryStored(entryName)) {
return path.getPath() + zipSeparator + entryName;
}
}
return null;
}1.7 DexPathList#DexPathList
\>libcore/dalvik/src/main/java/dalvik/system/DexPathList.java
java
DexPathList(ClassLoader definingContext, String dexPath,
String librarySearchPath, File optimizedDirectory, boolean isTrusted) {
...
this.definingContext = definingContext;
ArrayList<IOException> suppressedExceptions = new ArrayList<IOException>();
// save dexPath for BaseDexClassLoader
// dex 的路径
this.dexElements = makeDexElements(splitDexPath(dexPath), optimizedDirectory,
suppressedExceptions, definingContext, isTrusted);
// Native 库的路径
this.nativeLibraryDirectories = splitPaths(librarySearchPath, false);
// 系统 Native 库的路径
this.systemNativeLibraryDirectories =
splitPaths(System.getProperty("java.library.path"), true);
// 所有的 Natvie
this.nativeLibraryPathElements = makePathElements(getAllNativeLibraryDirectories());
...
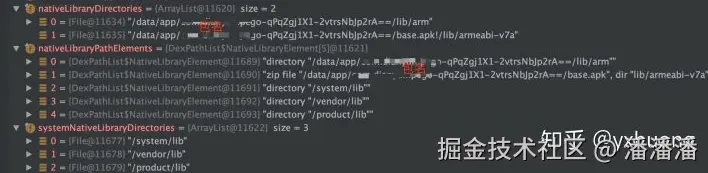
}在 DexPathList 的构造函数中,我们可以知道 nativeLibraryPathElements 是所有 Native Library 的集合。
DexPathList 是在 ActivityThread 中创建,ActivityThread 是在 App 启动时候创建的。关于 App 启动的启动流程,可以去找这方面的资料,自行查看。
总结一些 Native Library 的路径来源:
- 一个是 Native 库的原始路径
System.getProperty("java.library.path****"), /system/lib/; /vendor/lib/; /product/lib/ - 另外一个是App启动时的 Lib 库路径
- 如下图所示
1.8 Runtime#doLoad
在上面我们解决 Native Library 的路径问题,下面分析一下加载的过程
java
private String doLoad(String name, ClassLoader loader) {
String librarySearchPath = null;
if (loader != null && loader instanceof BaseDexClassLoader) {
BaseDexClassLoader dexClassLoader = (BaseDexClassLoader) loader;
librarySearchPath = dexClassLoader.getLdLibraryPath();
}
synchronized (this) {
// 调用 native 方法加载 so, librarySearchPath 就是前面分析的路径的路径
return nativeLoad(name, loader, librarySearchPath);
}
}
private static native String nativeLoad(String filename, ClassLoader loader,
String librarySearchPath);1.9 Runtime.c#Runtime_nativeLoad
\> libcore/ojluni/src/main/native/Runtime.c
c
JNIEXPORT jstring JNICALL
Runtime_nativeLoad(JNIEnv* env, jclass ignored, jstring javaFilename,
                   jobject javaLoader, jclass caller)
{
    return JVM_NativeLoad(env, javaFilename, javaLoader, caller);
}
Runtime.c 中 Runtime_nativeLoad 方法会调用 JVM_NativeLoad
1.10 OpenjdkJvm.cc#JVM_NativeLoad
\>art/openjdkjvm/[OpenjdkJvm.cc](https://link.juejin.cn?target=https%3A%2F%2Flink.zhihu.com%2F%3Ftarget%3Dhttp%253A%2F%2FOpenjdkJvm.cc "https://link.zhihu.com/?target=http%3A//OpenjdkJvm.cc")
c
JNIEXPORT jstring JVM_NativeLoad(JNIEnv* env,
jstring javaFilename,
jobject javaLoader,
jclass caller) {
ScopedUtfChars filename(env, javaFilename);
if (filename.c_str() == nullptr) {
return nullptr;
}
std::string error_msg;
{
// 获取 java 虚拟机
art::JavaVMExt* vm = art::Runtime::Current()->GetJavaVM();
// 加载 调用java 虚拟机中 NativieLibrary 方法去加载 so
bool success = vm->LoadNativeLibrary(env,
filename.c_str(),
javaLoader,
caller,
&error_msg);
if (success) {
return nullptr;
}
}
...1.11 java_vm_ext.cc#JVM_NativeLoad
\>art/runtime/[java_vm_ext.cc](https://link.juejin.cn?target=https%3A%2F%2Flink.zhihu.com%2F%3Ftarget%3Dhttp%253A%2F%2Fjava_vm_ext.cc "https://link.zhihu.com/?target=http%3A//java_vm_ext.cc")
c
bool JavaVMExt::LoadNativeLibrary(JNIEnv* env,
const std::string& path,
jobject class_loader,
std::string* error_msg) {
error_msg->clear();
SharedLibrary* library;
Thread* self = Thread::Current();
// ① 先判断 so 是否已经被加载过
{
MutexLock mu(self, *Locks::jni_libraries_lock_);
library = libraries_->Get(path);
...
}
VLOG(jni) << "[Shared library "" << path << "" already loaded in "
<< " ClassLoader " << class_loader << "]";
if (!library->CheckOnLoadResult()) {
StringAppendF(error_msg, "JNI_OnLoad failed on a previous attempt "
"to load "%s"", path.c_str());
return false;
}
return true;
}
// ② 打开 so
ScopedLocalRef<jstring> library_path(env, GetLibrarySearchPath(env, class_loader));
Locks::mutator_lock_->AssertNotHeld(self);
const char* path_str = path.empty() ? nullptr : path.c_str();
bool needs_native_bridge = false;
void* handle = android::OpenNativeLibrary(env,
runtime_->GetTargetSdkVersion(),
path_str,
class_loader,
library_path.get(),
&needs_native_bridge,
error_msg);
VLOG(jni) << "[Call to dlopen("" << path << "", RTLD_NOW) returned " << handle << "]";
// 打开失败返回
if (handle == nullptr) {
VLOG(jni) << "dlopen("" << path << "", RTLD_NOW) failed: " << *error_msg;
return false;
}
// 检测异常
if (env->ExceptionCheck() == JNI_TRUE) {
LOG(ERROR) << "Unexpected exception:";
env->ExceptionDescribe();
env->ExceptionClear();
}
// ③ 创建一个新的 SharedLibrary 结构体放到 libraries 中
bool created_library = false;
{
// Create SharedLibrary ahead of taking the libraries lock to maintain lock ordering.
std::unique_ptr<SharedLibrary> new_library(
new SharedLibrary(env,
self,
path,
handle,
needs_native_bridge,
class_loader,
class_loader_allocator));
MutexLock mu(self, *Locks::jni_libraries_lock_);
library = libraries_->Get(path);
if (library == nullptr) { // We won race to get libraries_lock.
library = new_library.release();
libraries_->Put(path, library);
created_library = true;
}
}
if (!created_library) {
LOG(INFO) << "WOW: we lost a race to add shared library: "
<< """ << path << "" ClassLoader=" << class_loader;
return library->CheckOnLoadResult();
}
VLOG(jni) << "[Added shared library "" << path << "" for ClassLoader " << class_loader << "]";
// ④ 查找 "JNI_OnLoad" 符号
bool was_successful = false;
void* sym = library->FindSymbol("JNI_OnLoad", nullptr);
// 没有查找到, 标记为加载成功
if (sym == nullptr) {
VLOG(jni) << "[No JNI_OnLoad found in "" << path << ""]";
was_successful = true;
} else {
// 如果我们在 JNI 中已经复写了 JNI_OnLoad 方法,则需要重写 ClassLoader
ScopedLocalRef<jobject> old_class_loader(env, env->NewLocalRef(self->GetClassLoaderOverride()));
self->SetClassLoaderOverride(class_loader);
VLOG(jni) << "[Calling JNI_OnLoad in "" << path << ""]";
typedef int (*JNI_OnLoadFn)(JavaVM*, void*);
JNI_OnLoadFn jni_on_load = reinterpret_cast<JNI_OnLoadFn>(sym);
int version = (*jni_on_load)(this, nullptr);
...
self->SetClassLoaderOverride(old_class_loader.get());
// 判断 JNI 版本
if (version == JNI_ERR) {
StringAppendF(error_msg, "JNI_ERR returned from JNI_OnLoad in "%s"", path.c_str());
} else if (JavaVMExt::IsBadJniVersion(version)) {
StringAppendF(error_msg, "Bad JNI version returned from JNI_OnLoad in "%s": %d",
path.c_str(), version);
} else {
was_successful = true;
}
...
}
// 返回加载结果
library->SetResult(was_successful);
return was_successful;
}上面的内容比较多,需要一步步分析
- 第一步是判断 so 是否已经被加载过,如果已经加载过了,则直接返回加载成功
- 第二步是打开 so, 返回
handle句柄,如果返回的句柄为空,这份表示加载失败 - 第三步是创建一个
SharedLibrary结构体,放到libraries中缓存 - 第四步是查找
JNI_OnLoad符号,这里分两种情况 -
- 如果在 JNI 中没有写
JNI_OnLoad方法,找不到符号,返回加成功 - 另一种情况是,如果 JNI 中有
JNI_OnLoad方法,则会重写当前的 ClassLoader, 并且判断 JNI 版本
- 如果在 JNI 中没有写
从上面的第四步,我们可以知道加载 so 中 JNI 的入口是 JNI_OnLoad 方法,所以在写 JNI 的时候,会在 JNI_OnLoad方法中做一些初始化的工作。另外一个就是,如果写了 JNI_OnLoad 方法,就要指定 JNI 版本。
判断 JNI 的版本
\>art/runtime/[java_vm_ext.cc](https://link.juejin.cn?target=https%3A%2F%2Flink.zhihu.com%2F%3Ftarget%3Dhttp%253A%2F%2Fjava_vm_ext.cc "https://link.zhihu.com/?target=http%3A//java_vm_ext.cc")
c
bool JavaVMExt::IsBadJniVersion(int version) {
  // We don't support JNI_VERSION_1_1. These are the only other valid versions.
  return version != JNI_VERSION_1_2 && version != JNI_VERSION_1_4 && version != JNI_VERSION_1_6;
}
上面是判断 JNI 版本,可以看到只能是 JNI_VERSION_1_2,JNI_VERSION_1_4,JNI_VERSION_1_6 三个版本
下来是我们平时在写 JNI 的时候, JNI_OnLoad 方法中需要给定 jni 的版本, 同时做一些初始化的工作。
c
int JNI_OnLoad(JavaVM *vm, void *reserved) {
JNIEnv *env;
jVM = vm;
// 设定 jni 版本为 1_4
if ((*vm)->GetEnv(vm, (void **) &env, JNI_VERSION_1_4) != JNI_OK) {
return -1;
}
// 初始化的工作
android_dumpVideo = (*env)->GetStaticMethodID(env, cEmulator, "bitblt",
"(Ljava/nio/ByteBuffer;)V");
if (android_dumpVideo == NULL) {
__android_log_print(ANDROID_LOG_ERROR, "mame4droid-jni", "Failed to find method bitblt");
return -1;
}
android_changeVideo = (*env)->GetStaticMethodID(env, cEmulator, "changeVideo", "(IIII)V");
if (android_changeVideo == NULL) {
__android_log_print(ANDROID_LOG_ERROR, "mame4droid-jni",
"Failed to find method changeVideo");
return -1;
}
}2. So 的加载原理
在前面的部分,我们梳理了 so 加载的整个流程,但这个过程还有一些疑问,包括:
- ClassLoader 从哪里来
- Native 库是怎样来的
- so 是怎样到 Native 库里面的
下面将一个个来查找这些疑问的答案
2.1 ClassLoader 是怎样来的
2.1.1 System#loadLibrary
\> java/lang/System.java
java
public static void loadLibrary(String libname) {
      Runtime.getRuntime().loadLibrary0(VMStack.getCallingClassLoader(), libname);
}
加载的 ClassLoader 从 VMStack 中获取, VMStack 再去从 Native 中获取
\>/libcore/libart/src/main/java/dalvik/system/VMStack.java
java
@FastNative
native public static ClassLoader getCallingClassLoader();
2.1.2 ActivityThread#handleBindApplication
\>/frameworks/base/core/java/android/app/ActivityThread.java
在 ActivityThread 是 Android App 启动的入口,关于 App 的启动可参考其他资料。 App 启动过程,会调到 ActivityThread#handleBindApplication 方法。 在这个方法中,会创建 LoadedApk 并且传入进去 Context 中的 ClassLoader. Context 的实现是 ContextImpl,Context#getClassLoader() 方法,去看 ContextImpl#getClassLoader(), 详见 2.1.3
java
private void handleBindApplication(AppBindData data) {
...
// 创建 LoadedApk,使用是 Context 的 ClassLoader
LoadedApk pi = getPackageInfo(instrApp, data.compatInfo, appContext.getClassLoader(), false, true, false);
// 将 ActivityThread 和 LoadedApk 作为创建 ContextImpl 的参数
ContextImpl instrContext = ContextImpl.createAppContext(this, pi);
try {
java.lang.ClassLoader cl = instrContext.getClassLoader();
mInstrumentation = (Instrumentation) cl.loadClass(data.instrumentationName.getClassName())
.newInstance();
} catch (Exception e) {
throw new RuntimeException(
"Unable to instantiate instrumentation " + data.instrumentationName + ": " + e.toString(), e);
}
...
}2.1.3 ContextImpl#getClassLoader
\>/frameworks/base/core/java/android/app/ContextImpl.java
java
@Override
public ClassLoader getClassLoader() {
    return mClassLoader != null ? mClassLoader : (mPackageInfo != null ? mPackageInfo.getClassLoader() : ClassLoader.getSystemClassLoader());
}
这里的逻辑有点绕,将代码整理改成下面,会更加容易看懂
java
@Override
public ClassLoader getClassLoader() {
    if (mClassLoader != null){
        return mClassLoader;
    }
    if (mPackageInfo != null){
      return mPackageInfo.getClassLoader();
    } else {
      return ClassLoader.getSystemClassLoader();
    }
}
经过整理的代码逻辑就很清晰了,第一次进来的时候 mClassLoader 是空的,只要看后面的逻辑。 mPackageInfo是 LoadApk, mPackageInfo 不会为空,在 2.1.2 节知道它是 ContextImpl 创建的时候传进来的mP。所以,ackageInfo.getClassLoader() 是调用了 LoadApk#getClassLoader() 方法,关于这个方法详见 2.1.4
2.1.4 LoadApk#getClassLoader
\>/frameworks/base/core/java/android/app/LoadApk.java
java
public ClassLoader getClassLoader() {
synchronized (this) {
if (mClassLoader == null) {
createOrUpdateClassLoaderLocked(null /*addedPaths*/);
}
return mClassLoader;
}
}
private void createOrUpdateClassLoaderLocked(List<String> addedPaths)
···
// 创建 LoadApk 的时候,传进 mIncludeCode 的值是 false
if (!mIncludeCode) {
if (mClassLoader == null) {
StrictMode.ThreadPolicy oldPolicy = StrictMode.allowThreadDiskReads();
mClassLoader = ApplicationLoaders.getDefault().getClassLoader(
"" /* codePath */, mApplicationInfo.targetSdkVersion, isBundledApp,
librarySearchPath, libraryPermittedPath, mBaseClassLoader,
null /* classLoaderName */);
StrictMode.setThreadPolicy(oldPolicy);
mAppComponentFactory = AppComponentFactory.DEFAULT;
}
return;
}
// 调用 ApplicationLoaders.getDefault() 创建 ClassLoader,
if (mClassLoader == null) {
..
mClassLoader = ApplicationLoaders.getDefault().getClassLoader(zip,
mApplicationInfo.targetSdkVersion, isBundledApp, librarySearchPath,
libraryPermittedPath, mBaseClassLoader,
mApplicationInfo.classLoaderName);
mAppComponentFactory = createAppFactory(mApplicationInfo, mClassLoader);
...
}
···
}2.1.5 ApplicationLoaders#getClassLoader
\>/frameworks/base/core/java/android/app/ApplicationLoaders.java
java
ClassLoader getClassLoader(String zip, int targetSdkVersion, boolean isBundled,
String librarySearchPath, String libraryPermittedPath,
ClassLoader parent, String classLoaderName) {
// For normal usage the cache key used is the same as the zip path.
return getClassLoader(zip, targetSdkVersion, isBundled, librarySearchPath,
libraryPermittedPath, parent, zip, classLoaderName);
}
private ClassLoader getClassLoader(String zip, int targetSdkVersion, boolean isBundled,
String librarySearchPath, String libraryPermittedPath,
ClassLoader parent, String cacheKey,
String classLoaderName) {
ClassLoader baseParent = ClassLoader.getSystemClassLoader().getParent();
synchronized (mLoaders) {
if (parent == null) {
parent = baseParent;
}
// 试图从缓存总去取 ClassLoader
if (parent == baseParent) {
ClassLoader loader = mLoaders.get(cacheKey);
if (loader != null) {
return loader;
}
}
// 创建 ClassLoader
ClassLoader classloader = ClassLoaderFactory.createClassLoader(
zip, librarySearchPath, libraryPermittedPath, parent,
targetSdkVersion, isBundled, classLoaderName);
mLoaders.put(cacheKey, classloader);
return classloader;
}
...
}
}2.1.6 ClassLoaderFactory#createClassLoader
\>/frameworks/base/core/java/com/android/internal/os/ClassLoaderFactory.java
java
public static ClassLoader createClassLoader(String dexPath,
String librarySearchPath, ClassLoader parent, String classloaderName) {
if (isPathClassLoaderName(classloaderName)) {
return new PathClassLoader(dexPath, librarySearchPath, parent);
} else if (isDelegateLastClassLoaderName(classloaderName)) {
return new DelegateLastClassLoader(dexPath, librarySearchPath, parent);
}
throw new AssertionError("Invalid classLoaderName: " + classloaderName);
}经过上面这么多步,终于看到了创建创建 ClassLoader 的地方. 根据参数的 classloaderName 的不同,会创建 PathClassLoader 或者 DelegateLastClassLoader。
classloaderName 参数是 app 启动的时候传下来的,见 2.1.4 节
总的来说,ClassLoader 是 app 启动的时候, ActivityThread 中经过一步步的调用,最后在 ApplicationLoaders 中用 ClassLoaderFactory 创建。
ClassLoader 的分类
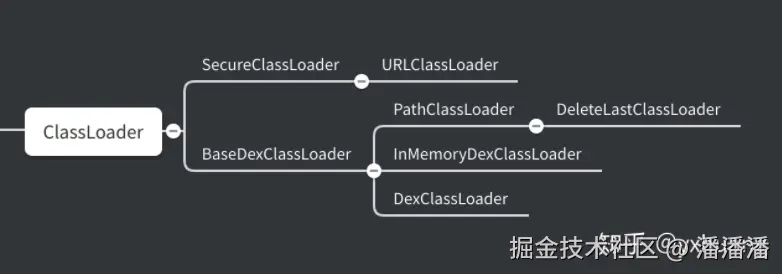
关于不同的 ClassLoader 有不同的作用,可以去查相关的资料
到此,我们的第一个问题解决了,ClassLoader 是 app 启动的时候在 ActivityThread 中创建。
2.2 Native 库是怎样来的
通过对 DexPathList 的分析,可以知道 Native Library 来自来自两个地方
- 一个是 DexPathList 创建的时候,构造函数传进来的 librarySearchPath。
- 另外一个是 addNativePath(Collection libPaths) 例如 : /data/app/com.test.baidu/base.apk!/lib/armeabi-v7a
2.2.1 DexPathList#findLibrary
在第一章的时候,加载 so 会调用到 DexPathList#findLibrary 方法,在这个方法里面会遍历 nativeLibraryPathElements。 nativeLibraryPathElements 是 NativeLibrary 路径的集合。
java
public String findLibrary(String libraryName) {
String fileName = System.mapLibraryName(libraryName);
for (NativeLibraryElement element : nativeLibraryPathElements) {
String path = element.findNativeLibrary(fileName);
if (path != null) {
return path;
}
}
return null;
}System.mapLibraryName 的实现是在 System.c 里面,返回 so 的文件名,例如
libraryName 是 test_baidu, System.mapLibraryName('test_baidu') 返回的是 libtest_baidu.so
下面要看看 nativeLibraryPathElements是怎么来的 NativeLibraryElement 类是 Native Library 的路径元素
java
static class NativeLibraryElement {
private final File path;
private final String zipDir;
public NativeLibraryElement(File dir) {
this.path = dir;
this.zipDir = null;
}
public NativeLibraryElement(File zip, String zipDir) {
this.path = zip;
this.zipDir = zipDir;
if (zipDir == null) {
throw new IllegalArgumentException();
}
}
...
}2.2.1 DexPathList#DexPathList 构造函数
java
DexPathList(ClassLoader definingContext, String dexPath,
String librarySearchPath, File optimizedDirectory, boolean isTrusted) {
...
this.dexElements = makeDexElements(splitDexPath(dexPath), optimizedDirectory,
suppressedExceptions, definingContext, isTrusted);
// ① 创建是传入进来的 librarySearchPath
this.nativeLibraryDirectories = splitPaths(librarySearchPath, false);
// ② 系统的 "java.library.path" 路径
this.systemNativeLibraryDirectories = splitPaths(System.getProperty("java.library.path"), true);
List<File> allNativeLibraryDirectories = new ArrayList<>(nativeLibraryDirectories);
allNativeLibraryDirectories.addAll(systemNativeLibraryDirectories);
this.nativeLibraryPathElements = makePathElements(allNativeLibraryDirectories);
...
}在 DexPathList 的构造函数中,我们可以看到 Native library 存在两个方面
- 一个是传入进来的 librarySearchPath
- 另外一个是通过虚拟机属性
java.library.path获取的系统 Native 库
2.2.2 DexPathList#addNativePath
外部添加的 libPaths 路径 例如
/data/app/com.test.baidu/base.apk!/lib/armeabi-v7a
DexPathList#addNativePath 是在 ApplicationLoaders#addNative 中调用,见 2.2.3
java
public void addNativePath(Collection<String> libPaths) {
    if (libPaths.isEmpty()) {
        return;
    }
    List<File> libFiles = new ArrayList<>(libPaths.size());
    for (String path : libPaths) {
        libFiles.add(new File(path));
    }
    ArrayList<NativeLibraryElement> newPaths =
            new ArrayList<>(nativeLibraryPathElements.length + libPaths.size());
    newPaths.addAll(Arrays.asList(nativeLibraryPathElements));
    for (NativeLibraryElement element : makePathElements(libFiles)) {
        if (!newPaths.contains(element)) {
            newPaths.add(element);
        }
    }
    nativeLibraryPathElements = newPaths.toArray(new NativeLibraryElement[newPaths.size()]);
}
2.2.3 ApplicationLoaders#addNative
\>/frameworks/base/core/java/android/app/ApplicationLoaders.java
java
void addNative(ClassLoader classLoader, Collection<String> libPaths) {
        if (!(classLoader instanceof PathClassLoader)) {
            throw new IllegalStateException("class loader is not a PathClassLoader");
        }
        final PathClassLoader baseDexClassLoader = (PathClassLoader) classLoader;
        baseDexClassLoader.addNativePath(libPaths);
    }
2.2.4 LoadedApk#createOrUpdateClassLoaderLocked
\> /frameworks/base/core/java/android/app/LoadedApk.java
java
private void createOrUpdateClassLoaderLocked(List<String> addedPaths) {
...
// ① 默认 library 的路径
final String defaultSearchPaths = System.getProperty("java.library.path");
final boolean treatVendorApkAsUnbundled = !defaultSearchPaths.contains("/vendor/lib");
if (mApplicationInfo.getCodePath() != null
&& mApplicationInfo.isVendor() && treatVendorApkAsUnbundled) {
isBundledApp = false;
}
// ②
makePaths(mActivityThread, isBundledApp, mApplicationInfo, zipPaths, libPaths);
String libraryPermittedPath = mDataDir;
...
// ③ 创建 ClassLoader
if (mClassLoader == null) {
...
mClassLoader = ApplicationLoaders.getDefault().getClassLoader(zip,
mApplicationInfo.targetSdkVersion, isBundledApp, librarySearchPath,
libraryPermittedPath, mBaseClassLoader,
mApplicationInfo.classLoaderName);
mAppComponentFactory = createAppFactory(mApplicationInfo, mClassLoader);
...
}
if (!libPaths.isEmpty() && SystemProperties.getBoolean(PROPERTY_NAME_APPEND_NATIVE, true)) {
...
try {
// ④ 添加 libPaths 路径
ApplicationLoaders.getDefault().addNative(mClassLoader, libPaths);
} finally {
StrictMode.setThreadPolicy(oldPolicy);
}
}
...
// ⑤ 其他的 lib 路径 到 defaultSearchPaths
List<String> extraLibPaths = new ArrayList<>(3);
String abiSuffix = VMRuntime.getRuntime().is64Bit() ? "64" : "";
if (!defaultSearchPaths.contains("/vendor/lib")) {
extraLibPaths.add("/vendor/lib" + abiSuffix);
}
if (!defaultSearchPaths.contains("/odm/lib")) {
extraLibPaths.add("/odm/lib" + abiSuffix);
}
if (!defaultSearchPaths.contains("/product/lib")) {
extraLibPaths.add("/product/lib" + abiSuffix);
}
if (!extraLibPaths.isEmpty()) {
...
try {
// ⑥ 将 其他 lib 路径也添加到 DexPathList 中
ApplicationLoaders.getDefault().addNative(mClassLoader, extraLibPaths);
} finally {
StrictMode.setThreadPolicy(oldPolicy);
}
}
}createOrUpdateClassLoaderLocked 方法里面创建 ClassLoader 并且设置 lib 路径
- 首先 defaultSearchPaths 默认路径,在 ①⑤中获取并放置进去,包含
/system/lib/ /vendor/lib/ /product/lib/
- 其次,在 ② 中 makePaths
- 在 ④⑥中将 libs 路径添加到 DexPathList 中
2.2.5 LoadedApk#makePaths
java
public static void makePaths(ActivityThread activityThread,
boolean isBundledApp,
ApplicationInfo aInfo,
List<String> outZipPaths,
List<String> outLibPaths) {
final String appDir = aInfo.sourceDir;
// aInfo.nativeLibraryDir 的来源在 ActivityThread#getInstrumentationLibrary 中
final String libDir = aInfo.nativeLibraryDir;
final String[] sharedLibraries = aInfo.sharedLibraryFiles;
...
String instrumentationLibDir = activityThread.mInstrumentationLibDir;
String instrumentedLibDir = activityThread.mInstrumentedLibDir;
...
if (outLibPaths != null) {
outLibPaths.add(instrumentationLibDir);
if (!instrumentationLibDir.equals(instrumentedLibDir)) {
outLibPaths.add(instrumentedLibDir);
}
}
if (outLibPaths != null) {
outLibPaths.add(instrumentationLibDir);
if (!instrumentationLibDir.equals(instrumentedLibDir)) {
outLibPaths.add(instrumentedLibDir);
}
...
if (outLibPaths.isEmpty()) {
outLibPaths.add(libDir);
}
① 根据 cpu 的不同添加不同路径
if (aInfo.primaryCpuAbi != null) {
if (aInfo.targetSdkVersion < Build.VERSION_CODES.N) {
outLibPaths.add("/system/fake-libs" +
(VMRuntime.is64BitAbi(aInfo.primaryCpuAbi) ? "64" : ""));
}
for (String apk : outZipPaths) {
outLibPaths.add(apk + "!/lib/" + aInfo.primaryCpuAbi);
}
}
if (isBundledApp) {
outLibPaths.add(System.getProperty("java.library.path"));
}
}在 ① 中,会根据 cpu 架构的不同,而添加不同路径,例如,如果手机 cpu 的架构 是 armeabi-v7a, 那 apk + "!/lib/" + aInfo.primaryCpuAbi 就是
data/app/包名==/base.apk!/lib/armeabli-v7a
2.2.6 ActivityThread#getInstrumentationLibrary
\>/frameworks/base/core/java/android/app/ActivityThread.java
java
private String getInstrumentationLibrary(ApplicationInfo appInfo, InstrumentationInfo insInfo) {
if (appInfo.primaryCpuAbi != null && appInfo.secondaryCpuAbi != null
&& appInfo.secondaryCpuAbi.equals(insInfo.secondaryCpuAbi)) {
String secondaryIsa =
VMRuntime.getInstructionSet(appInfo.secondaryCpuAbi);
final String secondaryDexCodeIsa =
SystemProperties.get("ro.dalvik.vm.isa." + secondaryIsa);
secondaryIsa = secondaryDexCodeIsa.isEmpty() ? secondaryIsa : secondaryDexCodeIsa;
final String runtimeIsa = VMRuntime.getRuntime().vmInstructionSet();
if (runtimeIsa.equals(secondaryIsa)) {
return insInfo.secondaryNativeLibraryDir;
}
}
return insInfo.nativeLibraryDir;
}在 ActivityThread 中的 nativeLibraryDir 通过 getInstrumentationLibrary 方法获取,也是通过 SystemProperties.get("ro.dalvik.vm.isa." + secondaryIsa); 系统属性获取
总的来说 NativeLibraryPath 主要是来至于几个方面
- 一个是系统的
java.library.path属性,是
/system/lib /vendor/lib /product/lib
- 一个是
apk + "!/lib/" + aInfo.primaryCpuAbi/data/app/包名==/base.apk!/lib/armeabli-v7a - 一个是
"ro.dalvik.vm.isa." + secondaryIsa属性 /data/app/包名==/lib/arm
如下图中的 nativeLiraryPathsElements中的路径

解决问题
通过上面的分析,已经回答了我们在前言部分的三个疑问,那接下来就要解决这个异常了。 我们知道
Caused by: java.lang.IllegalArgumentException: Unable to find native library using classloader: dalvik.system.PathClassLoader
在上面的分析知道, 通过 ClassLoader#findLibrary去 libs 路径去查找我们要加载的 so, 找不到这个 path 导致。
动态加载 so,我们在通常需要把要加载的 so 从后台下载下来,然后通过 System.load(String filename) 或者 System.loadLibrary(String libname) 方法去加载 so。
那解决这个问题就是把我们下载存放 so 的路径,添加到 ClassLoader 的 libs 路径里面,而这些 libs 路径是 app 启动的时候就应经生成了。可以利用反射,在运行时路径添加进去。
将存放 so 的路径放到 ClassLoader 中
利用反射将存放 so 的路径放到 ClassLoader 中,刚好 tinker 的 TinkerLoadLibrary 也有实现发方法,我们就不用自己实现了,可以拿过来直接使用
LoadLibrary 核心代码
ini
private static final class V25 {
private static void install(ClassLoader classLoader, File folder) throws Throwable {
Field pathListField = RetroShareReflectUtil.findField(classLoader, "pathList");
Object dexPathList = pathListField.get(classLoader);
Field nativeLibraryDirectories = RetroShareReflectUtil.findField(dexPathList, "nativeLibraryDirectories");
List<File> libDirs = (List<File>) nativeLibraryDirectories.get(dexPathList);
libDirs.add(0, folder);
Field systemNativeLibraryDirectories =
RetroShareReflectUtil.findField(dexPathList, "systemNativeLibraryDirectories");
List<File> systemLibDirs = (List<File>) systemNativeLibraryDirectories.get(dexPathList);
Method makePathElements =
RetroShareReflectUtil.findMethod(dexPathList, "makePathElements", List.class);
libDirs.addAll(systemLibDirs);
Object[] elements = (Object[]) makePathElements.
invoke(dexPathList, libDirs);
Field nativeLibraryPathElements = RetroShareReflectUtil.findField(dexPathList, "nativeLibraryPathElements");
nativeLibraryPathElements.setAccessible(true);
nativeLibraryPathElements.set(dexPathList, elements);
}
}关于反射的代码已放到 github
我的项目下载存放 so 的路径是 /data/user/0/包名/app_libs
运行之后,我们看开点 路径已经添加进了 ClassLoader 的 nativeLibraryDirecories 中
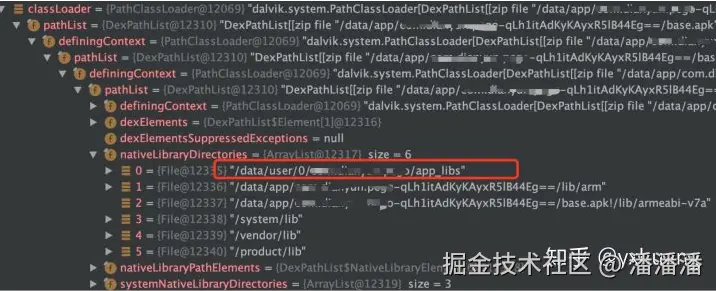
至此,异常解决了。 同时也对 so 的加载原理有了更好的了解。